Door eGuard Video Bell DG8500 - Intercom Burg Wächter - Free user manual and instructions
Find the device manual for free Door eGuard Video Bell DG8500 Burg Wächter in PDF.

| Product type | Wireless video intercom with doorbell |
| Brand | Burg Wächter |
| Model | Door eGuard Video Bell DG8500 |
| Wi-Fi frequency band | 2.4 GHz |
| Wi-Fi protocols | 802.11 b/g/n |
| Maximum Wi-Fi range | 60 m in open field |
| Wi-Fi transmission power | < 100 mW |
| Radio frequency band (chime) | 433 MHz – 434 MHz |
| Maximum radio range | 30 m |
| Power supply | Alternating voltage 8~20 V AC via existing doorbell |
| Built-in battery | Yes, charges via power supply |
| Viewing angle | Not specified, wide-angle camera |
| Night vision | Yes, passive infrared (PIR) sensor |
| Audio | Microphone and speaker, duplex mode |
| Recording | On SD card (not included) or smartphone |
| App | Tuya Smart (iOS/Android) |
| Supplied accessories | Screwdriver, radio chime, cables, terminals, wall plugs, screws, weatherproof hood |
| Dimensions (approx.) | Approx. 14 x 5 x 3 cm (estimated) |
| Weight (approx.) | Approx. 200 g (estimated) |
| Care and cleaning | Clean with a soft, dry cloth. Do not use water or chemical products. |
| Safety | Cut power before installation. Use a suitable 8~20 V AC transformer. |
| Spare parts and repairability | SD card accessible. No spare parts planned. Repair by a professional. |
| Operating temperature | Not specified, outdoor use with sun/rain protection |
Frequently Asked Questions - Door eGuard Video Bell DG8500 Burg Wächter
User questions about Door eGuard Video Bell DG8500 Burg Wächter
0 question about this device. Answer the ones you know or ask your own.
Ask a new question about this device
Download the instructions for your Intercom in PDF format for free! Find your manual Door eGuard Video Bell DG8500 - Burg Wächter and take your electronic device back in hand. On this page are published all the documents necessary for the use of your device. Door eGuard Video Bell DG8500 by Burg Wächter.
USER MANUAL Door eGuard Video Bell DG8500 Burg Wächter
natural_image
Two black and white electronic speakers with 'BURG WACHTER' branding, no visible text or symbols on the devices themselves.de Bedienungs- und Montageanleitung
en Assembly and user manual
fr Notice d'installation et d'utilisation
nl Bedienings- en montagehandleiding
it Istruzione d'uso e montaggio
pt Manual de instruções e de montagem
dk Betjenings- og monteringsvejledning
cz Návod k použití a instalaci
hu Kezelési és szerelési útmutató
es A descargar: www.burg.biz
se Ladda ned www.burg.biz
no Last ned: www.burg.biz
fi Lataa osoitteesta: www.burg.biz
el Λήψη: www.burg.biz
tr Indir: www.burg.biz
ro Descarcă: www.burg.biz
pl Do pobrania: www.burg.biz
sl Prevzemite na: www.burg.biz
sk Na prevzatie: www.burg.biz
hr Preuzmite na: www.burg.biz
ru Скачать:www.burg.biz
bg Изтегляне: www.burg.biz
et Laadige alla: www.burg.biz
Iv Lejupielādei: www.burg.biz
Language
de Deutsch 2
en English 7
fr Français 12
pl. Nederlands 17
it Italiano 22
pt Português 27
dk Dansk 32
α Čeština 37
hu Magyar 42
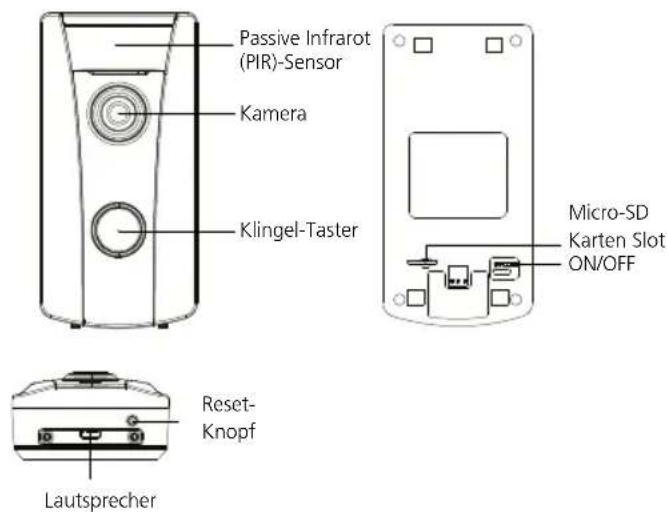
Aufbau
text_image
Passive Infrarot (PIR)-Sensor Kamera Klingel-Taster Micro-SD Karten Slot ON/OFF Reset- Knopf LautsprecherLieferumfang
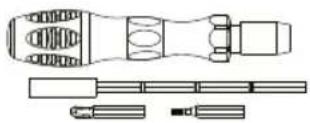
1x Schraubendreher
Montageplatte
text_image
QR code with central logo, likely linking to a digital resource or website
text_image
Passive Infrared (PIR)-Sensor Camera Call button Micro-SD card slot Reset button SpeakerAccessories
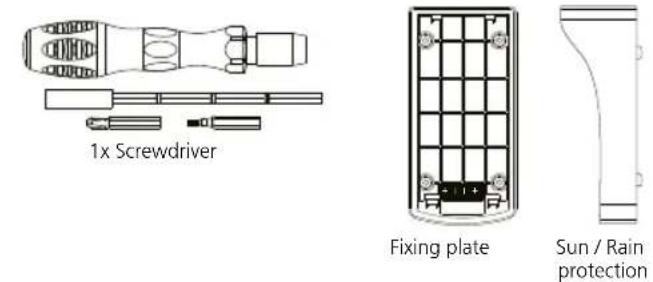
text_image
1x Screwdriver Fixing plate Sun / Rain protection
text_image
5x Anchors 5x Screws 2x Lever terminals 2x Connection wires with lugs Radio chimes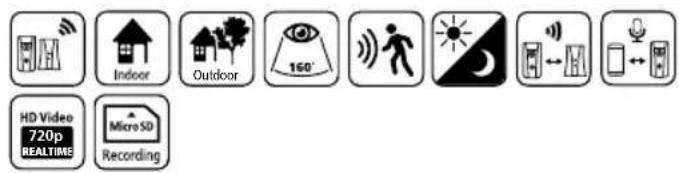
text_image
Indoor Outdoor 160° HD Video 720p REALTIME Micro SD RecordingSystem description
This Door eGuard Video Bell DG8500 is a 2.4GHz WIFI based video door intercom module designed to be used on and for replacing existing two-wire doorbell systems with an 8\~20 Vac AC power supply. When the call button is pressed the door chimes sound and a push notification is simultaneously sent to your smartphone. You can access the system at any time while on the move and talk to the person(s) at the door. The rechargeable battery is charged from the power supply when the button is pressed.
Technical details
| Lens 160° wide angle | |
| Resolution 1280 x 720 at 25 images per second | |
| Data compression H.264 | |
| Night vision IR LEDs effective visibility range up to 5m* | |
| Motion detection PIR motion detector range up to 5m | |
| Memory SD card slot for up to 32Gb micro SDHC cards | |
| Audio transmission 2 way audio with noise suppression | |
| Internal battery Lithium-ion battery | |
| Power consumption < 2.5 W | |
| Supply voltage ~8 – 20 Vac | |
| Operating temperature -20°C – 60°C | |
| Storage temperature -40°C – 70°C | |
| Weather protection IP55 (installed) |
eGuard WIFI
| WIFI frequency band | 2.4 Ghz |
| WIFI protocols | 802.11 b / g / n |
| WIFI range | Max. 60 m open area* |
| WIFI max. transmission power | <100 mW |
eGuard 433Mhz
| Radio frequency band | 433 Mhz – 434 Mhz |
| Max. transmission power | <10 dBm |
| Max. range | 30 m |
* The real transmission distance can be different, pending on local scenario.
Preparation
IMPORTANT: Disconnect the system from the power supply to avoid serious injuries, lire and material damage, electric shock, etc. Ensure that there are no wires or water pipes in the wall where the device is to be installed. Before installation, check that the system is voltage-free and protected against unauthorised reconnection. Work on electrical systems may only be carried out by qualified personnel. It may be necessary to replace the existing doorbell transformer with a suitable 8\~20 Vac AC transformer.
- Unscrew the retaining screws on the bottom edge of the device by approx. 5mm using the screwdriver and hexagon bit provided.
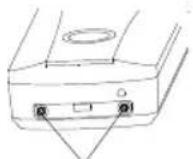
Retaining screws
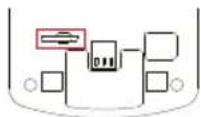
- Insert the SD card (not included) Insert the SD card in the into the slot provided on the back of the device, bottom left.
- Remove the existing doorbell button. The existing indoor chimes will usually still function if the internal resistance is less than 5 ohms.
Installation
Note: Before installation check with your smartphone whether the WIFI signal strength is sufficient. If necessary use a WIFI repeater to achieve a better signal strength
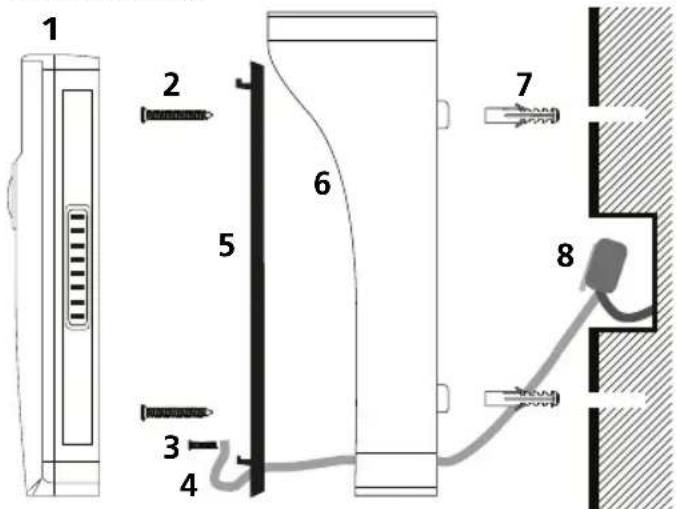
text_image
1 2 3 4 5 6 7 8Fig. Example installation
| 1 | Video door intercom module | 5 | Base plate |
| 2 | Fixing screws 30 mm | 6 | Sun/rain cover |
| 3 | Wire fixing screw | 7 | Anchors |
| 4 | Wire with lugs | 8 | Lever terminals |
- Connect the lever terminals provided to the existing doorbell wire.
- Hold the base plate in the desired installation position and mark the holes to be drilled with a pencil.
- Using a 6mm drill bit, drill a hole approximately 30mm deep and insert the dowels provided.
- Connect the wires supplied to the base plate circuit board. Use the Phillips head bit provided to loosen and tighten the screws. The screws are inserted through the wires lugs. Hand tighten the lugs.
- For outdoor use we recommend that the sun/rain cover provided is fitted. Place the base plate in the sun/rain cover so that the holes are aligned.
- Feed the wire through the slot provided below the circuit board and the sun/rain cover if litted.
- Using the lever terminals connect the device wires with the existing doorbell wires.
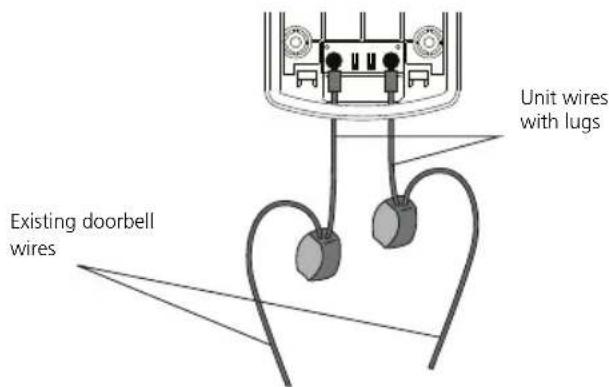
text_image
Unit wires with lugs Existing doorbell wires- Screw on the base plate (option: including the sun/rain cover) hand-tight (2). The screw heads must sit in the depressions provided for this purpose and must not protrude above them.
- First hang the upper end of the eGuard on the two upper brackets of the base plate. Then press the lower part level into the base plate. Using light pressure push the housing down approx. 1.5mm until the base
- To secure the device gently tighten the retaining screws on the bottom edge in a clockwise direction using the screwdriver and hexagon bit provided.
Activation
- Make sure that all cables and wires are undamaged and firmly connected. Turn power button to position ON
- Reconnect the doorbell transformer to the electrical supply (fuse). The blue LED ring around the call button illuminates. Wait until the system beeps to indicate that it is ready to be connected Note: If the LED ring on the device does not illuminate, please read the FAQ before proceeding with the next step of the activation procedure.
- Continue with the installation of the TUYA app.
Installing the app
Use the TUYA Smart App to operate the system.
Download and install the TUYA Smart App from the appropriate App Store.

text_image
QR code with central logo, likely linking to a digital resource or website
Registration is required to use the app. Please refer to the TUYA Privacy Policy for your region.
http://smart.tuya.com/private
If you already have a TUYA account, please log on.
TUYA and TUYA Smart are registered trademarks of Tuya Inc.
BURG-WÄCHTER KG has no influence on the presentation, data processing, functions or contents of the app. If you have any questions, please contact the TUYA In-App Support.
Add a new device
- Tap „+“ or the „Add device“ button.
- From the list select -> Security sensor -> Security camera
text_image
Koch Cloudy 33.8°C Comfortable 4.3 mph Air Room Living Room Master Room Smart Video Doorbell 2 Smart Video Doorbell Smart Video Doorbell... online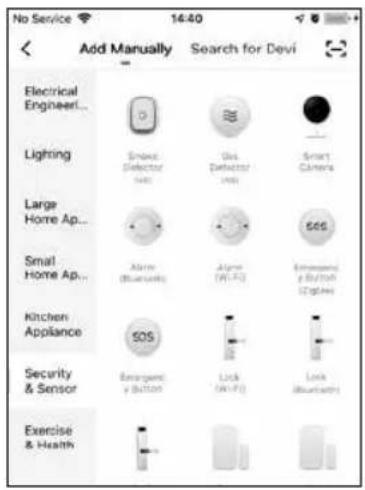
text_image
No Service 14:40 Add Manually Search for Devi Electrical Engineer... Lighting Large Home Ap... Small Home Ap... Kitchen Appliance Security & Sensor Exercise & Health- Tap „Next Step“ when the illuminated ring around the call button flashes.
Note: If the device is not ready, press and hold the reset button on the bottom of the base device for about 10 seconds and wait until the device has restarted - Select the desired WIFI network, enter the password and "Confirm" the entry.
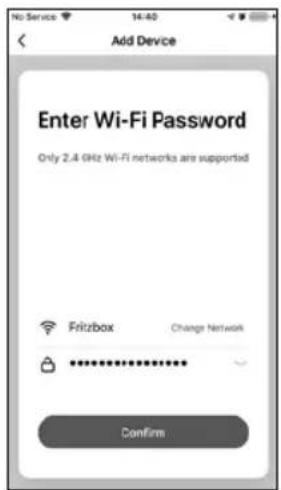
text_image
Add Device Enter Wi-Fi Password Only 2.4 GHz Wi-Fi networks are supported Fritzbox Change Network ------------------------ Confirm- Note: Next hold the QR Code displayed approx. 15-20cm in front of the camera on the eGuard device until a beep sounds. Vary the distance if necessary. Continue by tapping on "Beep heard".
- The device is now registered on the server and linked to your account.
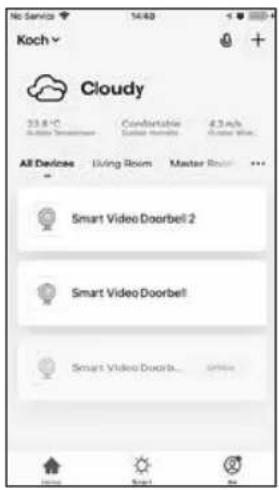
- The device is now displayed in your list of devices.
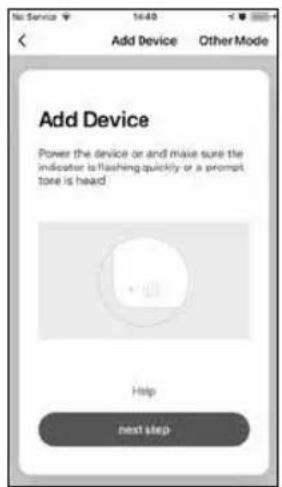
text_image
No Service 16:40 Add Device Other Mode Add Device Power the device or and make sure the indicator is flashing quickly or a prompt tone is head! Help next step
text_image
Add Device Use Camera to Scan QR... Too Next. The mobile phone displays a QR code. Use the camera to scanto the QR code 16 cmto 20 cm away from the mobile phones. 15~20cm Continue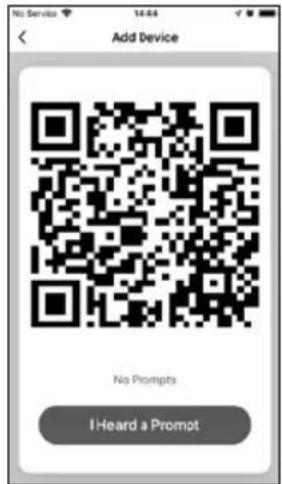
text_image
No Service Add Device No Prompts I Heard a Prompt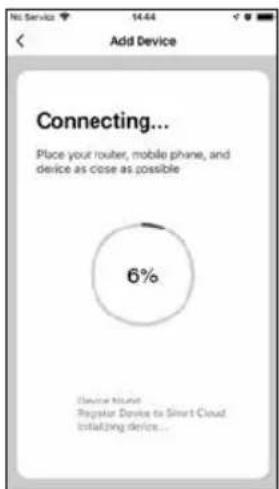
text_image
No Service 14:44 Add Device Connecting... Place your router, mobile phone, and device as close as possible 6% Device Market Regular Device to Smart Cloud Initiating device...
text_image
Koch Cloudy 33.8°C Comfortable 4.3 m/s All Devices Living Room Master Room ... Smart Video Doorbell 2 Smart Video Doorbell Smart Video Doorb... OffshoreOperation
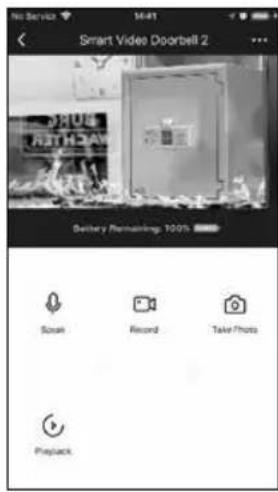
Talk: Activates the speaker and microphone enabling you to speak to the person at the door.
Record: Starts and stops the recording of video and sound images on the smartphone, for example in case of vandalism.
Take a photo: Saves a photo to the smartphone.
Playback: Retrieves recordings/messages from the SD card inserted in the device (SD card not included).
Important: Please observe the legal requirements of the General Data Protection Regulation (GDPR)
text_image
Smart Video Doorbell 2 Delivery Remaining 100% Snack Record Take Photo PlaybackCustomise settings
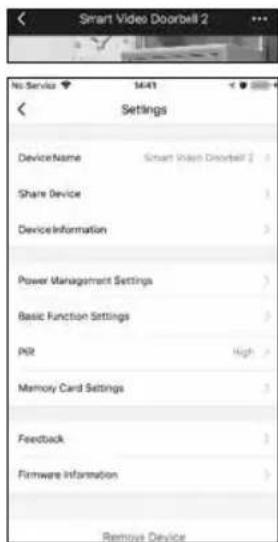
To adjust the factory settings, tap the device and then tap the „...“ icon that appears at the top right of the menu.
Change the name of the device:
Enter a custom name.
Share the device:
Share access to the device, for example with family members.
Device information:
Such as administrator, IP address, time zone, etc.
Energy management settings:
Remaining battery time, etc
text_image
Smart Video Doorbell 2 No Service 16:41 Settings DeviceName Smart Video Doorbell 2 Share Device DeviceInformation Power Management Settings Basic Function Settings P02 High Memory Card Settings Feedback Firmware Information Remove DeviceSetting the basic functions:
- Rotate image
• Show watermark
• Audio mode: One-way / two-way audio mode
Passive infrared (PIR) switch:
Setting the sensitivity of the sensor.
Setting the memory card:
• Capacity/used memory/free memory
- Format SD card/delete
Feedback:
Send a message to the TUYA Support Team if you have questions about the app or setup.
Firmware Info:
• Displays the currently installed firmware version.
- Checks whether a more update firmware version is available.
Remove the device:
Deletes the device from your account.
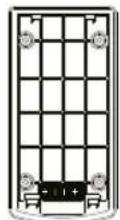
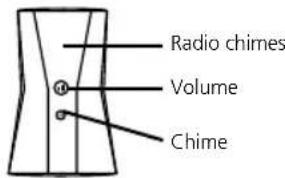
Radio chimes
The radio chimes are operated with two AA batteries. The batteries are inserted in the bottom of the device. Please ensure that the batteries are inserted in the correct position
text_image
Radio chimes Volume Chime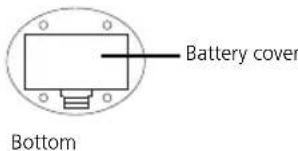
text_image
Battery cover BottomFAQ
| The LED ring does not illuminate | Check the supply voltage with a suitable AC voltage meter at the contacts on the base plate |
| Device setup failed | Check whether you are using the latest version of the app. Temporarily switch off the 5GHz WIFI. Reduce the distance between door intercom and router, use a WIFI repeater if necessary. Check the strength of the WIFI signal with your smartphone. Reboot the system by holding down the reset button on the bottom of the device |
| Device does not record | PCheck the SD card memory capacity. Format the SD card. Replace the SD card. |
| No sound Activate the two-way audio mode in Settings -> Basic Functions -> Audio Mode. | |
| Poor image quality | The picture quality essentially depends on the quality of the Internet connection between the eGuard system and the smartphone. |
| Too many recordings | Adjust the PIR (Passive Infrared) sensitivity or deactivate the function. |
| No push message is received when the button is pushed | Check whether push notifications are activated in the app settings and if the module has a good connection to the internet. |
| Existing chimes do not work | The system can only switch a limited electrical load. If the load is too high, replace the existing chimes with another model or use the radio chime provided with the system. |
| Radio chimes do not work | Check that the batteries are charged and correctly inserted into the chimes. Replace them with new 1.5V AA batteries if necessary. Repeat the pairing process between the chimes and camera system by holding down the volume/pairing button on the chimes for approx. 10 seconds and then briefly pressing the call button on the audio/video module. |
Notes
Disposal
Please be aware that electrical and electronic equipment and batteries shall not be disposed of as household waste, but rather collected separately. Please obtain information on the collecting points for electrical waste from the responsible authority of you municipality.

BURG-WÄCHTER KG hereby declares that this device complies with Directive 2014/53/EU, (RED) 2014/30/EU, (EMC), 2011/65/EU (RoHS).

The full text of the EU Declaration of Conformity can be found on www.burg.biz.
If you have technical questions about this device, please read the detailed user manual and the FAQ sheet which you will find on the following website: www.burg.biz.
If, however, you still have questions, please send an e-mail to: info@burg.biz
text_image
QR code with central logo, likely linking to a digital resource or website
text_image
No Service 14:40 Add Manually Search for Devi Electrical Engineer... Lighting Large Home Ap... Small Home Ap... Kitchen Appliance Security & Sensor Exercise & Healthtext_image
Add Device Enter Wi-Fi Password Only 2.4 GHz Wi-Fi networks are supported Emitzbox Change Network ****** Confirmtext_image
Add Device Power the device on and make sure the indicator is flashing quickly or a prompt store is heard. Help next step
text_image
Add Device Use Camera to Scan QR... Top Next. The mobile phone displays a QR code. Use the camera to scan to the QR code 10 cm to 20 cm away from the mobile phone. 15 - 20cm Continue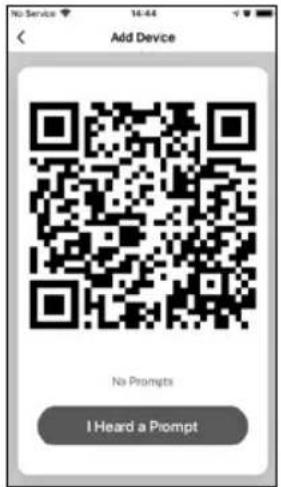
text_image
Add Device No Prompts I Heard a Prompt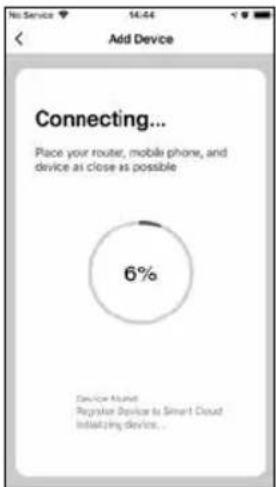
text_image
No Service 14:44 Add Device Connecting... Place your router, mobile phone, and device as close as possible 6% Device Mount Register Device to Smart Cloud Initiating device...
text_image
Koch Cloudy 23.8°C Comfortable 4.5 m/s All Devices Living Room Master Room ... Smart Video Doorbell 2 Smart Video Doorbell Smart Video Doorb... Off-lineUtilisation
text_image
No Service 14:44 Add Device Connecting... Pace your router, mobile phone, and device as close as possible 6% Device Round: Programed device to Smart Control Initializing device...
text_image
Koch Cloudy 23.8°C Comfortable 4.9%+Bediening
text_image
QR code with central logo, likely linking to a digital resource or website
text_image
No Service 14:40 Add Manually Search for Devi Electrical Engineer... Lighting Large Home Ap... Small Home Ap... Kitchen Appliance Security & Sensor Exercise & Healthtext_image
Add Device Enter Wi-Fi Password Only 2.4 GHz Wi-Fi networks are supported Eritzbanx Change Network ****** Confirmtext_image
No Service 14:40 Add Device Other Mode Add Device Power the device or and make sure the indicator is flashing quickly or a prompt tone is heard Help next step
text_image
Add Device Use Camera to Scan QR... Tap Next. The mobile phone displays a QR code. Use the camera to scan to the QR code 15 cm to 20 cm away from the mobile phone. 15 - 20cm Continue
text_image
No Service 14:44 Add Device No Prompts I Heard a Prompt
text_image
No Service 14:44 Add Device Connecting... Place your router, mobile phone, and device as close as possible 6% Device Mount Register Device to Smart Cloud Initiating device...
text_image
Koch Cloudy 23.8°C Comfortable 4.3 m/s All Devices Living Room Master Room ... Smart Video Doorbell 2 Smart Video Doorbell Smart Video Doorb... Off-lineIstruzioni
text_image
QR code with central logo, likely linking to a digital resource or website
text_image
No Service 14:40 Add Manually Search for Devi Electrical Engineet... Lighting Large Home Ap... Small Home Ap... Kitchen Appliance Security & Sensor Exercise & Healthtext_image
Add Device Enter Wi-Fi Password Only 2.4 GHz Wi-Fi networks are supported Frit3box Change Network ****** Confirmtext_image
No Service 14:40 Add Device Other Mode Add Device Power the device on and make sure the indicator is flashing quickly or a prompt. tone is head Help next step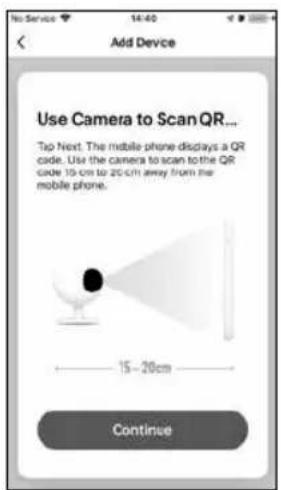
text_image
Add Device Use Camera to Scan QR... Tap Next. The mobile phone displays a QR code. Use the camera to scan to the QR code 10 cm to 25 cm away from the mobile phone. 15 - 20cm Continue
text_image
No Service Add Device No Prompts I Heard a Prompt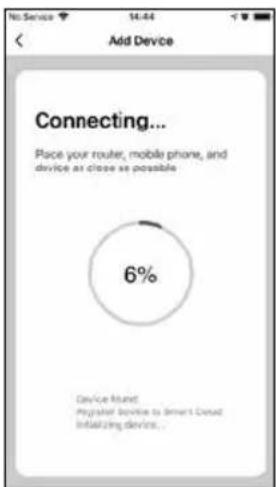
text_image
No. Service 14:44 Add Device Connecting... Pace your router, mobile phone, and device as close as possible 6% Device Round: Programed device to Smart Control Initializing device...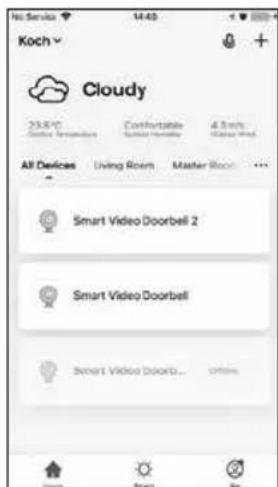
text_image
Koch Cloudy 23.8°C Comfortable 4.9%+Operação
text_image
QR code with central logo, likely linking to a digital resource or website
text_image
No Service 14:40 Add Manually Search for Devi Electrical Engineer... Lighting Large Home Ap... Small Home Ap... Kitchen Appliance Security & Sensor Exercise & Healthtext_image
Add Device Enter Wi-Fi Password Only 2.4 GHz Wi-Fi networks are supported Fritzbox Change Network ------------------------ Confirmtext_image
No Service 16:40 Add Device Other Mode Add Device Power the device or and make sure the indicator is flashing quickly or a prompt tone is head! Help next step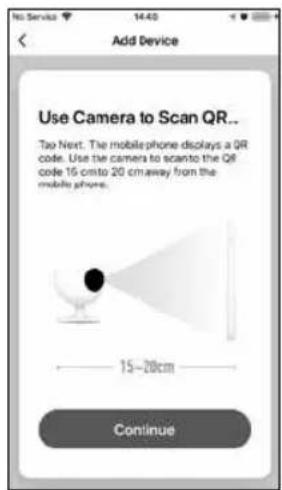
text_image
Add Device Use Camera to Scan QR... Too Next. The mobile phone displays a QR code. Use the camera to scanto the QR code 16 cmto 20 cm away from the mobile phones. 15~20cm Continue
text_image
No Service Add Device No Prompts I Heard a Prompt
text_image
No Service 14:44 Add Device Connecting... Place your router, mobile phone, and device as close as possible 6% Device Mount Register Device to Smart Cloud Initiating device...
text_image
Koch Cloudy 23.8°C Comfortable 4.3 m/s All Devices Living Room Master Room ... Smart Video Doorbell 2 Smart Video Doorbell Smart Video Doorbell... OffshoreBetjening
text_image
QR code with central logo, likely linking to a digital resource or website
text_image
No Service 14:40 Add Manually Search for Devi Electrical Engineer... Lighting Large Home Ap... Small Home Ap... Kitchen Appliance Security & Sensor Exercise & Healthtext_image
Add Device Enter Wi-Fi Password Only 2.4 GHz Wi-Fi networks are supported Eritzshow Change Network ****** Confirmtext_image
Add Device Power the device on and make sure the indicator is flashing quickly or a prompt tone is heard Help next step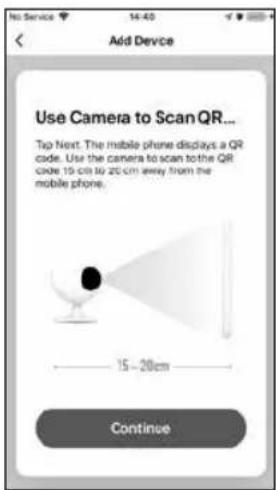
text_image
Add Device Use Camera to Scan QR... Tap Next. The mobile phone displays a QR code. Use the camera to scan to the QR code 15 cm to 20 cm away from the mobile phone. 15 - 20cm Continue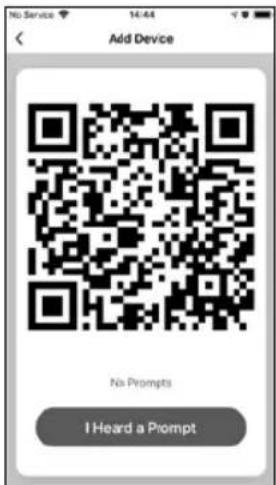
text_image
No Service Add Device No Prompts I Heard a Prompt
text_image
No Service 14:44 Add Device Connecting... Pace your router, mobile phone, and device as close as possible 6% Device Round: Programed device to Smart Control Initializing device...
text_image
Koch Cloudy 23.8°C Comfortable 4.9%+Ovládání
text_image
QR code with central logo, likely linking to a digital resource or website
text_image
No Service 14:40 Add Manually Search for Devi Electrical Engineer... Lighting Large Home Ap... Small Home Ap... Kitchen Appliance Security & Sensor Exercise & Healthtext_image
Add Device Enter Wi-Fi Password Only 2.4 GHz Wi-Fi networks are supported Fritzbox Change Network ****** Confirmtext_image
No Service 14:40 Add Device Other Mode Add Device Power the device on and make sure the indicator is flashing quickly or a prompt tobe is head Help next step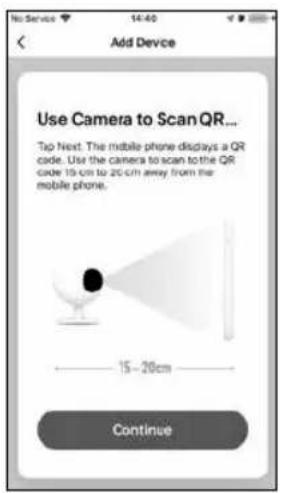
text_image
Add Device Use Camera to Scan QR... Tap Next. The mobile phone displays a QR code. Use the camera to scan to the QR code 15 cm to 20 cm away from the mobile phone. 15 - 20cm Continue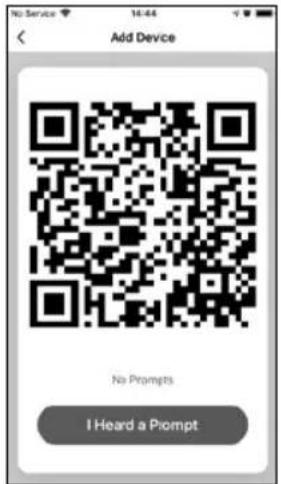
text_image
No Service 14:44 Add Device No Prompts I Heard a Prompt
text_image
No Service 14:44 Add Device Connecting... Pace your router, mobile phone, and device as close as possible 6% Device Round: Programed device to Smart Control Initializing device...