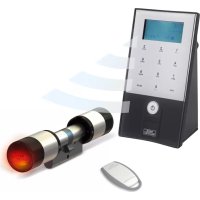
secuENTRY 7116 DUO - Electronic lock Burg Wächter - Free user manual and instructions
Find the device manual for free secuENTRY 7116 DUO Burg Wächter in PDF.
| Product type | Electronic lock with profile cylinder |
| Brand | Burg Wächter |
| Model | secuENTRY 7116 DUO |
| Dimensions (exterior button) | Diameter 30 mm, height 52 mm |
| Dimensions (interior button) | Diameter 34 mm, height 57 mm (adjustable) |
| Maximum door thickness | 119 mm (61 mm exterior side, 59 mm interior side) |
| Exterior button power supply | 1 CR123A lithium battery |
| Interior button power supply | 2 LR6 (AA) alkaline batteries |
| Number of user codes | Up to 2000 |
| Opening modes | 6-digit PIN code, fingerprint, passive transponder (15693, 1444A), active transponder (BLE), KeyApp |
| Mechanical emergency opening | Yes, with provided emergency key |
| Lockout time after errors | 1 minute after 3 incorrect entries, then 3 minutes each time |
| Optional software functions | User management, calendar, timer, hotel function, limited code, 2000 entry history |
| LED signaling | Indicates opening, closing, denial, programming mode, low battery |
| Anti-tamper protection | Yes, via integrated threaded stud |
| Programming | Via keypad (optional) or secuENTRY software |
| Smartphone compatibility | Android 4.3+ / iOS 10.3.2+ (Samsung Galaxy S4+, Apple iPhone 4S+) |
| Installation | No drilling, adjustable with included adapters |
| Maintenance | Do not grease or oil. Clean with a soft, dry cloth |
| Warranty | Subject to presentation of proof of purchase and valid QR codes |
| Compliance | RED 2014/53/EU, EMC 2014/30/EU, RoHS 2011/65/EU |
| Delivery contents | Cylinder, set of adapters, screws, emergency key, battery change tool, QR codes |
Frequently Asked Questions - secuENTRY 7116 DUO Burg Wächter
User questions about secuENTRY 7116 DUO Burg Wächter
0 question about this device. Answer the ones you know or ask your own.
Ask a new question about this device
Download the instructions for your Electronic lock in PDF format for free! Find your manual secuENTRY 7116 DUO - Burg Wächter and take your electronic device back in hand. On this page are published all the documents necessary for the use of your device. secuENTRY 7116 DUO by Burg Wächter.
USER MANUAL secuENTRY 7116 DUO Burg Wächter
natural_image
Mechanical component with cylindrical body and internal assembly (no visible text or symbols)text_image
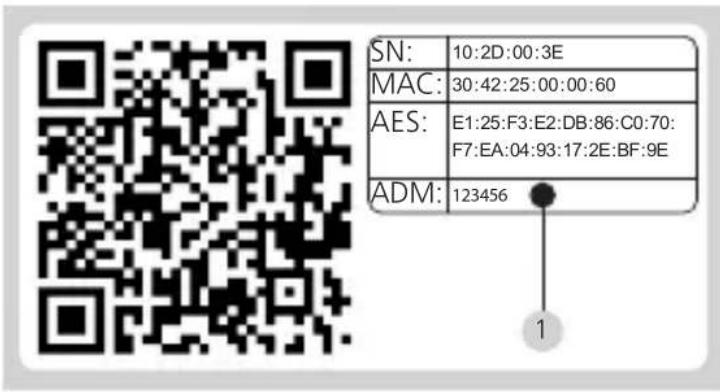
SN: 10:2D:00:3E MAC: 30:42:25:00:00:60 AES: E1:25:F3:E2:DB:86:C0:70: F7:EA:04:93:17:2E:BF:9E ADM: 123456 11 Zylinder (SN; MAC; AES; ADM)
natural_image
Two black-and-white photos showing hands adjusting a door lock and screwdriver (no text or symbols visible)natural_image
Close-up of a metallic door clip and a door lock mechanism (no text or symbols visible)natural_image
Mechanical component diagram showing a shaft and housing assembly with dimension label A (no text or symbols present)natural_image
Close-up of two mechanical components with cross-hatching, no visible text or symbolsBluetooth Low Energy
Maximum Transmit Output Power 7,5dBm
Frequency usage range 2,402GHz ... 2,483GHz
natural_image
Close-up of a hand holding a mechanical component, showing a metallic cylindrical part inserted into a circular housing (no visible text or symbols)natural_image
Close-up of a mechanical component with internal structure and mounting holes (no visible text or symbols)natural_image
Close-up of a hand holding a cylindrical mechanical component, alongside a close-up of its internal black and metallic component (no visible text or symbols)natural_image
Close-up of a mechanical component with metallic cylindrical body and flange (no visible text or symbols)natural_image
Close-up of a metallic mechanical component with flanged base and central hub (no visible text or symbols)natural_image
Close-up of a mechanical component with a cylindrical shaft and flange (no visible text or symbols)F. Notschlüssel
natural_image
Close-up of a hand pressing down on a wall-mounted device with a black cylindrical component and directional arrows (no text or symbols visible)natural_image
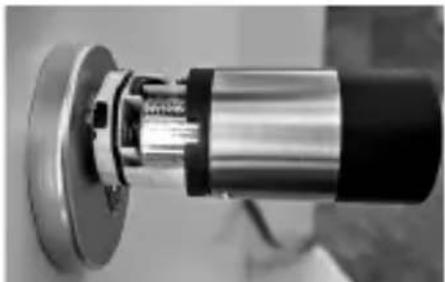
Two identical line diagrams of a trash bin with diagonal lines indicating no waste or discharge, no text or symbols present.Welcome to this quality BERG-WÄCHTER product! Thank you very much for your decision for the secuENTRY pro 7116 electronic locking system by BURG-WACHTER. This system has been developed and manufactured using the latest technical potential and satisfies high security requirements. The electronic cylinder can be used without any drilling in any door with PZ perforation up to a door thickness of 119 mm (61/59, measured in the middle of the screw) and is ideally suited for new installation as well as for retrofitting.
Contents of this manual
A General
E Battery replacement
B Assembly
F Emergency key
C Programming / Function / Operation
G Warranty / Environment
D Technical data
A. General
Please read the operating instructions carefully before starting the assembly and programming. Keep in a safe place.
We hope you enjoy your new locking system.
The secuENTRY pro 7116 Duo cylinder can be used with the following opening media:
- Keyboard PINCODE
- Keyboard FINGERPRINT
• Passive transponder (15693, 1444A)
• Active transponder (BLE) - Smartdevice/App
The opening media are to be purchased separately.
Administrator code / QR-Code
Each secuENTRY pro 7116 Duo cylinder has two QR codes, which are required for integration into a locking system using the optional secuENTRY software as well as for BW apps and for firmware updates. Without an associated keyboard, opening media (users, active, passive transponders) can only be taught to the cylinder via the optional software. The administrator code is also located on the QR code of the inner knob (main knob).
text_image
SN: 10:2D:00:3E MAC: 30:42:25:00:00:60 AES: E1:25:F3:E2:DB:86:C0:70: F7:EA:04:93:17:2E:BF:9E ADM: 123456 11 cylinder (SN; MAC; AES; ADM)
Attention! If the administrator and / or the QR code is lost, reprogramming or the use of all of the administrator functions is no longer possible. Please store it in at a safe place.
Tip: The QR code can also be scanned electronically as a file or saved as a photo on a protected data carrier.
The manufacturer assumes no liability for any injuries or damage that may occur during installation or through improper handling.
B. Assembly
The installation of the secuENTRY pro 7116 Duo cylinder is described below. Please read this Assembly Manual carefully prior to the assembly.
Remarks:
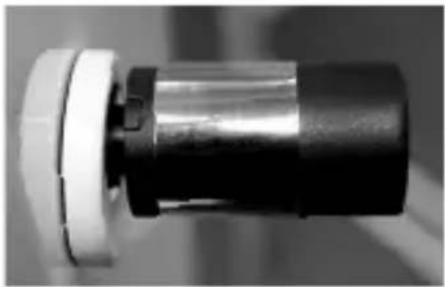
The base size of the cylinder is 30 mm per side. The cylinder has a special latching system on the inside and an adapter kit for the outer knob which allows the cylinder to be used on door thicknesses up to 119 mm (61/59, measured at the of the centre cuff screw). No prior adjustment is necessary. The appropriate screws for the adapter lengths are included with the set.
When delivered, the cylinder inner knob is completely collapsed (the smallest
door thickness). Before you insert the cylinder into the door, you should adjust it to your door thickness.
The inner knob is loosened and fixed using an integrated blade screw in the rotary knob.
Attention! Never pull the inner knob completely from the shaft, as this might cause damage to the electronics! The locking screw, which ensures the detent on the shaft, may be loosened only lightly and it always remains in the plastic knob. The locking screw provides protection against pulling out!
Care must be taken during installation. Avoid impacts or falls. The lock should not be greased or oiled.
When installing the cylinder, proceed as follows:
1 Take a rough measurement of the door thickness (incl. fi ttings)
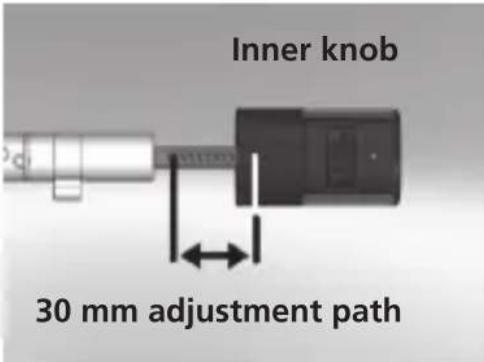
2 Pull the outer knob from the shaft, move the inner knob over the detent system (spacing 2.85 mm) to the required dimension.
text_image
Inner knob 30 mm adjustment pathSchematic illustration Inner knob
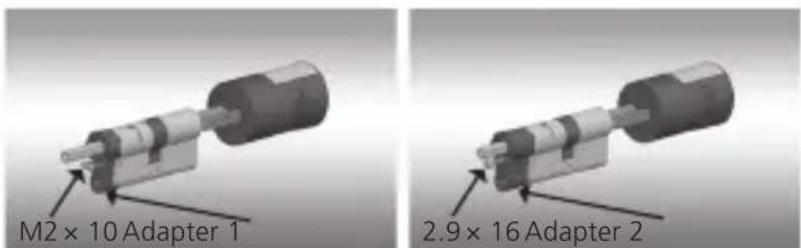
3 Depending on the door thickness, you can affi x an appropriate adapter on the outer side, in order to improve the path for the emergency key.
The following combinations are possible:
| Space detent bolt/ fi tting (mm) on the outer side | Adapter 1 | Adapter 2 |
| < 43 -- | ||
| 44-53 X - | ||
| 54-60 X X |
Tab. 1: Space detent bolt/mounting [mm] on the outer side and the required adapter.
text_image
M2 × 10 Adapter 1 2.9 × 16 Adapter 2Systematic illustration of adapter fi xing
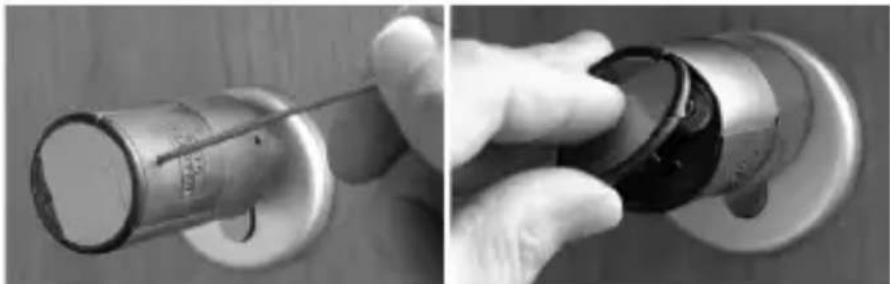
4 Move the secuENTRY pro 7116 Duo cylinder from inside to outside through the mortise lock into the door and then tighten the detent bolt.
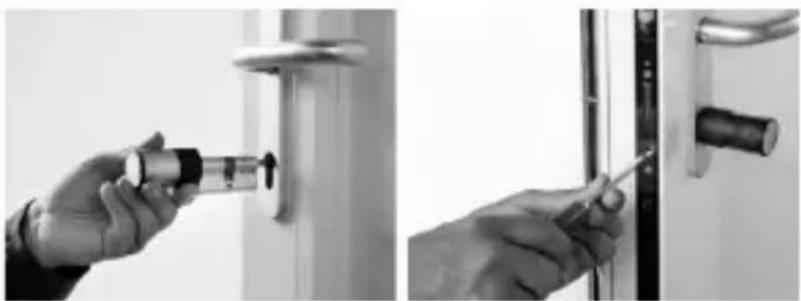
natural_image
Two black-and-white photos showing hands adjusting a door lock and screwdriver (no text or symbols visible)5 Shift the inner knob over the shaft until attaining the required dimension. Please make sure that the clearance between the rotary knob and the door mounting is at least 1mm. Then fix the rotary knob using the hex key.
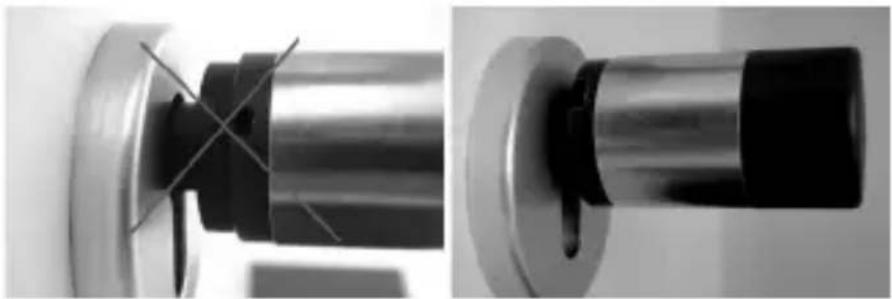
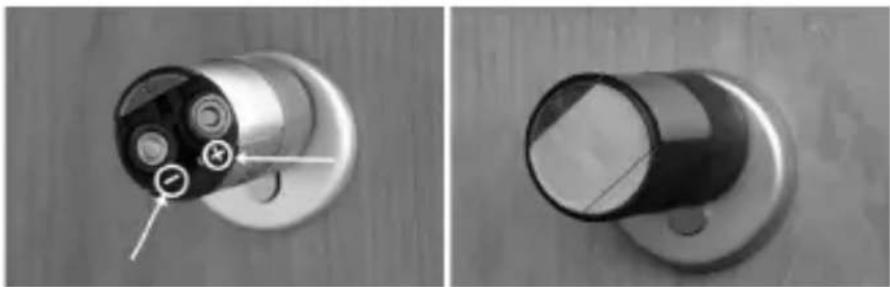
6 Before you fix the outer knob, please consider whether you wish to use the attached cover panel for the profile cylinder section. If so, remove the protective sheet and fix the cover panel onto the lock section.
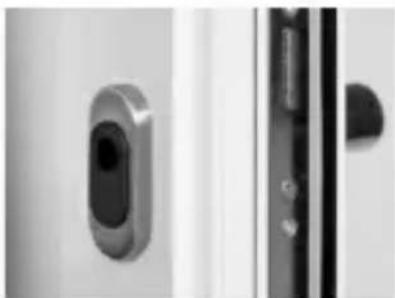
natural_image
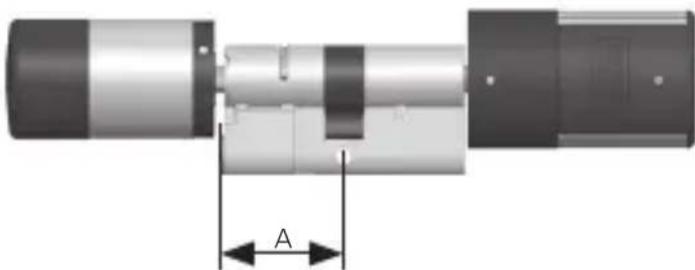
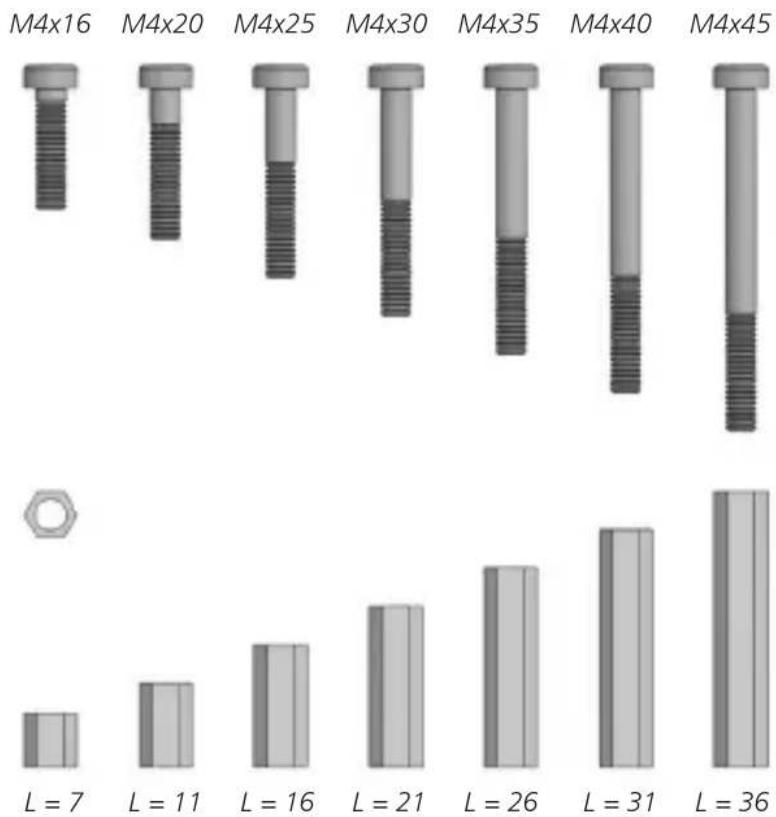
Close-up of a metallic door clip and a door lock mechanism (no text or symbols visible)7 Insert the outer knob of the cylinder or the appropriate adapter and tighten with the screw. Please refer to the table for suitable assignment and grading.
Assembly of outer knob
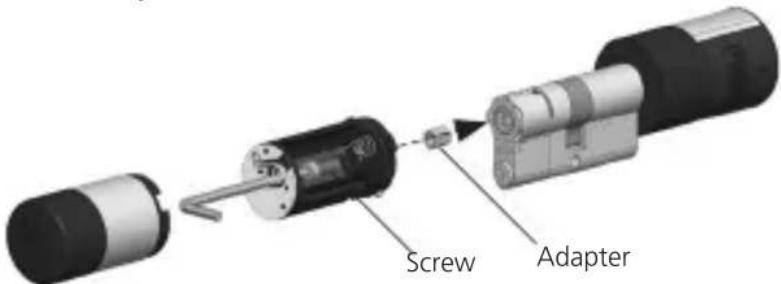
text_image
Screw Adapter| Screws Adapter length Dimension A | |
| M4x16 7 mm <= 32 | |
| M4x20 11 mm 32.5 × 36.0 | |
| M4x25 16 mm 36.5 × 41.0 | |
| M4x30 21 mm 41.5 × 46.0 | |
| M4x35 26 mm 46.5 × 51.0 | |
| M4x40 31 mm 51.5 × 56.0 | |
| M4x45 36 mm 56.5 × 61.0 | |
natural_image
Mechanical component diagram showing a shaft and housing assembly with dimension label 'A' (no text or symbols beyond the label)Overview of the screws and hexagonal adapter Fig. in scale 1:1
bar
| Configuration | L | | ------------- | --- | | M4x16 | 7 | | M4x20 | 11 | | M4x25 | 16 | | M4x30 | 21 | | M4x35 | 26 | | M4x40 | 31 | | M4x45 | 36 |Adapter (L = length in mm)
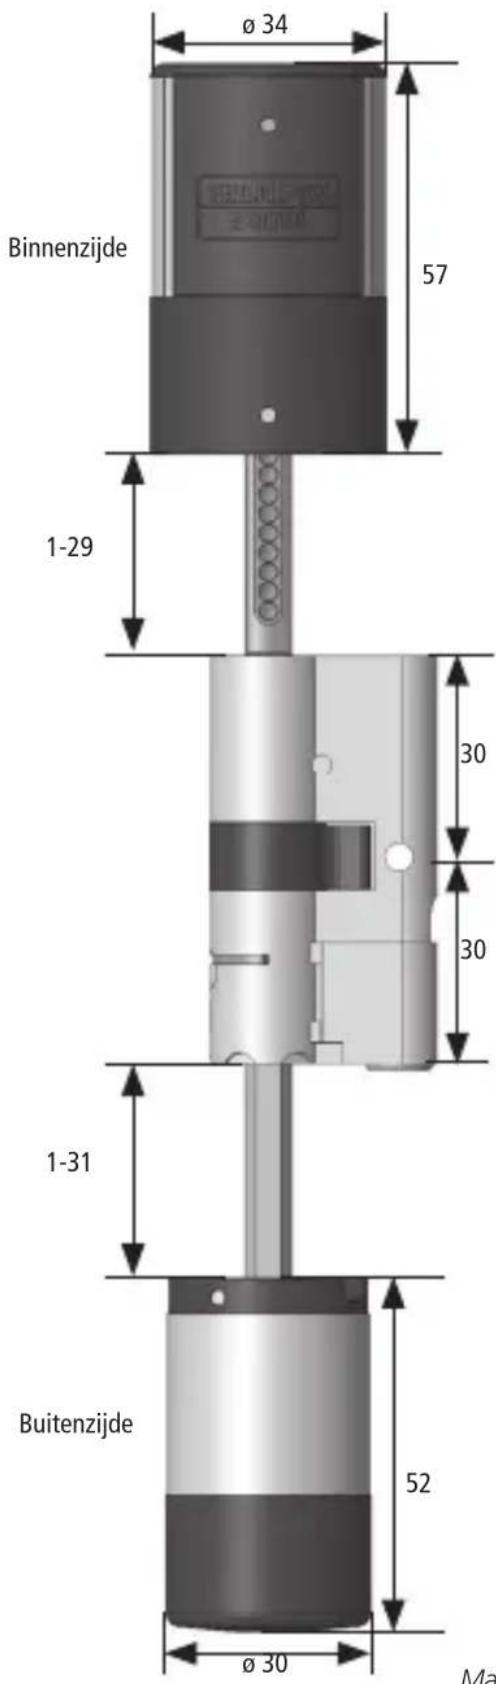
Dimensions secuENTRY pro 7116 Duo
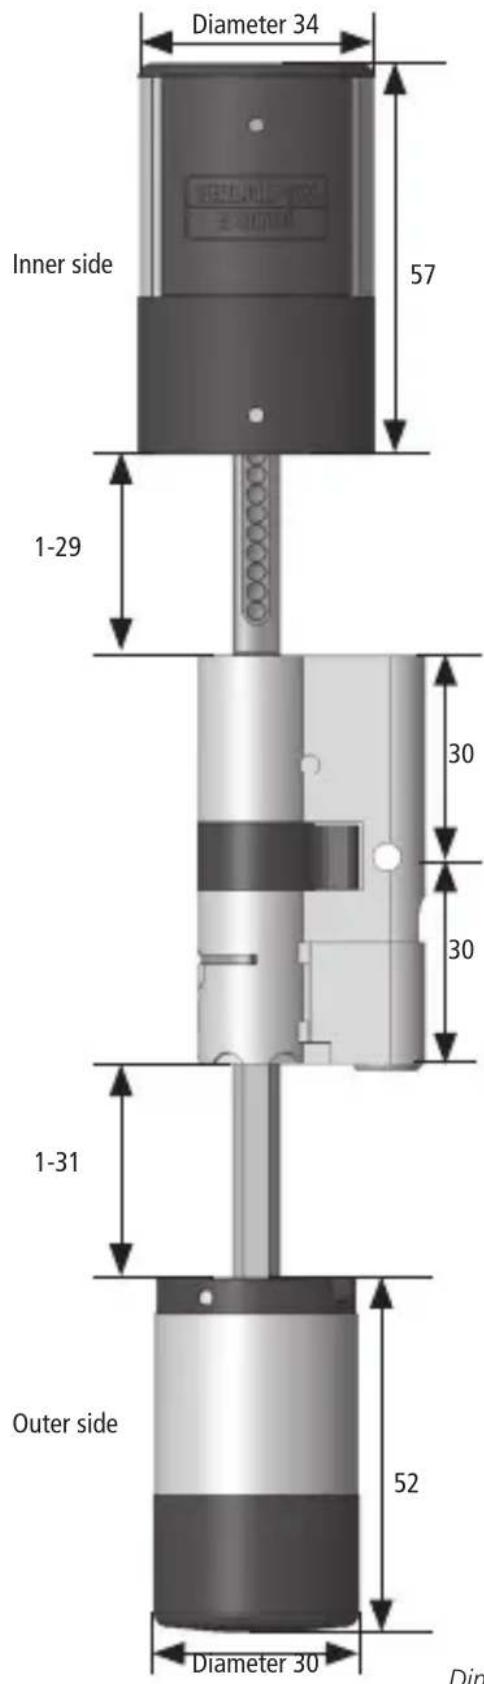
text_image
Diameter 34 Inner side 57 1-29 30 30 1-31 Outer side 52 Diameter 30 DimDimensions in mm
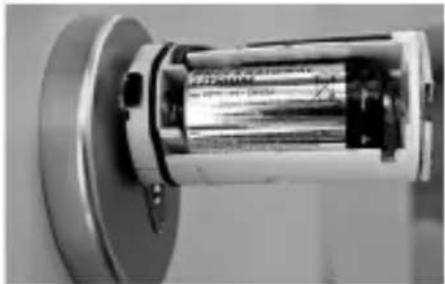
8 Insert the CR123A lithium battery with the correct polarity (positive pole forward)
9 Slide the sleeve onto the inner knob and snap in place.
natural_image
Close-up of two mechanical components with cross-hatching, no visible text or symbolsC. Programming / Function / Operation
The keyboard can be registered to a cylinder either via the keyboard itself or via the secuENTRY software. To operate a cylinder via a keyboard, both units must be matched. Proceed as follows:
Registration using the keyboard
- Activate the keypad using the key
- Then press FUNC, the "Code Change" menu is displayed
- Scroll using the 1 or 2 keys until reaching the Administrator menu
- Confirm with
- Scroll using the 1 or 2 keys until reaching the Administrator menu setup options "Setup"
- Confirm with
- Enter the Admin. Code of the unit to be read
- "Data has been saved" is displayed after a successful registration
Attention! Please make sure that no other powered secuENTRY unit is placed within direct reach of the device during installation of
a new keypad or cylinder, as by mistake such unit could be addressed instead of the intended one. When in doubt, disconnect these units from power.
Registration via the secuENTRY software
Please refer to the operating instructions of the respective software.
Attention! For the registration of the secuENTRY pro 7116 Duo profile cylinder, please use only the QR code of the internal knob in the PC software. This is provided with the administrator code. It is not necessary to register the external connector in the PC software.
Opening
The secuENTRY pro 7116 Duo can be operated with fingerprint, the passive transponder or the active transponder, depending on the equipment variant, using a 6-digit number code, the BURG-WÄCHTER KeyApp.
Opening with Pincode
- Activate the keypad using the key
- Enter the 6 digit PIN code (factory-set to "1-2-3-4-5-6").
The display indicates "Please use rotating knob!" and the LED integrated in the cylinder flashes once when the opening is successful. - Turn the cylinder knob
Opening with Fingerprint
- Activate the keypad using the key
- Move the registered finger from the top to the bottom centrally over the sensor.
The display indicates "Please use rotating knob!" and the LED integrated in the cylinder flashes once when the opening is successful. - Turn the cylinder knob
Opening with passive transponder
- Hold the transponder at the front end at a maximum distance of 1 cm from the cylinder knob. The LED which is integrated in the cylinder flashes once upon successful opening.
- Turn the cylinder knob
Opening with active transponder
- Briefly press the opening button 1x at a maximum of 4 m distance from the secuENTRY pro 7116 Duo cylinder knob. The LED which is integrated in the cylinder flashes once upon successful opening.
- Turn the cylinder knob
Opening with BURG-WÄCHTER KeyApp
- Hold your SmartDevice in front of the cylinder knob and press the KeyApp opening button.
- The LED which is integrated in the cylinder flashes once upon successful opening.
- Turn the cylinder knob.
The BURG-WÄCHTER KeyApp can be downloaded from the App Store or from Google Play Store. Just enter the keyword "secuENTRY" or "KeyApp". Compatible with Samsung Galaxy S4, S4 mini, S5 and S5 mini, S6, S6-Edge, S7, S7-Edge, S8, S8Plus from Android 4.3 KitKat or 5.0 Lollipop, Apple iPhone 4S, 5, 5S, 6, 6Plus, 6S, 6S-Plus,7 and 7-Plus from IOS 10.3.2.
Please check under: www.burg.biz/ secuentry/description whether other Smartphones are compatible with the App.
When using the Key App opening procedure, please note that the active or passive transponder should not be previously activated using the ⏻key!
| D. Technical data | |
| Number of User Codes max. 2000 | |
| Mechanical emergency opening | ✓ |
| Blocking times After 3 x wrong code | is entered1 minute, then always 3 minutes |
| Power supply 1 x CR 123A Lithium | 2 x MIGNON LR6 ALKALINE |
| Date / Time | ✓ |
| Calendar* | ✓ |
| Stopwatch* | ✓ |
| Permanent Timer* | ✓ |
| Hotel function / Guest code* | ✓ |
| Hotel function / Transponder* | ✓ |
| Temporary code | ✓ |
| Smart Device / KeyApp* | ✓ |
| Smart Device / KeylessEntry* | ✓ |
| Apple Watch / KeyApp* | ✓ |
| History number 2000 | |
* Functions only via the optional secuENTRY Software
Bluetooth Low Energy
Maximum Transmit Output Power 7.5dBm
Frequency usage range 2,402GHz ... 2.483GHz
Additional functions available using the optional secuENTRY Software, for example:
- Setup User
- Timer and calendar functions
- Assignment of authorisations
Optical signalling inner knob
The optical signal in form of a LED is incorporated in the knob on the inner side of the door.
This LED informs you on the following:
- 1 x short: Cylinder is engaged
- 2 x short: Cylinder is released
- 3 x short: Transponder Tag recognized, no opening authorization
- 4 x short: Permanent opening activated
- 1 × short, 1 × long, 2 sec. pause, Repeat: Lock in programming mode
5 × short, 2 sec. pause, Repeat after 20 seconds: Empty battery in the cylinder
Optical signalling outer knob
The optical signal in form of a LED is incorporated in the knob on the outer side of the door.
This LED informs you on the following:
• 1 x short: Cylinder is engaged
- 2 x short: Cylinder is released
- 3 x short: Transponder Tag recognized, no opening authorization
- 4 x short: Permanent opening activated
- 1 × short, 1 × long, 2 sec. pause, Repeat: Lock in programming mode
5 × short, 2 sec. pause, Repeat after 20 seconds: Empty battery in the cylinder
E. Battery replacement
E-1. Battery replacement inner knob
- Using the attached hex key, loosen the top locking screw on the cylinder cover. It can be turned out only up to the opening of the cover and will not fall out.
- Open the cover.
natural_image
Close-up of a hand holding a mechanical component, showing a metallic cylindrical part inserted into a circular housing (no visible text or symbols)- Replace the batteries. Make sure the batteries are inserted with the correct polarity, indicated at the marked point on the housing. Replace the cover.
natural_image
Close-up of a mechanical component with internal components and mounting holes, shown from two angles (no text or symbols visible)E-2. Battery replacement outer knob
- Push the ratchets with the enclosed tool and remove the knob sleeve.
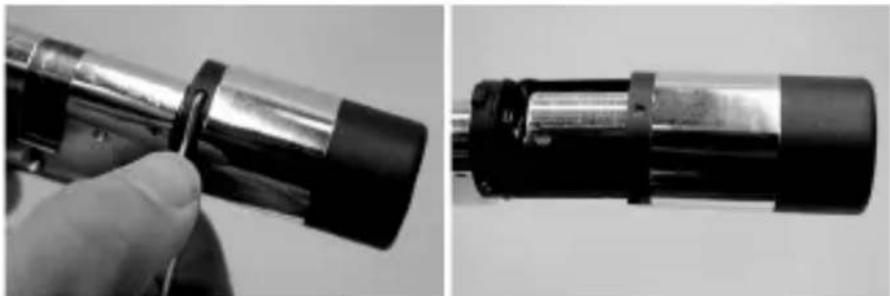
natural_image
Close-up of a hand holding a cylindrical mechanical component, shown from two angles (no text or symbols visible)- Replace the battery with the correct polarity.
natural_image
Close-up of a mechanical cylindrical component mounted on a flanged base (no visible text or symbols)- Carefully push the knob again. Please note: Latching is only possible in one position!
natural_image
Close-up of a mechanical component with metallic shaft and flange (no visible text or symbols)Attention! Be careful not to nip the cable. Make sure that the O-ring is correctly placed.
• Re-engage the knob sleeve.
natural_image
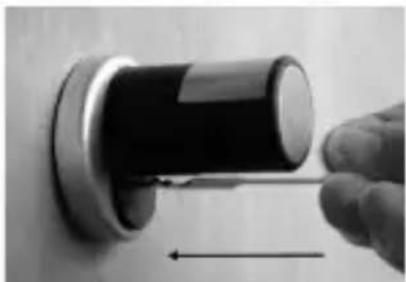
Close-up of a mechanical component with a cylindrical shaft and flange (no visible text or symbols)F. Emergency key
Using the mechanical emergency key, you can provide access in case of failure of the system.
1 Swing the emergency key open and then insert it into the indicted slot in the cover panel.
natural_image
Close-up of a hand using a screwdriver to press a black cylindrical object on a wall (no text or symbols visible)2 Turn the key 90 ° clockwise. If required, move the outer knob slightly to the right and left in order to release the mechanism.
3 Turn the outer knob. The lock opens when fully turned at the latest.
Turn the key to its initial position and take it out. To close the emergency lock, the knob shall be turned twice fully in both directions.
G. Warranty / Environment
Warranty
In order to provide you with a perfect, high-quality product and to help you if service or repair is required, the faulty or defective devices together with the valid administrator code and the QR code (s) should be submitted to your handler with the original purchase document.
In the case of returns due to your right of withdrawal all parts of the device must be in the factory setting and the seals on the cylinder and the knob must be undamaged. If these conditions are not met, the warranty expires.
Important information about our electronic locks
General: Please take care that the codes and the code carrier do not fall into the wrong hands. Therefore, store the codes and code carrier at a safe location so that these can only be accessed by authorised persons. In case you loose a code or code carrier, the lock must be converted to a new code / code carrier, or replaced.
- The factory code must be changed as soon as the lock is commissioned.
- Simple codes that are easy to guess (e.g. 1, 2, 3, 4, 5, 6) must not be used.
- Personal data (e.g. birthday) or other data that may be concluded with knowledge of the code owner must not be used as code.
- After changing the code, the lock must be checked several times with the safety door opened.
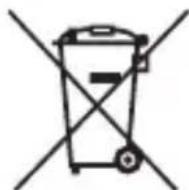
Disposal of the device
Dear Customer,
Please help us avoid unnecessary waste. Should you intend to dispose of this device at any time, please remember that many components of this device contain valuable materials, which can be recycled. Please do not throw out the device as general waste, but rather obtain information on the collecting points for electrical waste from the responsible authority of you municipality.
natural_image
Symbol of a trash bin with crossed lines indicating no waste or discharge (no text or labels)Please be aware that electrical and electronic equipment and batteries shall not be disposed of as household waste, but rather collected separately. Please obtain information on the collecting points for electrical waste from the responsible authority of you municipality.
BURG-WÄCHTER KG hereby declares that this device Directive (RED) 2014/30/EU, (EMC), (toHS). The full text of the EU Declaration of Conformity can be found on www.burg.biz
Regarding interferences from Bluetooth devices
Bluetooth devices use the same frequency bandwidth (2.4 GHz) as Wi-Fi devices. This can lead to interference, which causes errors or interrupts communication. In such cases devices that are not required should be de-energized.
Print and typesetting errors as well as technical changes reserved.
Introduction
text_image
SN: 10:2D:00:3E MAC: 30:42:25:00:00:60 AES: E1:25:F3:E2:DB:86:C0:70: F7:EA:04:93:17:2E:BF:9E ADM: 123456 11 cylindre (SN ; MAC ; AES ; ADM)
natural_image
Two black-and-white photos showing hands adjusting a door lock and screwdriver (no text or symbols visible)natural_image
Close-up of a metallic door handle and door lock mechanism (no text or symbols visible)natural_image
Mechanical component diagram showing a shaft and housing assembly with dimension label A (no text or symbols present)natural_image
Close-up of two mechanical components with cross-hatching, no visible text or symbolsBluetooth Low Energy
Maximum Transmit Output Power 7,5dBm
Frequency usage range 2,402GHz ... 2,483GHz
natural_image
Close-up of a hand holding a metallic cylindrical object with a pointed tip, against a wooden background (no visible text or symbols)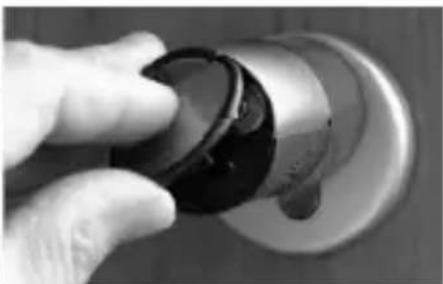
natural_image
Close-up of a hand holding a black circular knob on a metallic knob (no text or symbols visible)natural_image
Close-up of a mechanical component with internal structure and mounting holes (no visible text or symbols)natural_image
Close-up of a hand holding a cylindrical mechanical component, shown from two angles (no text or symbols visible)natural_image
Close-up of a mechanical cylindrical component mounted on a flanged base (no visible text or symbols)natural_image
Close-up of a mechanical component with metallic and black casing (no visible text or symbols)natural_image
Close-up of a mechanical component with a cylindrical shaft and flange (no visible text or symbols)F. Clé de secours
natural_image
Close-up of a hand holding a black cylindrical object with an arrow pointing to it, against a plain wall (no text or symbols visible)text_image
SN: 10:2D:00:3E MAC: 30:42:25:00:00:60 AES: E1:25:F3:E2:DB:86:C0:70: F7:EA:04:93:17:2E:BF:9E ADM: 123456 11 cilinder (SN; MAC; AES; ADM)
natural_image
Two black-and-white photos showing hands using a tool to adjust or install a door lock (no text or symbols visible)natural_image
Close-up of a metallic door clip and door lock mechanism (no text or symbols visible)natural_image
Mechanical component diagram showing a shaft and housing assembly with dimension label A (no text or symbols present)Adapter ( L = lengte in mm)
Maten secuENTRY pro 7116 Duo
natural_image
Close-up of two mechanical components with cross-hatching, no visible text or symbolsBluetooth Low Energy
Maximum Transmit Output Power 7,5dBm
Frequency usage range 2,402GHz ... 2,483GHz