YVC330 - Phone YAMAHA - Free user manual and instructions
Find the device manual for free YVC330 YAMAHA in PDF.
User questions about YVC330 YAMAHA
0 question about this device. Answer the ones you know or ask your own.
Ask a new question about this device
Download the instructions for your Phone in PDF format for free! Find your manual YVC330 - YAMAHA and take your electronic device back in hand. On this page are published all the documents necessary for the use of your device. YVC330 by YAMAHA.
USER MANUAL YVC330 YAMAHA
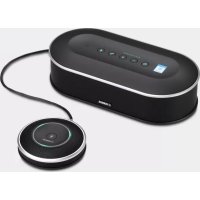
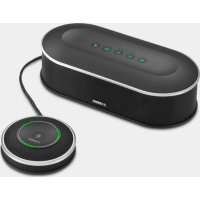
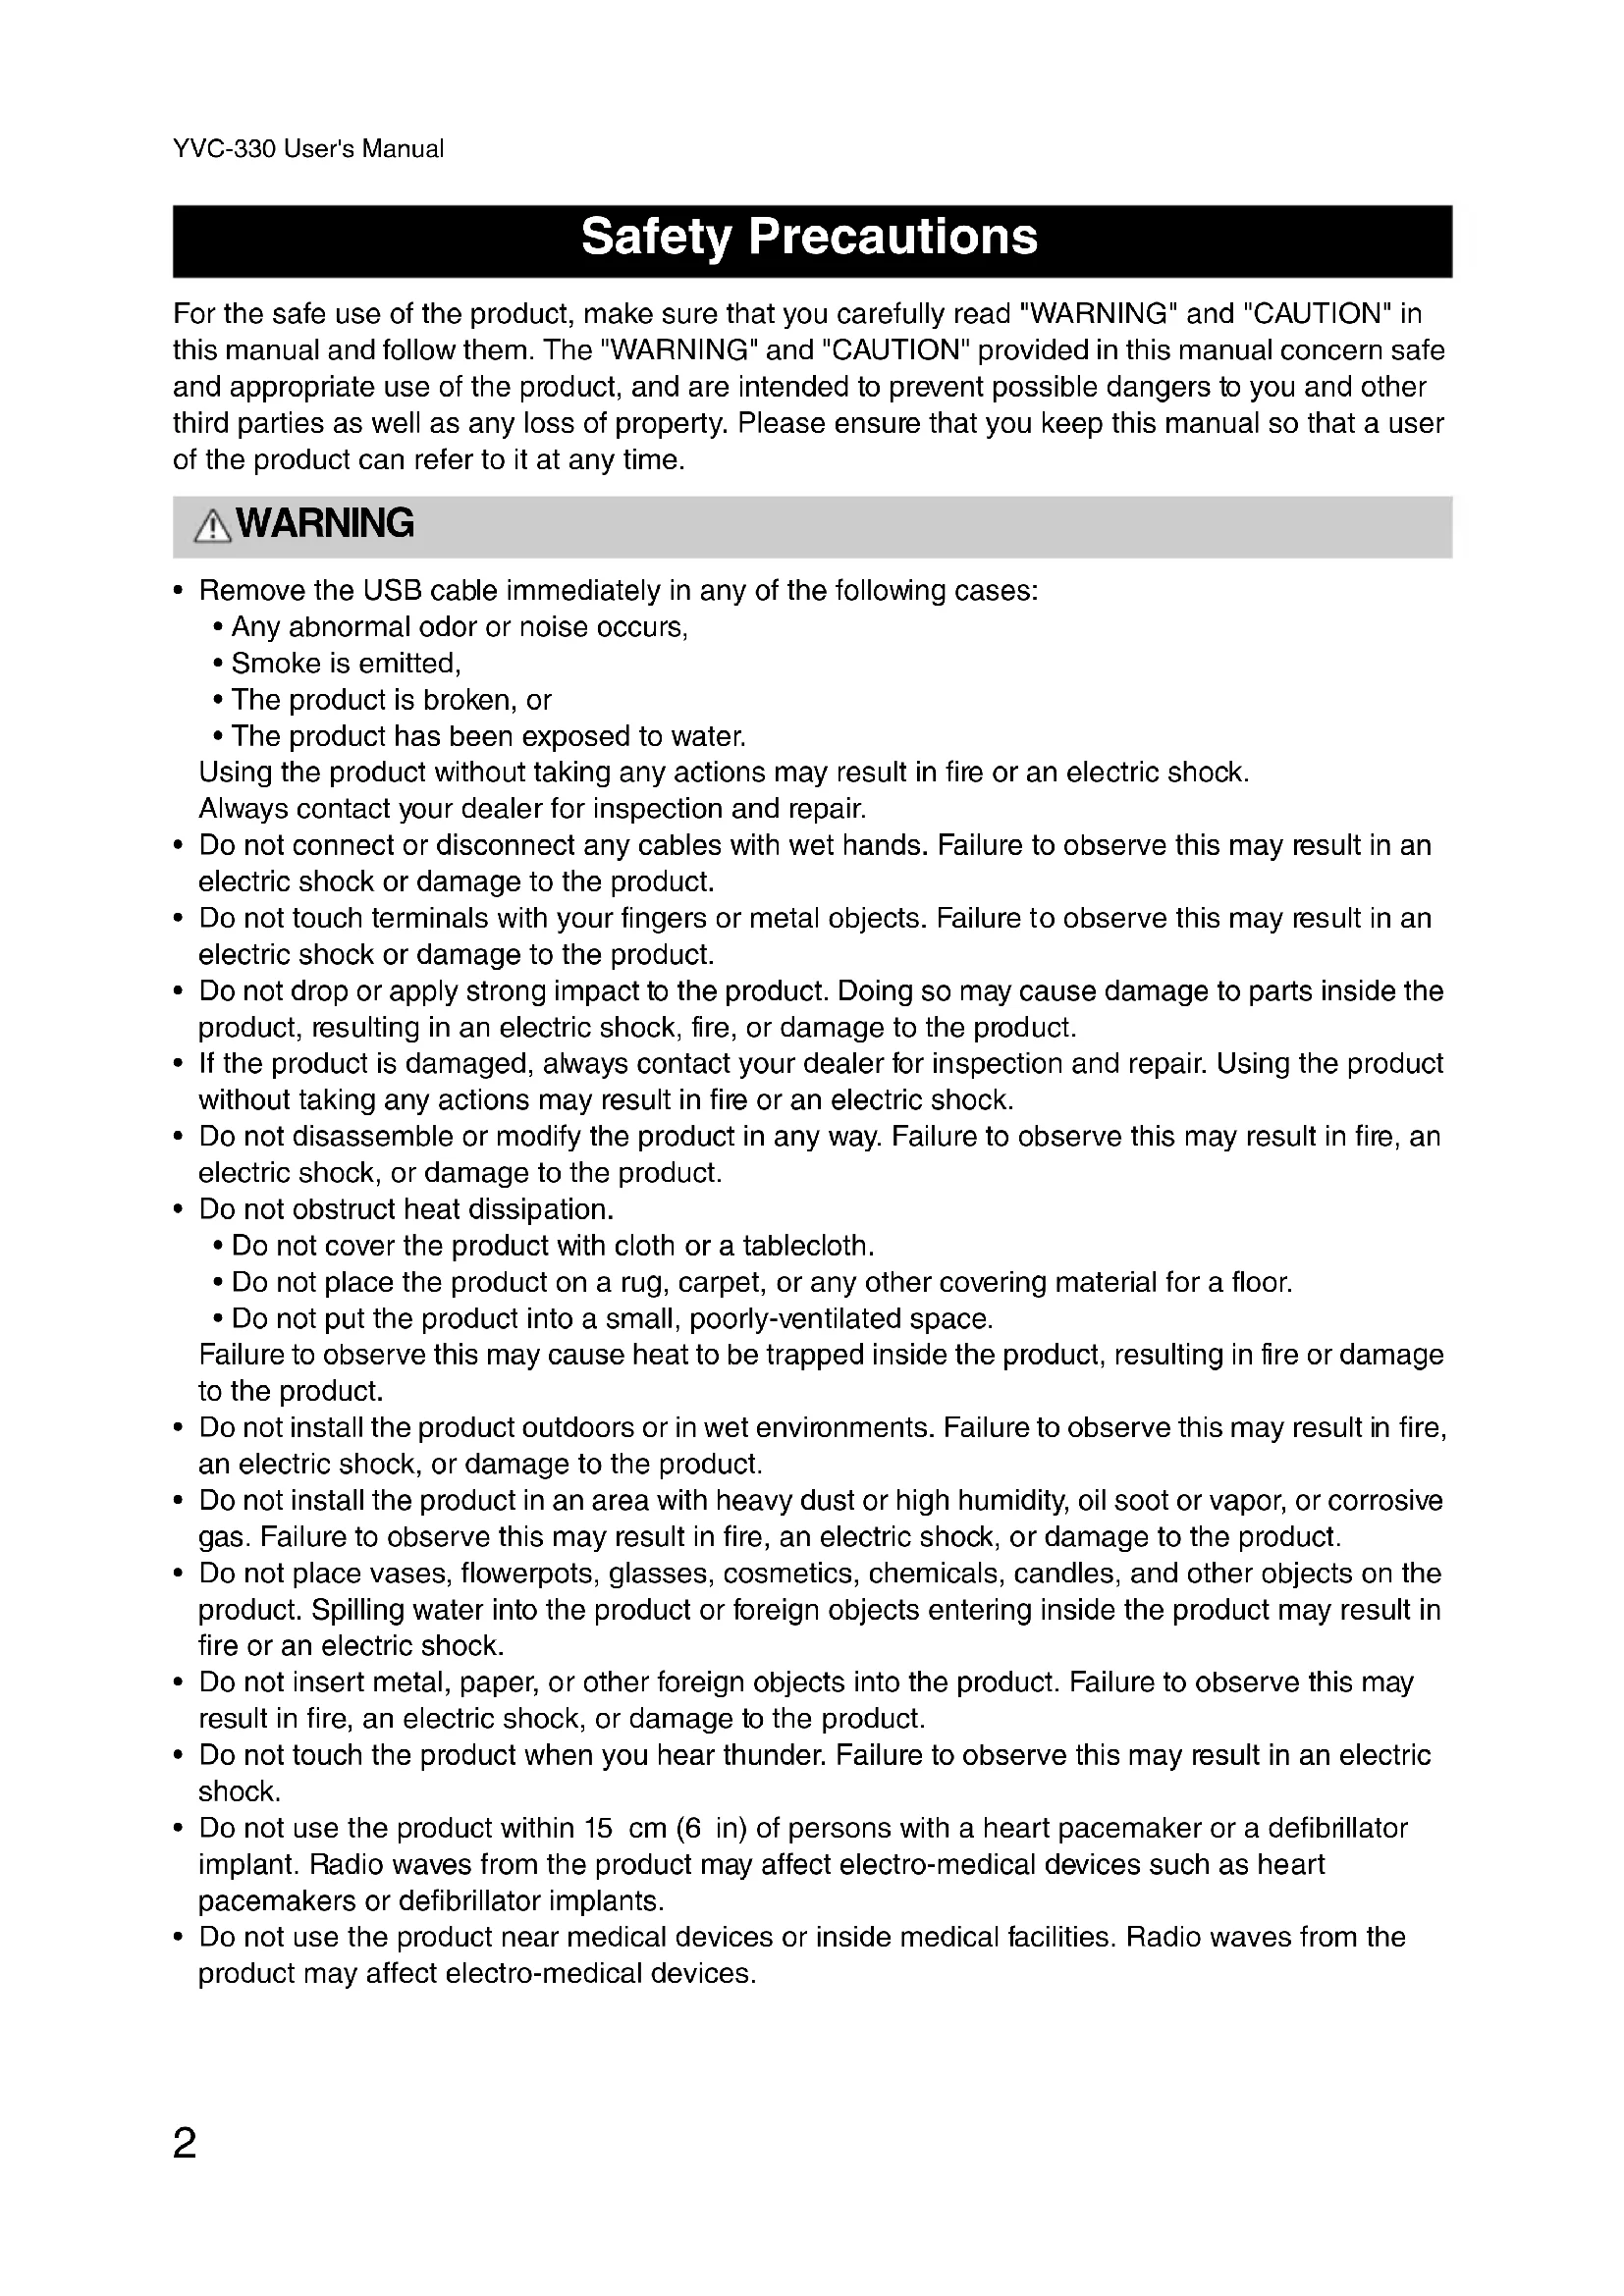
Unified Communications Speakerphone
YVC-330
natural_image
Black YAMAM digital sound wave device with control buttons and speaker grille (no visible text or symbols)User's Manual
Update the firmware and use the latest features.
You can download the latest firmware and user's manual from the following website:
https://uc.yamaha.com/resources/support/
Contents
Introduction
Safety Precautions ...... 2
WARNING 2
CAUTION 3
Precautions for Use 4
Bluetooth ^® 4
Introduction 7
What is supplied in the box....7
Conventions used in this manual......7
Using the latest features....7
What You Can Do
with the Product 8
Controls and Functions ...... 9
Top 9
Side 11
Bottom 12
How to use YVC-330
Installing the Product 13
Connecting to Communication
Equipment 14
Connecting to a PC
using the USB cable ....14
Connecting to a Mac
using the USB cable 18
Connecting to a smartphone or
tablet via Bluetooth....21
Connecting to a videoconference
system using audio cables .....25
Making a Daisy Chain Connection
with Two of this Product 27
Convenient functions
Using Convenient Functions .....30
Adjusting the speaker volume .....30
Muting the microphone....30
Muting the speaker.... 30
Accepting an incoming Bluetooth
connection request/ending a call.....31
Selecting a connected device
on the EXT IN/OUT terminals....31
Enabling or disabling the Bluetooth
function....31
Returning to the factory settings......32
Using SoundCap ....32
Others
Troubleshooting 33
Before contacting Yamaha ....33
Q1 An indicator is off or flashing .....33
Q2 Audio quality issues......33
Q3 Bluetooth connection issues......36
Specifications ....38
General specifications....38
Audio specifications....39
Option specifications ....39
Customer Support ....39
Safety Precautions
For the safe use of the product, make sure that you carefully read "WARNING" and "CAUTION" in this manual and follow them. The "WARNING" and "CAUTION" provided in this manual concern safe and appropriate use of the product, and are intended to prevent possible dangers to you and other third parties as well as any loss of property. Please ensure that you keep this manual so that a user of the product can refer to it at any time.

WARNING
- Remove the USB cable immediately in any of the following cases:
- Any abnormal odor or noise occurs,
- Smoke is emitted,
• The product is broken, or - The product has been exposed to water.
Using the product without taking any actions may result in fire or an electric shock.
Always contact your dealer for inspection and repair.
- Do not connect or disconnect any cables with wet hands. Failure to observe this may result in an electric shock or damage to the product.
- Do not touch terminals with your fingers or metal objects. Failure to observe this may result in an electric shock or damage to the product.
- Do not drop or apply strong impact to the product. Doing so may cause damage to parts inside the product, resulting in an electric shock, fire, or damage to the product.
- If the product is damaged, always contact your dealer for inspection and repair. Using the product without taking any actions may result in fire or an electric shock.
- Do not disassemble or modify the product in any way. Failure to observe this may result in fire, an electric shock, or damage to the product.
- Do not obstruct heat dissipation.
- Do not cover the product with cloth or a tablecloth.
- Do not place the product on a rug, carpet, or any other covering material for a floor.
- Do not put the product into a small, poorly-ventilated space.
Failure to observe this may cause heat to be trapped inside the product, resulting in fire or damage to the product.
- Do not install the product outdoors or in wet environments. Failure to observe this may result in fire, an electric shock, or damage to the product.
- Do not install the product in an area with heavy dust or high humidity, oil soot or vapor, or corrosive gas. Failure to observe this may result in fire, an electric shock, or damage to the product.
- Do not place vases, flowerpots, glasses, cosmetics, chemicals, candles, and other objects on the product. Spilling water into the product or foreign objects entering inside the product may result in fire or an electric shock.
- Do not insert metal, paper, or other foreign objects into the product. Failure to observe this may result in fire, an electric shock, or damage to the product.
- Do not touch the product when you hear thunder. Failure to observe this may result in an electric shock.
- Do not use the product within 15 cm (6 in) of persons with a heart pacemaker or a defibrillator implant. Radio waves from the product may affect electro-medical devices such as heart pacemakers or defibrillator implants.
- Do not use the product near medical devices or inside medical facilities. Radio waves from the product may affect electro-medical devices.

CAUTION
- Make sure that you use the supplied USB cable. Using a different USB cable may result in fire, an electric shock, or damage to the product.
-
Do not damage the USB cable.
-
Do not place heavy objects on the cable.
- Do not process the cable in any way.
- Do not staple the cable.
- Do not apply excessive force to the cable.
- Keep the cable away from heat-generating appliances.
Failure to observe this may result in fire, an electric shock, or damage to the product.
- Do not install the product in an unstable location or a location that is exposed to vibration. It may fall or topple over, thus resulting in injury or damage to the product.
- Do not install the product in a location where it is exposed to direct sunlight or at extraordinarily high temperatures (for example, near a heater). Failure to observe this may result in damage to the product.
- Do not sit or stand on the product or place other objects on top of it. Failure to observe this may result in damage to the product.
- T urdown the volume to the minimum before starting playback. Failure to observe this may create a sudden loud noise, resulting in hearing impairment.
- Do not use the product in locations where the ambient temperature changes rapidly. Rapid changes in the ambient temperature may result in condensation on the product. Continued use of the product with condensation on it may result in damage to the product. If there is condensation on the product, make sure that you leave the product for a while until it dries off with the power turned off.
- Make sure that you remove static electricity from your body or clothing before touching the product. Failure to observe this may result in damage to the product due to the static electricity.
- Make sure that you route and connect the cables correctly. If the cables are pulled or someone gets caught in the cables, the product or connected equipment may tip over or fall, thus resulting in injury or damage to the product.
- Before connecting external equipment, thoroughly read the instruction manuals provided with the equipment and connect the equipment according to the instructions.
- Turn off the product and remove all the connection cables before moving the product. Failure to observe this may cause the product or connected equipment to fall or topple over, thus resulting in injury.
WARNING
TO REDUCE THE RISK OF FIRE OR ELECTRIC SHOCK, DO NOT EXPOSE THIS APPARATUS TO RAIN OR MOISTURE.
Precautions for Use
- This product is intended for use in general offices and is not designed for use in any fields requiring a high degree of reliability, such as the handling of human lives or valuable assets.
- Note that Yamaha cannot assume any responsibility for any loss or damage resulting from improper use or misconfiguration of the product.
- Depending on the usage environment, the product may generate noise in telephones, radios, televisions, or other appliances. If this occurs, change the location where it is installed or its orientation.
- If you transfer this product to a third party, pass this manual and accessories along with it.
- Make sure that you follow the instructions of your local government when disposing of the product.
- Do not connect any equipment that generates noise on the same power line as the product.
Bluetooth®
- Bluetooth is a technology for wireless communication employing the 2.4 GHz frequency band, which can be used without a license.
- The 2.4 GHz band used by Bluetooth-compatible devices is a radio band shared by many types of equipment. While Bluetooth-compatible devices use a technology to minimize the influence from other components using the same radio band, such influence may reduce the speed or distance of communications and in some cases interrupt communications.
- The speed or distance of communications differs according to the distance between the communicating devices, the presence of obstacles, radio wave conditions, and the type of equipment.
- Yamaha does not guarantee that all wireless connections between this product and devices compatible with the Bluetooth function.
COMPLIANCE INFORMATION STATEMENT
(Supplier's declaration of conformity procedure)
Responsible Party: Yamaha Unified Communications, Inc.
Address: 144 North Rd, Suite 3250 Sudbury, MA 01776
Telephone: 800-326-1088
Type of Equipment: Unified Communications Speakerphone
Model Name: YVC-330
This device complies with Part 15 of the FCC Rules.
Operation is subject to the following conditions:
1) this device may not cause harmful interference, and
2) this device must accept any interference received including interference that may cause undesired operation.
FCC INFORMATION (U.S.A.)
1 IMPORTANT NOTICE: DO NOT MODIFY THIS UNIT!
This product, when installed as indicated in the instructions contained in this manual, meets FCC requirements. Modifications not expressly approved by Yamaha may void your authority, granted by the FCC, to use the product.
2 IMPORTANT: When connecting this product to accessories and/or another product use only high quality shielded cables. Cable/s supplied with this product MUST be used. Follow all installation instructions. Failure to follow instructions could void your FCC authorization to use this product in the USA.
3 NOTE: This equipment has been tested and found to comply with the limits for a Class A digital device, pursuant to Part 15 of the FCC rules. These limits are designed to provide reasonable protection against harmful interference when the equipment is operated in a commercial environment. This equipment generates, uses and can radiate radio frequency energy and, if not installed and used in accordance with the instruction manual, may cause harmful interference to radio communications. Operation of this equipment in a residential area is likely to cause harmful interference in which case the user will be required to correct the interference at his own expense.
This transmitter must not be co-located or operated in conjunction with any other antenna or transmitter.
This equipment complies with FCC radiation exposure limits set forth for an uncontrolled environment and meets the FCC radio frequency (RF) Exposure Guidelines. This equipment has very low levels of RF energy that is deemed to comply without maximum permissive exposure evaluation (MPE).
This equipment complies with IC radiation exposure limits set forth for an uncontrolled environment and meets RSS-102 of the IC radio frequency (RF) Exposure rules. This equipment has very low levels of RF energy that is deemed to comply without maximum permissive exposure evaluation (MPE).
This device complies with Industry Canada's licence-exempt RSSs. Operation is subject to the following two conditions:
(1) This device may not cause interference; and
(2) This device must accept any interference, including interference that may cause undesired operation of the device.
Warning: Operation of this equipment in a residential environment could cause radio interference.
Information for users on collection and disposal of old equipment:
natural_image
Symbol of a trash bin crossed with no text or numbers, representing waste sorting or disposal (no text present)This symbol on the products, packaging, and/or accompanying documents means that used electrical and electronic products should not be mixed with general household waste.
For proper treatment, recovery and recycling of old products, please take them to applicable collection points, in accordance with your national legislation.
By disposing of these products correctly, you will help to save valuable resources and prevent any potential negative effects on human health and the environment which could otherwise arise from inappropriate waste handling.
For more information about collection and recycling of old products, please contact your local municipality, your waste disposal service or the point of sale where you purchased the items.
For business users in the European Union:
If you wish to discard electrical and electronic equipment, please contact your dealer or supplier for further information.
Information on Disposal in other Countries outside the European Union:
This symbol is only valid in the European Union. If you wish to discard these items, please contact your local authorities or dealer and ask for the correct method of disposal.
Introduction
Thank you for purchasing Yamaha YVC-330. This product is a voice terminal for convenient teleconferencing and remote talks, when connected to communication equipment, such as a PC or Mac, a smartphone or tablet, and a videoconference system.
Please read this manual thoroughly before using the product for proper installation and connections.
Keep this manual in a safe place so that it does not become lost.
- The contents of this manual apply to the latest specifications as of the publishing date. To obtain the latest manual, access the following website then download the manual file. https://uc.yamaha.com/resources/support/
- No part of this manual may be reproduced or used in any form without permission of Yamaha.
- Yamaha shall not be liable for any loss of or damage to data resulting from use of the product. Also note that the warranty only covers physical damage to the product.
What is supplied in the box
- Main unit (YVC-330) x1
• USB cable 3 m (9.8 ft) x1 - User's manual (this manual) x1
Conventions used in this manual
■Abbreviations
This manual uses the following abbreviations for the products below:
- Yamaha YVC-330: The product, this product
- Micr® Windows®: Windows
- m a c ® r6acOS
Trademarks
• SoundCap is a trademark or registered trademark of Yamaha Corporation.
- Microsoft and Windows are registered trademarks of Microsoft Corporation in the United States and other countries.
• Mac and macOS are registered trademarks of Apple Inc.
- Android ^TM is a trademark or registered trademark of Google Inc.
- B Bluetooth is a registered trademark of the Bluetooth SIG and is used by Yamaha in accordance with a license agreement.
- NFC logo (N-Mark) is a trademark or registered trademark of NFC Forum, Inc.
- The company names and product names in this manual are the trademarks or registered trademarks of their respective companies.
Using the latest features
Yamaha is making continual improvements in product features.
To make use of the latest features, visit the following website to download the firmware of the product: https://uc.yamaha.com/resources/support/
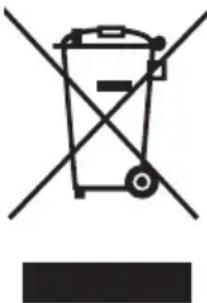
What You Can Do with the Product
flowchart
graph TD
    A["YVC-330"] -->|Bluetooth connection| B["Smartphone"]
    A -->|USB connection| C["PC/Mac"]
    A -->|EXT connection| D["Videoconference system"]
    B --> E["Mobile network Internet Intranet, etc."]
    C --> F["Internet Intranet, etc."]
    D --> G["Internet Intranet, etc."]
    E --> H["Audio teleconference, etc."]
    E --> I["Fixed-line phone"]
    F --> J["Web conference, etc."]
    F --> K["PC/Mac"]
    G --> L["Video conference"]
    G --> M["Videoconference system"]
■"Easy-to-talk" and "easy-to-hear" voice communications
The product is equipped with microphones with high voice-capturing capability and a speaker with high voice reproduction capability. It also provides high-performance audio signal processing functions, such as the adaptive echo canceller and noise reduction, providing "easy-to-talk" and "easy-to-hear" voice communications without skipping or noise.
■Connection with various communication devices
The product provides three connection interfaces: "USB" for a connection with a PC or Mac, "Bluetooth" for a smartphone or tablet, and "EXT" for an analog connection with a videoconference system.
You can also use the "USB, Bluetooth, and EXT" interfaces at the same time (the audio mixer function enables this).
■Using this product in various places
• Using this product in open workspaces
By enabling SoundCap, which is comprised of the "Far Field Noise Reduction (FFNR)", "Self-Silence", and "Self-Volume Balancer" functions, you can automatically mute distracting noise around you and deliver only the sound from the pick-up range (radius of 1 m) to the remote party. This also automatically adjusts the volume of the sound from the speakers based on the noise around you.
* Use this product with SoundCap enabled.
• Using this product in a conference room
You can use this product in small to medium-sized conference rooms. It clearly picks up the sound in the conference room and enables high-quality calls using a powerful maximum volume.
* Use this product with SoundCap disabled.
■Extension through a daisy chain connection
Connecting two products by using an optional daisy chain cable allows the products to pick up sound from or transmit sound to a broader area. With this feature, the product can support a conference with many participants that is not achieved through a single device, or the use in a large room.
Controls and Functions
Top
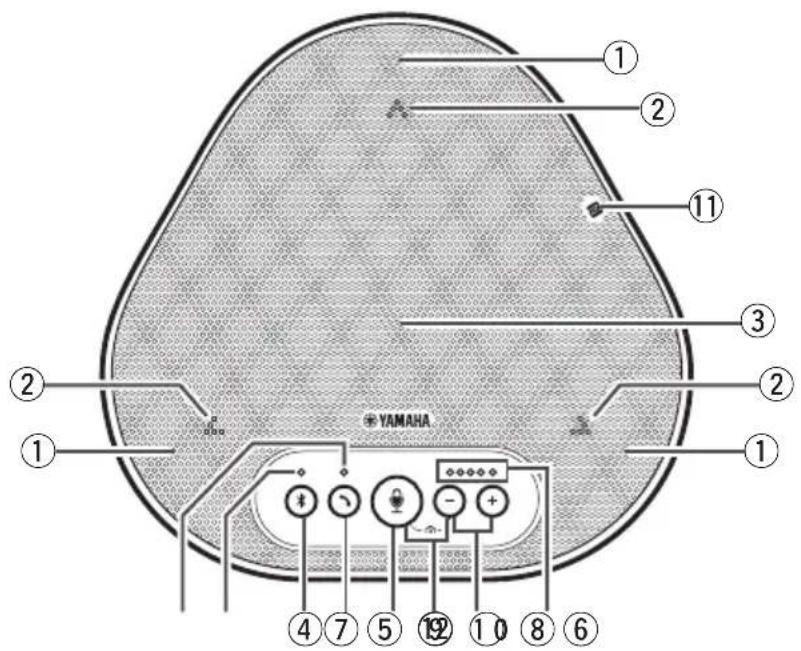
text_image
① ② ③ ④ ⑦ ⑤ ⑫ ⑩ ⑪ ⑧ ⑥ YAMAHA①Microphones
Picks up voice of people who are speaking.
②Microphone indicators
Indicate the level of voice the microphone picks up. They also indicate incoming Bluetooth connection requests and a mode of the product. (→Page 10)
③Speaker
Outputs voices from the remote party.
④Bluetooth button ()
Press this button to pair the product with or connect/disconnect the product to/from a Bluetooth-compatible smartphone or tablet. (→Page 21)
⑤Bluetooth indicator
Indicates the product status in conjunction with the operation of the Bluetooth button. (→Page 11)
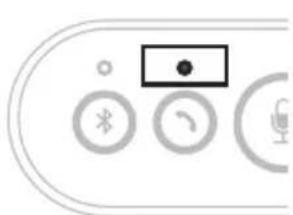
⑥On/off-hook button ()
Allows you to take an incoming call or hang up a call while the product is connected to a Bluetooth-compatible smartphone or tablet. (→Page 31)
⑦On/off-hook indicator
Indicates the product status in conjunction with the operation of t he on/off-hook button. (→Page 11)
⑧Microphone mute button ( )
Used to temporarily turn off (mute) the microphone. The remote party can no longer hear you. (→Page 30)
⑨Volume buttons () - +
Press them to adjust the speaker volume. Holding down either of the buttons for at least 0.5 seconds allows you to continuously turn the volume up or down. (→Page 30)
⑩Volume level indicator
Usually indicates the input level of voice from the remote party. It indicates the volume level of the speaker output when the speaker volume level is adjusted.
⑪NFC logo (N-Mark)
Holding a Bluetooth-compatible smartphone or tablet with the NFC (Near Field Communication) function over the logo allows it to be paired with, connected to, or disconnected from the product. (→Page 24)
⑫SoundCap (+) -
Enables or disables SoundCap function. (→Page 32)
■ How the volume level indicator (Page 9: ⑩) works
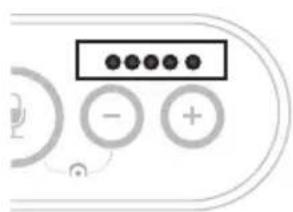
natural_image
Pure electrical circuit lines without any symbols| Status Description | Example(●: On, ○: Off, ●: Flashing) | ||
| Normal operation | The input level of incoming audio signals from the remote party is indicated. | ○○○○○○ | No audio signal is present. |
| ●●●○○○ | Audio signals are present. | ||
| ●●●●● | Maximum audio signal input. | ||
| When the speaker volume is being adjusted (→Page 30) | The specified speaker volume level is indicated. | ○○○○○○ | The speaker volume level is set to minimum. |
| ●●●○○○ | The speaker volume level is set to medium. | ||
| ●●●●● | The speaker volume level is set to maximum. | ||
| When the speaker is muted (→Page 30) | The indicator indicates that the speaker is muted. | The indicator symbols at the current volume level will flash. | |
| When the product is being started | The indicator indicates that the product is now starting. | ●●○○○○→←○○○●● | The illuminated symbols move back and forth until the product is completely started. |
In addition to the above, the indicator indicates the setting of the product, as described in "Selecting a connected device on the EXT IN/OUT terminals" (page 31). Also, when an error occurs, it displays the details of the error. (→Page 33)
■ How the microphone indicators (Page 9: ②) work
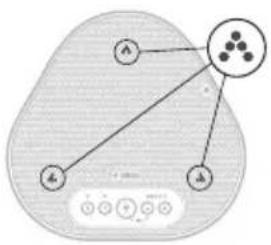
flowchart
graph TD
    A["A"] --> C["●"]
    B["B"] --> C
    A --> D["A"]
    B --> D
    C --> E["●"]
    D --> F["●"]
    style C fill:#f9f,stroke:#333
    style D fill:#ccf,stroke:#333
| Status Description | |
| When SoundCap is disabled (→Page 32) | Lit in green.(They light up brighter when the voice is input.) |
| When SoundCap is enabled (→Page 32) | Lit in blue.(They light up brighter when the voice is input.) |
| When the microphone is muted (→Page 30) | Flashes red. |
| When incoming Bluetooth connection requests are received (→Page 31) | Flashes green or blue (red when the microphone is muted) (at 0.25-second intervals). |
In addition to the above, the indicators flash white in various setting modes. (→Page 32) Also, when an error occurs, they flash red at high speed (at 0.1-second intervals). (→Page 33)
■ How the Bluetooth indicator (Page 9: ⑤) works
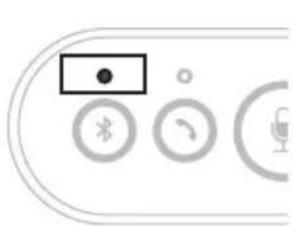
natural_image
Pure electrical circuit lines without any symbols| Indication Status | |
| Off | The Bluetooth function is disabled. |
| Flashing blue at high speed (at 0.25-second intervals) | The function is waiting for the pairing process to be done. |
| Flashing blue at slow speed (at 0.5-second intervals) | The Bluetooth function is waiting for the connection to be established. |
| Non-flashing blue light | The Bluetooth connection has been established. |
| Green light | The Bluetooth connection has not been established. |
■How the on/off-hook indicator (Page 9: ⑦) works
natural_image
Pure electrical circuit lines without any symbols| Indication Status | |
| Off A Bluetooth connection is | ended/theproduct is waiting for an incoming call. |
| Green light A Bluetooth connection is in progress. | |
Side

text_image
YAMAHA IN OUT EXT ① ②①EXT IN/OUT terminals
If you use two of this product connected with a daisy chain, use the optional daisy chain cable to connect to the YVC-330 EXT IN/OUT terminals of the other one. (→Page 27) Connect the terminals to the audio I/O terminals of a video conference system. (→Page 25)
②USB terminal
Use the supplied USB cable to connect this terminal to a PC or Mac for communication and for power supply.
When you connect this product to a product that does not supply power, such as a smartphone or a tablet, use a commercially available USB power adapter. No USB power adapter is supplied with this product.
Bottom
natural_image
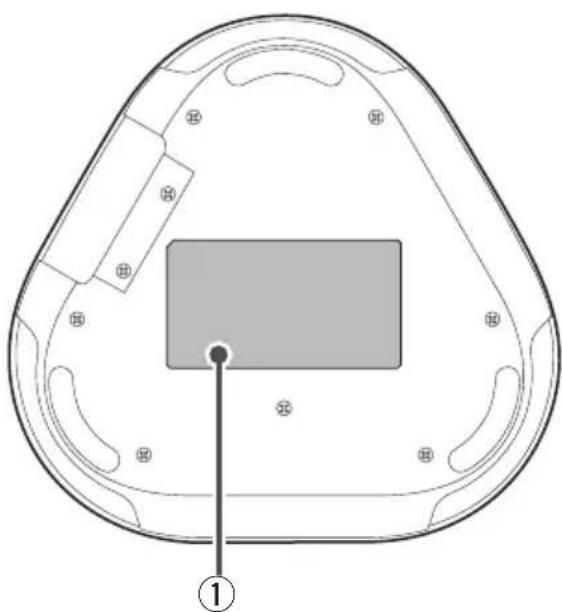
Top-down schematic of a device casing with internal components and a central rectangular block (no text or symbols)①Nameplate
Provides the following information:
Model No.: Provides the model number of the product.
SERIAL LABEL: Provides the serial number, which is used to manage and categorize the product.
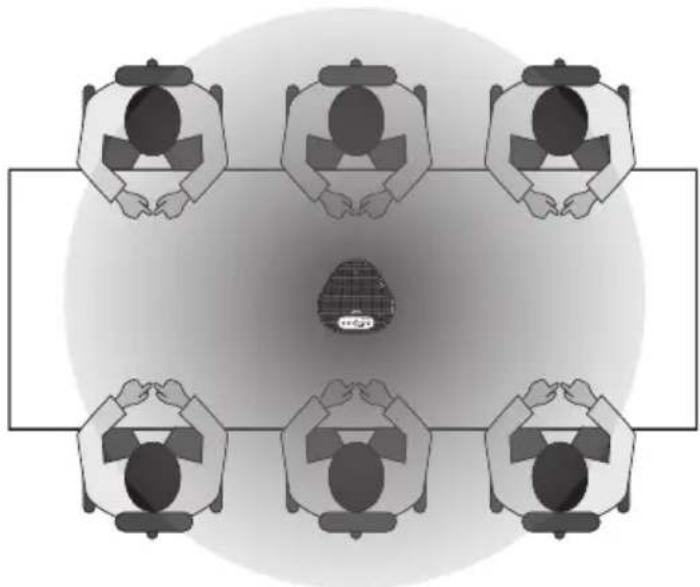
Installing the Product
Install the product in the conference room or open space where you will actually use it.
■Installation location
Locate a position where the product can pick up voices of participants well and the participants can hear audio from the speaker well to place the product there.
Notes
- Keep the product away from noise sources (such as heat radiation fans of PCs and Macs, and projectors). Otherwise, the remote party may have poor audio quality.
- If enabling SoundCap, install this product within 1 m (3.3 ft) from all participants. (→Page 32)

Tip
Connecting the product with another one allows more people to participate in the conference. (→Page 27)
natural_image
Top-down view of five people seated at a table with one person highlighted in a patterned circle (no text or symbols present)Connecting to Communication Equipment
This chapter describes how to connect to each communication device.
After the connection is established, check that sound is output correctly.
Connecting to a PC using the USB cable
■Check the following before the connection procedure
Make sure that you have the supplied USB cable available.
In addition, the PC connected to the product must meet the following system requirements:
- OS: Windows (*1)
• USB: USB 2.0 or later
(*1) For the supported versions, refer to the following website:
https://uc.yamaha.com/
Notes
- You cannot connect more than one microphone or speaker including this product to one PC and use them at the same time.
- Use the supplied USB cable only. Using a different USB cable may cause the product to malfunction.
- The product must be connected directly to a PC. Connecting the product via a USB hub may cause the product to malfunction.
- In rare cases, an audio playback may be interrupted due to PC usage, such as the workload or limited free space in memory.
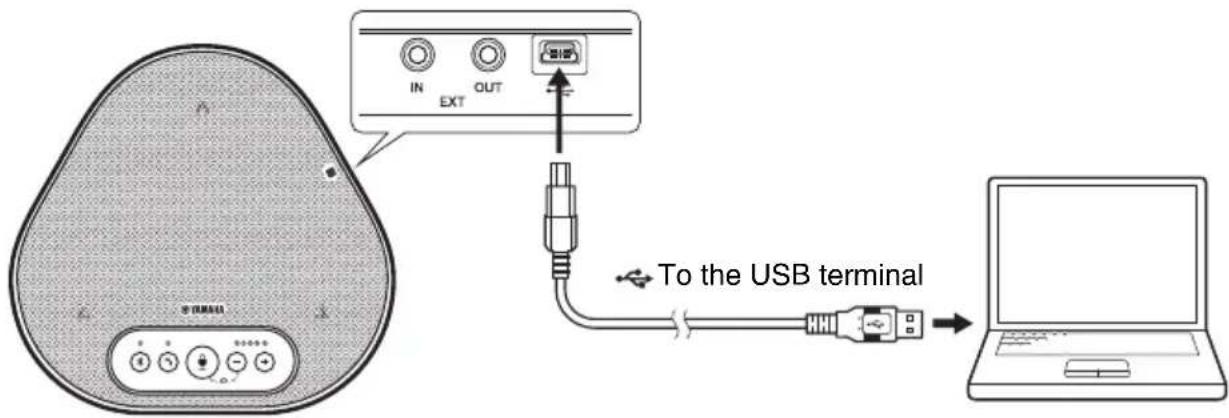
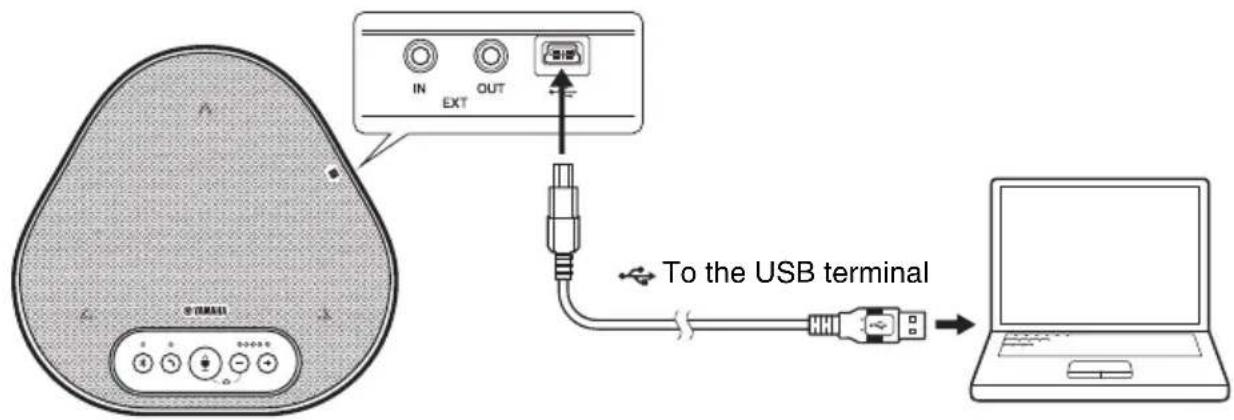
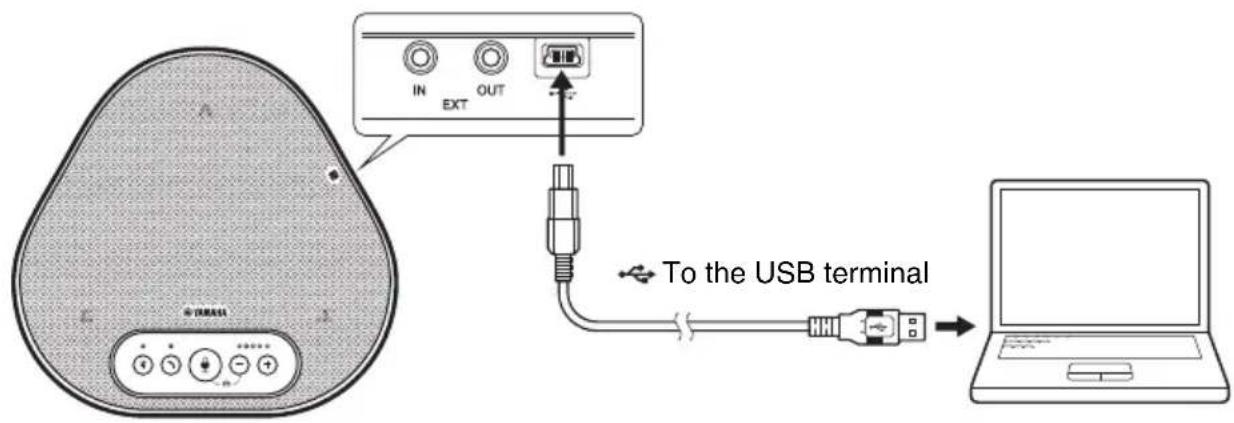
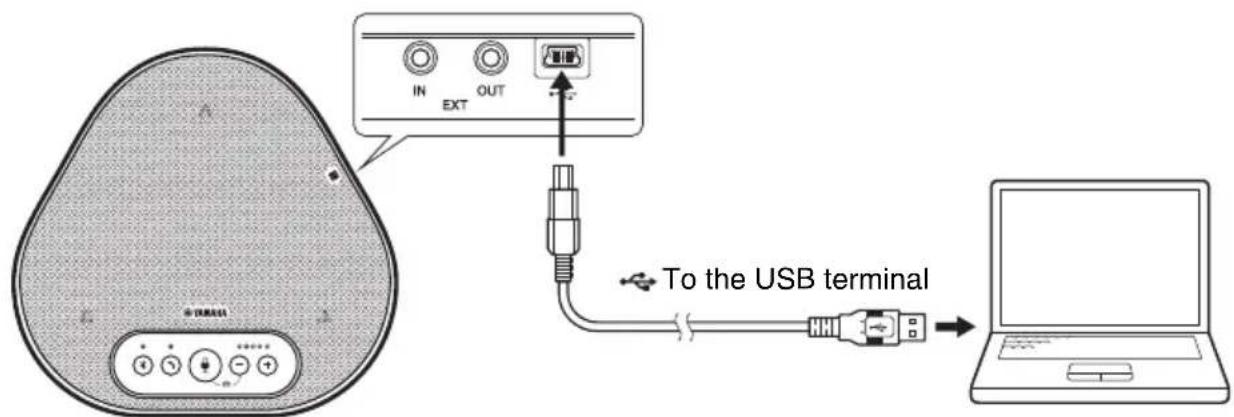
■Connecting the devices
Connect between the product and a PC through the supplied USB cable.
text_image
IN EXT OUT To the USB terminal
Tips
- The product receives power from the PC through the USB cable (USB bus powered).
- You do not need to install a separate USB driver because the PC recognizes the product as a standard USB audio device.
■Checking that the connection has been made correctly
After the connection is established, perform the following steps to check that the PC recognizes the product correctly.
Note
The items and options in the setting window may vary depending on your PC environment.
1 Open the Control Panel on your PC.
- In Windows 7, click "Start" - "Control Panel".
- In Windows 8.1, or 10, right-click the bottom left corner of the Start screen, and then click "Control Panel".
2 Click "Hardware and Sound" - "Sound".
The "Sound" window appears.
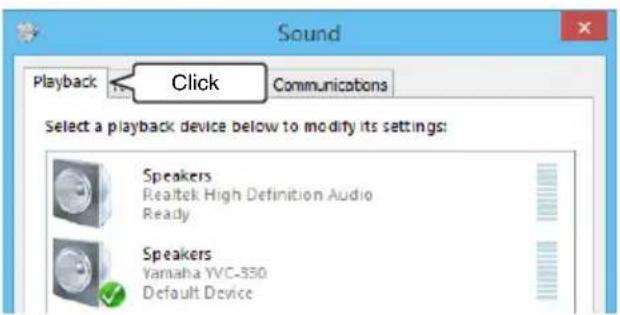
3 Click the "Playback" tab.
text_image
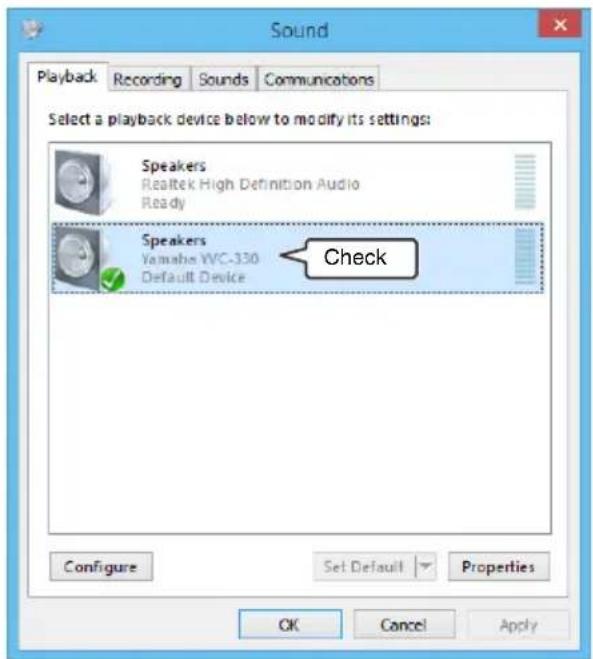
Sound Playback Click Communications Select a playback device below to modify its settings: Speakers Realtek High Definition Audio Ready Speakers Yamaha YVC-330 Default Device4 Check that "Yamaha YVC-330" is set as a default device in the "Speakers" field.
If not, click "Yamaha YVC-330" and then click "Set Default".
text_image
Sound Playback Recording Sounds Communications Select a playback device below to modify its settings: Speakers Realtek High Definition Audio Ready Speakers Yamaha WVC-330 Default Device Check Configure Set Default Properties OK Cancel Apply
Tip
In most cases, simply connecting the product to a PC automatically sets "Yamaha YVC-330" as a default device.
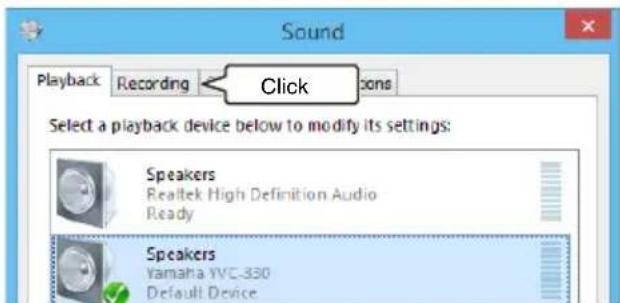
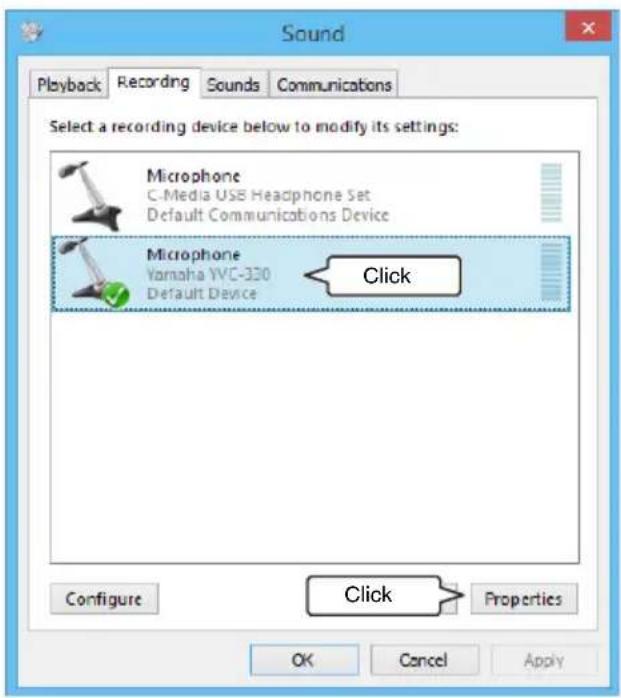
5 Click the "Recording" tab.
text_image
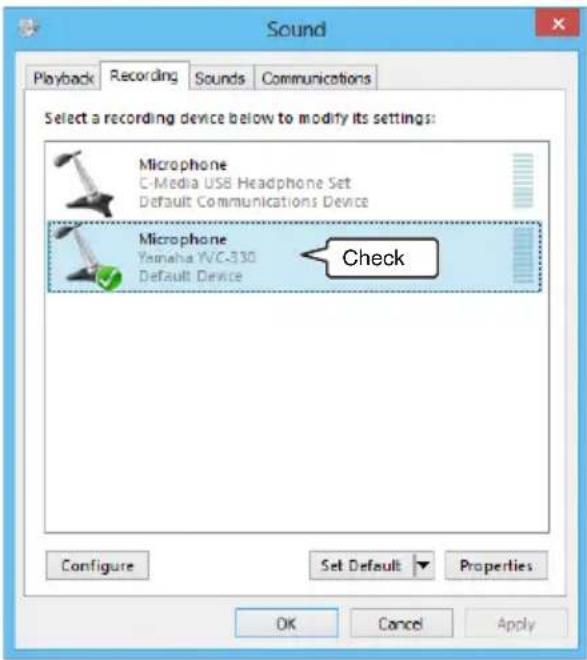
Sound Playback Recording Click Select a playback device below to modify its settings: Speakers Realtek High Definition Audio Ready Speakers Yamaha YVC-330 Default Device6 Check that "Yamaha YVC-330" is set as a default device in the "Microphone" field.
If not, click "Yamaha YVC-330" and then click "Set Default".
text_image
Sound Playback Recording Sounds Communications Select a recording device below to modify its settings: Microphone C-Media USB Headphone Set Default Communications Device Microphone Yamaha YWC-330 Default Device Check Configure Set Default Properties OK Cancel Apply
Tip
In most cases, simply connecting the product to a PC automatically sets "Yamaha YVC-330" as a default device.
7 Click "OK" to close the "Sound" window.
■Adjusting the microphone sensitivity
Sound may be distorted or too faint on the remote party depending on your environment. In this case, adjust the microphone sensitivity.
Note
The items and options in the setting window may vary depending on your PC environment.
1 Open the Control Panel.
- In Windows 7, click "Start" - "Control Panel".
- In Windows 8.1, or 10, right-click the bottom left corner of the Start screen, and then click "Control Panel".
2 Click "Hardware and Sound" - "Sound". The "Sound" window appears.
3 Click the "Recording" tab.

text_image
Sound Playback Recording Click Select a recording device below to modify its settings: Microphone C-Media USB Headphone Set Default Communications Device Microphone4 Select "Yamaha YVC-330" from "Microphone" devices and then click "Properties".
The "Microphone Properties" window appears.
text_image
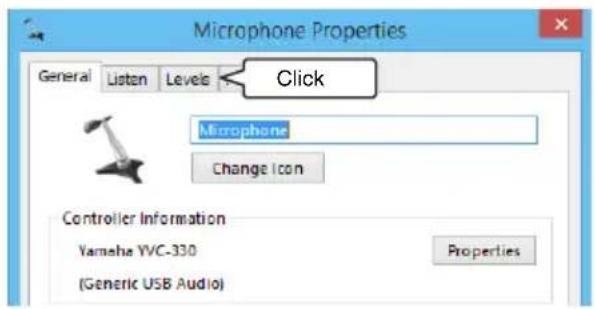
Sound Playback Recording Sounds Communications Select a recording device below to modify its settings: Microphone C-Media USB Headphone Set Default Communications Device Microphone Yamaha YWC-330 Default Device Click Configure Click Properties OK Cancel Apply5 Click the "Levels" tab.
text_image
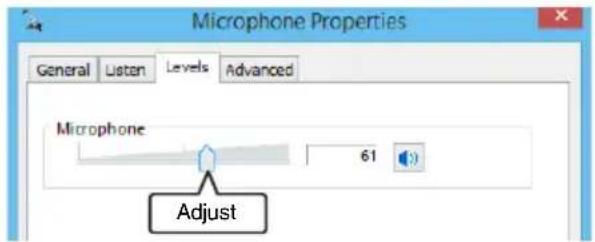
Microphone Properties General Listen Levels Click Microphone Change Icon Controller Information Yamaha YVC-330 Properties (Generic USB Audio)6 In the "Microphone" section, adjust the microphone sensitivity.
text_image
Microphone Properties General Listen Levels Advanced Microphone 61 AdjustConnecting to a Mac using the USB cable
■Check the following before the connection procedure
Make sure that you have the supplied USB cable available.
In addition, the Mac connected to the product must meet the following system requirements:
- OS: macOS (*1)
- USB: USB 2.0 or later
(*1) For the supported versions, refer to the following website:
https://uc.yamaha.com/
Notes
- You cannot connect and use more than one microphone or speaker including this product to one Mac at the same time.
- Use the supplied USB cable only. Using a different USB cable may cause the product to malfunction.
- The product must be connected directly to a Mac. Connecting the product via a USB hub may cause the product to malfunction.
- In rare cases, an audio playback may be interrupted due to Mac usage, such as the workload or limited free space in memory.
■Connecting the devices
Connect between the product and a Mac through the supplied USB cable.
text_image
IN EXT OUT To the USB terminal
Tips
- The product receives power from the Mac through the USB cable (USB bus powered).
- You do not need to install a separate USB driver because the Mac recognizes the product as a standard USB audio device.
■Checking that the connection has been made correctly
After the connection is established, perform the following steps to check that the Mac recognizes the product correctly.
Note
The items and options in the setting window may vary depending on your Mac environment.
1 At the top left corner of the Mac desktop, click and then click "System Preferences".
2 Click "Sound".
The "Sound" window appears.
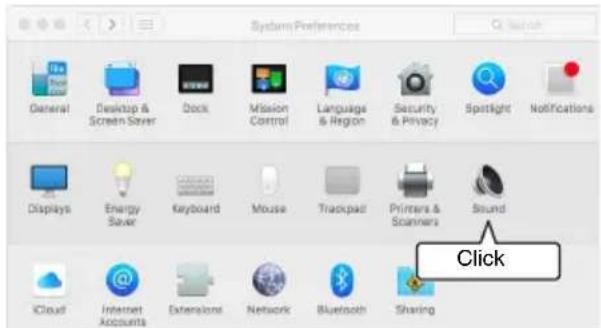
text_image
System Preferences General Desktop & Screen Saver Dock Mission Control Language & Region Security & Privacy Spotlight Notifications Displays Energy Saver Keyboard Mouse Trackpad Printers & Scanners Sound iCloud Internet Accounts Extensions Network Bluetooth Sharing Click3 Click the "Output" tab.
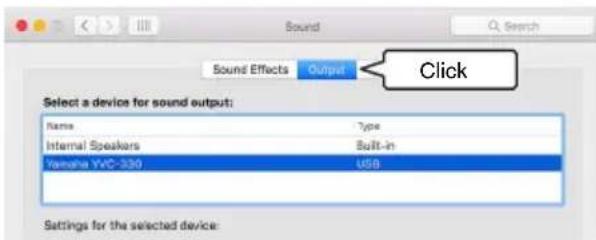
text_image
Sound Effects Output Click Select a device for sound output: Name Type Internal Speakers Built-in Yamaha YWC-330 USB Settings for the selected device:4 In the "Select a device for sound output:" section, check that "Yamaha YVC-330" is selected.
If not, click "Yamaha YVC-330".
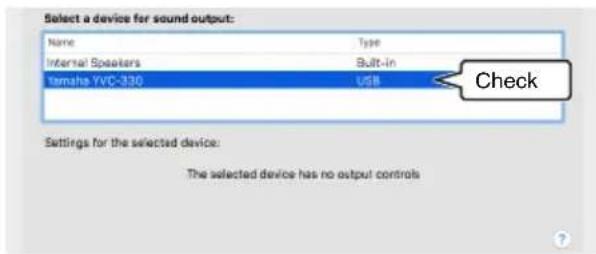
text_image
Select a device for sound output: Name Type Internal Speakers Built-in Yamaha YVC-330 USB Check Settings for the selected device: The selected device has no output controls
Tip
In most cases, simply connecting the product to a Mac automatically selects "Yamaha YVC-330".
5 Click the "Input" tab.
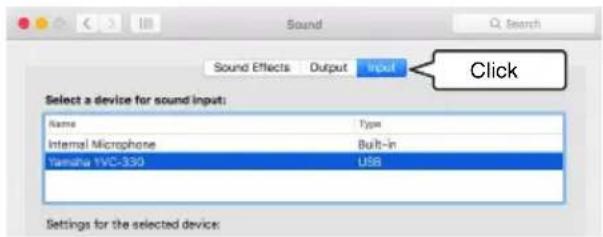
text_image
Sound Sound Effects Output Input Select a device for sound input: Name Type Internal Microphone Built-in Tamaha 1VC-330 USB Settings for the selected device:6 In the "Select a device for sound input:" section, check that "Yamaha YVC-330" is selected.
If not, click "Yamaha YVC-330".
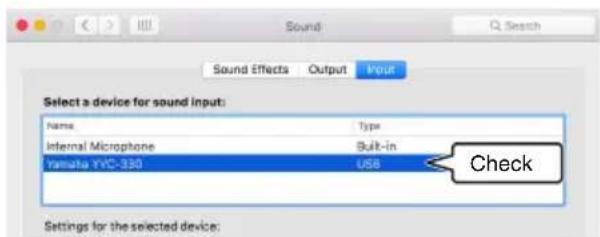
text_image
Sound Effects Output Input Select a device for sound input: Name Type Internal Microphone Built-in Yamata YVC-330 USB Check Settings for the selected device:
Tip
In most cases, simply connecting the product to a Mac automatically selects "Yamaha YVC-330".
■Adjusting the microphone sensitivity
Sound may be distorted or too faint on the remote party depending on your environment. In this case, adjust the microphone sensitivity.
Note
The items and options in the setting window may vary depending on your Mac environment.
1 From at the top left corner of the Mac desktop, select "System Preferences" - "Sound" - "Input" tab.
2 In the "Input volume" field, adjust the microphone sensitivity.
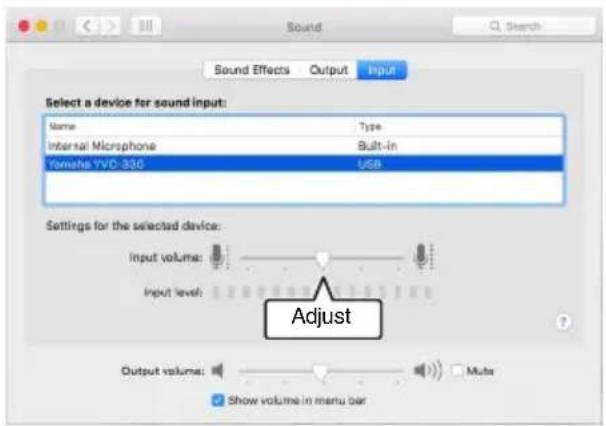
text_image
Sound Sound Effects Output Input Select a device for sound input: Name Type Internal Microphone Built-in Yamaha YVD-330 USB Settings for the selected device: Input volume: Input level: Adjust Output volume: Mute Show volume in menu barConnecting to a smartphone or tablet via Bluetooth
■Check the following before the connection procedure
Make sure that you have a Bluetooth-compatible smartphone or tablet (hereafter, collectively referred to as a "smartphone") available.
Also, make sure that you have one PC or Mac for power supply.
Notes
- The smartphone must be within 10 m (32.8 ft) from the product (with no obstacles between them).
- There is no guarantee that the product can connect to any types or models of smartphones via Bluetooth.

Tips
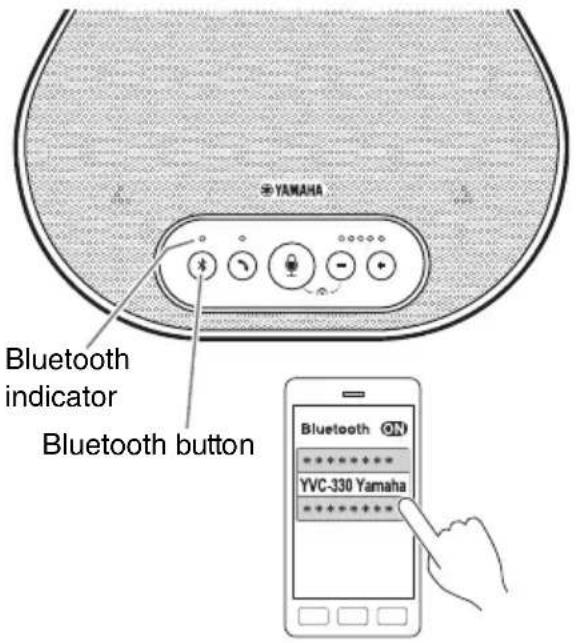
- Smartphones show the product as "YVC-330 Yamaha".
- Only one smartphone can connect to the product via Bluetooth at the same time.
■Connecting to a power source
Use the supplied USB cable to connect between the product and a PC or Mac. The product receives power from the PC or Mac.
text_image
IN EXT OUT To the USB terminalIf the product is not connected to the PC or Mac, connect the supplied USB cable to a commercially available USB power adapter.
Notes
- Make sure to first read the safety precautions for the USB power adapter you are going to use.
- Use the USB power adapter that is capable of supplying power compliant with the USB standard.
Output voltage: 4.8 to 5.2 V
Output current: At least 0.5 A
Pairing
Pairing is an operation where a smartphone and the product are registered with each other. When a Bluetooth connection is used for the first time or when pairing information is deleted, the pairing process is required.
Once a pairing is completed, you can make a Bluetooth connection in a simple procedure.

Tips
- Check that the pairing is completed on the smartphone. If the pairing is not succeeded, retry it.
- If the power supply to the product is stopped during a pairing operation, the pairing information may be discarded. In this case, retry pairing.
- The product can be paired with up to eight smartphones. If a ninth smartphone is paired, the product deletes the pairing information on the device with the oldest Bluetooth connection date and time.
- If the product is connected to another smartphone via Bluetooth, disconnect it from the smartphone before pairing.
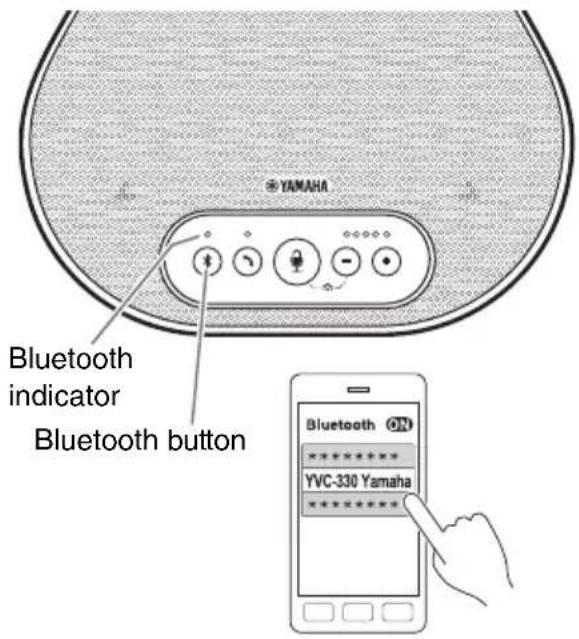
text_image
YAMAHA Bluetooth indicator Bluetooth button Bluetooth ON ********** YVC-330 Yamaha **********1 Press and hold the Bluetooth button
( ) for at least 2 seconds.
The Bluetooth indicator now flashes blue at high speed, indicating that the product is ready for paring.
2 Perform a pairing operation on the smartphone.
If a message prompts you to enter your passkey, enter "0000" in figures.

Tip
If you press the Bluetooth button (✗) while the Bluetooth indicator is flashing blue at high speed, or if 90 seconds elapses without the pairing being completed, the product is no longer ready for the pairing.
■Making a Bluetooth connection with the paired smartphone

Tip
Some smartphones make Bluetooth connections simultaneously with their pairing. In such a case, the procedure below is not required.
text_image
YAMAHA Bluetooth indicator Bluetooth button Bluetooth ON ********** YVC-330 Yamaha **********1 Press the Bluetooth button ( )
The Bluetooth indicator now flashes blue, indicating that the product is ready for a Bluetooth connection.
2 Make a Bluetooth connection on the paired smartphone.
When the connection is established, the Bluetooth indicator now lights up blue. Also, a notification sound rings to let the user know that the Bluetooth connection has been established.

Tip
If you press the Bluetooth button (✗) while the Bluetooth indicator is flashing blue, or if 90 seconds elapses without the Bluetooth connection established, the product is no longer ready for the Bluetooth connection.
■Making a pair and Bluetooth connection using the NFC function (for NFC-compatible models)
Any of the following smartphone models (hereafter, referred to as an "NFC-compatible model") offers an easy paring and Bluetooth connection.
• NFC-compatible Android devices
Before starting the procedure below, turn on the NFC function of the smartphone.
Note
The function may not work or the connectable distance may be different depending on smartphones.

Tips
- If the smartphone is in a case, remove it.
- If a pairing or Bluetooth connection does not work well, hold the smartphone differently over the product.
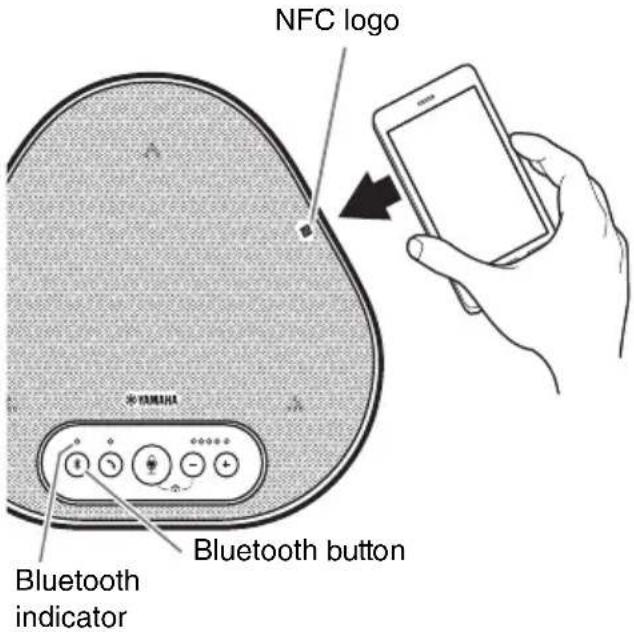
text_image
NFC logo Bluetooth button Bluetooth indicator1 Press the Bluetooth button ()
The Bluetooth indicator now flashes blue, indicating that the product is ready for a Bluetooth connection.
2 Hold the smartphone over the NFC logo on the product.
When the connection is established, the Bluetooth indicator now lights up blue. Also, a notification sound rings to let the user know that the Bluetooth connection has been established.

Tip
If you press the Bluetooth button (✗) while the Bluetooth indicator is flashing blue, or if 90 seconds elapses without the Bluetooth connection established, the product is no longer ready for the Bluetooth connection.
■Disconnecting a Bluetooth connection
To disconnect a Bluetooth connection while the connection is made, perform one of the following operations:
- Press the Bluetooth button (④).
- Perform the Bluetooth disconnection procedure on the smartphone.
- Hold the smartphone over the NFC logo on the product (for NFC-compatible models).
When a Bluetooth connection is disconnected, the Bluetooth indicator now lights up green. Also, a notification sound rings to let the user know that the Bluetooth connection has been disconnected.
Connecting to a videoconference system using audio cables
■Check the following before the connection procedure
Make sure that you have two audio cables available for input and output. Also, make sure that you have one PC or Mac for power supply.

Tip
Different models of videoconference systems may have different shapes of audio input and output terminals. Use audio cables with their connector shapes that match the shapes of the audio input and output terminals of your videoconference system. The product must be connected to a stereo mini plug, regardless of the type of the plug connected to the videoconference system.
■Connecting to a power source
Use the supplied USB cable to connect between the product and a PC or Mac. The product receives power from the PC or Mac.
text_image
IN OUT EXT To the USB terminalIf the product is not connected to the PC or Mac, connect the supplied USB cable to a commercially available USB power adapter.
Notes
- Make sure to first read the safety precautions for the USB power adapter you are going to use.
- Use the USB power adapter that is capable of supplying power compliant with the USB standard.
Output voltage: 4.8 to 5.2 V
Output current: At least 0.5 A
■Setting up the EXT IN/OUT terminals function
Follow the steps in "Selecting a connected device on the EXT IN/OUT terminals" (page 31), switch the mode of the EXT IN/OUT terminals to the "Videoconference system" in advance.
■Connecting to a videoconference system
Use audio cables to connect between the product and the videoconference system.
The following figure shows an example of using RCA pin plugs for the audio input/output terminals on the videoconference system.
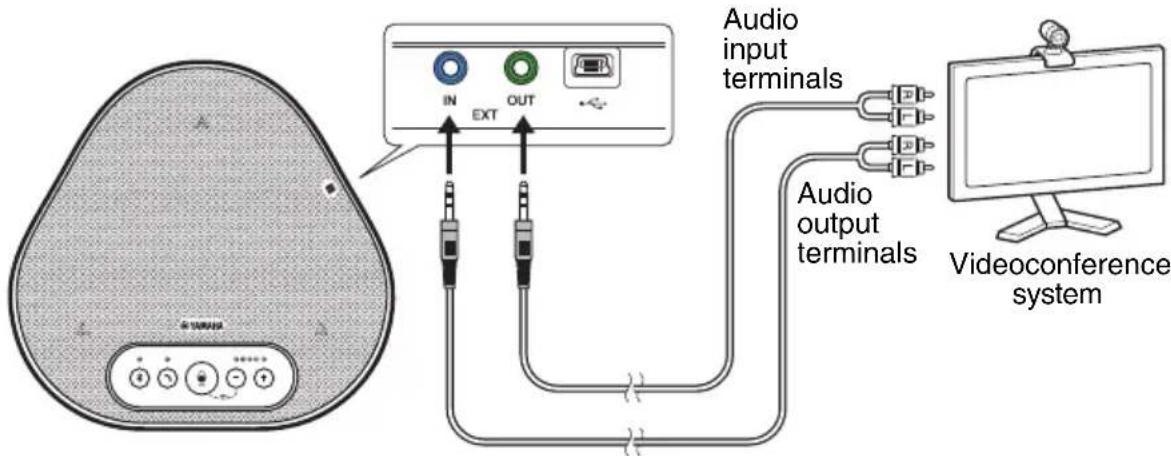
text_image
Audio input terminals Audio output terminals Videoconference systemNote
If two products are connected for use, they cannot be connected to a videoconference system.
■Changing settings of the videoconference system
Change audio input/output settings of the videoconference system, so that the product can serve as a microphone and speaker for that system.
Note
Make sure that you disable the microphone and speaker of the videoconference system.
Making a Daisy Chain Connection with Two of this Product
If the product is connected to a PC or Mac using the USB cable or to a smartphone or tablet via Bluetooth, it can pick up sound from or transmit sound to a broader area by connecting one product with another.
Notes
- If a videoconference system is connected to the EXT IN/OUT terminals on the product, the daisy chain connection is not possible.
- The SoundCap function cannot be used together with a daisy chain connection.
- If a daisy chain connection is made while SoundCap is enabled, SoundCap will be canceled.
- When using a daisy chain connection, SoundCap cannot be enabled.
■ Check the following before the connection procedure
Make sure that you have the following available:
- The products x2
- Daisy chain cable (optional: YCBL-DC3M) x1
• PC/Mac for communication x1
• PC/Mac for power supply x1
■ Connecting the devices
1 Connect this product to communication equipment.
- Connecting to a PC using the USB cable (→Page 14)
- Connecting to a Mac using the USB cable ( Page 18)
- Connecting to a smartphone or tablet via Bluetooth ( →Page 21)
This one works as a parent device.
2 Use the USB cable to connect between the other one and the power-supplying PC or Mac.
This one works as a child device. The child device receives power from the PC or Mac. If the product is not connected to the PC or Mac, connect the supplied USB cable to a commercially available USB power adapter.
Notes
- Make sure to first read the safety precautions for the USB power adapter you are going to use.
- Use the USB power adapter that is capable of supplying power compliant with the USB standard.
Output voltage: 4.8 to 5.2 V
Output current: At least 0.5 A
3 On both the parent and child devices, set the connected equipment on the EXT IN/OUT terminals to "YVC-330 daisy chain connection".
→"Selecting a connected device on the EXT IN/OUT terminals" (page 31)
4 Use the daisy chain cable to connect between the EXT IN/OUT terminals of the parent and child devices.
On each of the parent and child devices, connect the blue plug of the daisy chain cable to the EXT IN terminal (blue) and the green plug to the EXT OUT terminal (green).
After the connection is established, the product is now ready for a connection, the indicators flashing as follows:
- Microphone indicator: Flashing red
- On/off-hook indicator: Flashing green
5 Press and hold the on/off-hook button on the parent device for at least 0.5 seconds.
The child device emits a notification sound and starts restarting. After the child device is restarted and the daisy chain connection is established, the parent and child devices emit notification sounds.

Tip
If you configure the child settings for the parent device and the parent settings for the child device, unplug the daisy chain cable once. A notification sound rings, and the child device starts restarting. After the child device is restarted, repeat step 4 and subsequent steps.
Parent device

flowchart
graph TD
    A["Child device"] --> B["Blue plug"]
    A --> C["Daisy chain cable (optional)"]
    A --> D["Green plug"]
    B --> E["USB cable"]
    C --> F["PC/Mac (for communication)"]
    D --> G["USB cable"]
    G --> H["PC/Mac (for power supply)"]
Notes
- Do not connect both the parent device and the child device to a PC/Mac.
- Make sure that you use the YCBL-DC3M daisy chain cable, which is optional. Using a different cable may cause the products to malfunction.
■ How the devices connected with a daisy chain connection work
If the products are connected with a daisy chain connection, the system works under the following specifications:
- Both parent and child devices alike output audio signals from the remote party to their speakers.
- Each of the parent and child devices picks up sound signals with their microphones to mix and output the signals to the remote party.
- The microphone mute button (💡), volume button (⊖⊕), and on/off-hook button (↘) work alike and together on both parent and child devices.
- Only the parent device can configure the Bluetooth settings and perform NFC operations. The child device cannot perform those operations.
Using Convenient Functions
This chapter describes convenient functions provided by the product.
Adjusting the speaker volume
You can adjust the output volume of the speaker (voices from the remote party) by pressing the volume buttons (⊖ ⊕). When you press the volume button, the volume level indicator shows the volume level.
Every time you press either of the buttons, the volume is turned up or down in a step-by-step manner. Holding down the button for at least 0.5 seconds will cause the volume level to be changed continuously.
| Example ( ● : On, ○ : Off) | |
| ●○○○○ | The speaker volume level is set to minimum. |
| ●●●●● | The speaker volume level is set to maximum. |
Note
Adjust the speaker volume level so that the sound is not distorted. If the sound is distorted, the remote party may hear echoes.

Tip
If a PC or Mac is connected through a USB cable, changing the speaker volume level on the PC or Mac will also change the speaker volume level of the product according to the volume level of the PC or Mac.
Muting the microphone
Temporarily turn off the microphone so that the remote party cannot hear you.
■Muting the microphone
Press the microphone mute button (💡). The microphone indicator now flashes red, causing the microphone to be muted.
■Unmuting the microphone
When the microphone is muted, press the microphone mute button (💡). The microphone indicator now lights up green or blue, causing the microphone to be unmuted.
Muting the speaker
Temporarily turn off the speaker so that you cannot hear the remote party.
The speaker can be muted only when the PC or Mac is connected through the USB cable.
■Muting the speaker
Use the PC or Mac to mute the speaker (output).
The volume level indicator now flashes green with the current volume level displayed, causing the speaker to be muted.
■Unmuting the speaker
When the speaker is muted, use the PC or Mac to unmute the speaker (output).
The volume level indicator now stops flashing, causing the speaker to be unmuted.

Tip
You can unmute the speaker by pressing either of the volume buttons (⊖ ⊕).
Accepting an incoming Bluetooth connection request/ending a call
The product can work with the phone function of the Bluetooth-connected smartphone.
■Taking an incoming call
When the Bluetooth-connected smartphone gets an incoming call, the microphone indicator flashes green or blue (red if the microphone is muted) (at 0.25-second intervals).
By pressing the on/off-hook button (☐) while the incoming call is received, you can talk with the remote party through the microphone and speaker of the product. The on/off-hook indicator lights up green during the call.
Note
Some smartphones may enable the microphone and speaker on them after they get an incoming call. To resolve this situation, select YVC-330 in the audio source settings of the smartphone to enable the microphone and speaker of the product.
■Ending a call
Press the on/off-hook button (☐) during a call. The on/off-hook indicator turns off and the call is ended.
Selecting a connected device on the EXT IN/OUT terminals
The EXT IN/OUT terminals of the product are available for two purposes: for connecting the products and for connecting a videoconference system.
Based on the device for connection, follow the steps below to switch the setting:
1 Press and hold the both volume buttons ( )simultaneously for at least 2 seconds.
A notification sound rings, and the microphone indicator flashes white.
2 Press the volume button () and set the volume level indicator display so that the device to be connected is selected.
| Example ( ● : On, ○ : Off) | |
| ●○○○○ | YVC-330 daisy chain connection |
| ○●○○○ | Videoconference system |

The factory setting is set to "YVC-330 daisy chain connection".
3 Press and hold the both volume buttons ( )simultaneously for at least 0.5 seconds.
A notification sound rings when the setting is applied. The microphone indicator goes back to the previous state, lighting up green or blue (flashing red if the microphone is muted).
Enabling or disabling the Bluetooth function
When not using a Bluetooth connection, you can disable the Bluetooth function. To use a Bluetooth connection again, enable the Bluetooth function.
1 Press and hold the both volume buttons ( )simultaneously for at least 2 seconds.
A notification sound rings, and the microphone indicator flashes white.
2 Press the Bluetooth button ( ) to enable or disable the function.
The Bluetooth indicator that lights up green indicates that the function is enabled, and the indicator that is off indicates that the function is disabled.
3 Press and hold the both volume buttons ( )simultaneously for at least 0.5 seconds.
A notification sound rings when the setting is applied. The microphone indicator goes back to the previous state, lighting up green or blue (flashing red if the microphone is muted).
Returning to the factory settings
Return the settings of the product to the factory settings.
1 Press and hold the both volume buttons ( ) simultaneously for at least 2 seconds.
A notification sound rings, and the microphone indicator flashes white.
2 Press and hold the on/off-hook button ( ) and the volume - button () simultaneously for at least 2 seconds.
A notification sound rings. The volume level indicator lights up green, the illuminated symbols moving back and forth. The other indicators turn off.
3 When the volume level indicator turns off and is in the started-up state, the product now has the factory settings.

Tip
Returning the product to the factory settings will clear various settings, such as Bluetooth pairing information. Reconfigure the settings as necessary.
Using SoundCap
By enabling SoundCap, which is comprised of the "Far Field Noise Reduction (FFNR)", "Self-Silence", and "Self-Volume Balancer" functions, you can automatically mute distracting noise around you and deliver only the sound from the pick-up range (radius of 1 m) to the remote party. This also automatically adjusts the volume of the sound from the speakers based on the noise around you.
Enable SoundCap if using this product in an open workspace, and disable SoundCap if using this product in a conference room.
Note
If enabling SoundCap, install this product within 1 m (3.3 ft) from all participants. ( Page 13)
■Checking settings of SoundCap
When the microphone is not muted, if the microphone indicator is lit in blue, then SoundCap is enabled; if it is lit in green, then SoundCap is disabled.
■Enabling or disabling SoundCap
Press the microphone mute button (💡) and the volume button (⊖) simultaneously. A notification sound rings and the SoundCap is enabled or disabled.
Troubleshooting
Before contacting Yamaha
Read this manual to check whether the problem can be resolved.
If the problem still continues, please contact the retailer or dealer who you purchased the product from.
Q1 An indicator is off or flashing
| Symptom Cause Action | ||
| The product looks turned off. | The USB cable is disconnected (if all the indicators are off). | Make sure that you securely connect the USB cable to the PC or Mac.(→Page 14, Page 18) |
| You cannot hear the remote party. | The product has not started up yet (if the lights are moving back and forth on the volume level indicator). | Wait for the product to start up. (→Page 10) |
| The product is in setup mode (if the microphone indicator is flashing white). | Exit the setup mode.(→Page 31) | |
| An error occurred (if the microphone indicator is flashing red at high speed). | Two parent devices are connected with a daisy chain connection (if only the leftmost volume level indicator lights up green). | Choose which device will work as a parent device.(→Page 28) |
| A firmware update failed (if only the second volume level indicator from the left lights up green). | Retry the firmware update. | |
| A software or hardware failure occurred (if the volume level indicator lights up green in any other pattern). | Make a request to repair the product. | |
Q2 Audio quality issues
| Symptom Cause Action | ||
| You cannot hear the remote party. | The speaker is muted. | Unmute the speaker.(→Page 30) |
| The speaker volume is set to the minimum. | Turn up the speaker.(→Page 30) | |
| On the PC or Mac connected via USB, a speaker other than YVC-330 is selected for the call application. | Select YVC-330 in the speaker device settings of the call application. | |
| You cannot hear the remote party. | The microphone on the remote party is muted. | Ask the remote party to unmute their microphone. |
| The microphone sensitivity on the remote party is set to the minimum. | Ask the remote party to increase the microphone sensitivity. | |
| The remote party cannot hear you. | Your microphone is muted. | Unmute your microphone. (→Page 30) |
| The microphone sensitivity of the PC or Mac connected via USB is set to the minimum. | Increase the microphone sensitivity on that machine. (→Page 17, Page 20) | |
| On the PC or Mac connected via USB, a microphone other than YVC-330 is selected for the call application. | Select YVC-330 in the microphone device settings of the call application. | |
| The speaker on the remote party is muted. | Ask the remote party to unmute their speaker. | |
| The speaker volume on the remote party is set to the minimum. | Ask the remote party to turn up their speaker. | |
| The remote party cannot hear sound far away from this product. | SoundCap is enabled. | Disable SoundCap. (→Page 32) |
| You hear echoes. | The remote party has a problem with their device configuration or operating environment. | - |
| The remote party hear echoes or howling noises. | The PC or Mac connected via USB does not recognize the product properly. | Verify that the PC or Mac is configured properly. (→Page 15, Page 19) |
| On the PC or Mac connected via USB, a speaker and microphone other than YVC-330 are selected for the call application. | Select YVC-330 in both the speaker and microphone device settings of the call application. | |
| Even though a videoconference system is connected to the EXT IN/OUT terminals, the connected device setting is set to "YVC-330 daisy chain connection". | Change the connected device setting to "Videoconference system". (→Page 31) | |
| A videoconference system with substantial delay and distortion is connected to the EXT IN/OUT terminals. | Use a videoconference system with a little delay and distortion. | |
| The product is installed near a wall. | Install the product away from any wall. | |
| Objects are placed near the product. | Do not place any object around the product if possible. | |
| The product is used in a room with large reverberations. | Place an object with high sound absorption in the room, away from the front of the microphone.T o r e d uce the reverberations, turn down the speaker. (→Page 30) | |
| You hear noise. | The remote party has a problem with their device configuration or operating environment. | - |
| The remote party hears noise. | The product has a device that generates noise near it. | Keep the product as far away from noise sources as possible. |
| The product is installed in a noisy room. | If any device is generating noise, turn it off. | |
| Sound is distorted. A videoconference system connected to the EXT IN terminal has a high output level. | Decrease the output level of the videoconference system. | |
| Sound is distorted on the remote party. | Your microphone has a high input level. | Take the product away from people who are talking. |
| The microphone sensitivity of the PC or Mac connected via USB is high. | Reduce the microphone sensitivity.(→Page 17, Page 20) | |
| A videoconference system connected to the EXT OUT terminal does not provide a line-level input. | Connect a videoconference system that supports a line-level input. | |
| A videoconference system connected to the EXT OUT terminal has a high output volume. | Turn down the volume on the videoconference system. | |
| The speaker volume on the remote party is high. | Ask the remote party to turn down their speaker. | |
| The volume on the remote party is low. | The microphone sensitivity of the PC or Mac connected via USB is low. | Increase the microphone sensitivity on that machine.(→Page 17, Page 20) |
| A videoconference system connected to the EXT OUT terminal has a low output volume. | Turn up the volume on the videoconference system. | |
| Symptom Cause Action | ||
| When the products are connected with a daisy chain connection, the child device picks up sounds, but the remote party cannot hear them. | The connected device setting for EXT IN/OUT terminal is set to "Videoconference system". | Change the connected device setting to "YVC-330 daisy chain connection". (→Page 31) |
| When the products are connected with a daisy chain connection, the child device cannot play the voices from the remote party. | ||
| When the products are connected with a daisy chain connection, you hear echoes. | ||
Q3 Bluetooth connection issues
| Symptom Cause Action | ||
| The product cannot pair with a smartphone via Bluetooth. | The Bluetooth function is disabled (if the Bluetooth indicator is off). | Enable the Bluetooth function. (→Page 31) |
| The smartphone you are trying to pair with the product has pairing information for a different YVC-330. | Delete the pairing information for the different YVC-330 from the smartphone, and then pair with the desired YVC-330. (→Page 21) | |
| The product cannot connect to a smartphone via Bluetooth. | The Bluetooth function is disabled (if the Bluetooth indicator is off). | Enable the Bluetooth function. (→Page 31) |
| The product is not paired with the smartphone via Bluetooth (if the Bluetooth indicator lights up green). | Pair with the smartphone. (→Page 21) | |
| A different smartphone is connected to the product via Bluetooth (if the Bluetooth indicator lights up blue). | Disconnect the connection with the different smartphone, and then connect to the desired smartphone. (→Page 24, Page 21) | |
| Symptom Cause Action | ||
| You cannot hear the remote party from the speaker through the smartphone. | The Bluetooth function is disabled (if the Bluetooth indicator is off). | Enable the Bluetooth function, and then connect the smartphone to the product.(→Page 31, Page 21) |
| The smartphone is not connected via Bluetooth (if the Bluetooth indicator lights up green). | Connect the smartphone to the product. (→Page 21) | |
| YVC-330 is not selected in the audio source settings of the smartphone. | Select YVC-330 in the audio source settings of the smartphone. (→Page 31) | |
Specifications
General specifications
| External interface: | USB 2.0 Full Speed, Bluetooth, NFC (Near Field Communication),EXT IN/OUT (stereo mini plug) |
| Maximum power consumption: | 2.5W |
| Operating environment: | Temperature: 0 to 40 °C (32 to 104 °F)Humidity: 20 to 85% (no condensation) |
| Storage environment: | Temperature: -20 to +50 °C (-4 to 122 °F)Humidity: 10 to 90% (no condensation) |
| Dimensions: 235 (W) x 46 (H) x 226 (D) mm (9.3 (W) x 1.8 (H) x 8.9 (D) in) | |
| Weight: | 0.8 kg (1.8 lb) |
| Power source: | USB bus powered |
| PC/Mac environment: | OS: Windows (*1), macOS (*1)USB: USB 2.0 or later |
| Bluetooth: | Bluetooth specification version: 2.1 + EDRSupported profiles: HFP (1.6), A2DPSupported codecs: SBC, mSBC, CVSDWireless output: Class 2Maximum communication distance: 10 m (32.8 ft) (no obstacles)Radio frequency (Operational frequency): 2,402 MHz to 2,480 MHzMaximum output power (EIRP): 4.0 dBm (2.5 mW) |
| NFC: | Compatible devices: NFC-compatible Android devicesRadio frequency (Operational frequency): 13.56 MHz |
| Accessories: | USB cable 3 m (9.8 ft), User's Manual |
| Others: Fi | rmware update (transferred from a PC/Mac through USB) |
(*1) For the supported versions, refer to the following website: https://uc.yamaha.com/
Audio specifications
| Microphone unit: Unidirectional microphones x3 | |
| Speaker unit: | Full-range speaker x1 |
| Frequency bandwidth for sound pickup: | 100 to 20,000 Hz |
| Frequency bandwidth for playback: | 190 to 20,000 Hz |
| Signal processing: | Adaptive echo canceller, Noise reduction, Automatic tracking, Automatic gain control, Dereverberation, SoundCap |
Option specifications
| Daisy chain cable: | Product number: YCBL-DC3MCable length: 3 mTerminal shape: stereo mini plug x2-stereo mini plug x2 |
Customer Support
For any questions and inquiries regarding this product, please access the following web site.
■Contact page
https://www.yamaha.com/products/en/communication/
TABLE DES MATIÈRES
Introduction
Service client ....38
Mesures de sécurité
natural_image
Symbol of a trash bin crossed out by two diagonal lines (no text or labels)⑧Bouton mute (silence) microphone ()
natural_image
Pure electrical circuit lines without any symbolsnatural_image
Pure electrical circuit lines without any symbolsnatural_image
Pure electrical circuit lines without any symbolsnatural_image
Top-down schematic of a device casing with internal components and a central gray rectangle, labeled with number 1 (no text or symbols beyond label)natural_image
Top-down view of five people seated at a table with one person standing at the center (no text or symbols visible)https://uc.yamaha.com/
Remarques
https://www.yamaha.com/products/en/communication/
Inhalt
Einleitung
natural_image
Simple line drawing of a trash bin with two crossed lines indicating no waste or prohibition (no text or symbols)natural_image
Pure electrical circuit lines without any symbolsflowchart
graph TD
    A1["A"] --> C["●"]
    A2["A"] --> C
    A3["A"] --> C
    style C fill:#f9f,stroke:#333,stroke-width:2px
natural_image
Pure electrical circuit lines without any symbols①EXT IN/OUT-Anschlüsse
natural_image
Top-down schematic of a device casing with internal components and a central gray rectangle, labeled with number 1 (no text or symbols on the diagram itself)①Typenschild
natural_image
Top-down view of six people seated at a table with one person standing at the center, no text or symbols visible.https://uc.yamaha.com/
Hinweise
https://uc.yamaha.com/
Hinweise
https://www.yamaha.com/products/en/communication/
Sommario
Introduzione
natural_image
Simple line drawing of a trash bin with two crossed lines indicating no waste or prohibition (no text or symbols)natural_image
Pure electrical circuit lines without any symbolsnatural_image
Pure electrical circuit lines without any symbolsnatural_image
Top-down schematic of a device casing with internal components and a central rectangular block (no text or symbols)natural_image
Top-down view of six people seated at a table with one person standing at the center (no text or symbols visible)https://uc.yamaha.com/
Note
https://www.yamaha.com/products/en/communication/
Contenido
Introducción
natural_image
Simple line drawing of a trash bin with two crossed lines indicating no waste or prohibition (no text or symbols)natural_image
Pure electrical circuit lines without any symbolsflowchart
graph TD
    A["A"] --> C["●"]
    B["A"] --> C
    D["A"] --> C
    style C fill:#f9f,stroke:#333,stroke-width:2px
natural_image
Pure electrical circuit lines without any symbolsnatural_image
Pure electrical circuit lines without any symbolsnatural_image
Top-down schematic of a device casing with internal components and a central gray rectangle (no text or symbols)natural_image
Top-down view of six people seated at a table with one person standing at the center (no text or symbols visible)text_image
IN OUT EXT AI terminal USB
https://uc.yamaha.com/
Notas
text_image
IN OUT EXT AI terminal USB
text_image
IN OUT EXT AI terminal USBtext_image
IN OUT EXT AI terminal USBhttps://www.yamaha.com/products/en/communication/
Índice
Introdução
natural_image
Symbol of a trash bin crossed with no text or numbers, representing waste sorting or disposal (no text present)natural_image
Pure electrical circuit lines without any symbolsflowchart
graph TD
    A["A"] --> C["●"]
    B["B"] --> C
    A --> D["A"]
    B --> D
    C --> D
natural_image
Pure electrical circuit lines without any symbolsnatural_image
Pure electrical circuit lines without any symbolsnatural_image
Top-down schematic of a device casing with internal components and a central gray rectangle, labeled with number 1 (no text or symbols beyond label)natural_image
Top-down view of five people seated at a table with one person highlighted in a circle (no text or symbols present)text_image
IN OUT EXT Ao terminal USB
Dicas
https://uc.yamaha.com/
Notas
text_image
IN OUT EXT Ao terminal USB
Dicas
text_image
IN OUT EXT Ao terminal USBtext_image
IN OUT EXT Ao terminal USBhttps://www.yamaha.com/products/en/communication/
Содержание
Введение
text_image
Labeled diagram of a biological or anatomical structure with numbered components and electrical connections①Микрофоны
natural_image
Pure electrical circuit lines without any symbolsnatural_image
Pure electrical circuit lines without any symbolsnatural_image
Top-down diagram of a device casing with internal components and a central gray rectangle, labeled with number 1 (no text or symbols on the diagram itself)natural_image
Top-down view of six people seated at a table with one person standing at the center (no text or symbols visible)https://www.yamaha.com/products/en/communication/
| EN | IMPLIFIED EU DECLARATION OF CONFORMITY |
| Hereby, Yamaha Music Europe GmbH declares that the radio equipment type [YVC-330] is in compliance with Directive 2014/53/EU. The full text of the EU declaration of conformity is available at the following internet address:https://uc.yamaha.com/products/yvc-330/ | |
| FR | ECLARATION UE DE CONFORMITE SIMPLIFIEE |
| Le soussigné, Yamaha Music Europe GmbH, déclare que l'équipement radioélectrique du type [YVC-330] est conforme à la directive 2014/53/UE. Le texte complet de la déclaration UE de conformité est disponible à l'adresse internet suivante:https://uc.yamaha.com/products/yvc-330/ | |
| DE | EREINFACHTE EU-KONFORMITÄTSERKLÄRUNG |
| Hiermit erklärt Yamaha Music Europe GmbH, dass der Funkanlagentyp [YVC-330] der Richtlinie 2014/53/EU entspricht. Der vollständige Text der EU-Konformitätserklärung ist unter der folgenden Internetadresse verfügbar:https://uc.yamaha.com/products/yvc-330/ | |
| SV | ÖRENKLAD EU-FÖRSÄKRAN OM ÖVERENSSTÄMMELSE |
| Härmed försäkrar Yamaha Music Europe GmbH att denna typ av radioutrustning [YVC-330] överensstämmer med direktiv 2014/53/EU. Den fullständiga texten till EU-försäkran om överensstämmelse finns på följande webbadress:https://uc.yamaha.com/products/yvc-330/ | |
| IT | CHIARAZIONE DI CONFORMITÀ UE SEMPLIFICATA |
| Il fabbricante, Yamaha Music Europe GmbH, dichiara che il tipo di apparecchiatura radio [YVC-330] è conforme alla direttiva 2014/53/UE. Il testo completo della dichiarazione di conformità UE è disponibile al seguente indirizzo Internet:https://uc.yamaha.com/products/yvc-330/ | |
| ES | ECLARACIÓN UE DE CONFORMIDAD SIMPLIFICADA |
| Por la presente, Yamaha Music Europe GmbH declara que el tipo de equipo radioeléctrico [YVC-330] es conforme con la Directiva 2014/53/UE. El texto completo de la declaración UE de conformidad está disponible en la dirección Internet siguiente:https://uc.yamaha.com/products/yvc-330/ | |
| PT | ECLARAÇÃO UE DE CONFORMIDADE SIMPLIFICADA |
| O(a) abaixo assinado(a) Yamaha Music Europe GmbH declara que o presente tipo de equipamento de rádio [YVC-330] está em conformidade com a Diretiva 2014/53/UE. O texto integral da declaração de conformidade está disponível no seguinte endcreço de Internet:https://uc.yamaha.com/products/yvc-330/ | |
| NL | ERENVOUDIGDE EU-CONFORMITEITSVERKLARING |
| Hierbij verklaar ik, Yamaha Music Europe GmbH, dat het type radioapparatuur [YVC-330] conform is met Richtlijn 2014/53/EU. De volledige tekst van de EU-conformiteitsverklaring kan worden geraadpleegd op het volgende internetadres:https://uc.yamaha.com/products/yvc-330/ | |
| BG | ОПРОСТЕНА ЕС ДЕКЛАРАЦИЯ ЗА СЪОТВЕТСТВИЕ |
| С настоящото Yamaha Music Europe GmbH декларира, че този тип радиосъоръжение [YVC-330] е в съответствие с Директива 2014/53/EC. Цялостният текст на ЕС декларацията за съответствие може да се намери на следния интернет адрес:https://uc.yamaha.com/products/yvc-330/ | |
| CS | ZJEDNODUŠENÉ EU PROHLÁŠENÍ O SHODĚ |
| Tímto Yamaha Music Europe GmbH prohlašuje, že typ rádiového zařízení [YVC-330] je v souladu se směrnici 2014/53/EU. Úplné znění EU prohlášení o shodě je k dispozici na této internetové adrese:https://uc.yamaha.com/products/yvc-330/ | |
| DA | ORENKLET EU-OVERENSSTEMMELSESERKLÆRING |
| Hermed erklærer Yamaha Music Europe GmbH, at radioudstyrstypen [YVC-330] er I overensstemmelse med direktiv 2014/53/EU. EU-overensstemmelseserklæringens fulde tekst kan findes på følgende internetadresse:https://uc.yamaha.com/products/yvc-330/ | |
| ET | HTSUSTATUD ELI VASTAVUSDEKLARATSIOON |
| Käesolevaga deklareerib Yamaha Music Europe GmbH, et käesolev raadioseadme tüüp [YVC-330] vastab direktiivi 2014/53/EL nõuetele. ELi vastavusdeklaratsiooni täielik tekst on kättesaadav järgmisel internetiaadressil:https://uc.yamaha.com/products/yvc-330/ | |
| EL | ΑΠΛΟΥΣΤΕΥΜΕΝΗ ΔΗΛΩΣΗ ΣΥΜΜΟΡΦΩΣΗΣ ΕΕ |
| Με την παρούσα ο/η Yamaha Music Europe GmbH, δηλώναι ότι ο radioεξοπλισμός [YVC-330] πληροί την οδηγία 2014/53/EE. Το πλήρες κείμενο της δήλωσης συμμόρφωσης ΕΕ διατίθεται στην ακόλουθη ιστοσελίδα στο διαδίκτυο:https://uc.yamaha.com/products/yvc-330/ | |
| HR | OJEDNOSTAVLJENA EU IZJAVA O SUKLADNOSTI |
| Yamaha Music Europe GmbH ovime izjavljuje da je radijska oprema tipa [YVC-330] u skladu s Direktivom 2014/53/EU. Cjeloviti tekst EU izjave o sukladnosti dostupan je na sljedećoj internetskoj adresi:https://uc.yamaha.com/products/yvc-330/ | |
| LV | VIENKÄRŠOTA ES ATBILSTĪBAS DEKLARĀCIJA |
| Ar šo Yamaha Music Europe GmbH deklarē, ka radioiekārta [YVC-330] atbilst Direktīvai 2014/53/ES.Pilns ES atbilstības deklarācijas teksts ir pieejams šādā interneta vietnē:https://uc.yamaha.com/products/yvc-330/ | |
| LT | UPAPRASTINTA ES ATITIKTIES DEKLARACIJA |
| Aš, Yamaha Music Europe GmbH, patvirtinu, kad radijo įrenginių tipas [YVC-330] atitinka Direktyvą 2014/53/ES.Visas ES atitikties deklaracijos tekstas prieinamas šiuo interneto adresu:https://uc.yamaha.com/products/yvc-330/ | |
| HU | EGYSZERŪSĪTETT EU-MEGFELELŌSĒGI NYILATKOZAT |
| Yamaha Music Europe GmbH igazolja, hogy a [YVC-330] típusú rádióberendezés megfelel a 2014/53/EU irányelvnek.Az EU-megfelelőségi nyilatkozat teljes szövege elérhető a következő internetes címen:https://uc.yamaha.com/products/yvc-330/ | |
| PL | UPROSZCZONA DEKLARACJA ZGODNOŚCI UE |
| Yamaha Music Europe GmbH niniejszym oświadcza, że typ urządzenia radiowego [YVC-330] jest zgodny z dyrektywą 2014/53/UE. Pełny tekst deklaracji zgodności UE jest dostępny pod następującym adresem internetowym:https://uc.yamaha.com/products/yvc-330/ | |
| RO | DECLARAȚIA UE DE CONFORMITATE SIMPLIFICATĂ |
| Prin prezenta, Yamaha Music Europe GmbH declară că tipul de echipamente radio [YVC-330] este în conformitate cu Directiva 2014/53/UE. Textul integral al declarației UE de conformitate este disponibil la următoarea adresă internet:https://uc.yamaha.com/products/yvc-330/ | |
| SK | JEDNODUŠENÉ EÚ VYHLÁSENIE O ZHODE |
| Yamaha Music Europe GmbH týmto vyhlasuje, že rádiové zariadenie typu [YVC-330] je v súlade so smernicou 2014/53/EÚ. Úplné EÚ vyhlásenie o zhode je k dispozícii na tejto internetovej adrese:https://uc.yamaha.com/products/yvc-330/ | |
| SL | OENOSTAVLJENA IZJAVA EU O SKLADNOSTI |
| Yamaha Music Europe GmbH potrjuje, da je tip radijske opreme [YVC-330] skladen z Direktivo 2014/53/EU. Celotno besedilo izjave EU o skladnosti je na voljo na naslednjem spletnem naslovu:https://uc.yamaha.com/products/yvc-330/ | |
| FI | KSINKERTAISTETTU EU-VAATIMUSTENMUKAISUUSVAKUUTUS |
| Yamaha Music Europe GmbH vakuuttaa, että radiolaitetyyppi [YVC-330] on direktiivin 2014/53/EU mukainen.EU-vaatimustenmukaisuusvakuutuksen täysimittainen teksti on saatavilla seuraavassa internetosoitteessa:https://uc.yamaha.com/products/yvc-330/ | |
| TR | BASÍTLEŠTÍRÍLMİŞ AVRUPA BÍRLIĞI UYGUNLUK BÍLDÍRÍMÍ |
| İşbu belge ile, Yamaha Music Europe GmbH, radyo cihaz tipinin [YVC-330], Direktif 2014/53/ AB'ye uygunluğunu beyan eder. AB uyumu beyanının tam metni aşağıdaki internet adresinden edinilebilir:https://uc.yamaha.com/products/yvc-330/ | |
Important Notice: Guarantee Information for customers in European Economic Area (EEA) and Switzerland
Important Notice: Guarantee Information for customers in EEA* and Switzerland
For detailed guarantee information about this Yamaha product, and Pan-EEA* and Switzerland warranty service, please either visit the website address below (Printable file is available at the website) or contact the Yamaha representative office for your country. * EEA: European Economic Area
https://europe.yamaha.com/warranty/
| Tärkeä ilmoitus: Takuutiedot Euroopan talousalueen (ETA)* ja Sveitsin asiakkaille | Suomi |
| Tämän Yamaha-tuotteen sekä ETA-alueen ja Sveitsin takuuta koskevat yksityiskohtaiset tiedot saatte alla olevasta nettiosoitteesta. (Tulostettava tiedosto saatavissa sivustolla.) Voitte myös ottaa yhteyttä paikalliseen Yamaha-edustajaan.*ETA: Euroopan talousalue | |
| Ważne: Warunki gwarancyjne obowiązujące w EOG* i Szwajcarii | Polski |
| Aby dowiedzieć się więcej na temat warunków gwarancyjnych tego produktu firmy Yamaha i serwisu gwarancyjnego w całym EOG* i Szwajcarii, należy odwiedzić wskazaną poniżej stronę internetową (Plik gotowy do wydruku znajduje się na stronie internetowej) lub skontaktować się z przedstawicielstwem firmy Yamaha w swoim kraju. * EOG — Europejski Obszar Gospodarczy | |
| Důležité oznámení: Záruční informace pro zákazníky v EHS* a ve Švýcarsku | Česky |
| Podrobné záruční informace o tomto produktu Yamaha a záručním servisu v celém EHS* a ve Švýcarsku naleznete na niže uvedené webové adrese (soubor k tisku je dostupný na webových stránkách) nebo se můžete obrátit na zastoupení firmy Yamaha ve své zemi. * EHS: Evropský hospodářský prostor | |
| Fontos figyelmeztetés: Garancia-információk az EGT* területén és Svájcban élő vásárlók számára | Magyar |
| A jelen Yamaha termékre vonatkozó részletes garancia-információk, valamint az EGT*-re és Svájcra kiterjedő garanciális szolgáltatás tekintetében keresse fel webhelyünket az alábbi címen (a webhelyen nyomtatható fájlt is talál), vagy pedig lépjen kapcsolatba az országában můködő Yamaha képviseleti irodával. * EGT: Európai Gazdasági Térség | |
| Oluline márkus: Garantiiteave Euroopa Majanduspiirkonna (EMP)* ja Šveitsi klientidele | Eesti keel |
| Täpsema teabe saamiseks selle Yamaha toote garantii ning kogu Euroopa Majanduspiirkonna ja Šveitsi garantiiteeninduse kohta, kúlastage palun veebisaiti alljärgneval aadressil (sel saidil on saadaval prinditav fail) või põörduge Teie regiooni Yamaha esinduse poole. * EMP: Euroopa Majanduspiirkond | |
| Svarīgs paziņojums: garantijas informācija klientiem EEZ* un Šveicē | Latviešu |
| Lai sanemtu detalizētu garantijas informāciju par šo Yamaha produktu, kā arī garantijas apkalpošanu EEZ* un Šveicē, lūdzu, apmeklējiet zemāk norādīto tīmekļa vietnes adresi (tīmekļa vietnē ir pieejams drukājams fails) vai sazinieties ar jūsu valsti apkalpojošo Yamaha pārstāvniecību. * EEZ: Eiropas Ekonomikas zona | |
| Dèmesio: informacija dėl garantijos pirkėjams EEE* ir Šveicarijoje | Lietuvių kalba |
| Jei reikia išsamios informacijos apie šį „Yamaha” produktą ir jo techninę priežiūrą visoje EEE* ir Šveicarijoje, apsilankykite mūsų svetainėje toliau nurodytu adresu (svetainėje yra spausdintinas failas) arba kreipkitės į „Yamaha“ atstovybę savo šaliai.*EEE – Europos ekonominė erdvė | |
| Dôležité upozornenie: Informácie o záruke pre zákazníkov v EHP* a Švajčiarsku | Slovenčina |
| Podrobné informácie o záruke týkajúce sa tohto produktu od spoločnosti Yamaha a garančnom servise v EHP* a Švajčiarsku nájdete na webovej stránke uvedenej nižšie (na webovej stránke je k dispozícii súbor na tlač) alebo sa obráťte na zástupcu spoločnosti Yamaha vo svojej krajine. * EHP: Európsky hospodársky priestor | |
| Pomembno obvestilo: Informacije o garanciji za kupce v EGP* in Švici | Slovenščina |
| Za podrobnejše informacije o garanciji za ta Yamahin izdelek ter garancijskem servisu v celotnem EGP in Švici, obiščite spletno mesto, ki je navedeno spodaj (natisljiva datoteka je na voljo na tem spletnem mestu), ali se obrnite na Yamahinega predstavnika v svoji državi. * EGP: Evropski gospodarski prostor | |
| Bажно съобщение: Информация за гаранцията за клиенти в ЕИП* и Швейцария | Български език |
| За подробна информация за гаранцията за този продукт на Yamaha и гаранционното обслужване в паневропейската зона на ЕИП* и Швейцария или посетете посочения по-долу уеб сайт (на уеб сайта има файл за печат), или се свържете с представителния офис на Yamaha vъв вашата страна. * ЕИП: Европейско икономическо пространство | |
| Notificare importantă: Informații despre garanție pentru clienții din SEE* și Elveția | Limba română |
| Pentru informații detaliate privind acest produs Yamaha și serviciul de garanție Pan-SEE* și Elveția, vizitați site-ul la adresa de mai jos (fișierul imprimabil este disponibil pe site) sau contactați biroul reprezentanței Yamaha din țara dumneavoastră.* SEE: Spațiul Economic European | |
https://europe.yamaha.com/warranty/
Manual Development Group
© 2019 Yamaha Corporation
Published 10/2019
ABES-A0