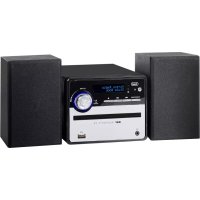
HF 1900 BT - Hi-fi system Trevi - Free user manual and instructions
Find the device manual for free HF 1900 BT Trevi in PDF.
| Product type | Hi-fi system with CD/MP3 player, FM radio, USB input and Bluetooth |
| Brand | Trevi |
| Model | HF 1900 BT |
| Dimensions (main unit) | 330 x 240 x 112 mm |
| Power supply | 15 V ⎓ 3 A (mains adapter included) |
| Power consumption | 45 W |
| Standby power consumption | < 1 W |
| FM radio frequency range | 87.5 – 108 MHz |
| CD player type | CD/CD-R/CD-RW/MP3 |
| USB port | USB 2.0 |
| Bluetooth version | Class 3 |
| Bluetooth transmission power | Max. 0.8 mW |
| Bluetooth frequency band | 2.4 GHz |
| Audio power (amplifier) | 30 W + 30 W |
| Woofer power | 25 W |
| Tweeter power | 5 W |
| Speaker impedance | 4 Ω |
| Frequency response | 60 Hz – 20 kHz |
| Signal-to-noise ratio | 50 dB |
| Main functions | FM radio, CD/MP3 player, USB playback, Bluetooth, auxiliary input (AUX IN) |
| Maintenance and cleaning | Use a soft cloth slightly dampened with water. Avoid solvents and abrasives. |
| Safety | Do not expose to water, naked flames; respect ventilation (≥5 cm around) |
| Spare parts and repairability | Contact the TREVI authorized service center |
| General information | Remote control with CR2025 battery included; deployable FM antenna |
Frequently Asked Questions - HF 1900 BT Trevi
User questions about HF 1900 BT Trevi
0 question about this device. Answer the ones you know or ask your own.
Ask a new question about this device
Download the instructions for your Hi-fi system in PDF format for free! Find your manual HF 1900 BT - Trevi and take your electronic device back in hand. On this page are published all the documents necessary for the use of your device. HF 1900 BT by Trevi.
USER MANUAL HF 1900 BT Trevi
User manual and connection
SYSTÉME HIFI AVEC CD/MP3/USB/RADIO ET ConnEXION BLUETOOTH®
Speaker 140x158x240mm
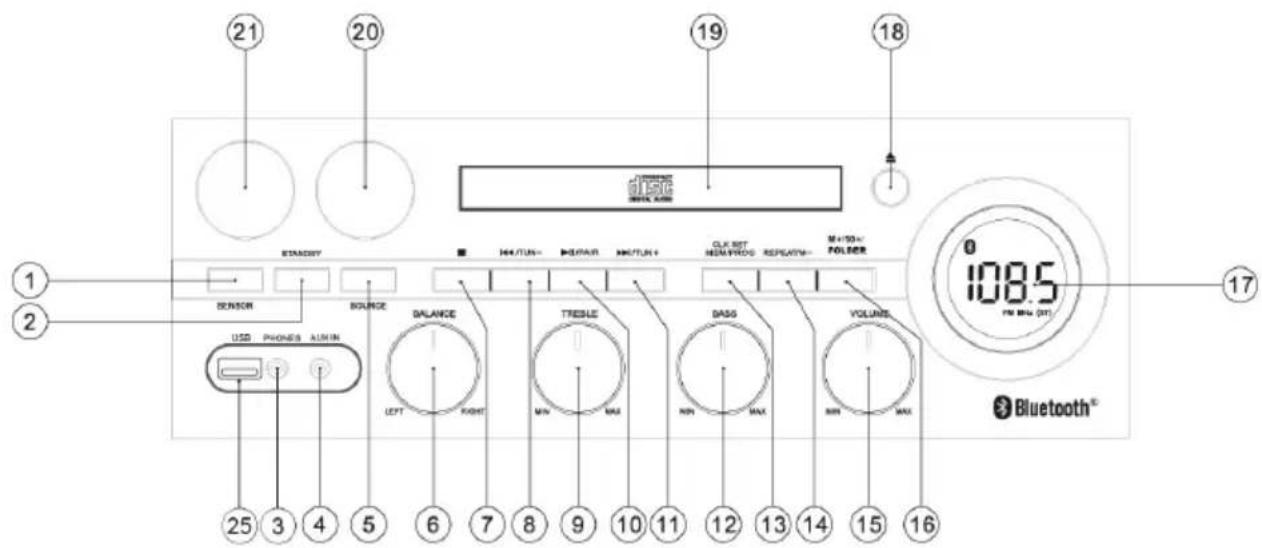
MAIN UNIT

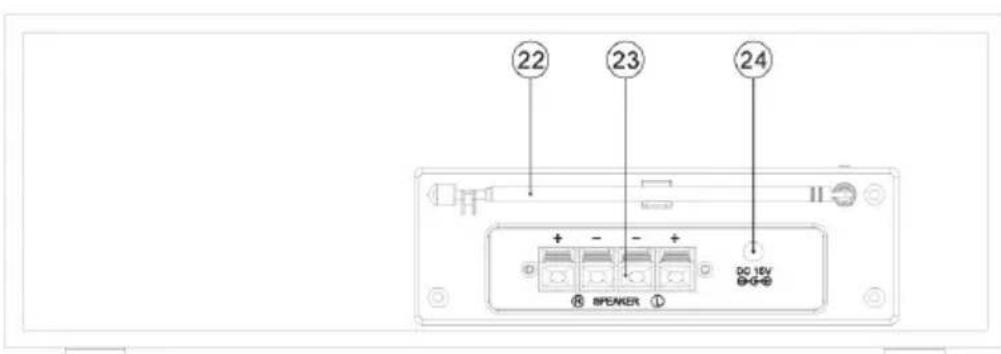
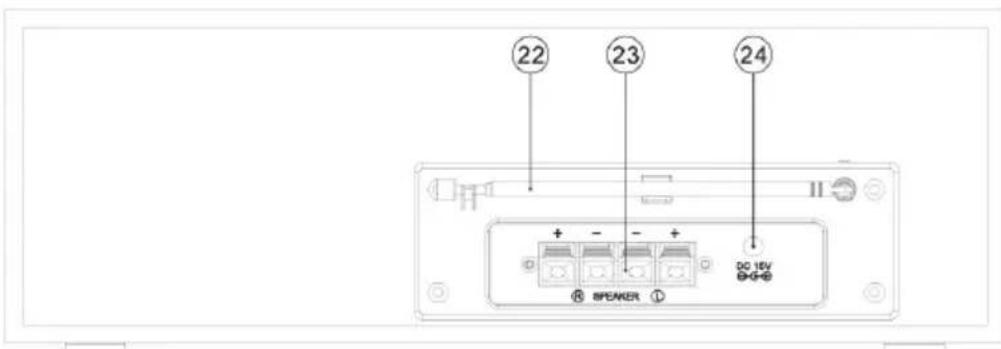
BACK SIDE

BUTTONS AND CONTROLS
- IR.
- STANDBY.
- Phones Jack.
- AUX IN jack.
- SOURCE button.
- BALANCE knob.
- TOP button.
- TUN-, button.
- TREBLE knob.
- II/PAIR, button.
- TUN+, button.
-
BASS knob.
-
CLK SET, MEM/PROG, button.
- REPEAT/M-, button.
- Volume knob.
- M + / 10 + / FOLDER button.
- LCD Display.
18.EJECT/ENTER button. - CD compartment.
- & 21. Volume VU Meter.
- FM Antenna.
- Speaker socket.
- DC jack.
- USB socket.
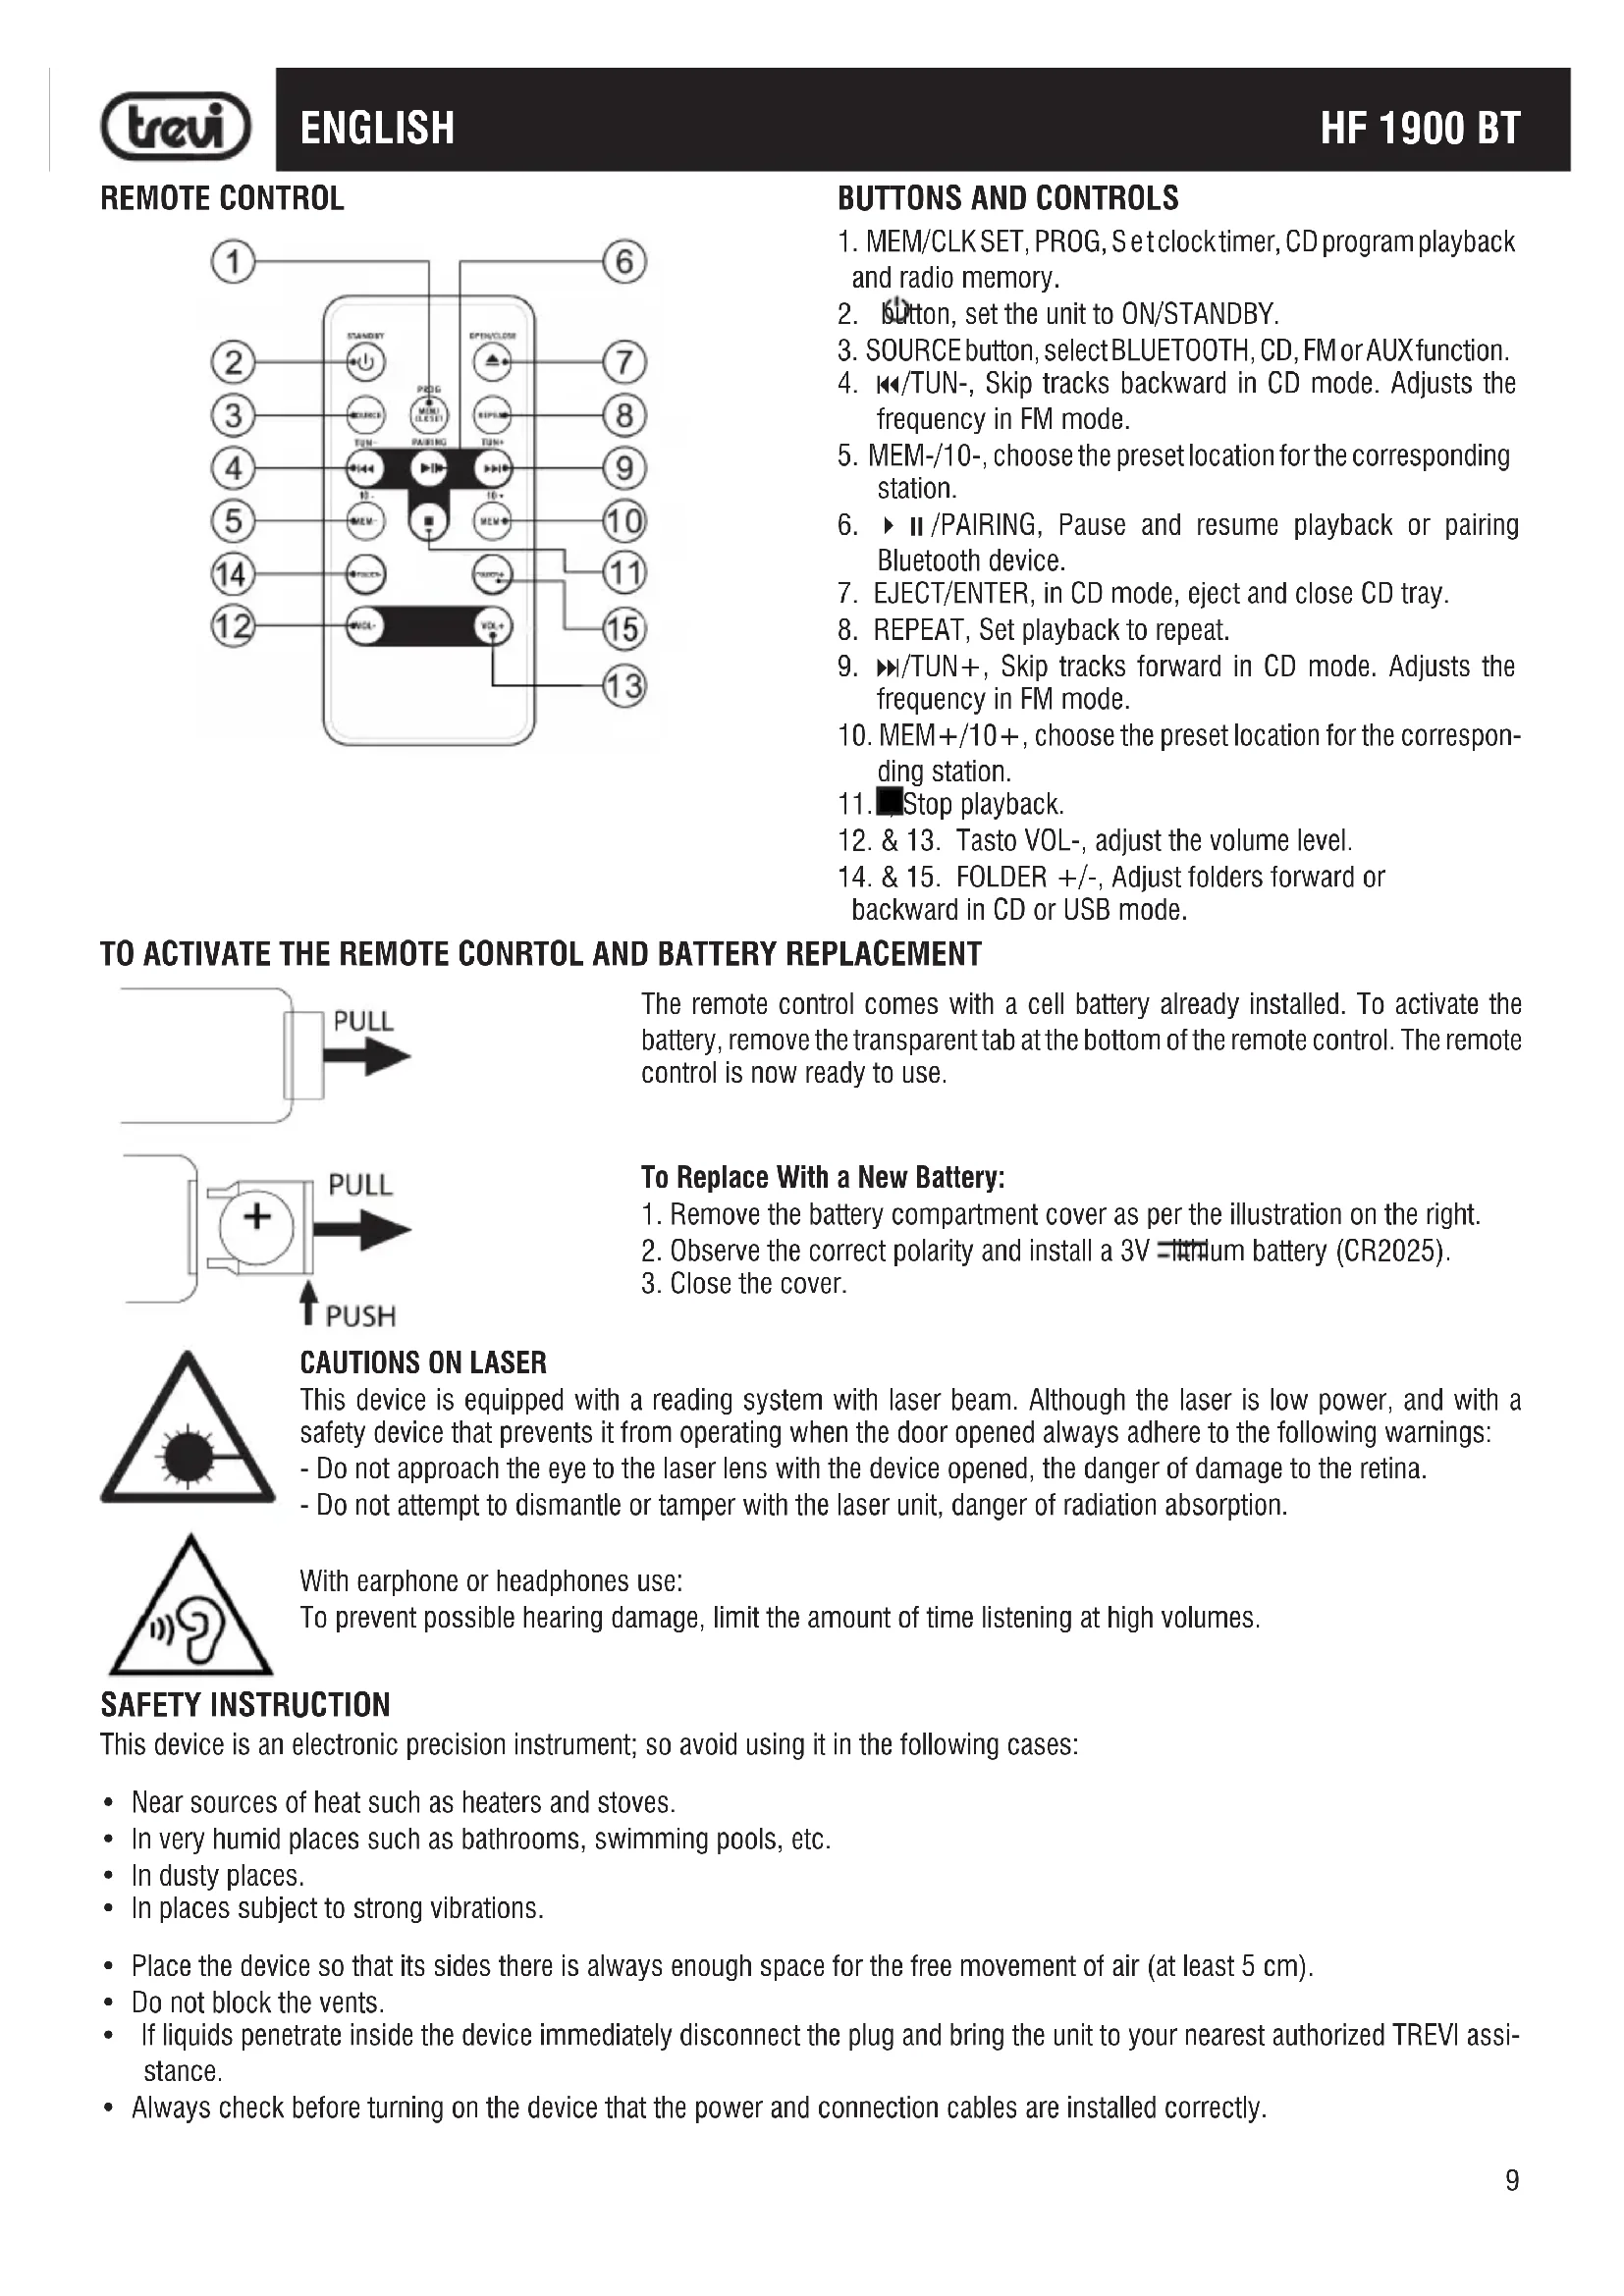
REMOTE CONTROL
BUTTONS AND CONTROLS
- MEM/CLKSET, PROG, Setclock timer, CD program playback and radio memory.
- Button, set the unit to ON/STANDBY.
- SOURCE button, select BLUETOOTH, CD, FM or AUX function.
- / - , Skip tracks backward in CD mode. Adjusts the frequency in FM mode.
- MEM-/10-, choose the preset location for the corresponding station.
- II/PAIRING, Pause and resume playback or pairing Bluetooth device.
- EJECT/ENTER, in CD mode, eject and close CD tray.
- REPEAT, Set playback to repeat.
- /TUN+ ,Skip tracks forward in CD mode.Adjusts the frequency in FM mode.
- MEM+/10+, choose the preset location for the corresponding station.
- Stop playback.
- & 13. Tasto VOL-, adjust the volume level.
- & 15. FOLDER +/-, Adjust folders forward or backward in CD or USB mode.
TO ACTIVATE THE REMOTE CONRTOL AND BATTERY REPLACEMENT
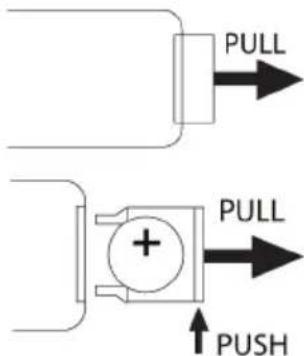
The remote control comes with a cell battery already installed. To activate the battery, remove the transparent tab at the bottom of the remote control. The remote control is now ready to use.
To Replace With a New Battery:
- Remove the battery compartment cover as per the illustration on the right.
- Observe the correct polarity and install a 3V lithium battery (CR2025).
- Close the cover.

CAUTIONS ON LASER
This device is equipped with a reading system with laser beam. Although the laser is low power, and with a safety device that prevents it from operating when the door opened always adhere to the following warnings:
- Do not approach the eye to the laser lens with the device opened, the danger of damage to the retina.
- Do not attempt to dismantle or tamper with the laser unit, danger of radiation absorption.
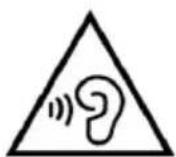
With earphone or headphones use:
To prevent possible hearing damage, limit the amount of time listening at high volumes.
SAFETY INSTRUCTION
This device is an electronic precision instrument; so avoid using it in the following cases:
Near sources of heat such as heaters and stoves.
- In very humid places such as bathrooms, swimming pools, etc.
- In dusty places.
- In places subject to strong vibrations.
- Place the device so that its sides there is always enough space for the free movement of air (at least 5 cm).
- Do not block the vents.
If liquids penetrate inside the device immediately disconnect the plug and bring the unit to your nearest authorized TREVI assistance.
- Always check before turning on the device that the power and connection cables are installed correctly.
- The apparatus shall not be exposed to dripping or splashing water. No objects filled with liquid, such as vases, should be placed on the unit.
No naked flame sources, such as lighted candles, should be placed on. - Keep this manual.
CARE AND MAINTENANCE
For cleaning we recommend the use of a soft, slightly damp cloth. Avoid solvents or abrasives.
IMPORTANT
The good construction of this machine guarantees the perfect functioning for a long time. However, should present some inconvenience, you should consult your nearest authorized service center.
CONNECTING TO A POWER SOURCE
This unit works with 15V = = 3A power adapter (supplied). Do not connect the appliance to sockets with a voltage other than specified.
Note: Unless otherwise noted, command descriptions are given for a device that for the remote control.
ON/OFF
- Plug the power cord into the power socket (24) on the device and the power adapter into a power outlet.
- Press the STANDBY button (2). The device will turn on.
- Press the STANDBY button (2) to switch the system to standby mode.
VOLUME, TONE AND BALANCE CONTROL
- Turn the VOLUME Control (15) on the unit or press the VOL + (13) or VOL- (12) on the remote to increase or decrease the volume.
- Turn the BASS control (12) to increase or decrease bass.
- Turn up the TREBLE control (9) to increase or decrease the treble.
- Turn the BALANCE control (6) to adjust the balance of left and right speakers.
FM RADIO, FUNCTION
- Turn on the unit and press the SOURCE button (5) until the display on the display and the frequency.
- Press the keys /TUN + (11) or TUN - (8) on the unit, or the keys /TUN + (9) or TUN - (4) on the remote control to increase or decrease the frequency of 0.05MHz and make a step-by-step search.
- Press and hold for a few seconds the keys / TUN + (11) or / TUN - (8) on the unit, or the keys / TUN + (9) or / TUN - (4) on the remote control to tune to next or previous radio station with the best signal.
-
To store a radio station:
-
Navigate to the frequency to be stored, press the CLK SET, MEM/PROG (13) button on the unit, or MEM/CLK SET, PROG (1) button on remote control.
-
With REPEAT/M-(14) or M+/10+/FOLDER (16) buttons on unit, or MEM-/10- (5) or MEM+/10+ (10) buttons on remote control, select the desired preset number where you want to save the radio station.
-
Press the CLK SET, MEM/PROG (13) button on unit, or MEM/CLK SET, PROG (1) on remote control to confirm.
-
The device can store up to 20 radio stations.
Note: To get the best FM reception, extend and turn the aerial (22). If the reception is not good try setting different length and orientation of the antenna, however, the quality of the FM reception depends on the place where you place the unit.
CD-MP3 PLAYER FUNCTION
LISTENING TO A CD
- Turn on the unit and press SOURCE button (5) until the display reads CD, which indicates the loading of the disc. In case of absence of the disc, display will show No.
- Open the CD compartment by pressing the button (18) on the unit, or OPEN/CLOSE (7) button on the remote control and insert the disc into the CD tray (19), with the label facing up. Close the door by pressing the button (18) on the unit, or OPEN/CLOSE (7) button on the remote.
- After a few seconds the display (17) will show the number of tracks on the disc and auto start to playback. Playback will start automatically. The display (17) will always show and only the number of the track being played.
- Press II/PAIR (10) button on unit or II/PAIRING (6) button on remote control, the disc will pause and play indicator blink on the display. Press II/PAIR (10) button again to resume playback.
- Press the button on the unit or (1) button on remote control to stop playback.
CHANGE TRACKS AND SEARCH DURING PLAYBACK
- Press /TUN + (11) or /TUN - (8) on unit, or /TUN + (9) or /TUN - (4) buttons on remote control for select previous or next track.
- Press and hold / TUN + (11) or / TUN- (8) buttons on unit, or / TUN + (9) or / TUN- (4) buttons on remote control, while listening to quickly search for a particular musical passage. Release the button to return to normal playback.
REPEATING PLAYBACK OF A TRACK OR A CD
Press the REPEAT button on the main unit or remote control to circle the play mode:
- Repeat 1 --- Press the REPEAT (14) button on the main unit or remote control once and the current track will be played continuously
- Repeat All --- Press the REPEAT (14) button again and ALL tracks on the current disc will be played continuously.
- Normal playback --- Press REPEAT (14) button again to resume normal playback.
Note: Pressing the STOP button (7) on the unit or (11) button on remote control will stop playback and the play mode will be cleared.
PROGRAM PLAY
Program play must be set when the CD is stopped. You can program up to 20 tracks in any order.
- Press STOP (7) on the unit or (11) button on remote control and then press CLK SET, MEM/PROG (13) button on the main unit or MEM/CLK SET, PROG (1) button on remote control.
- Press /TUN + (11) or /TUN - (8) buttons on main unit or /TUN + (9) or /TUN - (4) buttons on remote control to select a track. The display shows P = 01 the selected track.
- Press CLK SET, MEM/PROG (13) button on the main unit or MEM/CLK SET, PROG (1) on remote control to add the track into the program list. The display shows P - 02
- Repeat steps 2 and 3 until you complete the programming. You can program up to 20 tracks in CD disc or 99 tracks in MP3 disc.
Start the Program Play: Press II /PAIR (10) button on main unit or II /PAIRING (6) button on remote control.
To Pause or Stop a Program Play: Press PAIR (10) button on main unit or PAIRING (6) button on remote control for PAUSE. Press STOP) on the unit or ) button on remote control to STOP the program play.
To Replay a Program: Press II /PAIR (10) button on main unit or II /PAIRING (6) button on remote control.
To Review the Content of a Program: Press STOP (7) on the unit or (11) button on remote control, then keep pressing the CLK SET, MEM/PROG (13) button on the main unit or MEM/CLK SET, PROG (1) on remote control to review the programmed tracks.
To Clear the Program: Press STOP (7) on the unit or (11) button on remote control twice or open and close the CD door.
USB FUNCTION
PLAYBACK
- Connect to the USB (25) a USB memory device.
- Power on and press the SOURCE button (5) until the display will show "USB", which indicates the loading of data in the USB device. In the absence of the USB device, the display will show No.
Note:
-
The unit may not support some USB devices, this is due to the incompatibility of some processors.
-
For the rest of the functions, refer to section "CD-MP3 PLAYER FUNCTION".
AUX IN OPERATION
External (auxiliary) audio sources such as tablets, smartphones or MP3 players, can connect to the Bluetooth CD Radio Microsystem via aux-in.
- Press STANDBY button to turn the unit ON and then press SOURCE (5) button until the display will show "FLUX".
- Set the volume to the minimum level with the VOLUME KNOB.
- Plug in an AUX-IN cable (not included) into the AUX-IN jack (4) on the front of the unit.
- Plug the other end of the cable into the headphone or Line-Out jack of the external source.
- Turn on the external audio device and set it to play. Turn the external audio device's volume up to 2/3. If necessary, adjust the volume on the main unit by turning the VOLUME KNOB.
BLUETOOTH OPERATION
External devices that have a built-in Bluetooth feature can connect wirelessly to the Microsystem's Bluetooth.
GETTING CONNECTED
- Press the SOURCE (5) button until the BT indicator shows on LCD Display with blink.
- Set the Bluetooth function of your external device to ON and begin searching for devices.
Note:
-
The effective distance between your external device and this apparatus is 10 meters.
-
Once "HF 1900BT" or "RCP75UB" appears on the paired devices list of your external device, select it.
- If you are asked for a password, enter "0000".
- A beep will be heard and Bluetooth indicator light steadily that indicates a connection has been established.
- A few seconds later your Bluetooth connection should be ready to use.
PLAYING MUSIC FROM AN EXTERNAL BLUETOOTH DEVICE
- Follow the "GETTING CONNECTED" steps above to pair your external device.
- Turn on the music player program on your external device and set it to play. Normally, you can control music playback with the / TUN + (11) or / TUN- (8) buttons on the unit, or the keys / TUN + (9) or / TUN- (4) on the remote control.
Note: Some function buttons may not work with all devices.
TROUBLESHOOTING GUIDE
In case of trouble with the unit, please look through the problems below and see if you can solve them yourself before calling your dealer:
| WHOLE UNIT | PROBLEM CAUSE SOLUTION | ||
| Unit does not turn ON when STANDBY is pressed. | ·Unit is unplugged ·Connect unit to AC power supply | ||
| No sound comes out of the speakers. | ·The external speakers are disconnected. ·The volume is turned down (to MIN). ·The input selector does not match the playback source. | ·Connect the external speakers. ·Adjust the volume. ·Re-select the desired input source. | |
| The sound is noisy. ·The unit is too close to a TV set or another similar appliance. | ·Turn off the TV or other appliance, and relocate the unit. | ||
| The unit does not act as expected, or respond. | ·External factors such as ESD (Electro-static discharge) affect the unit. | ·Remove the power cord and all power supply devices. Then re-plug the unit after one minute. | |
| RADIO UNIT | Cannot listen to any station, or signal appears weak. | ·The station is not tuned-in properly. ·A TV set is being used nearby and is interfering with the radio reception. | ·Properly tune-in the desired station. ·Turn-off the interfering TV set. |
| The sound is distorted. | ·The antenna is not positioned properly | ·Re-position the antenna until reception improves | |
| CD PLAYER | CD stops immediately after starting, or unit pauses or stops during play. | The CD is inserted upside down. The CD is dusty or dirty or there is condensation on the CD. | Insert the CD with the printed side right-side up. Carefully clean and dry the CD. |
| No sound. | The CD player is paused. | Press the PLAY/PAUSE button. | |
| Specific CD is noisy, or playback stops or skips. | The CD is scratched, damaged or warped. The disc is very dirty. | The CD should be changed. Carefully clean the CD. | |
| USB | No sound in USB mode | The volume is turned down (to MIN). External device not connected properly. | Adjust the volume. Clear contact pins and connect again. |

INFORMATION TO USERS
pursuant to Legislative Decree No. 49 of March 14, 2014
"Implementation of Directive 2012/19/EU on Waste Electrical and Electronic Equipment (WEEE)"
This wheeled bin symbol on the product indicates that at the end of its life must be collected separately from other waste. The user must, therefore, take the remote control integrates the essential components that got to its life to the appropriate differentiated collection centers for electronic and electro-technical waste, or return it to the dealer when purchasing a new appliance of equivalent type, in terms of one to one, or one to zero for equipment having longer side of less than 25~cm . Appropriate separate collection for the decommissioned equipment for recycling, processing and environmentally compatible disposal helps prevent negative impact on the environment and human health and promotes recycling of the materials making up the product. Illegal dumping of the product by the user entails the application of administrative sanctions stated in Legislative Decree n. Legislative Decree No. 49 of March 14, 2014.
TREVI pursues a policy of continuous research and development policy, therefore, the product may show different characteristics from those described.
SPECIFICATIONS
GENERAL
Power Requirements 15V 3A
Power Consumption 45W
Standby Consumption <1W
RADIO/CD PLAYER/USB/BT
Frequency Range 87.5 - 108MHz
type Player CD/CD-R-RW/MP3
USB version 2.0
Power class Bluetooth 3
Peak transmission power Bt 1mW
Max power transmission Bt 0,8mW
Band transmission Bluetooth 2,4GHz
AMPLIFIER Section
Output Power 30W+30W
Woofer: 25W
Tweeter: 5W
Impedance 4Ω
Frequency Response: from 60Hz to 20KHz
Signal-to-Noise Ratio: 50dB
DIMENSIONS
Unit 330x240x112mm
Speaker 140x158x240mm
AVANT UNITE DE VUE

ARRIÈRE UNITE DE VUE
DESCRIPTION DES COMMANDES
Speaker 140x158x240mm
FRONTPLATTE
RÜCKSEITE
SIMPLIFIED EU DECLARATION OF CONFORMITY
Hereby TREVI Spa declares that the radio equipment type HF 1900 BT is in compliance with directive 2014/53/EU.
The full text of the EU declaration of conformity is available at the following internet address www.trevi.it