
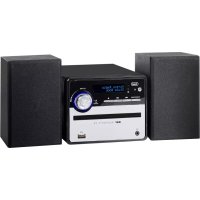
HCV 10D35 DAB - Hi-fi system Trevi - Free user manual and instructions
Find the device manual for free HCV 10D35 DAB Trevi in PDF.
| Product Type | Hi-Fi System |
| Brand | Trevi |
| Model | HCV 10D35 DAB |
| Power Supply | 100-240V 50/60Hz, 25W |
| Standby Power Consumption | <0.5W |
| Output Power | 2x3W RMS (max 10W) |
| Speaker Impedance | 8 Ω |
| FM Radio | Band 87.5 - 108 MHz |
| DAB+ Radio | Band 174.928 - 239.200 MHz |
| Bluetooth | Band 2.4 GHz, max power 2.5 mW, profiles A2DP/AVRCP |
| NFC | Frequency 13.56 MHz, max power 100 mW |
| CD Player | CD/CD-R-RW/MP3 (bitrate 32-320 kbps) |
| USB Input | Yes |
| AUX Input | 3.5 mm jack |
| Equalizer | Modes FLAT, ROCK, CLASSIC, POP, JAZZ |
| X-Bass | Bass enhancement |
| Sleep Timer | 10 to 90 minutes |
| Station Memory | Up to 10 DAB/FM presets |
| Remote Control | Yes (AAA batteries not included) |
| Wall Mounting | Possible (screws provided) |
| Cleaning | Soft cloth slightly damp, avoid solvents |
| Safety | Do not open (risk of electric shock); class 1 laser |
Frequently Asked Questions - HCV 10D35 DAB Trevi
User questions about HCV 10D35 DAB Trevi
0 question about this device. Answer the ones you know or ask your own.
Ask a new question about this device
Download the instructions for your Hi-fi system in PDF format for free! Find your manual HCV 10D35 DAB - Trevi and take your electronic device back in hand. On this page are published all the documents necessary for the use of your device. HCV 10D35 DAB by Trevi.
USER MANUAL HCV 10D35 DAB Trevi
User manual and connection
WARNING: DO NOT OPEN THE SET. NEITHER CONTROLS OR SPARE PARTS TO BE USED BY THE USER ARE TO BE FOUND INSIDE IT. APPLY TO AUTHORISED TREVI CENTERS FOR SERVICE OPERATIONS.

ATTENTION
RISQUE DE DECHARGES
ELECTRIQUES
NE PAS EXPOSER A LA PLUIE ET A
L'HUMIDITE

ATTENTION: NE PAS OUVRIR L'APPAREIL, A L'INTERIEUR IL N'Y A PAS DE COMMANDES AMANIPULER PAR L'UTILISATEUR OU DE PIECES DE RECHANGE. POUR TOUTES LES OPERATIONS DE SERVICE IL FAUT S'ADRESSER A UN SERVICE D'ASSISTANCE AUTORISE TREVI.

ACHTUNG
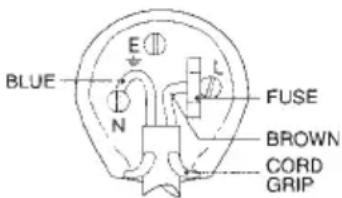
WIRES CONNECTIONS TO A UK THREE-PIN PLUG
The wires in this mains lead are coloured in accordance with the following wiring codes:
Blue: Neutral
Brown: .Live
The wires in this mains lead must be connected to the terminals in the plug as follows:
Blue wire: N or Black
Brown wire: L or Red
Neither wire is to be connected to the earth (E or W) terminal of three-pin plug.
Should the fuse fail in the plug remove the plug form the wall socket and replace the fuse
with a 3 Amp. ASTA approved BS 1362 fuse.

pursuant to Legislative Decree No. 49 of March 14, 2014
"Implementation of Directive 2012/19/EU on Waste Electrical and Electronic Equipment (WEEE)"
This wheeled bin symbol on the product indicates that at the end of its life must be collected separately from other waste. The user must, therefore, take the remote control integrates the essential components that got to its life to the appropriate differentiated collection centers for electronic and electro-technical waste, or return it to the dealer when purchasing a new appliance of equivalent type, in terms
of one to one, or one to zero for equipment having longer side of less than 25~cm . Appropriate separate collection for the decommissioned equipment for recycling, processing and environmentally compatible disposal helps prevent negative impact on the environment and human health and promotes recycling of the materials making up the product. Illegal dumping of the product by the user entails the application of administrative sanctions stated in Legislative Decree n. Legislative Decree No. 49 of March 14, 2014.

INFORMATIONS AUX UTILISATEURS
Assorbimento in Standby: <0.5W
Potenza audio: 2x3W (RMS), max 10W
Impedenza Speaker: 8 Ω ohms
Dimensioni: .450x200x100mm
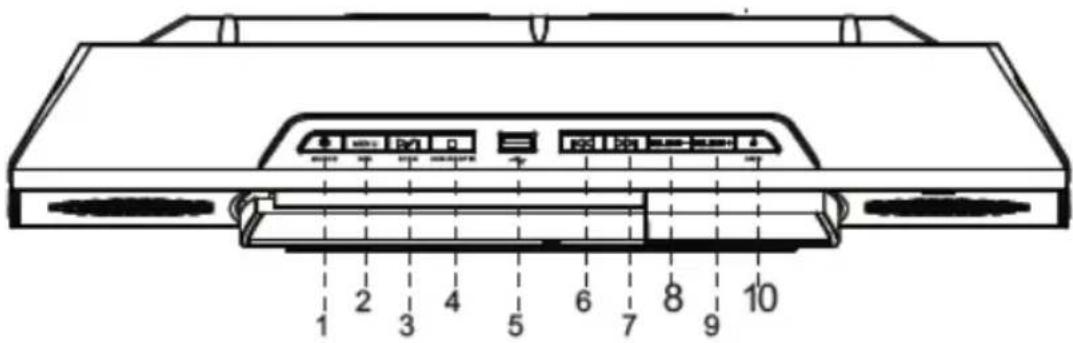
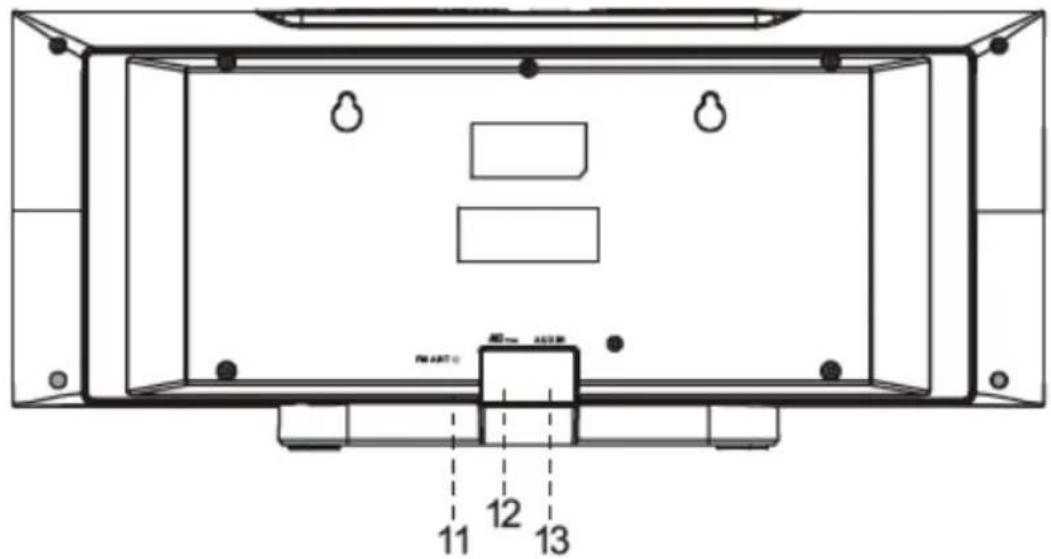
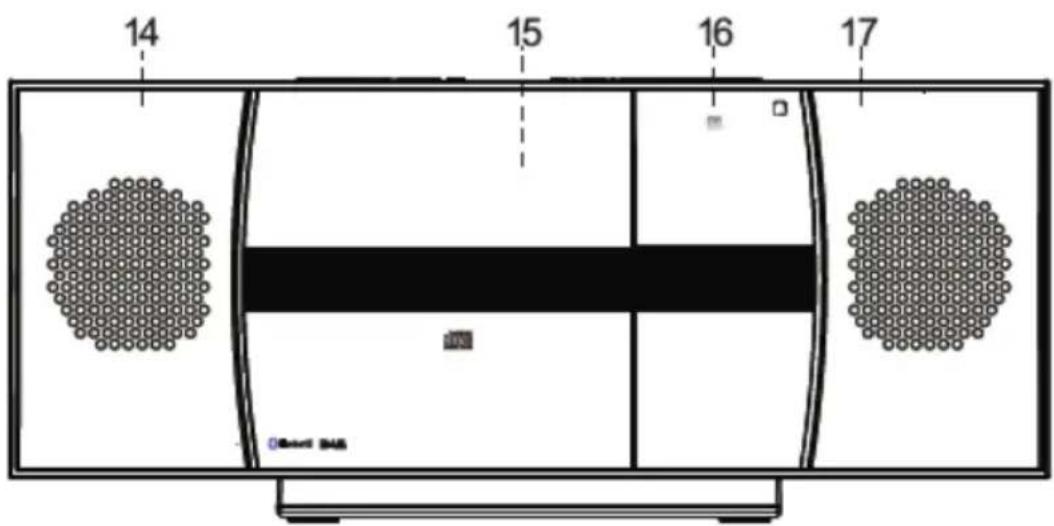
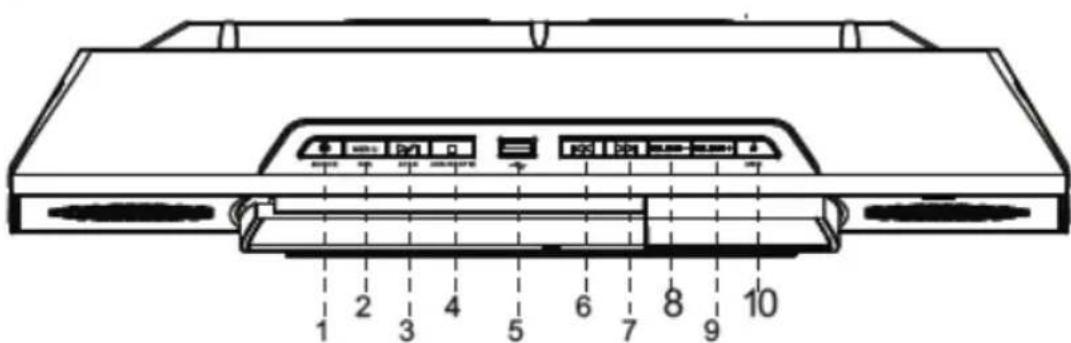
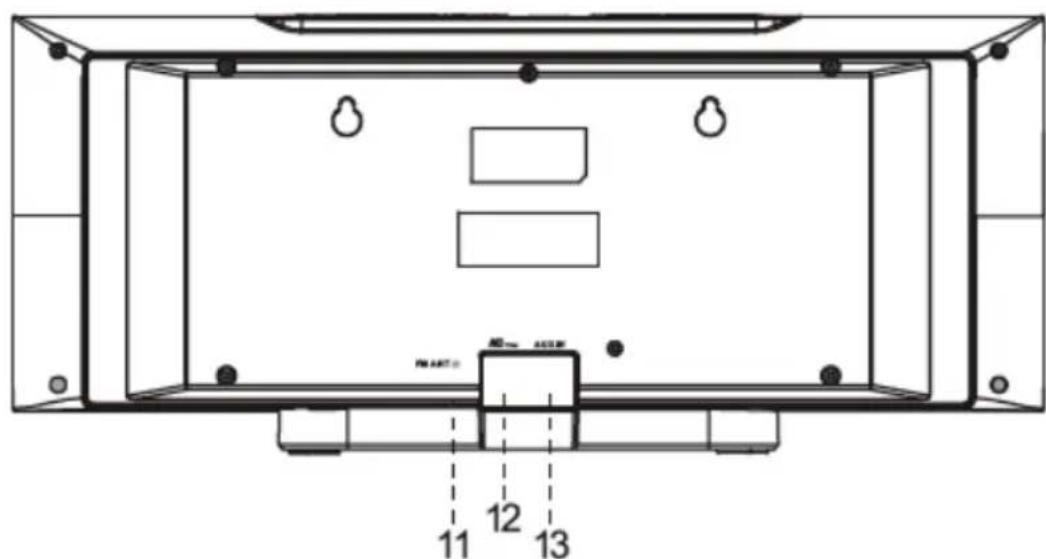
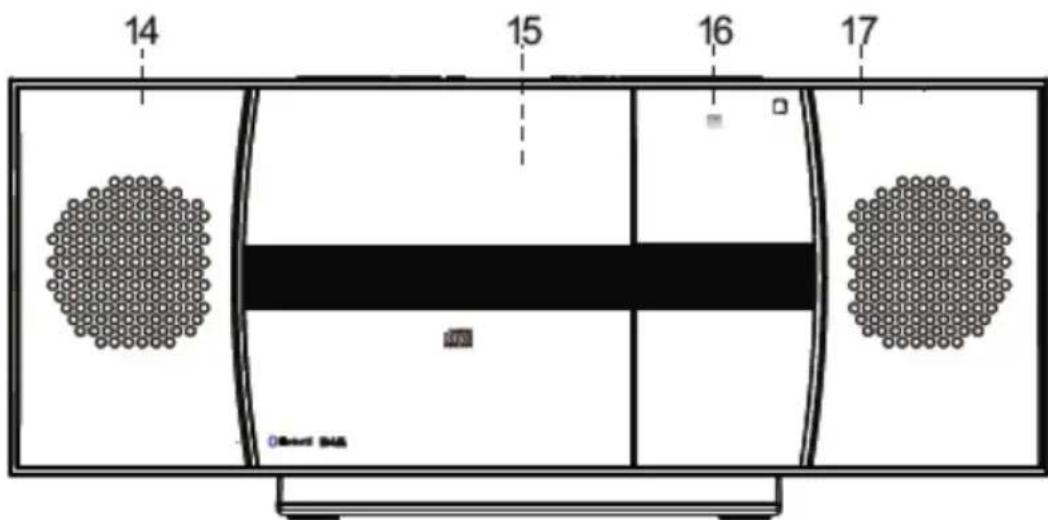
LOCATION OF CONTROLS
- STAND-BY/ SOURCE button.
-
MENU/INFO button.
-
/II/SCAN,Play/Pause/Scan button.
- STOP/ENTER button.
- USB Input.
- SKIP button.
- SKIP button.
-
VOLUME - button.
-
VOLUME + button.
- OPEN/CLOSE button.
- DAB/FM Antenna.
- AC Power Lead.
- AUX-IN input.
- Left speaker.
- OPEN DOOR Disc compartment.
- NFC sensor.
- Right speaker.
REMOTE CONTROL

- FM/DAB button.
- USB button.
- CD button.
- MENU button.
- PRESET UP button.
- TUNER DOWN < button.
- ENTER button.
- PRESET DOWN \Button.
- LIGHT button, INACTIVE.
- SKIP DOWN 卡 button.
- SKIP UP button.
- FOLDER + button.
- FOLDER - button.
- X-BASS button.
- MONO/ST button.
- REPEAT button.
- Numeric buttons.
- MEMORY button.
- SLEEP button.
- INFO button.
- UNPAIR button.
- MUTE button.
- RANDOM button.
- INTRO button.
- VOLUME - button.
- TREBLE button.
- VOLUME + button.
- Stop button.
- / , Play/Pause button.
- EQ button.
- TUNER UP > button.
- SCAN button.
- AUDIO IN button.
- BLUETOOTH button.
- OPEN/CLOSE button.
- ON/STAND-BY button.
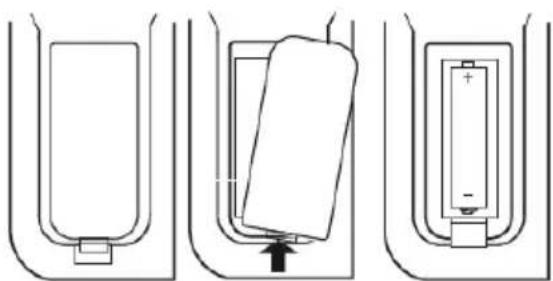
REMOTE CONTROL BATTERY INSTALLATION
Before use, the remote control will need batteries fitting:
- Remove the battery compartment lid as shown;
- Fit 2 × "AAA" batteries as shown. Take care to match the polarities of the remote to the batteries. EG: the +sign on the battery matches the + sign on the remote control battery compartment;
- Replace the battery compartment lid and proceed to use.
NOTE:
Dispose of used batteries with regards to the recycling regulations in your area.
Do NOT short circuit batteries or throw them into water, the general rubbish or in a fire. Weak batteries can leak and damage the remote control. Replace them in good time.
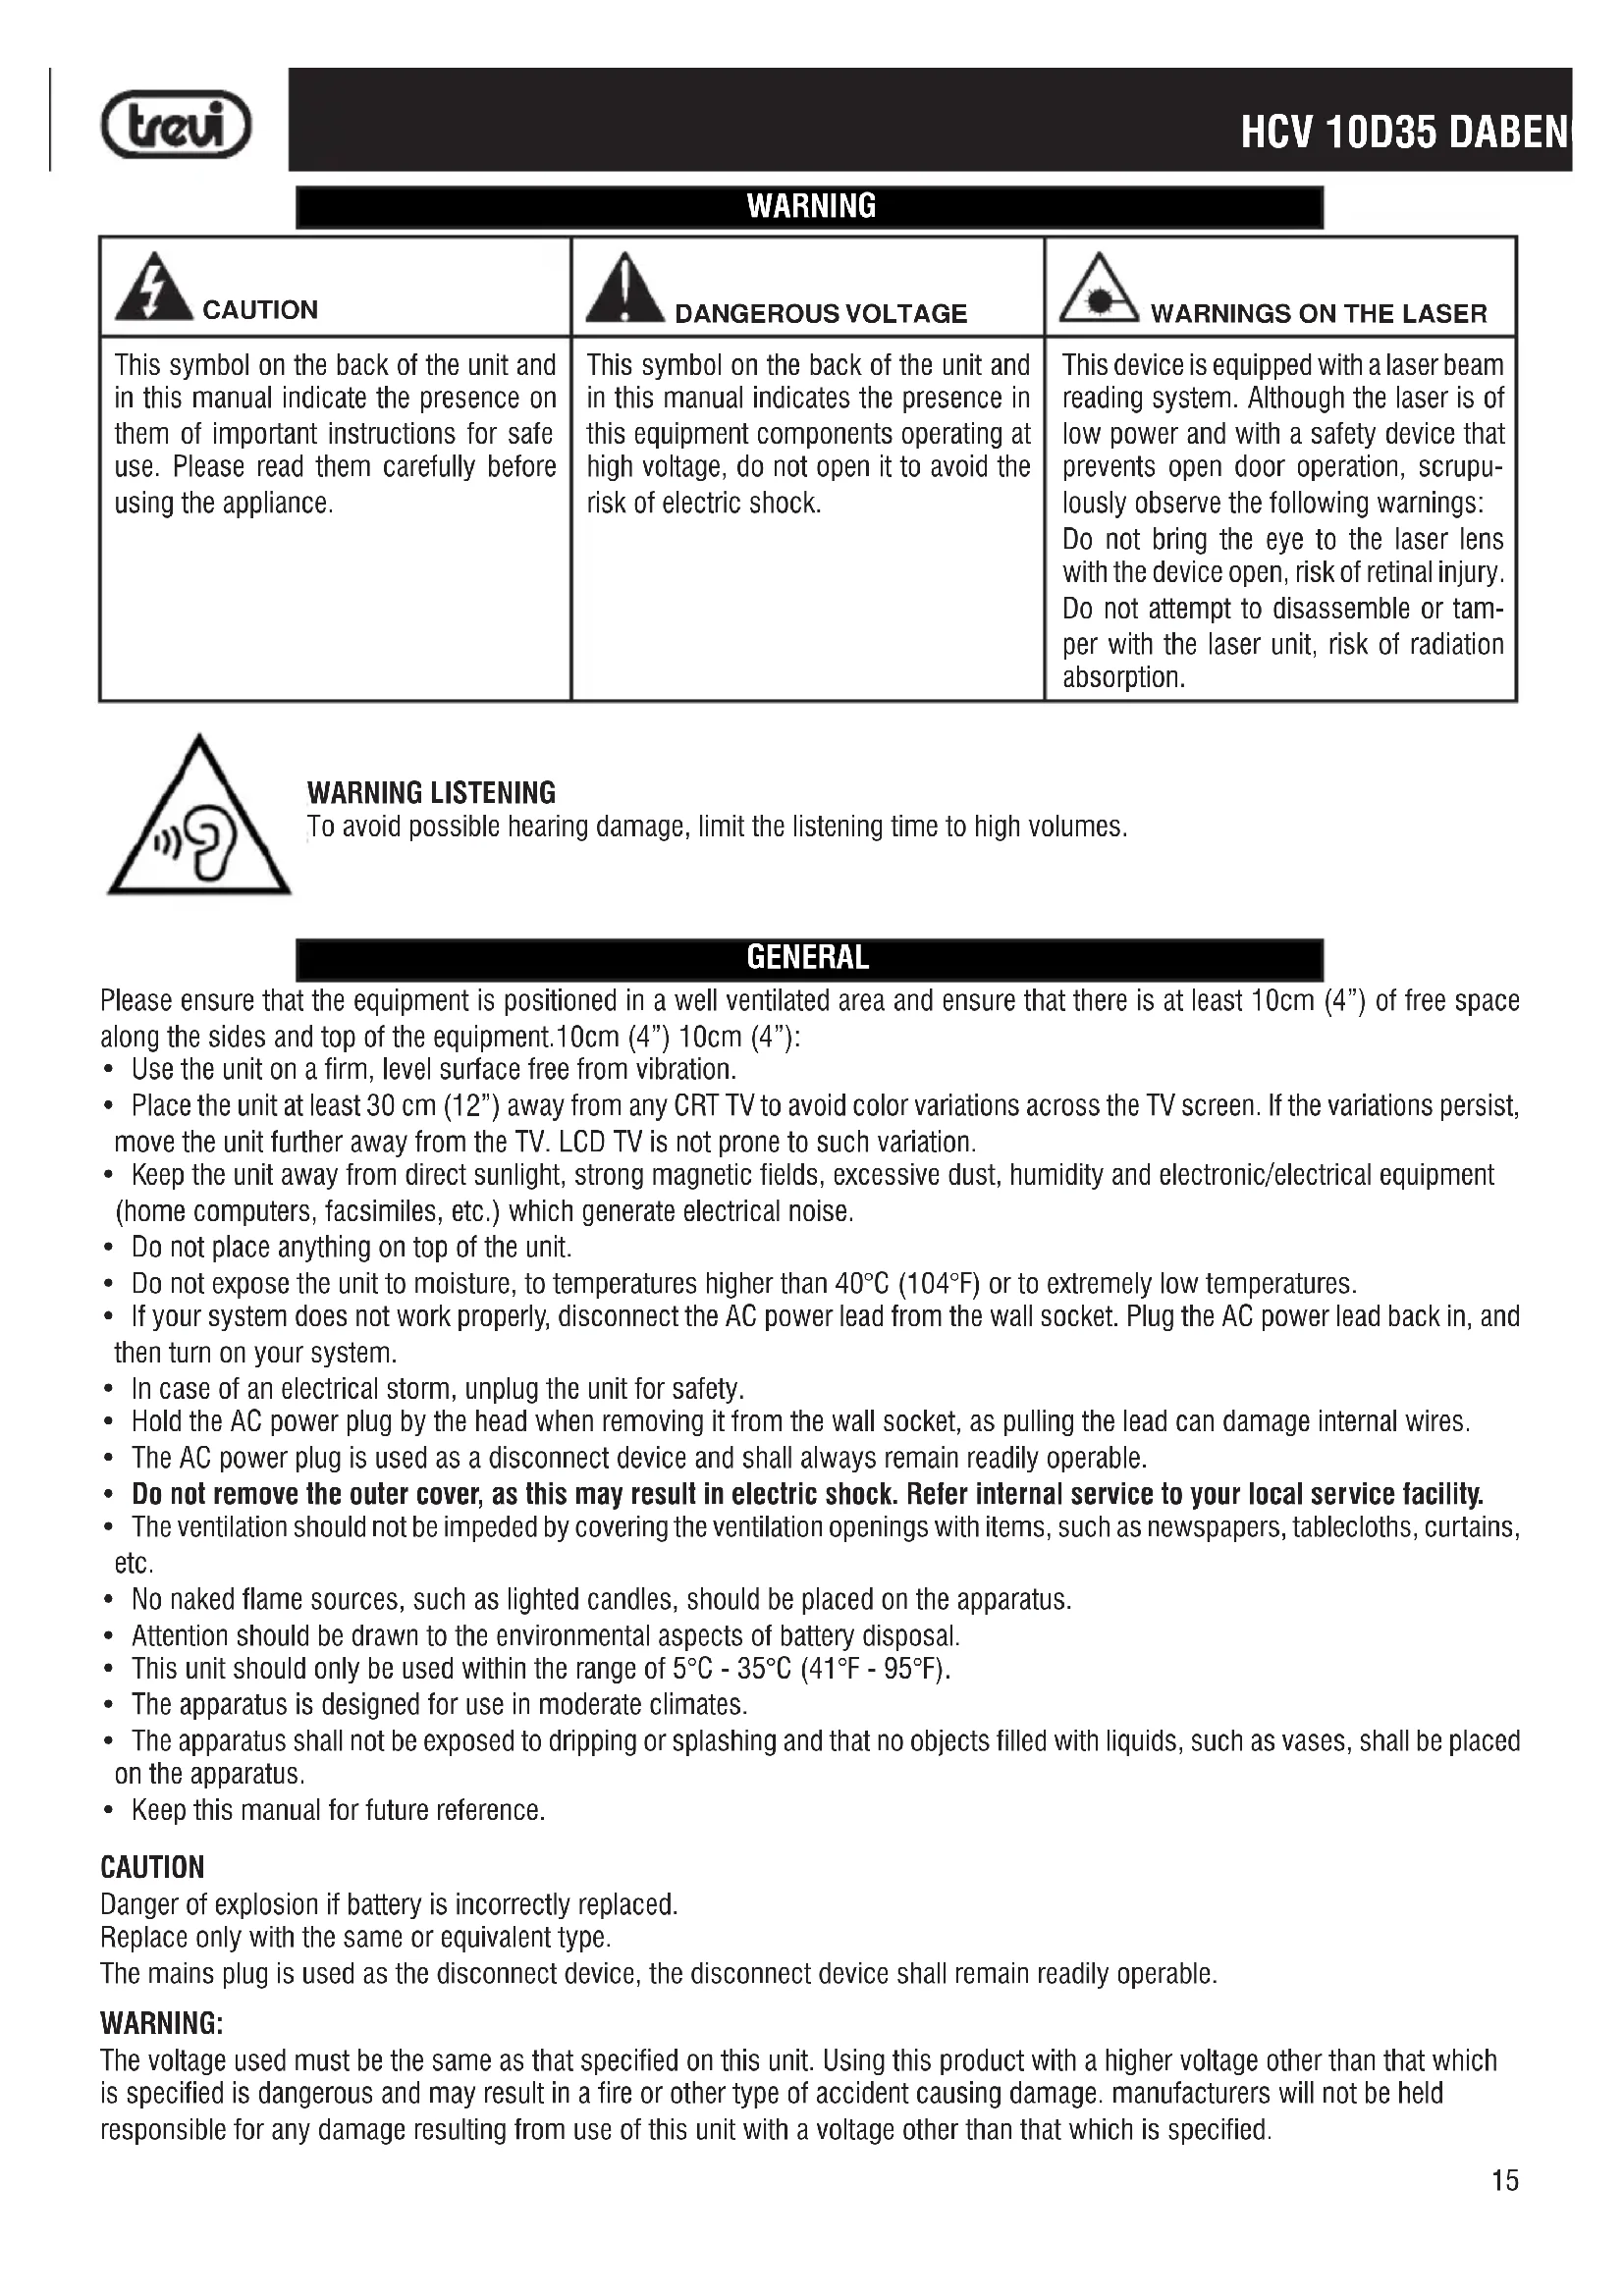
WARNING
| CAUTION | DANGEROUS VOLTAGE | WARNINGS ON THE LASER |
| This symbol on the back of the unit and in this manual indicate the presence on them of important instructions for safe use. Please read them carefully before using the appliance. | This symbol on the back of the unit and in this manual indicates the presence in this equipment components operating at high voltage, do not open it to avoid the risk of electric shock. | This device is equipped with a laser beam reading system. Although the laser is of low power and with a safety device that prevents open door operation, scrupulously observe the following warnings: Do not bring the eye to the laser lens with the device open, risk of retinal injury. Do not attempt to disassemble or tamper with the laser unit, risk of radiation absorption. |
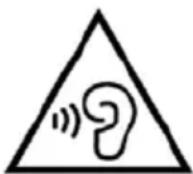
WARNING LISTENING
To avoid possible hearing damage, limit the listening time to high volumes.
GENERAL
Please ensure that the equipment is positioned in a well ventilated area and ensure that there is at least 10cm (4") of free space along the sides and top of the equipment.10cm (4") 10cm (4"):
- Use the unit on a firm, level surface free from vibration.
- Place the unit at least 30~cm (12") away from any CRT TV to avoid color variations across the TV screen. If the variations persist, move the unit further away from the TV. LCD TV is not prone to such variation.
- Keep the unit away from direct sunlight, strong magnetic fields, excessive dust, humidity and electronic/electrical equipment (home computers, facsimiles, etc.) which generate electrical noise.
- Do not place anything on top of the unit.
- Do not expose the unit to moisture, to temperatures higher than 40^ (104^) or to extremely low temperatures.
- If your system does not work properly, disconnect the AC power lead from the wall socket. Plug the AC power lead back in, and then turn on your system.
- In case of an electrical storm, unplug the unit for safety.
- Hold the AC power plug by the head when removing it from the wall socket, as pulling the lead can damage internal wires.
- The AC power plug is used as a disconnect device and shall always remain readily operable.
- Do not remove the outer cover, as this may result in electric shock. Refer internal service to your local service facility.
The ventilation should not be impeded by covering the ventilation openings with items, such as newspapers, tablecloths, curtains, etc. - No naked flame sources, such as lighted candles, should be placed on the apparatus.
- Attention should be drawn to the environmental aspects of battery disposal.
- This unit should only be used within the range of 5^ - 35^ (41^ - 95^) .
- The apparatus is designed for use in moderate climates.
- The apparatus shall not be exposed to dripping or splashing and that no objects filled with liquids, such as vases, shall be placed on the apparatus.
- Keep this manual for future reference.
CAUTION
Danger of explosion if battery is incorrectly replaced.
Replace only with the same or equivalent type.
The mains plug is used as the disconnect device, the disconnect device shall remain readily operable.
WARNING:
The voltage used must be the same as that specified on this unit. Using this product with a higher voltage other than that which is specified is dangerous and may result in a fire or other type of accident causing damage. manufacturers will not be held responsible for any damage resulting from use of this unit with a voltage other than that which is specified.
INSTALLATION
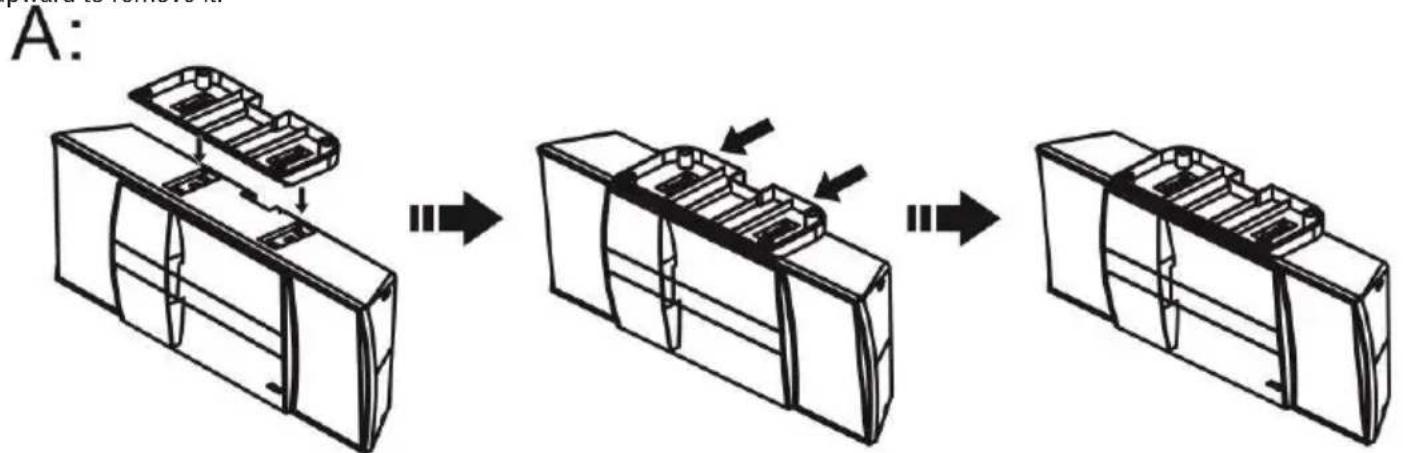
ATTACHING THE STAND (See Illustrations Below)
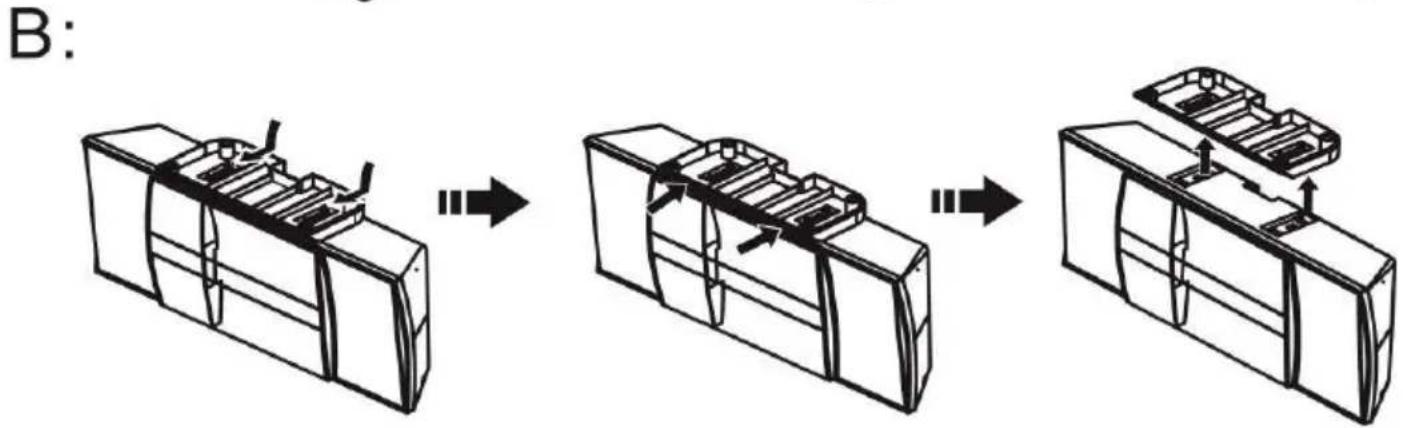
A. Turn the unit over as shown below, and align the mounting blocks on the top of the stand, with the mounting openings located on the bottom of the main unit. Once in place, the 4 mounting tabs on the stand will align with the 4 rectangular mounting slots located on the bottom of the unit. Make sure the mounting tabs are lined up with the slots, and slide the stand towards the front of the unit until the mounting stand it is fully inserted, and locked in place. Make sure the base is locked firmly in place, so it does not come off.
B. To remove the stand, use both hands to hold the stand, and using two fingers, lift the two locking tabs marked with arrows to unlock the base. Slide the stand towards the back of the unit to unlock. When the stand is in unlock position, pull the stand upward to remove it.
FOR WALL MOUNTING (STAND MUST BE REMOVED)
It's important to be sure there are no electric, gas or water lines located behind the wall where you are attaching the unit. We recommend having this speaker professionally installed. Use the included wall mounting accessories and template to attach the sound bar to the wall.
- Use the supplied wall mounting instruction sheet to make marks on the wall for the plastic anchors. Make sure the marks are level before drilling;
- Drill 1/4 holes on the marks;
- Insert the included plastic anchors into the holes until they are flush with the wall;
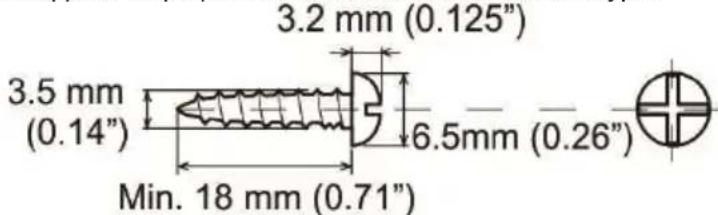
- Screwing the 2 included flat head screws into the plastic anchor holes and tighten the screws;
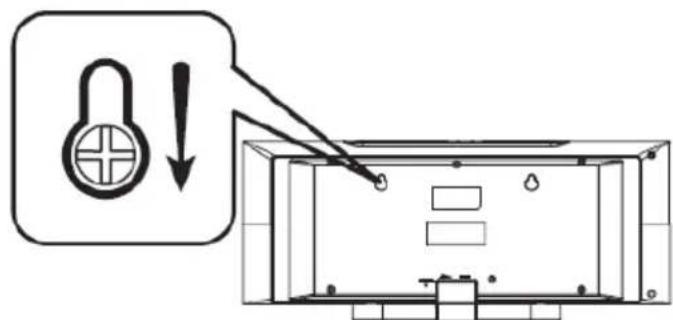
- When the screws are tightened, the screw heads should be about 14 away from the mounting wall. Line up the keyhole slots located on the back of the main unit with screws in the wall;
- Hang the unit onto the screws.
WALL MOUNT PREPARATION
To mount the unit on the wall
CAUTION:
- Be very careful to prevent the unit 2.1kg (4.2 bs.) from falling when mounting on the wall.
- Before mounting, check the wall strength. (Do not put on the veneer plaster or whitewashed wall. The unit may fall.) If unsure, consult a qualified service technician.
-
Use the supplied mounting screws.
-
Check all wall mount screws for looseness.
- Select a good location. If not, accidents may occur or the unit may get damaged.
Driving screws: Installing the unit:
You may hang it on the wall. Use supplied or proper screws. See below for size and type.
Installing the unit:
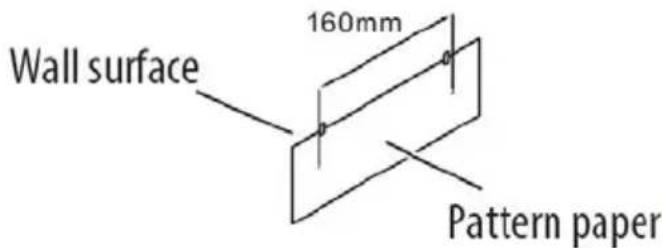
Fix the pattern paper to the wall in horizontal position as below.
Make a hole on the wall following the screw point marks on the pattern paper by using a drill.
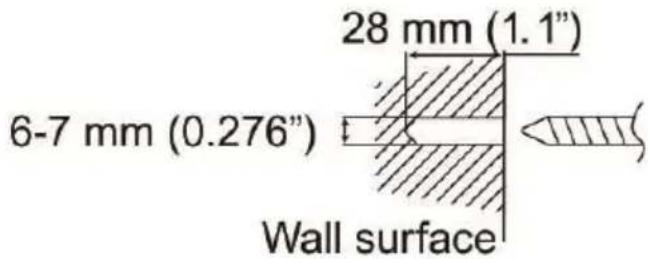
Fix a wall mount plug into the hole using a hammer, until it is flush with the wall surface.
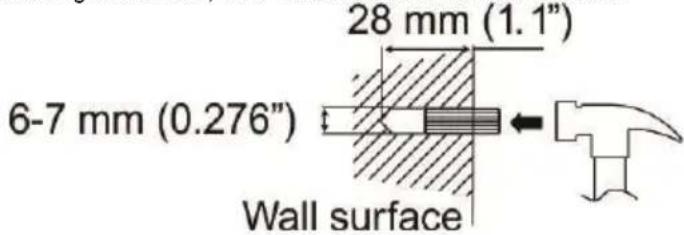
Fasten the screws to the wall as shown below. (Total screws: 2 ps)
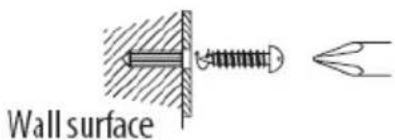

Hang the unit onto the screws.
GENERAL OPERATION
After checking all the connections have been made correctly, plug the AC power lead of this unit into the wall socket.
NOTE: Unplug the AC power lead from the wall socket if the unit will not be in use for a prolonged period of time.
STAND-BY FUNCTION
- To switch on the appliance, press the SOURCE button (1) on the main unit, or press the SOURCE button (53) on the remote control;
- The appliance will start on the last selected function before switching off.
- To switch off the appliance, hold down the SOURCE button (1) on the main unit for 2 seconds, or press the SOURCE button (53) on the remote control.
Note: This unit is designed to enter STANDBY mode automatically after 20 MINUTES of inactivity. Press the SOURCE button (1) on the main unit, or press the SOURCE button (53) on the remote controlo to wake the unit.
MUTE
- To temporarily silence playback of any mode press the MUTE button (39) on the remote control;
- Press once more to resume the audio output.
VOLUME CONTROLS
- Press the VOL+ button (44) on the remote control or on the main unit (9) to increase the volume level;
- Press the VOL- button (42) on the remote control or on the main unit (8) to decrease the volume level.
EQ MODES AND X-BASS CONTROL
You can change the EQ levels to adapt to the type of audio you are listening to.
- Press the EQ button (34) repeatedly to cycle through the available options of: FLAT, ROCK,C LASSIC,POP & JAZZ.
When the power is first turned on, the unit will enter the extra bass mode which emphasises the bass frequencies, and "X-BASS" indicator will appear. To cancel the extra bass mode, press the X-BASS button on the remote control.
BASS AND TREBLE CONTROL
- Press the TREBLE button (3) to select "Treble";
- Within 5 seconds, press the VOL + (44) or VOL - (42) button to adjust the treble;
- Press the TREBLE button (3) to select "Bass";
- Within 5 seconds, press the VOL + (44) or VOL - (42) button to adjust the bass.
SLEEP FUNCTION
Should you wish to set a timer for the unit to enter standby mode after a period of time follow the steps below:
- Ensure the unit is ON and not in STANDBY;
- Press the SLEEP button (36 ) repeatedly to cycle through the preset timers from 90 minutes to 10 minutes then OFF;
- When you have selected the required timer duration, after 1 second of inactivity the setting will be stored and the countdown will begin.
- Switch on the appliance and press the SOURCE button (1) on the main unit several times, until the indication DAB appears on the display, or press the FM/DAB button (18) on the remote control;
- The first time the radio is turned on it will automatically scan and store all available DAB stations.
- If you want to repeat the scan operation of the available DAB stations, press the SCAN (49) button, the message will appear Scanning...
- Press (6) and (7) button on the unit, or TUNE < (23) and TUNE > (48) buttons on the remote control to scroll through the various tuned DAB stations. Press the ENTER button (4) on the unit or the ENTER (24) on the remote control on the desired DAB station to start playback;
- Press the INFO button (37) several times to display information on the station received.
DAB/DAB+ MENU
- Press the MENU button (21) to access the DAB menu;
- Press the TUNE < (23) and TUNE × (48) buttons on the remote control to view the various items in the DAB menu;
- Press the ENTER button (24) to select the displayed menu item:
Full scan: allows you to scan the entire DAB/DAB + band and store the stations found.
Manual tune: allows you to manually scan a single DAB/DAB+ frequency. Press the TUNE < (23) or TUNE > (48) button to select the channel number relating to the frequency to be scanned and then press the ENTER (24) button to start the scan. The stations found will be automatically memorized. At the end, long press the MENU button (21) to return to the DAB menu.
DRC: allows you to enable/disable the DRC function to improve the sound when listening in noisy environments. The DRC level can be set to high, low or OFF.
Prune (Delete): allows you to delete from the list of stored stations all the radios found but not available or with scarce signal. Use the TUNE < 23 and TUNE × 48 button to move to Y (YES) and confirm the deletion with ENTER button (24).
Time: allows you to set the current time/date.
Set Time/Date: set the current time and date.
Auto Update: select from which source to automatically set the time and date if available.
Set 12/24 Hour: set the time format 12/24H.
Set Date Format: set the date format.
Factory Reset: allows you to restore the appliance's factory settings. After the restoration is complete, an automatic scan of the DAB/DAB+ stations will be performed. Move with the TUNE < (23) and TUNE × (48) on Y (YES) and confirm with the ENTER (24).
SW version: allows you to view the device's software version.
STORING STATION PRESETS
It is possible to store up to 10 of your favourite stations to the preset keys:
- Tune in to the desired radio station;
- Hold MEMORY button (35) for 2 seconds, then press PRESET button (22) the display will show the message "Save to P01";
- Use PRESET button (22) and PRESET button (25) to select a memory location;
- Press ENTER button (24) to confirm and save the radio station. Repeat this for each radio station you wish to save. 10 memory locations are available;
- To recall a stored radio station, press the relevant numeric button (34) or press MEMORY button (35) then PRESET button (22) or PRESET button (25) key to scroll the list. Press ENTER button (24) to confirm and start playback of the chosen station.
Note: to recall a station stored on location 10, press the "O" button.
DAB/DAB+DISPLAYMODE
Every time you press the INFO button (37) on the remote control, the display will cycle through the following display modes:
DLS (dynamic label segment): Dynamic label segment is a scrolling message that the broadcaster may include with their transmissions. This message usually includes information, such as program detail etc...
Signal strength: This option will display a bar indicating the signal strength.
Program type: This describes the "Style" or "genre" of music that is being broadcast e.g. "Rock "or Classical".
Ensemble/Multiplex (group name): A multiplex/ensemble is a collection of radio stations that are bundled and transmitted on one frequency. There are national and local multiplexes. Local ones contain stations that are specific to that area.
Channel frequency: Displays the current DAB multiplex in use.
Signal error index: displays information relating to the level of signal errors and the intensity with which it is received.
Bit Rate: displays information related to the compression ratio of the current transmission.
Time: displays the time signal received by the radio station.
Date: displays information about the date.
FM RADIO OPERATION
- Switch on the appliance and press the SOURCE button (1) on the main unit several times, until the indication FM, or press FM/DAB button (18) on the remote control;
- Press and hold TUNE < button (23) or TUNE > button (48) button on the remote control for two seconds to tune in to the next or previous radio station with the best signal received;
- To optimize the frequency, press TUNE < button (23) or TUNE button (48) on the remote control to increase or decrease the frequency by 0.05MHz and perform a step-by-step search;
- To activate the automatic station search and storage function, keep the SCAN (49). pressed for a few seconds. The device is capable of storing up to 10 stations;
- To store a radio station, refer to the paragraph "Storing station preset" in the DAB section.
Note: To obtain the best FM reception, connect and orient the antenna. If the reception is not good, try to adjust the length and orientation of the antenna, however the quality of FM reception depends a lot on the place where the device is placed.
CD OPERATION
PLAY MODE
- Switch on the appliance and press the SOURCE button (1) on the main unit several times, until the indication CD appears on the display, or press the CD button (20) on the remote control;
- Press the OPEN/CLOSE button (52) on the remote control, load a disc on the drawer (label facing upwards) and press the OPEN CLOSE button once more to close;
- After a brief period the unit will automatically read the disc and begin playback from track 01;
- Press / II button (46) to PAUSE playback. From the PAUSE position pres again / II button (46) button to resume playback;
- Press , Stop button (45) on remote control during playback to stop the disc at it's current position.
SKIPPING TRACKS
- Press button (6) or button (7) on unit or button (27) or button (28) on remote control to skip to the next or previous track on a disc;
- Press and hold button (6) or button (7) on unit or button (27) or button (28) on remote control to fast forward or fast rewind the current track.
REPEAT FUNCTION
- Press the REPEAT button (33) on the remote control, "REP. ONE" will appear on the display to repeat the current track;
- Press the REPEAT button (33) again, the display will show "REP. ALL" to repeat the entire disc;
- To cancel the repeat function, press the REPEAT button (33) again, the word "DISC CD" will appear on the display.
RANDOM FUNCTION
- During CD playback pressing the RANDOM button (40) on the remote will playback all tracks on the current disc in a random order. You will see 'RANDOM' appear on the display to indicate this function is active;
- Press the RANDOM button once more to cancel the function. The 'RANDOM' icon will disappear.
PROGRAMME SETTING (REMOTE CONTROL ONLY)
User can program up to 30 tracks in CD mode or 99 tracks in MP3 in any desired order. Programme mode is activated while in STOP mode.
- Press the , STOP button (46) to stop playback (if required);
- Press the MEMORY button (35) on the remote control You will see 'P01' on the display to indicate the program function is active;
- Use the NUMERIC buttons (34) to enter the track number you want to play in slot P01;
- Press the MEMORY button (35) once more to proceed to slot P02. When 'P02' appears on the display you can repeat step 3 and enter the track number of slot P02;
- Repeat steps 4-5 until you have programmed all tracks you want in the sequence;
- To begin playback of the programmed sequence press the / II button (46);
- To cancel playback press the , STOP button (45).
INTRO FUNCTION
- Press the INTRO button (41), you will see 'INTRO' appear on the display. The first 15 seconds of each track on the current disc will now play;
- Press the INTRO button (41) again to cancel. You will see 'INTRO' disappear on the display.
USB OPERATION
PLAY AUDIO FROM USB SOURCE
- Press the USB button (19) on the remote control or / SOURCE button (1) main unit repeatedly until you reach the USB mode;
- Insert a compatible USB flash drive into the USB port (5) on the front of the unit. The unit will scan the USB flash drive and display the total number of tracks found on the drive. Playback of track 01 will begin automatically.
Note: The player may not support some devices equipped with a USB socket, this is due to the incompatibility of some processors.
- Press / II button (46) on remote control to activate PAUSE, the time indication on the display will start to flash;
- Press again / II button (46) on remote control to resume playback;
- Press , STOP button (45) to Stop playback;
- Refer to "CD Operation" for all functions control.
BLUETOOTH OPERATION
PAIRING BLUETOOTH DEVICES:
- Switch on the appliance and press the BLUETOOTH button (51) on the remote control;
- In Bluetooth mode, the "BT LINK" indicator flashes, the system automatically enters the search. Otherwise hold for 3sec. the UNPAIR button (38) on the remote control;
- Activate the Bluetooth functionality on the external device and start searching for devices;
- At the end select the "HCV 10D35 BT" device;
- Enter the password "0000" if required;
- Press / II button (46) on the remote control to start playback and button (27) and button (28) keys on the remote control for selecting the tracks;
CONNECTING YOUR BLUETOOTH DEVICE USING NFC:
NFC (Near Field Communication) is a technology enabling short-range wireless communication between various devices, such as mobile phones and IC tags. Thanks to the NFC function, data communication can be achieved easily just by touching the relevant symbol or designated location on NFC compatible devices.
- Make sure your Smartphone or Bluetooth device has the NFC feature, and it is turned ON (enabled);
- Press the SOURCE Button(1) on main unit or BLUETOOTH Button(51) remote control to enter Bluetooth mode, the Bluetooth "BT LINK" message will be shown in display and flashing;
Note: If the HCV 10D35 DAB is connected to other smartphone, press and hold the UNPAIR Button on remote control or main unit for 3 seconds to enter Bluetooth paring mode, display will show "BT LINK" message and flashing.
3. Touch the back of your smartphone to the NFC linking point icon located on the front panel of the unit (16).
Check the owner's manual of your Bluetooth device to locate the NFC touch point if you are not sure where it is;
4. If the HCV 10D35 DAB is in pairing mode, it will turn on and enter Bluetooth mode automatically and pair with your smartphone. Display "BT LINK" Bluetooth icon Stop flashing;
5. Some smartphones may ask you to confirm the pairing if they are not paired before.
AUX IN OPERATION
You can connect an audio devices to the unit using a 3.5mm audio cable (not supplied).
1. Connect the 3.5mm plug (not supplied) into the AUX-IN socket on the rear of the unit (13);
2. Connect the other end to your audio device;
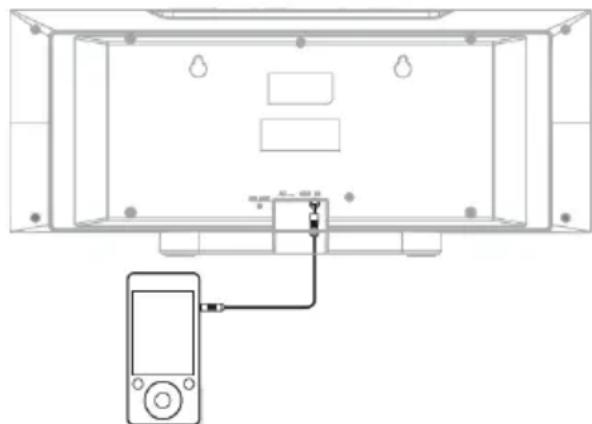
- Press the AUDIO IN button (50) on the remote control, Power on the external audio device and begin playback.
TECHNICAL SPECIFICATIONS
Power/power consumption: 100-240V 50/60Hz - 25W
Power consumption Standby: <0.5W
Power audio: 2x3W (RMS), max 10W
Impedance: 8 Ω ohms
FM Band: 87,5 - 108 MHz
DAB/DAB+Band: 174.928-239.200MHz
Bluetooth power transmission: 2,5mW
Bluetooth transmission band: 2,4GHz
NFC transmission band: 13,56MHz
Power tx max NFC: 100mW
Bluetooth profiles: A2DP (Advanced Audio Distribution Profile)
AVRCP (Audio/Video Remote Control Profile)
CD disc type: CD/CD-R-RW/MP3
MP3 bit rate: MP3 (32 ~ 320 kbps)
Size: .450x200x100mm
DESCRIPTION DES COMMANDES
Unité: 450x200x100mm
Power audio: 2x3W (RMS), max 10W
Impedanz: 8 Ω ohms
Radiofrequencyband: 87,5-108 MHz
Radiofrequencyband DAB/DAB+: 174.928 - 239.200 MHz
Banda FM: .87,5-108 MHz
Banda DAB/DAB+: 174.928 - 239.200 MHz
Transmission energia Bluetooth: 2,5mW
SIMPLIFIED EU DECLARATION OF CONFORMITY
Hereby TREVI Spa declares that the radio equipment type HCV 10D35 DAB is in compliance with directive 2014/53/EU.
The full text of the EU declaration of conformity is available at the following internet address:
https://www.trevi.it/dms/zidi/TREVI/DOCHCV10D35DAB.pdf

- INFORMATIONS AUX UTILISATEURS
- REMOTE CONTROL
- REMOTE CONTROL BATTERY INSTALLATION
- NOTE:
- WARNING
- WARNING LISTENING
- GENERAL
- CAUTION
- WARNING:
- INSTALLATION
- ATTACHING THE STAND (See Illustrations Below)
- FOR WALL MOUNTING (STAND MUST BE REMOVED)
- WALL MOUNT PREPARATION
- To mount the unit on the wall
- CAUTION:
- Driving screws: Installing the unit:
- GENERAL OPERATION
- STAND-BY FUNCTION
- MUTE
- VOLUME CONTROLS
- EQ MODES AND X-BASS CONTROL
- BASS AND TREBLE CONTROL
- SLEEP FUNCTION
- DAB/DAB+ MENU
- STORING STATION PRESETS
- DAB/DAB+DISPLAYMODE
- FM RADIO OPERATION
- CD OPERATION
- PLAY MODE
- SKIPPING TRACKS
- REPEAT FUNCTION
- RANDOM FUNCTION
- PROGRAMME SETTING (REMOTE CONTROL ONLY)
- INTRO FUNCTION
- USB OPERATION
- PLAY AUDIO FROM USB SOURCE
- BLUETOOTH OPERATION
- PAIRING BLUETOOTH DEVICES:
- CONNECTING YOUR BLUETOOTH DEVICE USING NFC:
- AUX IN OPERATION
- TECHNICAL SPECIFICATIONS
- SIMPLIFIED EU DECLARATION OF CONFORMITY
Brand : Trevi
Model : HCV 10D35 DAB
Category : Hi-fi system