
HCX 1080 BT - Hi-fi system Trevi - Free user manual and instructions
Find the device manual for free HCX 1080 BT Trevi in PDF.
| Product Type | Hi-Fi System |
| Brand | Trevi |
| Model | HCX 1080 BT |
| Dimensions (main unit) | 247 x 83 x 230 mm |
| Power supply | AC 110-230 V, 50/60 Hz |
| Power consumption | 30 W (standby < 0.5 W) |
| Output power | 2 x 10 W RMS / 2 x 20 W max (40 W total) |
| Frequency response | 20 Hz - 20 kHz ± 3 dB |
| Signal-to-noise ratio | > 80 dB |
| Bass control | -10 dB to +10 dB |
| Treble control | -10 dB to +10 dB |
| Radio sections | FM 87.5 - 108.5 MHz, AM (internal antenna) |
| CD player | CD/CD-R/RW, MP3 |
| USB port | USB 2.0 compatible |
| Wireless connectivity | Bluetooth, NFC |
| Auxiliary input | 3.5 mm jack |
| Maintenance and cleaning | Soft cloth slightly damp, avoid solvents and abrasives |
| Laser safety | Do not look directly at the beam |
| Usage precautions | Avoid moisture, heat, dust, and vibrations |
| Repairability | Contact an authorized TREVI support center |
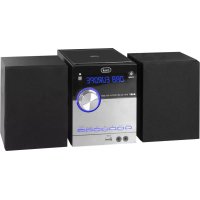
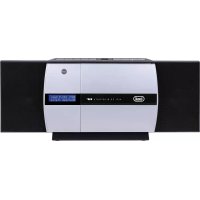
| General information | Hi-Fi system with CD, radio, USB, Bluetooth, and NFC |
Frequently Asked Questions - HCX 1080 BT Trevi
User questions about HCX 1080 BT Trevi
0 question about this device. Answer the ones you know or ask your own.
Ask a new question about this device
Download the instructions for your Hi-fi system in PDF format for free! Find your manual HCX 1080 BT - Trevi and take your electronic device back in hand. On this page are published all the documents necessary for the use of your device. HCX 1080 BT by Trevi.
USER MANUAL HCX 1080 BT Trevi
User manual and connection
SYSTEME STEREO HIFI AVEC CD/MP3/USB/BT
Output 2x10W (RMS) 2X20W (MAX 40W)
BASS-10dB~+10dB
TREBLE-10dB~+10dB
Speaker 115x163x157mm
BEFORE WE BEGIN
Thank you for purchasing the HCX 1080 BT: MICROSYSTEM BLUETOOTH with NFC function Digital FM tuner - CD MP3 -USB compatible.
This is your assurance of quality, performance and value. Our engineers have included many useful and convenient features in this product. Please be sure to read this instruction Manual completely to make sure you are getting the maximum benefit from each feature.
This product was manufactured using the highest quality components and standards of workmanship. It was tested by inspectors and found to be in perfect working order before it left our factory. For future reference, record the serial number in the space provided.
Model No: HCX 1080 BT
Serial Number:
WARNING
TO PREVENT FIRE OR SHOCK HAZARD DO NOT EXPOSE THIS APPLIANCE TO RAIN OR MOISTURE.
CAUTION
RISK OF ELECTRIC SHOCK DO NOT OPEN

CAUTION: TO REDUCE THE RISK OF ELECTRIC SHOCK, DO NOT REMOVE COVER (OR BACK). NO USER-SERVICEABLE PARTS INSIDE. REFER SERVICING TO QUALIFIED SERVICE PERSONNEL
LIGHTNING FLASH WITH ARROWHEAD SYMBOL -
Within an equilateral triangle, is intended to alert the user to the presence of uninsulated dangerous voltage within the products enclosure that may be of sufficient magnitude to constitute a risk of electric shock to persons.

EXCLAMATION POINT - within an equilateral triangle is used to indicate that a specific component shall be replaced only by the component specified in that documentation for safety reason.
The following label has been affixed to the unit, listing the proper procedure for working with the laser beam:
CLASS 1 LASER PRODUCT LABEL -
This label is attached to the place as illustrated to inform that the apparatus contains a laser component.

WARNING LABEL INFORMING OF RADIATION - This label is placed inside the unit. As shown in the illustration. To warn against further measures on the unit. The equipment contains a laser radiating laser rays according to the limit of laser product of class 1.

This equipment is a Class II or double insulated electrical appliance. It has been designed in such a way that it does not require a safety connection to electrical earth.
SAFETY INTRUCTIONS
- READ INSTRUCTIONS --- All the safety and operating instructions should be read before the product is operated.
- RETAIN INSTRUCTIONS --- The safety and operating instructions should be retained for future reference.
- HEED WARNINGS --- All warnings on the product and in the operating instructions should be adhered to.
- FOLLOW INSTRUCTIONS --- All operating and use instructions should be followed.
- CLEANING --- Unplug this product from the wall outlet before cleaning. Do not use liquid cleaners or aerosol cleaners. Use a damp cloth for cleaning.
- WATER AND MOISTURE --- Do not use this product near water - for example, near a bath tub, wash bowl, kitchen sink, or laundry tub; in a wet basement; or near a swimming pool; and the like.
- ACCESSORIES --- Do not place this product on an unstable cart, stand, tripod, bracket, or table.
The product may fall, causing serious injury to a child or adult and serious damage to the product.
Use only with a cart, stand, tripod, bracket, or table recommended by the manufacturer, or sold with the product. Any mounting of the product should follow the manufacturer instructions, and should use a mounting accessory recommended by the manufacturer. A Product and Cart Combination should Be Moved with Care - Quick stops, excessive force and uneven surfaces may cause the product and cart combination to overturn.
- VENTILATION --- Slots and openings in the cabinet are provided for ventilation and to ensure reliable operation of the product and to protect it from overheating, and these openings must not be blocked or covered. The openings should never be blocked by placing the product on a bed, sofa, rug or other similar surface. This product should not be placed in a built-in installation, such as a bookcase or rack, unless proper ventilation is provided or the manufacturer* instructions have been adhered to.
- POWER SOURCES --- This product should be operated only from the type of power source indicated on the marking label. If you are not sure of the type of power supply to your home, consult your product dealer or local power company. For products intended to operate from battery power, or other sources, refer to the operating instructions.
- POWER-CORD PROTECTION --- Power-supply cords should be routed so that they are not likely to be walked on or pinched by items placed upon or against them, paying particular attention to cords at plugs, convenience receptacles, and the point where exit from the product.
- NON-USE PERIODS --- The power cord of the product should be unplugged from the outlet when left unused for long periods of time.
- LIGHTNING --- For added protection for this product during a lightning storm, or when it is left unattended and unused for long periods of time, unplug it from the wall outlet and disconnect the antenna or cable system. This will present damage to the product due to lightening and power-line surges.
- OVERLOADING --- Do not overload wall outlets, extension cords, or integral convenience receptacles as this can result in a risk of fire or electric shock.

SAFETY INSTRUCTIONS
- OBJECT AND LIQUID ENTRY --- Never push objects of any kind into this product through openings as they may touch dangerous voltage points or short-out parts that could result in a fire or electric shock. Never spill liquid of any kind on the product.
- SERVICING - Do not attempt to service this product yourself as opening or removing covers may expose you to dangerous voltage or other hazards. Refer to all servicing to qualified service personnel.
- DAMAGES REQUIRING SERVICE – Unplug this product from the wall outlet and refer servicing to qualified service personnel under the following conditions.
a) When the power-supply cord or plug is damaged.
c) If the product has been exposed to rain or water.
b) If liquid has been spilled, or objects have fallen into the product.
d) If the product does not operate normally by following the operating instructions. Adjust only those controls that are covered by the operating instructions as an improving adjustment of other controls may result in damage and will often require extensive work by a qualified technician to restore the product to its normal operation.
e) When the product exhibits a distinct change in performance - this indicates a need for service.
-
REPLACEMENT PARTS - When replacement parts are required, be sure the service technician has used replacement parts specified by the manufacturer or have the same characteristics as the original part, Unauthorized substitutions may result in fire electric shock and other hazards.
-
HEAT the product should be situated away from sources such as radiators, heat registers, stoves or other products that produce heat
PREPARATION FOR USE
Unpacking and set up

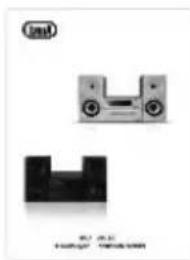
The Micro system
Remote Control
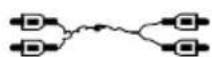
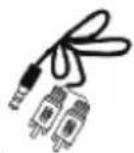
Audio cable RCA/RCA and RCA/LINE-IN
User manual
Carefully remove all the components from the carton and remove all packing materials from the components. Make sure noting is accidentally discarded with the packing materials.
Save the carton and the packing materials, if possible, in the unlikely event that the unit ever needs to be returned for service. Using the original carton and packing material is t he only proper way to protect the unit from shipping damage.
- Unwind the AC power cord on the back of the main unit and extend it to its full length.
CONNECTIONS
- Check if the power voltage, as shown on the type plate located on the back of the set, corresponds to your local AC power supply. If it does not, consult your dealer or service centre.
- Connect the speakers to the unit
Connect the speaker cables to the front speaker terminals. Connect the black end of each wire to the marked-(minus) and the other end to the terminals \ marked + (plus) terminals.

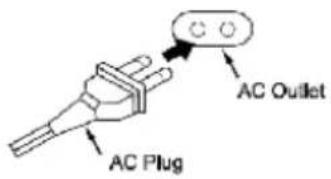
- Connect the power cord to the wall outlet. The power supply is now connected and ready for use.
-
To switch off completely, turn off the main power on/off button and unplug the power cord from the wall outlet.
-
Unplug the power cord from the wall outlet to protect your set during heavy thunderstorms.
- If electric cable is damaged, it must be replaced by manufacturer, or by the qualification persons, in order to avoid a danger.
The mains plug is used as disconnect device, the disconnect device shallremain readily operable.
FM ANTENNA CONNECTION
Hints for Better FM Reception:
The FM lead wire antenna on the back panel should be extended to its full length. You may also have to vary the direction of this antenna until you find the position that provides the best reception.
STEREO HEADPHONE JACK
This system includes a stereo PHONES jack on the front panel of the main unit. You may connect a set of stereo headphones, not included, to this jack for private listening without disturbing others.
The main unit speakers are automatically shut off when headphones are connected to the PHONES jack. Make sure that the plug from your headphones is fully inserted into the headphone jack. If the plug is not fully inserted the sound may be intermittent, or you may only hear sound from one side of the headphones.
IMPORTANT: To prevent hearing damage always set the volume control to a low level before you connect the headphones. Then connect the headphones, put them on, and very gradually increase the volume to a comfortable listening level. Remember that CDs may contain both very soft and very loud passages. Adjust the volume to a comfortable level using a louder passage, so that you always know what the maximum level will be.
DESCRIPTION OF UNIT AND CONTROLS
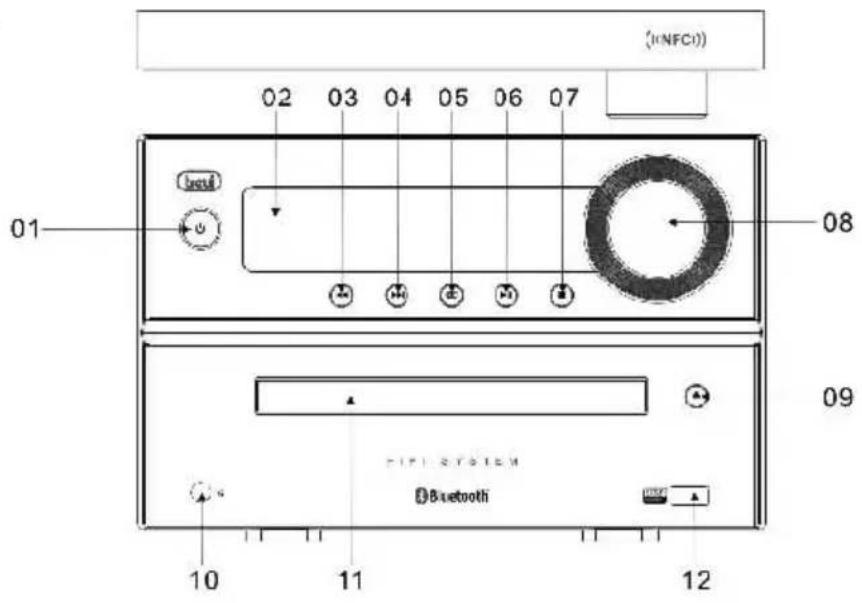
FRONT VIEW
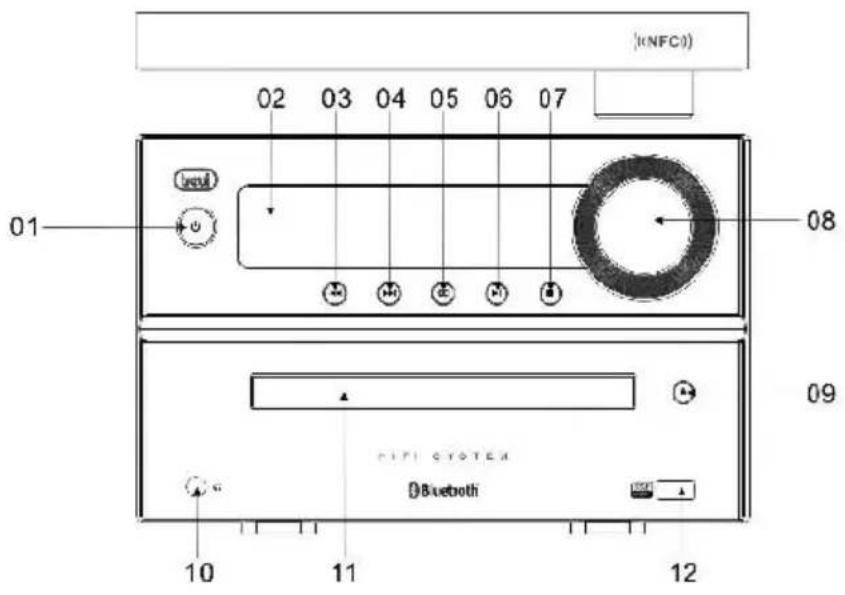
01.STANDBY
02 VFD DISPLAY
03 PREV
04.NEXT
05 SOURCE
06 PLAY/PAUSE
07.STOP
08.VOLUMETUNER
09. OPEN(CD DOOR CONTROL)
10.EARPHONEJACK
11.CDDOOR
12.USB MEDIAJACK
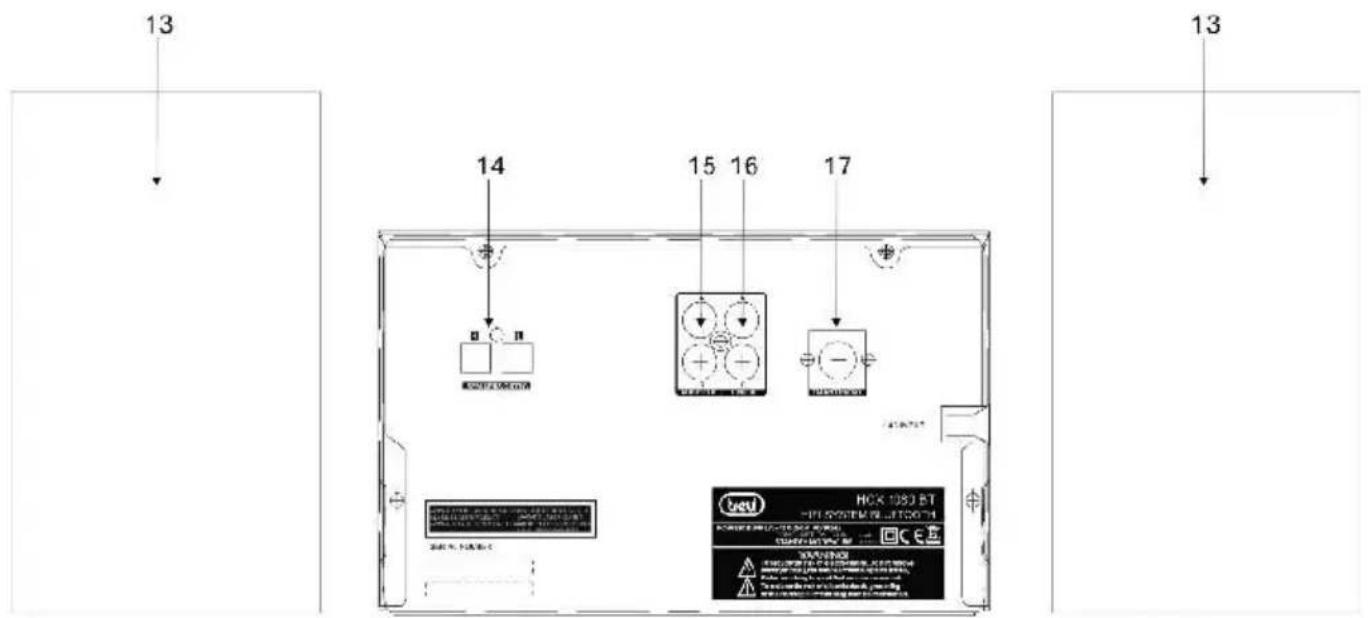
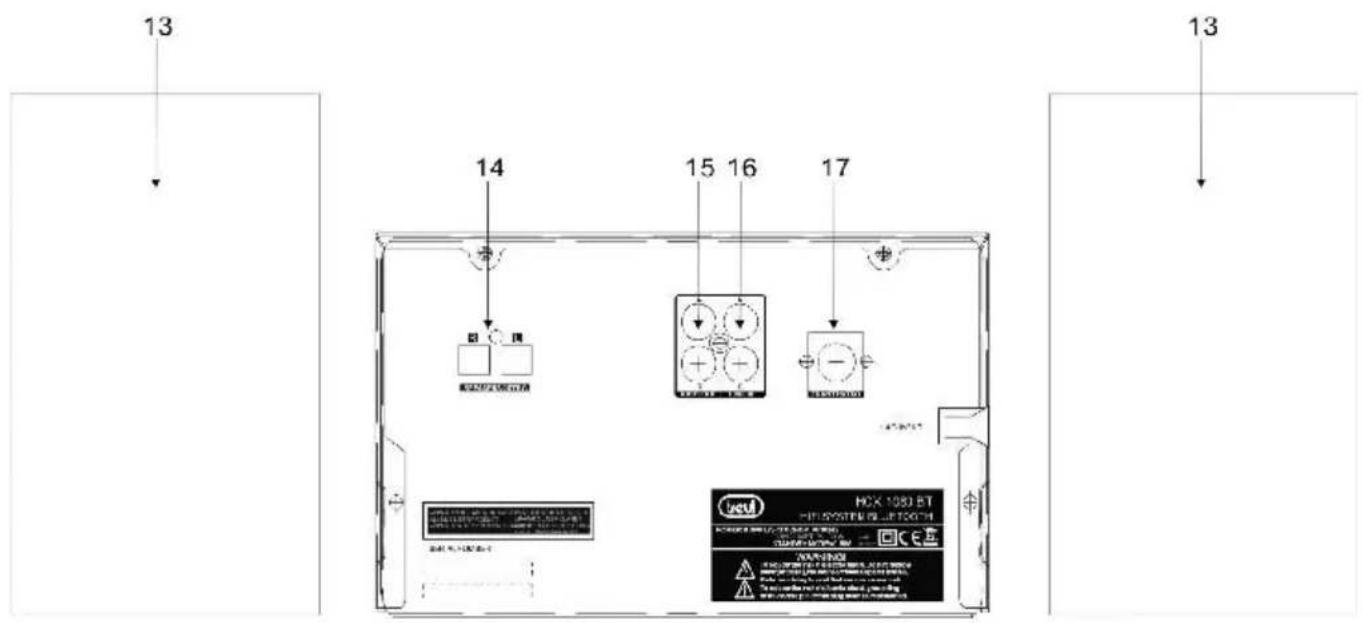
13
13
13.ENCEINTE
14. TERMINAUX DES ENCEINTES
15.SORTIE AUDIO
16.ENTREE LIGNE
17 ANTENNEFM
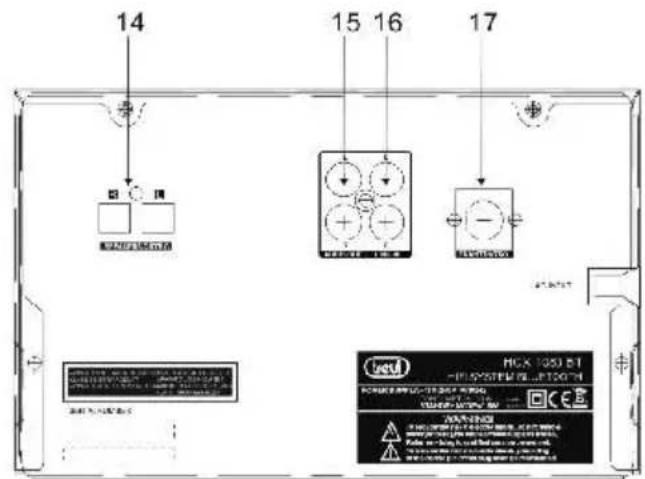
DESCRIPTION OF REMOTE CONTROL
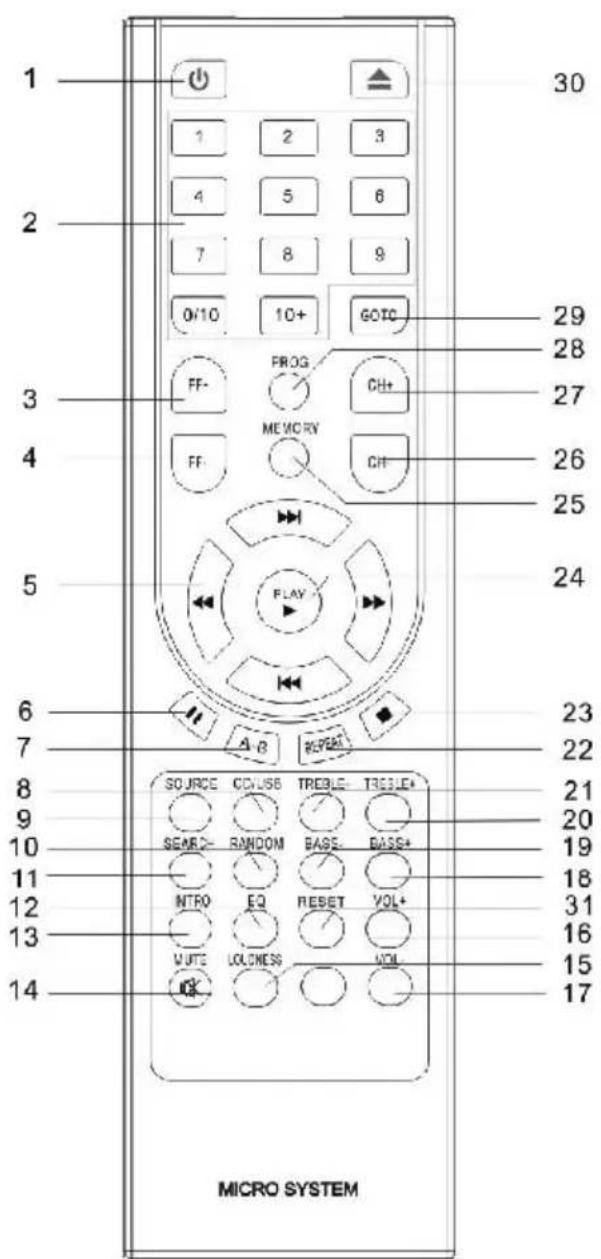
1)STANDBY
2) 0...9 number keys
0/10
10+
3)FF+
4)FF-
5) / / / / BUTTONS
6) PAUSE
7) A-B
8) CD/USB
9) SOURCE
10) RANDOM
11)SEARCH
12)EQ
13) INTRO
14) MUTE
15) LOUDNESS
16)VOLUME +
17) VOLUME -
18)BASS +
19)BASS-
20)TREBLE+
21)TREBLE -
22) REPEAT
23) STOP
24)PLAY
(25) MEMORY
26)CH
27)CH+
28) PROGRAM
(29) GOTO.
30) EJECT
31) RESET
IR REMOTE SENSOR
- Even if the remote control is operated within the effective range, its operation may be impossible if there are any obstacles between the appliance and the remote control.
- If the remote control is operated near other appliances which generate infrared rays, or if other remote control devices using infrared rays are used near the appliance, it may operate incorrectly.
BATTERYINSTALLATION
Insert 2 AAA/ LR03 TYPE batteries (not included) into the battery compartment. Be sure that the battery is inserted correctly to avoid damage to the remote control. Always remove the battery when the remote control will not be used for a long period of time, as this will cause leakage to the battery and subsequently damage to your set.
BATTERYNSTALLATION
Slide out cover and install 2 AAA/ LR03 TYPE batteries (not included).
Notes:
- If the distance required between the remote control and the appliance decreases, the batteries are exhausted. In this case replace the batteries with new one.
- Power button on main unit must be 'On' in order for Remote Control to operate.
To turn on the micro system, press the button on front panel of the unit or on the remote control. Press the button again to turn off the micro system
SOURCE BUTTON
Press the button repeatedly to switch among CD/TUNER/LINEIN /BT modes. To select the USB mode please select the CD MODE and press CD/USB button on remote control to switch into USB mode.
MUTE Button (On Remote Control Only)
- You can also press the MUTE button on the remote control to turn off the sound temporarily, for example, when answer the telephone.
Press the MUTE button again to cancel the mute function and restore the sound. - The mute function will also be cancelled automatically by pressing the VOLUME + or - buttons.
VOLUMELEVEL
Turn the VOLUME knob on front panel or press VOL+/ VOL - buttons on remote control to adjust the volume level.
LOUDNESS
Press LOUDNESS button to enhance the bass level immediately when bass is not enough.
FUNCTION
Press successively the FUNCTION button to adjust VOLUME, BASS and TREBLE at your convenience. Press FUNCTION once if you want to adjust the volume, twice to adjust the bass and 3 times to adjust the treble.
CD / MP3 OPERATION
You can play in your Micro System your audio CD and MP3, CD-R. Please do not try to play CD-ROM, CD -I, VCD or DVD.
- Open the disc tray by pressing OPEN/ CLOSE button on the unit or on the remote control.
- Insert the CDwith the printing side facing up and close gently the disc tray by pressing again
OPEN/ CLOSE .
- Press SOURCE button to select the CD MODE.
- Press to start the CD playback; for AUDIO CD, playback starts automatically.
- Press stop button on unit or on remote control to stop playback.
Searching for a section within a CD (On Remote Control Only).
During playback, press and hold / on the remote control to find a specific passage within the track and release it at the point you want to listen to.
CD / MP3 OPERATION
Select another track or file
Press or button on the remote control to select a particular track.
Listening to your tracks (files) repeatedly (On Remote Control Only)
- Press REPEATbuttonrepeatedly to activate the REPEATfunction in following order: REPEAT 1-REPEAT ALBUM (*MP3 MODE ONLY) - REPEAT ALL - OFF-
Listening to your tracks (files) randomly(On Remote Control Only)
- Press RANDOM button to play tracks in a random order.
A-B function(On Remote Control Only)
During CD/MP3 DISC playback, you can press A-B button on remote to start from the point A (time point you pressed), and ended point B when you press A-B button again and music will play repeatedly from A to B.
Intro function(On Remote Control Only)
This feature allows you to play the 10 first seconds of each track on the disk.
Load the disc and wait until the display shows the total playing time and number of tracks. Press INTRO button on remote control to activate the function, press again to cancel the function.
PROGRAM
Creating your own playlist
You can play up to 20 tracks on a CD in order.
- Insert a CD and wait for to be read
- Press PROGbutton on the remote control in STOP status.
- Press on the unit or on the remote control to select the track you want to program. Press PLAY button on remote or on front panel of the unit to confirm your selection.
- Press on the unit or on the remote control to play the programmed music files.
About MP3
MP3 Disc compatibility with this unit is limited as follows
Sampling Frequency: 32-48 (MP3)
Bit rate: 32-320kbps (MP3)
Do not use special letters such as / :*?< > etc
Even if the total number of files on the disc has more than 1000, it will only be shown up to 999.
RADIO OPERATION
- Press SOURCE button on remote control to select TUNER MODE.
-
Tune to the desired radio station by using / + , / - , / + , / - for a manual tuning.
-
For AUTO TUNING, press button on the unit or SEARCH button on remote control to enter in automatic searching radio station mode.
For a best FM reception
- Make sure that you have fully extended the FM antenna wire.
Preset Radio Stations:
You can store up to 40 of your favorite stations in the tuner memory for easy recall at any time.
1) Press SOURCE button on remote to select TUNER, and press GOTO button, the VFD will display "---:---" digital input mode, please input FM frequency of the radio station that what you want to listen.
For example : 106.20, after input station frequency by using the number buttons, press PL AY button to confirm.
2) Once the desired radio station is tuned, press MEMORY button on remote control, VFD will display “CH__” input the preset number you want to store the radio station.
How to recall presets radio stations
Press GOTO button on remote control, VFD will display “CH_”, and press the preset number of the radio station to recall it. For example, press 1 to play the radio station you preset in position 1. If the preset number is above 10, press ‘+10’ button on remote control and number key to input second digit preset number.

The unit can be used to play the music from many types of external device
- Connect by using a 3.5mm Male-to-Male Stereo cable the external device to the LINE IN connector/jack of the unit.
If your TV has only one output for audio (MONO). Connect it to the left (white) audio jack on the unit.
- PressSOURCE repeatedly to select the LINE IN MODE.
- Start playback on the external audio device. Adjust the volume on the audio device (do not set the volume to a high level in order to avoid distortion). You may also adjust the volume on the appliance.
To control playback function, use the controls on the external audio device.
USB OPERATION
You can enjoy media files saved on an USB device by connecting the USB device to the USB port of the unit.
- Connect the USB device to the USB port of the unit.
- Select the USB MODE by pressing CD/USB on your remote control
- Select a file you want to play using / + , / - , / , / + directly thanks to number keys.
- Press on remote control or on the unit to start the playback.
- Turn the VOLUME knob or press VOL+ / VOL-to increase or decrease volume level.
- Press stop button on unit or on remote control to stop USB playback.
- Before disconnecting the USB device, change the source by pressing SOURCE button.
Compatible USB Device:
Mp3 player: Flash type Mp3 player.
USB Flash Drive: Devices that support USB2.0 or USB 1.1.
The USB function may not be available depending on device.
Device which require additional program installation when you have connected it to a computer, are not supported.
Do not extract the USB device while in operation.
For a large USB capacity, it may take longer than a few minute to be searched.
To prevent data loss, back up all data.
If you use a USB extension cable or USB hub, the USB device is not recognized.
Using NTFS file system is not supported. (Only FAT (16/32) file system is supported)
This unit is not supported when the total number of files is 1000 or more.
External HDD, locked devices or hard type USB devices are not supported.
PROGRAM MODE
The operation of PROGRAM MODE are as the same as that of CD / MP3. Please refer to CD / MP3 OPERATION section paragraph PROGRAM.
BLUETOOTHOPERATION
Note: Prior to use Bluetooth function, your micro system should be paired firstly with your Bluetooth device. ("Pairing" means establish connection between Bluetooth devices such as MOBILE PHONE, TABLETS, PC, ETC.)
- Press the “SOURCE” button to switch into the BLUETOOTH MODE, “BT” displays on the VFD.
- In Bluetooth mode, the blue status indicator flashes three times, then 2 beep sounds, the status indicator goes RED & flashes, The micro system enters automatically searches for Bluetooth device.
- Turn on Bluetooth functionality on your device and make it discoverable (see your device's instructions to add or setup a Bluetooth device).
- Search for Bluetooth equipment "HCX 1080 BT" is your micro system identification. Red status indicator switches to blue lighting which means that devices are successfully paired. (During the paring, if the Bluetooth Version is below 3.0, you need to input code "0000") Your Bluetooth device stores the micro system unique identification at the same time.
NOTE: The effective range of Bluetooth devices is 10 meters.
Once paired, your device should connect to the HCX 1080 BT whenever within the Bluetooth range (10 meters).
NFC FUNCTION
Using NFC (Near Field Communication), you can transfer your music from your phone to your Bluetooth device including NFC feature.
The maximum reading distance is about 1 cm, which prevents unauthorized communications.
Connection procedure
- Please press SOURCE button on remote to switch into Bluetooth mode
- Before connecting, make sure your connecting devices (e.g. phone or Tablet) with NFC technology.
- Set your connecting devices (e.g. phone or Tablet) into Bluetooth working mode.
- Set your connecting devices (e.g. phone or Tablet) in to NFC working mode. For all the devices with NFC, you will find NFC setting on your device, confirm setting "Allow data exchange when it touches another device". Please refer to below photo from the cell phone.
NFC
Allow data exchange when the phone
touches another device

CARE AND MAINTENANCE
*Carrying for Compact Discs
- Treat the disc carefully. Handle the disc only by its edges. Never allow your fingers
to come in contact with the shiny, unprinted side of the disc.
- Do not attach adhesive tape, stickers, etc. to the disc label.
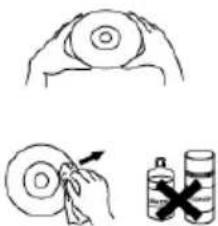
- Clean the discs periodically with a soft, lint-free, dry cloth. Never use detergents or abrasive cleaners to clean the disc. If necessary, use a CD
cleaning kit. If a disc skips or gets stuck on a section of the disc, it is probably dirty or damaged (scratched). When cleaning the disc, wipe in straight lines from the center of the disc to the outer edge of the disc. Never wipe in circular motions.
- This unit is designed to play discs bearing the identification logo as shown here or MP3 format Disc. Other discs may not conform to the CD standard and may not play properly.
- Discs should be stored in their cases after each use to avoid damage.
- Do not expose discs to direct sunlight, high humidity, high temperatures, or dust, etc. Prolonged exposure or extreme temperatures can warp the disc.
- Do not stick or write anything on either side of the disc. Sharp writing instruments or the ink may damage the surface.

Care of the Cabinet
- To prevent fire or shock hazard, disconnect your unit from the AC power source when cleaning.
- The finish on your unit may be cleaned with a dust cloth and cared for as other furniture. Use caution when cleaning and wiping the plastic parts.
- Mild soap and a damp cloth may be used on the front panel.
To Clean the Lens
If the lens gets dirty, your player may skip or may not play a CD
- Open the CD door.
- Use a camera lens blower/brush to blow on the lens once or twice, brush the dust or particles off the lens then blow again.
- To remove fingerprints, use a dry cotton swab to wipe from the middle to outer edge of the lens.
TROUBLE SHOOTING GUIDE
If a fault occurs, first check the points listed below before taking the set to repair.
Do not open the set as there is a risk of electric shock. If you are unable to remedy a problem by following these hints, consult your dealer or service center.
WARNING : under no circumstances should you try to repair the set yourself, as this will invalidate the warranty.
| Symptom | Cause | Correction |
| General | ||
| No power. | The power cord is not plugged | Plug in the power cord. |
| Check whether electricity failed. | Check the condition by operating other electronic devices. | |
| No sound. | Check whether you select right function. | Press SOURCE and check the selected function. |
| CD | ||
| The unit dose not start playback. | An unplayable disc is inserted | Insert a playable disc |
| The disc is dirty | Clean the disc | |
| RADIO | ||
| Radio stations cannot be tuned in. | The antenna is positioned or connected poorly. | Connect the antenna securely. |
| Remote control | ||
| The remote control does not work properly. | The remote control is too far from the unit. | Operate the remote control within about 23ft(7M). |
| There is an obstacle in the path of the remote control and the unit. | Remote the obstacle. | |
| The battery in the remote control is exhausted. | Replace the battery with new one. | |
TECHNICAL SPECIFICATIONS
MODEL
Power supply
Power consumption
Standby mode consumption
HCX 1080 BT
AC 110 - 230 V, 50/60 Hz
20 W
< 0.5 W
RADIO SECTION
Frequency ranges
FM 87.5 ~ 108.5 MHz
CD PLAYER
CD / CD-R-RW / MP3 FORMAT
USB SECTION
USB compatible Port 2.0
AUXILIARY
3.5MM
AMPLIFIER
Output power
BASS
TREBLE
Frequency Response
S/N
2x10W (RMS)
-10dB~+10dB
-10dB~+10dB
20Hz20KHz ± 3dB
80dB
ACCESSORIES
Multifunction Remote Control
(Battery: 2X AAA –not included)
Audio cable RCA
Audio cable LINE IN
User manual
Dimensions & weight
Unit
1 speaker
W247XH83xD230mm / 1.8 Kg
W115xH163xD157mm / 0.75KG
IMPORTANT:
Due to continual revision and improvement on our products design, specifications are subject to change without further notice.
DESCRIPTION DES COMMANDES
Speaker 115x163x157mm
Precautions for correct disposal of the product.
The symbol shown on the equipment indicates that waste must be disposed of in "separate collection" and so the product must not be disposed of together with urban waste.
The user must take the product to special "separate waste collection centres" provided by local government, or deliver it to the retailer against the purchase of a new product.
Separate collection of waste and subsequent treatment, recycling and disposal operations promotes the production of equipment with recycled materials and limits negative effects on the environment and on health caused by improper handling of waste.
Illegal disposal of the product leads to the enforcement of administrative penalties.
WARNING: DO NOT OPEN THE SET. NEITHER CONTROLS OR SPARE PARTS TO BE USED BY THE USER ARE TO BE FOUND INSIDE IT. APPLY TO AUTHORISED TREVI CENTERS FOR SERVICE OPERATIONS.
ACHTUNG
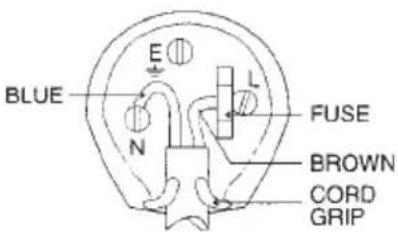
WIRES CONNECTIONS TO A UK THREE-PIN PLUG
The wires in this mains lead are coloured in accordance with the following wiring codes:
Blue: Neutral
Brown: Live
The wires in this mains lead must be connected to the terminals in the plug as follows:
Blue wire: N or Black
Brown wire: L or Red
Neither wire is to be connected to the earth
(E or W) terminal of three-pin plug.
Should the fuse fail in the plug remove the plug form the wall socket and replace the fuse with a 3 Amp. ASTA approved BS 1362 fuse.
- BEFORE WE BEGIN
- WARNING
- CAUTION
- SAFETY INTRUCTIONS
- SAFETY INSTRUCTIONS
- PREPARATION FOR USE
- Unpacking and set up
- CONNECTIONS
- FM ANTENNA CONNECTION
- Hints for Better FM Reception:
- STEREO HEADPHONE JACK
- DESCRIPTION OF UNIT AND CONTROLS
- DESCRIPTION OF REMOTE CONTROL
- IR REMOTE SENSOR
- BATTERYINSTALLATION
- BATTERYNSTALLATION
- Notes:
- SOURCE BUTTON
- MUTE Button (On Remote Control Only)
- VOLUMELEVEL
- LOUDNESS
- FUNCTION
- CD / MP3 OPERATION
- OPEN/ CLOSE .
- Searching for a section within a CD (On Remote Control Only).
- Select another track or file
- Listening to your tracks (files) repeatedly (On Remote Control Only)
- Listening to your tracks (files) randomly(On Remote Control Only)
- A-B function(On Remote Control Only)
- Intro function(On Remote Control Only)
- PROGRAM
- Creating your own playlist
- About MP3
- MP3 Disc compatibility with this unit is limited as follows
- RADIO OPERATION
- For a best FM reception
- Preset Radio Stations:
- The unit can be used to play the music from many types of external device
- USB OPERATION
- You can enjoy media files saved on an USB device by connecting the USB device to the USB port of the unit.
- Compatible USB Device:
- Do not extract the USB device while in operation.
- PROGRAM MODE
- BLUETOOTHOPERATION
- NFC FUNCTION
- Connection procedure
- CARE AND MAINTENANCE
- *Carrying for Compact Discs
- Care of the Cabinet
- To Clean the Lens
- TROUBLE SHOOTING GUIDE
- TECHNICAL SPECIFICATIONS
- MODEL
- RADIO SECTION
- CD PLAYER
- USB SECTION
- AUXILIARY
- AMPLIFIER
- ACCESSORIES
- Dimensions & weight
- DESCRIPTION DES COMMANDES
- Precautions for correct disposal of the product.
- ACHTUNG
- WIRES CONNECTIONS TO A UK THREE-PIN PLUG
Brand : Trevi
Model : HCX 1080 BT
Category : Hi-fi system