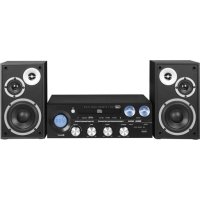
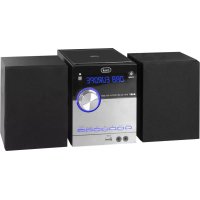
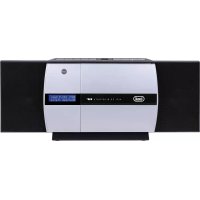
HCX 10D6 DAB - Hi-fi system Trevi - Free user manual and instructions
Find the device manual for free HCX 10D6 DAB Trevi in PDF.

| Brand | Trevi |
| Model | HCX 10D6 DAB |
| Category | Hi-fi system |
| Product type | Hi-fi chain with DAB+/FM radio, CD player, Bluetooth, USB, auxiliary input |
| Main unit dimensions | 161 x 125 x 226 mm |
| Speaker dimensions | 102 x 161 x 112 mm |
| Power supply | 100-240 V ~ 50/60 Hz |
| Power consumption | 22 W |
| Standby consumption | < 0,5 W |
| Audio power | 20 W |
| FM radio reception | 87,5 - 108 MHz |
| DAB/DAB+ radio reception | 174 - 240 MHz |
| Compatible disc type | CD / CD-R / RW / MP3 |
| Supported MP3 bitrate | 32 ~ 320 kbps |
| Bluetooth | Version 2.4 GHz, transmission power 2,5 mW, typical range 10 m |
| USB input | Yes, for MP3 file playback |
| Auxiliary input (AUX IN) | Yes, 3.5 mm jack |
| Headphone jack | Yes, 3.5 mm jack |
| Number of radio presets | 30 (DAB and FM) |
| Audio functions | Preset equalizer (Classic, Rock, Pop, Jazz, Flat), repeat, random play, programming |
| Display | Adjustable backlighting, DLS information, program type, frequency, error rate, bitrate, time, date |
| Cleaning | Soft cloth slightly damp, avoid solvents and abrasives |
| Safety | Do not open the device (high voltage), do not expose to moisture, do not obstruct ventilation slots, avoid naked flames |
| Repairability | Contact an authorized TREVI service center |
| Remote control batteries | 1 lithium 3V CR2025 battery (pre-installed) |
Frequently Asked Questions - HCX 10D6 DAB Trevi
User questions about HCX 10D6 DAB Trevi
0 question about this device. Answer the ones you know or ask your own.
Ask a new question about this device
Download the instructions for your Hi-fi system in PDF format for free! Find your manual HCX 10D6 DAB - Trevi and take your electronic device back in hand. On this page are published all the documents necessary for the use of your device. HCX 10D6 DAB by Trevi.
USER MANUAL HCX 10D6 DAB Trevi
MINI HIFI STEREO SYSTEM WITH DAB+/CD/MP3/USB/AUX-IN AND BLUETOOTH® CONNECTION User manual and connection
MINI SYSTÉME HIFI AVEC DAB+/CD/MP3/USB/AUX-IN ET ConnEXION BLUETOOTH® Mode d'emploi et connexion
WARNING: DO NOT OPEN THE SET. NEITHER CONTROLS OR SPARE PARTS TO BE USED BY THE USER ARE TO BE FOUND INSIDE IT. APPLY TO AUTHORISED TREVI CENTERS FOR SERVICE OPERATIONS.
The wires in this mains lead are coloured in accordance with the following wiring codes:
Blue: Neutral
Brown: .Live
The wires in this mains lead must be connected to the terminals in the plug as follows:
Blue wire: N or Black
Brown wire: L or Red
Neither wire is to be connected to the earth (E or W) terminal of three-pin plug.
Should the fuse fail in the plug remove the plug form the wall socket and replace the fuse with a 3 Amp. ASTA approved BS 1362 fuse.
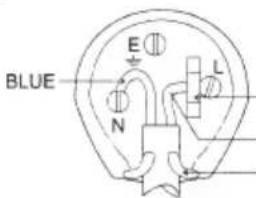
FUSE
BROWN
CORE GRIP
Assorbimento in Standby: <0.5W
Potenza Audio 20W
Ricezone banda in FM: 87.5 - 108 MHz
Ricezone banda DAB/DAB+: 174 - 240 MHz
This symbol on the back of the unit and in this manual indicate the presence on them of important instructions for safe use. Please read them carefully before using the appliance.

DANGEROUS VOLTAGE
This symbol on the back of the unit and in this manual indicates the presence in this equipment components operating at high voltage, do not open it to avoid the risk of electric shock.

WARNING ON THE LASER
This device is equipped with a laser beam reading system. Although the laser is of low power and with a safety device that prevents open door operation, scrupulously observe the following warnings: Do not bring the eye to the laser lens with the device open, risk of retinal injury. Do not attempt to disassemble or tamper with the laser unit, risk of radiation absorption.
NOTES OF USE
Please ensure that the equipment is positioned in a well ventilated area and ensure that there is at least 10cm (4") of free space along the sides and top of the equipment. 10cm (4") 10cm (4"):
- Use the unit on a firm, level surface free from vibration.
- Place the unit at least 30~cm (12") away from any CRT TV to avoid color variations across the TV screen. If the variations persist, move the unit further away from the TV. LCD TV is not prone to such variation.
- Keep the unit away from direct sunlight, strong magnetic fields, excessive dust, humidity and electronic/electrical equipment (home computers, facsimiles, etc.) which generate electrical noise.
- Do not place anything on top of the unit.
- Do not expose the unit to moisture, to temperatures higher than 40^ (104^) or to extremely low temperatures.
If your system does not work properly, disconnect the AC power lead from the wall socket. Plug the AC power lead back in, and then turn on your system. - In case of an electrical storm, unplug the unit for safety.
- Hold the AC power plug by the head when removing it from the wall socket, as pulling the lead can damage internal wires.
- The AC power plug is used as a disconnect device and shall always remain readily operable.
- Do not remove the outer cover, as this may result in electric shock. Refer internal service to your local service facility.
The ventilation should not be impeded by covering the ventilation openings with items, such as newspapers, tablecloths, curtains, etc. - No naked flame sources, such as lighted candles, should be placed on the apparatus.
- Attention should be drawn to the environmental aspects of battery disposal.
- This unit should only be used within the range of 5^ - 35^ (41^ - 95^) .
- The apparatus is designed for use in moderate climates.
- The apparatus shall not be exposed to dripping or splashing and that no objects filled with liquids, such as vases, shall be placed on the apparatus.
- Keep this manual for future reference.
CARE AND MAINTENANCE
For cleaning we recommend the use of a soft, slightly damp cloth. Avoid solvents or abrasives.
IMPORTANT
The good construction of this machine guarantees the perfect functioning for a long time. However, should any problem arise, you should consult your nearest authorized service center.
TREVI pursues a policy of continuous research and development. Therefore, the products may have different features from those described.
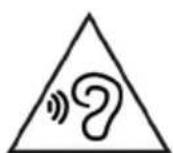
To avoid possible hearing damage, limit the time listening at high volumes
FRONT UNIT VIEW
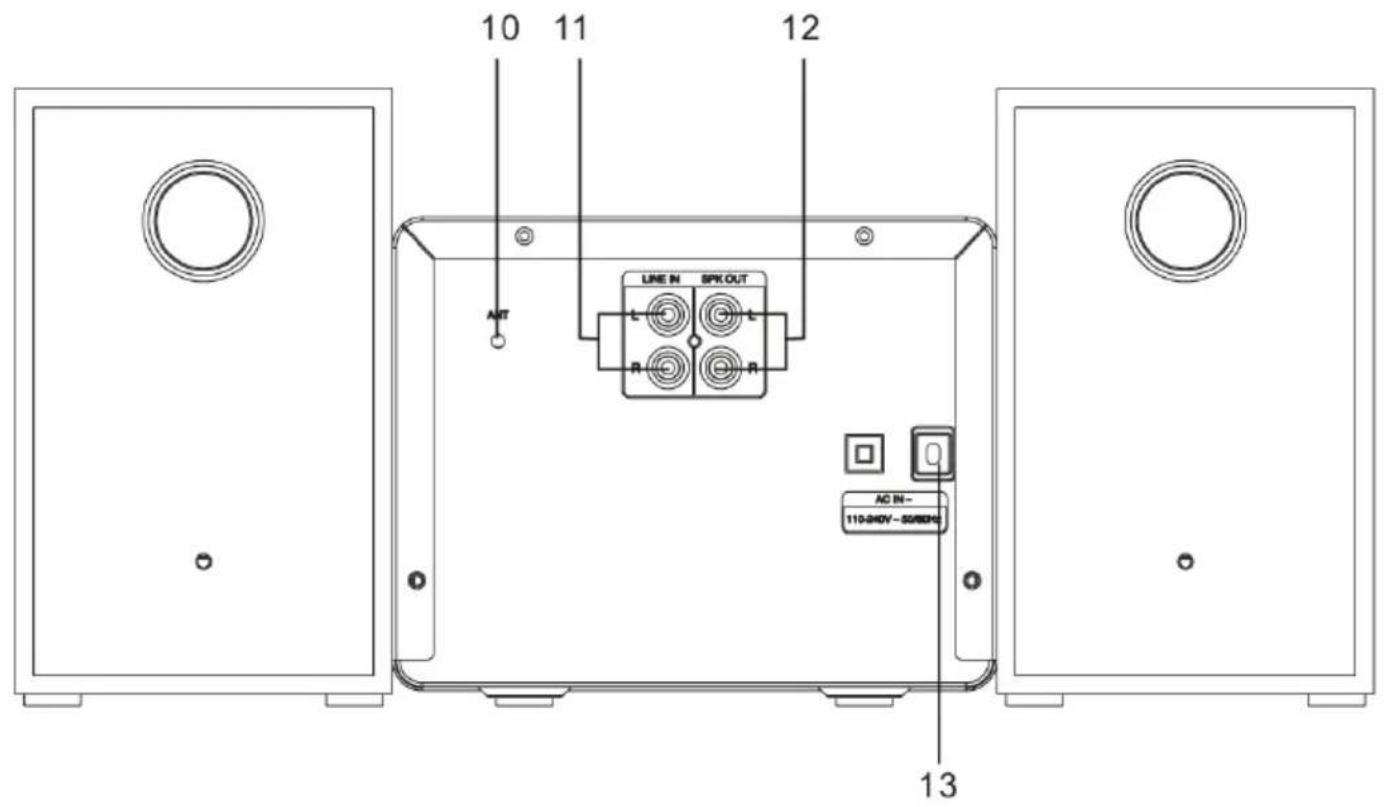
REAR UNIT VIEW
DESCRIPTION OF CONTROLS
- Main Power Switch
- STANDBY/MODE button
- 卡 button, previous track/radio station
- button, next track/radio station
- Litton, Open/Close CD tray
- Volume adjustment/ II /ENTER.
-
Headphones socket
-
CD tray
- USB input.
- Antenna
- Audio Input (AUX IN)
- R/L speaker connection sockets
- Power cord
REMOTE CONTROL
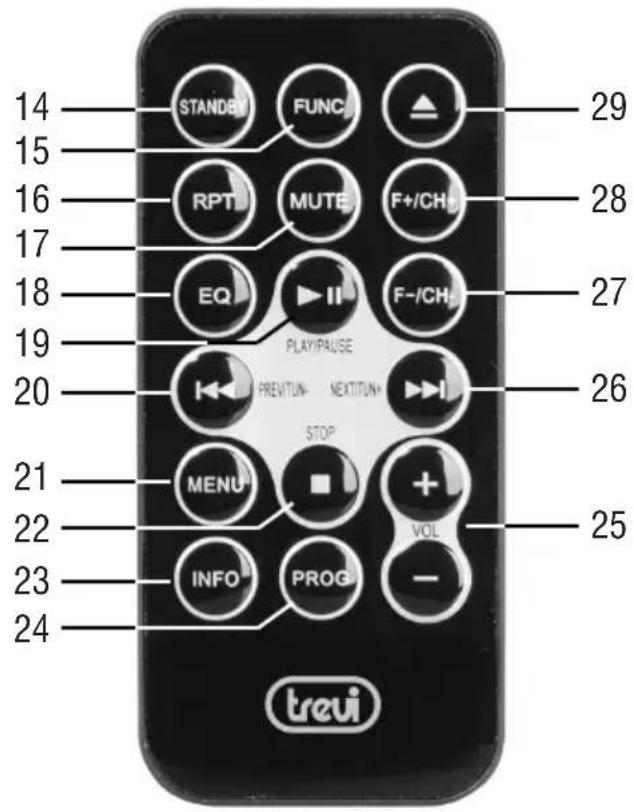
DESCRIPTION OF CONTROLS
- Standby button
- FUNC button, source selection
16.RPT button - MUTE button, device sound exclusion
- EQ button, selection of various preset sound modes
- II, Play/Pause/ confirm selection
- button, previous track/ radio station
- MENU buttons
22.Key stop - INFO button
24.PROG button - VOL +/- buttons, volume adjustment
- button, next track/ radio station
27 F-/CH- button, previous folder in CD or USB mode/ preset radio station - F+/CH+ button, next folder in CD or USB mode/ preset radio station
- ENTER key,
ACTIVATION AND REPLACEMENT OF REMOTE CONTROL BATTERY
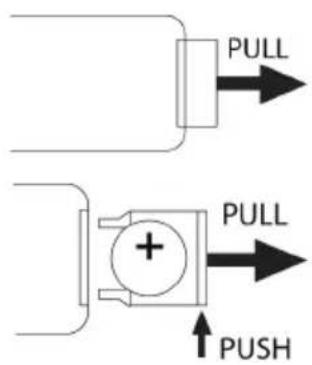
The remote control has a cell battery already installed. To activate the battery, remove the transparent tab at the bottom of the remote control. The remote control is now ready to use.
To Replace Battery:
- Remove the battery compartment cover as per the illustration on the right.
- Observe the correct polarity and install a 3V lithium battery (CR2025).
- Close the cover.
SUPPLY
Connect the power cord (13) to 100-240V 50 / 60Hz power outlet.
Do not connect the appliance to electrical outlets other than those indicated.
At the first start-up the device will scan the DAB stations present, the display will show the word SCANNING. Wait until the display shows the current time.
Note: Unless otherwise specified, the descriptions of the commands apply to both the device and the remote control.
ON/OFF
- Press Main Power Switch (1) on the unit to put the unit in Stand-by mode (the time and date will be shown on the display);
- To Enable/disable STAND-BY mode, press STANDBY button (14) on the remote control;
- If you want to turn Off the unit completely, press Main Power Switch (1) on the unit.
Note: In CD, USB or AUX source, if no operation is performed within 10 minutes, the unit will automatically enter STANDBY mode.
VOLUME CONTROL AND EQUALIZER FUNCTION
- Turn the Volume control (6) on the appliance or press the VOL +/- keys (25) on the remote control to increase or decrease the volume;
- Press the EQ button (18) on the remote control several times to select one of the preset audio dynamics (Classic, Rock, Pop, Jazz, Flat).
- Switch on the appliance and press the FUNC key (15) on the remote control several times until the indication DAB appears on the display;
The first time the radio is turned on it will scan and store automatically all available DAB stations. - If you want to repeat the scan station operation, press and hold (19) on the remote control for a few seconds to start scanning the DAB stations, or press the MENU button (21) on the remote control to access the DAB menu. Search and select the word "Full scan";
- Press the button (4) or (3) on the unit, or the button (26) or (20) on the remote control to scroll through the various tuned DAB stations;
- Press the VOLUME/ENTER control (6) on the unit, or the button (19) on the remote control on the desired DAB station to start playback;
- Press the INFO button (23) on the remote control several times to display all the information on the station received.
STORING RADIO STATIONS
To store a radio station, do as following:
- Tune in to the desired radio station;
- Press and hold the PROG button (24) for a few seconds, the display will show the word "PRESET STORE";
- Use the (26) and (20) buttons to select a memory location;
- Press the button (19) to confirm and save the radio station;
Repeat this for each radio station you wish to save. 30 memory locations are available.
5. To recall a stored radio station use the F + / CH + (28) and F - / CH - (27) buttons.
DAB/DAB+MENU
- Press MENU button (21) of remote control to enter the DAB menu;
- Press the key (4) or (3) on the unit, or the keys (26) or (20) on the remote control to display the various DAB menu items;
- Press the VOLUME/ENTER control (6) on the unit, or button (19) on the remote control to select the displayed menu item: Full scan: allows you to scan the entire DAB/DAB+ band and automatically store the found stations.
Manual tune: allows you to manually scan a single DAB/DAB + frequency. Press (26) or (20) buttons to select the channel number for the frequency to be scanned and then press (19) button to start scanning. The found stations will be automatically stored.
DRC: allows you to enable / disable the DRC function to improve the sound while listening in noisy environments. The DRC level can be set up (high), low (low) or OFF (off).
Prune: allows you to delete from the list of stations stored all the radio found but not available (poor signal). Move with the keys (26) and (20) to Y (YES) and confirm the deletion with (19).
System: allows access to the system submenu:
Time: allows you to set the current time/date.
Set Time/Date: set the current time and date.
Auto Update: select from which source to automatically set the time and date if available.
Set 12/24 Hour: set the time format 12/24H.
Set Date Format: set the date format.
Back light: allows you to set the time and brightness level of the display:
Timeout: display lighting time adjustment (10sec, 20sec, 30sec., 45sec, 60sec, 90sec, 120sec, 180sec, ON).
On level: adjustment of the display lighting degree with the appliance running (High, Medium, Low).
Dim level: adjustment of display lighting degree in Stand-by mode (High, Medium, Low).
Language: it is possible to choose the language of the menus; Italian, English (default), Deutsch, Italian, Francais are available.
Factory Reset: allows you to reset the device to the factory settings. At the end of the reset an automatic scan of the DAB/DAB+ stations will be performed. Move with the keys (26) and (20) to Y (YES) and confirm with (19).
Software upgrade: allows you to perform a scan to check for any updates available for the device.
SW version: allows you to view the software version of the device.
DAB/DAB+DISPLAYMODE
Every time you press the INFO button (23) on the remote control, the display will cycle through the following display modes.
DLS: Dynamic label segment is a scrolling message that the broadcaster may include with their transmissions. This message usually includes information, such as program detail etc...
Program Type: This describes the "Style" or "genre" of music that is being broadcast e.g. "Rock "or Classical".
Channel Frequency: Displays the current DAB multiplex in use.
Signal error index: displays information relating to the level of signal errors and the intensity with which it is received.
Bit Rate: displays information related to the compression ratio of the current transmission.
Time: displays the time signal received by the radio station.
Date: displays information about the date.
FM RADIO OPERATION
-
Switch on the appliance and press repeatedly the FUNC button (15) on the remote control until the FM indication appears on the display;
-
Press the buttons (4) and (3) on the unit repeatedly, or the (26) and (20) buttons on the remote control to increase or decrease the frequency 0,05MHz and perform a step-by-step search;
-
Hold down for a few seconds the buttons (4) and (3) on the unit, or the (26) and (20) buttons on the remote control to tune into the next station or previous radio station with the best signal received;
-
To activate the automatic search and memorization of radio stations (SCAN) function, press the button II (19) on the remote control or press the MENU button (21) to access the FM menu. Search for and select the word "Scan setting"; from this item it is possible to select the type of automatic search: select STRONG (stations with strong signal) or ALL (all stations), confirm with the II (19) on the remote control.
The device is capable of storing up to 30 stations.
-
To store a radio station:
-
Go to the frequency to be memorized and keep the PROG key (24) pressed for a few seconds, the display will show the wording "PRESET STORE"; Use the keys (26) and (20) to select a memory location;
-
Press II (19) to confirm.
-
To call up a stored radio station use F + / CH + (28) and F - / CH - (27) buttons.
Note: To get the best FM reception connected and oriented the antenna. If reception is not good try to adjust the length and orientation of the antenna differently, however the quality of FM reception depends very much on the place where the device is placed.
- Switch on the appliance and press the FUNC key (15) on the remote control several times until CD appears on the display. If there is no disc, the indication "NO DISC" will appear on the display;
- Open the CD compartment (8) by pressing the button (29) on the remote control and insert the disc with the written side facing up. Gently close the compartment;
- After a few seconds the display will show the number of tracks on the disc. Press the button II (19) on the remote control to start music playback;
- Press the button (19) on the remote control again to activate the pause, the elapsed time of the track will start to flash. Press it again to start normal playback;
- Press the button 2) on the remote control to stop playback permanently.
JUMP TRACE AND QUICK SEARCH
- Press (4) and (3) on the unit, or the (26) and (20) buttons on the remote control to move to the previous or next track;
- Press and hold (4) and (3) on the unit, or the (26) and (20) buttons on the remote control during playback to quickly search a particular musical passage. Release the button to return to normal playback.
REPEAT
- Press RPT button (16) on the remote control, REP-1 indication appears on the display to reproduce the same track continuously.
- Press the RPT button (16) on the remote control, RPT-DIR indication appears on the display to continuously play all the tracks in the selected folder (only for MP3 CDs containing folders).
- Press the RPT button (16) on the remote control, RPT ALL indication appears on the display to continuously reproduce all the tracks present.
- Press the RPT button (16) on the remote control, RANDOM indication appears on the display to randomly reproduce all the tracks present.
- Press the RPT button (16) on the remote control until the INTRO indication appears on the display to play the first 10sec. of each song.
- Press the RPT (16) key on the remote control until the DISC indication appears on the display to continuously play all tracks on the disc.
ALBUM FUNCTION
NOTE: function valid only for MP3 CDs containing folders.
- When playing an MP3 CD or USB with multiple folders, press the F+/CH+ (28) and F-/CH-(27) buttons to select the folder you want to play.
PROGRAMMING
You can select the order in which the tracks are played.
- Press the button 22) on the remote control to stop playback;
- Press the PROG button (24) on the remote control, the message P01 appears on the display;
- Select the track you want to play first with the keys (4) and (3) on the unit, or the keys (26) and (20) on the remote control;
- Press the PROG button (24) on the remote control to confirm:
- Repeat steps 3 and 4 to store and play the songs you want; for audio CDs a maximum of 20 tracks can be stored, while for MP3/USB CDs a maximum of 99 tracks can be stored;
- Press the VOLUME/ENTER control (6) on the unit, or the II (19) on the remote control to start playback;
- Press the button 22) on the remote control twice to cancel programming.
USB INPUT OPERATION
- Connect a USB memory device to the USB (9) input;
- Switch On the appliance and press the FUNC button (15) on the remote control several times until the USB indication appears on the display, in the absence of the USB device, the display will show "NO USB";
Note: The device may not support some USB devices, this is due to the incompatibility of some processors.
3. For the rest of the functions, refer to the paragraph "CD-MP3 PLAYER OPERATION".
BLUETOOTH OPERATION
- Switch On the appliance and press FUNC button (15) on the remote control several times until the BT indication appears on the display;
- The word "Not Connected" will start to flash on the display and the system will automatically enter search;
- Activate the Bluetooth functionality on the external device to be paired and make it visible;
- Start the device search. At the end, look for the "HCX 10D6 DAB" device;
- Enter the password "0000" if necessary;
- After pairing, the device will emit a notification sound and the word "Connected" will remain on the display;
- Start audio playback from your device;
- Press (4) and (3) on the unit, or the (26) and (20) buttons on the remote control to move to the previous or next track;
- Press II (19) button on the remote control to activate the pause. Press it again to deactivate the pause;
- Press and hold the (19) button on the remote control to remove the coupling.
INPUT AUX IN
- Switch On the device and press several times FUNC button (15) on the remote control until the Enter Aux indication appears on the display;
- Connect any unit with audio output through the appropriate cable to the AUX IN (11) input;
- Command the external unit from its commands;
- Adjust the volume using the control (6) on the appliance or using the VOL +/- keys (25) on the remote control.
HEADPHONES
- Insert the headphones into the headphone jack (7);
- Start the desired playback and adjust the volume.

PRECAUTIONS FOR CORRECT DISPOSAL OF THE PRODUCT.
The symbol shown on the equipment indicates that waste must be disposed of in "separate collection" and so the product must not be disposed of together with urban waste.
The user must take the product to special "separate waste collection centres" provided by local government, or deliver it to the retailer against the purchase of a new product.
Separate collection of waste and subsequent treatment, recycling and disposal operations promotes the production of equipment with recycled materials and limits negative effects on the environment and on health caused by improper handling of waste. Illegal disposal of the product leads to the enforcement of administrative penalties.
TREVI pursues a policy of continuous research and development, the products may show different characteristics from those described.
TECHNICAL SPECIFICATIONS
Power and consumption: 110-240V 50/66Hz - 22W
Standby consumption: <0.5W
Power Audio 20W
FM band reception: 87.5 - 108 MHz
DAB/DAB ^+ band reception: 174-240 MHz
Bluetooth transmission power: 2.5mW
Bluetooth transmission frequency: 2.4GHz
CD disc type: CD/CD-R-RW/MP3
MP3 bit rate: MP3 (32 ~ 320 kbps)
Unit dimensions: 161 x 125 x 226 mm
Speaker dimensions: 102 x 161 x 112 mm
PRECAUTIONS POUR UNE ÉLIMINATION CORRECTE DU PRODUIT.
SIMPLIFIED EU DECLARATION OF CONFORMITY
Hereby TREVI Spa declares that the radio equipment type HCX 10D6 DAB is in compliance with directive 2014/53/EU.
The full text of the EU declaration of conformity is available at the following internet address:
https://www.trevi.it/dms/zidi/TREVI/DOCHCX10D6DAB.pdf