
NR917 - Hi-fi system Soundmaster - Free user manual and instructions
Find the device manual for free NR917 Soundmaster in PDF.
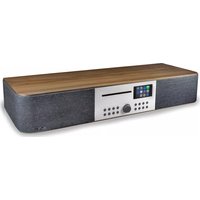
| Product type | Retro hi-fi system |
| Brand | Soundmaster |
| Model | NR917 |
| Category | Hi-fi system |
| Power supply | 230 V ~ 50 Hz (via mains adapter) |
| Main functions | AM/FM radio, CD/MP3 player, cassette deck, vinyl turntable (phono), USB player, SD card player, Bluetooth, USB recording |
| Laser type | Class 1 (invisible laser) |
| Antenna | FM wire (extendable), AM built-in |
| Connections | USB port, SD slot, mains adapter socket, integrated speakers (horn) |
| Maintenance | Clean with a dry cloth only; do not use detergents or abrasive cloths |
| Safety | Do not open (risk of electric shock); do not expose to moisture, direct heat or flames; unplug during storms |
| Included accessories | Mains adapter, FM wire antenna, horn support |
| Repairability | Repair only by an authorized center; opening voids warranty |
| Automatic standby mode | The device enters standby after 15 minutes of inactivity following playback |
| Declaration of conformity | Compliant with Directive 2014/53/EU |
| Recycling | Do not dispose of with household waste; recycle batteries and the device at a collection point |
Frequently Asked Questions - NR917 Soundmaster
User questions about NR917 Soundmaster
0 question about this device. Answer the ones you know or ask your own.
Ask a new question about this device
Download the instructions for your Hi-fi system in PDF format for free! Find your manual NR917 - Soundmaster and take your electronic device back in hand. On this page are published all the documents necessary for the use of your device. NR917 by Soundmaster.
USER MANUAL NR917 Soundmaster
natural_image
Black-and-white photo of a vintage gramophone with a horn emitting sound waves (no visible text or symbols)DEUTSCH
ENGLISH
FRANÇAIS
NEDERLANDS
ITALIANO
DANSK
SVENSKA
ČEŠTINA
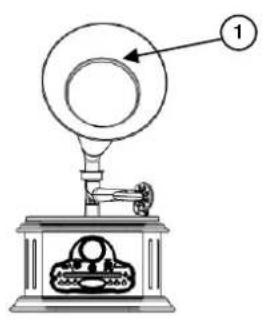
1 Horn
2 Frequenzskala
3 Ein/Aus, Lautstärkeregler
4 SD-Buchse
5 OPEN/CLOSE Taste
6 STOP Taste
7 PLAY/PAUSE Taste
8 REPEAT Taste
9 USB/SD Indikator
BEDIENTEIL
natural_image
Line drawing of a portable stove with a flame inside, connected to a piping bag (no text or symbols)

natural_image
Simple line drawing of a cone with an arrow indicating direction (no text or symbols)
natural_image
Illustration of a vintage gramophone emitting sound waves (no text or symbols)INBETRIEBNAHME
Copyright by Woerlein GmbH, 90556 Cadolzburg, www.soundmaster.de
Do not dispose of this product with the normal household waste at the end of its life cycle. Return it to a collection point for the recycling of electrical and electronic devices. This is indicated by the symbol on the product, user manual or packaging
The materials are reusable according to their markings. By reusing, recycling or other forms of utilization of old devices you make an important contribution to the protection of our environment.
Please contact your local authorities for details about collection points.
| WARNING | ! | |
| Risk of electric shockDo not open! |
Caution: To reduce the risk of electric shock, do not remove the cover (or back). There are no user serviceable parts inside. Refer servicing to qualified service personnel.

This symbol indicates the presence of dangerous voltage inside the enclosure, sufficient enough to cause electric shock.

This symbol indicates the presence of important operating and maintenance instructions for the device
Used batteries are hazardous waste and NOT to be disposed of with the household waste! As a consumer you are legally obligated to return all batteries for environmentally responsible recycling – no matter whether or not the batteries contain harmful substances*)
Return batteries free of charge to public collection points in your community or shops selling batteries of the respective kind.
Only return fully discharged batteries
*) marked Cd = cadmium, Hg = mercury, Pb = lead
- Only use mercury and cadmium-free batteries.
- Used batteries are hazardous waste and NOT to be disposed of with the household waste!!!
- Keep batteries away from children. Children might swallow batteries.
- Contact a physician immediately if a battery was swallowed.
- Check your batteries regularly to avoid battery leakage.
- Batteries shall not be exposed to excessive heat such as sunshine, fire or the like.
- CAUTION: Danger of explosion if battery is incorrectly replaced
- Replace only with the same or equivalent type
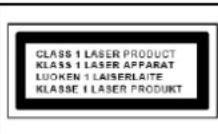
CAUTION - INVISIBLE LASER RADIATION WHEN OPENING THE COVER OR PRESSING THE SAFETY INTERLOCK. AVOID EXPOSURE TO THE LASER BEAM.
- The device is equipped with a "Class 1 Laser". Avoid exposure to the laser beam as this could cause eye injuries.
- Use the device in dry indoor environments only.
Safety, Environmental and Setup Instructions
- Protect the device from humidity.
- This apparatus is for moderate climates areas use, not suitable for use in tropical climates countries.
- No objects filled with liquids, such as vases, shall be placed on the apparatus.
- The mains plug or an appliance coupler is used as the disconnect device, the disconnect devices shall remain readily operable.
- Connect this device to a properly installed and earthed wall outlet only. Make sure the mains voltage corresponds with the specifications on the rating plate.
- Make sure the mains cable stays dry during operation. Do not pinch or damage the mains cable in any way.
- A damaged mains cable or plug must immediately be replaced by an authorized service center.
- In case of lightning, immediately disconnect the device from the mains supply.
- Children should be supervised by parents when using the device.
- Clean the device with a dry cloth only.
- Do NOT use CLEANING AGENTS or ABRASIVE CLOTHS!
- Do not expose the device to direct sunlight or other heat sources.
• Install the device at a location with sufficient ventilation in order to prevent heat accumulation. - Do not cover the ventilation openings!
- Install the device at a safe and vibration-free location.
- Install the device as far away as possible from computers and microwave units; otherwise radio reception may be disturbed.
- Do not open or repair the enclosure. It is not safe to do so and will void your warranty. Repairs only by authorized service/ customer center.
- No naked flame sources, such as lighted candles, should be placed on the unit.
- When you are necessary to ship the unit store it in its original package. Save the package for this purpose.
- In case of malfunction due to electrostatic discharge or fast transient (burst), remove and reconnect the power supply.
- If the unit is not using for a long period of time, disconnect it from the power supply by unplugging the power plug. This is to avoid the risk of fire.
LOCATION OF CONTROLS
FRONT VIEW
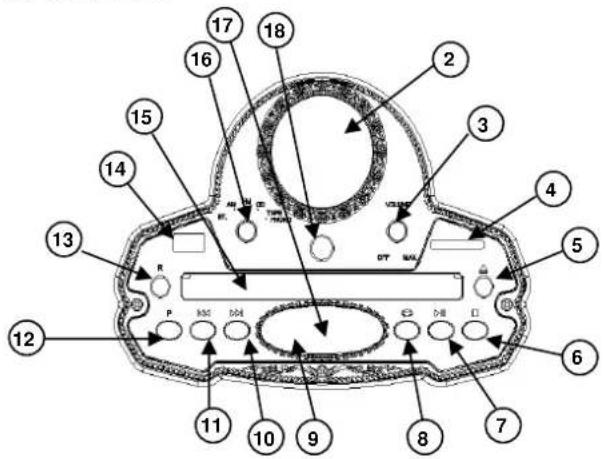
1 Horn
2 Radio Dial Lens
3 On/Off, Volume Control
4 SD Slot
5 OPEN/CLOSE ▲button
6 STOP button
7 PLAY/PAUSE button
8 REPEAT button
9 USB/SD indication light
SIDE VIEW LEFT
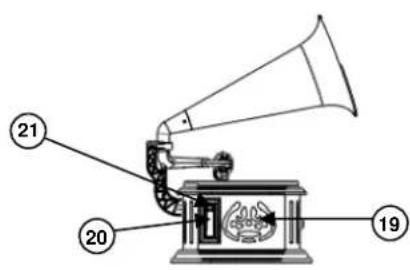
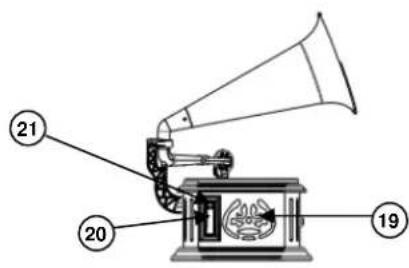
19 Speaker
20 Cassette
PANEL
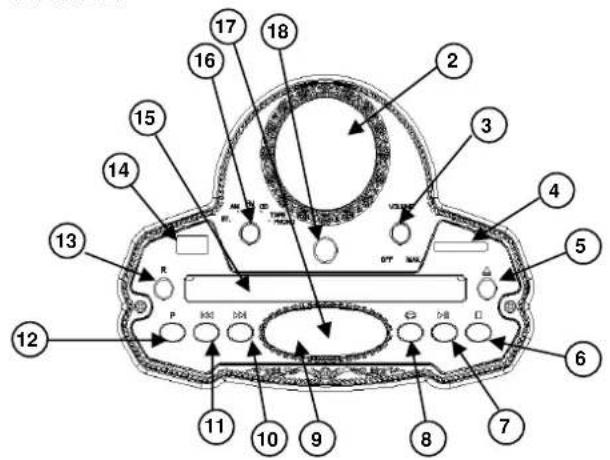
10 F.FWD button
11 REW button
12 PROGRAM button
13 ENCODING
14 USB Slot
15 CD DOOR
16 FUNCTION SELECTOR
17 CD Track display
18 Tuning Control
SIDE VIEW RIGHT
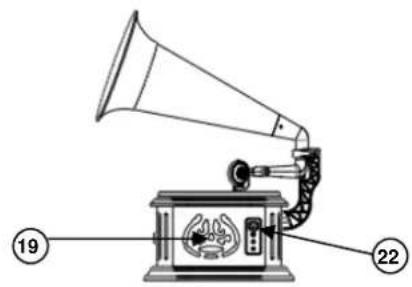
21 CASSETTE F.FWD/EJECT button
22 SPEED SELECTOR (33 13 , 45 or 78 RPM)
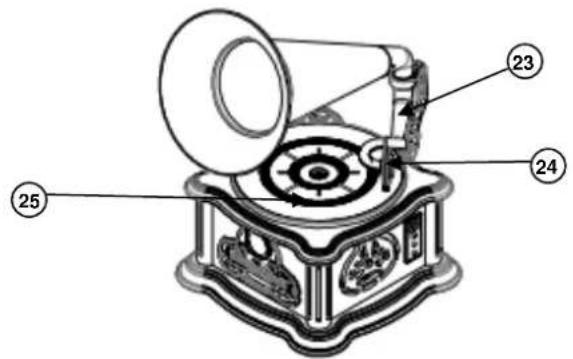
TURNTABLE VIEW
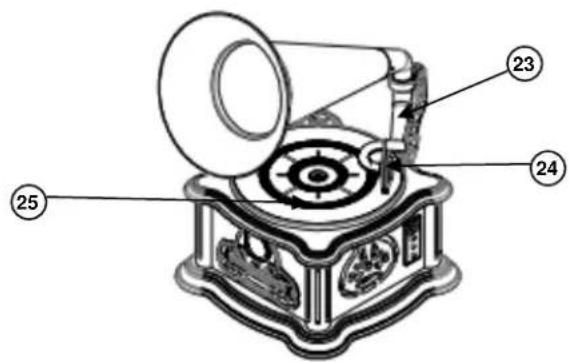
23 Tone arm
24 Cartridge
25 Turntable
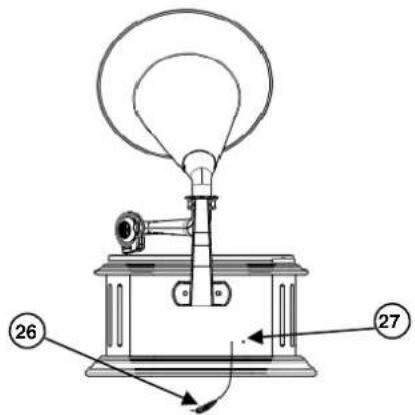
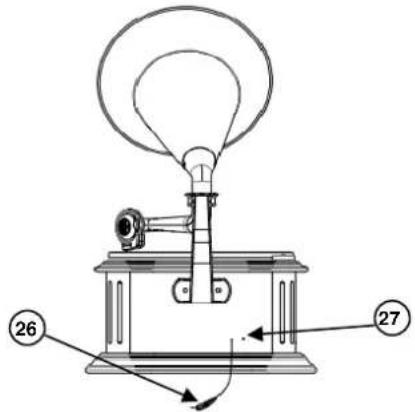
REAR VIEW
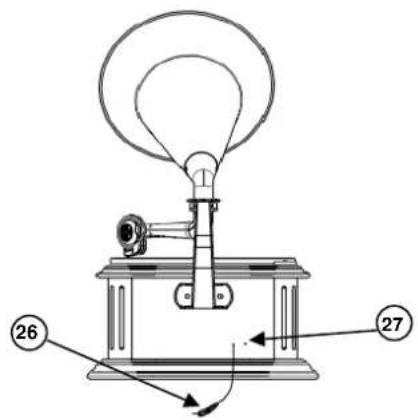
26 FM wire antenna
27 Adapter jack
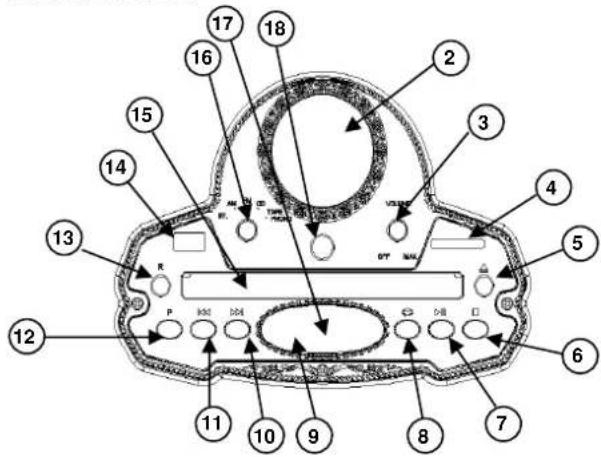
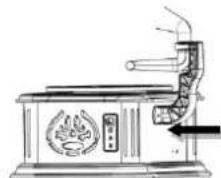
INSTALLATION OF SPEAKER AND HORN
- Insert the plug of the horn holder into the jack at the back side of the unit.
- Place the horn holder on the screws and fix it with the two wing nuts.
- Insert the front cover into the horn tube.
- Connect the bearing to the horn tube with the front cover, and fix the connection with the two screws.
natural_image
Line drawing of a portable stove with a flame inside, connected to a piping bag (no text or symbols)

natural_image
Simple line drawing of a cone with an arrow indicating direction (no text or symbols)
natural_image
Illustration of a vintage gramophone emitting sound waves (no text or symbols)AC OPERATION
Use only the supplied power adapter!
This old fashion TURNTABLE AM/FM CASSETTE CD/MP3 PLAYER operates with AC230V\~50Hz line power. Ensure that the voltage is the same as that indicated on the AC-adapter label.
Insert the DC plug of the AC-adapter in the AC-adapter jack on the back of the unit, and plug the AC adaptor into a wall outlet with AC power supply.
Automatic standby
As a power-saving feature, the unit will automatically switch to standby mode if you do not press any button within 15 minutes after playback is stopped.
RADIO
CAUTION! Do not connect the FM wire antenna to any external antenna!
TIPS FOR GOOD RADIO RECEPTION
- To ensure maximum FM tuner sensitivity, the FM wire antenna should be fully extended to obtain the best possible reception.
- To ensure best AM sensitivity, try repositioning the unit until the best reception is obtained.
RADIO OPERATION
- Turn the VOLUME CONTROL clockwise until a "click" is heard, the LED indicator lights up in the Radio Dial Lens.
- Set the FUNCTION SWITCH to the "AM" or "FM" position.
- Turn the TUNING CONTROL to select the desired radio station.
- When you are listening to the stereo program, the color of the LED indicator changes.
- Adjust the VOLUME CONTROL to obtain the desired sound level.
- To turn the radio off, turn the VOLUME CONTROL counter-clockwise until a click is heard.
CD
CD/MP3 DISC PLAYER
- Set the FUNCTION SWITCH to the CD position.
- Press the ▲ button. The display shows "OPEN".
- Put the disc into the CD tray, with the label side facing up.
- Then press the ▲ button again. The CD tray closes automatically. The display shows "LOAD".
- After the disc is read, the display shows the total number of tracks. If the display shows "no", it means that the disc cannot be read, or no disc is inserted.
- Press the ▶ button to start playback from the first track to the last track. The display shows the current playing track number. The playback stops automatically when all the tracks in the disc are played. Then the display shows the total number of tracks again.
- During playback, press the ▶II button to pause the playback, and press the ▶II button again to resume playback.
- For MP3-CD, if there are several foldesr in the disc, the display shows the current folder and file number alternatively. For example, if it is the second folder and the fifth file, the display shows F and alternately in every three seconds.
- To stop playback, press the ■ button. The display shows the total number of tracks in the disc.
SKIP FUNCTION
During playback, press the 🎯 or button to select a track.
REPEAT FUNCTION
- During playback, press once the REPEAT button. The repeat indication blinks fast, and play the current track repeatedly.
- During playback, press twice the REPEAT button. The repeat indication ⬇ blinks slowly, and play the current folder repeatedly (only for MP3-CD).
- During playback, press the REPEAT button three times. The repeat indication lights up, the complete disc will be repeated.
- During playback, press the REPEAT button four times. The repeat mode exits, and return to the normal playback.
PROGRAMMED PLAYBACK
Play programmed tracks in the sequence you desire.
- Set the unit in the stop mode, and press the PROG. button. The display shows PO
- Press the ◀◀ or ▶◀ button to select the track you like to program, then press the PROG. button to confirm.
- Repeat Step 2 to program more tracks in the list. Up to 20 tracks by CD, up to 99 tracks by MP3-CD.
- Press the Button to start playback of the programmed tracks.
Note: To delete the programmed tracks, press twice the STOP button, and all the programmed tracks are deleted.
USB/SD
The USB and SD works in the BT mode.
- Set the FUNCTION SWITCH to the BT position. The blue LED flashes if no USB or SD card is inserted, or Bluetooth is not connected.
- When both USB and SD card are inserted, the unit plays the USB first. Press briefly the "P" button to switch to USB mode, and the blue LED turns off. During USB or SD play, the display shows the playing time.
- The control functions are the same as CD play.
The control elements are the same as in CD mode.
Note: In USB/SD mode the STOP button has no function.
BLUETOOTH®
- Set the FUNCTION SWITCH to the BT position. The blue LED flashes, and the display shows "BLUE".
- Activate the Bluetooth function on your mobile phone, and search and select "NR917" from the list.
- After Bluetooth is connected successfully, the blue LED lights up. You can enjoy the music from your mobile phone through the speaker of the unit.
PHONO
- Set the FUNCTION SWITCH to the PHONO position. The display shows "PH".
- Put the record on the turntable.
Note: If you want to play a single record, insert the 45 rpm adaptor in the center of the turntable and then place the record. - Set the SPEED SELECTOR to 33 13 , 45 or 78 RPM according to the size of the record.
- Take out the stylus guard of the tone arm, then place the tone arm on the record carefully.
- Adjust the VOLUME CONTROL to adjust the desired sound level.
- To stop operation, lift up the tone arm carefully and return it to the tone arm rest.
CASSETTE
- Set the FUNCTION SWITCH to the PHONO position. The display shows "PH".
- Insert the cassette and the unit starts playback of the cassette.
- During playback, to wind fast forward, press the CASSETTE F.FWD/EJECT button half inwards. Then the CASSETTE F.FWD/EJECT button is kept in the middle height position. To return to normal playback, slightly press the CASSETTE F.FWD/EJECT button again. Then the CASSETTE F.FWD/EJECT button resumes to the highest position.
- To eject the cassette tape, press the CASSETTE F.FWD/EJECT button completely inwards. Then the CASSETTE F.FWD/EJECT button is kept at the lowest position.
RECORDING
NOTE! The recording is only applied to phono, BT, CD and cassette mode.
When playing a record or cassette, insert the USB, and the red light turns on.
- Press the button "R" to start recording, and the red light turns on.
- Press the button "R" again to stop recording, and the red light bright turns off. The recorded files are saved in the USB folder which is named "JL_REC".
How to play the recorded file in the USB
During USB play, press the left button to select the recorded file. The recorded files are saved at the end of the USB files and arranged according to the recording time.
Technical changes and misprints reserved. Copyright by Woerlein GmbH, 90556 Cadolzburg, www.soundmaster.de Duplication only with the express permission of Woerlein GmbH.

PROTECTION DE L'ENVIRONNEMENT

21 Bouton d'AVANCE RAPIDE/ D'ÉJECTION DE LA CASSETTE
22 SÉLECTEUR DE VITESSE (33½, 45 ou 78 TR/MIN)
VUE DE LA PLATINE

23 Bras de lecture
24 Cartouche
25 Platine
VUE ARRIÈRE

natural_image
Line drawing of a traditional steam stove with a fire hydrant and smokestack (no text or symbols)

natural_image
Simple line drawing of a conical funnel with an arrow indicating upward motion (no text or symbols)
natural_image
Illustration of a vintage gramophone emitting sound waves (no text or symbols)UTILISATION SUR SECTEUR CA
1 Hoorn
2 Lens van radioschaal
3 Aan/Uit, Volumeregeling
4 SD-gleuf
5 Knop OPENEN/SLUITEN
6 STOPKNOP
7 Knop AFSPELEN/PAUZEREN
8 HERHAALKNOP
9 USB/SD-indicatielampje
PANEEL

10 VOORUITSPOELKNOP
11 TERUGSPOELKNOP
12 PROGRAMMEERKNOP
13 CODERING
14 USB-poort
15 CD-KLEPJE
16 FUNCTIESCHAKELAAR
17 Weergave van cd-track
18 Afstemknop
ZIJAANZICHT LINKS
21 Knop CASSETTE
VOORUITSPOELEN/UITWERPEN
22 TOERENSCHAKELAAR (33 ^1/3 , 45 of 78 TPM)
AFBEELDING PLATENSPELER

23 Toonarm
24 Element
25 Draaiplateau
ACHTERAANZICHT
26 FM-draadantenne
27 Adapteringang
DE LUIDSPREKER EN HOORN INSTALLEREN
natural_image
Line drawing of a traditional stove with fire extinguisher and smokestack (no text or symbols)
natural_image
Simple line drawing of a conical funnel with an arrow indicating rotation (no text or symbols)
natural_image
Illustration of a vintage gramophone emitting sound waves (no text or symbols)AC-VOEDING
natural_image
Line drawing of a vintage gramophone with labeled component (no text or symbols beyond label)1 Tromba
2 Pannello frequenze radio
3 Acceso/Spento, Controllo volume
4 Slot SD
5 Pulsante APRI/CHIUDI
6 Pulsante INTERRUZIONE
7 Pulsante PLAY/PAUSA
8 Pulsante RIPETI
9 Indicatore luminoso USB/SD
PANNELLO
21 Pulsante AVANZAMENTO RAPIDO/ESTRAI CASSETTA
22 SELETTORE VELOCITÀ (33 ^1/3 , 45 o 78 GIRI)
VISTA GIRADISCHI
23 Braccio acustico
24 Puntina
25 Giradischi
VISTA POSTERIORE
natural_image
Line drawing of a traditional stove with fire extinguisher and smokestack (no text or symbols)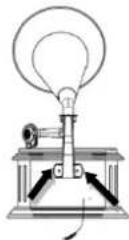

natural_image
Simple line drawing of a conical funnel with an arrow indicating rotation (no text or symbols)
natural_image
Illustration of a vintage gramophone emitting sound waves (no text or symbols)FUNZIONAMENTO CA
natural_image
Line drawing of a vintage gramophone with labeled component (no text or symbols beyond label)21 Knappen KASSETTE Hurtigt frem/
BÄNDUDL∅SER
22 HASTIGHEDSVÆLGER (33 ^1/3 , 45 eller 78 o/min.)
OVERSIGT OVER PLADESPILLER

23 Tonearm
24 Pick-up
25 Pladetallerken
BAGPANEL

26 FM trådantenne
27 Adapterstik
INSTALLATION AF H∅JTTALER OG TRAGT
natural_image
Line drawing of a vintage steam stove with a fire hydrant and control panel (no text or symbols)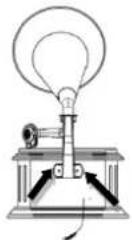

natural_image
Simple line drawing of a conical funnel with an arrow indicating rotation (no text or symbols)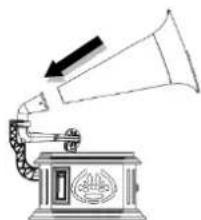
natural_image
Illustration of a vintage gramophone emitting sound waves (no text or symbols)LYSNETDRIFT
*) markerade Cd = kadmium, Hg = kvicksilver, Pb = bly
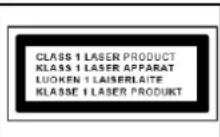
VARNING - OSYNLIG LASERSTRÅLNING NÄR DU ÖPPNAR LOCKET ELLER TRYCKER PÅ SÄKERHETSSPÄRREN. UNDVIK EXPONERING FÖR LASERSTRÅLEN.
1 Horn
2 Radio med frekvensskala
3 Volymkontroll på/av
4 SD Slott
5 ÖPPNA/STÄNG-knapp
6 STOPP knapp
7 SPELA/PAUS knapp
8 UPPREPNINGSKNAPP
9 USB/SD-indikeringslampa
PANEL

21 Knappen SNABBSPOLA FRAMÅT/MATA UT på KASETTEN
22 HASTIGHETER (33½, 45 eller 78 RPM)
VY AV SKIVSPELAREN

26 FM-trådantenn
27 Adapteruttag
INSTALLATION AV HÖGTALARE OCH MUSIKHORN
natural_image
Line drawing of a traditional steam stove with a fire extinguisher and control panel (no text or symbols)

natural_image
Simple line drawing of a conical funnel with an arrow indicating upward motion (no text or symbols)
natural_image
Illustration of a vintage gramophone emitting sound waves (no text or symbols)NÄTDRIFT
21 Tlačítko KAZETA – PŘEVINOUT
VPŘED/VYSUNOUT
22 VOLIČ RYCHLOSTI
(33½, 45 NEBO 78 OT./MIN)
POHLED NA OTOČNÝ TALÍŘ

natural_image
Line drawing of a portable stove with a fire hydrant and a hand operating the stove (no text or symbols)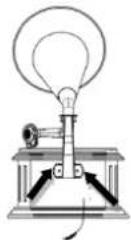

natural_image
Simple line drawing of a cone with an arrow indicating rotation (no text or symbols)
natural_image
Line drawing of a vintage gramophone emitting sound waves (no text or symbols)NAPÁJENÍ
Cadolzburg, www.soundmaster.de
D 90556 Cadolzburg, Germany
Tel: +49 9103 71 67 0
Fax: +49 9103 71 67 12
E-Mail: info@soundmaster.de
Hereby, Wörlein GmbH declares that this device is in compliance with the essential requirements and other relevant provisions of Directive 2014/53/EU.
A copy of the declaration of conformity can be obtained from the above address.
- INBETRIEBNAHME
- LOCATION OF CONTROLS
- INSTALLATION OF SPEAKER AND HORN
- AC OPERATION
- Use only the supplied power adapter!
- Automatic standby
- RADIO
- TIPS FOR GOOD RADIO RECEPTION
- RADIO OPERATION
- CD
- CD/MP3 DISC PLAYER
- SKIP FUNCTION
- REPEAT FUNCTION
- PROGRAMMED PLAYBACK
- USB/SD
- BLUETOOTH®
- PHONO
- CASSETTE
- RECORDING
- When playing a record or cassette, insert the USB, and the red light turns on.
- How to play the recorded file in the USB
- PROTECTION DE L'ENVIRONNEMENT
- UTILISATION SUR SECTEUR CA
- DE LUIDSPREKER EN HOORN INSTALLEREN
- AC-VOEDING
- FUNZIONAMENTO CA
- INSTALLATION AF H∅JTTALER OG TRAGT
- LYSNETDRIFT
- VARNING - OSYNLIG LASERSTRÅLNING NÄR DU ÖPPNAR LOCKET ELLER TRYCKER PÅ SÄKERHETSSPÄRREN. UNDVIK EXPONERING FÖR LASERSTRÅLEN.
- INSTALLATION AV HÖGTALARE OCH MUSIKHORN
- NÄTDRIFT
- NAPÁJENÍ
Brand : Soundmaster
Model : NR917
Category : Hi-fi system