CLEANTEC CTLC SYS I - Vacuum Cleaner FESTOOL - Free user manual and instructions
Find the device manual for free CLEANTEC CTLC SYS I FESTOOL in PDF.
| Product type | Cordless vacuum cleaner |
| Brand | Festool |
| Model | CLEANTEC CTLC SYS I |
| Motor voltage | 36 V (2x 18 V) |
| Compatible batteries | BP18 Li 4,0 HPC-AS, BP18 Li 4,0 HPC-ASI, BP18 Li 3,1 C, BP18 Li 3,1 CI |
| Max volumetric flow rate | 93.6 m³/h (vacuum) / 147 m³/h (central extraction unit) |
| Max suction pressure | 180 hPa |
| Filter surface area | 5357 cm² |
| Container volume | 4.5 L |
| Dimensions (L x W x H) | 396 x 297 x 307 mm (with systainer) |
| Weight (without batteries) | 7.1 kg |
| Noise level | 63 dB(A) |
| Hand-arm vibrations | < 2.5 m/s² |
| Dust category | L (exposure limit value > 1 mg/m³) |
| Usage | Dry only, indoor |
| Main functions | Manual and automatic start/stop, suction power regulation, Bluetooth connection with Festool tools and CT-FI remote control |
| Maintenance and cleaning | Replacement of filter bag and main filter, cleaning of container and seals |
| Safety | Automatic shut-off in case of overheating, volumetric flow monitoring, thermal fuse |
| Spare parts and repairability | Exclusive use of original Festool parts, repair by manufacturer or authorized workshops |
| General information | Integrated chip for data recording, compatibility with Festool Work app, Bluetooth® |
Frequently Asked Questions - CLEANTEC CTLC SYS I FESTOOL
User questions about CLEANTEC CTLC SYS I FESTOOL
0 question about this device. Answer the ones you know or ask your own.
Ask a new question about this device
Download the instructions for your Vacuum Cleaner in PDF format for free! Find your manual CLEANTEC CTLC SYS I - FESTOOL and take your electronic device back in hand. On this page are published all the documents necessary for the use of your device. CLEANTEC CTLC SYS I by FESTOOL.
USER MANUAL CLEANTEC CTLC SYS I FESTOOL
CTLC SYS I CTMC SYS I
Festool GmbH
Wertstraße 20
73240 Wendlingen
Germany
+49 (0)70 24/804-0
www.festool.com
2a
2b

3a
3b
3c
4a

Declaration of Conformity
We as the manufacturer Festool GmbH, Wertstraße 20, 73240 Wendlingen, Germany declare under our sole responsibility that the product(s):
Designation:
Cordless mobile dust extractor
(in combination with remote control CT-F I (serial number 10029918))
Designation of Type(s): Serial number(s) 1:
CTMC SYS I; CTLC SYS I 10037419; 10419326
fulfills all the relevant provisions of the following UK Regulations:
S.I. 2008/1597
Supply of Machinery [Safety] Regulations 2008
S.I. 2016/1091
Electromagnetic Compatibility Regulations 2016
S.I.2017/1206
Radio Equipment Regulations 2017
S.I. 2012/3032
Restriction of the Use of Certain Hazardous Substances in Electrical and Electronic Equipment Regulations 2012
and are manufactured in accordance with the following designated standards:
BS EN 60335-1:2012 + A2:2019
BS EN EN 60335-2-69:2012
BS EN 55014-1:2017 + A11:2020
BS EN 55014-2:2015
EN301489-1V2.2.3
EN301489-17V3.2.4
EN300328V2.2.2
BSEN62479:2010
BS EN IEC 63000:2018

Place and date of declaration: Wendlingen, 08.07.2021
Signed on behalf of and in name of Festool GmbH

i.v.Q. C
Ralf Brandt
Head of Productconformity
| Akku-Absaugmobil | Seriennummer1) |
| Cordless mobile dust extractor | Serial number1) |
| N° de série1) | |
| Aspirateur sans fil | (T-Nr.) |
CTMC SYS I 10037419
CTLC SYS I 10419326
Head of Product Development

Ralf Brandt
Head of Product Conformity
12.5 Software Update
1 Safety warnings. 18
2 Symbols. 20
3 Intended use 20
4 Technical data. 21
5 Parts of the machine. 21
6 Preparations. 21
7 Battery pack. 22
8 Commissioning. 22
9 Connecting a device 22
10 Settings. 23
11 Working. 24
12 Remote control. 25
13 Warning signals. 25
14 Maintenance and care. 26
15 Transportation. 26
16 Environment. 26
17 General information. 27
1 Safety warnings


WARNING! Read all safety warnings, instructions, illustrations and specifications provided with this power tool. Failure to follow all instructions listed below may result in electric shock, fire and/or serious injury.
Save all warnings and instructions for future reference.
- This appliance must not be used by persons (including children) with reduced physical, sensory or mental capabilities, or lack of experience and knowledge. Children need to be supervised to ensure they do not play with the device.
- This machine must not be used by people who might have a particularly adverse reaction to an electric shock (e.g. people with cardiac pacemakers), because the possibility of the machine building up a static charge cannot be excluded.
- Ensure you are on a firm base. The effects of a shock moment, e.g. due to antistatic discharge, may lead to accidents.
- WARNING! Operators must be appropriately instructed in the use of this machine.
- WARNING! This machine is only intended for use under dry conditions.


-
WARNING! Device may contain hazardous dust. Only have the device maintained and emptied, and only have the filter replaced by an authorised specialist using suitable protective equipment.
-
Always operate with the filter system installed!
WARNING! When extracting dust that exceeds the limit value or large volumes of oak or beechwood dust, only extract from one dust source (power or compressed-air tool).
- Risk of explosion and fire! Do not extract:
- Sparks, glowing particles or hot dust;
- combustible or explosive materials (e.g. magnesium, aluminium, petrol, diluting agents);
-
aggressive materials (e.g. acid, alkaline solutions, solvents);
-
chemically reactive materials which lead to the generation of heat, acids/bases, gases, etc. (e.g. reactive two-component materials, aluminium and water).
-
Observe all national safety regulations as well as the material manufacturer's specifications!
-
Always use suitable protective equipment!
-
If intact following a visual inspection, work in a dry environment according to instructions!
-
Check the battery interface and the filter regularly in order to prevent a hazard. In the event of damage, the battery interface must be replaced by an authorised service workshop only.
-
Do not lift or transport using a crane hook or lifting gear.
-
Only carry the machine using the handle, front handle or shoulder strap provided.
-
Risk of tilting, do not place on sloped areas!
NOTE
This machine is only intended for indoor use.
This machine must only be stored indoors.
-
Use only the original Festool suction hose.
-
Pay attention to the work environment and watch out for your own safety and the safety of others when transporting or working with the machine.
In this way, you can for example prevent tripping hazards caused by the suction hose or mains cable.
- Keep packaging film away from children.
There is a risk of suffocation.
-
Follow the operating manual for the charger and the battery pack.
-
Do not use power supply units or third-party battery packs to operate cordless devices. Do not use third-party chargers to charge the battery pack. The use of accessories not expressly authorised by the manufacturer can result in electric shocks and/or serious accidents.
-
Keep the unused battery pack away from metal objects (e.g. nails, screws, keys, paper clips, etc.) that could cause bridging of the contacts. A short circuit between the battery contacts can cause burns or fire.
-
Only use the battery pack in combination with your Festool device.
This is the only way to protect the battery pack from dangerous overload. Use of another device can lead to injury and fire hazard.
- Do not use battery packs that are damaged or have been modified.
Damaged or modified battery packs can lead to fire, explosion or injuries.
English
- Disconnect the battery pack from the device before you change the accessory parts/consumables, or place the device in storage. Such preventative safety measures reduce the risk of unintentionally starting the device.
2 Symbols

Warning of general danger

Warning of electric shock

Read the operating manual and safety warnings.

Read the operating instructions and safety instructions.

Wear a dust mask.

Suitable for separation of dust with an exposure limit value greater than 1mg / m^3

Suitable for separation of dust with an exposure limit value greater than 0.1mg / m^3

WARNING! The machine may contain hazardous dust!

Do not climb on the unit

Do not absorb any water or liquids!

Do not leave in the rain!

Risk of tilting!

Inserting the battery pack

Removing the battery pack

Tip or advice

Handling instruction

CE marking: Confirms the conformity of the power tool with the European Community directives.

UKCA marking: The United Kingdom Conformity Assessed symbol is a marking for products being placed on the market in the United Kingdom. It is a manufacturers indication that the product is in conformance with the relevant regulations in the UK.

Do not dispose of it with domestic waste.

Tool contains a chip which stores data. See section 17.2
3 Intended use
CTLC SYS I
Cordless mobile dust extractor suitable
- for extracting dust with limit values up to 1 mg/m³ corresponding to dust class L,
for increased loads during commercial use in accordance with IEC/EN 60335-2-69, - for use with BP Festool battery packs of the same voltage class which have been approved for this cordless mobile dust extractor.
CTMC SYS I
Cordless mobile dust extractor suitable
- for extracting dust up to 0.1mg / m^3 according to dust class M including wood and mineral quartziferous dust,
for increased loads during commercial use in accordance with IEC/EN 60335-2-69, - for use with BP Festool battery packs of the same voltage class which have been approved for this cordless mobile dust extractor.
The cordless mobile dust extractor is not recommended for continuous extraction of fine dust, such as cement dust or filler.

The user is liable for improper or non-intended use.
4 Technical data
| Cordless mobile dust extractor | |
| Motor voltage 36 V (2x 18 V) | --- |
| Compatible battery packs [2] | BP18 Li 4.0 HPC-AS BP18 Li 4.0 HPC-ASI BP18 Li 3.1 C BP18 Li 3.1 CI |
| Max. suction capacity (air), extractor/turbine 93.6 m³/h / 147 m³/h | |
| Max. vacuum, turbine 180 hPa | |
| Filter surface area 5357 cm² | |
| Suction hose D 27x3m-AS-90°/CT | |
| Sound pressure level as per EN 60335-2-69/uncertainty K 63 dB(A)/3 dB | |
| Hand-arm vibration value as per EN 60335-2-69/uncertainty K < 2.5 m/s² / 1.5 m/s² | |
| Frequency (cordless mobile dust extractor/remote control) | 2402-2480 Mhz |
| Equivalent Isotropically Radiated Power (EIRP) | < 10 dBm |
| (cordless mobile dust extractor/remote control) | |
| Container capacity 4.5 l | |
| Dimensions L x W x H With storage box 396 x 297 x 307 mm | |
| Only CTL/MC SYS I 396 x 297 x 187 mm | |
| Weight With storage box (without battery packs) 7.1 kg | |
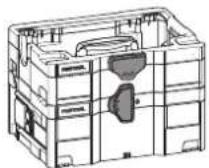
5 Parts of the machine
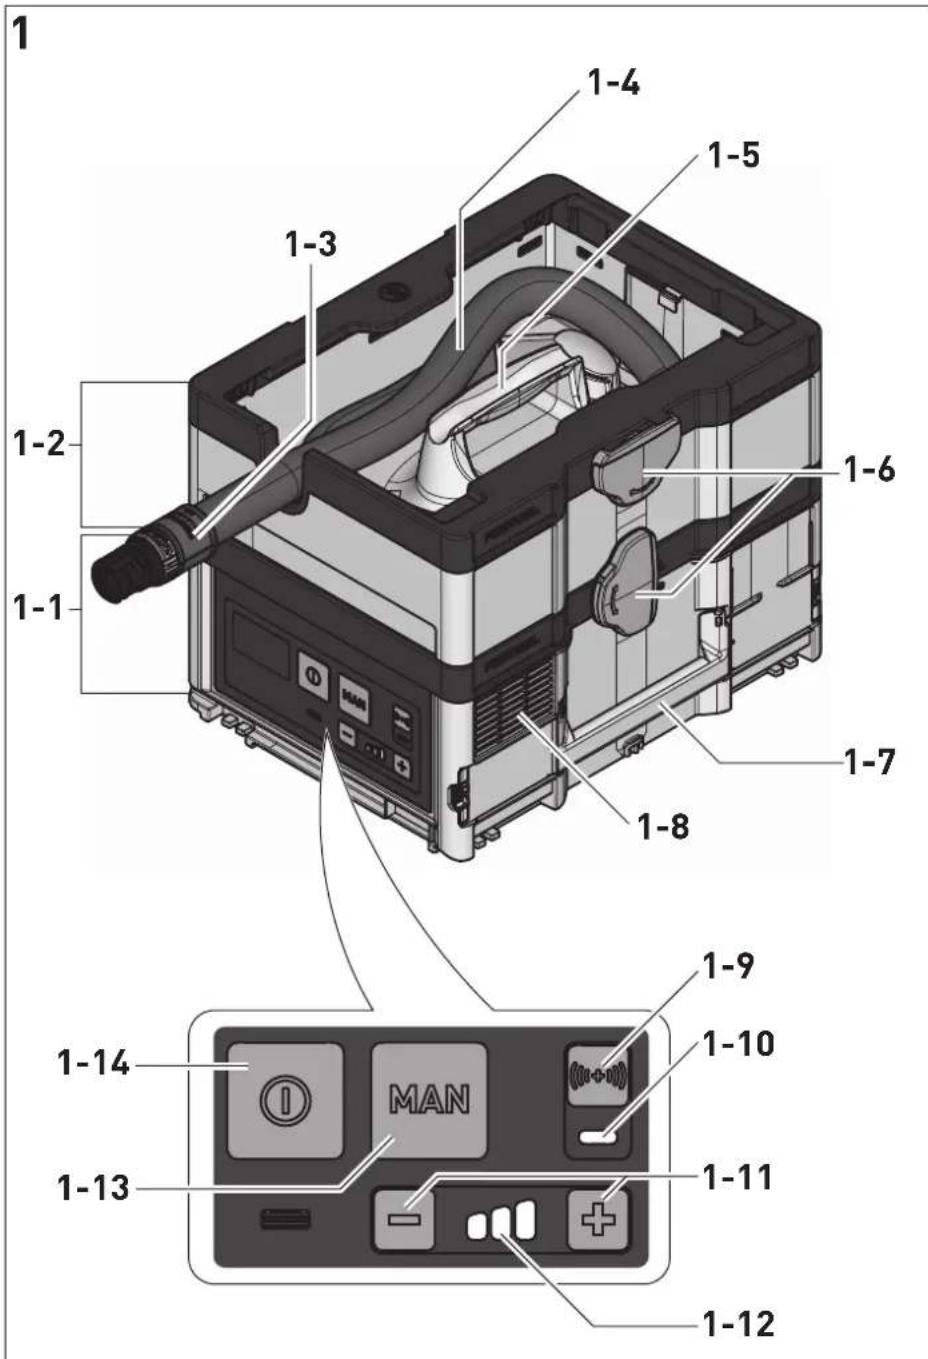
5.1 Cordless mobile dust extractor
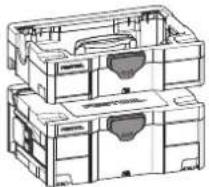
[1-1] Cordless mobile dust extractor
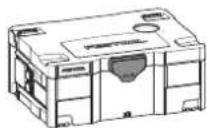
[1-2] Storage box
[1-3] Extraction sleeve
[1-4] Suction hose
[1-5] Handle
[1-6] T-Loc lock for Systainers
[1-7] Front handle
[1-8] Exhaust air opening
[1-9] Connection button
[1-10] Connection display
[1-11] Suction power adjustment
[1-12] Status display (suction power/warning signals)
[1-13] MAN button
[1-14] On/off button
[1-15] Remote control CT-F I *
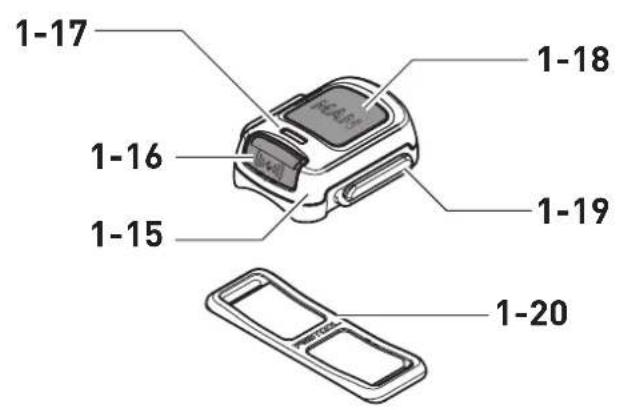
5.2 Remote control CT-F I
[1-16] Connection button
[1-17] LED indicator
[1-18] MAN button (for manually switching on)
[1-19] Attachment point for the fastening straps
[1-20] Fastening strap
The specified illustrations appear at the beginning of the Operating Instructions.
- Accessories shown or described are not always included in the scope of delivery.
6 Preparations
After removal from the packaging, the cordless mobile dust extractor is ready for use.
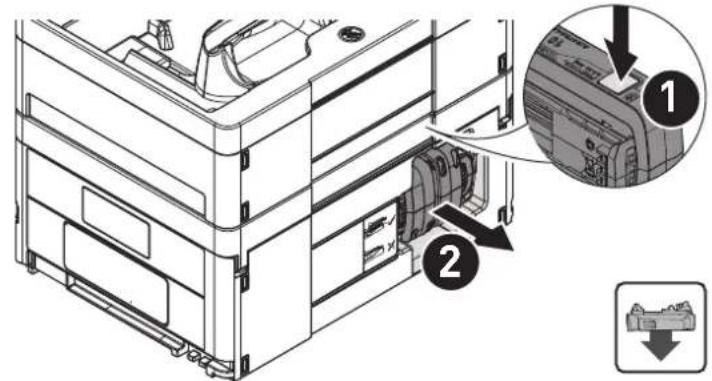
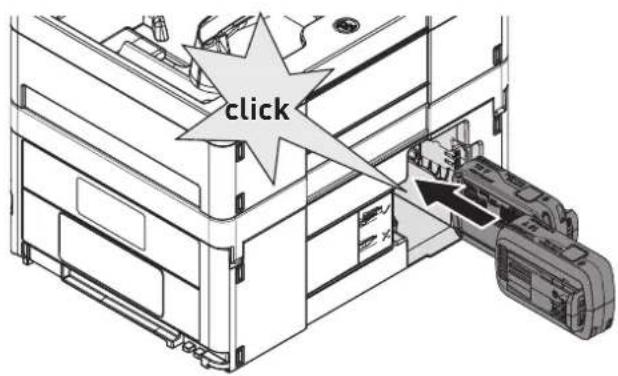
7 Battery pack
Before using the battery pack, check that the battery interface is clean. Any contamination of the battery interface may impair correct contact and lead to the contacts being damaged.
A faulty contact may result in the machine overheating or being damaged.
[2a]

Remove the battery pack.
Insert the battery pack - until it clicks into place.
The cordless mobile dust extractor can only be operated with two battery packs. Compatible battery packs (see section 4).
Further information about the charger and battery pack with capacity indicator can be found in the corresponding operating manual.
8 Commissioning
Standby mode
Press the on/off button [1-14].
The green LEDs on the status display [1-12] indicate standby mode.
Pressing the on/off button again will switch off the cordless mobile dust extractor.
Starting/stopping the cordless mobile dust extractor manually
The cordless mobile dust extractor is in standby mode.
Directly on the cordless mobile dust extractor:
Press the MAN button [1-13] to start/stop.
Alternatively, use the connected remote control CT-F I (see chapter 9.2):
Press the MAN button [1-18] on the remote control to start/stop.
Starting/stopping the cordless mobile dust extractor automatically
The cordless mobile dust extractor is in standby mode.
To start/stop the cordless mobile dust extractor automatically: Switch the connected battery-powered power tool on/off (see chapter 9.1).
9 Connecting a device

WARNING
Risk of injury from a cordless mobile dust extractor starting up unsupervised
Before performing any work with the cordless mobile dust extractor, check which remote control and which cordless power tool are connected to the cordless mobile dust extractor.
A battery-powered power tool must always be connected to the cordless mobile dust extractor via the suction hose. After finishing work, the connection to the cordless mobile dust extractor must be disconnected.
The remote control must only be attached to the suction hose.
9.1 Connecting a battery-powered power tool
In standby mode, press the connection button [1-9].
The connection display [1-10] slowly flashes blue. For a period of 60 seconds, the cordless mobile dust extractor is ready for connection.
- Switch on the power tool.
The cordless mobile dust extractor starts up.
The cordless mobile dust extractor is connected until the on/off button [1-14] is pressed or a battery pack is removed (from the cordless mobile dust extractor). The power tool must then be connected again.
Connecting a new power tool overwrites the previous connection.
This function is only possible on Festool power tools with a Bluetooth® battery pack.
9.2 Connecting the CT-F I remote control
To be able to connect a remote control to a cordless mobile dust extractor, the remote control must be reset (see "Reset on the remote control").
Remote controls that have not been connected previously can be connected directly.
A connection that has been created between remote controls and the cordless mobile dust extractor will persist even after pressing the on/off button or removing a battery pack (from the cordless mobile dust extractor).
The cordless mobile dust extractor can be connected to as many as five remote controls at the same time. The cordless mobile dust extractor can only be connected to one battery-powered power tool at a time.
i If a cordless mobile dust extractor which was initially switched on using the battery pack is switched off using the remote control, the temporary connection between the connected battery pack and the cordless mobile dust extractor will be lost. The battery pack can then be connected again.
- Hold down the connection button [1-9] on the cordless mobile dust extractor for three seconds in standby mode.
The connection display [1-10] rapidly flashes blue. For a period of 60 seconds, the cordless mobile dust extractor is ready for connection.
Press the MAN button [1-18] on the remote control.
The remote control is permanently stored in the cordless mobile dust extractor.
Resetting on the remote control
Resetting deletes the connection between a remote control and the cordless mobile dust extractor.
Press and hold the connection button [1-16] and the MAN button [1-18] for 10 seconds.
The LED indicator [1-17] lights up purple, if the reset has taken place.
9.3 Connecting a mobile device
The cordless mobile dust extractor can be connected to a mobile device (e.g. for a software update) using the Festool Work app.
Hold down the connection button [1-9] on the cordless mobile dust extractor for three seconds in standby mode.
The connection display [1-10] rapidly flashes blue. For a period of 60 seconds, the cordless mobile dust extractor is ready for connection.
- Follow the instructions provided in the Festool Work app to authorise the secure connection.
10 Settings
10.1 Adjusting the suction power
Press the plus or minus button for the suction power adjustment [1-11] while extracting.
The green LEDs on the status display [1-12] indicate the current performance level.
10.2 Connecting sleeve
The bypass function of the connecting sleeve [1-3] prevents strong suction from sanding machines and floor nozzles on smooth surfaces.
Open
- Turn the adjusting ring to the "OPEN" position.
Close
- Turn the adjusting ring to the "CLOSE" position.
10.3 Volumetric flow monitoring (only for dust class M)

CAUTION
Hazardous dust
Damage to the respiratory passage
- Correct functioning of volumetric flow monitoring is only ensured with the suction hose D 27x3m-AS-90°/CT.
For safety reasons, an acoustic warning signal sounds if the air speed in the suction hose falls below 20m / s
Possible causes Solution
Filter bag full. Insert a new filter bag (see section 14.1).
Dirty main filter. Change the main filter (see section 14.2).
Suction hose is eliminate the block or blocked or kinked. straighten the hose. Value set on the Set the suction power to a higher value (see suction power ad- justment [1-11] is section 10.1). too low.
Battery charge level - Charge battery low. packs.
- Use new battery packs.
Electronic monitor- Have the fault rectified ing malfunction. by a Festool service workshop.
Working with sanders. Activate the bypass function (see section 10.2).
10.4 Temperature cut-out
To protect against overheating, the temperature cut-out switches off the cordless mobile dust extractor before it reaches the critical temperature. The status display LED [1-12] indicates a fault.
LED lights up red Excessive temperature
- Switch off the cordless mobile dust extractor, let it cool down.
- Switch the cordless mobile dust extractor on again after approx. ten minutes.
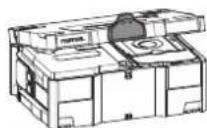
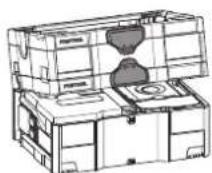
10.5 Connecting with the T-Loc
The cordless mobile dust extractor can be closed, opened and connected by turning the T-Loc:
- Close the cordless mobile dust extractor [3a].
- Open the cordless mobile dust extractor [3b].
- Connect the cordless mobile dust extractor to the storage box [3c].
Before lifting, always close the T-Loc at the cordless mobile dust extractor or connect to the storage box and check for secure holding.
Max. load for connection to other Systainers: 20 kg
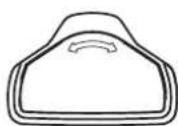
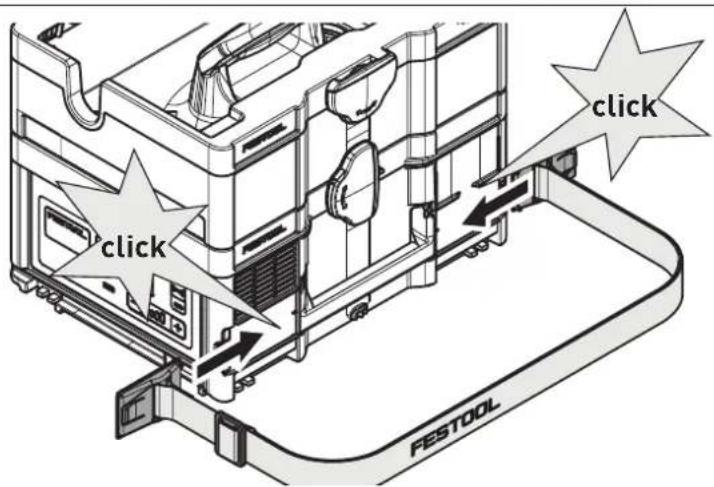
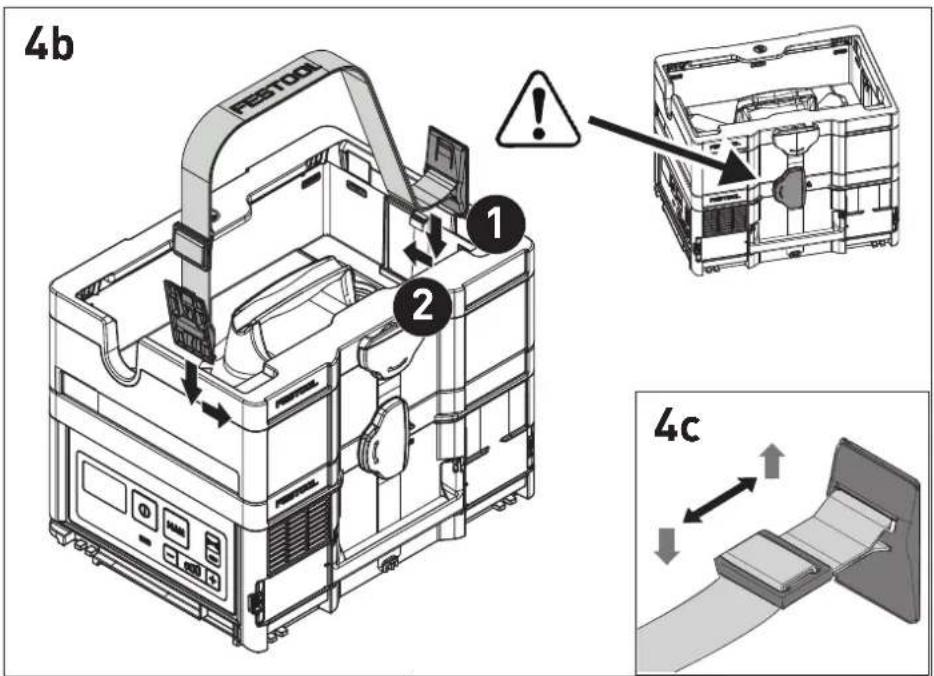
10.6 Use/Adjust shoulder strap [4]
Max. permissible load of shoulder strap: 20kg The shoulder strap can be attached in two different positions:
- Carrying the cordless mobile dust extractor: Shoulder strap on the cordless mobile dust extractor [4a]
- Carrying the storage box with the cordless mobile dust extractor: Shoulder strap on the storage box [4b]
Before lifting, check the shoulder strap for proper functionality and put the T-Loc on the cordless mobile dust extractor into the corresponding position.
Adjust the length of the shoulder strap at the adjusting tab [4c].
11 Working
11.1 Extracting dry materials


CAUTION
Hazardous dust
Damage to the respiratory passage
Always use a filter bag!
- Check that the main filter is undamaged before extracting.
When extracting dust that exceeds the limit value, only extract from one dust source (power or compressed-air tool).
Observe the following when extracting dust generated by operating power tools:
Ensure there is adequate ventilation! Observe regional regulations!
Limit values: Exhaust air max. 50% of the fresh air volume
Equation: Room volume V_R x air renewal rate L_W
Observe the following information:
- Keep the area around the exhaust air opening [1-8] clear.
- The cordless mobile dust extractor is a stationary system and not suitable for pulling at the suction hose. Use the handle [1-5], front handle [1-7] or shoulder strap [4].
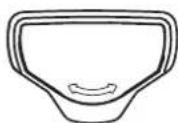
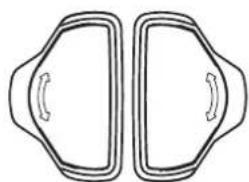
Two cleaning nozzles [5] are stored inside the storage box.
11.2 After finishing work
- Switch off the cordless mobile dust extractor.
Remove the battery pack.
Note: Keep the unused battery pack away from metal objects (e.g. nails, screws, keys, paper clips, etc.) as these may cause bridging of the contacts.
Empty the dirt trap.
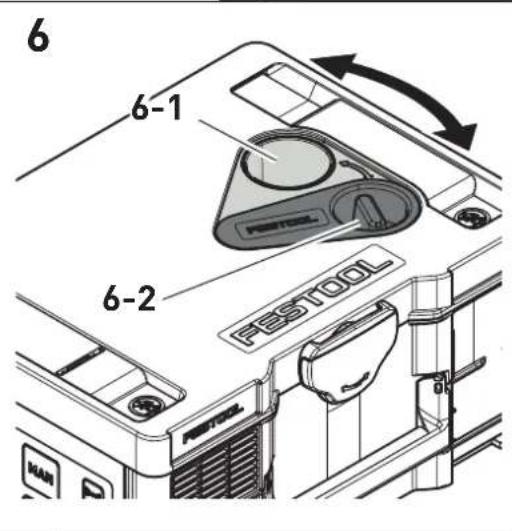
- Use the plug [6-2] to seal the suction opening [6-1].
When commissioning the cordless mobile dust extractor again, put the plug back into the parked position.
-
Place the suction hose [1-4] in the storage box [1-2].
Vacuum and wipe the inside and outside of the cordless mobile dust extractor to clean it. -
Place the cordless mobile dust extractor in a dry room inaccessible to unauthorised users.
12 Remote control
12.1 Intended use of remote control CT-F I
The remote control can manually start / stop a connected cordless mobile dust extractor.

The user is liable for improper or non-intended use.
12.2 Assembly
Attach the remote control [1-15] to the suction hose [1-4] using the corresponding fastening strap [1-20].

To connect the remote control and the cordless mobile dust extractor, see section 9.2.
12.3 LED indicator [1-17]
The remote control's LED indicator displays, the charge status of the remote control in addition to the Bluetooth® functionality:
![FESTOOL CLEANTEC CTLC SYS I - LED indicator [1-17] - 1](/content/2026/03/568917/images/8f6ba440eaf4d52ed40c612a64be17415b9e544b83d9805fd86256106f9e7a9b.jpg)
Flashes blue once
Confirmation of the connection button [1-16] or MAN button [1-18] having been pressed.

Flashes purple once
The remote control has been reset.

Flashes red
The remote control's battery is nearly empty and must be replaced.
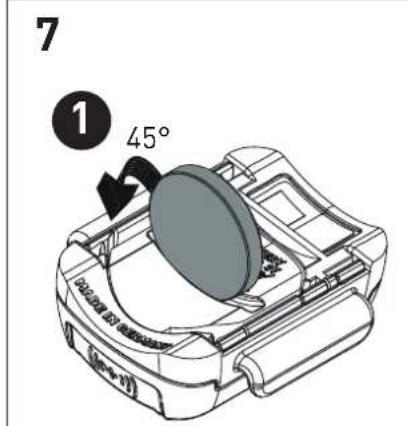
12.4 Changing the remote control's battery [7]
The remote control is operated using a CR 2032 battery.
If the battery compartment is opened, we recommend that you replace the seal (20 x 1.3 mm).
![FESTOOL CLEANTEC CTLC SYS I - Changing the remote control's battery [7] - 1](/content/2026/03/568917/images/22308a57a42662ba40451037798d334283750da1184fcd5b1f51483786372912.jpg)
Open the battery compartment closure.
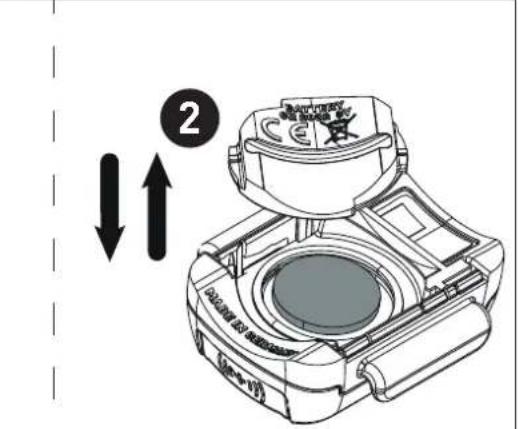
![FESTOOL CLEANTEC CTLC SYS I - Changing the remote control's battery [7] - 2](/content/2026/03/568917/images/46bdda4a9753315237cb536052b3712057e9dad06f12bce51d5ee54256931c24.jpg)
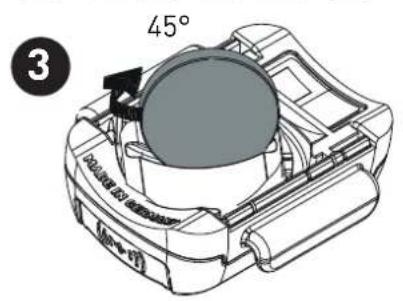
![FESTOOL CLEANTEC CTLC SYS I - Changing the remote control's battery [7] - 3](/content/2026/03/568917/images/4db5dd2b66c40de0b5a624c3bd1c379778ee467a1e85d2d9edb00cc0d46b6bfc.jpg)
Place the battery.
Use the battery compartment.
12.5 Software update
To check whether a software update that will enhance the functions of the remote control or improve existing functions is available, a Bluetooth® connection to the Festool Work App can be established.
Press the connection button on the remote control [1-16] until the LED indicator [1-17] flashes blue.
The remote control is ready for connection for 60 seconds.
- Follow the instructions provided in the Festool Work App to authorise the secure connection.
13 Warning signals
| Warning signal | Description of warning signal Cause Action | ||
| Visual | LED [1-12] | Flashes green Battery pack empty. Charge the battery pack. | |
| Incorrect battery pack. | Use correct battery pack (see section 4). | ||
| Battery pack under-cooling. | Operating temperature, see battery pack operating manual. | ||
| Flashes red Battery pack faulty. - Change the battery pack. | |||
| - Use the charger to check that the battery pack is fully functional once it has cooled down. | |||
| Lights up red Cordless mobile dust extractor overheating. | See section 10.4. | ||
| Battery pack overheating. | Leave the battery pack to cool for approx. ten minutes. | ||
Warning signal
Description of warning signal Cause Action
Acoustic Signal Regular Volume flow below
20 m/s.
Only for dust class M (see section 10.3).
Increasing, beginning with two short
Battery pack charge low.
- Charge the battery pack.
- Use the newly charged battery pack.
14 Maintenance and care

WARNING
Risk of injury, electric shock
Before all maintenance and care work, always remove the battery pack from the cordless mobile dust extractor.
All maintenance and repair work which requires the motor housing to be opened must always be carried out by an authorised service workshop.

Customer service and repairs must only be carried out by the manufacturer or service workshops. Find the nearest address at: www.festool.co.uk/service
Always use original Festool spare parts. Order no. at: www.festool.co.uk/service
Observe the following information:
- Dust-related inspection (e.g. for filter damage, tightness of the machine and function of the control devices) by the manufacturer or an instructed person at least once a year.
- Dispose of components that cannot be cleaned. Use impermeable bags to do so. Observe the applicable disposal provisions!
- Keep the contacts on the cordless mobile dust extractor, charger and battery pack clean.
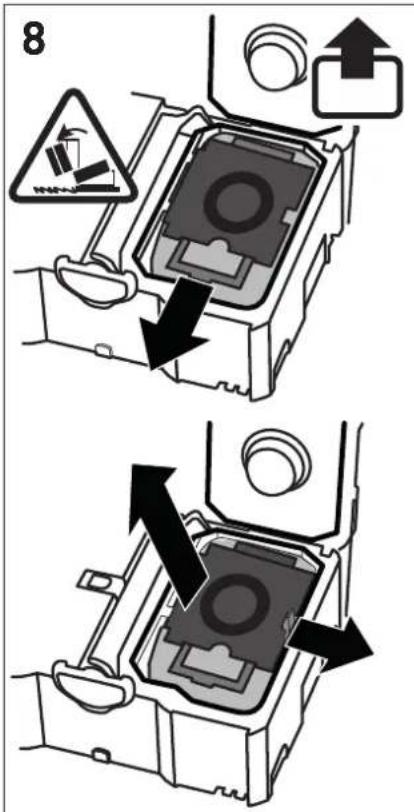
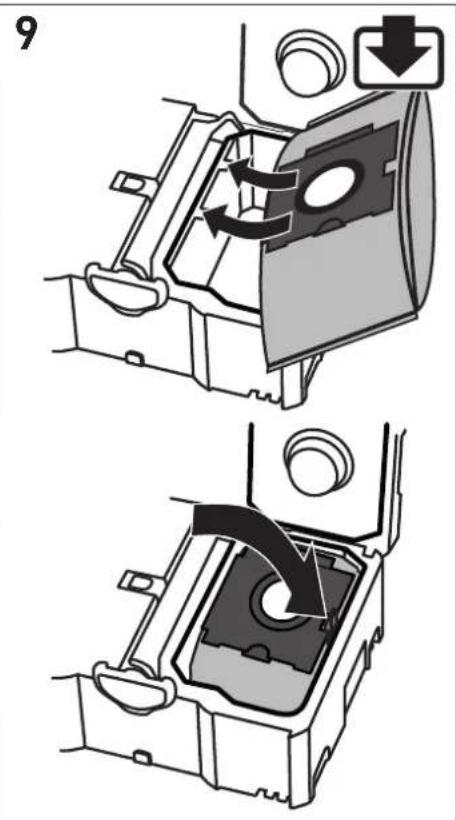
14.1 Changing the filter bag
- Open the cordless mobile dust extractor with T-Loc. Attention: Risk of tilting!
- Changing the filter bag:
- Remove the filter bag [8].
- Insert a filter bag [9].
- Close the cordless mobile dust extractor with T-Loc.
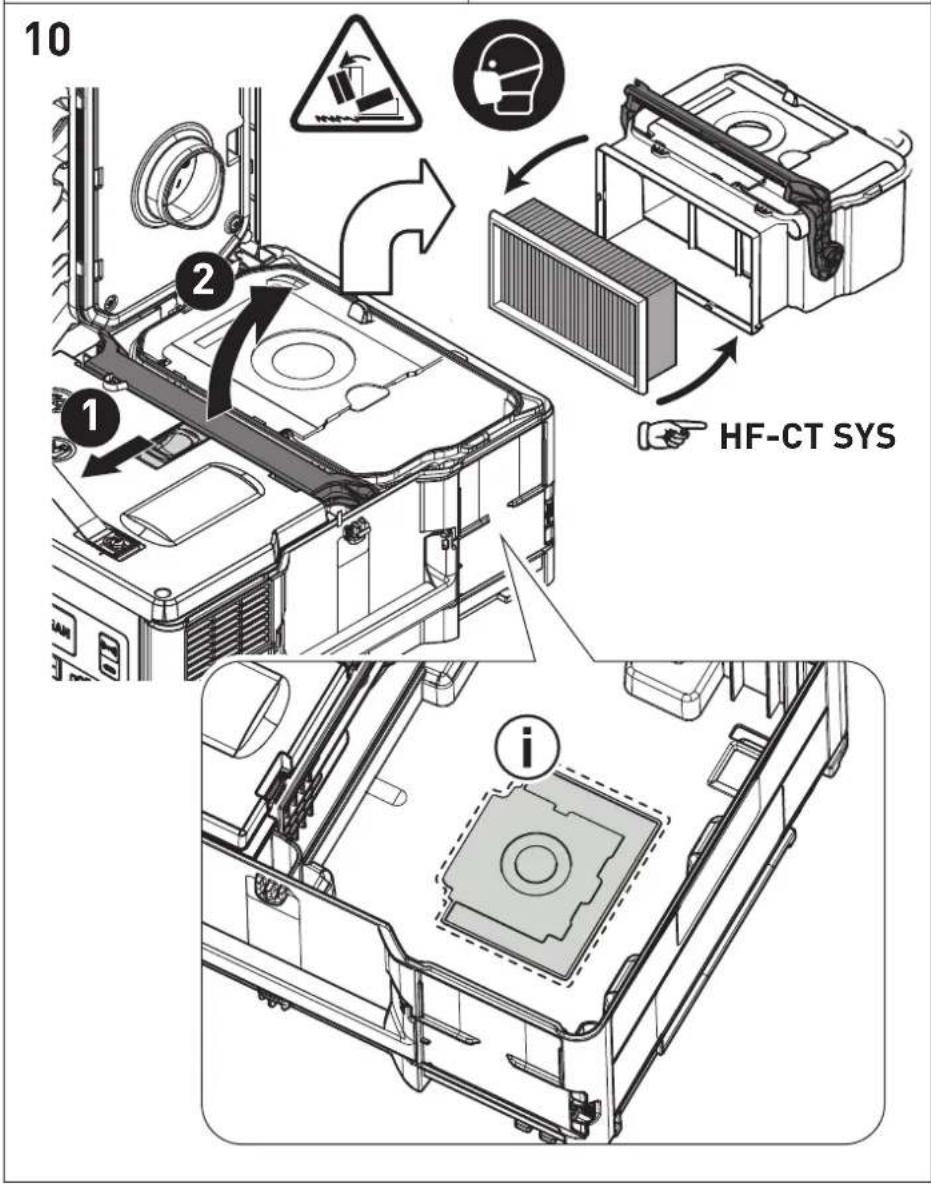
An additional filter bag can be stored on the base of the housing [10].
14.2 Changing the main filter [10]
NOTICE
Damage to the motor
- Never extract material without a main filter, as this can damage the motor.
- Open the cordless mobile dust extractor with T-Loc. Attention: Risk of tilting!
Unlock and fold down lever. - Remove container upwards.
- Remove the used main filter and replace with a new one.
- Dispose of the used main filter in accordance with statutory regulations.
Clean container and seals.
Insert container. Fold up and lock lever. - Close the cordless mobile dust extractor with T-Loc.
Refer to the Festool catalogue for the order numbers of accessories and tools or find them online at www.festool.co.uk.
15 Transportation
Observe the following information:
- Before transportation, always close the T-Loc at the cordless mobile dust extractor or connect to the storage box.
- For transportation in vehicles, secure the cordless mobile dust extractor against slipping and tilting in accordance with the valid guidelines.
16 Environment

Do not dispose of the device in the household waste! Recycle devices, accessories and packaging. Observe appli-national regulations.
EU only: In accordance with the European Directive on waste electrical and electronic equipment and implementation in national law, used power tools must be collected separately and handed in for environmentally friendly recycling.
17 General information
Imported into the UK by
Festool UK Ltd
1 Anglo Saxon Way
Bury St Edmunds
IP30 9XH
Great Britain
17.1 Information about Bluetooth®
As soon as the tool is connected to the Festool Work app via Bluetooth® and the secure connection has been authorised, the tool will connect automatically to the Festool Work app from this point onwards. The tool then regularly sends status information (ID, operating status, etc.) via Bluetooth®.
The Bluetooth® word mark and the logos are registered trademarks of Bluetooth SIG, Inc.; they are used by TTS Tooltechnic Systems AG & Co. KG, and therefore by Festool, under licence.
17.2 Information on data privacy
The tool contains a chip which automatically stores machine and operating data. The data saved cannot be traced back directly to an individual.
The data can be read in a contactless manner using special devices and shall only be used by Festool for fault diagnosis, repair and warranty processing and for quality improvement or enhancement of the device. The data shall not be used in any other way without the express consent of the customer.
Sommaire
10.2 Manchond's aspiration
Causes possibles Solution
Mobiele accu-stofzuiiger is in de stand-by-modus.
Direct op de mobiele accu-stofzuiiger:
Mobiele accu-stofzuiiger is in de stand-by-modus.
Varning for allman risk

Varning for elstotar

12.5 Programupppatering
Motorspenning 36 V [2x 18 V]
Legg inn filterposen [9].
Lukk den batteridrevne stovsugeren med TLoc.
i Det kan oppbevares en ekstra filterpose i bunnen av apparathuset [10].
14.2 Skifte hovedfilteret [10]
Merk
Skader pà motoren
- B3pbIbO- n noXapoonacHocTB! He donyckaTte BCacbBaHna:
- NCKp, TLeIoUxMATEpNaIob IInrOpaYe Ibln;
-TopuNX nIN B3pbIBOONacHbIX MaTePnaIOB (HaIpIMep MaHnra, aHOMHHa, 6eH3nHa, pa36abnteJe); - eKnx BeueCTB (HaPnmupe KncIotbl, 1eIouee, pactbopnteel);
-
XIMNueckn peakTbHbIX BeuecTB, BCTypaHoux B peakCIO C BblJeHneM TeIa, 6pa3oBaHHeM KncIoToI/uoN, ra3OB I T. d.(Ha npImeppeakTbHbIe 2-KomnoHeHThIe MaTePnaJIbI, aIOMHHn N Boda).
-
CobIoJaTe HaunohalbHbIe npaBnla TexHnKn 6e3oNaChocTn I daHHbIe n3rOToBnteJI MaTePnAJIa!
-
Pa3pewaetcpa60TaTb Tolbko C nCnoB3OBAHnem NODXoJxNxCpeIcTB 3aunTbl!
-
Y6eIntecb B nCnpaBHom coCToHnn annapaTa, pa6oTaIte Tolbko B cyXOM nOmeuHnn!
-
Perugno npOBepa pa3bEM aKKymyTApo n cniltp Bo n36eKahne B03MOxHbIX noBpeXdEHN. B clyuae noBpeXdEHN 3aMeHy pa3bEMa aK-KymyTApo BblONHnTe TOLbKO BAETOpN3OBAHHo MaCTepcKo CepBnCHo cLyX6bl.
-
3anpeuaeTcnoHnMaTb n TpaHcnpTnpoBaTb aannapat c nomoubu noDbemnka nn Kpana.
He BcacbBaIte BoNy n Hhble KnKo-CTn!

He octabnIte annapaT noIdoKdEm!

Onachoctb onpoknDbBaHna!

YcTaHOBKa aKKyMyJrTopa

OToeDnHeHne aKKyMylTopa

HCTpyKzna,pekomeHaazna

HCTpyKuaNo NcnoJb3ObaHnIO

MapknpoBka CE: NodTbePxxdaet cooTBeCTBnE 3JIeKTPoHnHCTpyMeHTa OCHOBHbIM Tpe6OBAHNm INpeKtNB EC.

He BbIbpaBbAaTe BMeCTe C 6bITOBbIMN OTXoJaMn.

B nHcTpymHe yctaHOBneH uIN dIa coXpaHeHHaHHbIX. Cm. pa3dJI 17.2

MapknpoBka EAC: PoiTBePxJaet coOTBeTCTBnE 3JIeKTPoHnHCTpyMeHTa OCHOBhIM Tpe6OBAHnM dIneKTHuB EBa-3NcKOro 3KOHOMUeCKOro COHO3a.

YKpaHnckn CmBBoJ SEPRO noTBeP- Xdaet COOTBeTCTBne 3JeKTponHCTpyMeHTa OCHOBHbIM Tpe6oBaHnM DnpeKTNb YKpaHnbl.
AkkymyIaTophI NbIeYdaIaIouIaI annapaT npirodeH
-ДЯ ydaJIeHnI pbln Do 0,1 Mr/M3 (Klacca M'), BkIIOuAЯ dpeBecHyIO pblb, MnHepaJIb-HyIO n KBaPcEByIO pblb,
-Дя npoфeccnoHaJIbHOrO nCNoIb3OBaHnB YcNoBnAx NOBblSeHHbIX HaRpy3OK CoIaCHO IEC/EN 60335-2-69,
-ДЯИСПОЛБ3OBaHЯс AkKуЛЯTOpAmi Festool cepu BP OdHoro Klnacca no Hapry-JKeHIO,ДоушeHHbIMДЯ pa60TbI C 3TUM aKKyMЛЯTOpHbIM nbIJIeUdAJIYIOUm anPnApaTOM.
AkkymyTophnynbIbIeYdaJauu annapaT He peKomeHdyetcNcNoIb3OBA TbJn HnpepbB-Horo c6opa/BCacbIBAHn TOHKo Nbln,HaNPmep ZemehTHOn nIIN WnatJIeBOUHO.

OTBETCTBeHHoCTb 3a NcNoJIb3OBAHHe He NO Ha3HaueHnIO HecET NOpIb3OBATeJIb.
4 TexHnueckne daHHbIe
5.1 AkkymyIaTOpHbI nbIeYdaIaIoun annapaT
[1-1] AKKymyIaTOPbI NblJeYdaJIaIoun annapaT
[1-2] OTeckДЯХpaHeHnA
[1-3] BcabsbIbAIOUaMyΦTa
[1-4] BcabsBaIoun mJaaHr
[1-5] Puyka Дяпегенockи
[1-6] 3amok T-Loc dIy cncTeHepa
[1-11] PerylnpoBka nHTeHcNBHOCTN BCacblBaHn
[1-12] HndkaTop coctoHn(cnla BcabsBaHn/ npedynpexkaioune cnHaJIbI)
[1-13] Khonka MAN
[1-14] KhoNka BkIoueHn/ByIKIoueHn
[1-15] NylbTДYCT-FI*
5.2 NyIbT DY CT-F I
[1-16] Khoŋka coeɪnHeHЯ
[1-17] CBeToIIOIbI INHdNkATOp
[1-18] KhoIIka MAN (pyHoe BkJIIOueHne)
[1-19] BbIcTyn noi 6paCteBtI dIy KpePJIeHnnyIbTa DY
[1-20]Бpacnetдя крpenпеня пьыДу
HJIIOCTpaun HaxoJrTcB Haayane pyKOBoDCTBa no 3KcNpyaTu.
- HeKOTopbIe n3o6paXkEHHbIe nIIN oNcblBaembIe 3JIeMeHTbl OChactKN He BXOJrT B KOMJIeKT NOCTaBKn.
6 PnodrotobntbHbIe pa60tbl
AkkymyTophni nbileydaIauu annapaT roTOB K pa6oTe cpa3y nocne n3BleueHn 13 ynaKOBKn.
7 AkkymyIaTOp
Ipepe yctaHOBkoAkkymyIaTopa npOBepbTe, He 3aqr3HeHb IIN KJIeMMbl. 3aqr3HcHHbIe KJIeMMbl He o6ecneuBaOT xopoUH N KOHTaKT N MOryt NOJyHTb NOBpeXdEHHa.
HeicnpaBbI KOHTaKT MoKeT npNBecTu K nepe- rpeBy N NobpeXdEHNIO HcTpymeHTa.
[2a] OToeHNHe aKkyMnyTOp.
[2b] BcTaBbTe aKKyMnyTOp -do kick 0nKcaun.
i AkKymyIaTOPHbI nbIeYdaJIaIOuIaI annapat MoKHO 3KcIIyaTnpoBaT ToIbKO c 2 aKKymyIaTOPaMn.
Cobmctmbie aKKymyIaTOpbl,cm.pa3- 4.
i Ioppo6nHa HOpMaun O 3apAnHom ycTPOINCTBe n aKKyMylTope C INHnKaTopoM EMKoCTn CoepXHTcB COOTBeTCTByIOx npKOBODTBax NO 3KcnIyatauN.
8 PndroToBka K pa6ote
PexnM OxuaHna
HaxmTe KhoNky BkIIOueHnry/BbIKIOue-Hnry [1-14].
3eIeHbIe CBeToDnOdbI NHdNkAtopa CoCToHnra [1-12]yKa3bIBaIoT Ha peXm OxuaHnra.
Pn NOBTOPHOM HaxaTN KHOKN BKNIOueHn/ BbIKNoUeHn aKKyMylTOpHbI NblJeYdaJIHO- 1nn annapaT OTKNQUaETc.
PyuHoi nysk/ocTaHOB aKKyMylaTOpHoro nbIeYdaJauoero annapaTa
Пыileудаляюши annapat haxoДNTcB peЖиMe OЖиДанЯ.
HenocpeDCTBeHHo Ha aKKymyIaTOPHom nbIeY-danlaouem annapate:
Для зауcke/octaHOBa HaXmTe KhoNky MAN [1-13].
Pycckn
B kauectBe aIbTepHaTnBbl c noDcoeHHeHHoro nyIbTa DY CT-F I (cM. pa3d9 9.2):
ДляЗanycka/OcTaHOBaHaXMMTeKHOKNKY MAN[1-18]Ha nylbTeДY.
A B T O M A T N U C E C K N N y c k / o c t a H O B a K K y M y J T O P H O R O n b l e y d a n a l y o u s e r o a n n a p a T a
Пыileудаляюши annapaT haxoДNTcB pexnme OxndaHn.
Дя abTomatnueckoro 3anycka/octaHOBa nIeYdAJIauOuIeRo aannapata: BKJIOUHTe/ BbIKJIIOUHTe NOcOeINHHeHHbI aKKyMylrTopHbI 3JIeKTPoINHCTpyMeHT (cm. pa3deI9.1).
9 CoeINHeHne c HnCTpyMeHTaMn

PPEyPExKdEHN
Onachoctb TpaBMPOBaHn npn HeKOHTpOJnyeMOM BKNIOUeHN aKKyMylrTopHO rIbIneydaJIouoero annapaTa
- Npeed hauaIom pa6oTbI c nbIyeJaIeHneM npOBepbTe, KaKoI pJIbT dY n KaKoI aKKyMyJrTOpHbI INCTpyMeHT nMeet coEduHeHne C aKKyMyJrTOpHbIM nbIyeJaIaIIOuIm aannapaTom.
AkkymyIaTOPbIeNeKtpOnHcTppyMeHTdoJIxH6bTB BceHa coeHNHe BCacBbAIOUm IlaHrom CaKKymyIaTOPbIM nbIeYdaIaIOuIuM aannapatom. Pocne pa6oTbI aKKymyIaTOPbIeYdaIaIouuN annapaT HyXHoOTcoeHNHTb. - NylbT Dy MoXHO 3aKpePnIaTb TOnbKO Ha BCacbBaIOUeM UHaHre.
NylbIy, eue He pa6oTaBwne Hn cOHN m annapaTOM, moKHO nOcOeINHraTb cpa3y.
i YcTaHOBHeHoe coeHHeHne MExy npIb- Tom Dn aKKymJrTOpHbIM nbJIyeJaIou- IuM annapaTOM coXpaHReTcN nOcNe Ha- XaTHNA KHOKN BKNIOUeHn/ BbIKIOUeHn IIN N3BJeEHn AKKymJrTOpa N3 nbJIeyDaJIauo eTo annapata.
K nbIeYdaIaIooIeMy aannapaty moXHO O-HOBpeMeHNO IOdCOeINHTb DO IaTI Nylb-TOB DY. NbIeYdaIaIooIu annapaT moXeT HmEt b coeINHeHne TOLbKO C OdHM aKKyMyJIaTOPHBIM IHCTpyMeHToM.
Ecnn nbineydaJauoun annapat 6bln BkIoueH no cnHaJy ot aKKymyJrTopa, a BbIKIOuayctc c nyIbTa DY,TO npn 3TOM OTMeHReTcBpeMeHHoe coeHNHeHne aKKymyJrTopa c annapatom. N0dHee 3To coeHNHeHne MOxHO BOCCTaHOBNTb.
BpeKIMeOxNdaHnHaXnMaITe KHOKnky coeINHeHn [1-9] Ha nbileydaJraIOuE m annapaTe BteueHne 3ceKyn.
HdNkatop coeHHeHn [1-10]HaunHaet yacto MNrTaB cHnM CBeTOM. IbIeYdaIaIouu nn aannapat rOToB K COeHHeHIO B TeueHne 60 ceKyHn.
Haxmnte KhoNky MAN [1-18]Ha nyIbTe Dy. NylbT dy 3auncaH B namrTaKKymnTopHoro nbIeYdaJauoero annapata.
C6poc hactpoKn npybTa DY
YCTAHOBJIeHHoe coeINHeHne nyIbTa DY cAKKyMyJIaTOpHBIM nbIeUdAIAJIOUIm aannapatom MOxHO c6pocntb.
Haxmte KhoKcoeHHeHn [1-16] n KhoKy MAN [1-18] B TeueHne 10 cekynd. YcneHbI cbpoc HactpoeK noTBePkdaetc npynpHbIM CBETOIOIDhIM INDnKATOpom [1-17].
9.3 PoiocoeiHHeHne Mo6nIbHbIX ycTpoiCTB
CoedHnTe aKKymJyTophBn nbJeYdaJIoUnn annapat yepe3 npNoXeHne Festool Work c MObNbHbM yCTpoiCtBOM (HaNPmep, nla 06HO BLeHnI PO.
Bpexime oxuandaHnnaHXmMaTe KhoNky coeunHeHn [1-9]Ha nIleydaJauoUeM annapaTe BteueHne 3ceKyHd.
HnKatop coeHHeHna [1-10]HaunHaet yacto Mntb cHnM uBcTOM. TbIeYdAaIouu anPa-paT rOToB K coeHHeHNo B TeueHne 60 ceKyHd.
ДябетониabTOpn3auncoeHHeNn BbIOnHЯTe yka3aHn npInOxHnFa Festool Work.
10 Hac tropon
10.1 PerylnpobKa cnIbI BCacbBaHn
HaxmMaTe KHOJKN «JIIOC» NIN «Mn-Hyc》[1-11]Ha peYJIATope INHTeHCNBHOCTN BCacbIBaHnB peXmE BCacbIBaHn.
3eJIeHbIe CBetOIOJbI INHnKAtopa CoCToHn [1-12] NOKa3bIBaIOT TeKyuN yPOBeHb NHTeHCNBHOCTN.
10.2 BcabsBaioaMyfTa
Функцябайпаса на BCacbBaIOошeMyΦ-Te[1-3]npedotBpaaet npincacbBaHne WlnΦ-MaunHOKи HacaOkДЯ NOJa K rJaIcKIM NOBepxHOCTaM.
OTKpbBaHne
- NobepnTe peRyInpoBouHoe KOJIecuKOB noJIoXeHne «OPEN» [OTKpblTO].
3aKpbBaHne
Kpome HndnKaun cTaTyca Bluetooth-coeHnHeHn CBeToNDnOHyn HndNKaTOp DOnoHNTeNb-Ho NOKa3bIbAet yPOBeHb 3apra 6aTapeuKn B nyIbTe DY:
1-KpaTHoe MnraHne cHero CBeToOnoJa
3aΦnKcnpoBaHo HaxKaTne KhoNk CoeHnHeHn [1-16] nJn KhoNk MAN [1-18].
1-KpaTHoe MrraHne npnpHoro cBeTo- dnoDa
BbnoJIHeH c6poc hacrpoKn nyIbTa Dy.
MuraHne KpacHoro CBeToNDnOda
BatapeKa B nyIbTe Dy noTu pa3pAnIaacb N Tpe6Byet 3aMeHbl.
12.4 3aMeHa 6aTapeKn B nyIbTe y [7]
① Пульт Ду pa6oTaet Ha 6aTapeикax CR 2032.
i Pocne oTKpbBaHnO TceKa IJy 6aTapeKn peKOMeHNyEtCra 3aMeHHTb yNIOTHHTeJIbHyIO npoknaKy (20x1,3 MM).
PcKcnpyTe KpbIuKy OToceKa Ina 6aTapeiKn.
3MeHnTe 6aTapeuKy.
3kpOteOTceK.
12.5 06HOBJIeHne IIO
Дляnpobeprkn BbixoJa HObIx O6HOBneHnIIO, NOBbIshaOuX INyUyUaIOxNx OYHKUHOHaNb-HocTb NylTa Dy, MoXHo yCTaHOBnTb
Bluetooth®-coeHHeHne c npNoXeHnem Festool Work.
Haxmte KhoNky coeHHeHna nyIbTe 1y [1-16], noka He 3aMnraet cHn CBeTo- nnOd [1-17].
IyIbT IY roTOB K coeINHeHIO B TeueHne 60 ceKyuHd.
Дя 6e30aCHO ABTOpH3aUN COeHNHeHn BbINOJIyTe yKa3aHn npNIOxKeHn Festool Work.
13 Празурацьпсгнавы
- 3apnyTe aKKyMnyTOp.
- BCTaBbTe HObBi 3apJxHeHnHy aKKyMnyTOp.
14.1 3aMeHa MeIka-ntbIeSc6OpHnKa
OTKpoTe aKKyMyJIaTOpHbI nbIeUdJIaIO- Ⅲn annapat, nobepHyB 3amok T-Loc. BHNMaHHe: onaCHOCTb ONpOKNbIBaHnI
3aMeHa MeuKa-ПbIeSc6OpHnKa: N3BJIeKNTe MeoK-PbIeSc6OpHnK [8]. BLoXHTe MeoK-PbIeSc6OpHnK [9].
3aKpoTe aKKyMylTOpHbI nbIeYdaJIaIO- Ⅲn annapaT, nobepHyB 3amok T-Loc.
Ha dHnue yctpoiCTBa moXHo XpaHnTb Do-noHNHeBHyI MeWOK-Nblne6OpHnK [10].
14.2 3aMeHa oChOBHoro ΦnIbTppa [10]
YKA3AHNE
PobpeKdHne DnurTaTeJra
Hnkorda He co6upaTe nbIb 6e3 ochOBHO- ro fNlbTpa, TaK KaK 3TO MOKeT npNBecTu K NOBpeXdEHNIO DBNrataTeJ.
OTKpoTe aKKyMyJlTOpHbI nbIeUdAJIIO- Ⅲn annapaT, nobepHyB 3amok T-Loc. BHNMaHHe: onacHOCTb ONpOKNDbIBAHNA!
Pa36JokpyTe n nepeKnHbTe pbIyar.
CHIMMTE KOHTeHep DBNXKeHHnEM BBepx.
N3BnKeNTe NcNoJIb3OBAHHbI OCHOBHO HJIbTp n 3aMeHnTe eRo Ha HObbI.
YTNIN3npyIeNCIOJIb3OBAHHbI OCHOBHOJnIbTp B COOTBeTCTBUN C 3aKOHoJaTeJIbHblMN IpeDnucHnM.
Ouncnte pe3epByap n ynpnoTHeHna.
- YctahOBnTe pe3epByap. IpekeHbTe pbiur n 3a6noKnpyTe.
3akpoTe aKKymyIaTOpHbI nbIeYdaIaI0- Ⅲn annapaT, noBepHyB 3amok T-Loc.
Homepa npHaJneXHoCTe N nHcTpymENTOB dJa 3aKa3a haoJrTcB KaTalore Festool nn Ha Be6-caIte www.festool.ru.
15 TpaHcnpTnpoBka
Co6IIOaIte cIeMyIoUne npabnla:
-Перед Транспортуков Всегда закрыВайтабамок T-Loc на nbileудалюцемannapate Или сединытесOTCEKOMДлЯхареня.
- Pn TpaHcnpTnpOBKe B aBTOMo6nne Heo6XoIMO npHnTb COOTBETCTByUOuNe MepbI NO 3aUNTe NblJeYdaJIaIooIero annapata OT CockaJIb3bIBaHnI N OnpOKnDbIBaHnI CoTlaCHO DeJcTByUOuM INHCTpyKuIam.
16 Oxpana okpykaioe cpebl

He BbI6paCbIbAaTe HnCTpyMeH TBeMeTc 6bITOBbIMN OTXoJam! 06ecneueyTe 3ko- IJorUeCKn 6e3OanchyU yTuIN3aunIO NH
CTpyMeHToB, OChAcTKn UyNaKOBKn. Co6IIOdaTe DeNCTByUOuNe HaunOHaJIbHbIe IpeDnncAHn.
ToIbko dIa cTpaH EC: corIacHo dinpeKTHube EC 06 OTxOdaX 3JIeKTPnuecKOro N 3JIeKTPoHHO 06OpUdoBaHnra, a TaKKe rapMOHN3uPObaHHbIM HaCuHOHaJIbHbIM CTaHdApTaM OTCJyXNBWe CBOI CpOK 3JIeKTPoHnCtpyMeHTbI DOJXHbI YTuIN3uPoBA TbCB pa3JeIbHO n HAnpaBnTbcr Ha 3KoJIoRn-ueckn 6e3OnacHyIO nepepa60TKy.
10.1 Regulace sily sani
V sacim rezimu stisknete tlacitko plus nebo minus regulace sily sani [1-11].
Zelené LED ukazatele stavu [1-12] signalizuji aktuálni stupen vykonu.