WS 6762 - Weather Station TECHNOLINE - Free user manual and instructions
Find the device manual for free WS 6762 TECHNOLINE in PDF.

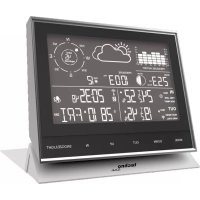
| Product type | Radio-controlled weather station |
| Brand | TECHNOLINE |
| Model | WS 6762 |
| Power supply (station) | 2 AA 1.5 V batteries (alkaline recommended) |
| Power supply (outdoor sensor) | 2 AA 1.5 V batteries |
| Indoor temperature range | 0 °C to +50 °C (32 °F to 122 °F) |
| Outdoor temperature range | -20 °C to +65 °C (-4 °F to 149 °F) |
| Indoor humidity range | 20 % to 95 % |
| Outdoor humidity range | 20 % to 95 % |
| Atmospheric pressure range | 850 to 1050 hPa |
| Radio frequency (sensor) | 433.92 MHz |
| Transmission range | 60 m max. in open area |
| Displays | Date, time, day, alarms, moon phases, sunrise/sunset, tides, indoor/outdoor temperature/humidity, atmospheric pressure, weather forecasts, trends |
| Alarms | 2 adjustable alarms, temperature and frost alarm |
| Weather forecasts | Symbols: sunny, partly cloudy, cloudy, rainy, rain + snow |
| Moon phases | New moon, first quarter, full moon, etc. |
| Sunrise/sunset | Automatic display after city selection |
| Tides | Display low, medium, high |
| Pressure history | Last 12 hours |
| Backlight | Press button, duration 5 seconds |
| Maintenance | Clean with a soft, dry cloth. Protect from moisture, dust, and shocks. |
| Safety (batteries) | Use non-rechargeable alkaline batteries. Observe polarities. Do not mix new and old batteries. Remove used batteries promptly. |
| General safety | Do not open the device. Do not expose to extreme temperatures, direct sunlight, or water. |
| Display languages | German, English, Italian, French, Spanish |
| Included accessories | Weather station, outdoor sensor, user manual. Batteries not included. |
Frequently Asked Questions - WS 6762 TECHNOLINE
User questions about WS 6762 TECHNOLINE
0 question about this device. Answer the ones you know or ask your own.
Ask a new question about this device
Download the instructions for your Weather Station in PDF format for free! Find your manual WS 6762 - TECHNOLINE and take your electronic device back in hand. On this page are published all the documents necessary for the use of your device. WS 6762 by TECHNOLINE.
USER MANUAL WS 6762 TECHNOLINE
natural_image
Technical line drawings of three views of a rectangular electronic device (no text or symbols)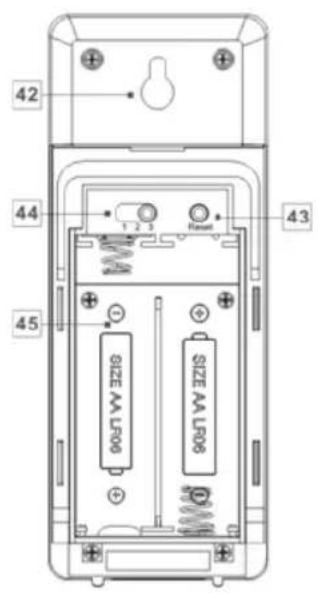
text_image
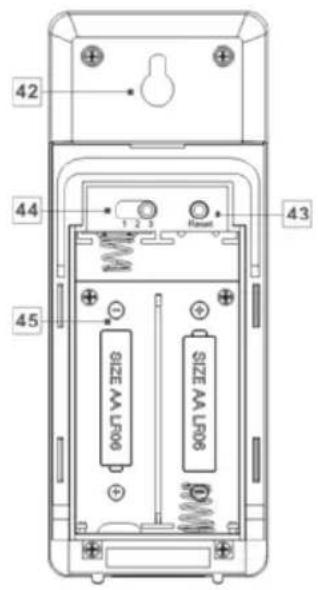
42 44 43 45 SIZE AA LR06 SIZE AA LR06ANZEIGE
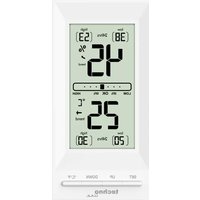
WS6762 - Radio-controlled weather station
Parts description
Weather station:
text_image
TREND 31 32 29 28 10 13 MOON PHASE TIDE HI MID LO 30:00 Sun RISE 38:00 SUN SET IN MAX MIN MAX MIN 16 17 OUT MAX MIN MAX MIN 21 24 38 D M DAY 27 9 2 5 6 11 12 14 30 1 3 4 7 23 18 19 15 20 in Hg m/s hPa Abs Rel % 00.8.00 18 -18 -30.00 15.00 16.00 17.00 18.00 19.00 20.00 21.00 22.00 23.00 24.00 25.00 26.00 27.00 28.00 29.00 30.00 31.00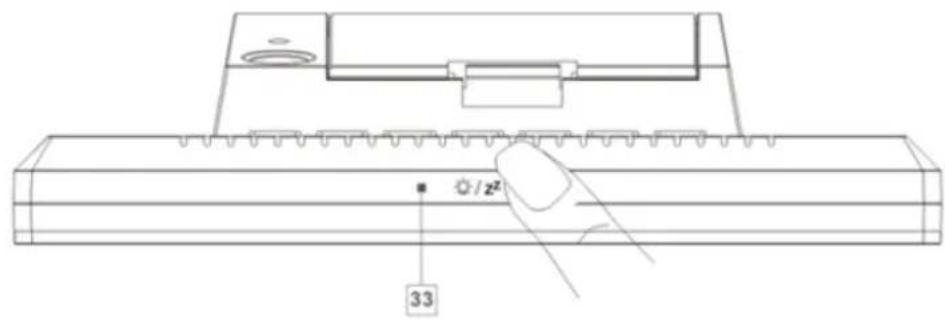
text_image
33 z²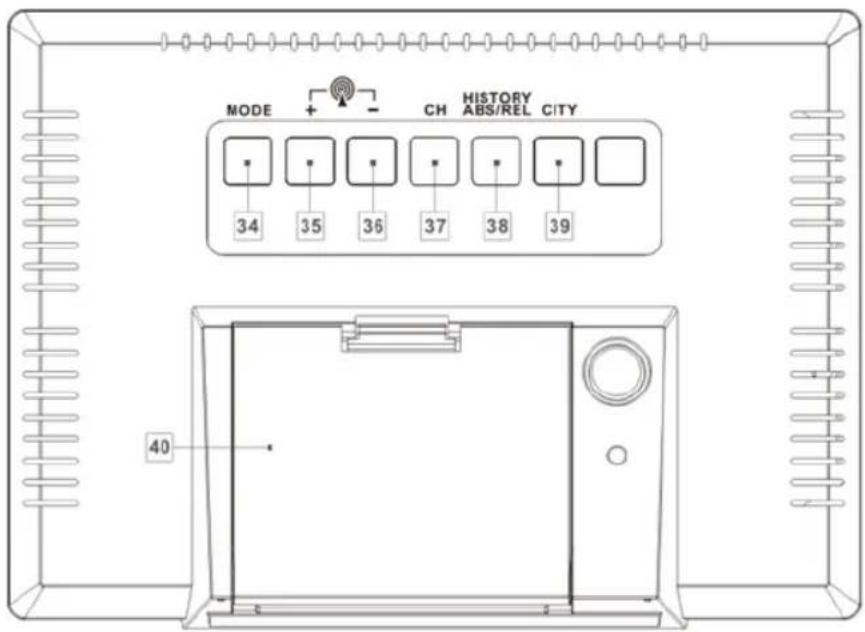
text_image
MODE 34 35 36 37 38 39 CH HISTORY ABS/REL CITY 40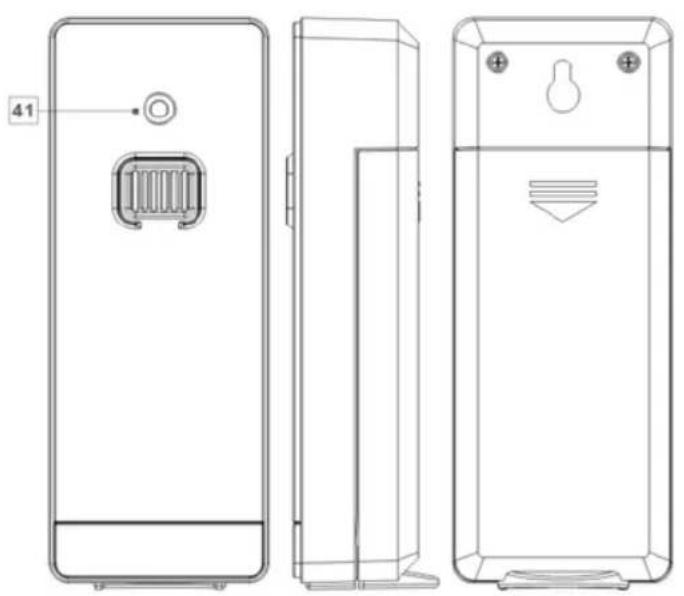
natural_image
Technical line drawings of three views of a rectangular electronic device (no text or symbols)
text_image
42 44 43 45 SIZE AA LR06 SIZE AA LR06DISPLAY
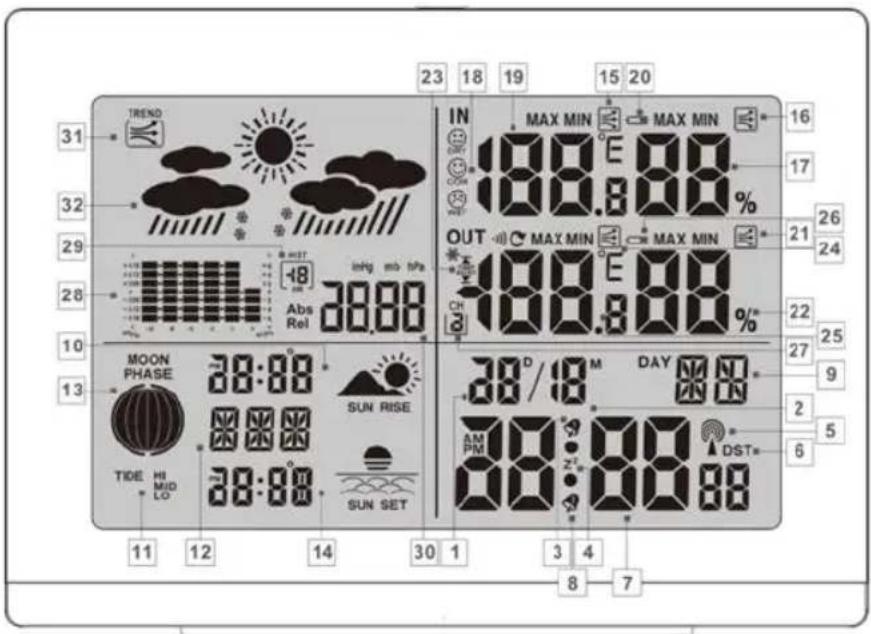
1- Date display
3- Alarm 1
5- Radio tower symbol
7- Time display
9-Day of week display
11- Tidal range display
2- Month display
4- SNOOZE display
6- DST display (summer time)
8- Alarm 2
10- Sunrise /time of sunrise
12- Location
13- Lunar phase
15- Temperature trend (indoor)
17- Humidity (indoor)
19- Inside temperature (°C/°F)
21- Humidity trend (outdoor)
23- Temperature and frost alarm (maximum / minimum)
25- Outdoor temperature (°C/°F)
27- Selected channel
29- Barometric pressure display of the last hour
31- Barometric pressure trend
14- Sundown / time of sundown
16- Humidity trend (indoor)
18- Comfort indicator
20- Battery state display
22- Humidity (outdoor)
24- Temperature trend (outdoor)
26- Battery state display (outdoor sensor)
28- Barometric pressure bar display
30- Absolute/ relative barometric pressure
32- Weather forecast
Exterior
33- SNOOZE/ LIGHT button
35- + button
37- Channel button (CH)
39- CITY button
34- MODE button
36- - button
38- HISTORY ABS/REL button
40- Battery compartment
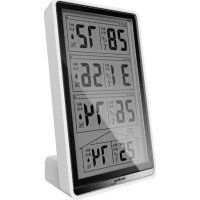
Outdoor sensor:
41- Control LED
42- Mount
43- RESET button
44- Channel selector switch
45- Battery compartment
Technical data
Weather station:
Temperature measurement range: 0 to +50°C(+32 to +122°F)
Temperature resolution: 0.1°C
Humidity measurement range: 20%–95%
Humidity resolution: 1%
Radio signal: DCF
Batteries: 2x AA, 1.5V (direct current)
Air pressure range: 850 - 1050hPa
Frequency Band: 433.050 to 434.790MHz
Outdoor sensor:
Temperature measurement range: -20 to +65°C (-4 to +149°F)
Humidity measurement range: 20%–95%
Humidity resolution: 1%
RF transmission signal: 433.92 MHz
RF transmission range: max. 60 metres (in open area)
Batteries: 2 x AA, 1.5 V (direct current)
Before use
Setting up the devices
Put the batteries into the outdoor sensor first.
CAUTION!
- When choosing where to position the weather station, make sure that it is not exposed to direct sunlight, vibrations, dust, heat, cold or moisture.
▶ Do not place the devices close to sources of heat, e.g. radiators. Otherwise they may be damaged.
▶ Do not place the devices on valuable or sensitive surfaces unless these are appropriately protected. Otherwise they may be damaged.
▶ Please ensure that neighboring devices are not operated at the same frequency of 433 MHz. Such devices may cause interference to the radio connection.
▶Do not place the devices next to or on metal plates. Otherwise the quality of radio wave transmission may be reduced.
▶Do not install the devices in buildings made of reinforced concrete, e.g. airports, high-rise buildings, factories or cellars. Otherwise the transmission of the radio waves between the devices may be severely impaired.
Preparing to use the outdoor sensor
- Remove the battery compartment cover from the back of the outdoor sensor.
▶ Insert 2 x AA batteries accordingly to right polarity (+/-). The outdoor sensor is now ready for operation and the control LED
(41) lights up briefly.
▶ Close the battery compartment cover.
Installing the Outdoor Sensor:
▶ Find an appropriate place for the outdoor sensor, protected from rain and direct sun light.
Note: Please ensure that you install the outdoor sensor within a radius of maximum 60m (open area) from the weather station. Check that there are no obstacles between the outdoor sensor and the weather station. Otherwise there may be interference of the transmission of data.
For wall mounting:
▶ Hang the outdoor sensor with the mount (42) on one screw.
Preparing the weather station for use
▶ Open the battery compartment (40) on the back of the weather station.
▶ Insert 2 x AA batteries accordingly to right polarity (+/-).
▶ Then close the battery compartment.
As soon as the battery safety strip has been removed, the weather station starts to receive the radio signal.
Note: Do not move the weather station while it is receiving the signal. This may disrupt reception.
Connecting the weather station with the outdoor sensor and the DCF radio signal:
After installing of batteries, the weather station attempts to establish a connection with the outdoor sensor. This process can take a few minutes. The symbol will keep flashing for few minutes. On successful connection with the outdoor sensor, the selected channel symbol (27) appears in the LC display with the channel of the outdoor sensor (if necessary you can change the channel of the outdoor sensor as shown in the section "Setting the channel"). If the connection with the outdoor sensor is not established automatically, this can be done manually as follows:
▶ Press the channel button (CH) (37) short until the desired channel (27) is displayed, then press and hold the CH button until the radio waves icon flashes. T
▶ Then press the RESET button (43) of the sensor. Weather station outdoor temperature (25) and humidity(outdoor) (22) will be displayed.
As soon as the weather station has established a connection with the outdoor sensor it automatically begins to receive the DCF radio signal. This process takes several minutes and is indicated by a flashing radio tower symbol (5).
When the DCF radio signal is being successfully received, the radio tower symbol is shown permanently in the display. If at the time of putting the device into operation it is not possible to synchronize with the atomic clock, you can also do the clock adjustments manually (“Setting the 12/24 hour mode /°C /°F/ hPa/ inHg/time zone /time/date/language manually”).
Radio signal (DCF):
The DCF signal (time signal transmitter) consists of time pulses emitted by one of the most accurate clocks in the world close to Frankfurt /Main, Germany.
In ideal conditions, your weather station can pick up this signal over a distance of up to approx. 2000 km around Frankfurt / Main. Reception of the radio signal generally takes approx. 3–10 minutes.
Reception can be considerably impaired by obstacles (e.g. concrete walls) or sources of interference (e.g. other electrical devices). In the event of reception problems, change the position of the weather station (e.g. to somewhere near a window).
Operation
Receiving the DCF radio time signal
After a connection with the outdoor sensor is established or 3 minutes after the batteries are installed, the weather station automatically begins to search for the DCF radio signal. The search is shown in the LC display by the radio tower symbol (5) flashing.
Note: In buildings made of reinforced concrete the reception of the radio signal may be severely impaired (see "Setting up the devices").
In order to correct any deviations from the exact time, the clock is automatically synchronized with the DCF radio signal every day at 1:00, 2:00 and 3:00.
Reception of the DCF radio signal can also be started manually on the weather station.
- Press the + and – button (35), (36) at the same time. The weather station attempts to receive the DCF radio signal.
This process takes several minutes and is indicated by a flashing radio tower symbol.
If the connection with the DCF radio signal cannot be established, the search is stopped.
Note: If the clock of the weather station cannot receive the DCF radio signal due to errors, too great a distance from the transmitter or similar reasons, it is possible to set the time manually. If reception of the DCF signal is successful, the manual settings are overwritten.
Manual settings
The reception of DCF radio signal where the weather station has been positioned may become degraded or interrupted. If this happens you can set the device manually.
Follow these steps:
- Press and hold down the MODE button (34) for about 3 seconds. "12Hr" or "24Hr" blinks in the display. Press the + or - button (35), (36) to choose the desired hour format.
- Confirm your setting by pressing the MODE button. The temperature unit “°C” or “°F” flashes in the display. Press the + or - button to choose the desired temperature unit.
- Confirm your setting by pressing the MODE button. The barometric pressure's unit flashes in the display. Press the + or - button to set the desired unit (hPa/inHg).
- Confirm your setting by pressing the MODE button. The time zone indicator flashes in the display. Press the + or - button to set the desired value (-2 to +2). Should You can manually adjust the clock to the time zone of a country where the clock receives the DCF signal but where the actual time differs from the time received. If, e.g. the time in a given country is 1 hour ahead of the German time, set the time zone display to 01. The clock is
now DCF controlled but the time is one hour ahead.
- Confirm your setting by pressing the MODE button. The hour value of the time display flashes. Press the + or - button to set the desired value.
- Confirm your setting by pressing the MODE button. The minute indicator of the time display blinks. Press the + or - button to set the desired value.
- Confirm your setting by pressing the MODE button. The year indicator flashes in the time display. Press the + or - button to set the desired value.
- Confirm your setting by pressing the MODE button. The month indicator flashes in the date display (1). Press the + or - button to set the desired value.
- Confirm your setting by pressing the MODE button. The day indicator flashes in the date display. Press the + or - button to set the desired value.
- Confirm your setting by pressing the MODE button. At the place of the day of the week display (9), the language indicator of this display flashes. Press the + or - button to choose the desired language.
- Confirm your setting by pressing the MODE button.
Notes:
- Press and hold the + or - button to accelerate the setting of values.
• If you do not press any button for 20 seconds, the LCD automatically reverts to the standard display. - The AM symbol in the time display (7) stands for before noon in the 12 hour mode. The PM symbol in the time display stands for after noon in 12 hour mode.
• You have the choice of German (GE), English (EN), Italian (IT), French (FR) and Spanish (SP) (German is set as
the standard language).
| Language | German | English | Italian | French | Spanish |
| GE | EN | IT | FR | SP | |
| Monday | MO | MO | LU | LU | LU |
| Tuesday | DI | TU | MA | MA | MA |
| Wednesday | MI | WE | ME | ME | MI |
| Thursday | DO | TH | GI | JE | JU |
| Friday | FR | FR | VE | VE | VI |
| Saturday | SA | SA | SA | SA | SA |
| Sunday | SO | SU | DO | DI | DO |
Setting the alarm time
- Press MODE button (34) to switch from time display to ALARM 1 display
- Press and hold the MODE button for 2 seconds, the flashing alarm time is shown
- The hour display of the alarm time is flashing. Use + or - button (35), (36) to select the hour.
- Press MODE button to confirm.
- The minute display of the alarm time is flashing. Use + or - button to select the minute.
- Press MODE button to confirm.
- Then press MODE button to switch from A1 display to ALARM 2 display
- The setting sequence for ALARM 2 is the same as for ALARM 1.
Note: Press and hold the + or - button to accelerate the setting of values.
Activating / deactivating the alarm function
- Briefly press the MODE button (34) briefly once or twice to reach ALARM 1 or ALARM 2 mode.
- Press the + button (35). The ALARM 1 symbol (3) or ALARM 2 symbol (8) appears in the LCD display. The alarm has been activated.
- Press the button + again. The ALARM 1 or ALARM 2 symbol in the LCD display goes out. The alarm has been deactivated.
Switching off the alarm signal
Press any button except the SNOOZE-/LIGHT button (33) to stop the alarm signal. It is not necessary to reactivate
the alarm. It switches itself automatically to the alarm time which has already been set.
Note: The alarm signal sounds for approx. 2 minutes.
SNOOZE function
Press the SNOOZE- /LIGHT button (33) as the alarm signal sounds to get to SNOOZE mode. The alarm signal sounds again after approx. 5 minutes.
Weather forecasting function
The weather forecast is calculated from evaluation of fluctuations in the barometric pressure and may deviate from the actual weather conditions. The weather station displays the following weather symbols:
| sunny | slightly cloudy | cloudy | rainy | rain + snow |
 |  | 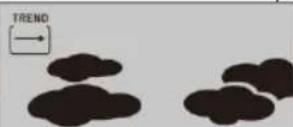 | 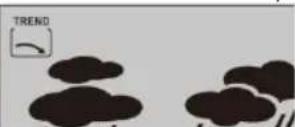 |  |
The weather symbols indicate the weather fluctuation over the next eight hours and not the current weather.
The weather station can display the barometric pressure trend (31).
You may see the following displays:

The barometric pressure will rise

The barometric pressure will remain constant.

The barometric pressure will fall
Selecting the location
▶ Press the CITY button (39). The location display (12) blinks and the longitude and latitude are displayed.
▶ Press the + or - button (35), (36) to select your location.
▶ Press the CITY button to confirm your entry. If the abbreviation for your location does not appear in the display, you may enter a user-defined location (see "Selecting the location manually").
After a brief moment, the weather station displays the times for sunrise and sundown, the lunar phases as well as the tidal range - low (TIDE LO), medium (TIDE MID) and high (TIDE TH).
Selecting the location manually
▶ Press the CITY button (39) down for approx. 2 seconds and keep it pressed.
▶ Press the + or - button (35), (36) to select the beginning letters of your location.
▶ Press the CITY button to confirm your entry. Enter the 2nd and 3rd letters in the same fashion.
GMT appears in the LC display and the time zone indicator blinks.
- Press the + or - button to set the difference from your time zone to GMT.
▶ Press the CITY button to confirm your entry. Set the longitude and latitude of your location in the same fashion.
After a brief moment, the weather station displays the times for sunrise and sundown, the lunar phases as well as the tidal range - low (TIDE LO), medium(TIDE MID) and high (TIDE TH).
You can choose from the following countries and cities:
| Germany(DIE) | Berlin | BER | Brest | BRE | Portugal(PT) | Faro | FAR | |
| Srienen | BRE | Cherbourg-Octeville | CHE | Warsaw | WAR | |||
| Köln | KOE | Clermont-Fernand | CMF | Portugal(PT) | Faro | FAR | ||
| Dortmund | DOR | Dijon | DJ | Lisbon | LIS | |||
| Dresden | DRE | Uille | UIL | Porto | POR | |||
| Düsseldorf | DUS | Lyon | LYO | RusikenFederation(FLU) | St.Petensburg | PET | ||
| Erfurt | ERF | Marseille | MRS | Serbia(PS) | Belgrade | SEO | ||
| Frankfurt | FRA | Metz | MET | Slovenia(SQ) | Bratislava | BRV | ||
| Freiburg | FRE | Nantes | NAN | Kosica | KOS | |||
| Hamburg | HAM | Nice | NCE | Slovenia(SI) | Ljubljana | LUB | ||
| Hannover | HAN | Orleans | ORL | Spain(III) | Alcantie | ALI | ||
| Hof | HOF | Paris | PAR | Andorra | AND | |||
| Kaisensleuthem | KAI | Perpignan | PER | Badajoz | BAD | |||
| Kassel | KAS | Rouen | ROU | Barcelona | BAR | |||
| Kiel | KIE | Strasbourg | STR | Bilbao | BIL | |||
| Leipzig | LEI | Toulouse | TOU | Cordoba | COR | |||
| Magdeburg | MAG | Greece(GR) | Athens | AHN | Eletsea Ibiza | IBZ | ||
| München | MUN | Hungary(HU) | Budapest | BUD | La Coruña | LCO | ||
| Nürnberg | NJR | Ireland(IE) | Dublin | DUB | Las Palmas | LPA | ||
| Canabrück | OSN | Italy (IT) | Ancona | ANC | Leon | LEO | ||
| Passau | PAS | Bari | BAR | Madrid | MAD | |||
| Regensburg | REG | Bolzano | BOZ | Malaga | MAL | |||
| Rostock | ROS | Capitan | CAG | Palma de Mallorca | PAL | |||
| Saarbrücken | SAA | Florence | FIR | Salamanca | SAL | |||
| Stuttgart | STU | Foggia | FOG | Sevilla | SEV | |||
| Ulm | ULM | Geneva | GEN | Valencia | VAL | |||
| Würzburg | WUR | Lecco | LEC | Zanagoza | ZAR | |||
| Australia(AU) | Canberra | CBR | Messina | MES | Sweden(ME) | Gothenburg | GOT | |
| Melbourne | MEL | Milan | MIL | Karlstad | KAR | |||
| Sydney | SYD | Naplas | NAP | Stockholm | STO | |||
| Austria(AT) | Bregenz | BRE | Palermo | PAL | Switzerland(CH) | Basel | BAS | |
| Grass | GRZ | Parma | PAR | Berms | BRN | |||
| Innsbruck | INN | Parugia | PER | Chur | CHU | |||
| Linz | UNZ | Rome | ROM | Geneva | GEN | |||
| Sakzburg | SLZ | San Ramo | SRE | Lucerne | LUC | |||
| Vienna | WE | Triest | TR8 | Lugarno | LUG | |||
| Viltech | VIL | Turin | TOR | Sion | SIO | |||
| Veits | VEL | Ventos | VEN | St. Gallen | SGL | |||
| Belgium(KE) | Antwerp | ANT | Verona | VER | Zurich | ZUR | ||
| Bruges | BRG | Liechtenstein(LJ) | Verdaz | VOZ | United Kingdom(UB) | Absterdam | ABD | |
| Brussels | BRU | Luxembourg(UU) | Luxembourg | LUX | Belfast | BEL | ||
| Libramont | UB | Monaco(MC) | Monte Carlo | MOM | Birmingham | BIR | ||
| Uege | UE | Netherlands(ML) | Amsterdam | AMS | Cardiff | CAR | ||
| BordeleAHermogorlie(BA) | Sarajevo | SAR | Amsterdam | ARN | Glasgow | GLW | ||
| Orelias(HF) | Spit | SPL | Eindhoven | EIN | London | LON | ||
| Zagreb | ZAG | Grøningen | GRO | Manchester | MAN | |||
| Czech(CZ) | Bmo | BRN | Rotterdam | ROT | Newcastle upon Tyne | NEC | ||
| Prague | PRG | The Hague | DHA | Plymouth | PLY | |||
| Denmark(DK) | Aufborg | ALB | New Zealand (KO) | Wellington | WLG | United States (U8) | Los Angeles | LAX |
| Copenhagen | KOB | Norway(KO) | Bergen | BCN | New York | NYC | ||
| Odense | ODE | Lifehammer | UIL | Washington | WAS | |||
| Finland(FT) | Helsinki | HEL | Oslo | OSL | Lithuania (LT) | Vitius | VNO | |
| France(FT) | Ajaccio | AJA | Poland(FL) | Cracore | KRA | Bulgaria (BG) | Sofia | SOF |
| Bismitz | BIA | Odansk | ODA | Romania (RO) | Bucharest | BUH | ||
| Bordeaux | BOR | Puznan | POZ | Cyprus (CY) | Nicosia | NIC |
Lunar phases
The weather station has a display which automatically displays the current lunar phase (13).
| New moon | Waving halfmoon | Half-moon | Waving full moon | Full moon | Waning full moon | Half-moon | Waning half moon |
 |  |  |  |  |  |  | 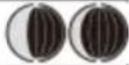 |
Sunrise and sunset
▶ A nearby city of your location must be set to correctly display the time of your area. The station needs to receive the radio-controlled time signal at least once in order to display correct sunrise and sunset time.
Reading the barometric pressure for the last 12 hours
▶ Press the HISTORY ABS /REL button (38) repeatedly to read the barometric pressure values for the last 12 hours.
0HR = present barometric pressure
-1HR = barometric pressure an hour earlier
-2HR = barometric pressure two hours earlier, etc.
......
-12HR = barometric pressure twelve hours earlier, etc.
Adjusting the air pressure indication
The forecast of this weather station is basing on an analysis of the change of the air pressure.
The barometric pressure (30) is factory provided adjusted to the absolute air pressure. As the air pressure generally decreases with the height beyond sea level, the public weather service always announces the so-called relative air pressure. This relative air pressure is adjusted to the topography of the country in order to get comparable values.
You can adjust the air-pressure of your weather station to the proportion of its place. For that you have to adjust your weather station uniquely the current air pressure. Ask your local weather forecast service for the barometric
pressure at sea level or get the current value from the Internet.
You can adjust the weather station like this:
▶ Press and hold the HISTORY ABS / REL button (38) for approx. 3 seconds. After that press the + or - button (35), (36), to interchange between the absolute or relative air pressure.
▶ Chose „Rel“ and press the HISTORY ABS/REL button for confirmation. The air pressure indication blinks. Now you can chose the correct value by pressing the + or - button.
▶ Confirm your choice by pressing the HISTORY ABS /REL button. Your weather station now shows the relative air pressure.
If you want your weather station to announce the absolute air pressure, proceed like this:
▶ Press and hold the HISTORY ABS/REL button for approx. 3 seconds. Afterwards press the + or - button, to change to the absolute air pressure. Confirm by pressing the HISTORY ABS /REL button.
Setting the channel
The weather station receives the outdoor sensor signal automatically after you have made all the settings.
Note: In the event of interference from nearby equipment transmitting radio signals, the symbol for humidity (outdoor) (22) and outdoor temperature (25) flashes during this time. Please select a different channel for the outdoor sensor by pressing the CH button (37) on the weather station or the channel selector switch (44) on the outdoor sensor. The relevant data is shown in the LC display.
- 1: Outdoor sensor channel 1
- 2: Outdoor sensor channel 2
- 3: Outdoor sensor channel 3
- Automatic channel change
Displaying temperature and temperature trend
The current indoor temperature (19) and the temperature trend (indoors) (15) are shown in the LCD display.
After successfully connecting with the outdoor sensor, the weather station can display the outdoor temperature (25) and the temperature trend (outdoor) (24). You may see the following:
The temperature is rising.
The temperature is remaining constant.
The temperature is falling.
Displaying the humidity and humidity trend
The current humidity trend (indoors) (16) and the current humidity (indoors) (17) are shown in the LCD display.
The COMFORT indicator (18) displays the humidity in three categories.
The following categories are available:

Humidity < 40%

Humidity 40–70 %, indoor temperature 20 °C–28°C

Humidity >70%
After a successful connection has been made with the outdoor sensor, the weather station shows the humidity trend (outdoors) (21) and the humidity (outdoors) (22) in the LCD display.
Displaying the maximum /minimum temperature /humidity
The minimum/maximum temperature /humidity is measured for the first time after the batteries have been inserted and stored in the weather station.
The maximum and minimum values for temperature, hygrometer and barometric pressure are automatically saved.
▶ If the weather station is in time display (7), press the + button (35) to display the maximum values.
▶ Press the + button twice to display the minimum values.
▶ Hold the + button down for approx. 3 seconds to erase the stored maximum and minimum values.
Temperature and frost alarm
The temperature alarm is a short beep, which sounds as soon as the outdoor temperature exceeds or falls below the preset temperature range. Follow the below procedures to set the desired temperature range.
▶ Press the – button (36) to get to the temperature alarm mode.
- Hold the – button down for 3 seconds. The maximum temperature display blinks. Press the + or – button to set the values.
▶ Press the MODE button (34) to confirm your setting. The minimum temperature display blinks. Press the + or - button to set the values.
▶ Press the MODE button to confirm your setting.
Activating / deactivating the the temperature and frost alarm
▶ If more than one outdoor sensor is activated, press the CH button (37) to select one.
- Press the – button (36) repeatedly to activate the temperature and frost alarms.
If the frost alarm alarm is activated, the corresponding symbol (23) appears next to the outdoor temperature. The alarm signal sounds at -1 ^ to +3 ^ .
If the temperature alarm is activated, the corresponding symbol appears next to the outdoor temperature. The alarm signal sounds at the set values.
If the temperature and frost alarm are activated, both symbols appear in the display.
Background lighting
▶ Press the SNOOZE /LIGHT button (33). The backlight illuminates for 5 seconds.
Battery state display
The battery state display (20), (26) appears, if the batteries are weak. Make sure you replace the batteries at the earliest opportunity (see “Changing the batteries”).
Changing the batteries
Weather station:
▶ Replace the batteries if the LCD display becomes illegible or if the battery display (20) is shown.
▶ Remove the battery compartment cover on the back of the weather station.
▶ Remove the used batteries. Insert 2 new batteries type AA, 1.5V.
Note: Make sure that the polarity is correct when you insert the battery. The correct polarity is shown inside the battery compartment (40).
▶ Close the battery compartment.
Outdoor sensor:
Replace the batteries if battery display (26) is shown.
- Remove the battery compartment cover from the back of the outdoor sensor.
▶ Remove the used batteries.
▶ Insert 2 new batteries type AA, 1.5V.
Note: Make sure you insert the batteries with the correct polarity. The correct polarity is shown inside the battery compartment (45).
▶ Close the battery compartment.
Environmental reception effects
The station obtains the accurate time with wireless technology. Same as all wireless devices, the reception is maybe affected by the following circumstances:
- long transmitting distance
• nearby mountains and valleys - near freeway, railway, airports, high voltage cable etc.
- near construction site
- among tall buildings
• inside concrete buildings
• inside moving vehicles
- near electrical appliances (computers, TV's, etc) and metallic structures
Place the station at a location with optimal signal, i.e. close to a window and away from metal surfaces or electrical appliances.
Precautions
- This main unit is intended to be used only indoors. Outdoor sensor is intended to be used outdoors.
- Do not subject the unit to excessive force or shock.
-
Do not expose the unit to extreme temperatures, direct sunlight, dust or humidity.
-
Do not immerse in water.
- Avoid contact with any corrosive materials.
- Do not dispose this unit in a fire as it may explode.
- Do not open the inner back case or tamper with any components of this unit.
Batteries safety warnings
- Use only alkaline batteries, not rechargeable batteries.
• Install batteries correctly by matching the polarities (+/-).
• Always replace a complete set of batteries. - Never mix used and new batteries.
- Remove exhausted batteries immediately.
- Remove batteries when not in use.
- Do not recharge and do not dispose of batteries in fire as the batteries may explode.
- Ensure batteries are stored away from metal objects as contact may cause a short circuit.
- Avoid exposing batteries to extreme temperature or humidity or direct sunlight.
- Keep all batteries out of reach from children. They are a choking hazard.
Use the product only for its intended purpose!
Consideration of duty according to the battery law
Old batteries do not belong to domestic waste because they could cause damages of health and environment. You can return used batteries free of charge to your dealer and collection points. As end-user you are committed by law to bring back needed batteries to distributors and other collecting
points!
Consideration of duty according to the law of electrical devices
This symbol means that you must dispose of electrical devices separated from the General household waste when it reaches the end of its useful life. Take your unit to your local waste collection point or recycling centre. This applies to all countries of the European Union, and to other European countries
with a separate waste collection system.
natural_image
Technical line drawings of three views of a rectangular electronic device (no text or symbols)
text_image
42 44 43 45 SIZE AA LR06 SIZE AA LR06AFFICHAGE
Signal radio (DCF) :
natural_image
Technical line drawings of three views of a rectangular electronic device (no text or symbols)
text_image
42 44 43 45 SIZE AA LR06 SIZE AA LR06PANTALLA
natural_image
Technical line drawings of three views of a rectangular electronic device (no text or symbols)
text_image
42 44 43 45 SIZE AA LR06 SIZE AA LR06DISPLAY
natural_image
Technical line drawings of three views of a rectangular electronic device (no text or symbols)
text_image
42 44 1 2 3 Raner 43 45 SIZE AA LR06 SIZE AA LR06DISPLAY
natural_image
Sequence of black-and-white circular diagrams showing progressive shading and division (no text or symbols)Alba e tramonto
natural_image
Technical line drawings of three views of a rectangular electronic device (no text or symbols)
text_image
42 44 43 45 SIZE AA LR06 SIZE AA LR06DISPLAY (ZOBRAZENÍ)
natural_image
Technical line drawings of three views of a rectangular electronic device (no text or symbols)