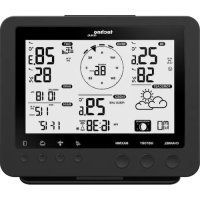
WS 250 - Weather Station TECHNOLINE - Free user manual and instructions
Find the device manual for free WS 250 TECHNOLINE in PDF.

| Product type | Wireless weather station for indoor/outdoor |
| Brand | TECHNOLINE |
| Model | WS 250 Edition |
| Dimensions (base station) | Approx. 136 x 198 x 35 mm (without stand) |
| Power supply base station | 4 LR6 (AA) batteries |
| Power supply combined sensor | 3 LR6 (AA) batteries |
| Main functions | Indoor/outdoor temperature, humidity, dew point, wind chill, wind speed, rainfall amount, atmospheric pressure, weather forecast, moon phase, sunrise/sunset, "Willy the Weather", 24h history, min/max values |
| Displays | Temperature in °C, humidity in %, wind speed in km/h, m/s or mph, rain in mm or l/m² |
| Compatible sensors | Up to 8 additional outdoor sensors (type ASH2200 or S300IA) + 1 combined sensor included |
| Radio frequency | 868.35 MHz |
| Maximum range in open field | 100 m |
| Measurement ranges | Indoor temperature: 0°C to +59.9°C; outdoor: -19.9°C to +79.9°C; humidity: 0% to 99%; rain: 0 to 999 mm; wind: 0 to 200 km/h |
| Maintenance and cleaning | Clean the base station with a soft, dry cloth; clean the combined sensor with a damp cloth; clean the rain gauge at least once a year |
| Safety | Do not expose to humidity, do not open the housing, use only indoors for the base station, follow battery safety instructions |
| Spare parts and repairability | Replaceable batteries; no specific spare parts provided; repairs by qualified technician only |
| General information | Personal use only; weather forecasts for reference only; package contents: base station, stand, combined sensor, metal rods, instruction manual, 7 LR6 batteries |
Frequently Asked Questions - WS 250 TECHNOLINE
User questions about WS 250 TECHNOLINE
0 question about this device. Answer the ones you know or ask your own.
Ask a new question about this device
Download the instructions for your Weather Station in PDF format for free! Find your manual WS 250 - TECHNOLINE and take your electronic device back in hand. On this page are published all the documents necessary for the use of your device. WS 250 by TECHNOLINE.
USER MANUAL WS 250 TECHNOLINE
GB These operating instructions belong with this product. They contain important information for putting it into service and operating it. This should be noted also when this product is passed on to a third party.
Therefore look after these operating instructions for future reference!
A list of contents with the corresponding page numbers can be found in the index on page 34.
natural_image
3D rendered mechanical component with two circled annotations highlighting features (no text or symbols present)natural_image
Close-up of a mechanical component with a highlighted circular area, showing internal structure and mounting features (no text or symbols visible)Thank you for purchasing this product.
The product has been EMV-tested and thus meets the requirements of the valid European and national guidelines. CE-conformity has been proven and the corresponding declarations deposited with the manufacturer.
In order to maintain this condition and ensure safe operation, you, as the user, have to observe this operating manual.
Prior to using the product for the first time, please read the entire operating manual and observe all operating and safety instructions.

We should already like to point out now the correct order for commissioning the products. Please also observe the installation and calibration instructions in this operating manual as well as the information about impairment of radio transmission between the sensors and base station.
All company names and product descriptions listed herein are the trademarks of the respective manufacturers. All rights are reserved.
Table of Contents
Page
- Intended use 36
- Scope of delivery 37
- Terminology 37
- Features and functions.... 37
a) Base station 37
b) Combination sensor 38
- Safety instructions 39
- Battery and environment instructions 39
- Preparation for operation, commissioning 40
a) Commissioning the combined sensor 40
b) Commissioning additional sensors 41
c) Commissioning the base station 41
-
LCD displays 42
-
Configuration and operation 44
a) Basic settings, configuration 44
Calling up configuration mode 45
Setting time and date 45
Entering longitude and latitude 45
Setting time zone 46
Entering rain sensor 46
Selecting unit for rain gauge 47
Allocating the progress display 47
Selecting the unit for the wind speed 47
Terminating the configuration mode.... 47
b) Operation 48
Selecting indoor temperature display 48
Selecting outdoor temperature display 48
Selecting outdoor sensor 48
Selecting rainfall quantity display period 48
Deleting total rainfall quantity 48
Displaying MIN/MAX values 48
Displaying time/date for individual extreme values 49
Deleting MIN/MAX Values 49
c) Other functions 49
Moon phase display 49
Weather Willie 49
Weather forecast 50
Wind symbol display (windsock) 50
Immediate rain display 50
Comfort indicator 51
- Changing battery 51
a) Base station 51
b) Combination sensor, outdoor sensors 51
-
Troubleshooting 52
-
Range: 53
- Maintenance and cleaning 54
a) General 54
b) Cleaning base station 54
c) Cleaning outdoor sensors or combination sensor .... 54
d) Aligning rain sensor 57
- Handling 58
a) General 58
b) Base station 58
c) Combination sensor .... 58
-
Terminology 59
-
Disposal 60
a) General 60
b) Disposing of batteries and accumulators 60
- Technical data 61
- Position table (longitude/latitude) 62
1. Intended use
The weather station WS 250 Edition is a high-quality universal weather measuring system which processes a large quantity of weather data and additional information, and displays the current weather as well as weather forecasts.
All relevant data are displayed simultaneously on the LC display. Additional data can be called up at the push of a key.
A special feature is „Weather Willie“. He indicates the current temperature range of the by means of the clothes he wears, the current wind speed with his hair and scarf and the forecast and starting or current precipitation.
The forecasts of the base station serve only the purpose of orientation. They do not represent an absolutely true forecast. The manufacturer does not assume any responsibility for incorrect displays, measuring values or weather forecasts or any consequences which may result from these.
The product is intended for private use. It is not suited for medical purposes or public information.
The components of this product are not toys. Install all components in such a way that children have no access to them.
The product is battery-operated. All external sensors transmit their data per radio to the base station (868 MHz, range up to 100 m in open space, see chapter 12 on page 52).

Any other use than that described above may lead to damage to the product or to other danger.
Read the complete operating manual carefully. It contains much important information about the installation and operation.
2. Scope of delivery
• Weather station WS 250 Edition
- Plastic base for weather station
- Combination sensor
• Metal rods/pegs for the combination sensors
- Operating manual
- 7 x LR6
3. Terminology

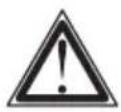
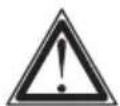
An exclamation mark in a triangle indicates important instructions in the operating manual which must be observed under all circumstances.

You will see the „hand” symbol for special tips and instructions concerning operation.
4. Features and functions
a) Base station
Display of indoor temperature and air humidity
• Temperature display in °C
- Can be switched to display internal dew point
- Storage of minimum/maximum temperature with time and date of incidence
- Storage of minimum/maximum humidity with time and date of incidence
- Comfort zone indicator
• Graphic display of progress for the past 24 hours
Display of one of a maximum of 9 outdoor sensors (temperature and air humidity)
- Display of the data of the combination sensor or 8 outdoor sensors for temperature/air humidity (ASH2200 and S 300 IA)
- Display of temperature, dew point or wind-chill temperature
- Storage of minimum/maximum temperature with time and date of incidence
- Storage of minimum/maximum humidity with time and date of incidence
• Graphic display of progress for the past 24 hours
Display of wind speed
- Selectable units: km/h, m/s, mph
- Storage of maximum wind speed with time and date of incidence
• Additional graphic display (wind cone) for slight, moderate and strong wind
Display of the amount of rain in mm, l/m^2 or inch for:
• total amount since the last clearance, last hour, current hour, last 24 hours, current 24 hours
- storage of the maximum quantity per hour and per day
• additional display for commencing rain (immediate rain display)
Display of atmospheric pressure progress / atmospheric pressure tendency:
- graphic display of the progress in the past 24 hours
- display of atmospheric pressure tendency in 5 different stages: increasing strongly, increasing, steady, falling, falling strongly
Symbolic display of weather forecast
- Symbol for: rainy, cloudy, fair and sunny
Display of time and date
- Integrated quartz clock
Display of sunrise / sunset
- Based on location data to be entered individually; calculation is possible within a range of -60 to +60^
Display of moon phases
- Display of current moon phase: new moon, waxing moon, full moon, waning moon
„Weather Willie“
Reminiscent of the almost forgotten weather house in which case a person with an umbrella comes out in case of bad weather and another one with light clothing in case of good weather, the WS 250 Edition has „Weather Willie“.
The behaviour of this figure depends on several weather factors so that you can tell at a glance which clothes you can wear if going outdoors.
This not only evaluates the current measuring values for the outdoor temperature, air humidity, wind and rain.
The weather forecast also plays an important role here. Depending on the weather situation, "Weather Willie" has a different appearance and wears different clothing.
„Weather Willie“ shows several weather factors at one glance:
- Weather Willie's clothing depends on the outdoor temperature measured by means of the combination sensor.
- In the case of wind speed in excess of 20 km/h, Weather Willie's hair will blow in the wind. If the temperature is below 15 °C at the same time, his scarf will also blow in the wind.
- If the weather forecast forecasts rain, Weather Willie will carry a (closed) umbrella.
- If it starts raining, Weather Willie will carry an open umbrella.
b) Combination sensor
• Radio transmission of:
- rain quantity
- immediate rain detection
- wind velocity
- temperature
- humidity
5. Safety instructions

Damage caused by non-observance of this operating manual can lead to forfeiture of the warranty! We shall not assume any liability for subsequent damage!
We shall not assume any liability for damage to items or persons caused by improper handling or non-observance of the safety instructions! In such cases, any guarantee claims shall become null and void.
Dear Customer, the following safety and hazard notices not only serve the protection of your health but also the protection of the appliance. Please read the following points carefully!
Do not use this product in hospitals or medical institutions. Although the outdoor sensor only emits relatively weak radio signals, these may cause interference to life-support systems. The same can also apply in other areas.
The weather station is only suited for dry, indoor premises. Do not expose it to direct sunlight, extreme heat, cold, dampness or humidity.
If used correctly, the rain/wind detector is suited on the other hand to unprotected outdoor locations.
For safety and licensing reasons (CE), it is not permitted to convert or modify the product.
Do not leave the packaging material lying around. Plastic foil and bags, polystyrene parts etc. are dangerous toys in the hands of children.
Handle the product with care! Blows or impact, or dropping it even from a small height will damage it.
6. Battery and environment instructions
- Batteries do not belong in the hands of children.
- Observe the right polarity when inserting the batteries/accumulators.
- Do not leave batteries lying around. Pets or small children may swallow them. If they are swallowed, contact a doctor immediately.
- Leaking or damaged batteries/accumulators may lead to injury to the skin. For this reason, use suitable protective gloves when changing them.
- Make sure that batteries or accumulators are not thrown into the fire or short-circuited. There is a likelihood of explosion!
- Never dismantle batteries/accumulators!
- Do not recharge normal batteries. There is a risk of explosion!
- If the product is not used for longer periods of time (e.g. in case of storage), please remove the inserted batteries/accumulators in order to prevent damage caused by leaking batteries/accumulators.
7. Preparation for operation, commissioning
Please observe:
First of all, put all available outdoor sensors into operation (insert batteries) and then the base station itself.
If you proceed in the opposite order, it could occur that the base station does not detect all the existing outdoor sensors.
We always recommend you to first of all try out the base station with all outdoor sensors (in as much as you have purchased additional outdoor sensors besides the supplied combination sensor) in a room before installing the outdoor sensors in the open air. However, the distance between the base station and the out-door sensors should be at least 2 m in order to avoid interference.
If you notice that one outdoor sensor is out of range after installation, you can assume that radio reception is not sufficient (and that there is no defect in the outdoor sensor).
This initial function test will save extensive and time-consuming error searches afterwards.
a) Commissioning the combination sensor
- Open the casing of the sensor. First of all, turn the lower casing cover slightly in the direction of the arrow (1) as shown below and then carefully lower the casing cover.
- Now insert three batteries (LR6/mignon/AA) with the correct polarity into the battery compartment (see illustration below on the right). Use preferably alkaline batteries.

Accumulators can also be used but these reduce will reduce the range due to the lower voltage / capacity as well as their operating life!
For the first 5 minutes the combination sensor is in a test mode and sends its data-telegrams in an intervall of approx. 3 seconds. After completion of the test mode the normal transmission interval of approx. 155 seconds is activated.
It must be guaranteed that the combination sensor has already left its test mode when the synchronisation mode of the base station is terminated, otherwise a normal reception isn't possible.
- Close the sensor casing, slide the cover to the top and lock it again.
- Assemble the installation base.
As already explained above, you should first of all install the sensors in the garden etc. after a successful initial function test.
It may be difficult to find a favourable place for the combination sensor as this should stand preferably in the shade in order to measure the correct temperature. On the other hand, it is also necessary to consider the functions of the wind and rain sensor.
Closeness to buildings, trees, etc. may impair the measuring values of the wind and rain sensor.
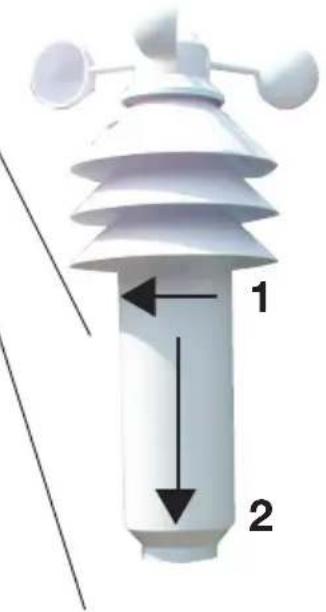
text_image
1 2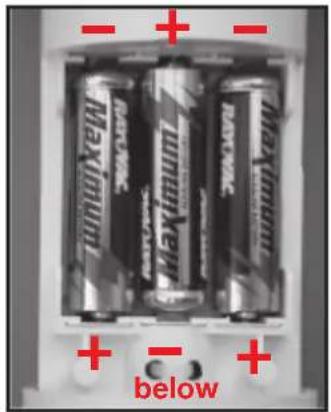
text_image
down + - + Maximum Maximum Maximum MAX Minimum MAX Minimum + - +Once you have found a favourable location, insert the earth peg deep into the ground in order to ensure the stability of the combination sensor.
When selecting the installation site, take the safety of children, pets, vehicles, etc into consideration.
Any risk of the combination sensor's falling poses the risk of injury or danger of damaging vehicles or other objects.
You can also use a hammer to insert the earth peg into the ground. However, use a suitable piece of wood or similar in order not to damage the top end of the pipe as this makes it impossible to connect the other pieces of pipe (loss of warranty)!
Make sure that there are no pipes or similar installed in the area where you wish to insert the peg into the ground (e.g. hoses for irrigation systems or similar).
b) Commissioning additional sensors
If you wish to use one or several additional temperature / humidity sensors of the type „ASH2200“, insert the batteries now into the sensor(s) with the right polarity. You can operate up to 8 sensors.
c) Commissioning the base station
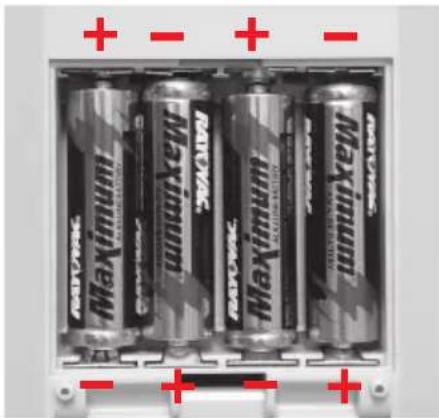
- Open the battery compartment on the back of the base station (remove the installation base, if applicable).
- Insert four batteries (LR6/mignon/AA) with the correct polarity into the battery compartment. Use preferably alkaline batteries.

It is possible to use accumulators but these reduce the operational life due to their lower voltage / capacity.
text_image
MAXIMINI RANOVAC RANOVAC MAXIMINI RANOVAC MAXIMINI RANOVAC MAXIMINI RANOVAC MAXIMINI RANOVAC MAXIMINI RANOVAC MAXIMINI RANOVAC MAXIMINI RANOVAC MAXIMINI RANOVAC MAXIMINI RANOVAC MAXIMINI RANOVAC MAXIMINI RANOVAC MAXIMINIbelow
- Close battery compartment.
• After you have inserted the batteries, all segments of the LCD are displayed briefly.
- After that, the base station activates the synchronisation mode for 15 minutes. During this period, the device displays all received radio weather sensors in succession.
If all sensors used have already been received, you can terminate synchronisation mode prematurely by pressing any key. It must be guaranteed that the combination sensor has already left its test mode, otherwise a normal reception isn't possible. In case of doubt the synchronisation mode of the base station should not be terminated manually.
- Normal display of all weather data takes place after synchronisation. Only the sunset and sunrise together with the moon phase are not yet displayed because the time and the calendar have to be set for this purpose.
- You can either hang the base station on a wall (there is a corresponding opening on the back) or place it on a level surface with the installation base.
- If you want to use the foot, first put the front central spike of the foot into the supports on the back side of the base station. Then, swing the foot a little bit back till the two rear spikes lock into the catch supports at the bottom of the base station.
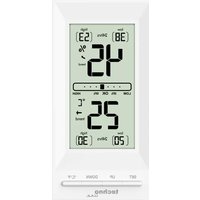
8. Indications of the LC Display
text_image
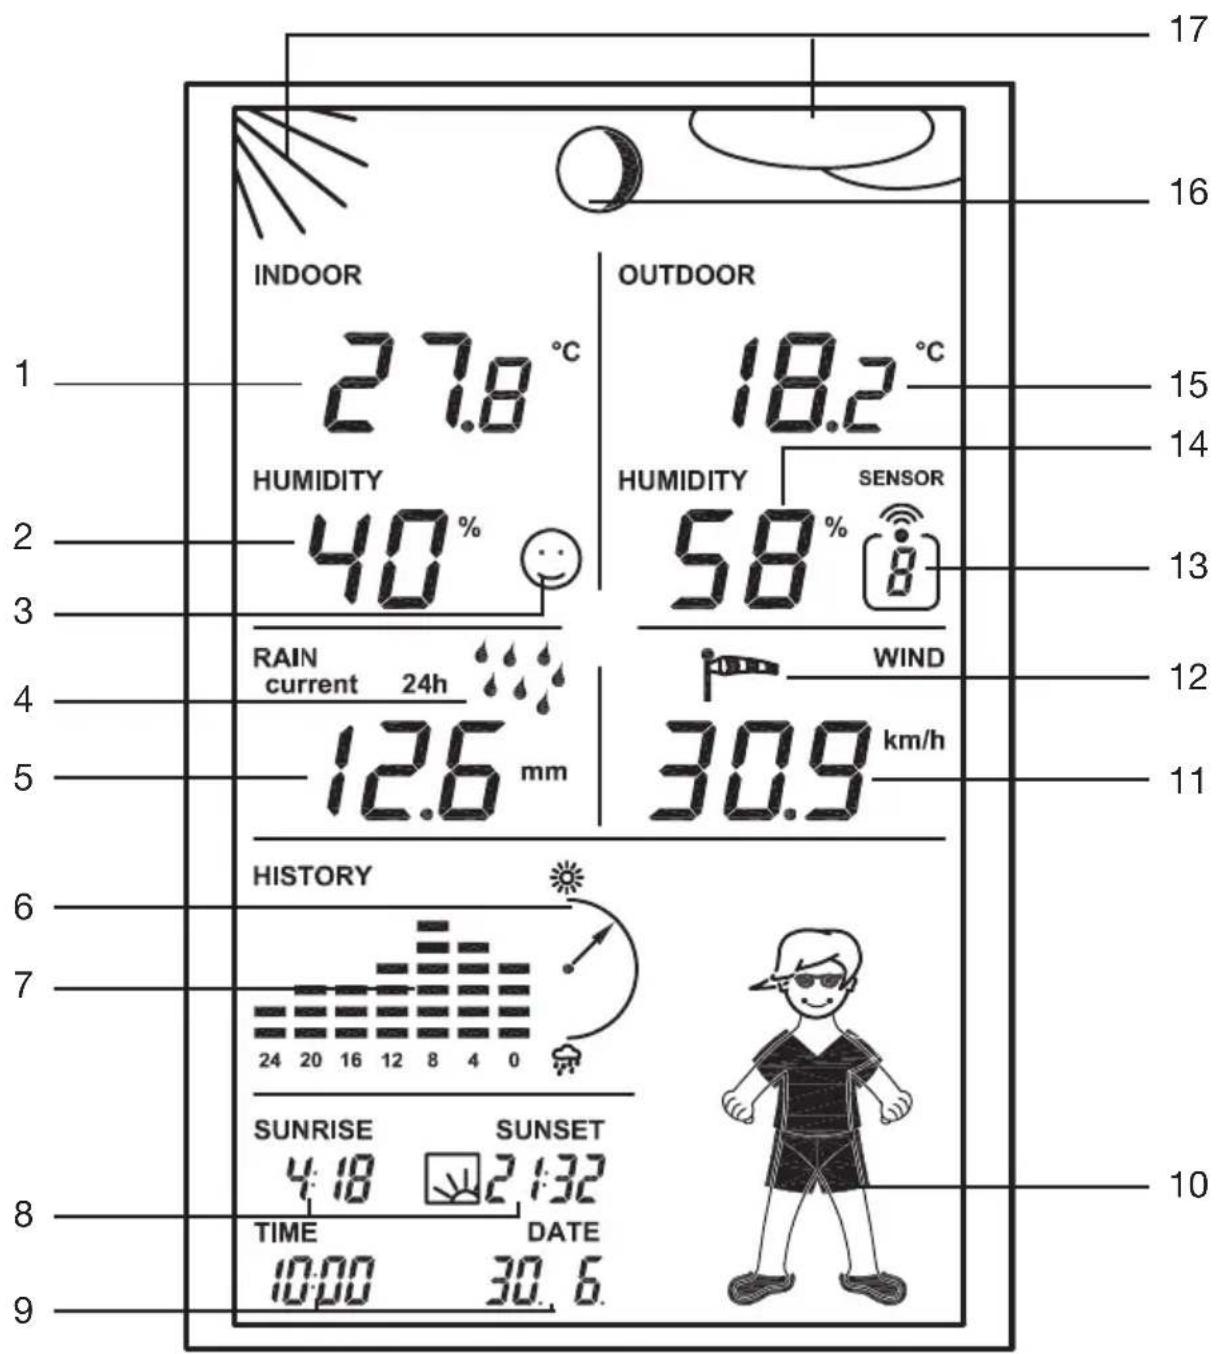
INDOOR 27.8 °C HUMIDITY 40 % RAIN current 24h 12.6 mm OUTDOOR 18.2 °C HUMIDITY 58 % SENSOR 30.9 km/h WIND 13 12 11 17 16 15 14 13 12 11 10 7 8 9 SUNRISE SUNSET 4:18 2:32 TIME DATE 10:00 30.61 Current indoor temperature
2 Current indoor humidity
3 Comfort zone indicator (for the display of a comfortable/uncomfortable climate)
4 Rain display
5 Amount of rain (in the above illustration, the rain amount in the last 24 hours)
6 Atmospheric tendency display
7 Graphic progress display (history) depending on the unit selected (illustration above: atmospheric pressure)
8 Sunrise time and sunset time
9 Time and date display
10 Animated icon „Weather Willie“
11 Current wind speed
12 Symbol for wind strength
13 Sensor number (no display when the combination sensor is selected)
14 Current air humidity value of the outdoor sensor selected
15 Current temperature value of the outdoor sensor selected
16 Symbol for the moon phase
17 Symbol for the weather forecast (sunny, fair, cloudy, rainy)
9. Configuration and Operation
After installation of the radio sensors and the subsequent commissioning of the base station (this order must be observed!), the data transmitted by the radio sensors should appear on the LC display of the base station.
a) Basic Settings, configuration
The following settings are still required for operation:
• Year, month, day, hour, minute
• Latitude/longitude of your position
- Time zone

You will then see the display of the moon phase and the sunset/sunrise as well as the date and the time.
Additional settings:
- Rain sensor alignment is possible on request (however, this was already carried out by the manufacturer so that it normally does not have to be repeated!)
- Unit of rain quantity
- Assignment of progress display (air pressure, interior or exterior temperature)
- Wind strength unit

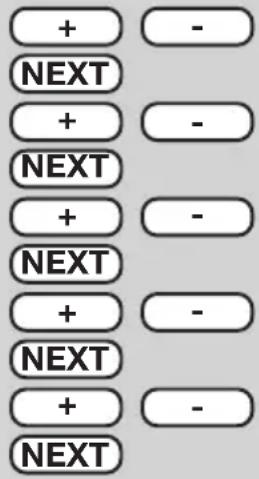
The keys have the following functions in configuration mode:
Imprint Function Description
IN (unused)
SENSOR EXIT leaving configuration mode
MIN/MAX + increase value
RAIN - decrease value
OUT NEXT to next setting
You will also find the key allocation on the back of the weather station.

Please observe:
The values are adjusted more quickly if you press the keys „+“ or „-“ longer when making individual settings.
After each setting, you can leave the configuration mode by pressing „EXIT“ or move on to the next setting using the key „NEXT“.
Configuration takes place in the sequence:
Year → Month → Day → Minute → Hours → Latitude →
Longitude → Time zone (ti) → Rain sensor alignment →
Rain unit quantity Assignment of progress display Wind unit

After that, the setting order commences from the beginning again.
IN
2 seconds
Calling up configuration mode
Press key „IN“ for approx. 2 seconds. When the key has been released, the corresponding display appears.
You can leave the configuration mode at any time by pressing „EXIT“ (= „SENSOR“), see „Terminating configuration mode“.
text_image
+ - NEXT + - NEXT + - NEXT + - NEXT + - NEXT + - NEXTSetting time and date
Set current year using the keys „+“ and „-“.
Press „NEXT“ key.
Set current month using the keys „+“ and „-“.
Press „NEXT“ key.
Set current day using the keys „+“ and „-“.
Press „NEXT“ key.
Set minutes using the keys „+“ and „-“.
Press „NEXT“ key.
Set hours using the keys „+“ and „-“.
Press key „NEXT“; then you can set the latitude („LA“ appears on the display).
Entering latitude/longitude
It is necessary to state the location of the weather station in order to calculate the sunset/sunrise times.
You can enter the latitude at a range of between -60.0^ to +60.0^ .
The manufacturer's setting is Berlin. You can determine your position in different ways:
- in chapter 18 on page 61, you will find a table with the coordinates of several German cities. Select a nearby location near and enter its coordinates.
- if you have a GPS navigation device, e.g. in your car or a mobile device, you can adopt its position details and thus the exact position.
- you can also obtain the exact co-ordinates in the Internet. There are numerous sites that deal with navigation.
Please observe the fact that the information concerning the sunrise / sunset would only be correct to be exact at the sea of for completely level landscape. Mountains, high forests etc. will alter these values for your location.
Even for the ideal situation, the information can deviate by some minutes as an approximation formula is used for the calculation.
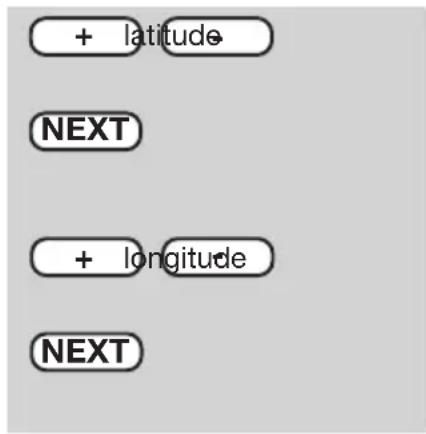
Press the „NEXT“ key. After that, you can enter the longitude.
The display shows this as „LO“ („Longitude“).
Set the longitude using the keys „+“ and „-“.
Example: 13.4°, input: 0134
Press the key „NEXT“ and now set the time zone. The display shows „ti”.
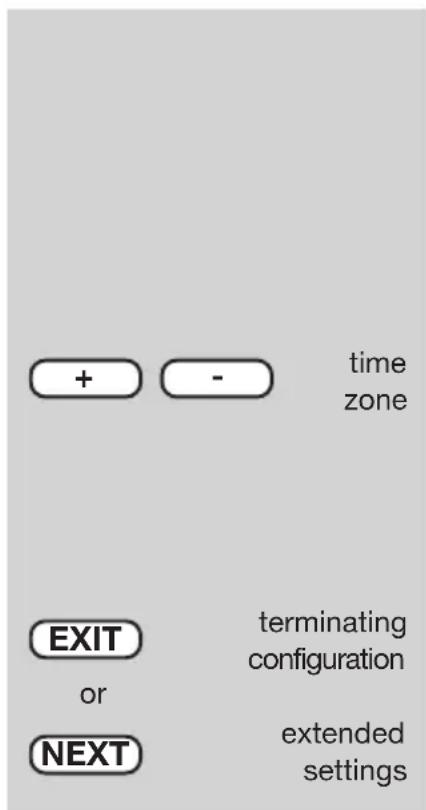
text_image
+ - time zone EXIT or terminating configuration NEXT extended settingsSetting the time zone
The time zone is required for the calculation of the sunrise and sunset times.
Enter the difference to GMT (Greenwich Mean Time).
The following values apply for Germany:
- Daylight saving + 2
- Winter time + 1
Enter the current value for your time zone using the keys „+“ and „-“.
All settings have been made at this time for correct operation of the weather station. The extended settings are not required for normal operation.
Now press „EXIT“ to leave the configuration mode and return to normal mode. Now the base station is back in normal mode.
Press the key „NEXT“ to make extended settings and go to the balancing of the rain sensor.
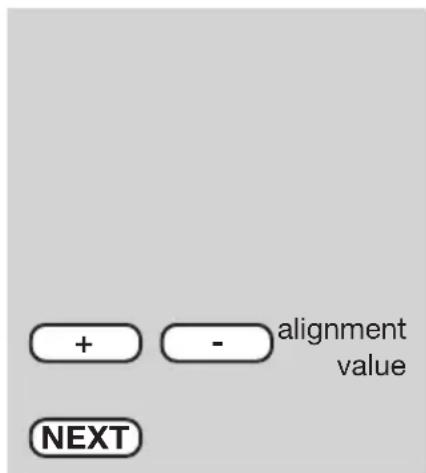
text_image
+ - alignment value NEXTEntering the alignment value
The rain gauge has been set to a high degree of accuracy ex works so that you normally do not need to align it.
Simply press „NEXT“ to take over the factory settings.
Otherwise the alignment value will have to be determined first of all in normal mode (see chapter 13 d) on page 56).
Enter the previously determined alignment value using the keys „+“ and „-“.
Press „NEXT“ to set the unit for measuring rain.


rain quantity unit


assigning progress display


wind velocity unit

Selecting the unit for rainfall measurement
The unit for the rainfall quantity is displayed in the field „RAIN“ where you can chose between l/m^2 or mm.
Select the desired unit using the keys „+“ and „-“.
Press the „NEXT“ key. After that, you can allocate the progression display.
Allocating the progress display
You can allocate the following display types to the graphic progression display:
• atmospheric pressure
- interior temperature
• exterior temperature
If the progress display is allocated to one of the two temperature displays, the symbol „ ^2 ” appears in the display field concerned in addition.
Overlay/identification in the display field:
P = atmospheric pressure
O = outdoor temperature
I = indoor temperature
Select the desired allocation using the keys „+” and „-”.
Press the key „NEXT“, after that, the unit for the wind velocity measurement can be entered.
Selecting the unit for wind velocity
The following units can be set:
km/h = kilometre per hour
m/s = metre per second
mph = miles per hour
The display will take place in the field „WIND”.
Select the unit with which you wish to display the wind velocity using the keys „+” and „-”.

If the „NEXT“ key is pressed, the year will appear again; the input order can commence from the beginning again. You could now, for example, monitor or alter the entries.
Terminating configuration mode
Press „EXIT“ to complete input. This can take place at any desired position, e.g. after setting the time etc.
b) Operation
Selecting indoor temperature display
In normal operation, the indoor temperature and internal humidity are displayed in the display field „INDOOR”.
By repeatedly pressing the „IN“ key, you can switch between:
- indoor temperature
• respective dew point
Selecting outdoor temperature display
In normal operation, the indoor temperature and internal humidity of the selected outdoor sensor are displayed in the display field „OUTDOOR”.
By repeatedly pressing the „OUT“ key, you can switch between:
• outdoor temperature
• respective dew point
• temperature measured (wind chill)
Selecting outdoor sensor
In the display field „Sensor“, the outdoor sensor selected at the moment concerned is displayed together with its sensor number. Only active (in the synchronisation phase) sensors are displayed.
To select the outdoor sensors or combination sensors, press the „SENSOR“ key so long until the desired sensor number appears:
- for outdoor sensors 1-8, the sensor number concerned (1-8) is displayed
- no sensor number is displayed for the combination sensor, the overlay „SENSOR“ (alongside the outside humidity) disappears.
Selecting rain quantity display period
By repeatedly pressing the „RAIN“ key, you can switch between:
• display for the last hour
• display for the current hour
• display for the last 24 hours
• display for the current 24 hours
- display of the total quantity since the last clearance of the rain quantity after inserting the batteries.
In the process please consider the following peculiarities: The calculation of the rain quantity „last hour“ always occurs at the half-hour, for example between 2.30 p.m. and 3.30 p.m. The calculation of the rain quantity „last day“ always occurs at 7.30 a.m. The rain quantity „current hour/day“ results from the quantity, that accumulates till the next half-hour, for example 4.30 p.m.
Deleting total rain quantity
Press „RAIN“ key for approx. 2 seconds. After releasing the key, the total rain quantity is deleted.
Displaying MIN-/MAX figures (extreme values)
For the measurement figure of the indoor/outdoor temperature and indoor/outdoor humidity, the minimum and maximum figures reached since the last clearance of data are stored.
Only the MAX figures are stored for the wind velocity and rain quantity measurements.

The point of time and date of incidence of the extreme value are also stored for all figures.
Pressing the „MIN/MAX“ key switches between the display of the minimum values, the maximum values and the normal display. Proceed in retrieving the stored date as follows:
• Retrieving minimum values

Press the „MIN/MAX“ key. „MIN“ appears in the centre.
The minimum values are now overlayed in the displays concerned. No display takes place for wind and rain (minimum value would always be „0“).
• Retrieving maximum values
Press the „MIN/MAX“ key once again (starting from the normal display press the key twice). „MAX“ appears in the display in the centre.

The maximum values are displayed in the display fields concerned.
- Returning to normal display
By pressing the „MIN/MAX“ key, return to the normal display takes place, the overlay „MAX“ disappears from the display.
Displaying time/date for individual extreme values
If necessary, you can have the appropriate time or date of incidence displayed for each individual extreme value.
Proceed as follows:
- First of all, select the display of the minimum values (press „MIN/MAX“ key once, overlay „MIN“ in the LCD) or the maximum values (press „MIN/MAX“ key twice, overlay „MAX“ in the LCD).
- The desired value can now be displayed by pressing the „SENSOR” several times.
Order of display:
indoor temperature → indoor humidity → outdoor temperature → outdoor humidity → rain quantity (only MAX value, not for „TOTAL“) → wind velocity (only MAX value)

Only one display field is displayed with its extreme value at one time; the point of time and date of incidence of the extreme value appears below in the time display.
- Pressing the „SENSOR“ key again leads back again to the complete display of all extreme values (MIN or MAX according to whether you have selected the minimum or maximum values at the beginning).
Deleting MIN/MAX values
Press the „MIN/MAX“ key once to display the minimum values or twice to display the maximum values. Now you can choose the value to be deleted by pressing the „SENSOR“ key.
To delete the values displayed (either minimum values or maximum values), press the „RAIN“ key for more than two seconds.
After that, the figures are deleted.
c) Other functions
Moon phase display
The moon phase display appears with the following symbols:

Full-moon


Waning New-moon


Waxing

The moon phase display only appears when the time/date have been entered.
Weather Willie
„Weather Willie“ displays several weather factors at once as an animated figure:
- Outside temperature (only combination sensor)
Weather Willie's clothing is altered through the outside temperature on the combination sensor.
- Rain
If the weather forecast function has registered „rain“, a closed umbrella is displayed. If the combination establishes rain, the umbrella is put up.
- Wind velocity
For wind velocities of over 20km/h, Weather Willie's hair blows in the wind. If the temperature is under 15 °C at the same time, the scarf displayed also blows in the wind.
Weather forecast
The symbols of the weather forecast from the weather station right at the top of the display give the following forecasts:
Overcast with rain → rainy
Overcast → cloudy
Overcast with sun → bright
Sun → sunny
Wind symbol display (windsock)
The windsock symbol in the display field „WIND” shows at a glance whether the wind is at present light, moderate or strong:
Windsock hanging → light wind (< 10 km/h)
Airsack half raised → moderate wind (10...20 km/h)
Airsack horizontal → strong wind (> 20 km/h)
Immediate rain display
The combination sensor determines not only the rain quantity but also transmits the current status (dry/wet) of a special sensor. Through this, even one drop can be transmitted to the base station as „beginning rain“.
In the LC display of the base station, a symbolic rain drop appears in the field „RAIN“. Apart from this, „Weather Willie“ puts up his umbrella.
Comfort indicator
The comfort indicator reflects the climate in the room (ratio of temperature to humidity). You can find a table of values for the display areas in section 15 on page 58.
The comfort indicator displays three different smiles: 😊 😞 😟
Graphic progression display (history)
The bar chart shows the last 24 hours' progress of atmospheric pressure, outdoor and indoor temperature. The individual columns represent no absolute value, but the difference to the current measurement (0-hour column). This point of reference is always situated in the center (4 bars), so that the tendendy can be interpreted at first glance.
10. Changing battery

Depending on which batteries or accumulators you use, the replacement interval can be very different. High-quality alkaline batteries keep the longest, accumulators for cheap zinc-carbon batteries require more frequent changing.
a) Base station
If the battery flat symbol appears in the display (☐), the batteries have to be replaced by new ones.
• Always replace the whole set of batteries.
- Do not mix full with „half-full“ batteries“.
• Always use four batteries of the same type and manufacturer.
- Do not mix batteries with accumulators.
- As already mentioned, accumulator operation is possible, the durability is, however, appreciably lower than with batteries.
- For changing the batteries, proceed as described in section 7. c).

Please observe the following:
After replacing the batteries, all data, values stored in the base station (e.g. time, date etc.) are deleted and have to be entered again.
b) Combination sensor, outdoor sensor
When the display of the sensor concerned fails for more than 24 hours, the batteries are to be replaced with new ones as described in section 7. a) and b).

Check as whether there is possibly some disturbance in the radio transmission which is the cause for the failure of the data transmission. In this case also, there will be no indication in the display of the base station.
The cause could be, for example, a metal object in the radio path (e.g., a parked vehicle).
11. Troubleshooting

Observe the safety instructions contained in these operating instructions
| Problem Remedy | |
| No reception • The distance between the base station and outdoor sensors is too great. Alter the position of the outdoor sensors. Objects or shielding materials are obstructing the radio reception. Alter the position of the outdoor sensors and the base station. The batteries of the outdoor sensors are too weak or flat. Insert new batteries into the sensors as an attempt. Another transmitter on the same or neighbouring frequencies is disturbing the radio signal of the outdoor sensors. This can be, for example, radio headphones, radio loudspeakers or similar devices. Such products are not usually operated constantly; the radio reception can, for example, be perfect the next day; this makes the search for the cause more difficult. If possible, set another frequency on the instruments which can eliminate the reception problems of the weather station. | |
| Disturbance of • The outdoor sensors transmit their data to the base station approx. other instruments every 3 minutes for a period of 0.1 (100ms) seconds. In this short through the outdoor period, disturbances in other devices are also possible. sensors For example, a very short disturbance signal can be audible from a radio head phone every 3 minutes. | |
| Problems with the • When inserting the batteries into the outdoor sensors and the base synchronisation station (observe this order exactly!), these devices are in synchronisation mode. A data telegram is transmitted here every 4 seconds which accelerates the recognition and registration of the outdoor sensors at the base station. To enforce new synchronisation, remove the batteries from the base station and outdoor sensors. After that, wait at least 60 seconds before you insert the batteries into the outdoor sensors again and, lastly, into the base station (observe this order without fail – first of all insert the batteries into all existing outdoor sensors, only then into the base station. In doing so, however, all values/data which the base station has stored (e.g. minimum values, maximum values and date/time etc.), are lost. Before you position the outdoor sensors, for example in your garden, carry out a function test as described at the beginning of section 7. | |
12. Range
The transmission range of the radio signals to the base station is 100 m under optimum conditions. This is often described as the „free field range”.

This ideal arrangement (e.g. base station and outdoor sensor on a smooth, level field without trees, houses etc.) is, however, never found in practice.
Normally, the base station is set up in the house, the combination in the garden and further outdoor sensors, for example in ancillary buildings (e.g. in an aviary) or garage.
The range can be reduced considerably partly through:
• walls, reinforced steel ceilings
- coated/vapoured insulation glass panes
- vehicles
- trees, bushes, earth, rocks
- closeness to metal & conductive objects (e.g. radiators)
• closeness to the human body
- broadband disturbances, e.g. in residential area (DECT telephones, mobile telephones, radio head-phones, radio loudspeakers, other radio weather stations, baby phones etc.)
- closeness to electric motors. Transformers, network parts pr computers
- closeness to poorly shielded or openly operated computers or other electrical devices

As the local circumstances are different at every place of set-up, a certain range cannot be guaranteed.
If the base station is receiving no data from the combination sensor or any additionally existing outdoor sensors (in spite of new batteries), reduce the distance between the outdoor sensors and the base station, change the place of set-up.
Observe section 7 and 11 of these operating instructions.
13. Maintenance and cleaning
a) General
Check the technical safety of the product regularly, e.g. damage to the housing.
It can be assumed that operation is no longer ensured without risk if
• the device shows visible damage
- the device is no longer functional
• after longer periods of storage under unfavourable conditions or
• after heavy transport stress
Before cleaning or servicing the device, observe the following safety instructions without fail:

Remove the batteries before cleaning, servicing or carrying out repair work.
There are no parts in the interior requiring servicing; the device may not be opened.
Repairs may only be carried out by a specialist who is familiar with the associated hazards and relevant regulations for the device.
b) Cleaning base station
Dust can be removed very easily with a vacuum cleaner and a clean, soft brush. Keep the opening of the vacuum cleaner close to the base station (do not come into contact, scratching possible!) and remove the dust with the brush. The dispersed dust will be sucked in by the vacuum cleaner. Use a soft, dry, lint-free cloth for cleaning the exterior of the product.
For greater contamination, you can use a cloth slightly moistened with warm water.
Never use aggressive cleaners or chemical solutions as the surface of the device or its functionality could be damaged as a result.
c) Cleaning outdoor sensors or combination sensor
After a longer period of operation in the open air, dirt can gather on the plastic surface of the outdoor sensors.
This can be removed very readily with a soft cloth which has been moistened with water.

Never spray the outdoor sensors with, for example, a garden hose as the outdoor sensors are only protected against rain from above and not against water jets from the side or from below.
The rain gauge should be monitored from time to time.
Depending on the location, leaves, particles of dirt carried by the wind, small twigs and similar can enter the cone collector of the rain gauge. Large parts can clog the flow-through!
Sand can also collect in the count rocker which will affect the measuring result negatively as it increases.

For this reason, the rain gauge should be cleaned at least once a year.
Proceed as follows:
- open the lower part of the rain gauge. To do this, turn the lower part approx. 1 cm to the left until you can let the metal nips slide downwards.
- remove the upper cone collector by turning it first of all a small distance to the right; then lift it off to the top.
- the rainfall sensor (the plastic part with the two brass pins and cable) can now be removed.

Make a note of the orientation; the connection cable of the rainfall sensor can be found at one side.
- Remove the count rocker.

Make a note of the orientation; there is a small magnet at one side of the count rocker.
- Now clean the components of the rain gauge. Think also of the drain hole in the plastic lower part of the rain gauge which you have pushed downwards at the metal pipe.
- To reassemble, place the count rocker first of all in the holder.

For this, the magnet of the count rocker has to be located on the side which points to the cable.
The two lower trapezoid pins have to be inserted into the lower part of the holder correctly.
Only in this manner is it guaranteed that the count rocker can be moved easily.
natural_image
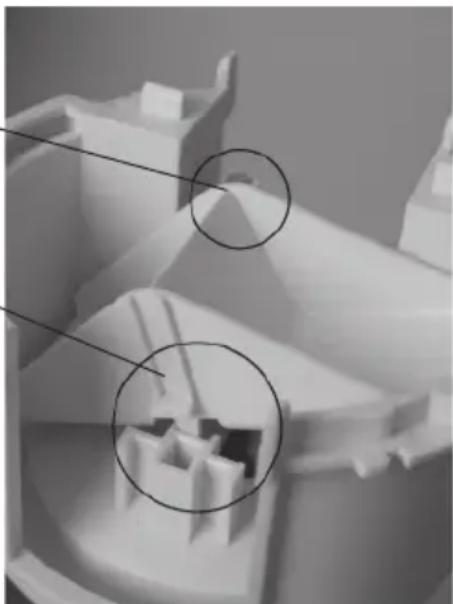
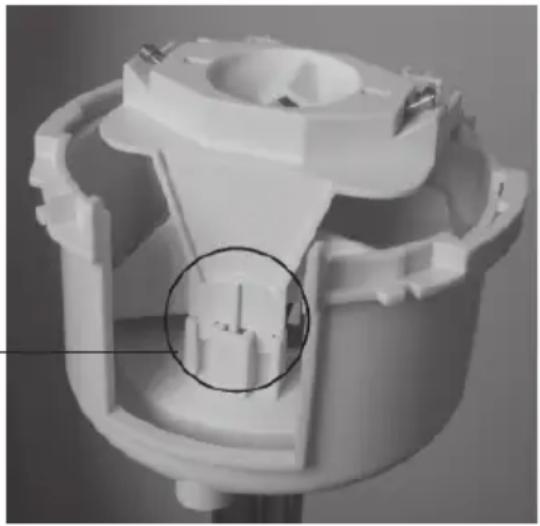
Close-up of a mechanical component with two circled features, no visible text or symbols- Insert the rainfall sensor into its holder. It will hold the count rocker firmly automatically.

Only one orientation is correct; the cable of the rainfall sensor and the magnet of the count rocker have to be on the same side; the plastic nib on the other side has to be inserted precisely into the holder, look at the circle in the picture on the right.
natural_image
3D rendered mechanical component with a highlighted circular feature (no text or symbols visible)- Place the cone collector from the top onto the sensor carrier and snap it in by turning it to the left.
- Push the lower part of the rain gauge housing upwards and lock it by turning it to the right until it snaps in.

The drain holes in the lower part of the housing have to point to the outside so that the water does not run on to the metal stands.
d) Aligning rain sensor

The measuring system of the rain gauge has already been set ex works to a high level of exactitude.
Any alignment is therefore normally not necessary.
The alignment process takes fairly long (at least 10 minutes) and has to be carried out very exactly and conscientiously as, otherwise, the exactitude is much lower than that which already exists.
Proceed as follows for alignment:
- First of all, set any rain quantity value which may have accumulated back to zero. For this, press the „RAIN“ key in normal display mode for about two seconds. After releasing the key, the display of the total rain quantity must indicate „0“.
- Make sure that the rain gauge is clean and the count rocker dry.
- Pour 100 ml of clear water very slowly (distributed over 10 minutes) into the cone collector of the rain sensor.

CAUTION!
If the water is poured too quickly, it results in an inaccurate measuring result. Pour the water into the cone so slowly that at no point of time water stands in the cone.
- The total quantity displayed should be 6.5 ~l / m^2 .
- If any other value is displayed, the so-called rocker value is to be recalculated as follows:
New rocker valuet = 6.5 × current rocker valueActual value (display after filling with water)
- This new value has to be entered in the configuration menu (see section 9. a), „enter alignment value of rain sensor“).

It is always entered in ml/rocker beat, the unit on the right is the subsequent display unit of rain quantity!
The setting ex works is 295 ml/rocker beat (the "current rocker value" for the formula above).
14. Handling

Observe all the safety precautions in these operating instructions!
a) General
The product may not be opened or taken apart (except for the work described in these operating instructions, e.g. change of battery or cleaning the rain gauge).
There are no parts to be maintained by the user in the inside of the product.
The product will be damaged even if dropped from a low height.
b) Base station
Avoid the following adverse ambient conditions during operation or transport:
- moisture or excessive humidity
- extreme cold or heat direct sunlight
- dust or flammable gases, vapours or
- heavy vibration
- strong magnetic fields, such as, for example, in the vicinity of machines or speakers
Never use the product immediately if it has been taken from a cold area to a warm area. The condensation developing could in certain cases destroy the device.
Wait until the base station has reached room temperature. This can take some hours!
A place for set-up has to be selected so that the base station stands securely and cannot fall down. There is danger of injury due to its extreme heaviness.
Valuable or easily scratched furniture surfaces should be protected from damage by suitable mats before setting up the base station.
c) Combination sensor
Although the combination sensor is protected against rain from above, this is not the case, however, from the side or from below. Therefore, avoid any direct spraying, for example, through a garden hose or another watering system.
Select the place of set-up so that children cannot tip the combination sensor over; do not place the combination sensor in the proximity of vehicles, glass doors, windows or similar!
15. Terminology
Sensed temperature
See „windchill“.
Comfort indicator
The symbol of the comfort indicator (the three different „smiles“ 😊 😊 😊) reflect the room climate whereby the weather station works according to the following table:
| Temperature moisture | ||||||||||
| 20% | 30% | 35% | 40% | 45% | 50% | 55% | 60% | 65% | 70% | |
| <18°C | ||||||||||
| 18-19,9°C | ||||||||||
| 20-21,9°C | ||||||||||
| 22-23,9°C | ||||||||||
| 24-25,9°C | ||||||||||
| 26-27,9°C | ||||||||||
| over 28°C | ||||||||||
Independent of the ratio temperature to humidity, there are clearly delimited areas which are defined as comfortable or uncomfortable climate.
For example, you feel humidity of under 30% to be too dry at a temperature of 25^ C (e.g. heating air) and humidity of over approx. 60% to be humid.
Dewpoint
This concerns a temperature which is dependent on the coincidence of a certain air pressure, a certain temperature and a certain humidity.
The condensation of the humidity begins at this temperature point, the co-called thaw, the humidity condenses and comes down as liquid (mist, vapour).
If the melting point for water vapour lies at below 0^ C, condensation will take place as snow or frost.
Weather forecast
The weather forecast of the weather station takes place by means of various weather symbols which are calculated from the rising or falling speed of the air temperature (tendency).
This speed of change in the air temperature is the decisive volume for forecast of the approaching weather, the absolute value plays a sub-ordinate role here. In general you can say that increasing air pressure signalises better weather while falling air pressure, on the other hand, means poor weather.
Windchill (equivalent temperature, sensed temperature)
The human being feels temperatures under certain circumstances quite differently from what a thermometer can show. In the case of low outdoor temperatures, you sense the temperature on the naked skin as being much lower the quicker any additional wind blows.
The „windchill“ is defined as a cooling down effect on the naked skin with a theoretical surface temperature of 33^ C and a wind velocity of over 2.6 m/s.
The higher the wind velocity is and the lower the actual environment temperature, the more the windchill effect can be felt.
The „sensed temperature” is approximately comparable to the so-called felt temperature which, in addition, amongst other things, also takes into consideration the radiation effect of the sun, the light reflection of the clouds, the light wave length etc.
Wind strength table (Beaufort)
Beaufort Wind velocity Description
0 0 - 0.7km/h calm
1 0.7 - 5.4 km/h light draught
2 5.5 - 11.9 km/h light breeze
3 12.0 - 19.4 km/h weal breeze
4 19.5 - 28.5 km/h moderate breeze
5 28.6 - 38.7 km/h fresh breeze
6 38.8 - 49.8 km/h strong wind
7 49.9 - 61.7 km/h stiff wind
8 61.8 - 74.6 km/h stormy wind
9 74.7 - 88.9 km/h storm
10 89.0 - 102.4 km/h heavy storm
11 102.5 - 117.4 km/h gale-force storm
12 > 117.4 km/h hurricane
16. Disposal
a) General
Dispose of the unusable product according to valid legal regulations
b) Disposing of used batteries and accumulators
You, as ultimate consumer, are required by law (battery regulations) to return all used batteries. Disposing of used batteries with domestic waste is prohibited!

Batteries / accumulators containing toxins are marked by appropriate symbols which refer to the prohibition of disposal with domestic waste.
The designations for the decisive heavy metals are: Cd = cadmium, Hg = mercury, Pb = lead (The designation can be found on the battery under the dustbin symbol illustrated on the left).
You may return used batteries/accumulators free of charge to collecting stations, our outlets or anywhere else where batteries/accumulators are sold.
By doing so, you fulfil the legal requirements and contribute to the conservation of our environment.
17. Technical data
Measuring interval of the outdoor sensors: .... approx. 3 minutes
Measuring interval of the indoor sensor: .... approx. 10 minutes
Transmission frequency: 868.35 MHz
Range in the free field: (please observe Section 12)
Temperature range indoors: 0°C to +59,9°C
Dissolution: 0.1°C
Exactitude: ....±0.8°C (10–40°C)
Temperature range outdoors (combination sensor): -19.9°C to +79.9°C
Dissolution: 0.1°C
Exactitude: ±0.8^ (10–40°C)
Measurement range rel. humidity (indoors/outdoor): 0% - 99 %
Dissolution: 1%
Exactitude: ±5% rH (30–70% rH)
Rain quantity display: 0 to 999mm
Evaluation interval: .... last hour: at xx:30 hrs; daily quantity: 7.30 a.m.
Base station: 4 x 1.5 V LR6, mignon, AA
Combination sensor: 3 x 1.5 V LR6, mignon, AA
Dim. (B x H x D) base station: .... approx. 136 mm x 198 mm x 35 mm (without base)
18. Position table (longitude/latitude)
Position table for selected place in Germany:
| Place Latitude Longitude | Display „LA” Display „LO” = „Latitude” = „Longitude” | |
| Aachen 50,8° 6,1° Augsburg 48,4° 10,9° Berlin 52,5° 13,4° Bonn 50,7° 7,1° Bremen 53,0° 8,8° Chemnitz 50,8° 12,9° Dortmund 51,5° 7,5° Dresden 51,1° 13,8° Duisburg 51,4° 6,8° Düsseldorf 51,2° 6,8° Erfurt 51,0° 11,0° Flensburg Frankfurt am Main Freiburg im Breisgau Hamburg Hannover 52,2° 9,7° Jena Karlsruhe 49,0° 8,4° Kassel Kiel Köln Leer/ Ostfriesland Leipzig Magdeburg Mainz München Nürnberg Oberhausen Oldenburg (Oldb.) Saarbrücken 49,3° 7,0° Schwerin Stuttgart Wiesbaden | 54,8° 50,1° 8,7° 48,0° 53,6° 50,9° 51,3° 54,3° 50,9° 53,2° 7,4° 51,3° 12,4° 52,1° 50,0° 48,1° 49,5° 51,5° 53,1° 8,2° 53,6° 48,8° 50,1° | 9,4° 7,9° 10,0° 11,6° 9,5° 10,1° 7,0° 6,8° 11,4° 9,2° 8,2° |
No reproduction (including translation) is permitted in whole or part e.g. photocopy, microfilming or storage in electronic data processing equipment, without the express written consent of the publisher.
The operating instructions reflect the current technical specifications at time of print. We reserve the right to change the technical or physical specifications.
© Copyright 2005
Ver. 2.1 04/06

Introduction
Chère cliente, cher client.

natural_image
3D rendered mechanical component with two circled features, no visible text or symbolsnatural_image
Close-up of a white plastic mechanical component with a circular annotation highlighting a specific feature (no text or symbols present)| Température | Humidité | ||||||||||
| 20% | 30% | 35% | 40% | 45% | 50% | 55% | 60% | 65% | 70% | ||
| < 18° | ◎ | ◎ | ◎ | ◎ | ◎ | ◎ | ◎ | ◎ | ◎ | ◎ | |
| 18-19,9° | ◎ | ◎ | ◎ | ◎ | ◎ | ◎ | ◎ | ◎ | ◎ | ◎ | |
| 20-21,9° | ◎ | ◎ | ◎ | ◎ | ◎ | ◎ | ◎ | ◎ | ◎ | ◎ | |
| 22-23,9° | ◎ | ◎ | ◎ | ◎ | ◎ | ◎ | ◎ | ◎ | ◎ | ◎ | |
| 24-25,9° | ◎ | ◎ | ◎ | ◎ | ◎ | ◎ | ◎ | ◎ | ◎ | ◎ | |
| 26-27,9° | ◎ | ◎ | ◎ | ◎ | ◎ | ◎ | ◎ | ◎ | ◎ | ◎ | |
| plus de 28° | ◎ | ◎ | ◎ | ◎ | ◎ | ◎ | ◎ | ◎ | ◎ | ◎ | |