WS 1900 - Weather Station TECHNOLINE - Free user manual and instructions
Find the device manual for free WS 1900 TECHNOLINE in PDF.

| Product Type | Wi-Fi Weather Station with Professional 5-in-1 Sensor |
| Brand | TECHNOLINE |
| Model | WS 1900 |
| Station Dimensions (WxHxD) | 136 x 168 x 24.5 mm |
| Station Weight | 370 g (with batteries) |
| Station Power Supply | 5V DC, 1A power adapter; backup battery CR2032 |
| Display | LCD screen with backlight, adjustable angle |
| Outdoor Sensor | Wireless 5-in-1 sensor: temperature, humidity, wind, rain, wind direction |
| Max. Number of Sensors | 1 5-in-1 sensor + up to 7 additional thermo-hygro sensors |
| RF Range | 150 m (line of sight) |
| RF Frequency | 868 MHz |
| Wi-Fi | 802.11 b/g/n, 2.4 GHz |
| Weather Server Connectivity | Weather Underground and Weathercloud |
| Indoor Temperature Range | -40 °C to 70 °C |
| Outdoor Temperature Range | -40 °C to 80 °C |
| Humidity Range | 1% to 99% |
| Barometric Pressure Range | 540 to 1100 hPa |
| Wind Speed Range | 0 to 50 m/s |
| Rainfall Range | 0 to 19999 mm |
| Main Functions | Weather forecast, moon phases, alarms, alerts, 24h history, weather index |
| Maintenance | Clean rain collector and radiation shield; replace batteries |
| Safety | Indoor use only; avoid shocks and moisture; respect battery polarities |
| Spare Parts and Repairability | Additional sensors available; firmware update via Wi-Fi |
| General Information | Complies with directive 2014/53/EU and RoHS 2011/65/EC |
Frequently Asked Questions - WS 1900 TECHNOLINE
User questions about WS 1900 TECHNOLINE
0 question about this device. Answer the ones you know or ask your own.
Ask a new question about this device
Download the instructions for your Weather Station in PDF format for free! Find your manual WS 1900 - TECHNOLINE and take your electronic device back in hand. On this page are published all the documents necessary for the use of your device. WS 1900 by TECHNOLINE.
USER MANUAL WS 1900 TECHNOLINE
Professionellen 5-in-1 Sender
Modell: WS1900
Bedienungsanleitung
natural_image
Technical illustration of a weather monitoring instrument with a digital display showing temperature and weather data (no readable text or symbols)Einführung 2
Übersicht 2
text_image
11 12 13 14 15 16 2 C A M N O S D W V A R M N O W W M N O W W M N O W W M N O W W M N O W W M N O W W M N O W W M N O W W M N O W W M N O W W M N O W M N O W W M N O W W M N O W W M N O W W M N O W W M N O W W M N O W W11 . [ CLOCK SET ] Taste
20 . [ BARO UNIT ] Taste
- [CHANNEL] Taste
12 . [ ALARM ] Taste
-
[SENSOR / WI-FI]
-
[HISTORY] Taste
-
Aufhängeöse
Taste
- [ MAX / MIN ] Taste
14 . [ ALERT ] Taste
22 . [ REFRESH ] Taste
- [WIND] Taste
15 . [V] Taste
-
Batteriefach
-
[INDEX] Taste
-
[Λ] Taste
-
[OFF/LO/HI] Taste
-
[ BARO ] Taste
17 . Netzteil
-
[ RESET ] Taste
-
[RAIN] Taste
18 . [ 12/24 ] Taste
LCD-Anzeige
text_image
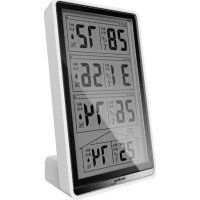
IN 25.6 58% FORECAST WIND N NW W SW S NE E SE OUT 28.3 85% BARO 10 18 RAIN 112 10-2 1 BOOD ENHIG PM 6:38 10-2 1Anzeigebereich:
Kabellosen 5-in-1 Wettersender
natural_image
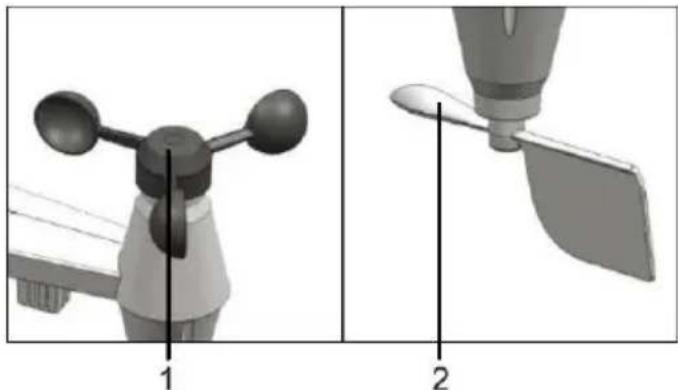
Technical diagram of a mechanical component with labeled parts (1 and 2), showing internal layered structure and mounting features (no text or symbols beyond labels)Windsensor
natural_image
3D mechanical assembly diagram showing a propeller and fan component with labeled parts (no text or symbols present)Kabellosen 5-in-1 Sender installieren
natural_image
3D mechanical assembly diagram showing internal components and mounting features (no text or symbols)natural_image
Three technical diagrams showing front and side views of a device component, including a cable clip, handle, and internal structure (no text or symbols present)text_image
WEATHER UNDERGROUND | Maps & Radar Severe Weather News & Blogs Photos & Video Activities More ▼ Search Locations Log is ↓...Hinweis:
text_image
Add a New PWS TYPE LOCATION DETAILS DONE Tell Us More About Your Device 75% Name:(Required) Give Your Device a Name Surface Type: Select device surface Elevation:(Required) 3261.15496 Associate Webcam: Select WebCams Device Hardware:(Required) Select device hardware Height Above Ground: F1 Above Groundtext_image
weathercloud About us Plans Projects Blog FAQ Map Sign in CN Welcome to Weathercloud The easiest way to share your weather data with the world. Join us today Username Email Password Sign up By clicking Sign up, you agree to our Texts.Hinweis:
text_image
weathercloud Your devices My Devicetext_image
Create new device Basic information Location Name * My device Model * Select model Link type * Select link type Website www.example.com Description Country * Select country State / Province * Select stats / province City * Time zone * (UTC+00:00) UTC Get coordinates Latitude * Longitude * Altitude 0 m Height 0 m Createtext_image
Link device The link details for your device WT_station are provided below: Weathercloud ID XXXXXXXXXXXXXX Key 1234567890ABCDEFGHIJKLMNOPQRSTUtext_image
MO MOON PHASE AP 10-2 Ltext_image
PWS-XXXXXX Open Other people might be able to see info you send over this network Connect automatically Connect Network settings Available Airplane mode
text_image
Wi-Fi On PWS-XXXXXX Connected, no internet autofamily pui JMTNET tonyp LAVENDER_ASUS CTM-WIFI-AUTO mollymole Linksys02060 ROYtext_image
Your devices My Device AT&T 2003 Series AutoCAD Plus TempLiving June 1, 2018, 12:49:4997 0/5 Settings View LWR OUT Devicetext_image
weathercloud My Device hong kong Last updated 2 months ago Profile Current Wind Evolution Inside Observer Jessikakool Company Online since January 29, 2018, 2:48 AM Followers 0 Calm 1014 IPs 5:52 AM - m 7:09 PM Feels like -1Firmware aktualisieren
text_image
Function firmware version: 1.00 C:\download\PWS_SYS.bin Browse 30% ... WiFi firmware version: 1.00 Upload Browse Upload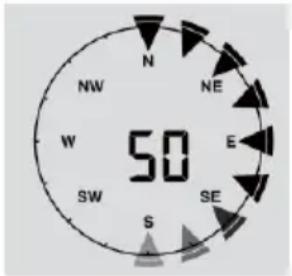
text_image
N NW NE W E SW SE S 50text_image
Technical diagram showing mechanical assembly with labeled parts and directional arrowsKabelloser 5-in-1-Sender
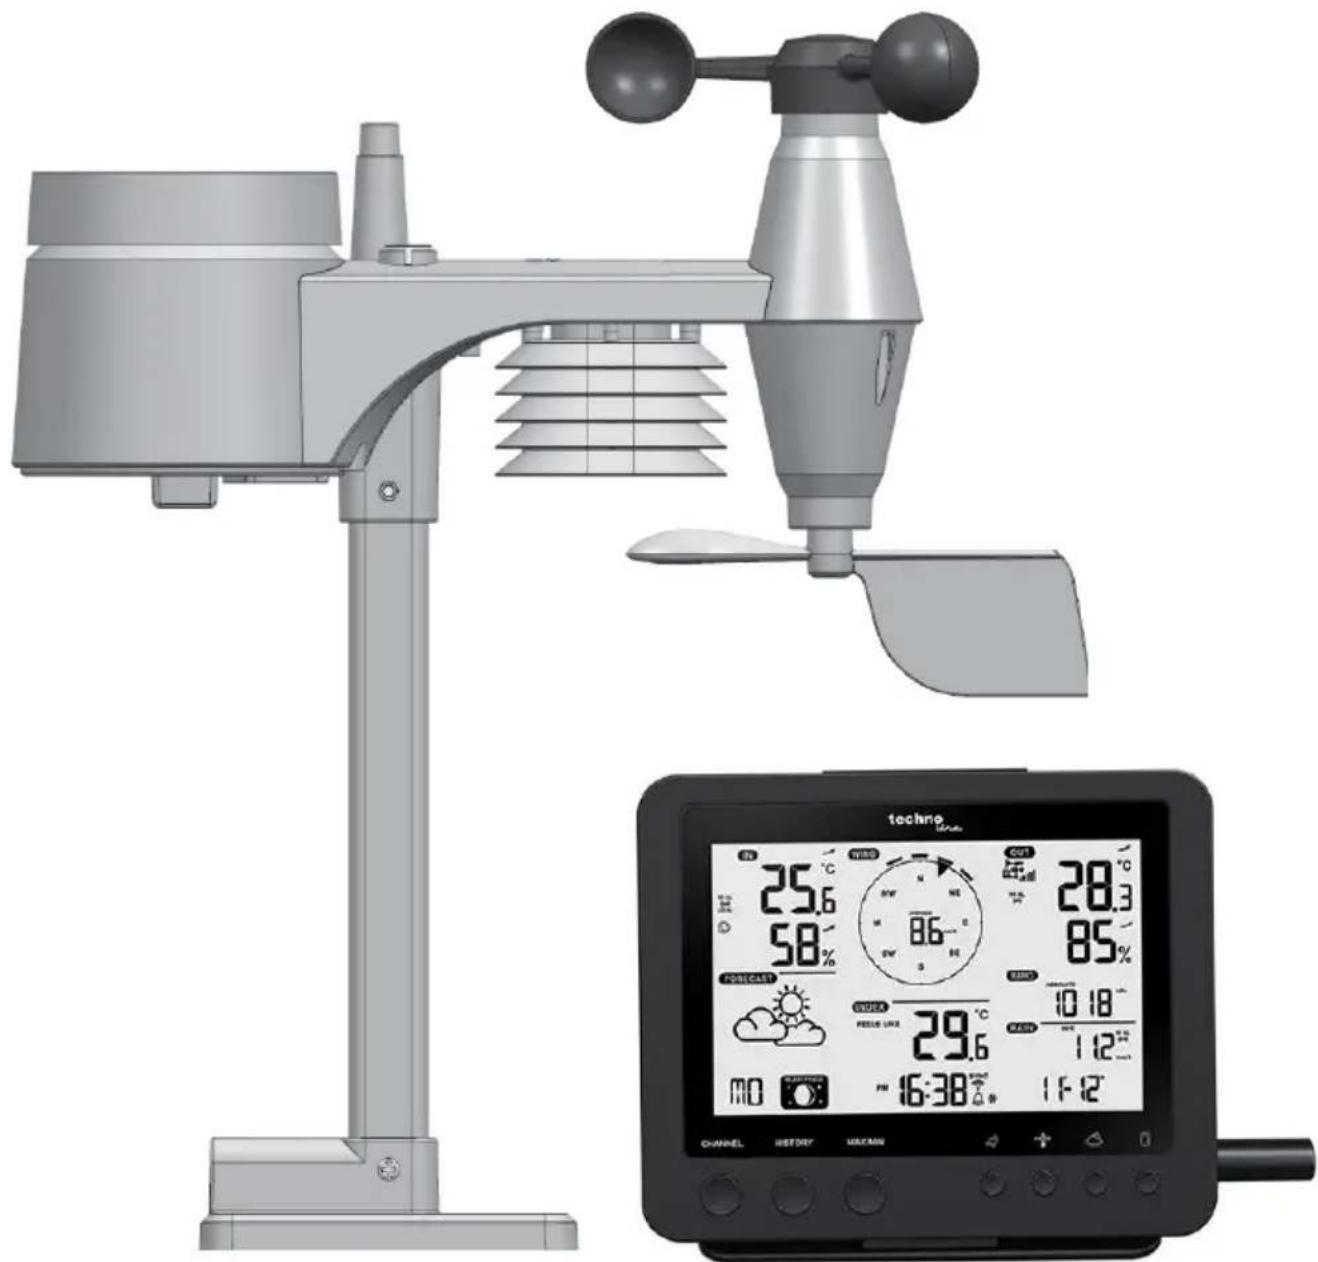
WI-FI weather station with
5-In-1 professional sensor
Model: WS1900
User Manual
text_image
techno 25.6 58% POST:CACT 29.6 MO 16:38° 28.3 85% 10 18° 112° 11:2° CHANNEL HISTORY MAX/ANIntroduction 2
Overview 2
Installation and setup 4
Power-up station 6
Pairing wireless 5-in-1 weather sensor & station 7
Pairing additional wireless sensor & station (optional) 7
Create weather server account & setup of wi-fi connection 7
Create Weather Underground account 7
Create Weathercloud account 8
Setup of wi-fi connection 9
Setup the weather server connection 10
Advanced setting in web interface 12
View your weather data in WUnderground 12
View your weather data in Weathercloud 13
Firmware update 13
Other settings & functions of the station 14
Time setting 14
Moon phase 15
Pointing the wireless 5-in-1 sensor to south 15
Setting the alarm time 16
Activating alarm and temperature pre-alarm function 16
Temperature / humidity function & trend 16
Room comfort indicator 17
Wireless receiving of sensor signal 17
Wind 18
Weather index 18
Weather forecast 19
Barometric pressure 19
Rainfall 19
MAX / MIN data recording 20
History data of past 24 hours 20
Weather alert setting 20
Maintenance 22
Battery replacement 22
Clearing the rain collector 22
Clearing the thermo-hygro sensor of wireless 5-in-1 sensor 22
Specifications 22
Precautions 25
Battery safety warnings 26
Introduction
Thank you for selecting Wi-fi weather station with 5-in-1 professional sensor. This system gathers and automatically uploads accurate and detailed weather data to Weather Underground and Weathercloud website - the famous weather service which allows weather observers to upload their local weather data with automated personal weather stations (PWS) - at which you can access and upload your weather data freely. This product offers professional weather observers or serious weather enthusiasts robust performance with a wide range of options and sensors. You will get your own local forecast, high/lows, totals and averages for virtually all weather variables without using a PC.
This weather station which transmits in / outdoor temperature, humidity, wind and rain data, which can add to a sensor array of maximum 7 units, transmits your temperature & humidity to the console. Both sensors are fully assembled and calibrated for your easy installation. They send data at a low power radio frequency to the console from up to 150m away (line of sight).
In the console, a high-speed processor is embedded to analyze the received weather data and these real-time data can be published to Wunderground.com and weathercloud.net through your home Wi-fi router. The console can also synchronize with internet time server to keep the time and weather data time stamp of high precision. The LCD display shows informative weather readings with advanced features, such as high/low alert alarm, different weather index, and MAX/MIN records. With calibration and moon phase feature, this system is truly a remarkably personal yet professional weather station for your own backyard.
Note:
This instruction manual contains useful information on the proper use and care of this product. Please read this manual through to fully understand and enjoy its features, and keep it handy for future use.
Overview
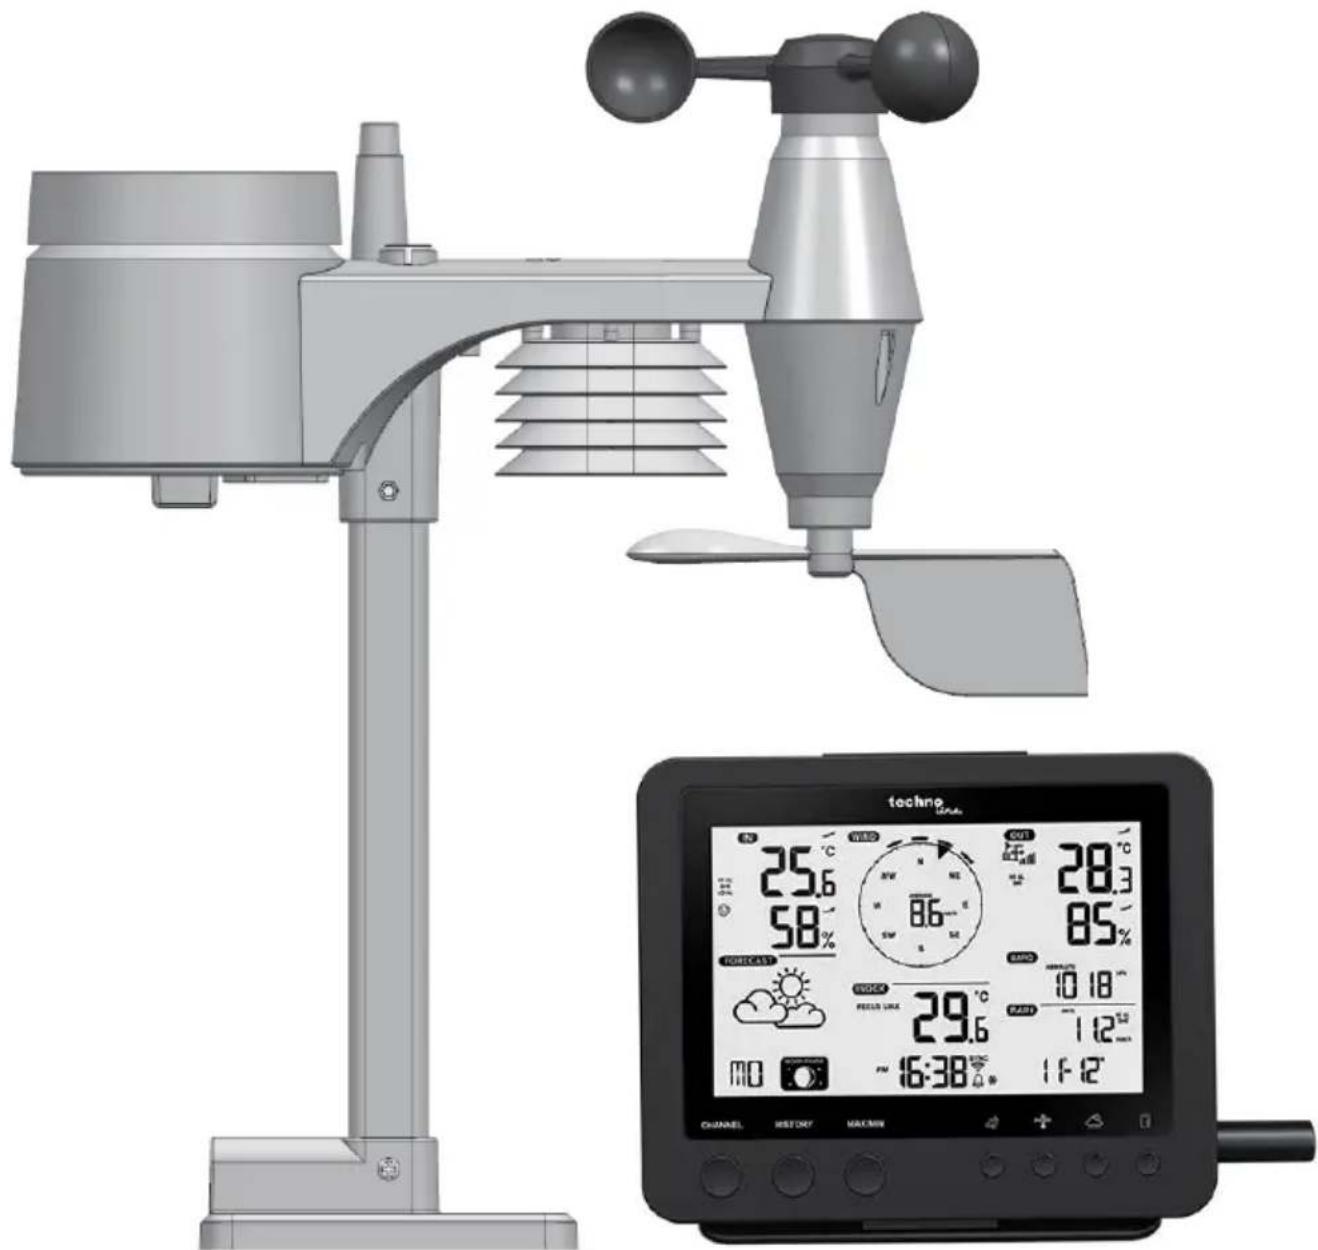
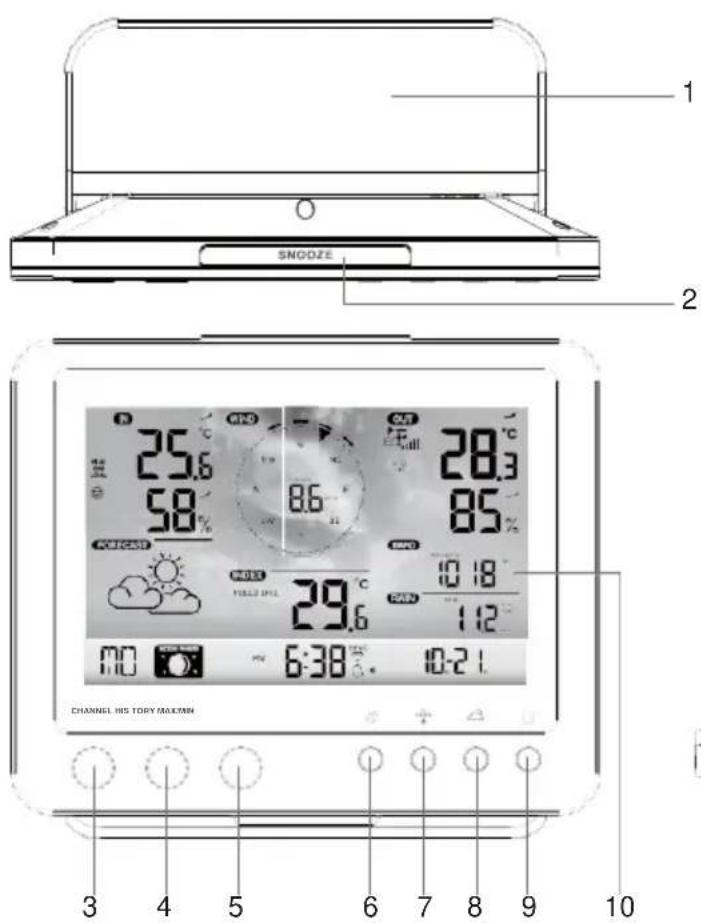
Base station
text_image
SNODZE 25.6 58°C 28.3 86°C 85°C 29.6°C 10:18 11:2 6:38°C 10:21 CHANNEL HIS TORY MAXIMUM 3 4 5 6 7 8 9 10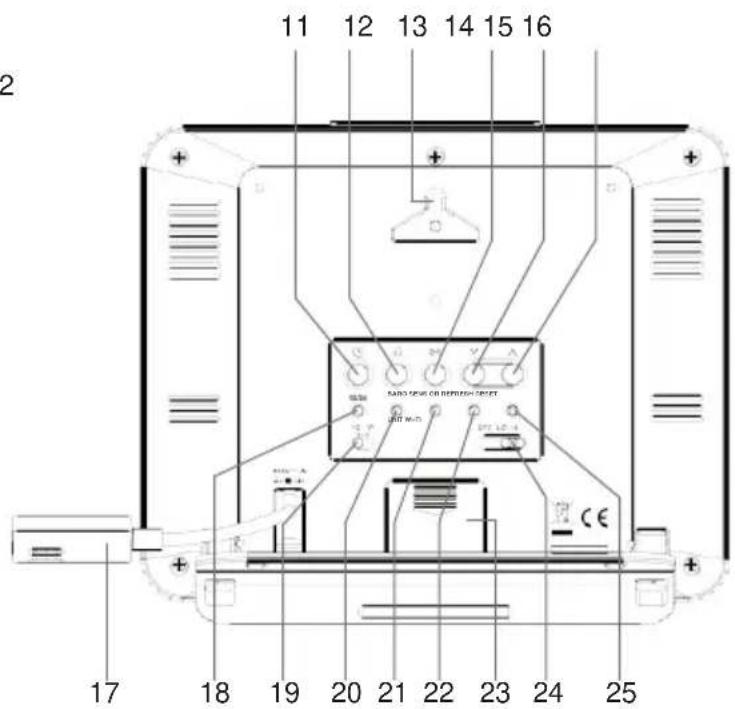
text_image
11 12 13 14 15 16 SAND SPIN OR REFLECTOR RESET UNIT M-D CE 17 18 19 20 21 22 23 24 25- Table stand
- [SNOOZE] key
- [CHANNEL] key
- [HISTORY] key
- [MAX / MIN] key
- [WIND] key
- [INDEX] key
- [ BARO ] key
-
[RAIN] key
-
LCD display
- [ CLOCK SET ] key
- [ ALARM ] key
- Wall mounting holder
- [ ALERT ] key
15 . [V] key - [Λ] key
- Power jack
-
[12/24] key
-
[°C / °F] slide switch
- [ BARO UNIT ] key
- [SENSOR / WI-FI] key
- [REFRESH] key
- Battery compartment
- [OFF/LO/HI] key
- [ RESET ] key
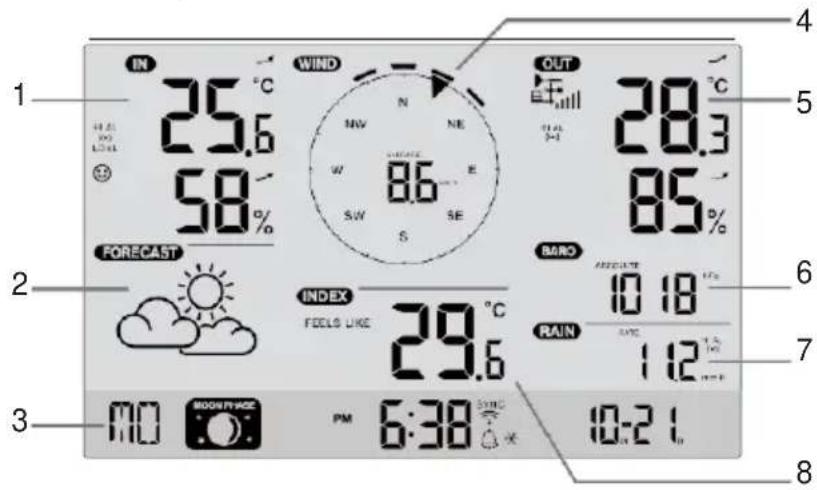
LCD display
text_image
IN 25.6 58% WIND N MW W SW S NE E SE OUT 28.3 85% FORECAST INDEX FEELS LIKE 29.6°C BARO 10 18 RAIN 112 10-2 L MO ROCKET PM 6:38Display section:
- Indoor / CH temperature & humidity
- Weather forecast
- Time, calendar & moon phase
- Wind direction & speed
- Outdoor temperature & humidity
- Barometer
- Rainfall
- Weather index
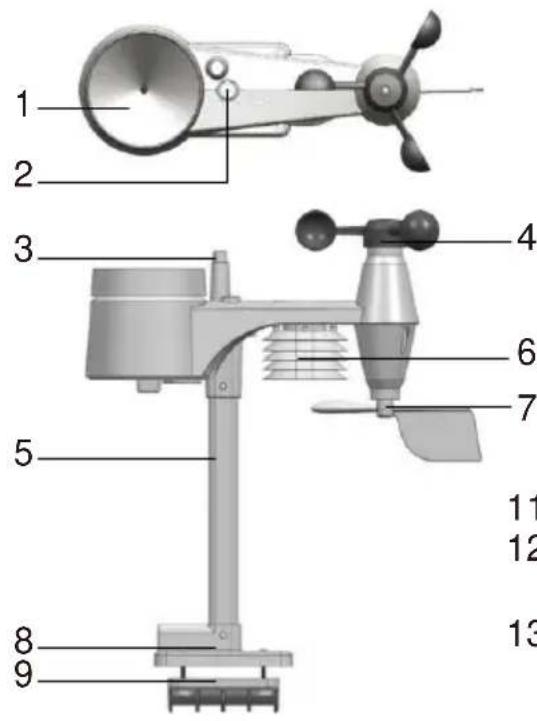
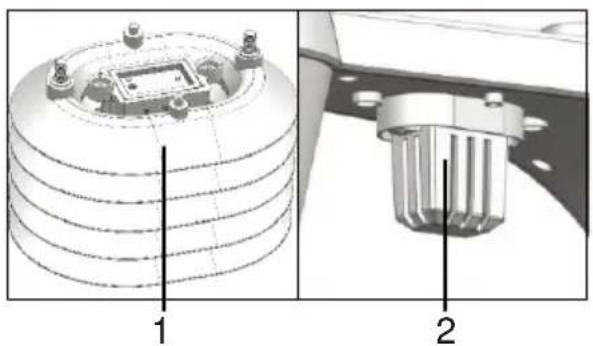
Wireless 5-in-1 weather sensor
- Rain collector
- Balance indicator
- Antenna
- Wind cups
- Mounting pole
- Radiation shield
- Wind vane
- Mounting base
- Mounting clamp
- Red LED indicator
- [RESET] key
12 .Battery door
13 .Screws
text_image
1 2 3 4 5 6 7 8 9 11 12 13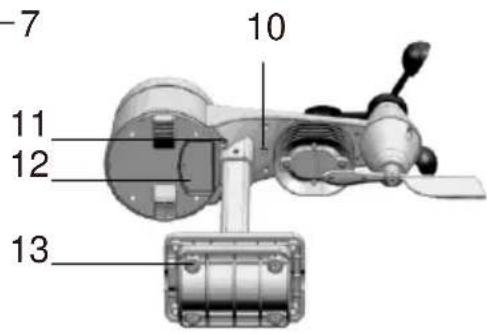
text_image
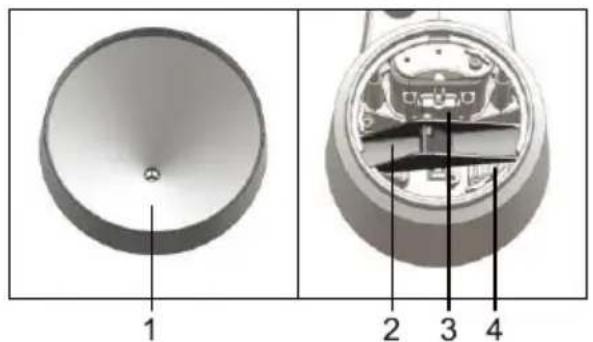
-7 10 11 12 13Rain gauge
- Rain collector
- Tipping bucket
- Rain sensor
- Drain holes
text_image
1 2 3 4Temperature and humidity sensor
- Radiation shield Sensor casing
- Temperature and humidity sensor (inside the radiation shield)
natural_image
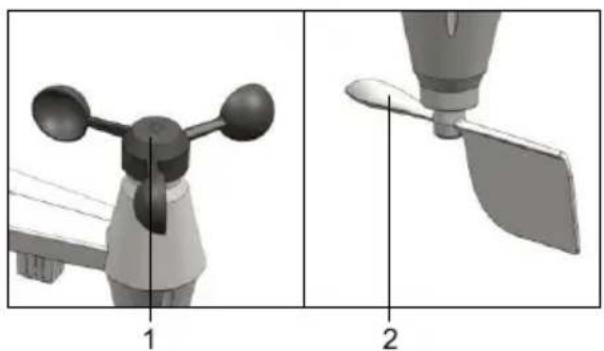
Technical diagram of a mechanical component with labeled parts (1 and 2), showing internal structure without any readable text or symbols.Wind sensor
- Wind cups (anemometer)
- Wind vane
natural_image
Two technical diagrams showing a mechanical component with labeled parts, no text or symbols present.Installation and setup
Install wireless 5-in-1 sensor
Your wireless 5-IN-1 sensor measures wind-speed, wind-direction, rainfall, temperature and humidity for you. It's assembled and calibrated for your easy installation.
Install batteries
Unscrew the battery door at bottom of unit and insert the batteries according to the +/- polarity indicated. Screw the battery door compartment on tightly.
Note:
- Ensure the water tight O-ring is properly aligned in place to ensure water resistant.
• The red LED will begin flashing every 12 seconds.
natural_image
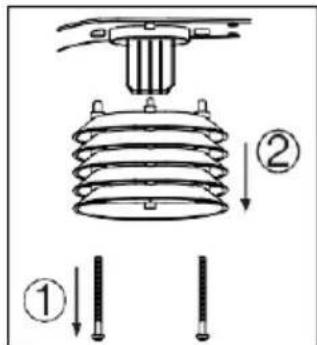
3D technical illustration of a mechanical device with internal components and mounting holes (no text or symbols)Assemble the stand and pole
| Step 1Insert the top side of the pole to the square hole of the weather sensor.Note:Ensure the pole and sensor's indicator align. | 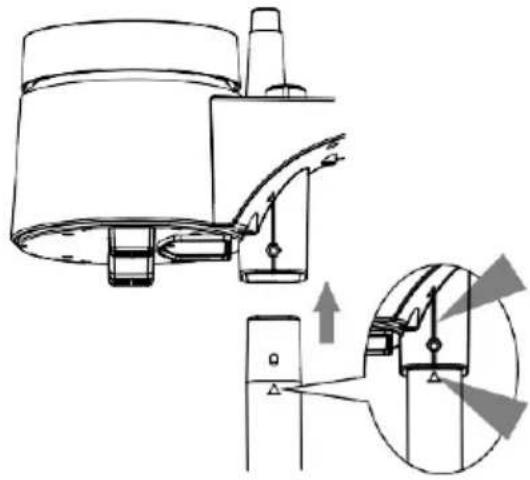 |
| Step 2Place the nut in the hexagon hole on the sensor, then insert the screw in other side and tighten it by the screw driver. | 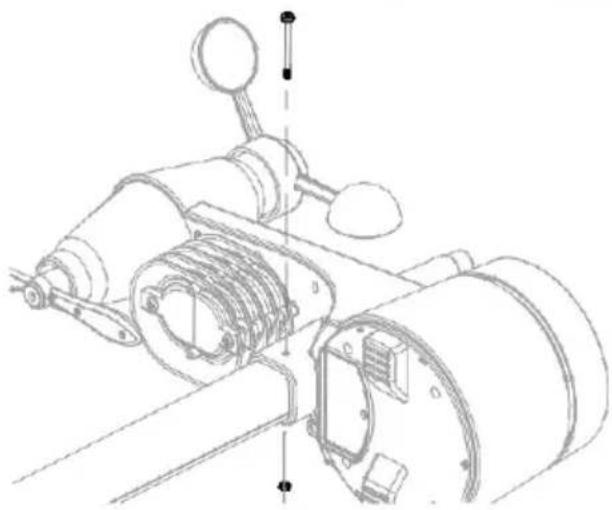 |
| Step 3Insert the other side of the pole to the square hole of the plastic stand.Note:Ensure the pole and stand's indicator align. | 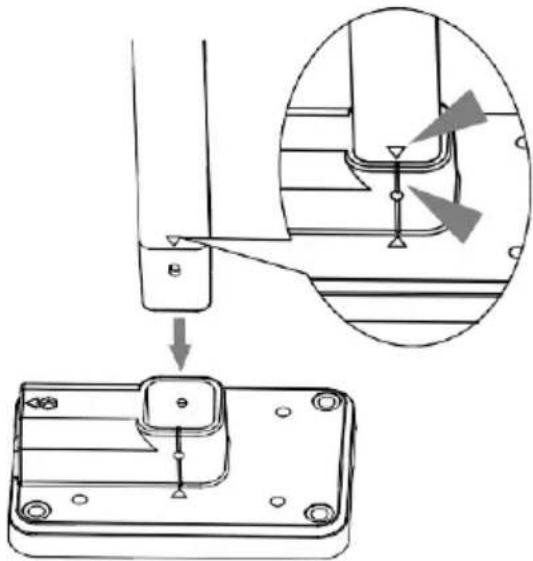 |
| Step 4Place the nut in the hexagon hole of the stand, then insert the screw in other side and then tighten it by the screw driver. |  |
Install the wireless 5-IN-1 sensor in an open location with no obstructions above and around the sensor for accurate rain and wind measurement. Install the sensor with the smaller end facing the North to properly orient the wind direction vane.
Secure the mounting stand and bracket (included) to a post or pole, and allow minimum 1.5m off the ground.
Make sure that the air bubble on the balance indicator is within the black circle before the sensor gets screwed tight.
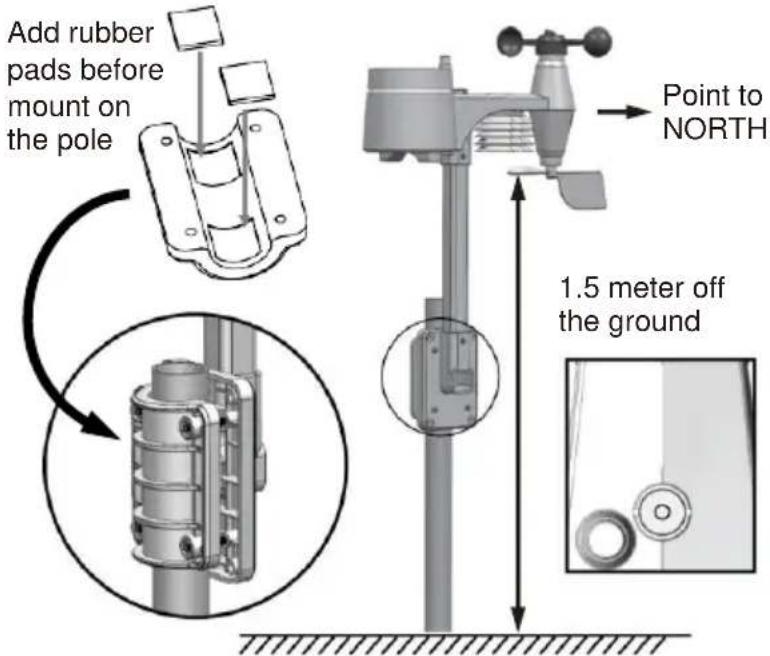
text_image
Add rubber pads before mount on the pole Point to NORTH 1.5 meter off the groundBase station
Your station can pairing up with the wireless 5-IN-1 outdoor weather sensor and up to 7 optional wireless sensors. (Not included)
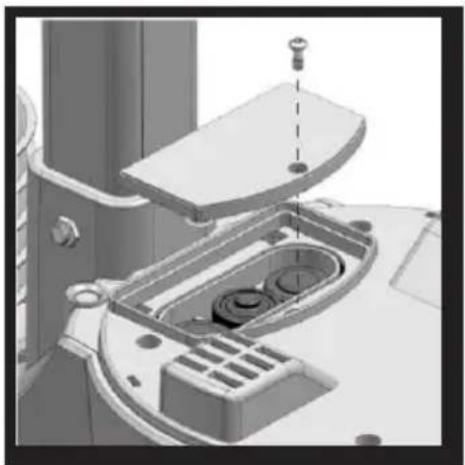
Install the back-up battery (not included, optional)
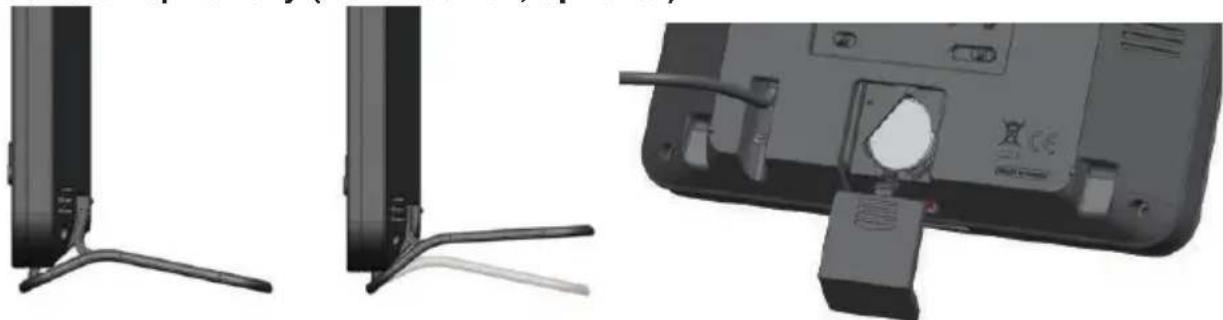
natural_image
Three-panel technical illustration showing front, side, and side views of a device with connectors and a handle (no text or symbols)- Remove the battery door of the base station.
- Insert a new button cell battery.
- Replace the battery door.
Note:
The backup battery can backup: Time & Date, Max/Min & Past 24 hours weather records, Alert setting values, offset value of weather data and Sensor(s) channel history.
The built-in memory can backup: Router setting and Weather server setting
Power up the station
- Plug the power adaptor to power up the console.
- Once the console power up, all the segments of the LCD will be shown.
- The console will automatically start AP (Access Point) mode.
Note:
If no display appears on the LCD after you plug the adaptor, press [ RESET ] key by using a pointed object.
Set the LCD display viewing angle
Press [ ∧ ] or [ ∨ ] key in normal mode to adjust LCD viewing angle to fit table stand or wall mount situation.
Pairing 5-in-1 weather sensor & station
After insert of batteries, the console will automatically search and connect the wireless 5-IN-1 sensor (the sensor antenna icon blinking).
Once the connection is successful, antenna icon and readings for outdoor temperature & humidity, wind speed, wind direction and rainfall will appear on the LCD.
Changing batteries and manual pairing of sensor
Whenever you changed the batteries of the wireless 5-IN-1 sensor, pairing must be done manually.
- Change all the batteries to new ones in the sensor.
- Press [SENSOR / WI-FI] key on the console.
- Press [RESET] key on the wireless 5-IN-1 sensor.
Pairing additional wireless sensor(s) & station (optional)
This console can support up to 7 additional wireless sensor(s). You can press [SENSOR / WIFI] key to search the on display channel's sensor manually. Once your sensor paired up, the sensor signal strength indicator and weather reading will appear on your console display.
Note:
- The additional wireless sensor(s) is not included.
Create weather server account & setup wi-fi connection
The console can upload weather data to Wunderground and / or Weathercloud through WI-FI router. you can follow the step below to setup your device.
Note:
The Weather Underground and Weathercloud website are subject to change.
Create Weather Underground account
- In https://www.wunderground.com click the "Join" on the top right corner to open the registration page. Follow the instructions to create your account.

text_image
WEATHER UNDERGROUND Maps & Radar Severe Weather News & Blogs Photos & Video Activities More Search Locations Log to J...Note:
Use the valid email address to register your account.
- After you have created your account and completed the Email validation, please go back to the WUnderground web page. Click "My Profile" -> "My Devices" -> "Add a New Device" -> "Professional Weather Station".

text_image
WEATHER UNDERGROUND Sensor Network Maps & Radar Severe Weather News & Blogs Mobile Apps More Search Locations My Profile- Set the location, by writing an address or use the map to set the location and proceed.
- Fill in at least all required fields. For "Device Hardware" choose "Other". Accept the privacy declaration and proceed
Add a New PWS
TYPE
LOCATION
DETAILS
DONE
Tell Us More About Your Device

Name:(Required)
Give Your Device a Name
Elevation:(Required)
3261.15496
Device Hardware:(Required)
Select device hardware
Height Above Ground:
Ft Above Ground
Surface Type:
Select device surface
Associate Webcam:
Select WebCams
- Note your Station ID and Station Key.
Create Weathercloud account
- In https://weathercloud.net enter your information in "Join us today" section, then follow the instructions to create your account.

text_image
weathercloud About us Plans Projects Blog FAQ Map Sign in CN Welcome to Weathercloud The easiest way to share your weather data with the world. Join us today Username Email Password Sign up By clicking Sign up, you agree to our Terms.Note:
Use the valid email address to register your account.
- Sign in weathercloud and then you will go the "Devices" page, click "+ New" to create new device.

text_image
weathercloud Your devices My Device- Enter all the information in Create new device page, for the Model* selection box select the "W100 Series" under "CCL" section. for the Link type* selection box select the "Pro Weather Link", Once you have completed, click Create.
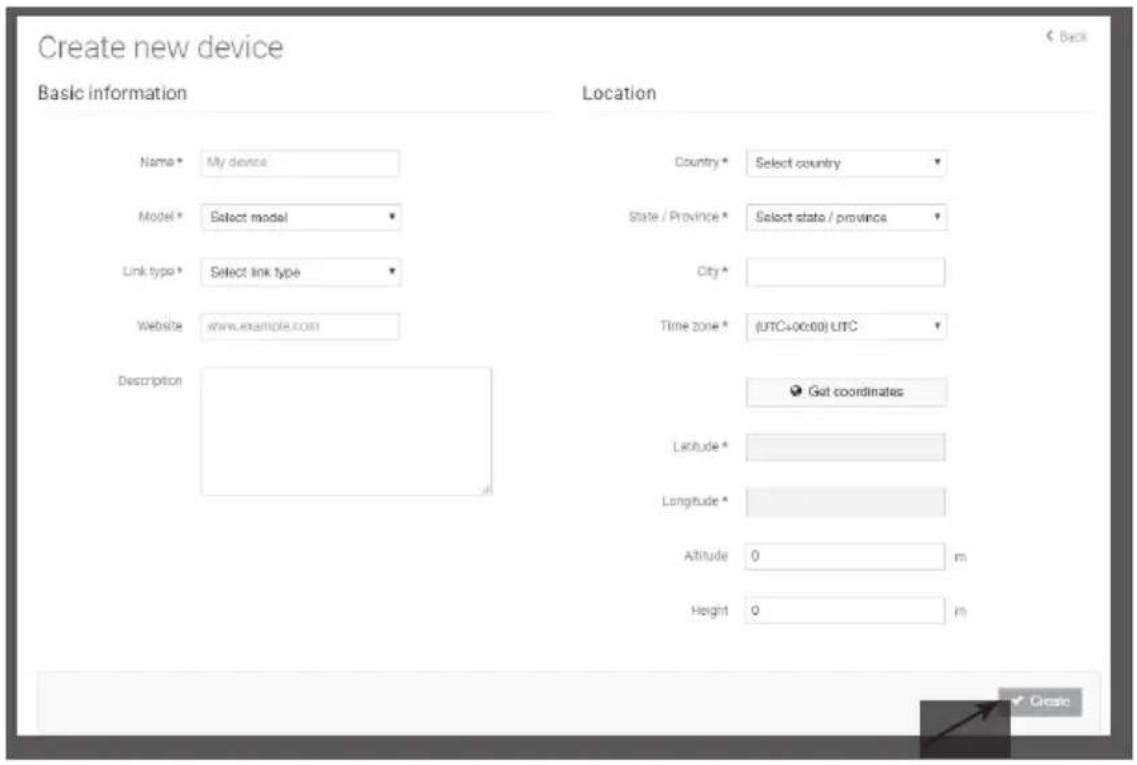
text_image
Create new device Basic information Location Name * My device Country * Select country Model * Select model State / Province * Select state / provinces Link type * Select link type City * Website www.example.com Time zone * (UTC+00:00) UTC Description Get coordinates Latitude * Longitude * Attitude 0 m Height 0 m Create- Jot down your ID and key for the further setup step.
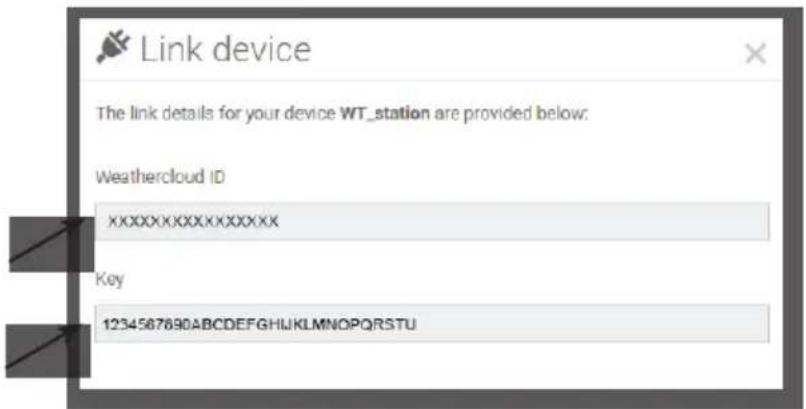
text_image
Link device The link details for your device WT_station are provided below: Weathercloud ID XXXXXXXXXXXXXX Key 1234567890ABCDEFGHIJKLMNOPQRSTUVWXYZXXXXXXSetup wi-fi connection
- When you first power up the console, or press and hold the [WI-FI / SENSOR] key for 6 seconds in normal mode, the console LCD will show "AP" and " 🔊" icon to signify that it has entered AP (access point) mode, and is ready for WI-FI settings.

text_image
MO MODE PHASE AP 10-2 L- Use the smart phone, tablet, or computer to connect to the console through WI-FI.
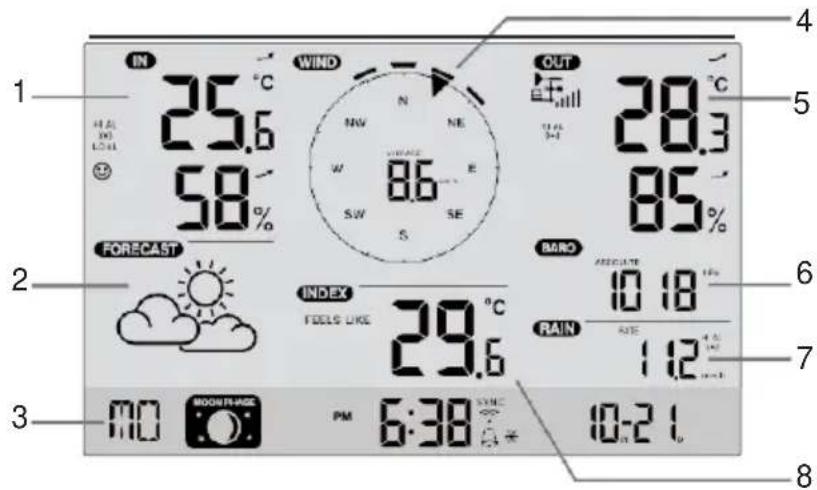
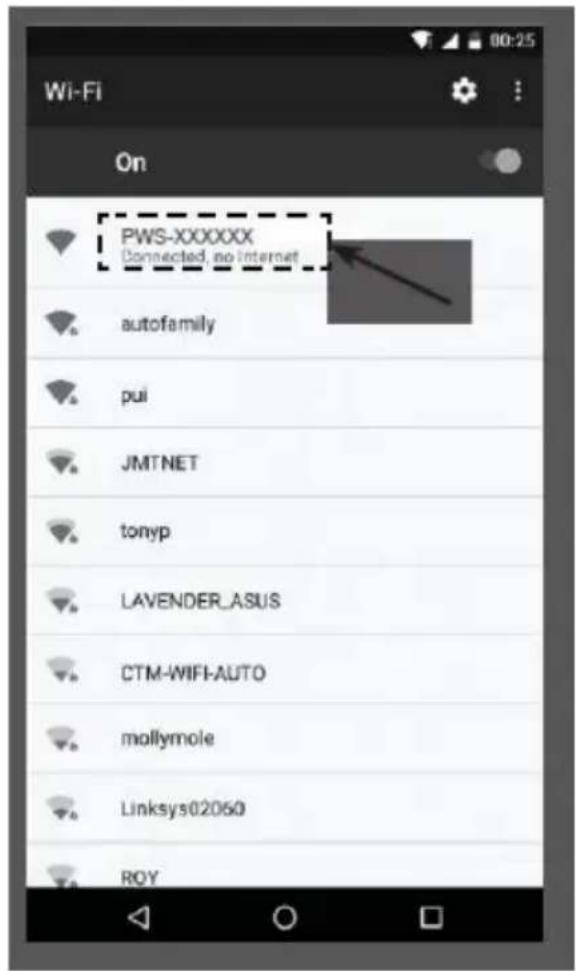
- In PC choose WiFi network settings or In Android / iOS choose setting → WI-FI to select the console's SSID: PWS-XXXXXX in the list and it will need several second to connect.
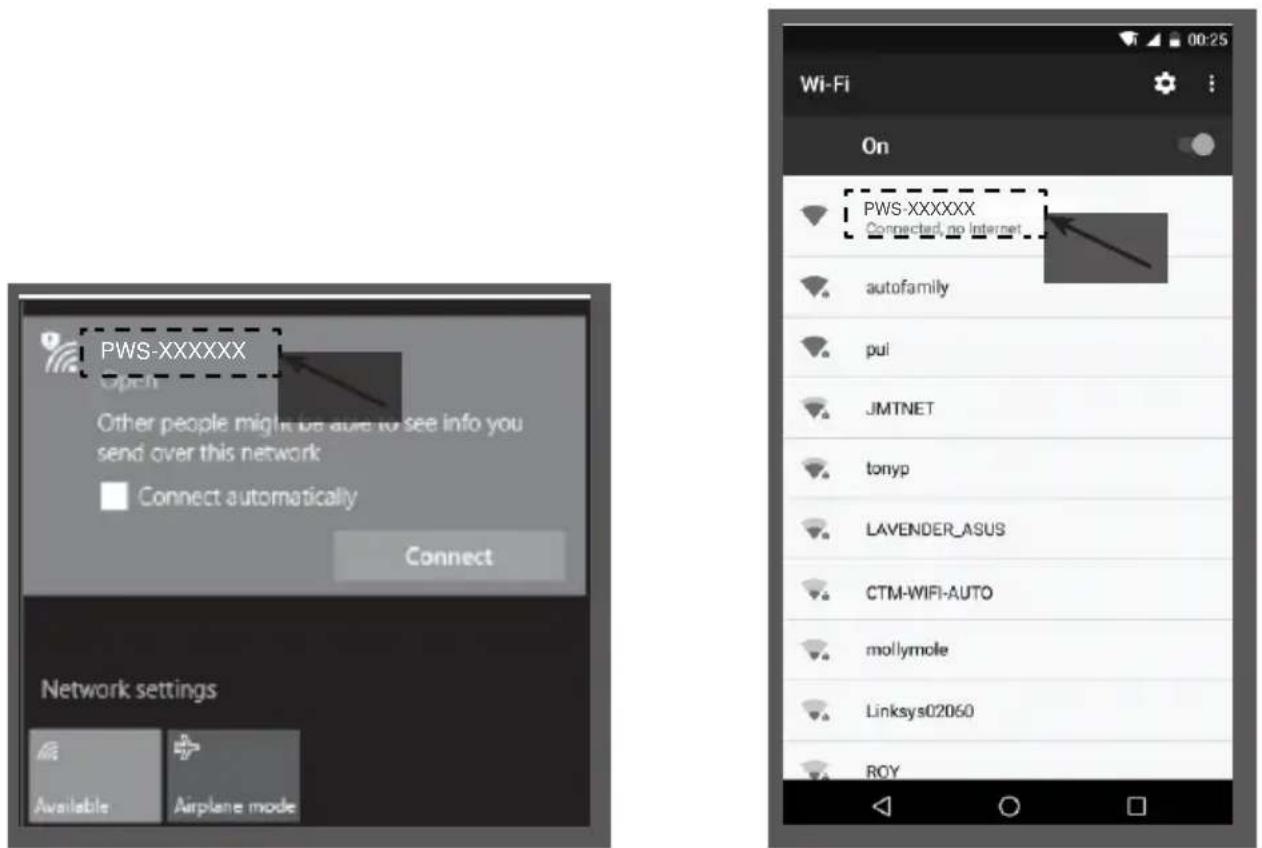
text_image
PWS-XXXXXX Open Other people might be able to see info you send over this network Connect automatically Connect Network settings Available Airplane mode Wi-Fi On PWS-XXXXXX Connected, no Internet autofamily pui JMTNET tonyp LAVENDER_ASUS CTM-WIFI-AUTO mollymole Linksys02060 ROYPC WI-FI network interface Android WI-FI network interface
- Once connected, enter the following IP address into your internet browser's address bar, to access the console's web interface:
http://192.168.1.1
Note:
- Some browsers will treat 192.168.1.1 as a search, so make sure you include http://header.
- Recommended browsers, such as the latest version of Chrome, Safari, Edge, Firefox or Opera.
Setup the weather server connection
Enter the following information into the below web interface "SETUP" page. If you choose not to use Wunderground.com or Weathercloud.net, leave the check boxes unchecked.
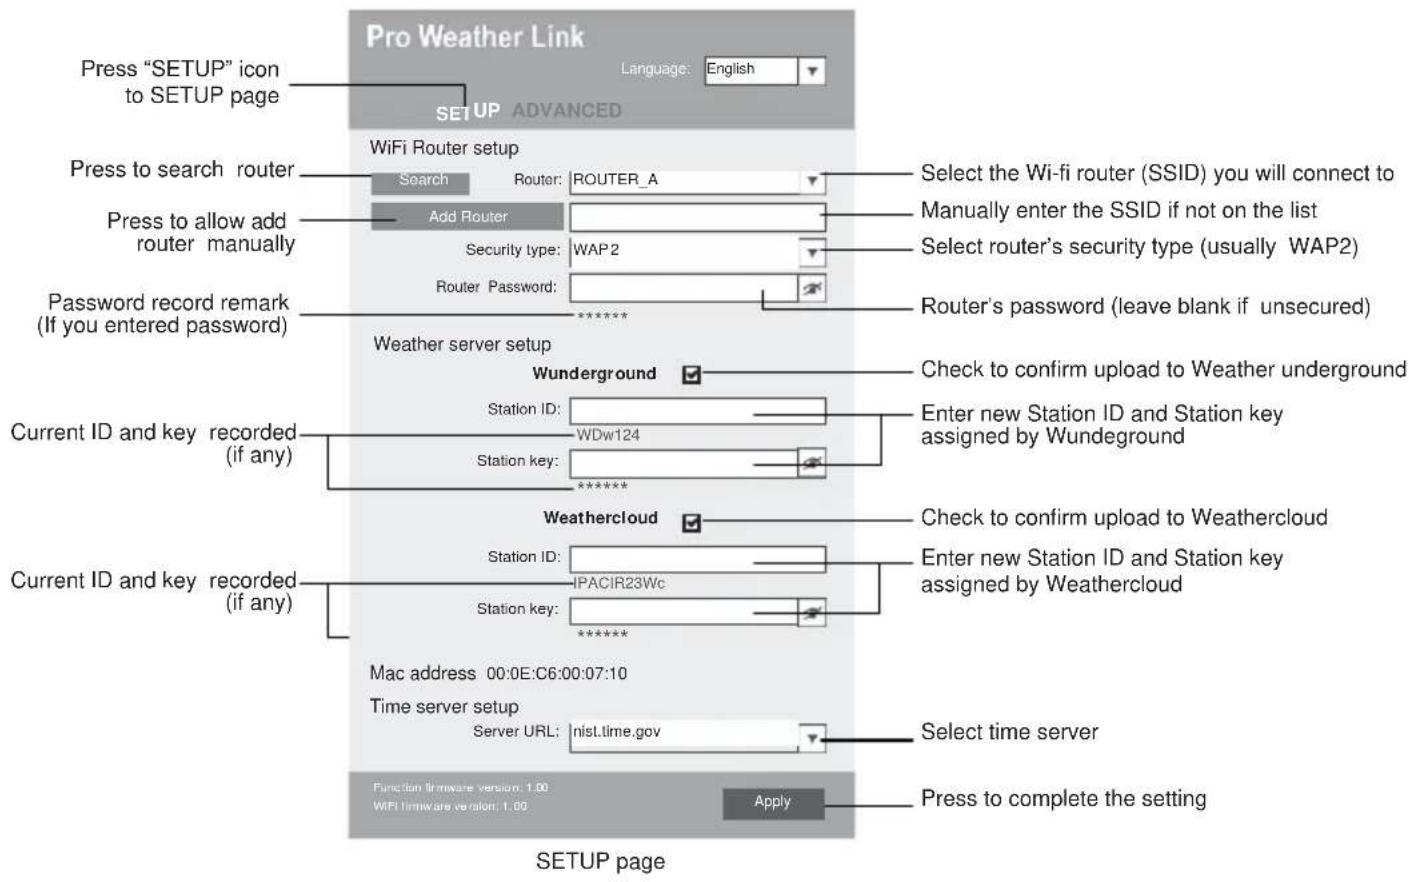
text_image
Pro Weather Link Language: English Press "SETUP" icon to SETUP page SETUP ADVANCED WiFi Router setup Search Router: ROUTER_A Select the Wi-fi router (SSID) you will connect to Press to search router Add Router Manually enter the SSID if not on the list Press to allow add router manually Security type: WAP2 Select router's security type (usually WAP2) Password record remark (If you entered password) Router Password: ********** Router's password (leave blank if unsecured) Weather server setup Wunderground Check to confirm upload to Weather underground Current ID and key recorded (if any) Station ID: Enter new Station ID and Station key assigned by Wundeground Station key: ********** Weathercloud Check to confirm upload to Weathercloud Current ID and key recorded (if any) Station ID: Enter new Station ID and Station key assigned by Weathercloud Station key: ********** Mac address 00:0E:C6:00:07:10 Time server setup Server URL: nist.time.gov Select time server Function firmware version: 1.00 WIFI firmware version: 1.00 Apply Press to complete the setting SETUP pageNote:
- When WI-FI setup is complete, your PC or mobile will resume your default WI-FI connection.
- During AP mode, you can press and hold the [ WI-FI / SENSOR ] key for 6 seconds to stop AP mode and the console will restore your previous setting.
Wi-fi connection status
Below is the WI-FI icon status on the console LCD:
 |  |  |
| Stable: Console is in connection with WI-FI router | Flashing: Console is trying to connect to WI-FI router | Flashing: Console currently in Access Point (AP) mode |
Time server connection status
After the console has connected to the internet, it will attempt to connect to the internet time server to obtain the UTC time. Once the connection succeeds and the console's time has been updated, the "SYNC" icon will appear on the LCD.

text_image
MO MOON PHASE PM 6:38 SYNC 10-2 1Time zone: To display the time of your time-zone, change the time zone in CLOCK setting mode from '00' (default) to your time zone (e.g. 01 for Germany).
- Press and hold [ CLOCK SET ] key for 2s to enter time setting mode.
- Press [ ∧ ] or [ ∨ ] key to enter your time zone, then press and hold [ CLOCK SET ] key to confirm and exit. Please refer to CLOCK SETTING session of manual for details of other setting for the console .
The time will automatically synchronize Internet time server at 12:00AM and 12:00PM per day. Also you can press the [REFRESH] key to get the internet time manually within 1 minute.
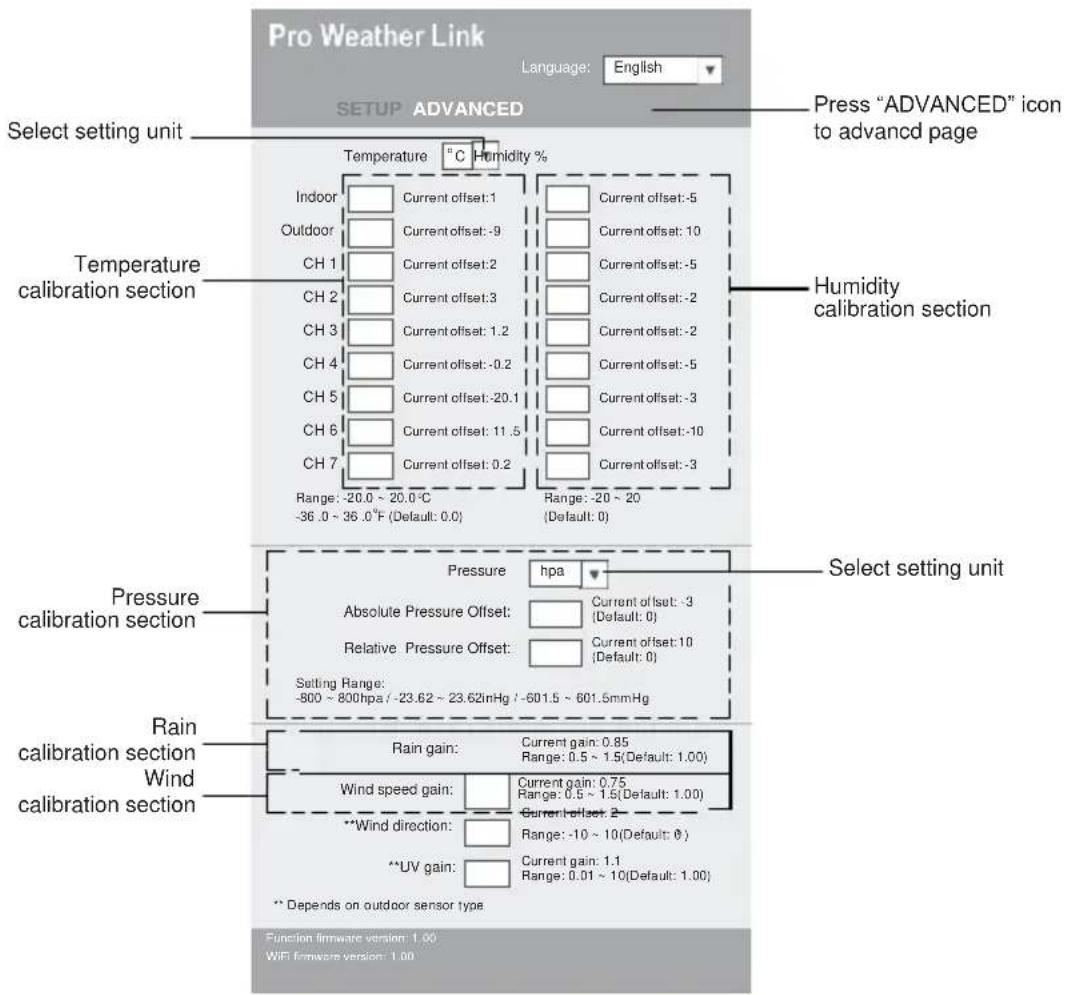
Advanced setting in web interface
Press "ADVANCED" key at the top of web interface to enter the advance setting page, this page allows you to set and view the calibration data of the console, also you can update the firmware in here (Only available in PC platform).
text_image
Pro Weather Link Language: English SETUP ADVANCED Press "ADVANCED" icon to advanced page Select setting unit Temperature °C Humidity % Indoor Current offset:1 Current offset:-5 Outdoor Current offset:-9 Current offset:10 CH 1 Current offset:2 Current offset:-5 CH 2 Current offset:3 Current offset:-2 CH 3 Current offset:1.2 Current offset:-2 CH 4 Current offset:-0.2 Current offset:-5 CH 5 Current offset:-20.1 Current offset:-3 CH 6 Current offset:11.5 Current offset:-10 CH 7 Current offset:0.2 Current offset:-3 Range: -20.0 ~ 20.0°C Range: -20 ~ 20 -36.0 ~ 36.0°F (Default: 0.0) (Default: 0) Temperature calibration section Humidity calibration section Pressure hpa Select setting unit Absolute Pressure Offset: Current offset:-3 (Default: 0) Relative Pressure Offset: Current offset:10 (Default: 0) Setting Range: -800 ~ 800hpa / -23.62 ~ 23.62lmHg / -601.5 ~ 601.5mmHg Rain calibration section Wind calibration section Rain gain: Current gain: 0.85 Range: 0.5 ~ 1.5(Default: 1.00) Wind speed gain: Current gain: 0.75 Range: 0.5 ~ 1.5(Default: 1.00) **Wind direction: Current offset: 2 Range: -10 ~ 10(Default: 0) **UV gain: Current gain: 1.1 Range: 0.01 ~ 10(Default: 1.00) ** Depends on outdoor sensor type Function firmware version: 1.00 WIFI firmware version: 1.00Advanced page
Calibration
- User may enter or change the offset and gain values for different measurement parameters while current offset and gain values are shown next to their corresponding boxes.
- Once completed, press Apply in the SETUP page
The current offset value will show the previous value that you entered, if you want to change, just input the new value in the blank, the new value will valid once you press Apply icon in SETUP page.
Note:
Calibration of most parameter is not required, with the exception of Relative Pressure, which must be calibrated to sea-level to account for altitude effects.
View your weather data in WUnderground
To view your weather station live data in a web browser (PC or mobile version), please visit http://www.wunderground.com, and then enter your "Station ID" in the searching box. Your weather data will show up on the next page. You can also login your account to view and download the recorded data of your weather station.

text_image
WEATHER UNDERGROUND | Maps & Radar Severe Weather News & Blogs Photos & Video Activities More Popular Cities 14 °C San Francisco, CA 23 °C Manhattan, NY 20 °C Atlanta, GA 20 °C Chicago, IL 24 °C Boston, MA 27 °C Houston, TX Central District, HK 28 °C 31° | 27° -100% 23° 29° 29° 28° 28° 30° 27° 28° 28°You can also use the Apple ipad's "WunderStation" app to login your own weather station to view the live data.
WunderStation
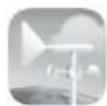
Vliewing your weather data in Weathercloud
- To view your weather station live data in a web browser (PC or mobile version), please visit https://weathercloud.net and sign in your own account.
- Click the icon inside the pull down menu of your station.

text_image
weathercloud Your devices My Device WS-2000 Series AmbientTool Hong Kong June 1, 2018, 12:49 AM tempa 27.4 °C temp °C chill °C down °C down °C heatin °C heat °C the °C turnin 45 % turn % word n/a weight n/a resplend n/a out ? walking ? by 10/3/19pc calls fun colors march Pictures 0/5 Settings View Link Edit device- Click "Current", "Wind", "Evolution" or "Inside" icon to view the live data of your weather station.
text_image
weathercloud My Device hong kong Last updated 2 months ago Profile Current Wind Evolution Inside Observer jessieskred Company Online since January 29, 2018, 2:46 AM Followers 0 Fasy like >* Calm 1014 kPa 5:52 AM 7:09 PMFirmware update
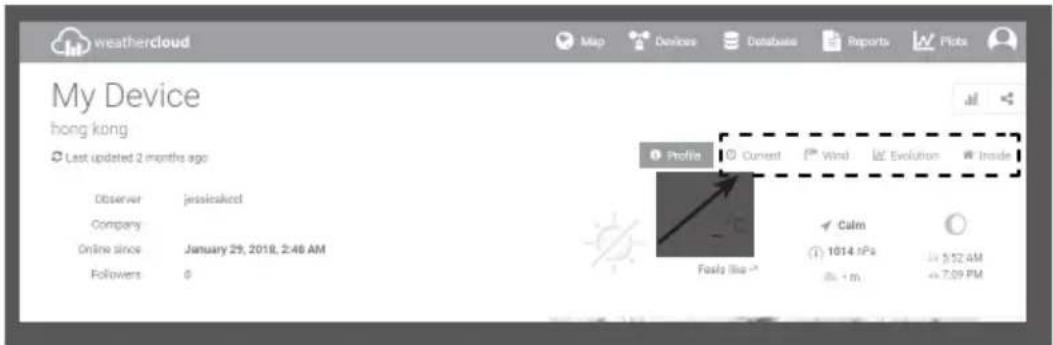
The console supports OTA firmware update capability. Its firmware may be updated over the air anytime (whenever necessary) through any web-browser on a PC with WI-FI connectivity. Update function, however, is not available through mobile/smart devices.
In case that a new firmware is available you can find it at:
https://www.technoline.de/software/ws1900
If no new firmware is available, then no firmware update can be found in above URL. Two types of firmware updates are available, namely Function Firmware and System WI-FI Firmware, and are located at the bottom of ADVANCED page.
text_image
For Weather Kit 192.168.1.1 **Wind direction: Current offset: 0' Range: 10 ~ -10 (Default: 0*) **UV gain: Current gain: 1 Range: 0.01 ~ 10 (Default: 1.00) ** Depends on outdoor sensor type Function firmware version: 1.00 Current Function Browse Upload WiFi firmware version: 0.70 Current WI-FI Browse Upload firmware version firmware versionFirmware update steps
-
Download the latest version firmware (function or WI-FI) to your PC.
-
Set the Console into AP (access point) mode then connect the PC to the console (ref to "SETUP WI-FI CONNECTION" section in previous page).
-
To update the Function firmware, click the Browse in Function firmware section and browse to the location of the file you download in step 1. To update the WI-FI firmware, click the Browse in WI-FI firmware section.
-
Click the corresponding Upload to start transfer the firmware file to console (indicated by a transfer completion %).
-
Once the console received the firmware file, it executes the update automatically as indicated by the update progress on display (i.e. 100 is completion).

text_image
Function firmware version: 1.00 C:\download\PWS_STS.BMI Browse 30% ... WiFi firmware version: 1.00 Upload Browse Upload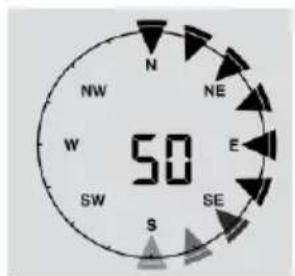
text_image
N NW W SW 50 NE E SE S- The console will restart once the update completed.
Note:
- Function and WI-FI firmware cannot be updated at the same time, you need to update one by one.
- Please keep connecting the power during the firmware update process.
- Please make sure your PC's WI-FI connection is stable.
- When the update process start, do not operate the PC and console.
- During firmware update the console will stop upload data. It will reconnect to your WI-FI router and upload the data again once the update success. If the console cannot connect to your router, please end the SETUP page to setup again.
- After the firmware updates, user might need to input the Weather Underground ID and password again.
Other settings & functions of the station
Time setting
This console is designed to obtain the local time by synchronize with the assigned internet time server. If you want to use it offline, you can set the time and date manually. During the first time
startup, press and hold the [ WI-FI / SENSOR ] key for 6 seconds and let the console back to normal mode.
- In normal mode, press and hold [CLOCK SET] key for 2 seconds to enter setting.
- The setting sequence: Time Zone → DST ON/OFF → Hour → Minute → 12/24 hour format → Year → Month → Day → M-D/D-M format → Time sync ON/OFF → weekday Language.
- Press [∧] or [∨] key to change the value. Press and hold the key for quick-adjust.
- Press [ CLOCK SET ] key to save and exit the setting mode, or the unit will automatically exit the setting mode 60 seconds later without pressing any key.
Note:
- In normal mode, press [ CLOCK SET ] key to switch between year and date display.
- During the setting, you can press and hold [ CLOCK SET ] key for 2 seconds to back to normal mode.
Moon phase
| The moon phase is determined by the time, date and time zone. The following table explains the moon phase icons of the Northern and Southern hemispheres. Please refer to orienting the 5-in-1 sensor towards south section about how to setup for the Southern hemispheres. |
| Northern hemisphere | Moon Phase | Southern hemisphere | |
 | New Moon |  | |
 | Waxing Crescent |  | |
 | First quarter |  | |
 | Waxing Gibbous |  | |
 | Full Moon |  | |
 | Waning Gibbous |  | |
 | Third quarter |  | |
 | Waning Crescent |  | |
Pointing the wireless 5-in-1 sensor to south
The outdoor 5-IN-1 sensor is calibrated to point to North for the maximum accuracy. However, for the user's convenience (e.g. users in the Southern hemisphere), it is possible to use the sensor with the wind vane pointing to South.
- Install the 5-IN-1 wireless sensor with its wind meter end pointing to South. (Please refer to INSTALLATION OF THE WIRELESS SENSOR for mounting details)
- In normal mode of the console, press and hold [INDEX] key for 10 seconds to enter into the calibration mode, then press [INDEX] key again until the "N" icon appears on the left bottom corner of the LCD to enter into the sensor orientation mode
- Use [] or [V] key to change to lower part (Southern Hemisphere).
- Press [INDEX] key to confirm and exit.
Note:
- Changing the hemisphere setting will automatically switch the direction of the moon phase on the display.
Setting the alarm time
- In normal time mode, press and hold [ ALARM ] key for 2 seconds until the alarm hour digit flashes to enter alarm time setting mode.
- Press [∧] or [∨] key to change the value. Press and hold the key for quick-adjust.
- Press [ ALARM ] key again to step the setting value to Minute with the Minute digit flashing.
- Press [] or [] key to adjust the value of the flashing digit.
- Press [ ALARM ] key to save and exit the setting.
Note:
- In alarm mode, the “ 🔊 ” icon will display on the LCD.
• The alarm function will turn on automatically once you set the alarm time.
Activating alarm and temperature pre-alarm
- In normal mode, press [ ALARM ] key to show the alarm time for 5 seconds.
- When the alarm time displays, press [ ALARM ] key again to activate the alarm function.
Or press [ ALARM ] key twice to activate the alarm with ice pre-alarm function.
 |  |  |
| Alarm off | Alarm on | Alarm with ice-alert |
Note:
Once the ice pre-alert activates, the pre-set alarm will sound and ice-alert icon will flash 30 minutes earlier if the outdoor temperature is below -3°C.
When clock reach the alarm time, alarm sound will start.
Where it can be stopped by following operation:
- Auto-stop after 2 minutes alarming if without any operation and the alarm will activate again in the next day.
- By pressing [ SNOOZE ] key to enter snooze that the alarm will sound again after 5 minutes.
- By pressing and hold [SNOOZE] key for 2 seconds to stop the alarm and will activate again in the next day
- By pressing [ ALARM ] key to stop the alarm and the alarm will activate again in the next day.
Note:
- The snooze could be used continuously in 24 hours.
- During the snooze, the alarm icon " 🔊" will keep flashing.
Temperature / humidity function & trend
Use the [°C / °F] slide switch to select the temperature display unit.
The temperature / humidity trend indicator shows the trends of changes in the forthcoming few minutes.
| Arrow indicator | |||
| Temperature / Humidity trend | Rising | Steady | Falling |
Note:
- When indoor temperature is below -40^ , the LCD will display "Lo". If temperature is above 70^ , LCD will display "HI".
- When outdoor temperature is below -40^ , the LCD will display "Lo". If temperature is above 80^ , LCD will display "HI".
- When humidity is below 1%, LCD will display “Lo”. If humidity is above 99%, LCD will display “HI”.
Room comfort indicator
The comfort indication is a pictorial indication based on indoor air temperature and humidity in an attempt to determine comfort level.
| Too cold | Comfortable | Too hot |
Note:
- Comfort indication can vary under the same temperature, depending on the humidity.
- There is no comfort indication when temperature is below 0^ C ( 32^ F) or over 60^ C ( 140^ F).
Wireless receiving of sensor signal
- The console display signal strength for the wireless 5-IN-1 sensor, as per table below:
 |  |  |
| No signal | Weak signal | Good signal |
- If the signal has discontinued and does not recover within 15 minutes, the signal icon will disappear. The temperature and humidity will display "Er" for the corresponding channel.
- If the signal does not recover within 48 hours, the "Er" display will become permanent. You need to replace the batteries and then press [SENSOR / WI-FI] key to pair up the sensor again.
View the outdoor channel (optional feature with add on extra thermo-hygro sensors)
This console is capable to pair with a wireless 5-IN-1 sensor and up to 7 wireless thermal-hygro sensors. If you have 2 or more sensors, you can press [CHANNEL] key to switch between different wireless channels in normal mode, or press and hold [CHANNEL] key for 2 seconds to toggle auto-cycle mode to display the connected channels at 4 seconds interval.
During auto-cycle mode, press [CHANNEL] key to stop auto cycle and display the current channel.
Wind Wind speed and direction section overview
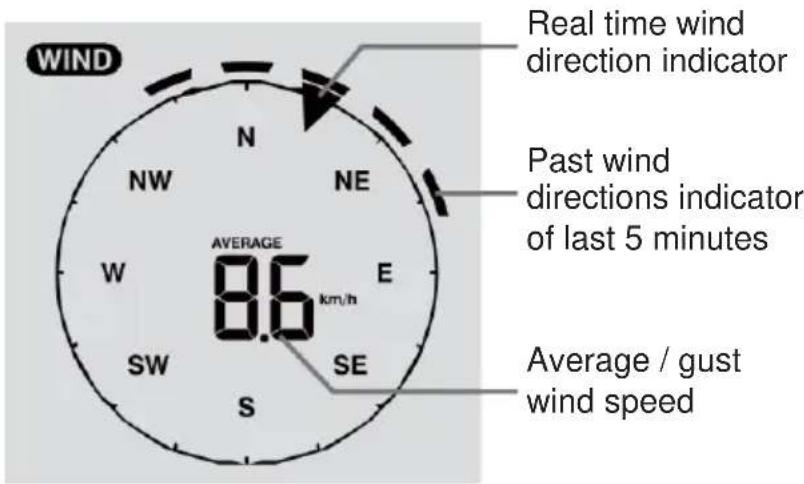
text_image
WIND N NW NE W AVERAGE 8.6 km/h E SW SE S Real time wind direction indicator Past wind directions indicator of last 5 minutes Average / gust wind speedTo set the wind speed unit and direction display format
-
In normal mode, press and hold [WIND] key for 2 seconds to enter into wind speed unit mode and the unit will flash. Press [∧] or [∨] key to change the wind speed unit in this sequence: m/s → km/h → knots → mph
-
Press [WIND] key again to return to normal mode.
To select the wind display mode
In normal mode, press [WIND] key to switch between AVERAGE and GUST wind speed.
Weather index
At the WEATHER INDEX section, you can press [INDEX] key to view the weather index in this sequence: FEELS LIKE → HEAT INDEX → WIND CHILL → DEWPOINT.
FEELS LIKE values
The feels like temperature index determine how the outdoor temperature that people actually feel.
Heat index
The heat index, which is determined by the wireless 5-IN-1 sensor's temperature & humidity data, when the temperature is between 27^ (80°F) and 50^ (120°F).
| Heat Index range | Warning | Explanation |
| 27°C to 32°C (80°F to 90°F) | Caution | Possibility of heat exhaustion |
| 33°C to 40°C (91°F to 105°F) | Extreme Caution | Possibility of heat dehydration |
| 41°C to 54°C (106°F to 129°F) | Danger | Heat exhaustion likely |
| ≥55°C (≥130°F) | Extreme Danger | Strong risk of dehydration / sun stroke |
Wind chill
A combination of the wireless 5-IN-1 sensor's temperature and wind speed data determines the current wind chill factor.
Dew point
- The dew point is the temperature below which the water vapor in air at constant barometric pressure condenses into liquid water at the same rate at which it evaporates. The condensed water is called dew when it forms on a solid surface.
- The dew point temperature is determined by the temperature & humidity data from wireless IN-1 sensor.
Weather forecast
The built-in barometer can notice atmosphere pressure changes. Based on the data collected, it can predict the weather conditions in the forthcoming 12\~24 hours within a 30\~50km (19\~31 miles) radius.
 |  |  | 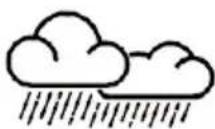 | 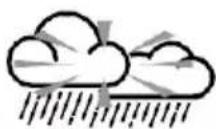 | 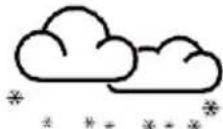 |
| Sunny | Partly cloudy | Cloudy | Rainy | Rainy / Stormy | Snowy |
Note:
- The accuracy of a general pressure-based weather forecast is about 70% to 75% .
- The weather forecast is reflecting the weather situation for next 12\~24 hours, it may not necessarily reflect the current situation.
- The SNOWY weather forecast is not based on the atmospheric pressure, but based on the temperature of outdoor. When the temperature is below -3^ (26°F), the SNOWY weather icon will be displayed on the LCD.
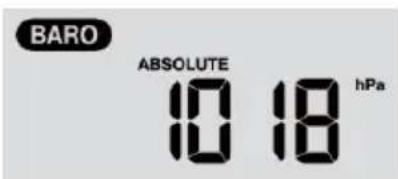
Barometric pressure
The atmospheric pressure is the pressure at any location of the earth caused by the weight of the column of air above it. One atmospheric pressure refers to the average pressure and gradually decreases as altitude increases. Meteorologists use barometers to measure atmospheric pressure. Since variation in atmospheric pressure greatly affected by weather, it is possible to forecast the weather by measuring the changes in pressure.
text_image
BARO ABSOLUTE 10 18 hPaTo set the barometer unit
In normal mode, press [ BARO UNIT ] key to change the barometer unit in this sequence: hPa→inHg → mmHg
To view the absolute / relative barometric reading
In normal mode, press and hold [ BARO ] key to switch between ABSOLUTE / RELATIVE barometric reading.
To set relative atmospheric pressure value
Go to "Advanced Setting in Web Interface" on page 11.
E.g. If your local REL reading is 1010 hPa, and the difference to the reading of the unit, say 1013 hPa, then enter “-3” into the box.
Rainfall
The RAINFALL section shows the rainfall and rain rate information

text_image
RAIN RATE 1.2 HI AL ((●)) mm/hTo set the rainfall unit
- Press and hold [RAIN] key for 2 seconds to enter unit setting mode.
- Press [Λ] or [V] key to toggle the rainfall unit between mm and in.
- Press [RAIN] key to confirm and exit the setting.
To select the rainfall display mode
Press [RAIN] key to toggle between:
- HOURLY - the total rainfall in the past hour
- DAILY - the total rainfall from midnight
- WEEKLY - the total rainfall of the current week
- MONTHLY- the total rainfall of the current calendar month
- Total - the total rainfall since the last reset
- Rate - Current rainfall rate in past an hour (Update every 24 seconds)
To reset the total rainfall recording
In normal mode, press and hold [ HISTORY ] key for 2 seconds to reset all the rainfall record.
Note:
To ensure correct data, please reset all the rainfall record when you reinstall your wireless 5-IN-1 sensor to other location
MAX / MIN data recording
The console can record the accumulated MAX / MIN weather data with the corresponding time stamp for you to easy review.
To view the accumulated MAX / MIN
In normal mode, press [ MAX / MIN ] key to check MAX/MIN records. The display sequence is: indoor (or current channel) MAX temperature → indoor (or current channel) MIN temperature → indoor (or current channel) MAX humidity → indoor (or current channel) MIN humidity → outdoor MAX temperature → outdoor MIN temperature → outdoor MAX humidity → outdoor MIN humidity → MAX average wind speed → MAX gust → MAX relative pressure → MIN relative pressure → MAX absolute pressure → MIN absolute pressure → MAX FEELS LIKE → MIN FEELS LIKE → MAX heat index → MIN heat index → MAX wind chill → MIN wind chill → MAX dew point → MIN dew point → MAX daily rainfall.
To clear the MAX/MIN recordings
Press and hold [ MAX / MIN ] key for 2 seconds to reset the MAX/MIN records of the specified weather display section.
Note:
The LCD will also display the "HISTORY", data records time & date.
History data of past 24 hours
The console automatically stores the weather data of the past 24 hours.
- Press [ HISTORY ] key to check the beginning of the current hour's weather data, e.g. the current time is 7:25 am, March 8, the display will show the data of 7:00am, March 8.
- Press [HISTORY] key repeatedly to view older readings of the past 24 hours, e.g. 6:00am (Mar 8), 5:00am (Mar 8), ..., 10:00am (Mar 7), 9:00am (Mar 7), 8:00am (Mar 7)
Note:
The LCD will also display the "HISTORY", history data records with time & date.
Weather alert setting
Weather Alert can alert you of certain weather conditions. Once the alert criterion is met, the alarm sound will activate and the LCD's alert icon will flash.
To set alert
- Press [ ALERT ] to select and display the desired weather alert reading in the sequence below:
| Alert reading Sequence | Setting Range | Display Section | Default Value |
| Indoor Temperature High Alert (current channel) | -40°C ~ 80°C | Indoor / CH temperature & humidity | 40°C |
| Indoor Temperature Low Alert (current channel) | 0°C | ||
| Indoor Humidity High Alert (current channel) | 1% ~ 99% | 80% | |
| Indoor Humidity Low Alert (current channel) | 40% | ||
| Outdoor Temperature High Alert | -40°C ~ 80°C | Outdoor temperature & humidity | 40°C |
| Outdoor Temperature Low Alert | 0°C | ||
| Outdoor Humidity High Alert | 1% ~ 99% | 80% | |
| Outdoor Humidity Low Alert | 40% | ||
| Average Wind Speed | 0.1m/s ~ 50m/s | Wind direction & speed | 17.2mm/h |
| Pressure Drop | 1hPa ~ 10hPa | Barometer | 3hPa |
| Hourly Rainfall | 1mm ~ 1000mm | Rainfall | 100mm |
- Under the current alert reading, press and hold [ ALERT ] key for 2 seconds to enter alert setting and the alert reading will flash.
- Press [] or [V] key to adjust the value or press and hold the key to change rapidly.
- Press [ ALERT ] key to confirm the value.
- Press [ ALARM ] key to toggle the regarding alert on / off.
- Press [ ALERT ] key to step to next alert reading.
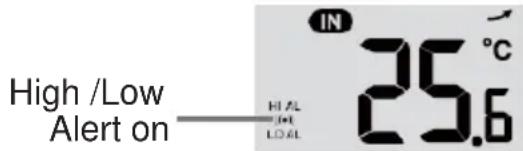
text_image
IN 35.6°C High /Low Alert on HIGH LOWAlert on
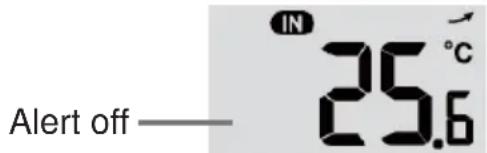
text_image
IN 25.6°C Alert off—Alert off
- Press any key on the front side to save alert on /off status and back to normal mode, or it will automatically back to normal mode after 30 seconds without pressing any key.
To stop the active alert
Press [SNOOZE] key to silence the alert alarm or let the alarm automatically turn off after 2 minutes.
Note:
- Once the alert is triggered, the alarm will sound for 2 minutes and the related alert icon and readings will flash.
- If the alert alarm is automatically off after 2 minutes, the alert icon and readings will still keep flash until the weather reading is out of the alert range.
• The weather alert will sound again when the weather readings falls into the alert range again.
Maintenance
Battery replacement
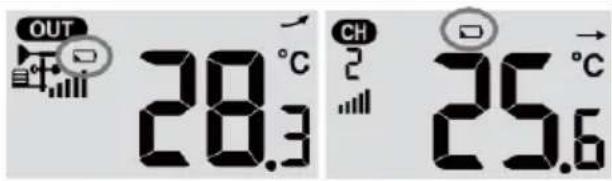
If the low battery indicator “☐” displayed in OUT or CH section, it indicates that the current channel wireless or outdoor 5-in-1 sensor battery power is low. You should replace all the batteries in the current channel sensor at once.
text_image
OUT 28.3°C CH 25.6°CCleaning the rain collector
- Unscrew the rain collector by turning it 30°anti-clockwise.
- Gently remove the rain collector.
- Clean and remove any debris or insects.
- Install the collector when it is clean and fully dried.
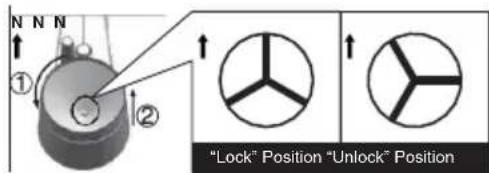
text_image
N N N ① ② "Lock" Position "Unlock" PositionCleaning the thermo-hygro sensor of wireless 5-in-1 sensor
- Remove the 2 screws at the bottom of the radiation shield.
- Gently pull out the shield.
- Carefully remove any dirt or insects on the sensor casing (do not let the sensors inside get wet).
- Clean the shield with water to remove any dirt or insects.
- Install all the parts back when they are clean and fully dried.
text_image
Technical diagram showing mechanical assembly with labeled parts and directional arrowsHereby, Technotrade declares that this product WS 1900 is in compliance with the essential requirements and other relevant provisions of Directive 2014/53/EU and ROHS 2011/65/EC.
The original EU declaration of conformity may be found at:
| General Specification | |
| Dimensions (W x H x D) | 136 x 168 x 24.5mm (5.4 x 6.6 x 1in) |
| Weight | 370g (with batteries) |
| Main power | DC 5V, 1A adaptor HX075-0501000-AG-001 |
| Backup battery | CR2032, 3V batteries |
| Operating temperature range | -5°C ~ 50°C |
| Wi-fi Communication Specification | |
| Wi-fi standard | 802.11 b/g/n |
| Wi-fi operating frequency & transmission power : | 2.4GHzb: 17.0dBm / g: 13.5dBm / n: 12.5dBm |
| Supported router security type | WPA/WPA2, OPEN, WEP (WEP only support Hexadecimal password) |
| Supported device for setup UI | Built-in Wi-fi with AP mode function smart devices, laptops or PCs: Android smart phone, Android pad, iPhone, iPad or Windows laptop |
| Recommended web browser for setup UI | Web browsers that support HTML 5, such as the latest version of Chrome, Safari, Edge, Firefox or Opera. |
| Wireless Sensor side Communication Specification | |
| Support sensors | 1 Wireless 5-in-1 weather outdoor sensor and up to 7 Wireless hygro-thermo indoor sensors |
| RF frequency & transmission power | 868Mhz7dBm |
| RF transmission range | 150m |
| Time Related Function Specification | |
| Time display | HH: MM |
| Hour format | 12hr AM / PM or 24 hr |
| Date display | DD / MM or MM / DD |
| Time synchronize method | Through Internet time server to synchronize the UTC |
| Weekday languages | EN / DE / FR / ES / IT / NL / RU |
| Time Zone | +13 ~ -12 hour |
| DST | ON / OFF |
| Barometer Display & Function SpecificationNote: The following details are listed as they are displayed or operate on the console. | |
| Barometer unit | hPa, inHg and mmHg |
| Measuring range | 540 ~ 1100hPa (relative setting range 930 ~ 1050hPa) |
| Accuracy | (700 ~ 1100hPa ± 5hPa) / (540 ~ 696hPa ± 8hPa)(20.67 ~ 32.48inHg ± 0.15inHg) / (15.95 ~ 20.55inHg ± 0.24inHg)(525 ~ 825mmHg ± 3.8mmHg) / (405 ~ 522mmHg ± 6mmHg)Typical at 25°C (77°F) |
| Resolution | 1hPa / 0.01inHg / 0.1mmHg |
| Weather forecast | Sunny / Clear, Slightly Cloudy, Cloudy, Rainy, Rainy / Stormy and Snowy |
| Display modes | Current |
| Memory modes | Historical data of past 24 hours, daily Max / Min |
| Alarm | Pressure change alert |
| Indoor / Outdoor Temperature Display & Function SpecificationNote: The following details are listed as they are displayed or operate on the console. | |
| Temperature unit | °C and °F |
| Display range | Indoor:-40 ~ 70°C(-40 ~ 158°F), Outdoor:-40 ~ 80(-40 ~ 176°F) |
| Indoor Accuracy | <0°C or >40°C ± 2°C (<32°F or >104°F ± 3.6°F)0~40°C ±1°C (32~104°F ± 1.8°F) |
| Outdoor Accuracy | 60.1 ~ 80°C ± 0.8°C (140.2 ~ 176°F ± 1.4°F)5.1 ~ 60°C ± 0.4°C (41.2 ~ 140°F ± 0.7°F)-19.9 ~ 5°C ± 1°C (-3.8 ~ 41°F ± 1.8°F)-40 ~ -20°C ± 1.5°C (-40 ~ -4°F ± 2.7°F) |
| Resolution | °C / °F (1 decimal place) |
| Display modes | Current |
| Memory modes | Historical data of past 24 hours, daily Max / Min |
| Alarm | Hi / Lo temperature alert |
Indoor / Outdoor Humidity Display & Function Specification
Note: The following details are listed as they are displayed or operate on the console.
| Humidity unit | % |
| Display range | 1 ~ 99% |
| Indoor Accuracy | 20~39% or 71~90% RH ±8%RH @ 25°C (77°F)40~70% RH ±5%RH @ 25°C (77°F) |
| Outdoor Accuracy | 1 ~ 20% RH ± 6.5% RH @ 25°C (77°F)21 ~ 80% RH ± 3.5% RH @ 25°C (77°F)81 ~ 99% RH ± 6.5% RH @ 25°C (77°F) |
| Resolution | 1% |
| Display modes | Current |
| Memory modes | Historical data of past 24 hours, Max / Min |
| Alarm | Hi / Lo Humidity Alert |
Wind Speed & Direction Display and Function Specification
Note: The following detail are listed as they are displayed or operate on the console.
| Wind speed unit | mph, m/s, km/h and knots |
| Wind speed display range | 0 ~ 112mph, 50m/s, 180km/h, 97knots |
| Resolution | 0.1mph, 0.1m/s, 0.1km/h, 0.1knots |
| Speed accuracy | < 5m/s: +/- 0.5m/s; > 5m/s: +/- 6% (whichever is greater) |
| Display mode | Gust / Average |
| Memory modes | Historical Data of past 24 hours, Max Gust / Average |
| Alarm | Hi Wind Speed Alert (Average / Gust) |
| Wind direction resolutions | 16 directions |
Rain Display & Function Specification
Note: The following details are listed as they are displayed or operate on the console.
| Unit for rainfall | mm and in |
| Accuracy for rainfall | ± 7% or 1 tip |
| Range of rainfall | 0 ~ 19999mm (0 ~ 787.3 in) |
| Resolution | 0.254mm (0.01in) |
| Display modes | Current |
| Memory modes | Historical Data of the past 24 hours, Max |
| Rainfall display mode | Hourly / Daily / Weekly / Monthly / Total rainfall |
| Alarm | Hi Daily Rainfall Alert |
Weather Index Display & Function Specification
Note: The following details are listed as they are displayed or operate on the console
| Weather index mode | Feels like, Wind Chill, Heat Index and Dew point |
| Feels like range | -40 ~ 50°C |
| Wind chill range | -40 ~ 18°C, wind speed >4.8km/h |
| Heat index range | 26 ~ 50°C |
| Dew point range | -20 ~ 60°C |
| Display modes | Current |
| Memory modes | Historical Data of past 24 hours, Max / Min |
Wireless 5-in-1 sensor
| Dimensions (W x H x D) | 343.5 x 393.5 x 136mm (13.5 x 15.5 x 5.35in) |
| Weight | 734g (with batteries) |
| Main power | 3 x AA size 1.5V batteries(Lithium batteries recommended) |
| Weather data | Temperature, Humidity, Wind speed, Wind direction and Rainfall |
| RF transmission range | 150m |
| RF frequency& transmission power | 868Mhz7dBm |
| Transmission interval | • 12 seconds for wind speed and wind direction data• 24 seconds for temperature, humidity and rain data |
| Operating range | -40 ~ 60°C (-40 ~ 140°F) Lithium batteries required |
#
Precautions
- Keep and reading the “User manual” is highly recommended. The manufacturer and supplier cannot accept any responsibility for any incorrect readings, export data lost and any consequences that occur should an inaccurate reading take place.
- This product is designed for use in the home only as indication of weather conditions. This product is not to be used for medical purposes or for public information
- Do not subject the unit to excessive force, shock, dust, temperature or humidity.
- Do not cover the ventilation holes with any items such as newspapers, curtains etc.
- Do not immerse the unit in water. If you spill liquid over it, dry it immediately with a soft, lint-
- free cloth .
- Do not clean the unit with abrasive or corrosive materials.
- Do not tamper with the unit's internal components. This invalidates the warranty.
- Placement of this product on certain types of wood may result in damage to its finishing for which manufacturer will not be responsible. Consult the furniture manufacturer's care instructions for information.
- Only use fresh batteries. Do not mix new and old batteries.
- Only use attachments / accessories specified by the manufacturer.
• Images shown in this manual may differ from the actual display. - When disposing of this product, ensure it is collected separately for special treatment.
- Dispose of used batteries according to the instructions.
- CAUTION! risk of explosion if battery is replaced by an incorrect type.
- The socket-outlet shall be installed near the equipment and easily be accessible.
- The contents of this manual may not be reproduced without the permission of the manufacturer.
- Technical specifications and user manual contents for this product are subject to change without notice.
- When replacement parts are required, be sure the service technician uses replacement parts specified by the manufacturer that have the same characteristics as the original parts. Unauthorized substitutions may result in fire, electric shock, or other hazards.
• This product is not a toy. Keep out of the reach of children. -
The console is intended to be used only indoors.
-
Place the console at least 20cm from nearby persons.
- This main unit is intended to be used only indoors.
- Do not subject the unit to excessive force or shock.
- Do not expose the unit to extreme temperatures, direct sunlight, dust or humidity.
- Do not immerse in water.
- Avoid contact with any corrosive materials.
- Do not dispose this unit in a fire as it may explode.
- Do not open the inner back case or tamper with any components of this unit.
Batteries safety warnings
- Use only alkaline batteries, not rechargeable batteries.
• Install batteries correctly by matching the polarities (+/-).
• Always replace a complete set of batteries. - Never mix used and new batteries.
- Remove exhausted batteries immediately.
- Remove batteries when not in use.
- Do not recharge and do not dispose of batteries in fire as the batteries may explode.
- Ensure batteries are stored away from metal objects as contact may cause a short circuit.
- Avoid exposing batteries to extreme temperature or humidity or direct sunlight.
- Keep all batteries out of reach from children. They are a choking hazard.
Use the product only for its intended purpose!
Consideration of duty according to the battery law
Old batteries do not belong to domestic waste because they could cause damages of health and environment. You can return used batteries free of charge to your dealer and collection points. As end-user you are committed by law to bring back needed batteries to distributors and other collecting points!
Consideration of duty according to the law of electrical devices

This symbol means that you must dispose of electrical devices separated from the General household waste when it reaches the end of its useful life. Take your unit to your local waste collection point or recycling centre. This applies to all countries of the European Union, and to other European countries with a separate waste collection system.
Allumer la station 6
text_image
Technical diagram of a mechanical device with numbered parts for identificationPluviomètre
natural_image
Technical diagram of a mechanical component with layered structure and labeled parts (no text or symbols present)Capteur de vent
natural_image
Technical illustration of a weathering device with labeled parts (1 and 2), showing mechanical components without any text or symbols.Installation et configuration
natural_image
3D mechanical assembly diagram showing internal components and mounting features (no text or symbols)natural_image
Three-panel illustration showing front and side views of a device with connectors and a handle (no text or symbols)text_image
Add a New PWS TYPE LOCATION DETAILS DONE Tell Us More About Your Device 75% Name:(Required) Surface Type: Give Your Device a Name Select device surface Elevation:(Required) Associate Webcam: 3201.15496 Select WebCam Device Hardware:(Required) Select device hardware Height Above Ground: F1. Above Groundtext_image
weathercloud About us Plans Projects Blog FAQ Map Sign In LN Welcome to Weathercloud The easiest way to share your weather data with the world. Join us today Welcome Email Password Sign up By clicking Sign as you arrive to our items.Remarque :
text_image
Create new device Basic information Location Name * My device Country * Select country Model * Select mode State / Province * Select state / province Link type * Select link type City * Website www.wacample.com Time zone * (UTC+000C) UTC Description Get coordinates Latitude * Longitude * altitude 0 m Height 0 m Back Createtext_image
Link device The link details for your device WT_station are provided below: Weathercloud ID XXXXXXXXXXXXXX Key 1234567890ABCDEFGHIJKLMNOPQRSTUVWXYZtext_image
MO HOURS PHASE RP 10-2 Ltext_image
PWS-XXXXXX Other people might be able to see info you send over this network Connect automatically Connect Network settings Available Airplane modetext_image
wU AT least BACKGROUND Maps & Factor Severe Weather Nature & Dogs Photos & Video Activities More My Profile Capeer Cocos 11°C San Francisco, CA 23°C Manhattan, NY 20°C Atlanta, GA 25°C Chicago, IL 24°C Boston, MA 27°C Houston, TX Central District, UK 28°C 31° 10PM 24.29 28.28 27.28 28.28text_image
weathercloud Map Devices Database Reports Plots Your devices My Device WS-2000 Series Antler/Tool Hong Kong. June 1, 2018, 12:49 AM Temp: 27.4 °C loop °C call °C down °C new °C heat °C low °C turnis re % from % vspd rms % septal rms % torgam rms data* endzone ! bur 1119.9 MHz gain mm maxrads mm/h Pictures 0 /5 Settings View Link Edit devicetext_image
weathercloud My Device hong kong Last updated 2 months ago Observer jessicalool Company Online since January 25, 2018 2:48 AM Followers 0 Profile Current I^ want Evolution # info Calm 1014 IPa $52 AM - m - 709 PM Feels like t^text_image
Function firmware version: 1.00 C:\download\WS_SYS.bit 30% ... WiFi firmware version: 1.00 Browse Upload Browse Upload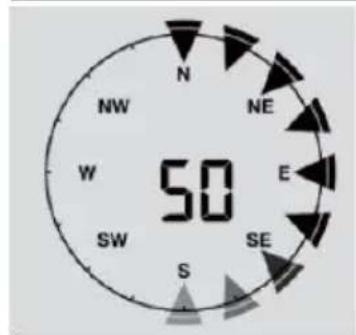
text_image
N NW W SW 50 NE E SE Stext_image
IN 25.6 Alerte —Alerte désactivée
text_image
N ① ② N "Lock" Position "Unlock" Positiontext_image
Technical diagram showing a mechanical assembly with labeled parts and directional arrows indicating motion or force.natural_image
Technical diagram of a mechanical component with layered structure and labeled parts (no text or symbols present)Sensor de viento
natural_image
Technical illustration of a mechanical component with labeled parts (1 and 2), showing two views: one with a three-bonded handle and the other with a propeller-like structure (no text or symbols present)natural_image
3D mechanical assembly diagram showing internal components and a dashed alignment line (no text or symbols)natural_image
Technical line drawing of a mechanical component with an inset close-up showing internal components (no text or symbols)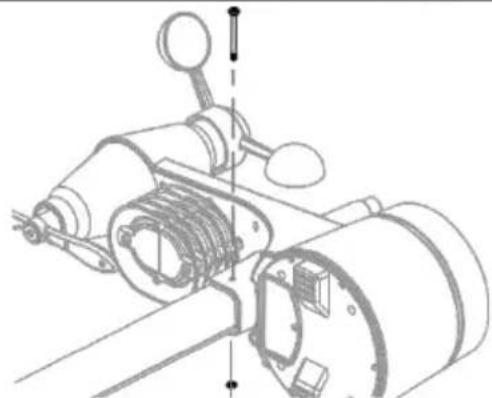
natural_image
Technical line drawing of a mechanical assembly with no visible text or symbolsnatural_image
Three technical diagrams showing front and side views of a device with connectors and a handle (no text or symbols present)text_image
Add a New PWS TYPE LOCATION DETAILS DONE Tell Us More About Your Device 75% Name:(Required) Give Your Device's Name. Elevation:(Required) 3261 15496 Surface Type: Select device surface Associate Webcam: Select WebCams Device Hardware:(Required) Select device hardware Height Above Ground: F1. Above Groundtext_image
weathercloud About us Plans Projects Blog FAQ Map Sign to EN Welcome to Weathercloud The easiest way to share your weather data with the world. Join us today Everyone Email Password Sign up By clicking Sign as you agree to our items.Nota:
text_image
weathercloud Map Software Database Reports Fiks Your devices My Device New OKtext_image
Create new device Basic information Location Name: My device Country: Select country Model: Select mode State / Province: Select state / province Link type: Select link type City: Website: www.wacample.com Time zone: UTC+000C) UTC Description Get coordinates Latitude: Longitude: Altitude: 0 m Height: 0 m Createtext_image
Link device The link details for your device WT_station are provided below: Weathercloud ID XXXXXXXXXXXXXX Key 1234587890ABCDEFGHIJKLMNOPQRSTUtext_image
PWS-XXXXXX Other people might be able to see info you send over this network Connect automatically Connect Network settings Available Airplane modeInterfaz de red wifi del PC

text_image
Wi-Fi On PWS-XXXXXX Connected, no Internet autofamily pui JMTNET tonyp LAVENDER_ASUS CTM-WIFI-AUTO mollymole Linksys02060 ROYInterfaz de red wifi para Android
text_image
weathercloud Your devices My Device WS-2003 Series AntiMer1Tool Hong Kong June 1, 2018, 12:41 AM Bottom 27.4 °C temp °C cold °C down °C new °C headin °C heat °C low °C double +0 % from -0 super m/s superd m/s superavg m/s win* willingness : fur 1119.9 MHz rail run minerals mm/h Pictures 0/5 Settings View Link Edit devicetext_image
weathercloud My Device hong kang Last updated 2 months ago Observer jessicalool Company Online since January 25, 2018 2:48 AM Followers 0 Hello Current I* Wind Is Evolution Noise Calm 1014 IPs 552 AM 700 PM Feels like *text_image
Function firmware version: 1.00 C:\download\01-WS_SYS.bin 30% ... WIFI firmware version: 1.00 Browse Upload Template Upload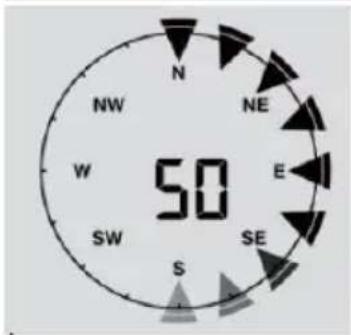
text_image
N NW NE W E SW SE S 50Nota:
text_image
N ① ② N "Lock" Position "Unlock" Positiontext_image
Technical diagram showing mechanical assembly with labeled parts and directional arrowsEspecificaciones
Estación
text_image
Technical diagram of a mechanical device with numbered parts for identificationRegenmeter
- Regenvanger
- Kantelbak
- Regensensor
- Afvoergaten
natural_image
Technical diagram of a mechanical component with layered structure and labeled parts (no text or symbols present)Windsensor
- Windcups (anemometer)
- Windvaan
natural_image
Technical illustration of a mechanical component with labeled parts (1 and 2), showing two views: one with a three-bonded handle and the other with a propeller-like structure (no text or symbols present)natural_image
3D technical illustration of a mechanical device with internal components and mounting holes (no text or symbols)De steun en paal monteren
natural_image
Three-panel illustration showing front and side views of a device with connectors and a handle (no text or symbols)text_image
Add a New PWS TYPE LOCATION DETAILS DONE Tell Us More About Your Device 75% Name:(Required) Give Your Device's Name. Elevation:(Required) 3261 15496 Surface Type: Select device surface Associate Webcam: Select WebCams Device Hardware:(Required) Select device hardware Height Above Ground: F1. Above Groundtext_image
weathercloud About vs Plans Projects Blog FAQ Map Sign In CN Welcome to Weathercloud The easiest way to share your weather data with the world. Join us today Username Email Password Sign up By clicking Sunday you agree to our items.Opmerking:
text_image
Create new device Basic information Location Name * My device Country * Select country Model * Select mode State / Province * Select state / province Link type * Select link type City * Website: www.example.com Time zone * (UTC+00DC) UTC Description Get coordinates Latitude * Longitude * altitude 0 m Height 0 m Back Createtext_image
Link device The link details for your device WT_station are provided below: Weathercloud ID XXXXXXXXXXXXXX Key 1234587890ABCDEFGHIJKLMNOPQRSTUDe WiFi-verbinding instellen
text_image
MO HOON PHASE AP 10-2 Ltext_image
PWS-XXXXXX Other people might be able to see info you send over this network Connect automatically Connect Network settings Available Airplane modePc WiFi-netwerkinterface
text_image
Wi-Fi On PWS-XXXXXX Connected, no Internet autofamily pui JMTNET tonyp LAVENDER_ASUS CTM-WIFI-AUTO mollymole Linksys02060 ROYAndroid WiFi-netwerkinterface
text_image
weathercloud Map Devices Database Reports Pots My Device hong kong Last updated 2 months ago Observer jessicalcel Company Online since January 29, 2018 2:48 AM Followers 0 Hello Current I^ wind I^ Evolution * inside Feel like °* Calm 1014 tPa m 5.52 AM 7:00 PMFirmware-update
text_image
Function firmware version: 1.00 C:\Download\WPS_SYS.bin 30% ... WiFi firmware version: 1.00 Browse Uploaded Browse Uploaded
text_image
N NW NE W E SW SE S 50text_image
N ① ② N "Lock" Position "Unlock" Positiontext_image
Technical diagram showing a mechanical assembly with labeled parts and directional arrows indicating motion or assembly.text_image
techno 25.6 58% 29.6 16:38° 28.3 85% 10.18° 11.2° 11.2°Introduzione....2
Panoramica 2
Sensore meteo wireless 5 in 1
text_image
Technical diagram of a mechanical device with numbered parts for identificationPluviometro
natural_image
Technical diagram of a mechanical component with labeled parts (1 and 2), showing internal layered structure without any readable text or symbols.Anemometro
natural_image
Technical illustration of a weathering device with labeled parts (1 and 2), showing mechanical components without any text or symbols.natural_image
3D rendering of a mechanical device interior with no visible text or symbolsnatural_image
Three technical diagrams showing front and side views of a device with connectors and a central component (no text or symbols visible)text_image
WU WEATHER UNDERGROUND | Maps & Radar Severe Weather News & Blogs Photos & Video Activities More √ Search Locations Log in [J-1]Nota:
text_image
Add a New PWS TYPE LOCATION DETAILS DONE Tell Us More About Your Device 75% Name:(Required) Give Your Device's Name. Elevation:(Required) 3261 15496 Surface Type: Select device surface Associate Webcam: Select WebCams Device Hardware:(Required) Select device hardware Height Above Ground: F1. Above Groundtext_image
weathercloud About us Plans Projects Blog FAQ Map Sign in CN Welcome to Weathercloud The easiest way to share your weather data with the world. Join us today Username Email Password Sign up By clicking Sign as you arrive to our items.Nota:
text_image
weathercloud Your devices My Devicetext_image
Create new device Basic information Location Name: My device Country: Select country Model: Select mode State / Province: Select state / province Link type: Select link type City: Website: www.wacample.com Time zone: UTC+000C) UTC Description Get coordinates Latitude: Longitude: Altitude: 0 m Height: 0 m Createtext_image
Link device The link details for your device WT_station are provided below: Weathercloud ID XXXXXXXXXXXXXX Key 1234587890ABCDEFGHIJKLMNOPQRSTUtext_image
PWS-XXXXXX Other people might be able to see info you send over this network Connect automatically Connect Network settings Available Airplane modetext_image
WU ATLEER BACKGROUND | Maps & Race Severe Weather News & Bags Photos & Video Activities Move My Profile 11°C San Francisco, CA 23°C Manhattan, NY 20°C Atlanta, GA 25°C Chicago, IL 24°C Boston, MA 27°C Houston, TX Central District, HK 28°C 31° 100% 24° 25° 26° 27° 28°text_image
weathercloud Your devices My Device WS 2000 Series AmbientTool Hong Kong June 3, 2018, 12:46 AM tem in 27.4°C temp °C volt °C down °C new °C bozin °C heat °C low °C burn in 46 % turn % wspd m/s wspdh m/s wspdavg m/s wdr wdray bar 1113.9 MHz train mm carloads mm/h Pictures 0/5 Settings View unk Edit devicetext_image
weathercloud Map Outdoors Database Reports Polls My Device hong kong Last updated 2 months ago Observer jessicalool Company Online since January 29, 2018. 2:48 AM Followers 0 Hello Current I^ wind I^ EVOLUTION I^ inside Calm 1014 IPa = 5.52 AM = 700 PM Feels like: - mtext_image
Function firmware version: 1.00 C:\Download\PWS_SYS.dsn 30% ... WIFI firmware version: 1.00 Browse Upload Browse Updated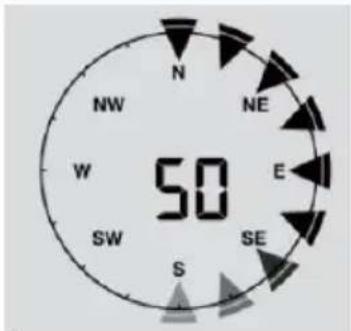
text_image
N NW NE W E SW SE S 50text_image
N ① ② N "Lock" Position "Unlock" Positiontext_image
Technical diagram showing mechanical assembly with labeled parts and directional arrowsSensore wireless 5 in 1
natural_image
Technical diagram of a mechanical component with two views (1 and 2), showing internal structure and assembly (no text or symbols)Senzor větru
natural_image
Technical illustration of a weather instrument with labeled parts (1 and 2), showing mechanical components without any text or symbols.Montáž a nastavení
natural_image
3D mechanical assembly diagram showing internal components and mounting features (no text or symbols)natural_image
Three-panel image showing a device with a clip, a close-up view of its cable, and a separate view of the front panel (no text or symbols visible)text_image
Add a New PWS TYPE LOCATION DETAILS DONE Tell Us More About Your Device 75% Name:(Required) Surface Type: Give Your Device a Name Select device surface Elevation:(Required) Associate Webcam: 3201.15496 Select WebCam Device Hardware:(Required) Select device hardware Height Above Ground: F1. Above Groundtext_image
weathercloud About us Plans Projects Blog FAQ Map Sign In LN Welcome to Weathercloud The easiest way to share your weather data with the world. Join us today Welcome Email Password Sign up By clicking Sign as you arrive to our items.Poznámka:
text_image
weathercloud Map Business Database Reports Plots Your devices My Devicetext_image
Create new device Basic information Location Name: My device Country: Select country Model: Select mode State / Province: Select state / province Link type: Select link type City: Website: www.wacample.com Time zone: UTC+000C) UTC Description Get coordinates Latitude: Longitude: Altitude: 0 m Height: 0 m Createtext_image
Link device The link details for your device WT_station are provided below: Weathercloud ID XXXXXXXXXXXXXX Key 1234587890ABCDEFGHIJKLMNOPQRSTUtext_image
PWS-XXXXXX Other people might be able to see info you send over this network Connect automatically Connect Network settings Available Airplane modetext_image
weathercloud My Device hong kong Last updated 2 months ago Observer jessicalool Company Online since January 25, 2018 2:48 AM Followers 0 Profile Current I* wind WC Evolution # mode Feel like * Calm 1014 JPa S$2 AM 7:00 PMtext_image
Function firmware version: 1.00 C:\buy\SO\WD\WS_SYSBIN 30% ... WiFi firmware version: 1.00 Upload Upload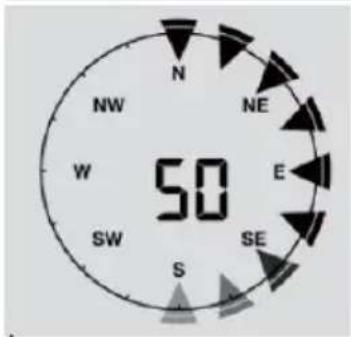
text_image
N NW NE W E SW SE S 50text_image
N ① ② N "Lock" Position "Unlock" Position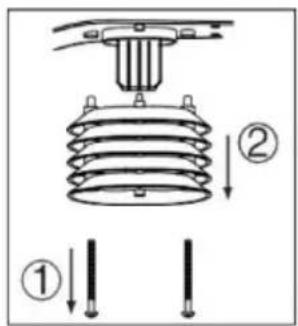
text_image
Technical diagram showing mechanical assembly with labeled parts and directional arrowstext_image
Technical diagram of a mechanical device with numbered parts for identificationDeszczomierz
natural_image
Technical diagram of a mechanical component with layered structure and labeled parts (no text or symbols present)Czujnik wiatru
natural_image
Technical illustration of a mechanical component with labeled parts (1 and 2), showing two views: one with a three-bonded handle and the other with a propeller-like structure (no text or symbols present)natural_image
3D technical illustration of a mechanical device with internal components and mounting bracket (no text or symbols)natural_image
Three technical illustrations of a device's front panel and side view, showing structural components without any text or symbols.text_image
Add a New PWS TYPE LOCATION DETAILS DONE Tell Us More About Your Device 75% Name:(Required) Surface Type: Give Your Device a Name Select device surface Elevation:(Required) Associate Webcam: 3201.15496 Select WebCam Device Hardware:(Required) Select device hardware Height Above Ground: F1. Above Groundtext_image
weathercloud About us Plans Projects Blog FAQ Map Sign In LN Welcome to Weathercloud The easiest way to share your weather data with the world. Join us today Welcome Email Password Sign up By clicking Sign as you arrive to our items.Uwaga:
text_image
weathercloud Map Search Database Reports Plots Your devices My Device Settings -text_image
Create new device Basic information Location Name * My device Model * Select mode Link type * Select link type Website www.necamprb.com Description Country * Select country State / Province * Select state / province City * Time zone * UTC+00001 UTC ✓ Get coordinates Latitude * Longitude * Attitude 0 m Height 0 m ✓ Createtext_image
Link device The link details for your device WT_station are provided below: Weathercloud ID XXXXXXXXXXXXX Key 1234587890ABCDEFGHIJKLMNOPQRSTUtext_image
MO HOURS PHASE AP 10-2 Ltext_image
PWS-XXXXXX Other people might be able to see info you send over this network Connect automatically Connect Network settings Available Airplane modeInterfejs sieci Wi-Fi na komputerze

text_image
Wi-Fi On PWS-XXXXXX Connected, no Internet autofamily pui JMTNET tonyp LAVENDER_ASUS CTM-WIFI-AUTO mollymole Linksys02060 ROYInterfejs sieci Wi-Fi w systemie Android
text_image
wu AT&T CD BACKGROUND | Maps & Faster | Severe Weather | News & Blogs | Photos & Video | Activities | Note ▼ Search My Profile Capeer Winds 14°C San Francisco, CA 23°C Manhattan, NY 20°C Atlanta, GA 25°C Chicago, IL 26°C Boston, MA 27°C Houston, TX Central District, HK 28°C 31°/27° © ANNtext_image
weathercloud My Device hong kong Last updated 2 months ago Observer jessicalool Company Online since January 29, 2018 2:48 AM Followers 0 Profile Current I* mind Ic evolution mode Calm 1) 1014 IPa = 5.52 AM 7.00 PM Feels like ** + - + - + - + - + - + -text_image
Function firmware version: 1.00 L:\Download\OPS_SYS.bin 30% ... WiFi firmware version: 1.00 Download Upload