BCA850 - Brush cutter HUSQVARNA - Free user manual and instructions
Find the device manual for free BCA850 HUSQVARNA in PDF.

| Product type | Accessory for brushcutter (cutting head) |
| Brand | Husqvarna |
| Model | BCA850 |
| Weight (accessory) | 3.7 kg |
| Total weight (with power unit 325iLK+) | 5.3 kg |
| Power source | Battery (compatible with power unit 325iLK+) |
| Output shaft speed | 5,800 rpm |
| Cutting diameter | 255 mm |
| Cutting type | Grass blade 255-4 (4 teeth) or trimmer head |
| Cutting depth | 255 mm (diameter) |
| Measured sound power level | 95 dB(A) |
| Guaranteed sound power level | 96 dB(A) |
| Equivalent sound pressure level (trimmer head) | 82 dB(A) |
| Vibration level (blade, left/right) | 3.3 / 1.5 m/s² |
| Safety features | Protection for cutting equipment, harness, anti-kickback device, stop pin |
| Maintenance | Daily cleaning, weekly inspection, monthly lubrication of angle gear |
| Included accessories | Grass blade, guard, harness, J-handle, 4 mm hex key |
| Spare parts | Blade, guard, lock nut, support flange, drive disc |
| Repairability | Routine maintenance by the user; complex repairs at an authorized dealer |
| Manufacturer | Husqvarna AB, Drottninggatan 2, SE-561 82 Huskvarna, Sweden |
Frequently Asked Questions - BCA850 HUSQVARNA
User questions about BCA850 HUSQVARNA
0 question about this device. Answer the ones you know or ask your own.
Ask a new question about this device
Download the instructions for your Brush cutter in PDF format for free! Find your manual BCA850 - HUSQVARNA and take your electronic device back in hand. On this page are published all the documents necessary for the use of your device. BCA850 by HUSQVARNA.
USER MANUAL BCA850 HUSQVARNA
natural_image
Simple black-and-white icon showing a lever and a battery (no text or symbols)BCA850
EN Operator's manual 2-14
DA Brugsanvisning 15-27
EC Declaration of Conformity.... 14
Introduction
Product description
We have a policy of continuous product development and therefore reserve the right to modify the design and appearance of the products without prior notice.
Note: This manual cover battery operated power units.
Intended use

WARNING: This attachment may only be used together with the intended product, see
the accessory chapter in the Operator's Manual of the product.
This is a brushcutter to cut different types of vegetation. Do not use the product for other tasks than grass trimming and grass clearing. Use a grass blade to cut grass.
Note: National or local regulations may regulate the use. Comply to given regulations.
Product overview
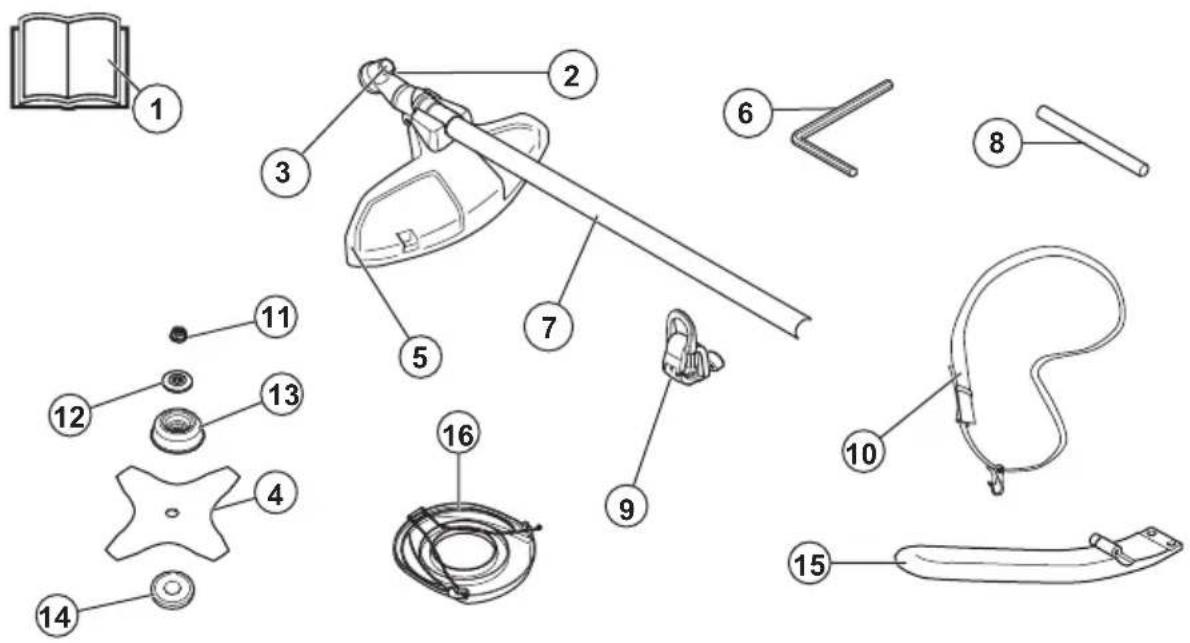
- Operator's manual
- Bevel gear
- Hole for locking pin
- Grass blade
- Cutting attachment guard
6.4 mm hex - Shaft
- Locking pin
-
Harness support hook
-
Harness
- Locknut
- Support flange
- Support cup
- Drive disc
- J-handle
- Transport guard
Symbols on the product

WARNING! Careless or incorrect use of this attachment can result in serious or fatal injury to the operator or others.

Use a protective helmet in locations where objects can fall on you. Use approved hearing protection. Use approved eye protection.

Maximum speed of the output shaft.
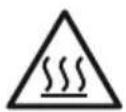
Keep all parts of your body away from the hot surfaces.
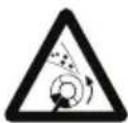
The product can cause objects to eject, which cause injury.
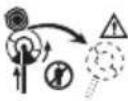
Risk of blade thrust if the cutting equipment touches an object that it does not immediately cut. The product can cut off body parts. Keep a minimum of 15 m / 50 ft. distance to persons and animals during operation of the product.

Use approved protective gloves.

Use heavy-duty slip-resistant boots.
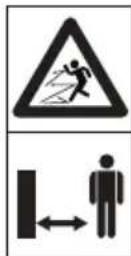
The operator must ensure that no people or animals come closer than 15 metres. When several operators are working at the same site a safety distance of at least 15 metres must be in effect. The attachment can forcibly throw objects that can bounce back. This can result in serious eye injuries if the recommended safety equipment is not used.
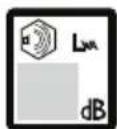
Noise emission to the environment according to the European Community's Directive. The attachment's emission is specified in the Technical data chapter and on the label.
yyyyMMddxxxx The
e rating plate shows the serial number. yyyy is the production year, ww is the production week and xxxx is the sequential number.
Note: Other symbols/decals on the product refer to certification requirements for other commercial areas.
Manufacturer
Husqvarna AB
Drottninggatan 2, SE-561 82 Huskvarna, Sweden, tel: +46-36-146500
Safety
Safety definitions
Warnings, cautions and notes are used to point out specially important parts of the manual.

WARNING: Used if there is a risk of injury or death for the operator or bystanders if the instructions in the manual are not obeyed.

CAUTION: Used if there is a risk of damage to the product, other materials or the adjacent area if the instructions in the manual are not obeyed.
Note: Used to give more information that is necessary in a given situation.
General power tool safety warnings

WARNING: Read all safety warnings, instructions, illustrations and specifications provided with this power tool. Failure to follow all instructions listed below may result in electric shock, fire and/or serious injury.
Note: Save all warnings and instructions for future reference. The term "power tool" in the warnings refers to your mains-operated (corded) power tool or battery-operated (cordless) power tool.
Other general safety information
- Deactivate the product before you move to another area. Always remove the battery when passing the product to another person.
- Never put the product down unless you have deactivated it and removed the battery. Do not leave the product unsupervised when it is switched on.
- The cutting tool does not stop immediately after the product is turned off.
- The blade should be completely stopped once the trigger switch has returned to the initial position.
- Before using the product and after any impact, check for signs of wear or damage and repair as necessary.
- If anything jams in the cutting attachment while you operate the product, stop and deactivate the product. Make sure that the cutting attachment stops completely. Remove the battery before you clean, inspect or repair the product and/or the cutting equipment.
- Do a check of the product before use. Refer to, Product overview on page 2 and To do a check of the cutting attachment guard on page 6. Do not use a defective product. Do the safety checks, maintenance and service instructions described in this manual.
- Faulty cutting attachment can increase the risk of accidents.
- Check the gear for dirt and cracks. Clean off grass and leaves from the gear using a brush. Gloves should be worn when necessary.
- Always ensure that ventilation openings are kept clear of debris.
- Check that the trimmer head is completely attached to the trimmer.
- All covers, guards and handles must be fitted before starting.
- Check that the product is in perfect working order. Check that all nuts and screws are tight.
- Check that the trimmer head and trimmer guard are not damaged or cracked. Replace the trimmer head or trimmer guard if it has been exposed to impact or are cracked. Always use the recommended guard for the cutting attachment you are using. See chapter on Technical data.
- This product is a dangerous tool if you are not careful or if you use the product incorrectly. This product can cause serious injury or death to the operator or others.
- This appliance is not intended for use by persons (including children) with reduced physical, sensory or mental capabilities, or lack of experience and knowledge, unless they have been given supervision or instruction concerning use of the appliance by a person responsible for their safety. Children should be supervised to ensure that they do not play with the appliance.
-
Never allow children to use or be in the vicinity of the machine. Since the machine is easy to start, children may be able to start it if they are not kept under full surveillance. This can mean a risk of serious personal injury. Therefore disconnect the battery when the machine is not under close supervision.
-
Never allow children or other persons not trained in the use of the product and/or the battery to use or service it.
- National or local regulations may regulate the use. Comply to given regulations.
- Store the equipment in a lockable area so that it is out of reach of children and unauthorized persons.
- The transport guard must always be used for storage and transport.
- Secure the product during transport.
- Keep hands and feet away from the cutting area at all times and especially when switching on the motor.
- Keep your hands and feet away from the cutting attachment until it has stopped completely when the product is deactivated.
- Do not remove the cut material, or let other persons remove cut material, while the product is activated or the cutting equipment rotates, as this can result in serious injury.
- Keep in mind that it is you, the operator that is responsible for not exposing people or their property to accidents or hazards.
- Under no circumstances may the design of the product be modified without the permission of the manufacturer. Always use original accessories. Non-authorized modifications and/or accessories can result in serious personal injury or the death of the operator or others. Your warranty may not cover damage or liability caused by the use of non-authorized accessories or replacement parts.
- The only accessories you can operate with this product are the cutting attachments recommended in the technical data chapter.
- Never use a product that has been modified in any way from its original specification
- Never use a product that is faulty. Carry out the safety checks, maintenance and service instructions described in this manual. Some maintenance and service measures must be carried out by trained and qualified specialists. See instructions under the Maintenance heading.
- Working in bad weather is tiring and often brings added risk. Due to the added risk, it is not recommended to use the machine in very bad weather, for instance in dense fog, heavy rain, strong winds, intense cold, risk of lightning, etc
- Never work from a ladder, stool or any other raised position that is not fully secured.
- Store Idle Appliances Indoors – When not in use, appliances should be stored indoors
-
It is not possible to cover every conceivable situation you can face. Always exercise care and use your common sense. Avoid all situations which you consider to be beyond your capability. If you still feel uncertain about operating procedures after reading these instructions, you should consult an expert before continuing.
-
Ensure that no people or animals come closer than 15 meters while you work. When several operators are working in the same area the safety distance should be at least 15 metres. Otherwise there is a risk of serious personal injury. Stop the product immediately if anyone approaches. Never swing the product around without first checking behind you to make sure that no one is within the safety zone.
- If anything jams in the cutting attachment while you operate the product, stop and deactivate the product. Make sure that the cutting attachment stops completely. Remove the battery before you clean, inspect or repair the product and/or the cutting equipment.
- Ensure that people, animals or other things can not affect your control of the product or that they do not come in contact with the cutting attachment or loose objects that are thrown out by the cutting attachment. However, do not use the product unless you are able to call for help in the event of an accident.
- Make sure that you can move and stand safely. Check the area around you for possible obstacles (roots, rocks, branches, ditches, etcetera) in case you have to move suddenly. Take great care when you work on sloping ground.
- Walk, never run.
- Inspect the working area. Remove all loose objects, such as stones, broken glass, nails, steel wire, string etc. that could be thrown out or become wrapped around the cutter or cutter guard.
- Watch out for stumps of branches that can be thrown out when you cut. Do not cut to close to the ground where stones and other objects can be thrown out.
- Make sure that no clothes or parts of the body come in contact with the cutting attachment when the product is activated. Keep the product below waist level.
- Watch out for thrown objects. Always wear approved eye protection. Never lean over the cut-ting attachment guard. Stones, rubbish, etc., can be thrown up into the eyes which can cause blindness or serious injury.
- Listen out for warning signals or shouts when you wear hearing protection. Always remove your hearing protection as soon as the product stops.
- If any unwanted vibrations occur, tap out new line to give the line the correct length to stop the vibrations.
- If the product starts vibrating abnormally, stop the product and remove the battery.
• Overexposure to vibration can lead to circulatory damage or nerve damage in persons who have poor circulation. Speak to your physician if you experience symptoms of overexposure to vibration. Such symptoms include numbness, loss of feeling, tingling, pricking, pain, loss of strength, changes in skin color or condition. These symptoms usually show in the fingers, hands or wrists.
• Always hold the product with both hands. Hold the product on the right side of your body.
Personal protective equipment

WARNING: Read the warning instructions that follow before you use the product.
• Always use approved personal protective equipment when you use the product. Personal protective equipment cannot fully prevent injury but it decreases the degree of injury if an accident does occur. Let your dealer help you select the right equipment.
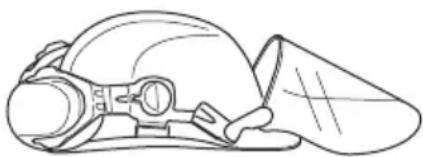
- Use a protective helmet where there is a risk of falling objects.
natural_image
Line drawing of a helmet and safety goggles (no text or symbols)- Use approved hearing protection that provides adequate noise reduction. Long-term exposure to noise can result in permanent hearing impairment.
natural_image
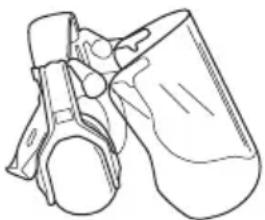
Line drawing of a mechanical component or device with no visible text or symbols- Use approved eye protection. If you use a visor, you must also use approved protective goggles. Approved protective goggles must comply with the ANSI Z87.1 standard in the USA or EN 166 in EU countries.

natural_image
Line drawing of a mechanical component or device with no visible text or symbols- Use gloves when necessary, for example when you attach, examine or clean the cutting equipment.
natural_image
Line drawing of a pair of gloves with bandages and straps (no text or symbols)- Use sturdy non-slip boots.
natural_image
Line drawing of a pair of boots with visible tread pattern and buckles (no text or symbols)- Use clothing made of a strong fabric. Always use heavy, long pants and long sleeves. Do not use loose clothing that can catch on twigs and branches. Do not wear jewelry, short pants, sandals or go with bare feet. Put your hair up safely above shoulder level.
- Keep first aid equipment close at hand.

Safety devices on the product

WARNING: Read the warning instructions that follow before you use the product.
In this section the product's safety features, its purpose and how checks and maintenance should be carried out to ensure that it operates correctly. See instructions under the heading Introduction on page 2 to find where these parts are located on your product.
The life span of the product can be reduced and the risk of accidents can increase if product maintenance is not carried out correctly and if service and/or repairs are not carried out professionally. If you need further information please contact your nearest servicing dealer.

WARNING: Never use a product with defective safety components. The product's safety equipment must be inspected and maintained as described in this section. If your product fails any of these checks, contact your service agent to get it repaired.

CAUTION: All servicing and repair work on the machine requires special training. This is especially true of the machine's safety equipment. If your machine fails any of the checks described below you must contact your service agent. When you buy any of our products we guarantee the availability of professional repairs and service. If the retailer who sells your machine is not a
servicing dealer, ask him for the address of your nearest service agent.
To do a check of the cutting attachment guard

WARNING: Do not use a cutting attachment without an approved and correctly attached cutting attachment guard. Always use the recommended cutting attachment guard for the cutting attachment that you use, see Accessories on page 13. If an incorrect or faulty cutting attachment guard is attached this can cause serious personal injury.
The cutting attachment guard stops objects that ejects in the direction of the operator. It also prevents injuries that occur if you touch the cutting attachment.
-
Stop the motor.
-
Do a visual check for damages, for example cracks.
natural_image
Illustration of a mechanical tool interacting with a curved component (no text or symbols)- Replace the cutting attachment guard if it is damaged.
Safety instructions for assembly

WARNING: Read, understand and obey these instructions carefully before you use the product.
- Remove the battery from the product before you assemble the product.
• Use approved protective gloves. - A defective or incorrect guard can cause injury. Do not use a cutting attachment that does not have an approved guard attached.
• Make sure that you assemble the cover and shaft correct before you start the product. - The drive disc and support flange must engage correctly in the centre hole of the cutting attachment. A cutting attachment that is attached incorrectly can cause injury or death.
• To operate the product safely and prevent injury to the operator or other persons, the product must always be attached correctly to the harness.
Safety instructions for maintenance
WARNING: Read the warning instructions that follow before you do maintenance on the product.
- Remove the battery before you do maintenance, other checks or assemble the product.
- The operator must only do the maintenance and servicing shown in this operator's manual. Turn to your servicing dealer for maintenance and servicing of a larger extension.
- Do not clean the battery or the battery charger with water. Strong detergent can cause damage to the plastic.
- If you do not do maintenance, it decreases the life cycle of the product and increases the risk of accidents.
- Special training is necessary for all servicing and repair work, especially for the safety devices on the product. If not all checks in this operator's manual are approved after you have done maintenance, turn to your servicing dealer. We guarantee that there are professional repairs and servicing available for your product.
Assembly
To assemble the J-handle

WARNING: The J-handle shall be attached to the loop handle if you intend to use the product with any of the metal cutting attachments recommended.
- Attach the J-handle to the loop handle with 3 screws.
natural_image
Technical line drawing of a mechanical clamp or tool assembly (no text or symbols)-
Adjust the product to a comfortable position.
-
Tighten the screws.

natural_image
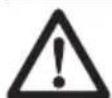
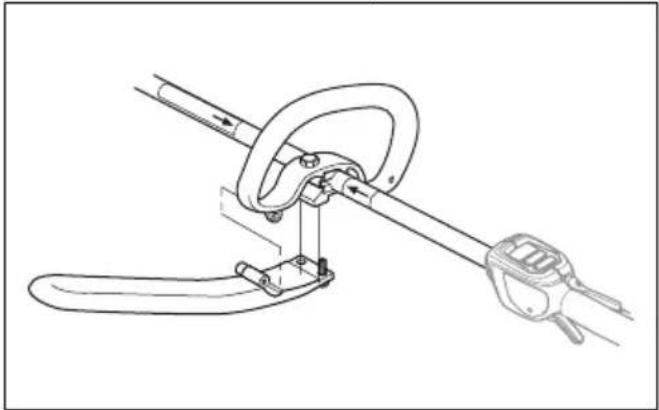
Line drawing of a manual tool with a loop handle and key inserted into a handle (no text or symbols)To install the harness support hook if applicable
- Install the harness support hook between the arrows on the rear handle and the loop handle.
natural_image
Line drawing of a rope knot securing a person's arm (no text or symbols)Note: Do not put the loop handle on the decal.
- Adjust the ring to make the product balanced, and easy to use.
To assemble the cutting equipment
The cutting equipment includes a cutting attachment and a cutting attachment guard.

WARNING: Use protective gloves.
WARNING: Always use the cutting attachment guard that is recommended for the cutting attachment. See Technical data on page 12.
WARNING: An incorrectly attached cutting attachment can result in injury or death.
Assembly of blades

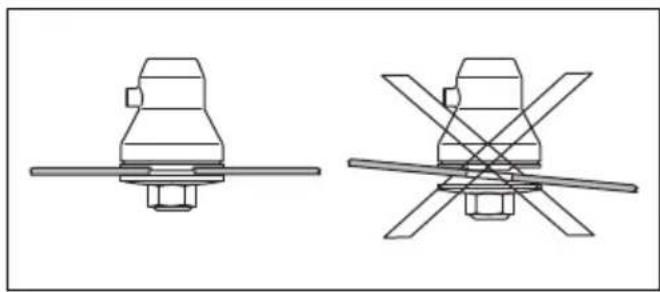
WARNING: When you install the cutting attachment it is very important that the raised section on the drive disc/support flange engages correctly in the centre hole of the cutting attachment. If the cutting attachment is install incorrectly it can result in serious and/or fatal personal injury.
natural_image
Technical line drawing of two mechanical components with cross-sectional views (no text or symbols)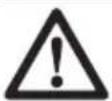
WARNING: Never use a cutting attachment without an approved guard. See the chapter on Technical data. If an incorrect or faulty guard, or the J-handle is missing when using metallic cutting attachment, is fitted this can cause serious personal injury.
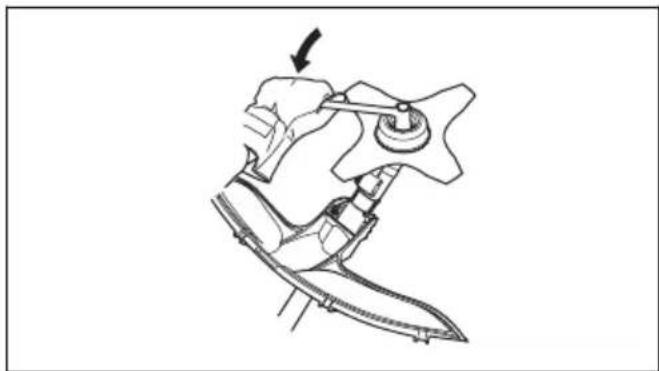
To attach the grass blade
- Put the gear of the product on a flat surface to make sure that the blade is assembled correctly.
- Turn the output shaft to align one of the holes in the drive disc (B) with the related hole in the gear housing.
- Put the locking pin (C) in the hole to lock the shaft.
- Put the grass blade (D), the support cup (E) and the support flange (F) on the output shaft.
- Make sure that the drive disc and support flange engages correctly in the center hole of the grass blade.

natural_image
Technical line drawing of two mechanical components with cross-sectional views (no text or symbols)-
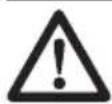
Attach the nut (G).
-
Tighten the nut with the socket wrench. Hold the shaft of the socket wrench near the blade guard. Tighten in the opposite direction to how the cutting attachment rotates. Tighten it to a torque of 35-50 Nm.
natural_image
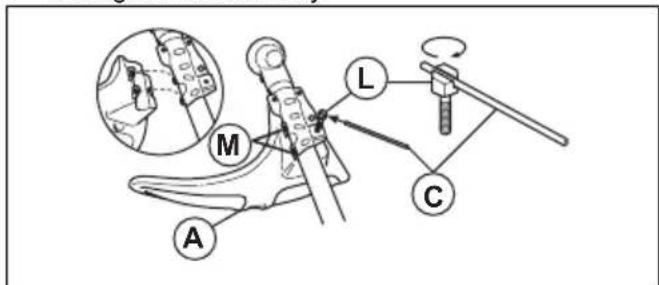
Technical line drawing of a mechanical component with an arrow indicating direction (no text or symbols)To attach the trimmer guard for a trimmer head
- Hang the trimmer guard (A) onto the two hooks on the plate holder (M).
- Bend the guard around the shaft and attach it with the bolt (L) on the opposite side of the shaft.
- Put the locking pin (C) in the groove on the bolt head and tighten the bolt fully.
Grass blade
- Use correctly sharpened blades. An incorrectly sharpened or damaged blade increases the risk of injury.
- Use correctly set blades. Correct blade set is 1 mm. An incorrectly set blade increases the risk of injury and damage.
- To sharpen and set the blade correctly, refer to the instructions that come with the blade.
To balance the product

WARNING: Always use the harness when you operate the product. The harness gives maximum control of the product and decrease the risk to become fatigued in your arms and back.
- Put on the harness.
- Connect the support hook of the product to the harness and keep the cutting attachment parallel with the ground.
- The product is correctly balanced when the blade is at cutting height near the ground.

natural_image
Illustration of a person using a handheld tool to measure a device (no text or symbols present)Operation
Introduction

WARNING: Read and understand the safety chapter before you use the product.
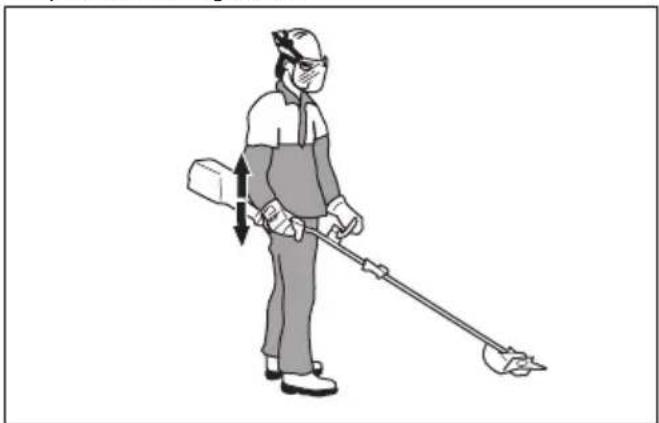
To adjust the harness
WARNING: Always attach this product to the harness correctly. If not, you cannot control the product safely and this can result in injury to you or others. Do not use a harness with a defective quick release.

WARNING: If an emergency occurs, let go of the harness and the product and let it fall to the ground.
- Put on the harness.
- Adjust the harness for the best work position.
- Adjust the harness until the cutting attachment is parallel to the ground.
natural_image
Illustration of a person in protective gear using a long-handled tool (no text or symbols present)- If the operation is to cut grass, let the cutting attachment stay lightly on the ground. Adjust the harness clamp to balance the product correctly.
Work position
• Hold the product with 2 hands.
- Hold the product on the right side of your body.
- Keep the cutting attachment below waist level.
- Keep body parts away from the hot surfaces.
- Keep body parts away from the cutting attachment.
Before you operate the product
- Examine the work area to make sure that you know the type of terrain, the slope of the ground and if there are obstacles such as stones, branches and ditches.
- Do an overhaul inspection of the product.
- Do the safety inspections, maintenance and servicing that are given in this manual.
- Make sure that all covers, guards, handles and the cutting equipment are correctly attached and not damaged.
- Make sure that there are no cracks at the bottom of the grass blade teeth or by the center hole of the blade. Replace the blade if it is damaged.
- Examine the support flange for cracks. Replace the support flange if it is damaged.

natural_image
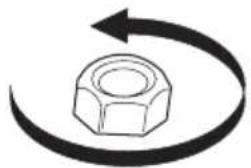
Simple line drawing of a circular component with a downward arrow pointing to its center (no text or symbols)• Make sure that the locknut can not be removed by hand. If you can remove it by hand, it does not lock
the cutting attachment sufficiently and you must replace it.
natural_image
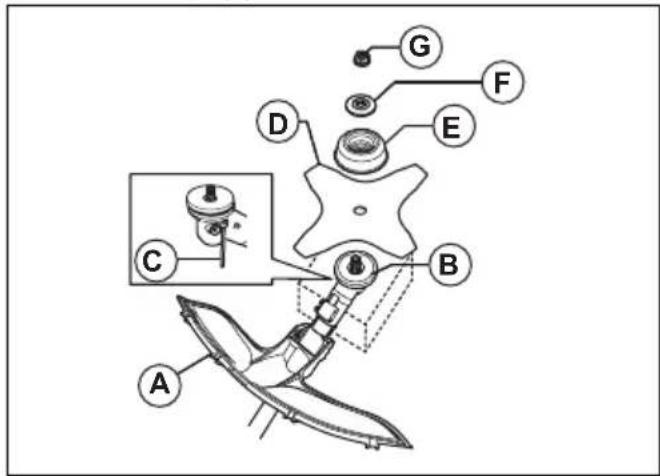
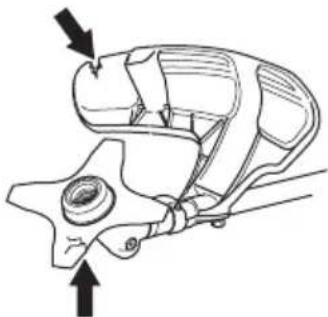
Simple line drawing of a hex nut with a curved arrow indicating rotation (no text or symbols)- Examine the blade guard for damages or cracks. Replace the blade guard if it has been hit or if it has cracks.
- Examine the trimmer head and cutting attachment guard for damages or cracks. Replace the trimmer head and cutting attachment guard if they have been hit or if they have cracks.
natural_image
Mechanical component diagram showing a lever and pivot mechanism (no text or labels)Blade thrust
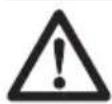
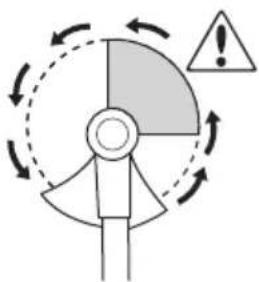
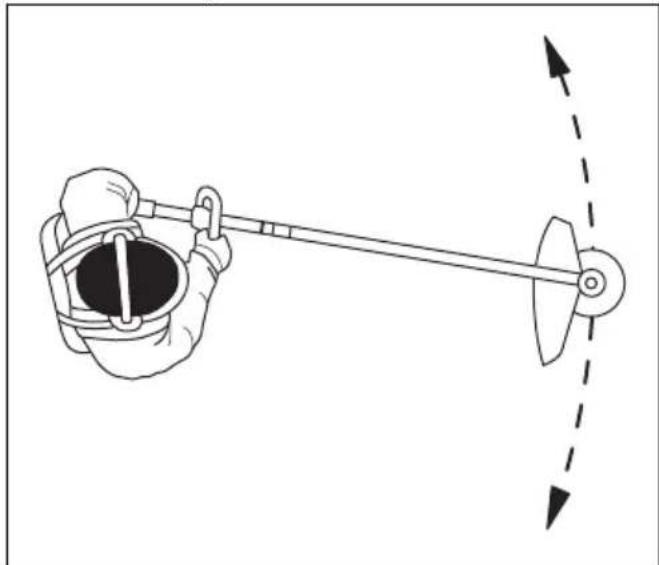
WARNING: A blade thrust is when the product moves to the side quickly and with force. A blade thrust occurs when the grass blade hits or catches on an object that cannot be cut. A blade thrust can eject the product or operator in all directions. There is a risk of injury to the operator and bystanders. The risk increases in areas where it is not easy to see the material that should be cut. Do not cut with the area of the blade that is shown in grey in the illustration. The speed and movement of the blade can cause blade thrust. The risk increases with the thickness of the stem that is cut.
natural_image
Diagram showing a person rotating around a wheel with directional arrows indicating rotation, and a warning symbol (no text or labels)Grass clearing with a grass blade
CAUTION: Do not use grass blades and grass knives on wood. Use grass blades and grass knives for long or heavy grass only.
- Move the product from side to side.
- Start the movement from right to left when you cut. Move the product to the right before you cut again.
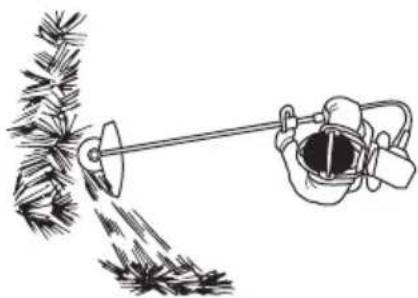
- Cut with the left side of the grass blade.
natural_image
Illustration of a manual sprinkler spraying water onto a pine branch (no text or symbols)- Tilt the grass blade to the left to make the grass fall in a line. This makes it easy to collect the grass.
- Keep a stable position with your feet apart.
- Move forward after each right movement and make sure that you have a stable position again before you cut again.
- Keep the support cup with a light pressure against the ground to make sure that the grass blade does not hit the ground.
- Obey these instructions to decrease the risk that cut material winds around the grass blade:
a) Apply full throttle.
b) Do not move the grass blade through cut material when you move the product from left to right.
- Before you collect the cut material, stop the engine and remove the product from the harness. Put the product down on the ground.
To clear grass with a grass blade
- Grass blades and grass cutters must not be used on woody stems.
- A grass blade is used for all types of tall or coarse grass.
- The grass is cut down with a sideways, swinging movement, where the movement from right-to-left is the clearing stoke and the movement from left-to-right is the return stoke. Let the left-hand side of the blade (between 8 and 12 o'clock) do the cutting.
- If the blade is angled to the left when clearing grass, the grass will collect in a line, which makes it easier to collect, e.g. by raking.
-
Try to work rhythmically. Stand firmly with your feet apart. Move forward after the return stoke and stand firmly again.
-
Let the support cup rest lightly against the ground. It is used to protect the blade from hitting the ground.
- Reduce the risk of material wrapping around the blade by always work at full speed and avoid the previously cut material during the return stroke.
- Stop the motor, unclip the harness and place the machine on the ground before you start to collect the cut material.
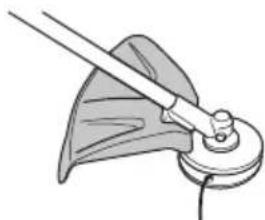
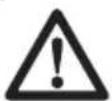
To cut the grass
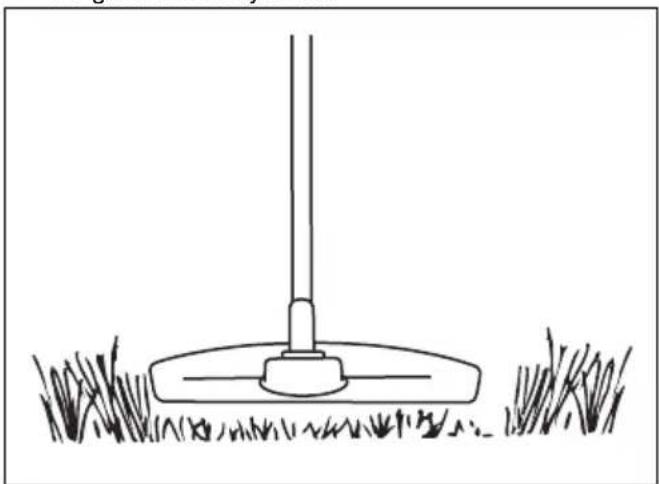
- Make sure that the grass trimmer line is parallel to the ground when you cut.
natural_image
Simple line drawing of a grassy field with a small utility pole and a flat support structure (no text or symbols)- Do not push the trimmer head to the ground. The ground and the product can be damaged.
-
Do not let the trimmer head touch the ground continuously, it can cause damage to the trimmer head.
-
Use full speed when you move the product from side to side to cut grass.
natural_image
Diagram of a hand holding a mechanical lever with a dashed arrow indicating motion direction (no text or symbols)Make sure that the grass trimmer line is parallel to the ground.
To sweep the grass
The airflow from the rotating trimmer cord can be used to remove cut grass from an area.
- Hold the trimmer head and its cord parallel to the ground and above the ground.
- Apply full speed.
- Move the trimmer head from side to side and sweep the grass.
WARNING: Clean the trimmer head cover each time you assemble new trimmer cord to prevent unbalance and vibrations in the handles. Also do a check of the other parts of the trimmer head and clean it if necessary.
Maintenance
Introduction

WARNING: Before you do any maintenance work you must read and understand the safety chapter.
Maintenance schedule

WARNING: Remove the battery before you do maintenance.
The following is a list of the maintenance steps that you must do on the product.
| Maintenance Daily Weekly Monthly | |||
| Clean the external parts of the product with a dry cloth. Do not use water. X | |||
| Make sure that the cutting attachment is not damaged. Replace the cutting attachment if it is damaged. | X | ||
| Make sure that the cutting attachment guard is not damaged. Replace the cutting attachment guard if it is damaged. | X | ||
| Make sure that the screws and nuts are tight. X | |||
| Check that the bevel gear is filled three-quarters full with lubricant. Fill if necessary using special grease. | X |
To sharpen the grass knife and grass blade

WARNING: Stop the engine. Use protective gloves.
• To sharpen the grass knife or grass blade correctly, refer to the instructions that come with the cutting attachment.
• Sharpen all edges equally to keep the balance.
- Use a single-cut flat file.

natural_image
Two diagrams showing a tool interacting with a shield-like shape, one with an arrow indicating direction (no text or symbols)
WARNING: Always discard a blade that is damaged. Do not try to make a bent or twisted blade straight and use it again.
Bevel gear
The bevel gear is filled to 34 with grease at the factory. Before use, make sure that the grease level has not changed. Use Husqvarna special grease if it is necessary to fill up. Do not change the grease in the bevel gear. Let servicing personnel do the repair of the bevel gear.
natural_image
Line drawing of a mechanical device with a knob inserted into a base, showing no text or symbols.Technical data
Technical data
| 325iLK + Brushcutter attachment BCA850 | |
| Motor | |
| Speed of output shaft, 1/min ^1 | 5800 |
| Weight | |
| Weight, kg 3.7+1.6 | |
| Cutting | |
| Cutting width, mm ∅ 255 | |
| Noise emissions ^2 | |
| Sound power level, measured dB (A) 95 | |
| Sound power level, guaranteed L_WA dB (A) 96 | |
| Noise levels ^3 | |
| Equivalent sound pressure level at the operator's ear, measured according to ISO 22868, dB (A): | |
| Equipped with trimmer head (original) 82 | |
| Vibration levels ^4 | |
| Vibration levels at handles, measured according to ISO 22867, m/s ^2 | |
| Equipped with trimmer blade (original), left/right 3.3/1.5 | |
Accessories
Accessories
| Approved Accessories with the BCA850 attachment Accessory type Cutting attachment | guard, art. no. | |
| Blade shaft thread M10 | ||
| Center hole in blades/cutters ∅ 25.4 mm | ||
| Grass blade/Grass cutter Grass blade 255-4, | 1" ( ∅ 255, 4 teeth) | 588 11 79-01 |
EC Declaration of conformity
Husqvarna AB, SE-561 82 Huskvarna, Sweden, tel: +46-36-146500, declares that the Bruschcutter attachment Husqvarna BCA850 with serial numbers dating from 2019 onwards (the year is clearly stated on the rating plate, followed by the serial number) together with the power head 325iLK comply with the requirements of the COUNCIL'S DIRECTIVE:
• of May 17, 2006 "relating to machinery" 2006/42/EC.
- of February 26, 2014 "relating to electromagnetic compatibility" 2014/30/EU.
- of May 8, 2000 "relating to the noise emissions in the environment" 2000/14/EC.
- of June 8, 2011 on the "restriction of use of certain hazardous substances in electrical and electronic equipment" 2011/65/EU
The following standards have been applied: IEC 62841-1:2014, EN ISO 11806-1:2011, EN 50581:2012
RISE SMP Svensk Maskinprovning AB, Box 7035, SE-750 07 Uppsala, Sweden, Box 7035, SE-750 07 Uppsala, Sweden, has carried out EC type examination in accordance with the machinery directive's (2006/42/EC) article 12, point 3b. The certificate has the number:
RISE SMP Svensk Maskinprovning AB has also verified agreement with appendix V of the council's directive 2000/14/EG. The certificate has the number: 01/1610/010
For information relating to noise emissions, Refer to Technical data on page 12.
Huskvarna

Pär Gustafsson, Development manager (Authorized representative for Husqvarna AB and responsible for technical documentation.)
Indhold
Indledning.... 15
Sikkerhed....16
Montering....20
Drift....22
Vedligeholdelse.... 24
natural_image
Line drawing of a helmet and safety goggles (no text or symbols)natural_image
Line drawing of a mechanical component or device with no visible text or symbolsnatural_image
Line drawing of glasses and binoculars (no text or symbols)natural_image
Line drawing of a pair of gloves with bandages and shaded areas (no text or symbols)natural_image
Line drawing of a pair of boots with visible tread pattern and buckles (no text or symbols)natural_image
Illustration of a mechanical tool interacting with a base (no text or symbols visible)natural_image
Technical line drawing of a mechanical clamp or tool assembly (no text or symbols)natural_image
Line drawing of a manual clamp tool interacting with a wire, showing no text or symbolsnatural_image
Line drawing of a rope knot securing a hanging hook (no text or symbols)natural_image
Technical line drawing of two mechanical components with cross-sectional views (no text or symbols)
natural_image
Technical line drawing of two mechanical components with cross-sectional views (no text or symbols)natural_image
Line drawing of a hand operating a mechanical device with a tool, no text or symbols presentGræsklinge
natural_image
Illustration of a person wearing a helmet and gloves, holding a long-handled tool (no text or symbols present)Drift
Indledning

natural_image
Illustration of a person wearing protective gear and holding a long-handled tool (no text or symbols)natural_image
Simple line drawing of a circular ring with a downward arrow pointing to its center (no text or symbols)natural_image
Simple line drawing of a hexagonal nut with a curved arrow indicating rotation or cycle (no text or symbols)natural_image
Mechanical component diagram showing a valve assembly with two arrows indicating direction (no text or labels)Kickback

natural_image
Diagram of a wind turbine blade with directional arrows indicating rotation and warning symbol (no text or labels)natural_image
Illustration of a person watering a pine tree with a tool (no text or symbols)natural_image
Simple line drawing of a grassy field with a vertical pole and base, no text or symbols present.natural_image
Diagram of a hand holding a mechanical lever with a dashed arrow indicating direction (no text or symbols)natural_image
Two diagrams showing a tool interacting with a shield-like object, one with an arrow indicating direction (no text or symbols)
natural_image
Line drawing of a mechanical device with a base and pivot point, no text or symbols presentTekniske data
Tekniske data
natural_image
Line drawing of a helmet with visor and clasp (no text or symbols)natural_image
Line drawing of a mechanical component or device with no visible text or symbolsnatural_image
Line drawings of eyeglasses and binoculars (no text or symbols)natural_image
Line drawing of two gloves with bandages and shaded areas, no text or symbols presentnatural_image
Line drawing of a pair of boots with visible tread pattern and shoulder clips (no text or symbols)natural_image
Illustration of a mechanical clamp or lever assembly (no text or symbols)natural_image
Technical line drawing of a mechanical clamp or tool assembly (no text or symbols)natural_image
Line drawing of a manual clamp tool interacting with a wire (no text or symbols)natural_image
Simple line drawing of a rope knot securing a curved cable (no text or symbols)natural_image
Technical line drawing of two mechanical components with cross-sectional views (no text or symbols)
natural_image
Technical line drawing of two mechanical components with cross-sectional views (no text or symbols)natural_image
Technical line drawing of a mechanical component with an arrow indicating direction (no text or symbols)Grasklinge
natural_image
Illustration of a person wearing protective gear and using a long-handled tool (no text or symbols)Betrieb
Einleitung

natural_image
Illustration of a person wearing protective gear and holding a long-handled tool (no text or symbols)natural_image
Simple line drawing of a circular object with a downward arrow pointing to its center (no text or symbols)natural_image
Simple line drawing of a hexagonal nut with a curved arrow indicating rotation (no text or symbols)natural_image
Mechanical component diagram showing a valve assembly with two arrows indicating direction (no text or symbols present)Klingenstoß
natural_image
Diagram of a wind turbine blade with directional arrows indicating rotation and warning symbol (no text or labels)natural_image
Illustration of a manual sprinkler spraying water onto a pine tree (no text or symbols)natural_image
Simple line drawing of a grassy field with a small utility pole and a flat support structure (no text or symbols)natural_image
Diagram of a hand holding a circular object with a long rod, connected to a rotating wheel with an arrow indicating direction (no text or symbols)natural_image
Two diagrams showing a tool interacting with a shield-like object, one with an arrow indicating direction (no text or symbols)Winkelgetriebe
natural_image
Line drawing of a mechanical device with a lever and base, no text or symbols present
natural_image
Line drawing of a helmet and gear assembly (no text or symbols)natural_image
Line drawing of a mechanical component or device (no text or symbols)natural_image
Line drawing of a mechanical component or bracket (no text or symbols)natural_image
Line drawing of two human gloves showing different grip positions (no text or symbols)natural_image
Line drawing of a pair of boots with visible tread pattern and buckles (no text or symbols)natural_image
Illustration of a mechanical clamp or lever assembly (no text or symbols)natural_image
Technical line drawing of a mechanical clamp or tool assembly (no text or symbols)natural_image
Line drawing of a manual tool with a handle and lever mechanism (no text or symbols)natural_image
Line drawing of a rope knot securing a curved cable (no text or symbols)natural_image
Technical line drawing of two mechanical components with cross-sectional views (no text or symbols)
natural_image
Technical line drawing of two mechanical components with cross-sectional views (no text or symbols)natural_image
Technical line drawing of a mechanical component with an arrow indicating direction (no text or symbols)Hoja de hierba
natural_image
Illustration of a person wearing protective gear and using a long-handled tool (no text or symbols)Funcionamiento
Introducción

natural_image
Illustration of a person wearing protective gear and holding a long-handled tool, with no visible text or symbols.natural_image
Simple line drawing of a circular component with a downward arrow pointing to its center (no text or symbols)natural_image
Diagram of a hex nut with a curved arrow indicating rotational motion (no text or symbols)natural_image
Technical line drawing of a mechanical component with arrows indicating direction (no text or symbols)Lanzada de hoja

natural_image
Diagram of a wind turbine blade with directional arrows indicating rotation and warning symbol (no text or labels)natural_image
Illustration of a hand watering a pine tree with a watering can (no text or symbols)natural_image
Simple line drawing of a grassy field with a vertical pole and base, no text or symbols presentnatural_image
Diagram of a hand holding a circular object with a connecting rod, connected to a rotating wheel (no text or symbols)natural_image
Two diagrams showing a tool interacting with a shield-like object, one with an arrow indicating direction (no text or symbols)
natural_image
Line drawing of a mechanical device with a knob and base, showing a hand operating the knob (no text or symbols present)Datos técnicos
Datos técnicos
natural_image
Line drawing of a helmet and gear assembly (no text or symbols)natural_image
Line drawing of a mechanical component or device with no visible text or symbolsnatural_image
Line drawing of a mechanical component or device with no visible text or symbolsnatural_image
Line drawing of two human gloves showing different grip positions (no text or symbols)natural_image
Line drawing of a pair of boots with visible tread pattern and buckles (no text or symbols)natural_image
Illustration of a mechanical component with a lever and base (no text or symbols)natural_image
Technical line drawing of a mechanical clamp or tool assembly (no text or symbols)natural_image
Line drawing of a manual tool with a handle and lever mechanism (no text or symbols)natural_image
Line drawing of a rope knot with a loop securing a person's arm (no text or symbols)natural_image
Technical line drawing of two mechanical components with cross-sectional views (no text or symbols)
natural_image
Technical line drawing of two mechanical components with cross-sectional views (no text or symbols)natural_image
Technical line drawing of a mechanical component with an arrow indicating direction (no text or symbols)natural_image
Illustration of a person wearing a mask and gloves, holding a long-handled tool (no text or symbols present)Käyttö
Johdanto

natural_image
Illustration of a person wearing protective gear and holding a long-handled tool (no text or symbols)natural_image
Simple line drawing of a circular ring with a downward arrow pointing to its center (no text or symbols)natural_image
Simple line drawing of a hexagonal nut with a curved arrow indicating rotation or cycle (no text or symbols)natural_image
Technical line drawing of a mechanical component with arrows indicating direction (no text or symbols)Takapotku

natural_image
Diagram of a mechanical or electrical component with directional arrows and a warning symbol (no text or labels)natural_image
Illustration of a hand watering pine branches with a tool (no text or symbols)natural_image
Simple line drawing of a grassy field with a vertical pole and base, no text or symbols present.natural_image
Diagram of a hand holding a circular object with a string, connected to a rotating wheel (no text or symbols)natural_image
Two diagrams showing a tool interacting with a shield-like shape, one with an arrow indicating direction (no text or symbols)
natural_image
Line drawing of a mechanical device with a knob and lever, no text or symbols presentTekniset tiedot
Tekniset tiedot
natural_image
Line drawing of a helmet with visor and clasp (no text or symbols)natural_image
Line drawing of a mechanical component or bracket (no text or symbols)natural_image
Line drawing of a mechanical component or bracket (no text or symbols)natural_image
Line drawing of two gloves with bandages and palm, no text or symbols presentnatural_image
Line drawing of a pair of boots with visible tread pattern and buckles (no text or symbols)natural_image
Diagram of a mechanical clamp or lever assembly (no text or symbols visible)natural_image
Technical line drawing of a mechanical clamp or tool assembly (no text or symbols)natural_image
Line drawing of a manual tool with a handle and lever mechanism (no text or symbols)natural_image
Line drawing of a rope knot securing a person's arm (no text or symbols)natural_image
Technical line drawing of two mechanical components with cross-sectional views (no text or symbols)
natural_image
Technical line drawing of two mechanical components with cross-sectional views (no text or symbols)natural_image
Technical line drawing of a mechanical device with a lever and handle (no text or symbols)Lame de désherbage
natural_image
Illustration of a person wearing protective gear and holding a long-handled tool (no text or symbols)Utilisation
Introduction

natural_image
Person wearing protective gear and holding a long-handled tool, no text or symbols visiblenatural_image
Simple line drawing of a circular component with a downward arrow pointing to its center (no text or symbols)natural_image
Diagram of a hex nut with a curved arrow indicating rotational motion (no text or symbols)natural_image
Technical line drawing of a mechanical component with two arrows indicating direction (no text or symbols)Rebond de la lame

natural_image
Diagram of a wind turbine blade with directional arrows indicating rotation and warning symbol (no text or labels)natural_image
Illustration of a hand pouring water from a tree branch into a pipe (no text or symbols)natural_image
Simple line drawing of a grassy field with a small utility pole and base (no text or symbols)natural_image
Diagram of a hand holding a hanging object with a dashed arrow indicating direction (no text or symbols)natural_image
Two diagrams showing a tool interacting with a shield-like object, one with an arrow indicating direction (no text or symbols)
natural_image
Line drawing of a mechanical device with a lever and base, no text or symbols presentnatural_image
Line drawing of a helmet and gear assembly (no text or symbols)natural_image
Line drawing of a mechanical component or device (no text or symbols)natural_image
Line drawing of a mechanical component or bracket (no text or symbols)natural_image
Line drawing of two different types of gloves, one with bandages and the other with a curved handle (no text or symbols)natural_image
Line drawing of a pair of boots with visible branding (no text or symbols)natural_image
Illustration of a mechanical clamp or lever assembly (no text or symbols)natural_image
Line drawing of a manual clamp tool interacting with a tool, showing mechanical components and motion arrows (no text or symbols)natural_image
Line drawing of a manual clamp tool interacting with a wire (no text or symbols)natural_image
Line drawing of a rope knot securing a person's arm (no text or symbols)natural_image
Technical line drawing of two mechanical components with cross-sectional views (no text or symbols)
natural_image
Technical line drawing of two mechanical components with cross-sectional views (no text or symbols)natural_image
Line drawing of a mechanical device with a lever and handle, no text or symbols presentnatural_image
Illustration of a person wearing protective gear and using a long-handled tool (no text or symbols)Utilizzo
Introduzione
natural_image
Illustration of a person wearing protective gear and holding a long-handled tool, with no visible text or symbols.natural_image
Simple line drawing of a circular ring with a downward arrow pointing to its center (no text or symbols)natural_image
Diagram of a hex nut with a curved arrow indicating rotational motion (no text or symbols)natural_image
Technical line drawing of a mechanical component with arrows indicating direction (no text or symbols)Spinta della lama
natural_image
Diagram of a wind turbine blade with directional arrows indicating rotation and warning symbol (no text or labels)natural_image
Illustration of a person watering pine branches with a tool (no text or symbols)natural_image
Simple line drawing of a grassy field with a small utility pole and a flat support structure (no text or symbols)natural_image
Diagram of a hand holding a mechanical lever with a rotating wheel, showing motion direction (no text or symbols)natural_image
Diagram showing two mechanical components with arrows indicating motion, no text or symbols present
natural_image
Line drawing of a mechanical device with a knob and base, showing a curved component inserted into a circular base (no text or symbols)Dati tecnici
Dati tecnici
natural_image
Line drawing of a helmet with visor and seat (no text or symbols)natural_image
Line drawing of a mechanical component or device (no text or symbols)natural_image
Line drawing of a mechanical component or bracket (no text or symbols)natural_image
Line drawing of two types of gloves with bandages and straps (no text or symbols)natural_image
Line drawing of a pair of boots with visible branding and sole details (no text or symbols)natural_image
Illustration of a mechanical clamp or lever assembly (no text or symbols)natural_image
Technical line drawing of a mechanical clamp or tool assembly (no text or symbols)natural_image
Line drawing of a manual tool with a handle and clasp, no text or symbols presentnatural_image
Line drawing of a rope knot securing a person's arm (no text or symbols)natural_image
Technical line drawing of two mechanical components with cross-sectional views (no text or symbols)
natural_image
Technical line drawing of two mechanical components with cross-sectional views (no text or symbols)natural_image
Technical line drawing of a mechanical component with an arrow indicating direction (no text or symbols)Grasmaaiblad
natural_image
Illustration of a person wearing protective gear and holding a long-handled tool (no text or symbols)Werking
Inleiding

natural_image
Illustration of a person wearing protective gear and holding a long-handled tool, with no visible text or symbols.natural_image
Simple line drawing of a circular component with a downward arrow pointing to its center (no text or symbols)natural_image
Diagram of a hex nut with a curved arrow indicating rotational motion (no text or symbols)natural_image
Technical line drawing of a mechanical component with two arrows indicating direction (no text or symbols)Terugslag

natural_image
Diagram showing a rotating wheel with directional arrows and a warning symbol (no text or labels)natural_image
Illustration of a person watering pine branches with a watering can (no text or symbols)natural_image
Simple line drawing of a grassy field with a vertical pole and base, no text or symbols presentnatural_image
Diagram of a hand holding a mechanical lever with a dashed arrow indicating motion direction (no text or symbols)natural_image
Two diagrams showing a tool interacting with a shield-like shape, one with an arrow indicating direction (no text or symbols)
natural_image
Line drawing of a mechanical device with a knob and base, showing a hand operating the knob (no text or symbols)Hoekoverbrenging
- Bruksanvisning
- Vinkelgir
- Hull for läsepinne
- Gressklinge
- Beskyttelse for skjæreutstyr
6.4 mm sekskant - Riggrør
-
Låsepinne
-
Opphengskrok for sele
- Sele
- Låsemutter
- Støtteflens
- Støttekopp
- Medbringer
- J-håndtak
- Transportbeskyttelse
natural_image
Line drawing of a helmet with visor and clasp (no text or symbols)natural_image
Line drawing of a mechanical component or device (no text or symbols)natural_image
Line drawing of a mechanical component or bracket (no text or symbols)natural_image
Line drawing of two human gloves with bandages and shaded areas (no text or symbols)natural_image
Line drawing of a pair of boots with visible tread pattern and sole (no text or symbols)natural_image
Illustration of a mechanical clamp or lever assembly (no text or symbols)natural_image
Technical line drawing of a mechanical clamp or tool being adjusted, showing handle and grip assembly (no text or symbols)natural_image
Line drawing of a mechanical clamp or clamping tool interacting with a tool, showing no text or symbols.Slik monterer du opphengskroken for sele hvis aktuelt
natural_image
Line drawing of a rope knot securing a person's arm (no text or symbols)natural_image
Technical line drawing of two mechanical components with cross-sectional views (no text or symbols)
natural_image
Technical line drawing of two mechanical components with cross-sectional views (no text or symbols)natural_image
Technical line drawing of a mechanical component with an arrow indicating direction (no text or symbols)Slik festes trimmerskjermen for et trimmerhode
Gressklinge
natural_image
Illustration of a person wearing protective gear and using a long-handled tool (no text or symbols)Drift
Innledning

ADVARSEL: Les og forstå kapittelet om sikkerhet før du bruker produktet.
Slik justerer du selen

ADVARSEL: Fest alltid dette produktet til selen på riktig måte. Hvis det ikke er gjort, kan du ikke kontrollere produktet på en trygg måte, og dette kan føre til skader på deg eller andre. Ikke bruk en sele med feil på hurtigutløseren.
ADVARSEL: Hvis en nødssituasjon oppstår, slipper du produktet og lar det falle til bakken.
natural_image
Illustration of a person wearing protective gear and holding a long-handled tool (no text or symbols)natural_image
Simple line drawing of a circular ring with a downward arrow pointing to its center (no text or symbols)natural_image
Simple line drawing of a hexagonal nut with a curved arrow indicating rotation or cycle (no text or symbols)natural_image
Technical line drawing of a mechanical component with arrows indicating assembly or force direction (no text or symbols)Klingekast
natural_image
Diagram of a wind turbine blade with directional arrows indicating rotation and warning symbol (no text or labels)natural_image
Illustration of a hand watering a pine tree with a tool (no text or symbols)natural_image
Simple line drawing of a grassy field with a vertical pole and base, no text or symbols present.- Ikke dytt trimmerhodet ned i bakken. Bakken og produktet kan bli skadet.
-
Ikke la trimmerhodet berøre bakken kontinuerlig, det kan føre til skade på trimmerhodet.
-
Bruk fullt turtall när du beveger produktet fra side til side for å klippe gress.
natural_image
Diagram of a hand holding a mechanical lever with a dashed arrow indicating direction (no text or symbols)natural_image
Two diagrams showing a tool interacting with a shield-like object, one with an arrow indicating direction (no text or symbols)
natural_image
Line drawing of a mechanical device with a knob and base, no text or symbols presentTekniske data
Tekniske data
natural_image
Line drawing of a helmet and safety goggles (no text or symbols)natural_image
Line drawing of a mechanical component or device with no visible text or symbolsnatural_image
Line drawing of a mechanical component or bracket (no text or symbols)natural_image
Line drawing of two gloves showing different grip positions (no text or symbols)natural_image
Line drawing of a boots with visible tread pattern and buckles (no text or symbols)natural_image
Illustration of a mechanical tool interacting with a curved component (no text or symbols)natural_image
Technical line drawing of a mechanical clamp or tool being adjusted, showing handle and grip assembly (no text or symbols)natural_image
Line drawing of a manual tool with a clamp and handle, no text or symbols presentnatural_image
Line drawing of a rope knot securing a person's arm (no text or symbols)natural_image
Technical line drawing of two mechanical components with cross-sectional views (no text or symbols)
natural_image
Technical line drawing of two mechanical components with cross-sectional views (no text or symbols)natural_image
Line drawing of a mechanical device with a lever and handle, no text or symbols presentLâmina de relva
natural_image
Illustration of a person wearing protective gear and using a long-handled tool (no text or symbols)Funcionamento
Introdução
natural_image
Illustration of a person wearing protective gear and holding a long-handled tool, with no visible text or symbols.natural_image
Simple line drawing of a circular ring with a downward arrow pointing to its center (no text or symbols)natural_image
Simple line drawing of a hex nut with a curved arrow indicating rotation (no text or symbols)natural_image
Technical line drawing of a mechanical component with arrows indicating assembly or force direction (no text or symbols)Arremesso da lâmina

natural_image
Diagram of a wind turbine blade with directional arrows indicating rotation and warning symbol (no text or labels)natural_image
Illustration of a hand watering a pine tree with a watering can (no text or symbols)natural_image
Simple line drawing of a grassy field with a small utility pole and a flat support structure (no text or symbols)natural_image
Diagram of a hand holding a circular object with a string, connected to a rotating wheel (no text or symbols)natural_image
Two diagrams showing a tool interacting with a shield-like shape, one with an arrow indicating direction (no text or symbols)
natural_image
Line drawing of a mechanical device with a lever and base, no text or symbols presentnatural_image
Line drawing of a helmet with a visor and cap (no text or symbols)natural_image
Line drawing of a pair of mechanical components or parts, possibly a pump or clamp device (no text or symbols)natural_image
Line drawing of glasses and a pair of eyeglasses (no text or symbols)natural_image
Line drawing of a human hand with bandages and fingers, no text or symbols presentnatural_image
Line drawing of a pair of boots with visible tread and buckles (no text or symbols)natural_image
Illustration of a mechanical clamp or lever assembly (no text or symbols)natural_image
Technical line drawing of a mechanical clamp or tool assembly (no text or symbols)natural_image
Line drawing of a manual clamp tool with a handle and clasp (no text or symbols)natural_image
Line drawing of a rope knot with a loop securing a handle (no text or symbols)natural_image
Technical line drawing of two mechanical components with cross-sectional views (no text or symbols)
natural_image
Technical line drawing of two mechanical components with cross-sectional views (no text or symbols)natural_image
Technical line drawing of a mechanical device with an arrow indicating direction (no text or symbols)Gräsklinga
natural_image
Illustration of a person wearing protective gear and holding a long tool, no text or symbols presentDrift
Introduktion

natural_image
Illustration of a person wearing protective gear and holding a long-handled tool, with no visible text or symbols.natural_image
Simple line drawing of a circular component with a downward arrow pointing to its center (no text or symbols)natural_image
Simple line drawing of a hexagonal nut with a curved arrow indicating rotation or cycle (no text or symbols)natural_image
Mechanical assembly diagram showing a valve or connector with directional arrows indicating movement (no text or symbols present)Kast

natural_image
Diagram of a mechanical or electrical component with directional arrows and a warning symbol (no text or labels)natural_image
Illustration of a manual sprinkler spraying water onto a pine tree (no text or symbols)natural_image
Simple line drawing of a grassy field with a vertical pole and base, no text or symbols presentnatural_image
Diagram of a hand holding a mechanical lever with a dashed arrow indicating motion direction (no text or symbols)natural_image
Two diagrams showing a tool interacting with a shield-like object, one with an arrow indicating direction (no text or symbols)