One Air+ Spring - Electric scooter Vermeiren - Free user manual and instructions
Find the device manual for free One Air+ Spring Vermeiren in PDF.

| Product type | Class A electric scooter |
| Brand | Vermeiren |
| Model | One Air+ Spring |
| Maximum user weight | 136 kg |
| Total weight | 42.35 kg |
| Dimensions (L x W x H) | 1030 x 490 x 880 mm |
| Ground clearance | 35 mm |
| Minimum turning diameter | 1150 mm |
| Battery type | Lithium 24 V DC, 20 Ah |
| Range | 26 km |
| Maximum forward speed | 6 km/h |
| Nominal gradient | 8° |
| Maximum obstacle clearance | 45 mm |
| Tire pressure | 3.5 bar |
| Seat height (adjustable) | 525 - 570 mm |
| Brakes | Electromagnetic |
| Motor | 270 W nominal |
| Protection rating | IPX5 |
| Operating and storage temperature | +5°C to +41°C |
| Assembly / Disassembly | Tool-free into 4 main parts |
| Maintenance | Clean with damp cloth, annual check by dealer |
| Safety | Anti-tip, thermal fuse, parking brake |
| Spare parts | Original Vermeiren accessories and parts |
| Expected service life | 5 years under normal use |
Frequently Asked Questions - One Air+ Spring Vermeiren
User questions about One Air+ Spring Vermeiren
0 question about this device. Answer the ones you know or ask your own.
Ask a new question about this device
Download the instructions for your Electric scooter in PDF format for free! Find your manual One Air+ Spring - Vermeiren and take your electronic device back in hand. On this page are published all the documents necessary for the use of your device. One Air+ Spring by Vermeiren.
USER MANUAL One Air+ Spring Vermeiren
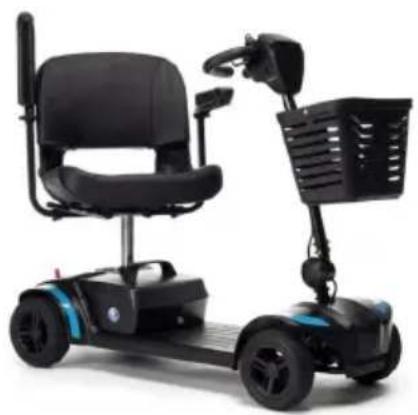
natural_image
Black electric scooter with open lid and blue accents, no visible text or symbolsContents
EN
Preface 4
1. Your product 6
1.1. Options 7
2. Before use 7
2.1. Intended use and indications 7
2.2. Safety instructions and applicable risks 8
2.3. Symbols on the scooter 9
2.4. Transport 10
2.5. Assembly/Disassembly 11
2.6. First use and storage 13
3. Using your scooter 14
3.1. First ride 14
3.2. Operating your scooter 15
3.3. Transfer in and out of the scooter 19
3.4. Brake and free-wheel lever 19
3.5. Comfort adjustments 20
3.6. Battery status and charging 23
3.7. Thermal fuses 25
3.8. Anti-tipping 26
4. Maintenance 26
4.1. Points of maintenance 26
4.2. Maintenance instructions 27
4.3. Expected lifespan 28
4.4. Reuse 29
4.5. End of use 29
4.6. Warranty 29
5. Troubleshooting 29
6. Technical specifications 31
Preface
Congratulations! You are now owner of a Vermeiren scooter!
This scooter is made by qualified and committed personnel. It is designed and produced according to high quality standards guarded by Vermeiren.
Thank you for your trust in the products of Vermeiren. To support you on the use of this scooter and its operating options, this manual is offered. Please read it carefully; it will help you to get familiar with the operation, capabilities and limitations of your product.
If you still have questions after reading this manual, do not hesitate to contact your specialist dealer. He/she will be glad to help you.
Important note
To ensure your safety, and to prolong the lifetime of your product, please take good care of it and have it checked and serviced on a regular basis.
This manual reflects the latest product developments. Vermeiren has the right to implement changes to this type of product without any obligation to adapt or replace similar products previously delivered.
Pictures are used to clarify the instructions in this manual. Details of the depicted product may deviate from your product.
Information available
On our website http://www.vermeiren.com/ you will always find the most recent version of the information in this manual. Please consult this website regularly for possible updates.
Visually impaired people can download the electronic version of this manual and have it read out by means of a text-to-speech software application.
 | User manualFor user and specialist dealer |
 | User manual of battery chargerFor user and specialist dealer |
 | Service manual for scootersFor specialist dealer |
 | EC declaration of conformity |
1. Your product
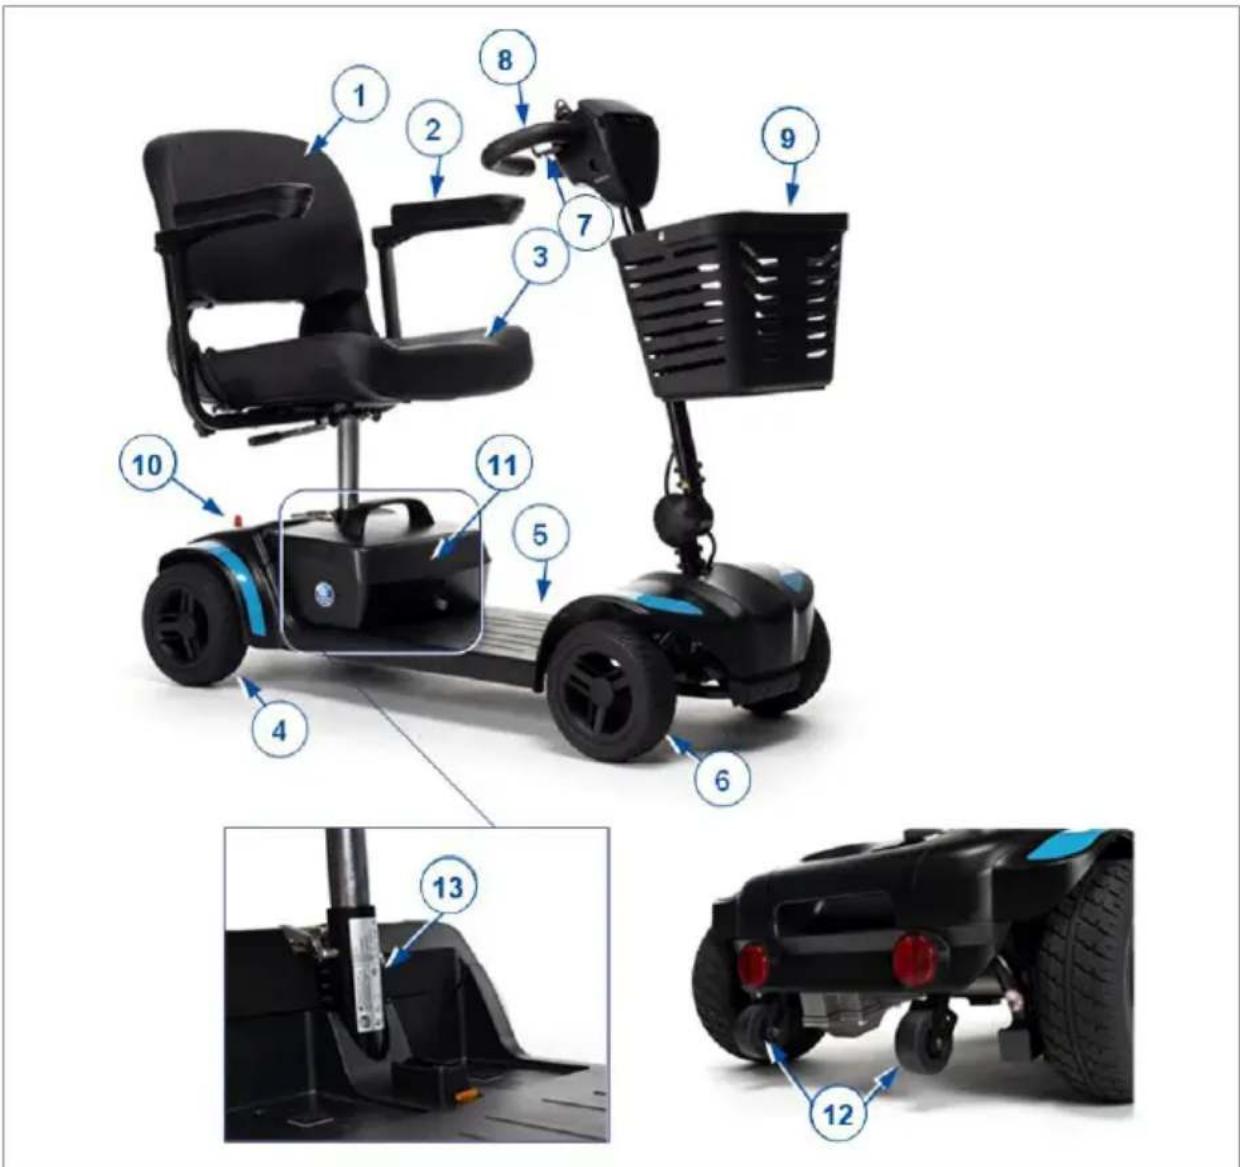
- Backrest
- Armrest / Arm pad
- Seat
- Rear wheels
- Footplate
- Front wheels
- Speed lever
- Handgrips
- Basket
- Free-wheel lever
- Battery
- Anti-tipping
- Identification plate
1.1. Options
Contact your specialist dealer about options. He will gladly advise you.
2. Before use
2.1. Intended use and indications
• This product is a medical device.
- Indications and contraindications: The scooter is operated by the user himself. It is intended to transport elderly people and people with reduced walking abilities. You should NOT use this scooter if you suffer from physical or mental impairments that may put you, or other people, in danger when driving the scooter, such as; visual impairment, mental disorder, or loss of function in both arms. For this reason, consult your physician first and make sure that your specialist dealer is informed about his advice.
• This scooter is classified as a class A product and is suitable for outdoor use. - This scooter is designed and produced solely to transport one (1) person with a maximum weight of 136kg. It is not designed to transport goods or objects, or for any other use than the transport previously described.
- Only use accessories and spare parts approved by Vermeiren.
- Please read all technical details and limits of your scooter in chapter 6..
- The warranty on this product is based on normal use and maintenance as described in this manual. Damage to your product caused by improper use or lack of maintenance will cause the warranty to lapse.
2.2. Safety instructions and applicable risks
CAUTION
Risk of injuries and/or damage
- Carefully read and follow the instructions in this manual. Otherwise you may get injured on your scooter may get damaged.
Keep the following general warnings in mind during use:
- Do not use your scooter if you are under the influence of alcohol, medicines or other substances that may influence your driving abilities.
- Be aware that some parts of your scooter may get very hot or cold due to ambient temperature, solar radiation, heating devices or due to the motor drive during the ride. Be careful when touching. Wear protective clothing if the weather is cold. After a ride, wait until the scooter/motor has cooled down.
- Before switching the scooter on, be aware of the environment/situation in which you are located. Adjust your speed to this before driving off. We advise you to use the slowest speed setting to drive indoors. For outdoor driving you can adjust the speed to a suitable speed at which you feel comfortable and safe.
- ALWAYS keep in mind that your scooter may stop suddenly due to a discharged battery or a protection that prevents your scooter from further damage. Also check the causes mentioned in chapter 5..
- Your scooter has been tested for electromagnetic compatibility and complies with the standard. Nevertheless, sources of electromagnetic fields, such as the fields of mobile phones, power generators or high-power energy sources, may influence the driving performance of your scooter. On the other hand, the electronics of your scooter may affect other electronic appliances as well, such as alarm systems of shops and automatic doors. We therefore advise you to check your scooter regularly for damage and wear, since these may enlarge the interference (see also chapter 4.).
• Only drive on flat surfaces where all four wheels touch the ground and where there is
sufficient contact to operate the scooter safely.
- Make sure that your hands, clothes, belts, buckles or jewellery don't get caught by wheels or other moving parts during use.
Any serious incident [MDR (EU) 2017/745 §2 (65)] that has occurred in relation to the device should be reported to the manufacturer and the competent authority of the Member State in which the user and/or patient is established.
2.3. Symbols on the scooter
 | Type designation |
 | Catalogue number |
 | Serial number |
 | Medical device |
 | Manufacturer |
 | Date of manufacture |
 | Declaration of conformity |
 | Attention: important information |
 | It is advised to read the manual |
 | Risk of entrapment |
 | For indoor use only |
 | Maximum weight of the user in kg |
 | Maximum safe slope in ° (degrees). |
 | Not intended to be used as a seat in a motor vehicle |
 | Maximum speed |
 | Maximum basket load |
2.4. Transport
2.4.1. Moving the scooter
The best way to move the scooter is to make use of the neutral mode, see §3.4.. Place the scooter in neutral and roll the scooter to the desired place.
If this is not possible, you can carry the scooter according to the following steps:
- Switch the scooter off.
- Remove loose parts and options.
- Store loose parts in a safe place.
- Carry the frame + steering unit with 2 or 3 persons to the desired place. Hold the frame to the chassis or fixed parts of the frame, not the bumpers or the plastic parts.
2.4.2. Transport by vehicle, as luggage
WARNING
Risk of injuries and damage
- Do NOT use your scooter as a seat in a vehicle.
- Remove all loose parts prior to transportation.
- There should be no people or objects under the scooter, on the footplate or on the seat during transportation.
- Make sure that the scooter is attached properly to avoid injury of the passengers during collision or sudden braking.
- Do not place fingers between the components of the scooter.
The best way to transport your scooter in the car is to drive the scooter in the car using ramps. If you are not experienced to drive the scooter on ramps, you can also put the scooter in neutral mode and push it in the car using ramps.
When the scooter does not fit in the car, it is also possible to transport the scooter according to the following steps:
- Disassemble the scooter (see §2.5.).
- Place all parts of the scooter in the car.
- Attach the frame and other parts of the scooter securely to the vehicle.
2.4.3. Transport by airplane, as luggage
One, One Air+ and One Air+ LED can be transported by airplane as a whole, or disassembled.
Since One Air+ Spring is equipped with a lithium battery, it is not possible to transport this scooter by airplane. If you still consider doing so, consult your airline before booking your flight. It is possible to transport your scooter by airplane without battery and to buy a new battery at the place of arrival. Contact your specialist dealer for this matter.
2.5. Assembly/Disassembly
CAUTION
Risk of injuries
- Turn the scooter off before disassembly / assembly.
- Keep fingers away from moving parts of the scooter.
The scooter can be disassembled into four main pieces without any tools: the seat, the front frame, the rear frame, and the battery housing.

natural_image
Exterior view of a black electric scooter with blue accents and internal components, shown with a close-up inset showing the interior compartment (no text or symbols visible)2.5.1. Assembly upon delivery
To assemble the scooter upon delivery:
- Take all parts of the scooter out of the packaging.
- Fold the steering column up and tighten into place (see §3.5.1.).
- Mount the shopping basket.
- Place the seat support in the desired seat height (see §3.5.2.).
- Mount the seat (see §3.5.2.) and fold the backrest up. Make sure it is securely fixed into place.
- Mount the armrests and tighten them into place with the star knobs (see §3.5.3.).
- Mount the battery pack.
- To change the colour accents, pull off the coloured plates and replace with the desired colour. A patch of Velcro holds them into place.
- Place the freewheel lever in drive mode (see §3.4.).
2.5.2. Assembly/Disassembly
2.5.2.1. Disassembly
- Switch the scooter off, remove the key and place the scooter in driving mode with the free-wheel lever.
- Remove the seat (see §3.5.2.).
- Remove the battery pack by lifting the pack straight up and off of the scooter.
-
Remove the shopping basket.
-
Fold the steering column down (see §3.5.1.).
-
Pull the release lever (1) and separate the front and rear frame from each other. Hold the front frame to the chassis or fixed parts of the frame, not the plastic parts or steering column.
2.5.2.2. Assembly
- Attach the front and rear frame to each other by pulling the front frame hooks over the rear frame tube.
- Fold the steering column up and tighten into place (see §3.5.1.).
- Mount the shopping basket.
- Mount the battery pack.
- Mount the seat (see §3.5.2.) and fold the backrest up. Make sure it is securely fixed into place.
- Place the freewheel lever in drive mode (see §3.4.).
2.6. First use and storage
CAUTION
Risk of battery damage
- Never completely discharge the battery.
- Do not interrupt the charging cycle; only disconnect the battery charger when the battery is fully charged.
- Make sure that your scooter is stored in a dry environment to prevent mould from growing and the upholstery from being damaged, see also chapter 6.. If necessary, use a protective cover.
- Read the storage and maintenance instructions in §4. and technical details in §6..
Ensure that the battery has been fully charged before using your scooter, ask your dealer if this has already been done or not. To charge, follow the charging instructions in §3.6.
If the packaging of your product has been damaged, (unintentionally) opened, or affected by environmental conditions (moisture, heat,...) upon delivery, check the device integrity of your product. When in doubt, contact your specialist dealer.
3. Using your scooter
WARNING
Risk of injuries
- First read previous chapters and inform yourself about the intended use. Do NOT use your scooter unless you have read and fully understood all instructions.
- In case of doubts or questions, do not hesitate to contact your local specialist dealer, your care provider or technical adviser to help you with this.
3.1. First ride
CAUTION
Risk of injuries or damage
• Make sure that your scooter is switched OFF when getting on and off.
• Always unplug the battery charger from the scooter before starting to drive.
Make sure you are familiar with the operation of your scooter before using it in crowded and possibly dangerous places. First exercise at a spacious, open area with little bystanders and ask someone to accompany you.
-
Make sure that:
-
the scooter is on a flat surface with all wheels touching the ground;
- the battery is fully charged, see § 3.6.;
- the motor is coupled, see § 3.4.;
- the tyres have the correct tyre pressure (if applicable), see § 4.2.1.;
- you have the correct sitting position;
-
all adjustments are firmly secured, see §3.5..
-
Switch your scooter on, see §3.2..
-
Set the speed to lowest speed setting, see §3.2..
-
Put both hands on the handgrips of the tiller.
-
Slightly pull the right operating lever to drive to the front. Use the left operating lever to drive backwards. Release the lever to stop. Repeat this a few times.
-
If you feel confident enough, you can try to drive at higher speed.
-
Now try to turn, in forward and backward direction. Repeat this a few times.
-
Make sure your scooter stands stable when ending the ride.
- Switch off the scooter and remove the key to protect against theft.
3.2. Operating your scooter
!WARNING
Risk of injuries or damage
- Do NOT drive on slopes, obstacles, steps or kerbs larger than specified in § 6..
- Take the local road traffic law into consideration; it may differ per country. This counts for driving on pavements, unpaved roads or paved roadways.
- Do not adjust the speed while you are driving.
• Take the weather conditions into consideration. Avoid driving by moist weather, extreme heat, snow, black ice, freezing temperatures; see technical specifications in chapter 6..
- To prevent tipping over, try to drive with a large turning radius at corners and curves. Do not cut corners and don't drive with sharp bends. Try to drive straight in small passages to prevent getting entrapped.
- Do not lean too far to the left/right/front/back of the scooter to prevent tipping over. Please pay specially attention when you are negotiating slopes and obstacles.
- Be aware of other road users to whom your scooter may be an obstacle. Pay special attention when turning, reversing or driving backward. If you are not acquainted with driving backwards, first practice in an open area. Indicate the direction you intent to go before cornering.
- When driving indoors, only use the lowest speed setting.
- Do not turn your scooter "OFF" while driving as this will lead to an emergency stop and possible risk of accident and injury.
- Keep the braking distance in mind. Be aware that the braking distance depends on speed, surface, weather conditions, slope and weight of the user.
- Pay attention if the road has holes or gaps that may cause entrapment of the wheels.
3.2.1. Operator control
- Switch the scooter ON by inserting the key (4).
• The battery level indicator (1) will light up and show the current level of your batteries.
• Turn the speed control switch (2) to the desired driving speed.
- Turn clockwise to increase speed control.
- Turn counterclockwise to lower speed control.
• To sound the horn, press the horn button (5).
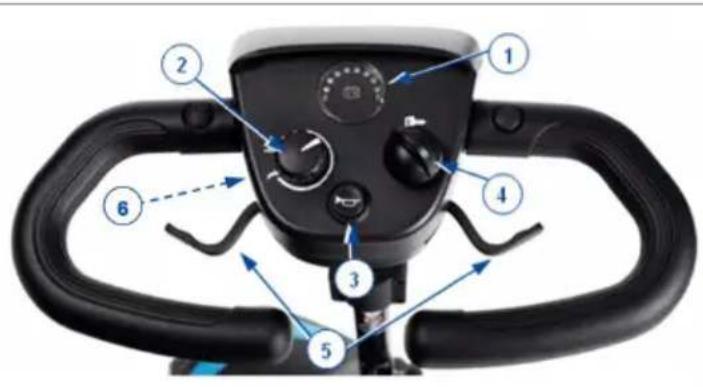
-
Battery level indicator
-
Speed control (slow/fast)
-
Key
-
Light switch (optional)
-
Horn button
-
Speed lever
3.2.2. Operating the brakes
3.2.2.1. To apply the electromagnetic brakes:
- Let go of the speed lever. The electromagnetic brake in the motor will be activated, the scooter will stop.
3.2.3. Operating the lights (One Air+ LED)
- Flip the light switch to [1] to turn on the lights.
- Flip the light switch to [0] to turn off the lights.
3.2.4. Driving the scooter
CAUTION
Risk of injuries
- Do not use both sides of the speed lever simultaneously. This might leave you unable to control your scooter.
Move the speed lever in the required direction:
- PULL ACTION BY THE RIGHT HAND = FORWARD MOVEMENT
- PULL ACTION BY THE LEFT HAND = BACKWARD MOVEMENT
Pulling the lever more will increase the speed within the selected speed setting. Only use higher speed settings when you are confident that you can easily operate and control your scooter.
When you switch on the scooter, wait for 3 seconds before pulling the speed lever. Otherwise, the horn will sound as a warning and the scooter will not move. If this is the case, switch OFF the scooter and switch ON again.
3.2.5. Braking
To brake, let go of the speed lever. It will return to the neutral position and slow down your scooter to a gentle stop. Practice pulling away and braking to get accustomed to the scooter. You need to be able to estimate how your scooter will react when you drive or brake.
3.2.6. Driving around corners and in bends
CAUTION
Risk of injuries
- Reduce your speed before you enter a curve or corner.
• Always maintain an adequate distance from corners and obstacles. - Do not drive your vehicle in an "S" pattern or make erratic turnings.
For corners and bends, use both hands to turn the handle bar in the direction you wish to take. It is very important that you ensure that there is enough space allowing you to go around bends and corners. Narrow passages must preferably be approached in a large curve so as to allow you to enter the narrowest part as straight from the front as possible. Bear in mind that your scooter's back part will in most cases be wider than the front part.
3.2.7. Backward movement
The speed of rearward movement is automatically reduced compared to forward driving. We also recommend that you use the slowest speed setting when you drive backward.
Do not forget that the steering direction with rearward driving is the opposite of when you go forward, and that your scooter will turn directly in the required direction.
The horn will beep while driving the scooter backwards.
3.2.8. Driving on slopes
CAUTION
Risk of injuries or damage
- Never put your scooter in free-wheel mode on a slope. The scooter may start moving, causing injuries to you or bystanders.
- Do not turn when driving down a slope, since the weight of the scooter may cause tipping over.
• Make sure all four wheels touch the ground while riding up or down a slope. - Never reverse on a slope.
3.2.8.1. Going up:
- Drive in a straight line and with higher speed on a slope, and lean slightly forward. When you drive in an angle or too slow, there is a risk of tipping over or falling.
3.2.8.2. Going down:
- Drive in a straight line (forward or backward) and with lower speed on a slope. When you drive in an angle or too fast, there is a risk of tipping over or falling.
- Lean slightly backward during a forward descent; lean slightly forward during a backward descent.
3.2.9. Coping with obstacles
CAUTION
Risk of injuries
- Do not use your scooter on an escalator.
• Always approach a kerb from the front.
• Make sure that all four wheels touch the ground when driving up or down.
It is possible to drive with your scooter over steps of 45 mm maximum. Take a short run-up to take these steps if necessary.
3.3. Transfer in and out of the scooter
- Park the scooter as close as possible to the place where you want to transfer.
- Make sure that the scooter is switched off.
- Turn the armpad upwards on the side where you want to transfer.
- Swivel the seat until it is facing you (see §3.5.2.).
- Transfer to / from the seat of the scooter.
natural_image
Exterior view of a modern electric scooter with black seat, blue front panel, and blue body (no text or symbols visible)3.3.1. Correct position in the scooter
Some recommendation for comfortable use of the scooter:
- Sit down on the seat with your lower back against the backrest.
- Make sure that your upper legs are horizontal and that your feet are in a comfortable position. Adjust if necessary.
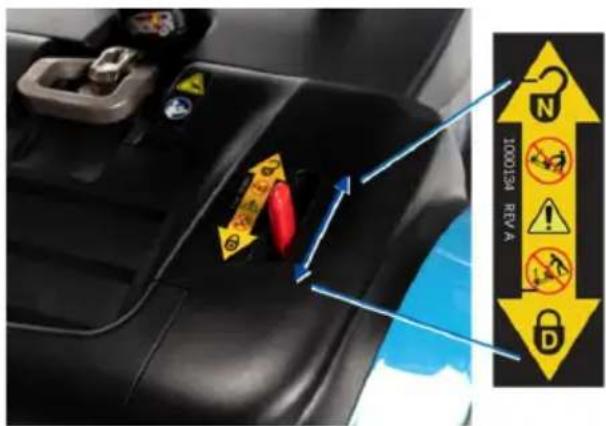
3.4. Brake and free-wheel lever
CAUTION
Risk of injuries or damage
- Only operate the free-wheel lever when your scooter is turned OFF!
- An attendant should operate the free-wheel lever if you have impaired mobility. NEVER operate it from sitting position.
The scooter is fitted with a free-wheel device that is accessible and operable by the attendant, or the user when he/she is not sitting in the scooter. You should only put the scooter in neutral to transport the scooter or to move it out of a danger zone.
3.4.1. Drive
- While the scooter is OFF, switch the free-wheel lever to "drive".
- Switch the scooter ON.
- Electronically controlled driving is now possible.
3.4.2. Neutral
- Switch the scooter OFF.
- Switch the free-wheel lever to "neutral".
- The scooter can now be pushed without electronic drive.
3.5. Comfort adjustments
CAUTION
Risk of injuries or damage
- Never perform adjustments while driving.
• The allowed adjustments can change the stability of your scooter (tilting back or sideways).
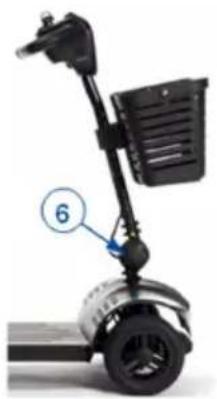
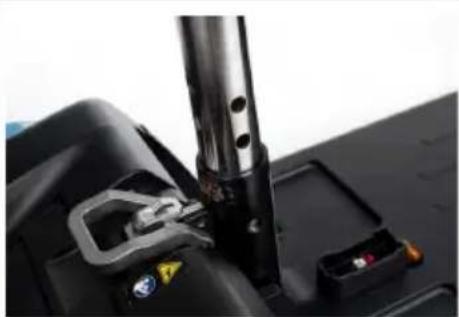
3.5.1. Adjusting the steering unit
CAUTION
Risk of injuries
• Turn the scooter off before you adjust the angle of the steering unit.
- Do not lean with your whole body on the steering unit.
natural_image
Electric scooter with labeled component (number 6) and base mount (no text or symbols beyond label)The steering unit can be adjusted to many different positions (stepless) to suit each driver.
- Loosen the star knob (1).
- Adjust the steering unit to the desired position.
- Retighten the star knob (1).
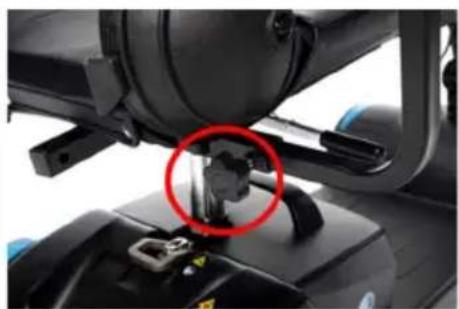
3.5.2. Adjusting the seat
CAUTION
Risk of injuries
• Make sure that the seat is locked securely.
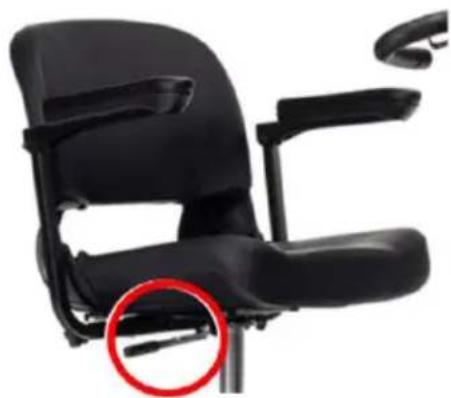
natural_image
Black office chair with red circular highlight on the lower side (no text or symbols visible)3.5.2.1. Removing the seat
- Pull the seat lever upwards.
- Turn the seat a little bit and lift the seat out of the adjustment bar.
- Release the seat lever.
3.5.2.2. Placing and locking the seat into place
- Pull the seat lever upwards.
- Place the seat on the adjustment bar and, at the same time, keep the seat lever pressed in.
- Release the seat lever.
3.5.2.3. Swivelling the seat
- Pull the seat lever upwards.
- Turn the seat in the desired direction.
- Release the seat lever.
natural_image
Close-up of a black motorcycle seat with a metal clamp and attached lever (no visible text or symbols)3.5.2.4. Seat height
The seat height can be adjusted in 4 positions (range 45 mm).
- Remove the seat and battery pack.
- Remove the locking pin that holds the seat support into place.
- Raise/Lower the seat support to the desired height.
- Insert the locking pin to secure the seat support into place.
- Replace the seat and battery pack. Make sure everything is firmly secured.
3.5.3. Adjusting the armrests
CAUTION
Risk of tipping over
• Make sure that the armrests are positioned symmetrically from the seat.
natural_image
Close-up of a mechanical device with a red circle highlighting a component (no visible text or symbols)- Remove the star knob underneath the seat.
- Grasp the inner square tube.
- Move the tube to adjust the armrest to the desired width (range: 70 mm each side, no further inward than indicated by the stickers).
- Retighten the star knob.
- Make sure that the armrest is well secured.
3.6. Battery status and charging
AWARNING
Risk of injuries and damage due to fire
- Only use the battery charger delivered with the scooter. The use of any other charger may be dangerous (fire hazard).
- The battery charger is only intended to charge the batteries delivered with the scooter, not to charge any other batteries.
- Do not adapt any of the delivered parts, like cables, plugs or battery charger. Never open or change the battery or the connection points.
- Protect the battery and battery charger against flames, high and low temperatures (see chapter 6.), moisture, sunshine, severe shocks (for example dropping). Do NOT use the battery if this has been the case.
- Charge the battery with the battery charger, indoors, in a well-ventilated area, out of children's reach.
CAUTION
Risk of damage
- Battery self-discharge and the quiescent current of the connected users will drain the battery charge slowly. The battery may be irreversibly damaged if the battery is fully discharged. Therefore, make sure that the battery is charged on time:
- With intensive use (long distances, daily use): Immediately recharge after use.
- With average use (short distances, daily or a few times a week): Charge when battery indicator shows 50% discharge.
- With little use or storage: Charge once a month.
- Read the storage and maintenance instructions in §4. and technical details in §6..
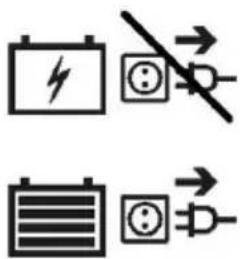
- Only disconnect the battery charger when the battery is fully charged, see the following symbols on the charger.
- Do not charge batteries below 0^ C. Move the battery to a warmer place and start charging.
- Keep the connection point for the battery charger free of dust and other contamination.
- In case of any problems due to which the battery cannot be charged according to the following instructions, please contact your specialist dealer.
It is recommended to unplug the battery charger from the mains when not in use. This is to prevent unnecessary energy consumption.
The light emitting diode (LEDs) in the steering unit indicates the remaining capacity of your batteries. If the battery charger is turned on and no LED's are lit, check the fuse. If the red LED does not illuminate, the charger is defective. Consult your specialist dealer.
- Switch the scooter OFF and remove the key.
- FIRST connect the battery charger to a 230V AC power socket. Use the battery charger directly, without extension cord, on the power supply (without time switch).
- If applicable, open the cover of the charging point on the scooter and connect the charger.
- Wait until the battery is fully charged.
- Disconnect the battery charger.
- Switch the scooter ON and check if all lights of the battery status indicator are ON.
- Remove the battery charger from the socket, let it cool down and store it in the charger pocket.
When the operating console displays the system code "Drive inhibit" after charging, make sure that the battery charger is disconnected. This safety measure prevents driving with the charger still connected to the supply grid.

natural_image
Close-up of a black industrial air purifier device with a labeled component (no visible text or symbols)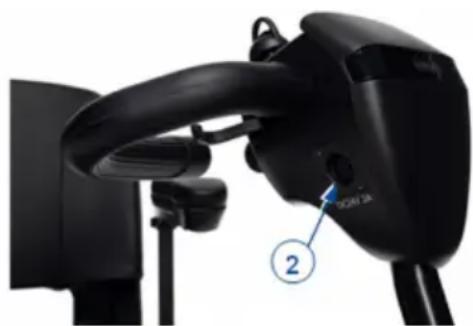
natural_image
Close-up of a black automotive charging plug with a blue circular annotation pointing to the handle (no text or symbols visible)Battery charger socket
- Battery pack
- Operator control
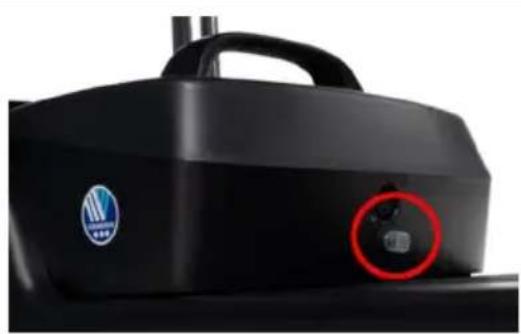
3.7. Thermal fuses
To protect the motor against overload, your scooter has a thermal safety mechanism on the rear. The thermal fuse will automatically cut off the motor to prevent overheating and thus rapid wear and tear or breakdowns. You can access the thermal safety device through a gap in the back of the synthetic cover.
The thermal safety device can be activated if you go up or down slopes that exceed the maximum specified gradient. Nominal loads that exceed the permitted maximum could also cause the device to jump out. Likewise, if you keep on driving with the engine brake on, it could result in overload. The maximum values not to exceed are indicated in §6..
To be able to use the scooter again, remove the overload and wait until the motor has cooled down. Then gently press the thermal safety mechanism back in. Your scooter is now ready for use again.
natural_image
Close-up of a black industrial vacuum cleaner with a red circular button highlighting a small component (no visible text or symbols)EN
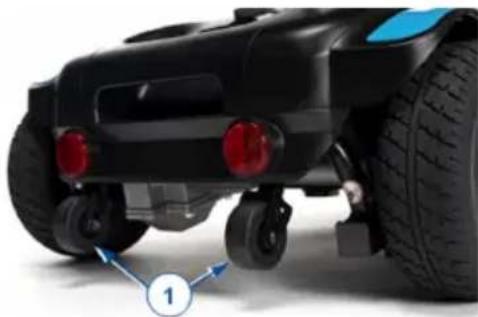
3.8. Anti-tipping
An anti-tipping (1) is fixed to the frame of the scooter on the rear side. It is not possible to remove them. The anti-tipping is there for your safety. It prevents the scooter from tipping over backward when you drive over small obstacles that do NOT exceed the maximum height as specified in §6..
natural_image
Close-up of a black electric vehicle rear wheel and tire, showing red headlight and blue livery (no text or symbols visible)4. Maintenance
i Regular care ensures that your scooter is preserved in a perfectly functional condition. For the maintenance manual, refer to the Vermeiren website: www.vermeiren.com.
4.1. Points of maintenance
CAUTION
Risk of injuries and damage
- Repairs and replacements may only be undertaken by trained persons and only genuine replacement parts of Vermeiren should be used.
The last page of this manual contains a registration form for the specialist dealer to record each service.
The service frequency depends on the frequency and intensity of use. Contact your dealer to agree to a common timetable for inspection/maintenance/repair.
i Read the user instructions of the applied battery charger regarding maintenance.
4.1.1. Before each use
Inspect the following points:
- All parts: Present and undamaged or unworn.
• All parts: Clean, see § 4.2.2..
- Battery status: charge the battery when necessary, see §3.6..
• Condition of wheels/tyres, see § 4.2.1..
Contact your specialist dealer for possible repairs or part replacements.
4.1.2. Yearly or more often
Have your scooter inspected and serviced by your specialist dealer at least once a year, or more often. The minimum maintenance frequency depends on use and should therefore be commonly agreed upon with your specialist dealer.
4.1.3. If stored
Make sure that your scooter is stored in a dry environment to prevent mould from growing and the upholstery from being damaged. Disconnect the battery to prevent it from being damaged.
If your scooter is stored for a longer period, you still need to charge the batteries every month. For more information, see §3.6..
4.2. Maintenance instructions
4.2.1. Wheels and tyres
Proper working of the brakes depends on the state of the tyres, and can change due to wear and contamination (water, oil, mud, ...).
Keep your wheels free of wires, hair, sand and fibres.
Check the profile of the tyres. If the tread depth is less than 1 mm, the tyres need to be replaced. Contact your specialist dealer for this matter.
Inflate each pneumatic tyre to the correct pressure (see pressure indication on the tyres).
4.2.2. Cleaning
CAUTION
Risk of damage by moisture
- Keep the operating console clean and protect it from water and rain.
- Never use a hose or high-pressure cleaner to clean the scooter.
Wipe all rigid parts of the scooter with a damp cloth (not drenched). If necessary, use a mild soap, suitable for varnishes and synthetics.
The upholstery can be cleaned with lukewarm water and a mild soap. Do not use abrasive cleaning agents to clean.
Keep the ventilation openings of the battery charger clean and free of accumulated dust. Blow away the dust and clean the battery charger enclosure with a slightly moistened cloth, if required.
4.2.3. Disinfection
CAUTION
Risk of damage
• Disinfections may only be undertaken by trained persons. Consult your specialist dealer.
4.3. Expected lifespan
The scooter is designed to have an average lifespan of 5 years. Depending on the frequency of use, driving circumstances and maintenance, the lifespan of your scooter will increase or decrease.
4.4. Reuse
Before each reuse, have the scooter disinfected, inspected and serviced according to the instructions in the maintenance manual.
4.5. End of use
At end of life, you need to dispose of your scooter according to the local environmental legislation. The best way to do so, is to disassemble the scooter to facilitate the transport of recyclable parts. Usually, batteries are collected separately.
4.6. Warranty
The warranty on this product is subject to the general terms and conditions of each country.
5. Troubleshooting
Even if you use your scooter properly, a technical problem may occur. In this case, contact your local specialist dealer.
WARNING
Risk of injuries and damage
• NEVER attempt to repair your scooter yourself.
- For problems in the operating console you need to contact your specialist dealer. He/She will decide if the console needs to be reprogrammed.
The following symptoms may indicate a serious problem. Therefore always contact your specialist dealer if you spot any of the following deviations:
- Strange sound;
- Frayed/damaged wiring harnesses;
- Cracked or broken connectors;
- Uneven tread wear on one of the tyres;
- Jerky movements;
- Scooter deflects to one side;
- Damaged or broken wheel assemblies.
- Scooter does not switch on;
- Scooter is powered, but does not move to the front or back.
In case of a possible problem, a system code is displayed by the blinking LEDs of the battery status indicator, see §3.2.1. (2). The following table summarises the possible system codes (number of blinks). Some problems can be solved by yourself. For all problems marked with a star (*), consult your specialist dealer.
| Code Problem Meaning | ||
| 1 Low battery Recharge the battery immediately. | ||
| 2 * Low battery Recharge the battery. Check the | battery and allassociated connections and wiring. If the problem is not solved, contact your specialist dealer. | |
| 3 High battery If traveling down a slope, stop / reduce your speed.Take less steep slopes. | ||
| 4 * Current limit time-out ORController too hot | Turn off the scooter, leave for a few minutes and turn back on.Check the motor and associated connections and wiring. If the problem is not solved, contact your specialist dealer. | |
| 5 * Parking brake Check the parking brake / free-wheel lever and associated connections and wiring. If the problem is not solved, contact your specialist dealer. | ||
| 6 Drive inhibit Disconnect the battery charger. OR Release the speedlever before switching on your scooter. | ||
| 7 * Speed pot Check the throttle and speed pot, as well as allassociated connections and wiring. Contact your specialist dealer. | ||
| 8 * Motor voltage Check the motor and associated connections and wiring. Contact your specialist dealer. | ||
| 9 * Other Check all connections and wiring. Contact your specialist dealer. | ||
EN
6. Technical specifications
The technical details below are only valid for this scooter, at standard settings and optimal ambient conditions. If other accessories are used, the tabulated values will change. Changes in outdoor temperatures, humidity, uphills, downhills, soils and battery levels can reduce output. Take these details into account during use. The values are no longer applicable if your scooter has been modified, damaged, or is severely worn.
| Brand Vermeiren | |
| Product group Scooters, Class A | |
| Type One | |
| Description Dimensions | |
| Maximum user weight 136 kg | |
| Overall length 1030 mm | |
| Overall width 490 mm | |
| Overall height 880 mm | |
| 840 mm | |
| Folded height 330 mm (seat removed, steering unit folded) | |
| Total mass | |
| One | 44,9 kg |
| One Air+, One Air+ LED | 50 kg |
| One Air+ Spring | 42,35 kg |
| Mass of demountable parts | |
| Basket | 1 kg |
| Seat | 8,85 kg |
| Battery | One : 9 kg |
| One Air+, One Air+ LED : 14 kg | |
| One Air+ Spring : 4,25 kg | |
| Front frame | One, One Air+, One Air+ LED : 14,65 kg |
| One Air+ Spring : 16 kg | |
| Rear frame | One, One Air+, One Air+ LED : 11,4 kg |
| One Air+ Spring : 12,15 kg | |
| Energy consumption * | |
| One | 16 km |
| One Air+, One Air+ LED | 30 km |
| One Air+ Spring | 26 km |
| Rated slope 8° | |
| Obstacle climbing | 45 mm |
| Maximum speed forward 6 km/h | 8 km/h |
| Max. braking distance from max. speed 6 km/h : 1m8 km/h : 1,5 m | |
| Seat plane angle 0° | |
| Effective seat depth 370 mm | |
| Effective seat width 410 mm | |
| Seat surface height at front edge (measured from ground) | 525 - 570 mm |
| Seat surface height at front edge (measured from footplate) | 420 - 465 mm |
| Backrest angle 12° | |
| Backrest height | 390 mm |
| Footplate height | 110 mm |
| Armrest to seat distance | 190 mm |
| Minimum turning radius | 1150 mm |
| Reversing width | 1250 mm |
| Ground clearance | 35 mm |
| Diameter of rear wheels | 8x2.5" |
| Diameter of front wheels | 8x2.5" |
| Tyre pressureOneOne Air+, One Air+ LED, One Air+ Spring | Not applicable3,5 bar |
| Min. batteryOneOne Air+, One Air+ LEDOne Air+ Spring | 15 Ah (C20), 24V DC, gel battery, maintenance-free25 Ah (C20), 24V DC, gel battery, maintenance-free20Ah, 24V DC, Lithium |
| Driving motors | Nom. 270 Watt, electromagnetic brakes |
| Degree of protection | IPX5 |
| Strength tests according to | ISO 7176-8 |
| Tests of power and control system according to | ISO 7176-14 |
| Ignitability of upholstery according to | EN 1021-2:2006 |
EN
| Brand Vermeiren | |
| Product group Scooters, Class A | |
| Type One | |
| Description Dimensions | |
| EMC compliance ISO 7176-21 | |
| Storage and use temperature +5°C - +41°C | |
| Operating temperature for electronics -10°C to +40°C | |
| Storage and use humidity 30% - 70% | |
| We reserve the right to introduce technical changes. Measurement tolerance +- 15 mm / 1,5 kg / 1,5°* The theoretical driving distance will be reduced if the wheelchair is used frequently on slopes, rough ground or to climb curbs. | |
Table des matières
FR
Préface 35
1. Votre produit 37
1.1. Options 38
natural_image
Exterior view of a black electric scooter with blue accents and internal components, shown with an inset close-up of the interior (no text or symbols visible)natural_image
Exterior view of a modern electric scooter with black seat and blue usage tray (no text or symbols visible)natural_image
Electric scooter with labeled component (number 6) and base mount (no text or symbols beyond label)natural_image
Close-up of a mechanical device with a red circle highlighting a component (no visible text or symbols)natural_image
Close-up of a black electronic device with a labeled button (1) and a logo, no readable text or symbols beyond the label.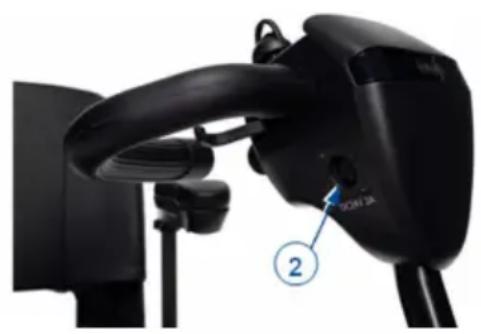
natural_image
Close-up of a black office chair with a curved arm and labeled component (no text or symbols visible)natural_image
Close-up of a black electronic device with a circular button and logo, no visible text or symbols3.8. Anti-bascule
natural_image
Close-up of a black electric vehicle's rear wheel and side-mounted sensors, showing red headlight and blue livery (no text or symbols visible)4. Entretien
natural_image
Exterior view of a black electric scooter with blue accents and internal components, shown with a close-up inset showing the interior compartment (no text or symbols visible)natural_image
Electric scooter with black seat and blue accents, no visible text or symbols3.3.1. Correcte positie in de scooter
natural_image
Close-up of a black electric scooter with labeled component (number 6) and no visible text or symbols on the body.natural_image
Close-up of a mechanical device with a red circle highlighting a component (no visible text or symbols)natural_image
Close-up of a black portable air conditioner unit with a labeled button (no visible text or symbols)
natural_image
Close-up of a black electronic device with a blue label pointing to a component, no visible text or symbols on the device itself.natural_image
Close-up of a black electronic device with a circular button and logo, no visible text or symbols on the body.3.8. Anti-tipping
natural_image
Close-up of a black electric vehicle's rear wheel and tire, showing red headlight and blue livery (no text or symbols visible)4. Onderhoud
NL
natural_image
Exterior view of a black electric scooter with blue accents and internal components, shown with an inset close-up of the interior (no text or symbols visible)natural_image
Modern electric scooter with black seat and blue body, no visible text or symbolsnatural_image
Electric scooter with labeled component (number 6) and base mount (no text or symbols beyond label)natural_image
Close-up of a mechanical device with a red circle highlighting a component (no visible text or symbols)natural_image
Close-up of a black industrial vacuum cleaner with a labeled component (1) and a logo, no visible text or symbols beyond the label.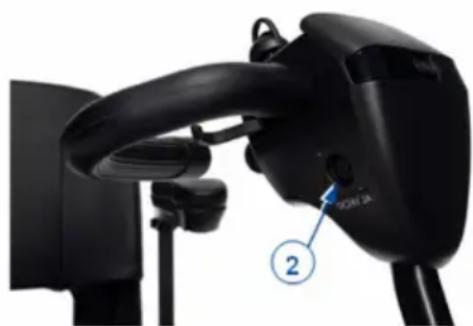
natural_image
Close-up of a black handheld device with a blue label pointing to a component, no visible text or symbols on the device itself.natural_image
Close-up of a black electronic device with a red circular button and logo (no visible text or symbols)3.8. Kippschutz
natural_image
Close-up of a black electric scooter's rear wheel and side-mounted sensors, showing red headlight and tire body (no text or symbols visible)4. Wartung
natural_image
Exterior view of a black electric scooter with blue accents and internal components, shown with an inset close-up of the interior (no text or symbols visible)natural_image
Exterior view of a modern electric scooter with black seat and blue accents (no text or symbols visible)natural_image
Electric scooter with attached battery and labeled component (no text or symbols visible)natural_image
Close-up of a mechanical device with a red circle highlighting a component (no visible text or symbols)natural_image
Close-up of a black industrial device with a labeled button (1) and a logo, no readable text or symbols beyond the label.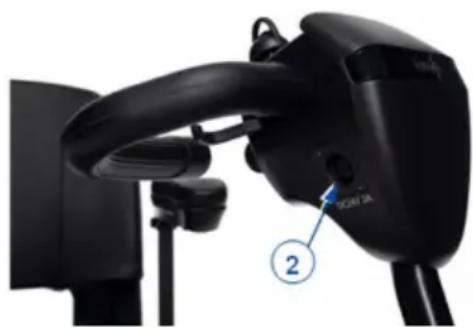
natural_image
Close-up of a black Sony 3A charging device with a blue arrow pointing to the cable (no text or symbols visible)natural_image
Close-up of a black electronic device with a circular button and logo, no visible text or symbolsnatural_image
Close-up of a black electric vehicle's rear wheel and side-mounted sensors, showing red headlight and blue livery (no text or symbols visible)4. Manutenzione
natural_image
Exterior view of a black electric scooter with blue accents and internal components, shown with an inset close-up of the seat (no text or symbols visible)natural_image
Exterior view of a modern electric scooter with black seat and blue accents (no text or symbols visible)natural_image
Electric scooter with labeled component (number 6) and base mount (no text or symbols beyond label)natural_image
Close-up of a mechanical device with a red circle highlighting a component (no visible text or symbols)natural_image
Close-up of a black electronic device with a labeled button (1) and circular logo, no readable text or symbols beyond the label.
natural_image
Close-up of a black ergonomic device with a blue arrow pointing to a component labeled '2' (no text or symbols on the device itself)natural_image
Close-up of a black electronic device with a circular button and logo, no visible text or symbols3.8. Antivuelco
natural_image
Close-up of a black electric vehicle's rear wheel and side-mounted sensors, showing red headlight and blue livery (no text or symbols visible)4. Mantenimiento
natural_image
Exterior view of a modern electric scooter with internal components and a close-up inset showing the interior compartment (no text or symbols visible)PL
natural_image
Exterior view of a modern electric scooter with black seat and blue accents (no text or symbols visible)natural_image
Electric scooter with labeled component (number 6) and base mount (no text or symbols beyond label)natural_image
Close-up of a mechanical device with a red circle highlighting a component (no visible text or symbols)natural_image
Close-up of a black industrial device with a labeled component (1) and a circular logo, no readable text or symbols beyond the label.
natural_image
Close-up of a black automotive charging plug with a blue label pointing to the handle (no text or symbols on the device itself)natural_image
Close-up of a black outdoor air purifier device with a red circular button highlighting a small component (no visible text or symbols)natural_image
Close-up of a black electric scooter's rear wheel and tire, showing red headlight and blue accents (no text or symbols visible)4. Konserwacja
natural_image
Exterior view of a modern electric scooter with blue accents and internal components, shown with close-up details (no text or symbols visible)natural_image
Exterior view of a modern electric scooter with black seat, blue usage tray, and front basket (no text or symbols visible)natural_image
Electric scooter with labeled component (number 6) and body panel, no visible text or symbols beyond the numbernatural_image
Close-up of a mechanical device with a red circle highlighting a component (no visible text or symbols)natural_image
Close-up of a black industrial vacuum cleaner with a labeled component (1) and a logo, no visible text or symbols beyond the label.
natural_image
Close-up of a black automotive headrest with a blue arrow pointing to the arm and a numbered label (2) on the side (no text or symbols on the device itself)Konektor nabíječky baterie
natural_image
Close-up of a black electronic device with a red circular button and logo (no visible text or symbols)natural_image
Close-up of a black electric scooter's rear wheel and side-mounted sensors, showing red headlight and blue livery (no text or symbols visible)4. Údržba
Service registration form
This product (name): ....
was inspected (I), serviced (S), repaired (R) or disinfected (D):
| By (stamp):Kind of work: I / S / R / DDate: | By (stamp):Kind of work: I / S / R / DDate: | By (stamp):Kind of work: I / S / R / DDate: |
| By (stamp):Kind of work: I / S / R / DDate: | By (stamp):Kind of work: I / S / R / DDate: | By (stamp):Kind of work: I / S / R / DDate: |
| By (stamp):Kind of work: I / S / R / DDate: | By (stamp):Kind of work: I / S / R / DDate: | By (stamp):Kind of world: I / S / R / DDate: |
| By (stamp):Kind of work: I / S / R / DDate: | By (stamp):Kind of work: I / S / R / DDate: | By (stamp):Kind of work: I / S / R / DDate: |
| By (stamp):Kind of work: I / S / R / DDate: | By (stamp):Kind of work: I / S /R / DDate: | By (stamp):Kind of work: I / S / R / DDate: |
| By (stamp):Kind of work: I / S / R / DDate: | By (stamp):Kind of work: I / S / R / DDate: | By (stamp):Kind of work: I / S / R / DDate: |

VERMEIREN GROUP
Vermeirenplein 1/15
2920 Kalmthout
Belgium
www.vermeiren.com
Version: E, 2025-03
Basic UDI-DI: 5415174OneHU
All rights reserved, including translation.