
Modula M2 - Cooker FALMEC - Free user manual and instructions
Find the device manual for free Modula M2 FALMEC in PDF.
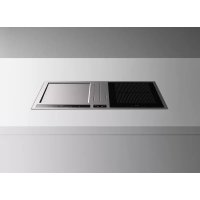


| Product type | Cooktop (induction hob + Teppan Yaki + integrated hood) |
| Brand | Falmec |
| Model | Modula M2 |
| Material | Stainless steel, ceramic glass |
| Dimensions (W x D x H) | 90 x 60 x 90 cm (estimated) |
| Net weight | 65 kg (estimated) |
| Power supply | 230 V ~ 50/60 Hz, 25 A |
| Induction hob – total power | 3500 W |
| Induction hob – zones | 2 zones: front 1600 W (booster 1850 W), rear 2100 W (booster 2100/3000 W) |
| Induction functions | Bridge, Booster, Keep warm (42°C), Timer (1-99 min) |
| Teppan Yaki hob | 1 zone, adjustable power 1-9, max temperature 250°C |
| Hood – mode | External extraction or recirculation (optional charcoal filter) |
| Hood – speeds | 8 speeds (1-8, boost P) |
| Hood – filters | Anti-grease metal filters (washable), activated charcoal (replace every 3-4 months) |
| Lighting | Integrated LED |
| Safety | Automatic shut-off, overheating protection, control lock, residual heat indication |
| Cleaning | Surfaces: damp cloth and mild detergent; ceramic glass hob: scraper and specific cleaner; metal filters: dishwasher |
| Supplied accessories | Fixing kit, Magic Steel cloths |
| Installation | By qualified personnel, comply with electrical standards and safety clearances |
| Repairability index | Not available |
Frequently Asked Questions - Modula M2 FALMEC
User questions about Modula M2 FALMEC
0 question about this device. Answer the ones you know or ask your own.
Ask a new question about this device
Download the instructions for your Cooker in PDF format for free! Find your manual Modula M2 - FALMEC and take your electronic device back in hand. On this page are published all the documents necessary for the use of your device. Modula M2 by FALMEC.
USER MANUAL Modula M2 FALMEC
INSTRUCTIONS BOOKLET
INSTRUCTIONS BOOKLET
INSTRUCTIONS BOOKLET EN
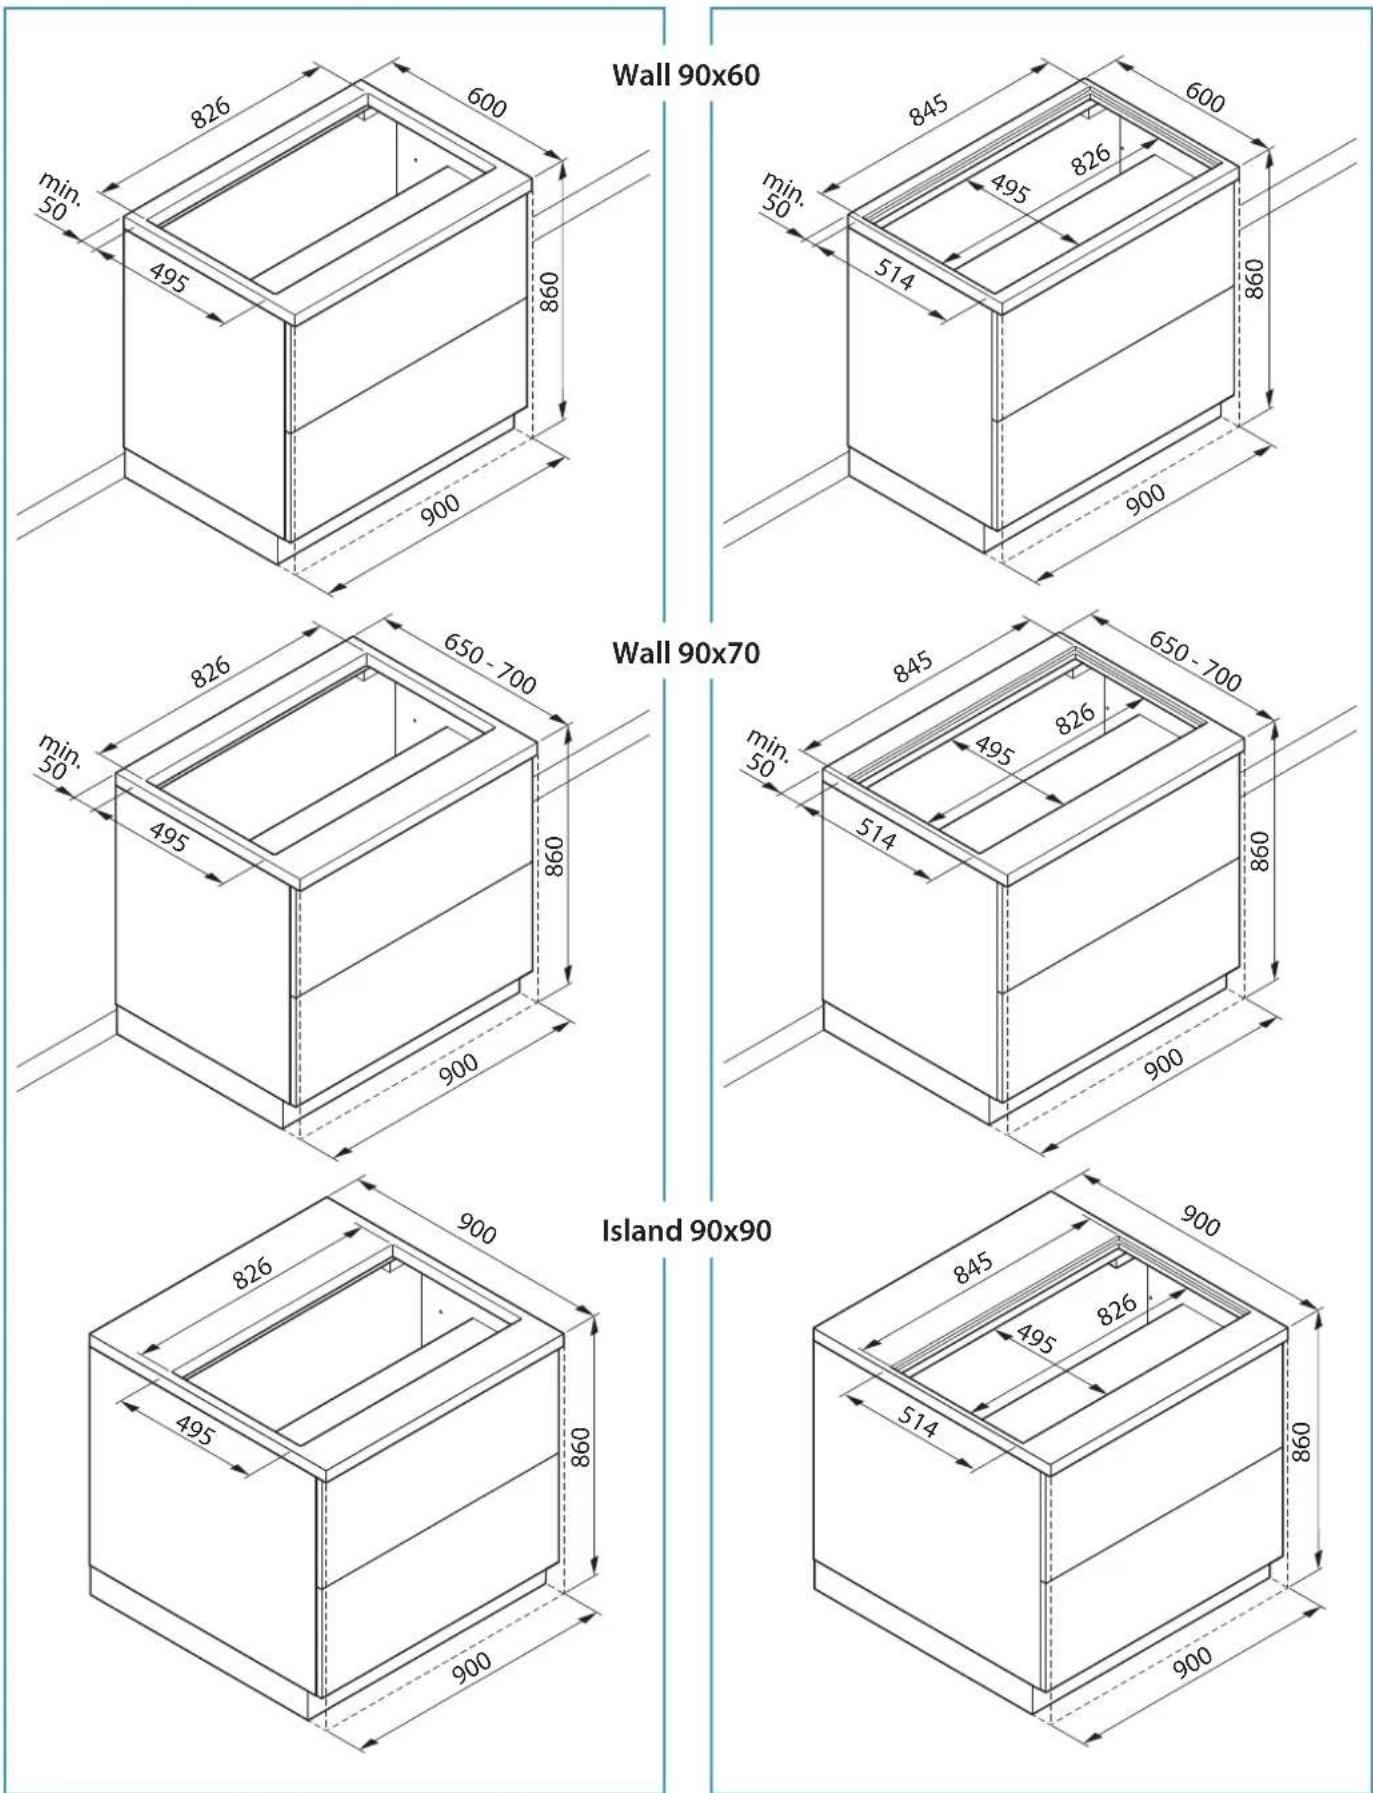
EN - Hole measurements for installation.
EN - Measurements for installation.
DK - Measurements for installation.
BUILT-IN version:

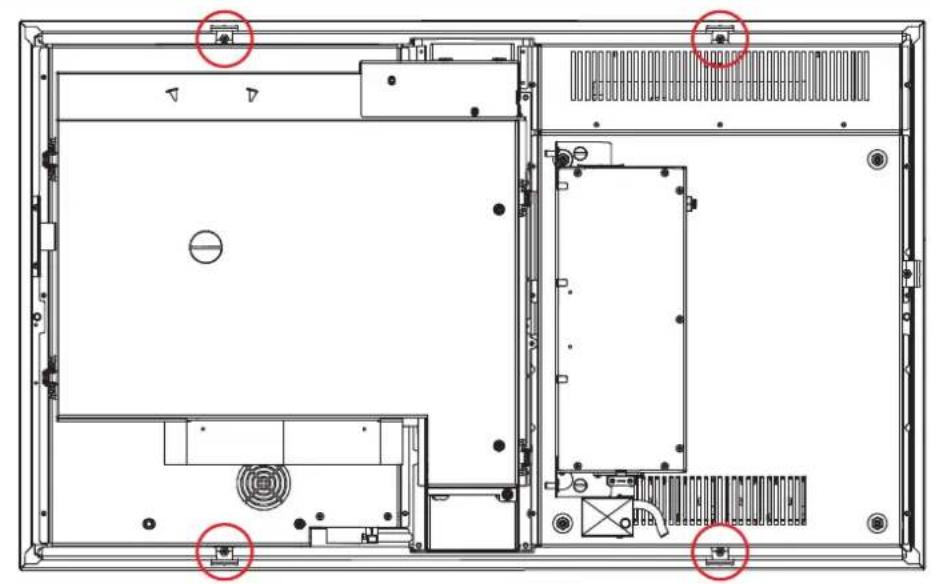
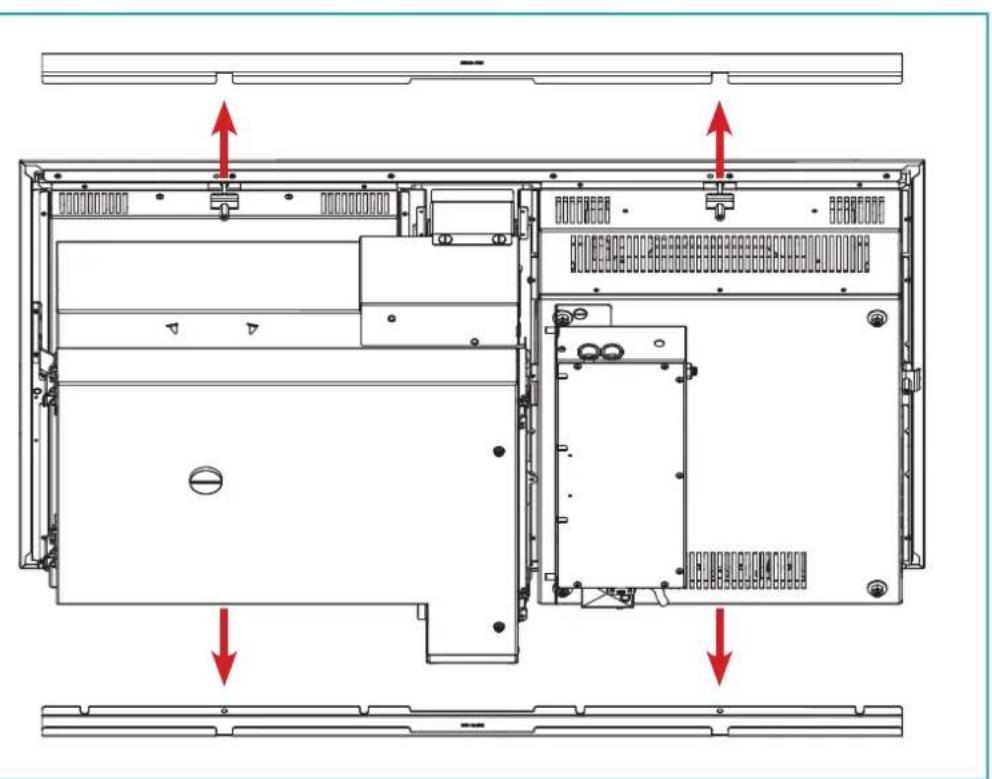
IT - Remove the screws EN - Remove the screws DE - Remove the screws FR - Remove the screws ES - Remove the screws RU - Remove the screws PL - Remove the screws DK - Remove the screws
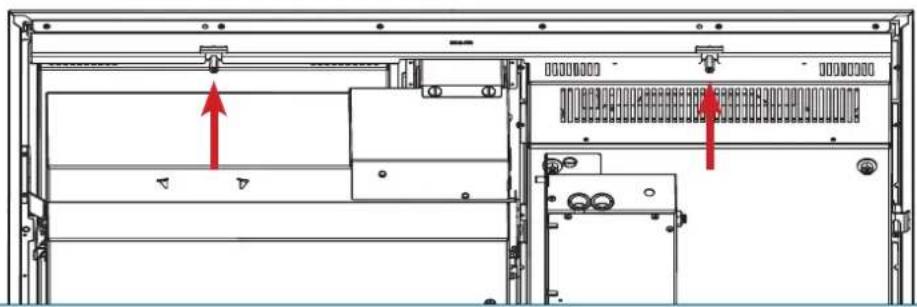
IT - Remove the stops EN - Remove the stops DE - Remove the stops FR - Remove the stops ES - Remove the stops RU - Remove the stops PL - Remove the stops DK - Remove the stops
IT - Preliminary operations: Cutting the top (1). EN - Preliminary operations: Cutting the top (1). DE - Preliminary operations: Cutting the top (1). FR - Preliminary operations: Cutting the top (1). ES - Preliminary operations: Cutting the top (1). RU - Preliminary operations: Cutting the top (1). PL - Preliminary operations: Cutting the top (1). DK - Preliminary operations: Cutting the top (1).
1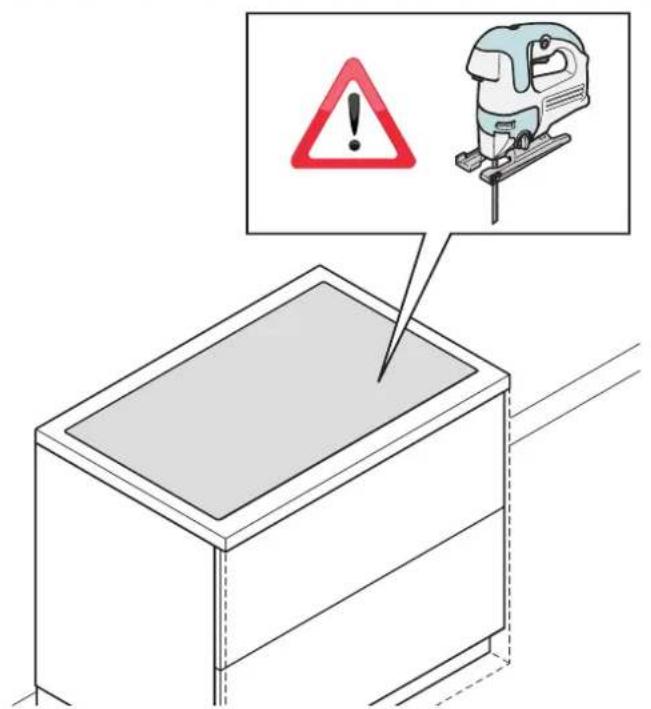
IT - Insertion of the hood onto the base (2). EN - Insertion of the hood onto the base (2). DE - Insertion of the hood onto the base (2). FR - Insertion of the hood onto the base (2). ES - Insertion of the hood onto the base (2). RU - Insertion of the hood onto the base (2). PL - Insertion of the hood onto the base (2). DK - Insertion of the hood onto the base (2).
2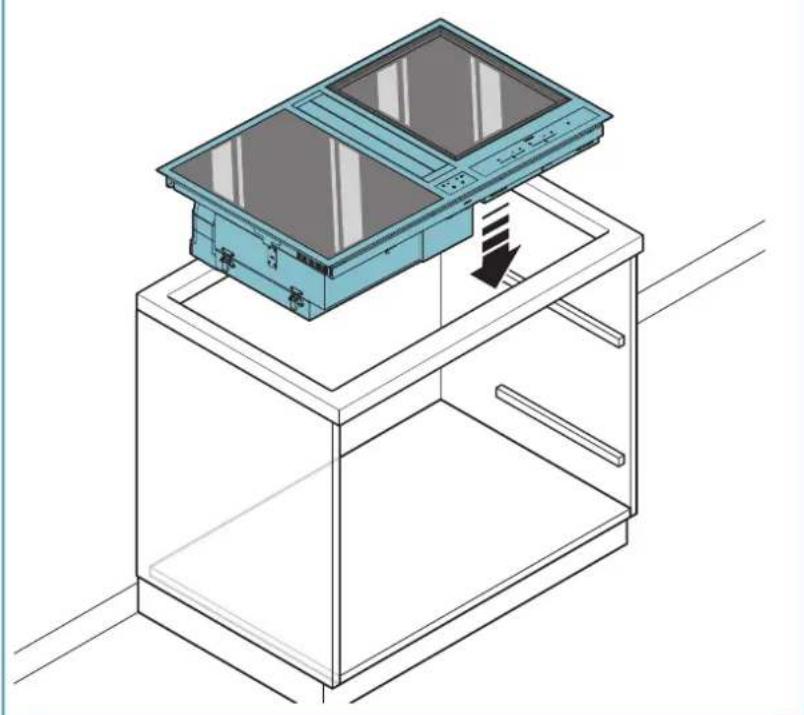
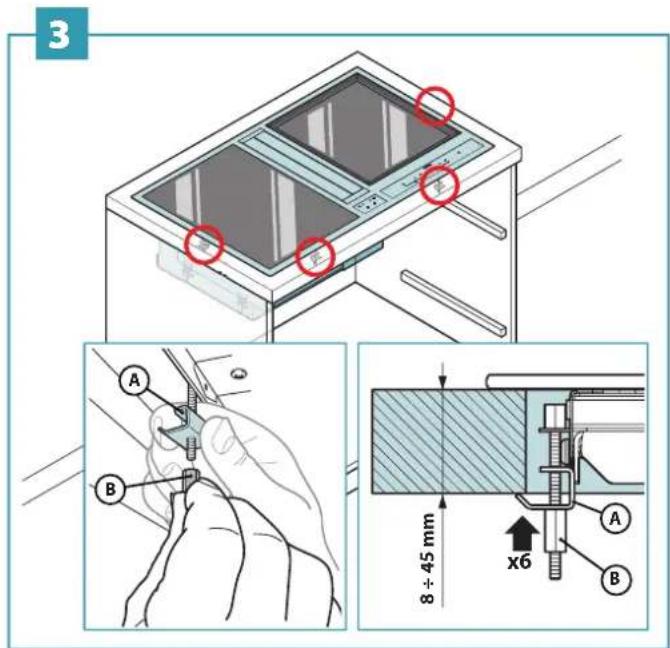
IT - Screw the cooking hob together with the worktop (3). EN - Screw the cooking hob together with the worktop (3). DE - Screw the cooking hob together with the worktop (3). FR - Screw the cooking hob together with the worktop (3). ES - Screw the cooking hob together with the worktop (3). RU - Screw the cooking hob together with the worktop (3). PL - Screw the cooking hob together with the worktop (3). DK - Screw the cooking hob together with the worktop (3).
IT - Motor and hob electrical connections (4). EN - Motor and hob electrical connections (4). DE - Motor and hob electrical connections (4). FR - Motor and hob electrical connections (4). ES - Motor and hob electrical connections (4). RU - Motor and hob electrical connections (4). PL - Motor and hob electrical connections (4). DK - Motor and hob electrical connections (4).
4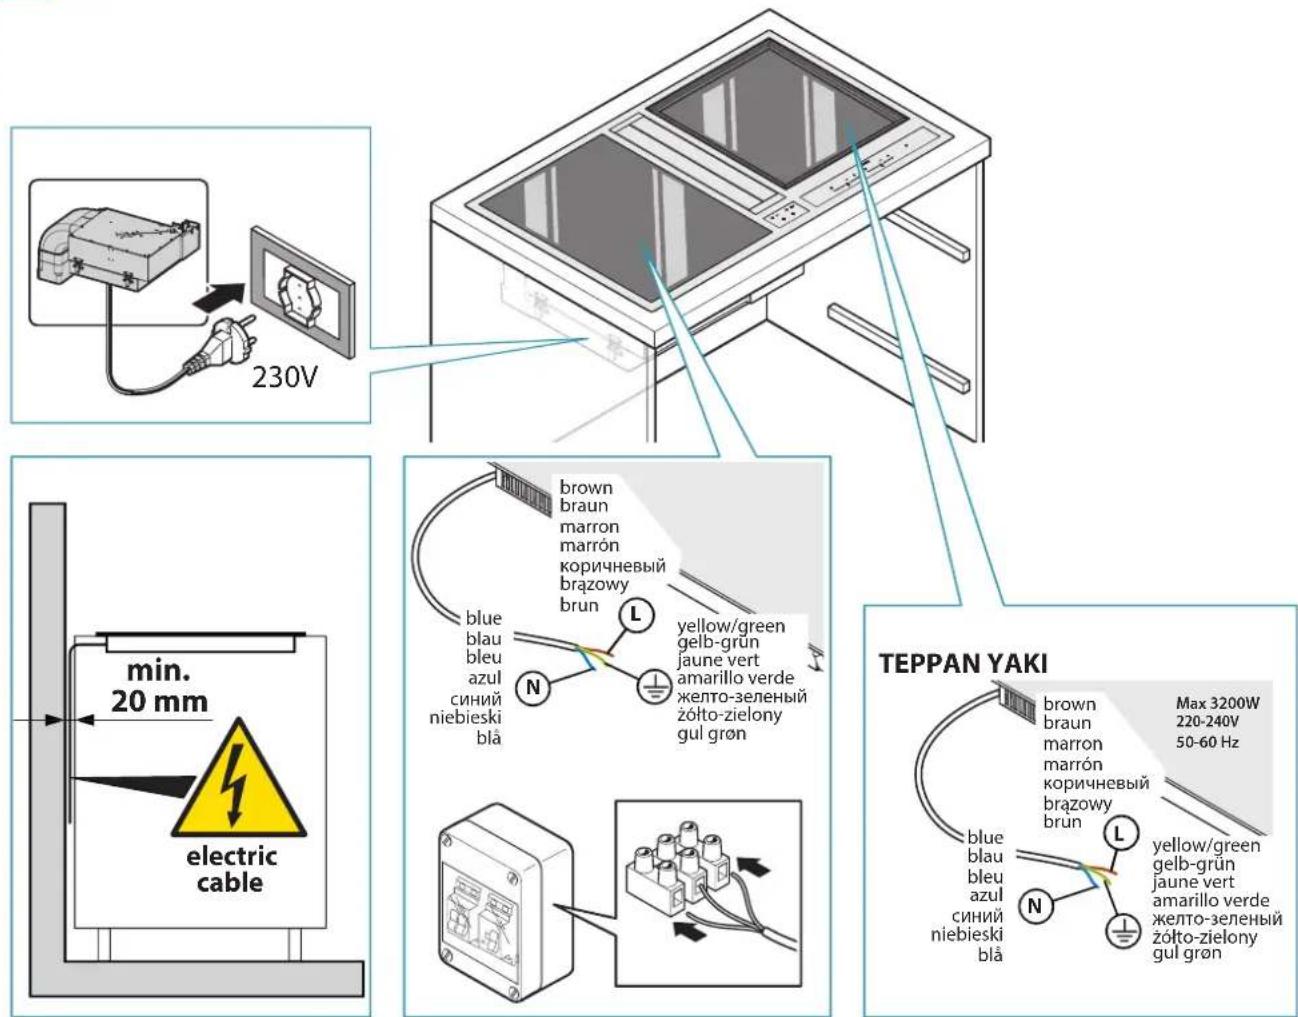

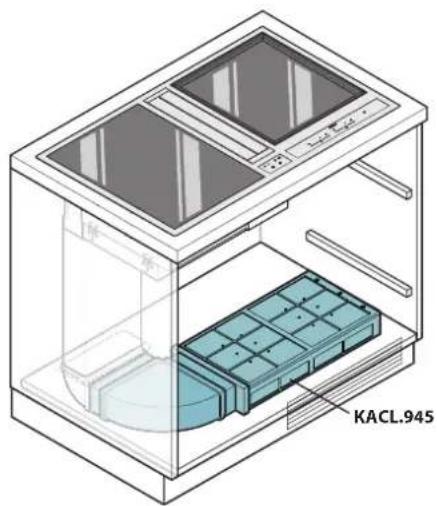
IT - Installazione filtro carbone-zeolite (opzionale) (6). EN - Installing the carbon-zeolite filter (optional) (6). DE - Installation des Kohlenstoff-Zeolith-Filters (Option) (6). FR - Installation du filtre charbon-zéolite (en option) (6). ES - Instalación del filtro de carbón-zeolita (opcional) (6). RU - Установка угольного цеолитового фильтра (дополнительно) (6). PL - Instalacja filtra węglowo-zeolitowego (opcjonalna) (6). DK - Installation af zeolit-kulfilteret (valgfrit) (6).
5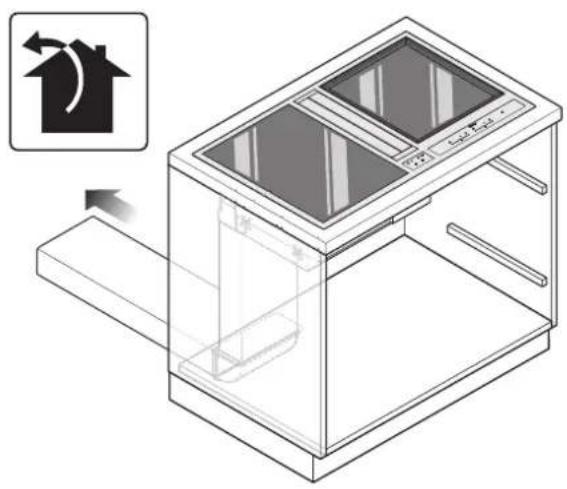
6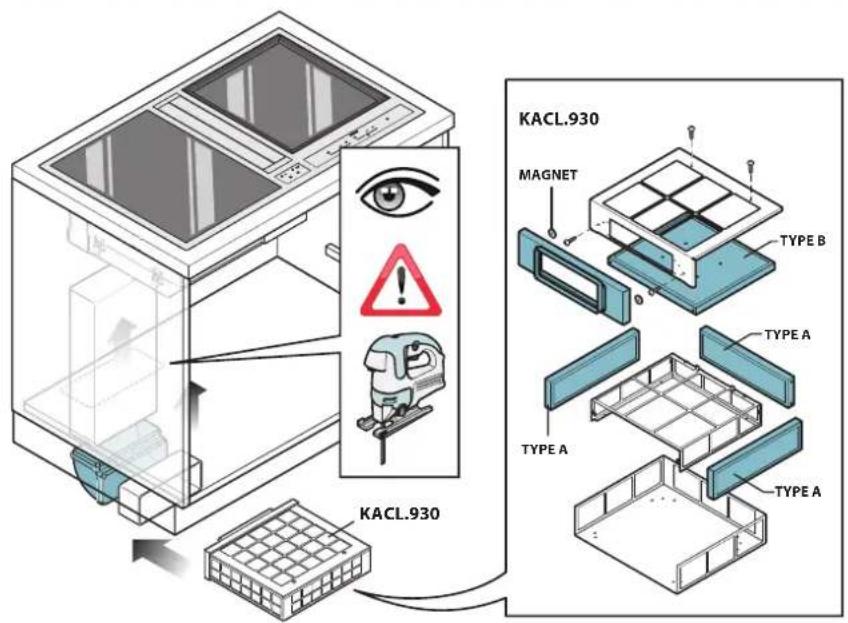
Installation operations are to be carried out by skilled and qualified installers in accordance with the instructions in this booklet and in compliance with the regulations in force.
DO NOT use the hood if the power supply cable or other components are damaged: disconnect the hood from the electrical power supply and contact the Dealer or an authorised Servicing Dealer for repairs.
Do not modify the electrical, mechanical or functional structure of the equipment.
Do not personally try to carry out repairs or replacements. Interventions carried out by incompetent and unauthorised persons can cause serious damage to the unit or physical and personal harm, not covered by the Manufacturer's warranty.
WARNING FOR THE INSTALLER
TECHNICAL SAFETY
Before installing the hood, check the integrity and function of each part. Should anomalies be noted, do not proceed with installation and contact the Dealer.
Do NOT install the hood if an aesthetic (or cosmetic) defect has been detected. Put it back into its original package and contact the dealer.
No claim can be made for aesthetic (or cosmetic) defects once it has been installed.
During installation, always use personal protective equipment (e.g.: Safety shoes) and adopt prudent and proper conduct.
The installation kit (screws and plugs) supplied with the hood is only to be used on masonry walls: in case of installation on walls of a different material, assess other installation options keeping in mind the type of wall surface and the weight of the hood (indicated on page 2).
Keep in mind that installations with different types of fastening systems from those supplied, or which are not compliant, can cause electrical and mechanical seal danger. Do not install the hood outdoors and do not expose it to atmospheric elements (rain, wind, etc.).
ELECTRICAL SAFETY
The electrical system to which the hood is to be connected must be in accordance with local standards and supplied with earthed connection in compliance with safety regulations in the country of use. It must also comply with European standards regarding radio antistatic properties.
Before installing the hood, check that the electrical mains power supply corresponds with what is reported on the identification plate located inside the hood. The socket used to connect the installed equipment to the electrical power supply must be within reach; otherwise, install a mains switch to disconnect the hood when required.
Any changes to the electrical system must be carried out by a qualified electrician.
The maximum length of the flue fastening screws (supplied by the manufacturer) must be 13 mm. Use of non-compliant screws with these instructions can lead to danger of an electrical nature.
Do not try to solve the problem yourself in the event of equipment malfunction, but contact the Dealer or an authorised Servicing Department for repairs.
When installing the hood, disconnect the equipment by removing the plug or switching off the main switch.
FUMES DISCHARGE SAFETY
Do not connect the equipment to discharge pipes of fumes produced from combustion (for example boilers, fireplaces, etc.).
Before installing the hood, ensure that all standards in force regarding discharge of air out of the room have been complied with.
Deviation for Australia and New Zealand: Range hoods and other cooking fume extractors may adversely affect the safe operation of appliances burning gas or other fuels (including those in other rooms) due to back flow of combustion gases. These gases can potentially result in carbon monoxide poisoning. After installation of a range hood or other cooking fume extractor, the operation of flued gas appliances should be tested by a competent person to ensure that back flow of combustion gases does not occur. (AS/NZS 60335.2.31:2013/A4:2020)
USER WARNINGS
These warnings have been drawn up for your personal safety and those of others. You are therefore kindly asked to read the booklet carefully in its entirety before using or cleaning the equipment.
The Manufacturer declines all responsibility for any damage caused directly, or indirectly, to persons, things and pets as a consequence of failing to comply with the safety warnings indicated in this booklet.
It is imperative that this instruction booklet is kept together with the equipment for any future consultation.
If the equipment is sold or transferred to another person, make sure that the booklet is also supplied so that the new user can be made aware of the hood's operation and relative warnings.
After the stainless steel hood has been installed, it will need to be cleaned to remove any residues remaining from the protection adhesive as well as any grease and oil stains which, if not removed, can cause irreversible damage to the hood surface. To properly clean the unit, the manufacturer recommends using the supplied moist wipes, which are also available sold separately.
Insist on original spare parts.
INTENDED USE
The equipment is solely intended to be used to extract fumes generated from cooking food in non-professional domestic kitchens: any other use is improper. Improper use can cause damage to persons, things, pets and exempts the Manufacturer from any liability.
The equipment can be used by children over the age of 8 and by persons with reduced physical, sensory and mental abilities, or with no experience or knowledge, as long as they do so under supervision or after having received relative instructions regarding safe use of the equipment and understanding of the dangers connected to it.
Children are not to play with the equipment. Cleaning and maintenance by the user must not be carried out by children without supervision.
USE AND CLEANING WARNINGS
Before cleaning or carrying out maintenance operations, disconnect the equipment by removing the plug or switching off the main switch.
Do not use the hood with wet hands or bare feet.
Always check that all electrical parts (lights, extractor fan) are off when the equipment is not being used.

Do not rest objects on top of the motorised fins.
The maximum overall weight of any objects placed or hung (if applicable) on the hood must not exceed 1.5 kg.
Always supervise the cooking process during the use of deep-fryers: Overheated oil can catch fire.
Do not leave open, unattended flames under the hood.
Do not prepare food over an open flame under the hood.
Never use the hood without the metal anti-grease filters: in this case, grease and dirt will deposit in the equipment and compromise its operation.
Accessible parts of the hood can be hot when used at the same time as the cooking appliances.
Do not carry out any cleaning operations when parts of the hood are still hot.
There can be a risk of fire if cleaning is not carried out according to the instructions and products indicated in this booklet.
Disconnect the main switch when the equipment is not used for long periods of time.
If other appliances that use gas or other fuels are being used at the same time (boiler, stove, fireplaces, etc.), make sure the room where the fumes are discharged is well-ventilated, in compliance with the local regulations.
INSTALLATION
only intended for qualified personnel

Before installing the hood, carefully read the chapter 'SAFETY INSTRUCTIONS AND WARNINGS'.
TECHNICAL FEATURES
The technical specifications are exhibited on the labels located inside the hood.
POSITIONING
Do not install the hood outdoors and do not expose it to outdoor environment (rain, wind, etc.).
ELECTRICAL CONNECTION
(only intended for qualified personnel)

Disconnect the equipment from electrical mains power supply before carrying out any operations on the hood.
Ensure that the wires inside the hood are not disconnected or cut:
in the event of damage, contact your nearest Servicing Department.
Refer to qualified personnel for electrical connections.
Connection must be carried out in compliance with the provisions of law in force.
Before connecting the hood to the electrical mains power supply, check that:
- voltage supply corresponds with what is reported on the data plate located inside the hood;
- the electrical system is compliant and can withstand the load (see the technical specifications located inside the hood); the power supply plug and cable do not come into contact with temperatures exceeding 70°C
- the power supply system is effectively and properly connected to earth in compliance with regulations in force;
- the socket used to connect the hood is within reach.
In case of:
- devices fitted with cables without a plug: the type of plug to use is a "standardised" one. The wires must be connected as follows: yellow-green for earthing, blue for neutral and brown for the phase. The plug must be connected to an adequate safety socket.
- fixed equipment not provided with a power supply cable and plug, or any other device that ensures disconnection from the electrical mains, with an opening gap of the contacts that enables total disconnection in overvoltage category III conditions.
Said disconnection devices must be provided in the mains power supply in compliance with installation regulations.
The yellow/green earth cable must not be cut off by the switch.
The Manufacturer declines all responsibility for failure to comply with the safety regulations.
FUMES DISCHARGE
EXTERNAL EXHAUST HOOD (SUCTION)
In this version the fumes and vapours are discharged outside through the exhaust pipe.
To this end, the hood outlet fitting must be connected via a pipe, to an external output.
The outlet pipe must have:
a diameter not less than that of the hood fitting. - a slight slope downwards (drop) in the horizontal sections to prevent condensation from flowing back into the motor. the minimum required number of bends. the minimum required length to avoid vibrations and reduce the suction performance of the hood.
You are required to insulate the pipes if it passes through cold environments. In the presence of motors with 800m-1 or higher, a check valve is present to prevent external air flowing back.
Deviation for Germany:
when the kitchen hood is used at the same time as appliances that are powered by energy other than electricity, the negative pressure in the room must not exceed 4 Pa (4 x 10⁻⁵ bar).
HOOD WITH INTERNAL RECIRCULATION (FILTERING)

In this model, the air passes through the charcoal filters (optional) to be purified and recycled in the environment. For assembly, see the instructions.
ASSEMBLY INSTRUCTIONS
only intended for qualified personnel

The hood can be installed in various configurations.
The generic assembly steps apply to all installations; for each case, follow the specific steps provided for the required installation.
OPERATION
WHEN TO TURN ON THE HOOD?
Switch on the hood at least one minute before starting to cook to direct fumes and vapours towards the suction surface.
After cooking, leave the hood operating until complete extraction of all vapours and odours. By means of the Timer function, it is possible to set auto switch-off function which will allow the hood to turn off automatically after 15 minutes of operation.
WHICH SPEED IS TO BE SELECTED?
speed (1-3): maintains the circulation of clean air with low electricity consumption.
speed (4-5): normal conditions of use.
speed (6-7): presence of strong odours and vapours.
speed (8-P): rapid disposal of odours and vapours.
WHEN SHOULD THE FILTERS BE WASHED OR REPLACED?
The metal filters must be cleaned every 30 hours of operation.
The active carbon filters must be replaced every 3-4 months, depending on the use of the hood.
For further details see the "MAINTENANCE" chapter.
| ① | ON/OFF Hood switch ON/OFF |
| + | Speed increase from 1 to...9 (up to "P"). Speed "P": active only for a few minutes, then speed 9. |
| - | Speed decrease from P to 1. |
| L | With hood active (short pulse): TIMER (flashing red LED) Automatic switch-off after 15 min. The function is disabled (red LED OFF) if: - The motor is switched off (button ① - Press the TIMER button ② again. With the hood OFF (long pulse 4s): opening the fins for hood and metal filter maintenance ③ Hold down the key for 4 seconds to exit maintenance mode. |
| FAT METAL FILTER ALARM Maintenance after about 30 hours' use. Press button ④ ⑤ seconds to reset the counter. | |
| CARBON.ZEO FILTER ALARM Maintenance after about 2000 hours' use. Press button ⑥ ⑦ seconds to reset the counter. | |
| To activate the alarm: With the hood OFF, press the buttons + and - for 3 seconds. The LED lights up. Confirm with button + |

If the pushbutton panel is completely inactive, before contacting the Technical assistance service, disconnect power temporarily to the appliance (about 5 seconds), possibly by acting on the main switch, to
restore normal operation. If this measure has no effect, contact the Technical assistance service.
MAINTENANCE

Before cleaning or carrying out maintenance operations, disconnect the equipment by removing the plug or switching off the main switch.
Do not use detergents containing abrasive, acidic or corrosive substances or abrasive cloths.
Regular maintenance guarantees proper operation and performance over time. Special attention is to be paid to the metal anti-grease filters: frequent cleaning of the filters and their supports ensures that no flammable grease is accumulated.
CLEANING OF EXTERNAL SURFACES
You are advised to clean the external surfaces of the hood at least once every 15 days to prevent oily substances and grease from sticking to them. To clean the brushed stainless steel hood, the Manufacturer recommends using "Magic Steel" wipes.
Alternatively and for all the other types of surfaces, it can be cleaned using a damp cloth, slightly moistened with mild, liquid detergent or denatured alcohol. Complete cleaning by rinsing well and drying with soft cloths.

Do not use too much moisture or water around the push button control panel and lighting devices in order to prevent humidity from reaching electronic parts.
The glass panels can only be cleaned with specific, non-corrosive or non-abrasive detergents using a soft cloth.

Do not wash the flaps in a dishwasher.
The Manufacturer declines all responsibility for failure to comply with these instructions.
CLEANING OF INTERNAL SURFACES

Do not clean electrical parts, or parts related to the motor inside the hood, with liquids or solvents.
For the internal metal parts, see the previous paragraph.
METAL ANTI-GREASE FILTERS
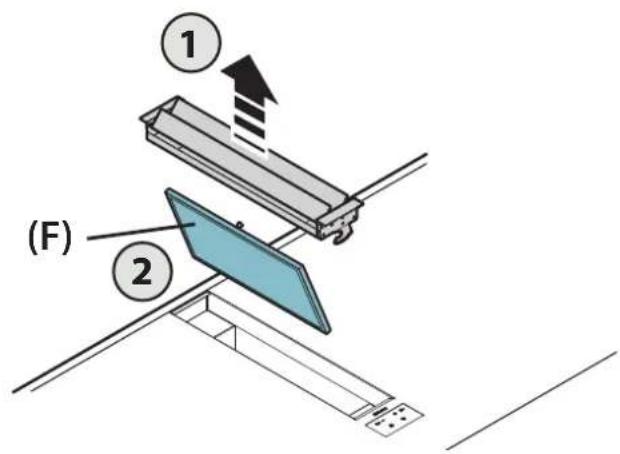
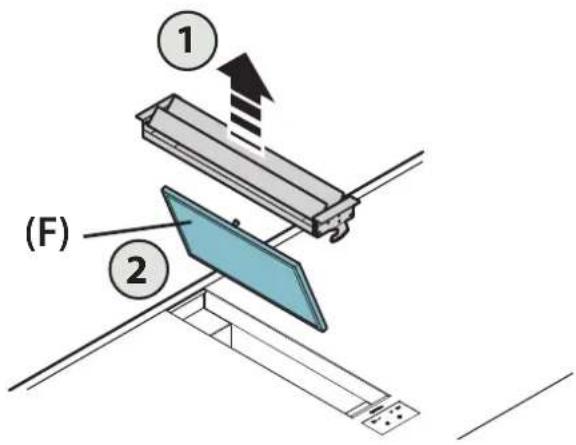
It is advised to frequently wash the metal filters (F) (at least once a month) leaving them to soak in boiling water and cleaning solution for 1 hour, taking care not to bend them.
Do not use corrosive, acid or alkaline detergents.
Rinse them well and wait for them to be completely dry before reassembling them.
Washing in a dishwasher is permitted, however, it may cause the filter material to darken: to reduce the possibility of this problem from happening, use low-temperature washes (55°C max.).
To extract and insert the metal anti-grease filters see the assembly instructions.
CARBON-ZEO FILTERS
Under normal conditions, they should be regenerated every 18 months and replaced after 3 years. To regenerate the filter, follow the following procedure:
- Remove the filter as described in the instructions (Fig. 12).
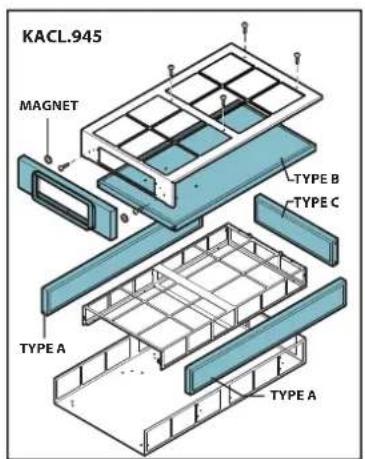
- Insert filters A, B and C (if any) in a domestic oven at 200°C for about 2 hours.
- When the filter has cooled down, refit the 4 filters onto the metal structure of the filter.
GREASE DRIP TRAY
It is advisable to clean the tray once a month.
Do not use corrosive, acid, or alkaline detergents.
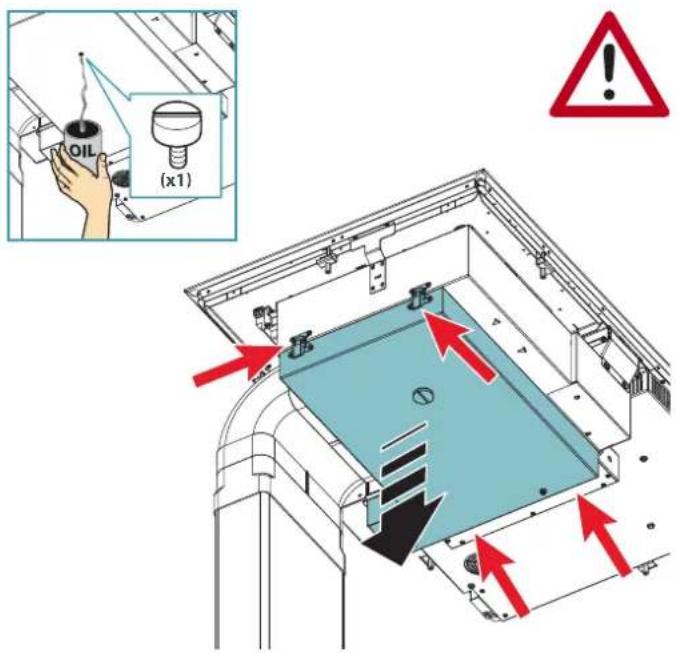
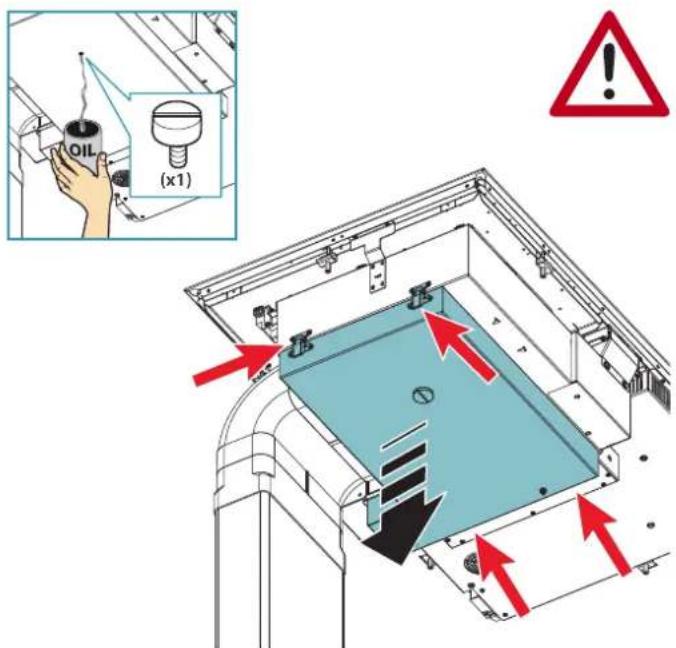
For more thorough cleaning, remove the oil collection tray (see figure) and wash it with hot water and washing-up liquid. Rinse it well and wait for it to be completely dry before reassembling it. They are dishwasher safe.
DISPOSAL AFTER END OF USEFUL LIFE

The crossed-out trash or refuse bin symbol on the appliance means that the product is WEEE, i.e. "Waste electrical and electronic equipment", accordingly it must not be disposed of with regular unsorted waste (i.e. with "mixed household waste"), but it must be disposed of separately so that it can undergo specific processing for its re-use, or a specific treatment, to remove and safely dispose of any substances that may be harmful to the environment and remove the raw materials that can be recycled.
Proper disposal of these products contributes to saving valuable resources and avoids potential negative effects on personal health and the environment, which may be caused by inappropriate disposal of waste.
You are kindly asked to contact your local authorities for further information regarding the designated waste collection points nearest to you. Penalties for improper disposal of such waste can be applied in compliance with national regulations.
INFORMATION ON DISPOSAL IN EUROPEAN UNION COUNTRIES
The EU WEEE Directive was implemented differently in each country, accordingly, if you wish to dispose of this appliance we suggest contacting your local authorities or dealer to find out what the correct method of disposal is.
INFORMATION ON DISPOSAL IN NON-EUROPEAN UNION COUNTRIES
The crossed-out trash or refuse bin symbol is only valid in the European Union: if you wish to dispose of this appliance in other countries, we suggest contacting your local authorities or dealer to find out what the correct method of disposal is.

WARNING!
The Manufacturer reserves the right to make changes to the equipment at any time and without prior notice. Printing, translation and reproduction, even partial, of this manual are bound by the Manufacturer's authorisation.
Technical information, graphic representations and specifications in this manual are for information purposes and cannot be divulged.
This manual is written in Italian. The Manufacturer is not responsible for any transcription or translation errors.
Induction 2Z
SAFETY INSTRUCTIONS AND WARNINGS
These warnings have been drawn up for your personal safety and the safety of others. You are therefore kindly asked to read the booklet carefully in its entirety before using or cleaning the equipment.
The Manufacturer declines all responsibility for any damage caused directly or indirectly to persons, things, and pets as a consequence of failing to comply with the safety warnings indicated in this booklet.
It is imperative that this instructions booklet is kept together with the equipment for any future consultation.

Intended use
- This cooker is intended to be used in domestic environments to prepare and keep dishes warm.
- Do not install the cooker outdoors and do not expose it to outdoor environment (rain, wind, etc.).
- Any other use is not admitted.
- The equipment can be used by children over the age of 8 and by persons with reduced physical, sensory, and mental abilities, or with no experience or knowledge, as long as they do so under supervision or after having received relative instructions regarding safe use of the equipment and understanding of the dangers connected to it. Children are not to play with the equipment. Cleaning and maintenance by the user must not be carried out by children without supervision.
- Do not leave the cooktop unattended while it is working.

Danger of burns
- Use the control lock to avoid that unauthorized people can switch on the appliance by themselves.
- Place handles of frying pans and saucepans in a way that children cannot touch them.
- Switch off the cooking areas after use.
- Do not place any metal object on cooking areas that are on.

Technical safety
- Installation operations are to be carried out by skilled and qualified installers in accordance with the instructions in this booklet and in compliance with the regulations in force.
If the power cable or other components are damaged, the cook top shall NOT be used: disconnect the cooker from the power supply and contact the Dealer or an authorised Servicing Department for repairs.
Do not modify the electrical, mechanical or functional structure of the equipment.
Do not personally try to carry out repairs or replacements. Interventions carried out by incompetent and unauthorised persons can cause serious damage to the unit or physical and personal harm, not covered by the Manufacturer's warranty.
- Before installing the cooker, check the integrity and function of each part. Should anomalies be noted, do not proceed with installation and contact the Dealer.

The electrical system to which the cooker is to be connected must be in accordance with local standards and supplied with earthed connection in compliance with safety regulations in the country of use. It must also comply with European standards regarding radio anti-rotic properties.
- The connection data (voltage and frequency) shown on the data plate of the cooker must match with those of the electric network. Compare these data before connection. In case of doubts, refer to an electrician.
- Do not use the cooker before installing it.
- It is forbidden to use the cooktop on moving equipment.
- Never open the case of the appliance.
- Falmec assures the compliance with the safety standards with original spare parts only.
- The appliance is not intended for use with external timer or remote control.
USE WARNINGS

Before powering the appliance for the first time, remove any protective films and adhesives.
While using, saucepans and kitchenware can cause noise that can depend on:
- a high power level.
- different materials of the bottom of saucepans.
- Never use water to put fire out. Deactivate the cooking area. Choke flames with a cover, a fireproofing blanket or something similar to it.
- Do not keep inflammable objects in the drawers below the cooker. The cutlery tray shall be made up of fire-resistant material.
- Do not heat empty saucepans or frying pans and always check that saucepans have a minimum quantity of liquids inside.
- Switch off the cooker after use.
- Continuously check the cooking in case of greases and oils used, as they can easily catch fire.
- Heat greases and oils at maximum for one minute and never use the Booster function.
- Pay attention not to burn yourself during and after using the device.
- Make sure that no fixed or mobile power cable of the device is in contact with the glass or a hot frying pan.
- Do not use the cooker to heat pots.
- Do not apply any type of cover on the cooktop.
- Electrical cables are not to be in contact with the cooker.
- It is recommended to protect hands from heat using pot holders. Only use dry gloves or pot holders.
- Only use saucepans and frying pans with a smooth and magnetic bottom.
- Avoid that sugar, synthetic materials of aluminium, films are in contact with the hot areas. During cooling, those substances can cause cracks or other alterations on the pyroceram surface: switch off the device and immediately remove from the cooking area that is still hot
- Move kitchenware by lifting it so as not to scrape the surface of the cooker.
- Saucepans and cooker are to be perfectly cleaned before being in contact.
- Do not let objects fall down and do not put any object on it! Only use saucepans with magnetic bottom. Other materials are not admitted.
- Use saucepans of appropriate size to the desired cooking area.
Kitchenware have different types of bottoms.
The bottoms can be completely ferrous, non-ferrous or a blend of both materials.
- Bottoms with non-ferrous material (aluminium, copper, ...) cannot be used with induction hobs.
- Bottoms with blended material might not heat evenly or reach high temperatures. If bottoms mainly consist of non-ferrous material, the hob might not recognise the pan and the cooking zone does not switch on. Furthermore some of these materials tend to release material that bonds with the screen-printing of the glass, ruining it beyond repair.
- Fully ferrous flat bottoms are the most suitable and the heat is distributed evenly.
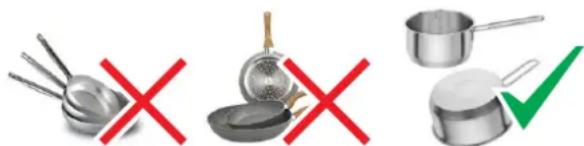
Always use a saucepan or frying pan on each cooking area, even with the BRIDGE function. - Never put hot kitchenware on sensor keys and lamps. Hot kitchenware on sensor keys and lamps can damage the electronics. Keep controls and lamps always clean. - Pacemaker warning: For users who have a pacemaker, the magnetic field can affect its operation. It is recommended to refer to the dealer or to a doctor. - Credit cards, pocket calculators, etc. are not to be in immediate proximity to a cooker switched on.
- Do not keep metal objects directly below the cooker.
- Possibly use covers always to avoid heat dispersion. Cook with little water. After starting grilling or cooking dishes bring the power level to a lower one.
SAFETY DEVICES ON THE COOKER
Safety shutdown
If a cooking area exceeds the maximum time for operation at the same power, it is automatically switched off and the indication of the residual heat is shown. To reset the cooking area, touch the necessary keys.
| Power level | 1 | low | 2 | 3 | 4 | 5 | 6 | 7 | 8 | 9 | P | ||||
| Maximum duration of operation in hours | 8.7 | 2.0 | 8.7 | 6.7 | 5.3 | 4.3 | 3.5 | 2.8 | 2.3 | 1.9 | 1.5 |
The cooker switches off automatically if one or more controls stay covered for more than 10 seconds.
To restore the proper operation:
- remove all objects from the control panel.
- clean the control panel.
- restart the cooker and the concerned area.
Overheating device
Before items of the cooker can overheat, the control reduces the used power by following this procedure for protection measures:
- Deactivation of booster and power booster if turned on.
- Reduction of the power level set.
- Shutdown of the cooking area concerned.
On the display of the cooking area the message "E2" is displayed.
It is possible to restore the cooking area when the default message is off.
ELECTRICAL SAFETY
The electrical system to which the cooker is to be connected must be in accordance with local standards and supplied with earthed connection in compliance with safety regulations in the country of use. It must also comply with European standards regarding radio antistatic properties.
Make sure that it can't be possible to touch the power cable of the cooker after it has been built-in and that it is not subject to mechanical stress.
The socket used to connect the installed equipment to the electrical power supply must be within reach: otherwise, install a mains switch to disconnect the hood when required.
Any changes to the electrical system must be carried out by a qualified electrician.
Do not try to solve the problem yourself in the event of equipment malfunction, but contact the Dealer or an authorised Servicing Department for repairs.
When installing the cooker, disconnect the equipment by removing the plug or switching off the main switch.
ELECTRICAL CONNECTION
(only intended for qualified personnel)
! Disconnect the equipment from mains power network before carrying out any operation on the cooker. Make sure that electric wires inside the cooker are not disconnected or cut:
in the event of damage, contact your nearest Servicing Department. Refer to qualified personnel for electrical connections.
Connection must be carried out in compliance with the provisions of law in force.
Before connecting the cooker to the mains power network, check that: - the mains voltage corresponds with the voltage indicated on the data plate located inside the cooker. - the electrical system is compliant and can withstand the load (see the technical specifications located inside the cooker); - the power supply plug and cable do not come into contact with temperatures exceeding 70°C; - the power supply system is effectively and properly connected to earth in compliance with regulations in force. - the socket used to connect the cooker is within reach.
In case of:
- devices fitted with cables without a plug: the type of plug to use is a "standardised" one. The wires must be connected as follows: yellow-green for earth, blue for neutral and brown for the phase. The plug must be connected to an adequate safety socket.
- fixed equipment not provided with a power supply cable and plug, or any other device that ensures disconnection from the electrical mains, with an opening gap of the contacts that enables total disconnection in overvoltage category III conditions. Said disconnection devices must be provided in the mains power supply in compliance with installation regulations.
The yellow/green earth cable must not be cut off by the switch.
The Manufacturer declines all responsibility for failure to comply with the safety regulations.
Connection of the cooker:
| network Connection | Cable section Power cable | Switch gauge |
| 230V~50/60Hz | Single-phase + N | H 05 VV - F H 05 RR - F |
- calculated with the contemporary factor in compliance with EN 60 335-2-6.
POWER:
| Feature | INDUCTION 2Z |
| Total power 3500W | |
| Front position | |
| Rated power 1600W | |
| Booster power 1850W | |
| Back position | |
| Rated power 2100W | |
| Booster power (1/2) 2100/3000W |

| Control description | |
| ① | Cooker top ON/OFF. In case no other control is enabled, the cooker switches off automatically after a few seconds |
| ■□ | Selection of the front cooking area. If pressed together with it enables the BRIDGE function. |
| □■ | Selection of the back cooking area. If pressed together with it enables the BRIDGE function. |
| ○ | Control block: pressed for more than 2 seconds it inhibits all controls. To release controls, repeat the operation. |
| + | Increase of the power level for cooking and booster selection, or increase of cooking time of the TIMER function. |
| — | Decrease of the power level for cooking and booster selection, or decrease of cooking time of the TIMER function. |
If the pushbutton panel is completely inactive, before contacting the Technical assistance service, disconnect power temporarily to the appliance (about 5"), possibly by acting on the main switch, to restore normal operation. If this measure has no effect, contact the Technical assistance service.
| Display display description | |
| 8 | Cooking area in stand-by |
| 1......9 | Levels of power from the lowest to the highest one, which can be selected pressing the keys + and - . |
| 8 | Power boost : 85% of the cooking power |
| 8+8(right display only) | Power boost : 100% of the cooking power |
| 8 | Indication of the residual heat |
| 8 | Level of power between 0 and 1, suitable to keep dishes warm |
| 8 | Bridge function enabled (min Ø230mm). |
| 8 | Saucepan not on the cooker or not suitable for material and size (min Ø120mm). |
| 8+8(on central display) | Control block function enabled. |
OPERATION AND USE OF THE COOKTOP
When a cooking area is turned on, the bottom of the saucepan heats. The cooking area only heats thanks to the heat given by the saucepan. The cooktop automatically detects the size of the saucepan. The heating power is to be chosen based on what shall be cooked. Please find below a short table:
SETTING AREAS
| 1-2 | Melt Heat | Sauces, butter, chocolate, gelatine Precooked dishes |
| 2-3 | Whisk Defrost | Rice, pudding and cooked dishes Vegetables,fish,frozen food |
| 3-4 | Steam Vegetables,fish,meat | |
| 4-5 | Boil | Boiled potatoes,soups,pasta Fresh vegetables |
| 6-7 | Cook over a low heat | Meat,liver,eggs,sausages Goulash,rolate,tripe |
| 7-8 | Cook Fry | Potatoes,donuts,cakes |
| 9 | Fry,bring to the boil | Steaks, omelettes Boil |
| P | Fry,bring to the boil | Bring to the boil big quantities of water |
Remark: heating time of cooktops is shorter than the gas cookers.
BRIDGE FUNCTION
This function allows for the simultaneous operation of the 2 cooking areas
To enable:
- Enable the cooktop;
press simultaneously the symbols +
- the symbol will be displayed on the screen of the front cooking area;
- Push the keys + and - to set power.
DEACTIVATION of the BRIDGE function:
press simultaneously the symbols +
BOOSTER FUNCTION
The Booster strengthens power, so that big quantities can be heated (e.g. water to cook pasta).
This power increase is enabled for max. 10 minutes.
- Turn on the cooker;
- select the cooking area;
- Touch (+) until the back cooking area is displayed on the screen.
Booster Activation
For the back cooking area, it is possible to enable a double booster:
- Touch the key (+) until the symbol P+H is displayed.
KEEP WARM FUNCTION
42°C - Keeping temperature of cooked dishes:
Turn on the cooker;
Select the cooking area;
Touch the key (+) : the symbol is displayed
Shutdown of the cooker
To shutdown the cooking area:
Touch the key (-) until 0 is displayed on the screen of the cooking area.
If the cooking area is still too hot, the residual heat is specified.
Turn off the cooker
Touch the key all cooking areas are deactivated.
On the display of the cooking areas that are still too hot, the symbol H is displayed.

Do not touch the cooking areas until the lamp is on.
TIMER FUNCTION
AND AUTOMATIC SHUTDOWN
The timer has two functions:
1 - TIMER;
2 - AUTOMATIC SHUTDOWN of one or more cooking areas.
It is possible to set the duration up to 99 minutes.
Once the set time is over, the display shows 00 and a sound warning is activated, which can be deactivated by pressing the keys (+) or (-).
TIMER
The timer can be used with the cooker being on or off.
To set:
- Press simultaneously the keys (+) and (-).
(on the premium version the lamp is on)
- Set the desired time by touching the keys (+) and (-).
Timer starts passing.
To modify time repeat the procedure from point 1.
To cancel timer:
- Press simultaneously the keys (+) and (-) .
(on the premium version the lamp is on ①
- Touch the key (-) to bring time to 00.
AUTOMATIC SHUTDOWN
For the automatic shutdown function:
1 - turn on the cooker; 2 - select the cooking area; 3 - select the level; 4 - set the timer as described above.
To set the automatic shutdown for another cooking area, repeat the procedure from point 2.
TIMER and AUTOMATIC SHUTDOWN can be used simultaneously.
WHAT TO DO IN CASE OF PROBLEMS
The cooker or cooking areas do not turn on:
- The cooker is not connected to the electric network. The protection fuse is released.
- Check if the block is not active.
- Keys are covered with water or grease. An object is placed on the keys.
The symbol is displayed.
- There is no saucepan on the cooking area. The container used is not compatible with cooktops.
- The diameter of the saucepan bottom is too small compared to the cooking area.
The symbol [E] is displayed:
- Disconnect and connect the cooker.
- Contact the after-sales centre.
One of the areas or the entire cooker turns off:
- The safety overheating system is active;
- The cooker or one cooking area remains on for too long; one or more keys are covered;
- one of the saucepans is empty and the bottom overheated.
The fan keeps on working after the cooker shutdown:
- This is not a malfunction: the fan keeps on protecting the electronic power unit of the device. The fan stops automatically.
The symbol [E2] or [EH] is displayed:
The cooker overheated, leave it cool and then turn it on again.
The symbol [E6] is displayed:
- Defective electrical network. Check the network voltage and frequency.
The symbol [E8] is displayed:
The air inlet of the fan is clogged, clean it.
CLEANING AND MAINTENANCE instructions

ATTENTION!
For cleaning, never use a steam equipment.
Before cleaning the cooker, make sure that it is at room temperature. Always clean the cooker after each use with a specific cleanser for pyroceram.
Do not use products containing:
- corrosive agents (soda, acids, ammoniac).
- abrasive agents (dusts or paste).
Do not use pointed or abrasive objects.
After cleaning, dry the appliance with a soft cloth.
USEFUL CARE TIPS
Clean your glass-ceramic cooktop regularly, preferably every time you use it. Avoid using abrasive sponges or scouring agents.
Harsh chemical cleaners like oven sprays or stain removers are also unsuitable, as are bathroom or household cleaners.
Accidents happen ...
Do not allow the hot hob to come into contact with plastic, tin foil, sugar, or sugary food that has fallen on the hot glass-ceramic cooktop. Please scrape it off the hot surface as quickly as possible. If these substances melt, they can damage the glass-ceramic cooktop.
Sparkling results in only three steps:
To thoroughly clean your glass-ceramic cooktop, first remove dirt and food with a suitable metal scraper.
Once the glass-ceramic cooktop has cooled, put a few drops of a suitable cleaner on it and rub it on with a paper towel or a clean cloth.
Then wipe the glass-ceramic cooktop with a damp cloth and dry it with a clean cloth.
How do I identify a suitable glass-ceramic scraper?
- Scraper made of metal (won't melt or catch fire)
- Scraper easy to lock / to unlock
- Blade is fixed precisely, it does not shift
- Blade is unbroken, clean and stainless
- Scraper certified by testing institute, if procurable (e.g. TÜV-GS seal)
- User manual and safety instructions available
If the appliance is built-in over an oven or an electric kitchen fitted with pyrolytic system, do not operate it while the pyrolytic procedure is under way, as the overheating protection of the cooker can be released (see relevant chapter).
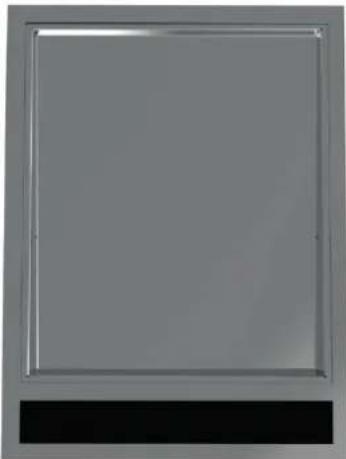
Teppan Yaki
SAFETY INSTRUCTIONS AND WARNINGS
These warnings have been drawn up for your personal safety and those of others. You are therefore kindly asked to read the booklet carefully in its entirety before using or cleaning the appliance.
The Manufacturer declines all responsibility for any damage caused directly, or indirectly, to persons, things and pets as a consequence of failing to comply with the safety warnings indicated in this booklet.
It is imperative that this instructions booklet is kept together with the appliance for any future consultation.

Intended use
- This appliance is intended for home use, exclusively for cooking food.
- Do not install the Teppan Yaki outdoors and do not expose it to outdoor environment (rain, wind, etc.).
- Any other use is not admitted.
- The appliance can be used by children over the age of 8 and by persons with reduced physical, sensory and mental abilities, or with no experience or knowledge, as long as they do so under supervision or after having received relative instructions regarding safe use of the appliance and understanding of the dangers connected to it.
Children are not to play with the appliance. Cleaning and maintenance by the user must not be carried out by children without supervision.
- Never move away while the Teppan Yaki is working.

Risk of burns
- Use the control lock to prevent unauthorized people from switching on the appliance by themselves.
- Switch off the cooking zones after use.
- Do not place any metal objects on cooking zones that are on.
- During operation and for at least 2 hours after use, some parts of the appliance remain very hot! Do not come into contact with these parts without adequate personal protection.
- Do not use the appliance as a supporting surface.
- Never place objects that are sensitive to heat or flammable (e.g., pot holders, curtains, alcoholic containers, etc.) near the appliance.
- Do not cover the appliance or parts of it with aluminum foil or anything similar.
- Never heat up tin cans or airtight containers on the appliance: the overpressure generated by the heat could cause them to explode, thereby causing serious personal damage.

Technical safety
- If the power cable or other components are damaged, the Teppan Yaki must NOT be used: disconnect it from the power supply and contact the Retailer or an authorized Servicing Centre for repairs.
Do not modify the electrical, mechanical, or functional structure of the appliance.
Do not personally try to carry out repairs or replacements. Interventions carried out by incompetent and unauthorized persons can cause serious damage to the unit or physical and personal harm, not covered by the Manufacturer's warranty.
The electrical system to which the Teppan Yaki must be connected must conform to the safety regulations in the country of use and be fitted with an earthing connection accordingly. It must also conform to European standards regarding radio anti-disturbance.
- The connection data (voltage and frequency) shown on the data plate of the Teppan Yaki must match those of the electric network.
Compare these data before connection.
In case of doubts, refer to an electrician.
- Do not use the Teppan Yaki before installing it.
- It is forbidden to use it on moving appliances.
- Never open the casing of the appliance.
- Falmec assures compliance with the safety standards only with original spare parts.
- The appliance is not intended for use with an external timer or remote control.
USE WARNINGS

Before powering the appliance for the first time, remove any protective films and adhesives.
- Never use water to put out fire. Deactivate the cooking area. Choke flames with a cover, a fireproofing blanket or something similar. Always switch off the Teppan Yaki after use.
- Continuously check the cooking in case of greases and oils used, as they can easily catch fire.
- Pay attention not to burn yourself during and after using the device.
- Electrical cables must not be in contact with the Teppan Yaki.
- Never place items on the sensor keys and lamps. Always keep controls and lamps clean.
- During cooking, use all the precautions to avoid scratching the cooking plate.
SAFETY DEVICES ON THE COOKER
Safety switch-off
The appliance switches off automatically if the safety thermostat is triggered.
ELECTRICAL SAFETY
The electrical system to which the Teppan Yaki must be connected must conform to the safety regulations in the country of use and be fitted with an earthing connection accordingly. It must also conform to European standards regarding radio anti-disturbance.
Make sure that the power cable cannot be touched after it has been recessed and that it is not subject to mechanical stress. The socket used to connect the installed appliance to the electrical power supply must be within reach: otherwise, install a mains switch to disconnect the appliance when required.
Any changes to the electrical system must be carried out by a qualified electrician. Do not try to solve the problem yourself in the event of appliance malfunction, but contact the Dealer or an authorized Servicing Department for repairs.
ELECTRICAL CONNECTION
(only intended for qualified personnel)
Disconnect the appliance from the electrical mains before carrying out any operation on it.
Make sure that wires inside the appliance are not disconnected or cut: otherwise, contact the nearest Servicing Centre.
Refer to qualified personnel for electrical connections. Connection must be carried out in compliance with the provisions of law in force.
Before connecting the Teppan Yaki to the mains, check that: the mains voltage corresponds with that indicated on the data plate; the electrical system is up to standard and can withstand the load; the power supply plug and cable do not come into contact with temperatures exceeding 70°C; the power supply system is effectively and properly connected to earth in compliance with regulations in force; the socket used to connect the cooker is within reach.
In case of:
- devices fitted with cables without a plug: the type of plug to use is a "standardized" one. The wires must be connected as follows: yellow-green for earth, blue for neutral, and brown for the phase. The plug must be connected to an adequate safety socket.
- fixed appliance not provided with a power supply cable and plug, or any other device that ensures disconnection from the electrical mains, with an opening gap of the contacts that enables total disconnection in overvoltage category III conditions.
Said disconnection devices must be provided in the mains power supply in compliance with installation regulations.
The yellow/green earth cable must not be cut off by the switch.
The Manufacturer declines all responsibility for failure to comply with the safety regulations.
OPERATING AND USING THE TEPPAN YAKI

| Control Description | |
| ① | Teppan Yaki switch-on and off |
| + | Increases the power level |
| - | Decreases the power level |
| Timer selection for timed switch-off of the Teppan Yaki (from 1 - 99 minutes) | |
| Front and rear heating zones | |
| 88 | Display: indicates the power level (1 - 9) or timer (1 - 99) |
| Press the + and - keys simultaneously to activate the keyboard lock. Press the + and - keys again to unlock the keyboard | |
If the pushbutton panel is completely inactive, before contacting the Technical assistance service, disconnect power temporarily to the appliance (about 5 seconds), possibly by acting on the main switch, to restore normal operation. If this measure has no effect, contact the Technical assistance service.
The Teppan Yaki allows you to cook on the entire plate or in the front or back part, with a temperature adjustment from 0 to 250°C, using a touch keypad. Teppan Yaki allows you to cook meat, fruit, vegetables, etc. using just a little vegetable fat (butter, oil, lard).
Thoroughly clean the appliance before and after each use.

First switch-on:
Thoroughly clean all the components - Heat the plate for about 10 minutes without placing any items or food. The appliance could emit smoke and odours; this way, the grease used to treat the heating elements is eliminated - Ventilate the room
USING THE TEPPAN YAKI
| Switch the Teppan Yaki on | ① |
| Select the desired power using the + and - keys in the desired area. ATTENTION: if only part of the Teppan Yaki is used, the other part will also heat up partly by contact. If you want to use the entire Teppan Yaki at the same temperature: set the desired power on both zones. | ②→+← ③→+← ④→+← |
| Wait a few minutes to allow the plate to warm up. | |
| Grease the plate and place the dish to be cooked. | |
| Turn the food only when it detaches easily from the plate. ATTENTION: do not scratch the Teppan Yaki with the utensils. | ⑤→ |
| Switch the Teppan Yaki off once cooking is completed. | ⑥→① |
| The display shows "H for about 1 h after switching off. ATTENTION: the Teppan Yaki is not necessarily cold if "H does not appear on the display. The plate remains hot for at least 2 h. Do not come into contact with these parts without adequate personal protection. | H |
Cooking tips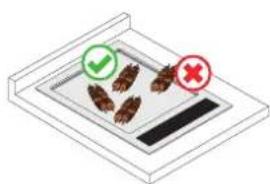
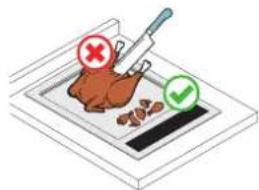
- Distribute the food evenly and homogeneously over the entire cooking surface
- Do not cut the food on the Teppan Yaki. Prepare the pre-cut food into small portions
TIMER FUNCTION
The timer can be set individually for each cooking zone. The timer can be programmed from 1 to 99 minutes. When the time elapses, a buzzer is activated and the relevant cooking zone switches off.
Press the key to switch off the buzzer.

ATTENTION: The cooking plate remains hot for long after switch-off.
WHAT TO DO IN CASE OF PROBLEMS
The Teppan Yaki does not switch on:
It is not connected to the mains. The protection fuse is released. - Check if the block is not active. - Keys are covered with water or grease. An object is placed on the keys.
One of the zones or the entire Teppan Yaki switches off :
The safety overheating system is active;
CLEANING AND MAINTENANCE

WARNING!
Never clean with a steam device.
No specific maintenance is required on the appliance except for cleaning. For cleaning:
- Do not use products containing: Corrosive agents (soda, acids, ammonia)
- Abrasive agents (dusts or paste)
- Stainless surfaces: use a soft cloth lightly soaked in specific detergent (follow the directions given by the detergent manufacturer).
- Cooking plate: cleaning is easier when the temperature of the cooking plate is about 50-60°C. Remove the larger residue from the plate using rounded utensils. Then dampen the plate with a little water and dishwashing liquid and leave for a few minutes. Remove food residue with a cloth or kitchen paper. Rinse several times with a damp cloth and dry thoroughly.
- If you want to clean the plate between one cooking cycle and another: remove the larger residue from the plate using rounded utensils and place ice cubes and lemon juice on the hot plate. The ice will soften the deposits and the lemon will eliminate the odours of the previously cooked food. Use a utensil to remove everything.
| ① | - | 9 | + | |
SAFETY INSTRUCTIONS AND PRECAUTIONS
Installation must be carried out by qualified installers in accordance with the instructions in this manual and current regulatory requirements.
If the power supply cable or other parts are damaged, do not use the hood: disconnect the hood from the electrical supply and contact the distributor or an authorized technical support center for repair.
Do not make electrical, mechanical, or functional modifications to the appliance.
Do not attempt to replace parts or repair the appliance yourself. Work performed by unqualified or unauthorized personnel may cause damage, including serious damage, to the appliance and/or persons, for which the warranty does not apply.
PRECAUTIONS FOR INSTALLATION
SAFETY INSTRUCTIONS
Before proceeding with the installation of the hood, it is necessary to verify the integrity and correct functioning of all its parts. If any damage is found, do not proceed with installation, but contact the distributor.
If external defects are detected, do not install the hood; place it in its original packaging and contact the distributor.
After installation is complete, no claims regarding external defects will be accepted.
Bo Bpem yctaHOBN CneNyET Bcerda NOb3OBAtbcr CpndTBAMN INDINBnDyalbHOn 3aunTb (HaPnPmepe, 3aunTHa OByB) IN PPOBJIaTb OCTOPOXHOCTb NOCMOTPNTeJbHOCTb.
KOMnJIeKT KpeNexHbIX DeTanei (BnHTbl, IIO6en), NOCTaBnIeMbI C BbITAKOJ, MOXHO NcNoIb3OBaTb NCKIouHtEnbHO Ha KIpNnUHbIX CTeHax. B cnyae YCTaHOBKn Ha CTeHbI N3 dpyrnx MaTePnaIIOB, CneDyET PpHrtBo BVHmAHHe Dpyrnie KpeNexHbIE CNCTeMbI C yUeTOM IpOuHOCIn CTeHbI N BECa BbITAKK (Yka3aHO Ha Ctp. 2).
CneNyET yuHTbIBaTb, YTO yCTaHOBka C nCNOJIb3OBaHnEm KpeNEXHBIX CNCTEM OTNIUHbIX OT NOCTaBnREMbIX INI He COOTBeTCTByIOxix Ha3HaueHnO, MoKeT pINBecTI K ONaCHOCTN 3JIeKTPnueCKORo XapaKtepa N MeXaHnueCKOHaDEXHOCTN.
He yctaHaBnBaTb BbITkky BHe NOMEeHn IN MeCTax, rIe OHa NOBeprAnac 6bl BO3JeNCTBnO aTMOC- φ ephbx JABeHn (doxNb, BeTeP n T.d.).
3NEKTPUeCKA B3OJACHOCTb
3neKtpocnCTema, K KOtOpoi NOkKnIOuaeTcB BbITJXKA, DOnXHa COOTBeTCTBOBaTb DeIcTBYIOuM HopMaM N DoXHa 6bITb 3a3emNeHa B COOTBeTCTBNN C Tpe6oBaHnA M HOpM, DeIcTBYIOuNX B CTpaHe EKcnnyatau; OHa TaKxE DoXHa COOTBeTCTBOBaTb Tpe6oBaHnA EBpOeNCKnx HOpM No IpOTNBONOMExOBblm yCTPOINCTBaM.
Y6eHtbcr,HTo HnprjKeHne B 3NeKtpocetu COOTBeCTByeT yKa3aHHOMy Ha 3aBOJCKO TaBnUke, KOTOPaHxODITcBHYTpN BbITAAKKN.
Po3eKa, nCNoJIb3yEma JnI NOcOeINHeHnK Cetn 3NeKtPOnNTAHn, DOnXHa 6bITb JeRKOIOCTynHa npu yCTaHOBHeHOM O6OpUOBaHn. B IpOTNBom cnyae Heo6xOJIMO npEpyCMOTpeTB DIOCTyIHOM MeCe TnaHBi BBkNIOAtEnb IJRA OTKnIOueHn BblTAKn IIpN BO3HNKHOBeHHn TaKo HEO6xOJMOCTn.
IIO6bIe N3MeHHeNHaJIeKTPoCnCTeMbI DOnJKeH BbINOpHrTb TOJIbKO KBaJIuΦHnUpOBAHHbI ΘJIeKTPnK.
MaKcImaIbHaA DnHa BnHTa IJa KpeJIeHnB bItJxKn (IOCTaBnReTc npOn3BOIDTeIem) COCTaBnReT 13 MM. NcNoJIb3OBaHne BnHTOB, He COOTBeTCTByUOuNX HaCToUzIM NHCTpyKUm, MoXeT npINBeCTN K OnacHOCTn 3JIeKTPnueCKOrO XapaKTepa.
B cnyuae HencnpaBHOCTn npnbopa He cneNyet nbTaTbcaMoCTOaTeNbHO yCTpaHNTb HeNCnpaBHOCTb, Heo6xOIMMO CBa3aTbCn C nCTpNbIOTepOM nn ABTOPIN3OBaHHbIM ceHTpOM TexHNueCKo NODePKKn IJRAego pemOHTA.
Bo Bpemr yctaHOBKn BbITJxKn CneJeT OTKIOuHTb np6Op,doCTAB BnIKy n3 po3eTK nnn BOCNoB30BaBUnCb rnaBhblm BbIKIOuAteMeM.
BE3OPIACHOCTb OTBODA DbIMOB
He noKIOaTb annapat k nbIMoOTbOaM nIy OTBOJa DbIMOB, NonyeHHbIX B pe3yJIbTaTe cropaHn (KOTNOB, KaMHHOB m T.D.).
Ipepe yctahOBKO BbITJXKn CNeJyET y6eNTbcra,TO CO6JIIOJeHb BCE Tpe6oBaHn IeCTByUOxN HOPM NO BBIBOy BO3dyxa 3a IpeJebl NOMEueHn.
Installation of kitchen extractor hoods or other devices for removing kitchen fumes may adversely affect the safe operation of appliances that burn gas or other fuels (including those in other rooms) due to the backflow of combustion products. These combustion products may lead to carbon monoxide poisoning. After installing a kitchen extractor hood or another device for removing kitchen fumes, the operation of gas appliances with flue gas discharge must be checked by a competent person to ensure there is no backflow of combustion products. (AS/NZS 60335.2.31:2013/A4:2020)
SAFETY PRECAUTIONS FOR THE USER
These safety precautions are intended to ensure your safety and the safety of others. Therefore, please read them carefully before using or cleaning the appliance.
The manufacturer shall not be held liable for any direct or indirect damage to persons, property, or pets caused by failure to comply with the instructions given in this manual.
It is important to keep this manual with the instructions together with the equipment and to refer to it when necessary.
In case of sale or transfer of the appliance to another person, make sure that the manual is also handed over so that the new user can become familiar with the operation of the hood and the relevant warnings.
After installing the hood or the hob, it is necessary to clean it from residues of protective coatings and possible traces of oil or grease. If not removed, they may irreparably damage the surface of the hood. For this operation, the manufacturer recommends using the cloths from the supply kit, which are also available for purchase.
Required spare parts.
INTENDED USE
The appliance is intended exclusively for extracting fumes generated during cooking in domestic environments, not in professional settings. Any other use, different from this, is considered improper and may cause harm to people, property, or pets, and relieves the manufacturer of all liability.
The appliance may be used by children aged at least 8 years and by persons with reduced physical, sensory, or mental capabilities, or lack of experience and knowledge, provided they are supervised or have been given instructions on the safe use of the appliance and understand the associated hazards. Children must not play with the appliance. Cleaning and maintenance performed by the user must not be carried out by children without supervision.
SAFETY PRECAUTIONS FOR USE AND CLEANING
Before performing any cleaning or maintenance operation, disconnect the appliance from the power supply by unplugging it from the socket or using the main switch.
Do not touch the hood with wet hands and do not use it barefoot.
When the appliance is not in use, always check that all electrical components (lights, aspirator) are switched off.
Any objects or mechanically moving parts.
The total weight of objects placed on or raised to the hood (where provided) must not exceed 1.5 kg.
Be careful when using: hot oil may ignite.
Do not light open flames under the hood.
Do not cook on an open flame under the hood unless using a metal filter; in this case, grease deposits may accumulate in the appliance and adversely affect its operation.
The accessible parts of the hood may become hot when used with cooking appliances.
Do not clean the hood while its parts are still hot. If cleaning is performed in accordance with the methods using the products specified in this manual, there is a risk of fire.
When the hood is not used for an extended period, turn off the main switch.
In case of simultaneous use of other devices (boilers, stoves, fireplaces, etc.) operating on gas or other fuel, provide adequate ventilation in the room where smoke is extracted, in accordance with applicable regulations.
INSTALLATION
This section is intended only for qualified personnel.
Before proceeding with the installation of the hood, carefully read the section "SAFETY AND PRECAUTIONS".
TECHNICAL CHARACTERISTICS
The technical data of the appliance are given on the labels located inside the hood.
POSITIONING
Do not install the hood outdoors in places where it would be exposed to atmospheric agents (rain, wind, etc.).
Electrical connection
(section intended for qualified personnel only)

Before performing any operation on the hood, disconnect the appliance from the electrical power supply.
Check that inside the hood there are no detached or torn wires:
If this is the case, contact the nearest technical support service.
The electrical connection must be carried out by qualified personnel.
The connection must be made in compliance with the requirements of current legislation.
Before connecting the hood to the electrical power supply, check that:
The voltage on the electrical power supply corresponds to that indicated on the manufacturer's data plate; the electrical power supply meets the requirements of current standards; it can withstand the load (see technical specifications inside the hood); the power supply cable must not come into contact with temperatures above 70°C; the electrical power supply system is equipped with proper earthing in accordance with current standards; the plug used for connection is accessible after installation of the hood.
In case:
- appliances with cable without plug: the plug used must be of the "standardized" type. The wires must be connected in the following way: yellow-green for earthing, blue for neutral, and brown for phase. The plug must be connected to a suitable protective socket. - Fix the appliance, the cable, and the plug to another device, ensuring the possibility of disconnection from the power supply with a contact separation that ensures complete disconnection under overvoltage category conditions.
These disconnecting devices must be provided in the electrical power supply network
in accordance with installation rules.
The yellow-green earthing wire must be disconnected by a circuit breaker.
The manufacturer bears no responsibility in case of failure to comply with safety regulations.
Exhaust air ducting
Hood with external exhaust (suction)
The exhaust air is discharged through the exhaust air duct.
The exhaust air duct must be connected to the outside via a pipe with an external inlet.
The exhaust air duct must have:
- A diameter not less than the diameter of the exhaust air duct. A slight downward slope (fall) of horizontal sections to prevent condensate from accumulating in the device. - A minimum number of necessary bends. The shortest possible length to prevent vibrations and reduce the suction capacity of the exhaust.
It is necessary to insulate the pipe if it passes through cold rooms.
To prevent the return of outside air, a backdraft damper must be installed, which is set at the factory to 800 m³/h and above.
Absence of the draft
When the hood and other devices operating on an energy source other than electricity are used simultaneously in the room, the negative pressure in the room must not exceed 4 Pa (4 x 10⁻⁵ bar).
Exhaust air recirculation (filter)

In this version, the air is cleaned before entering the room through filters with activated carbon (optional) and is then supplied to the room.
For assembly, see the instructions
Installation instructions
The device is intended for use only by qualified personnel.

The extractor can be installed in various configurations. The general installation steps are the same for all types of installations; it is also necessary to follow the separately specified steps corresponding to each type of installation.
OPERATION
WHEN TO TURN ON THE EXTRACTOR?
The extractor should be turned on before starting cooking to create an air flow and direct the steam towards the suction surface.
After cooking, leave the extractor on until all steam and odors are extracted. Using the timer function, you can set the extractor to turn off automatically after 15 minutes of operation.
WHICH SPEED TO CHOOSE?
Speed (1-3): extracts air quietly with low energy consumption.
Speed (4-5): usual working conditions.
Speed (6-7): for strong odors and large amounts of steam.
Speed (8-P): rapid removal of odors and steam.
WHEN TO CHANGE THE FILTERS?
Metal filters should be cleaned every 30 hours of operation. The activated carbon filter should be replaced every 3-4 months depending on the intensity of use of the extractor.
Additional information is given in the SERVICE section.
SENSOR CONTROL PANEL
| ① | - | 9 | + | |
CLEANING OF EXTERNAL SURFACES
It is recommended to clean the external surface of the hood every 15 days to prevent damage from small greasy substances. For cleaning the hood, the manufacturer recommends using a cloth dampened with "Magic Steel".
As an alternative, for all other surfaces of the hood, you can use a damp cloth moistened with a neutral liquid detergent or denatured alcohol.
Finish cleaning with a thorough rinse and dry with a soft cloth.

Do not use too much water near the control panel and lighting devices to avoid water entering electronic parts.
Cleaning of glass panels is done only using specific non-corrosive or non-abrasive detergents with a soft cloth.

Do not wash the hood in a dishwasher.
The manufacturer is not responsible for any damage caused by improper use of the appliance.
CLEANING OF INTERNAL SURFACES

It is forbidden to wash electrical components or motor parts inside the hood using liquids or solvents. Cleaning of internal metal parts is described in the following paragraph.
METAL GREASE FILTERS
It is recommended to wash the metal filters (F) at least once a month, or more often if the hood is used very frequently, with a suitable detergent. Be careful not to bend the filters.
Do not use corrosive, acidic, or alkaline detergents. Rinse thoroughly and let them dry completely before reinstalling them.
The filters can be washed in a dishwasher, but this may cause discoloration of the filter material. To minimize these effects, use a gentle program with low temperature (maximum 55°C). The removal and installation of metal grease filters is described in the installation instructions.
CHARCOAL FILTERS
The manufacturer recommends replacing the filters every 18 months and replacing them after 3 years. The filter replacement procedure is as follows:
- Remove the filter as indicated in the instructions (Fig. 12). Insert the filter, and if present, place it in the oven at 200°C for 2 hours. After cooling the filter, install the filter on the metal structure of the filter.
DRAIN COLLECTION TRAY
It is recommended to clean the tray regularly.
Do not use corrosive, acidic, or abrasive cleaning agents. For more thorough cleaning, it is necessary to remove the oil collection tray (see figure) and wash it with a dishwashing detergent. Rinse thoroughly and dry completely before reinstalling. It is allowed to wash in a dishwasher.
DISPOSAL AFTER END OF SERVICE LIFE

The symbol of a crossed-out wheeled bin indicates that this product belongs to the category of WEEE, i.e., "Waste Electrical and Electronic Equipment", therefore it must not be
thrown away with unsorted waste (i.e., with "household waste"), but must be handed over separately to allow for the necessary treatment, recycling, and environmentally safe disposal of possible hazardous materials and recovery of raw materials that can be reused. Proper disposal of this product will help preserve natural resources and avoid potential negative effects on human health and the environment, which could result from improper disposal. Please contact local authorities for more detailed information on the nearest collection point for disposal. In accordance with national legislation, penalties may be imposed for improper disposal of these wastes.
DISPOSAL INFORMATION IN EU COUNTRIES
The EU Directive on Waste Electrical and Electronic Equipment (WEEE) has been implemented differently in each country, so if you wish to dispose of this appliance, please contact local authorities or the distributor for information on correct disposal.
DISPOSAL INFORMATION IN COUNTRIES OUTSIDE THE EU
The symbol of the crossed-out wheeled bin is only valid in EU countries. If you wish to dispose of this appliance in other countries, please contact local authorities or the distributor for information on correct disposal.

WARNING!
This manual has been prepared by the manufacturer and is protected by copyright. Any reproduction, in whole or in part, including translation, is permitted only with the prior written permission of the manufacturer.
The technical information, graphic images, and specifications contained in this manual are for reference only and are subject to change without notice. This manual has been compiled in the English language; the manufacturer is not responsible for possible errors or inaccuracies in translation.
Induction 2Z
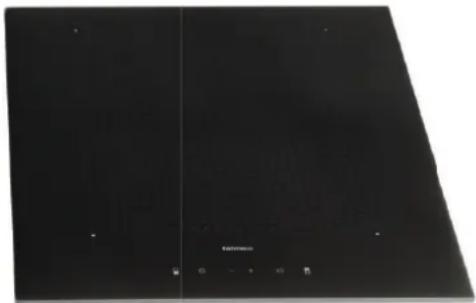

The following safety measures are provided for your safety and the safety of others. Please read them carefully before using or cleaning the appliance.
The manufacturer declines any responsibility for direct or indirect damage caused to persons, property, or pets due to failure to observe the safety instructions given in this manual.
It is recommended to keep this manual together with the appliance for future reference.
Intended use
The steam iron is intended for ironing in domestic conditions. The steam iron must not be placed outdoors or in places where it may be exposed to atmospheric conditions (rain, wind, etc.). Any use other than that described above is not permitted. - The appliance may be used by children aged 8 years and above, and by persons with reduced physical, sensory or mental capabilities, or lack of experience and knowledge, provided they are supervised or have been given instruction concerning safe use of the appliance and understand the hazards involved. Children must not play with the appliance. Cleaning and user maintenance must not be performed by children without supervision. Do not leave the iron switched on unattended.

Burn hazard
Use the key lock to prevent the appliance from being switched on by unauthorized persons. Place the appliance so that hands are away from the steam and children cannot reach it. - Switch off the heating zones after use. Do not place metal objects on the heating zones.

Safety instructions
Installation must be carried out by qualified, experienced installers in accordance with the instructions in this manual and applicable regulatory requirements.

In case of damage to the power cord or other components, do not use the steam iron: disconnect it from the power supply and contact your local dealer or an authorized service center.
- Do not make any electrical, mechanical, or functional modifications to the appliance.
The user must independently connect the device or replace its parts. Work performed by an incompetent person or unqualified personnel may cause damage, including serious damage to property and/or persons, for which the warranty does not apply.
Before installing the hob, make sure that all its parts are intact and undamaged. If any anomalies are detected, do not proceed with installation, but contact the service center.
The electrical system to which the hob will be connected must be installed in accordance with current standards, have a grounding device that meets the requirements of the country where the hob is installed, and also satisfy the requirements of European standards for radio interference.
The electrical characteristics of the hob (voltage and frequency) must correspond to the data indicated on the hob's rating plate. Check the compliance of the above data before connecting the hob to the electrical network. In case of doubt, contact an electrician. Do not use the hob before its installation. It is forbidden to use the hob on moving devices. It is strictly forbidden to open the appliance's casing. The manufacturer guarantees compliance of the appliance with safety standards only when using original spare parts. The appliance is not designed for outdoor use or for use with a remote control.
INSTRUCTIONS FOR USE OF THE DEVICE

- Before switching on the device for the first time, remove the protective films and stickers.
- During operation of the device, the cookware installed on it may create noise, the reasons for which may be:
- High power level. - Materials of the cookware.
Do not use water to extinguish flames. Turn off the heating zone. Extinguish the flame with a lid, fire extinguisher, or similar material. Do not store flammable items in cabinets above the hob. The shelves of cabinet appliances must be made of fire-resistant material. - Avoid overheating empty cookware; always check that it contains a sufficient amount of liquid. Turn off the hob after use. - Be careful when cooking with oil and fat, as there is a risk of fire. Heating oil or fat should be carried out for no more than one minute without using the booster function. - Pay attention to ensure that the appliance is not used improperly. - Make sure that the electrical cables of the appliance do not come into contact with glass or hot cookware. Do not use the hob for heating cans.
Protective coatings and the surface of the induction hob must not come into contact with electrical wires. To protect your hands from heat, use the handles provided for this purpose. Use only dry gloves and handles. Use only cookware with a flat and ferromagnetic bottom. Avoid contact with sugar, synthetic materials, or aluminum foil in the hot zones. The aforementioned substances, when cooled, can cause cracking or other damage to the glass-ceramic surface: turn off the appliance and immediately remove them from the hot surface.
- To move cookware, lift it; do not drag it across the surface of the hob.
- The contact surfaces of the cookware and the induction hob must be perfectly clean.
- Avoid dropping objects and do not place objects on the induction hob! Use only cookware with a ferromagnetic bottom. The use of other materials is not permitted.
Use cookware with a diameter corresponding to the size of the cooking zone being used.
Kitchen utensils may have a bottom made of different materials.
The bottom may be made of iron, an alloy containing iron, or a material that does not contain iron.
- If the bottom of the cookware is not made of a ferrous alloy (aluminum, copper...), then this cookware cannot be used on the induction hob. - A bottom made of mixed materials may heat unevenly and may not reach high temperatures. If the bottom consists mainly of non-ferrous material, the hob may not recognize it and the cooking zone will not activate. Also, some of these materials release substances that bond with the material of the pattern on the glass, causing irreversible damage. - A flat bottom, made entirely of ferrous material, is considered the most recommended and heat spreads evenly on it.
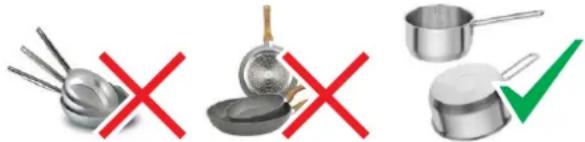
- Place only one pan or skillet on each cooking zone, even when the BRIDGE function is activated. Do not place cookware on the sensor keys or on the indicators.
Hot cookware on the sensor keys may cause damage to the internal electronics.
Keep the commands and indicators clean.
- Warning for pacemaker wearers: The normal functioning of pacemakers may be disturbed by magnetic fields. It is recommended to consult a doctor or a specialist. Credit cards, pocket calculators, etc. should not be placed near the induction hob when it is on. Do not store metal objects directly under the induction hob.
Whenever possible, always use lids on cookware to prevent heat loss.
Accessibility of the controls depends on the installation of the hob.
In special cases:
- The plug without a plug: the plug used must be standardized. The wires must be connected in the following way: yellow-green for grounding, blue for neutral, brown for phase. The plug must be connected to a safety socket.
Fixed plugs or other devices that ensure connection to the contacts with a distance between contacts, ensuring complete disconnection under conditions of overvoltage category III.
These disconnecting devices must be provided in the electrical supply network in accordance with installation rules.
The yellow-green grounding wire must be connected to the terminal with the grounding symbol.
The manufacturer bears no responsibility in case of non-compliance with safety rules.
Electrical connections:
Turn on the control panel;
Simultaneously press the symbols


- On the display, the symbol of the heating zone appears; -Adjust the power with the + and - keys.
Deactivating the BRIDGE function:
Simultaneously press the symbols


BOOSTER function
The Booster function is used to increase the heating power when heating a large quantity of food (for example, heating water for cooking pasta).
The function remains active for no more than 10 minutes.
- Turn on the steam function; - Select the heating zone; - Press (+) until the symbol for the rear heating zone appears.
Activating the booster function
In the rear heating zone, two boosters can be activated:
- Press (+) until the symbol P+ appears.
KEEP WARM FUNCTION
Turn on the steam function;
Select the heating zone;
Press the (+) key: the symbol appears
Turning off the steam function
Do not touch the heating zones while the indicator is still lit.
TIMER FUNCTION
AUTOMATIC SWITCH-OFF
The timer performs two functions:
1- Setting the time;
2- Automatic switch-off of one or some heating zones.
The timer is set for a duration of up to 99 minutes.
After the set time has elapsed, a sound signal will be emitted or turned on, which is turned off by pressing (+) or (-).
TIMER FUNCTION
(On premium models, the indicator lights up)
2. Using the (-) key, set the time to 00.
AUTO SHUT-OFF FUNCTION
To activate the auto shut-off function:
1. Turn on the hob; 2. Select the heating zone; 3. Select the heating power; 4. Set the timer as described above.
To deactivate the auto shut-off function for a heating zone, repeat the operations described above, starting from step 2.
The timer function and the auto shut-off function
can be used simultaneously.
PROBLEMS AND SOLUTIONS
The hob or heating zones do not turn on:
The hob is not connected to the electrical supply. - The fuse has blown. The control keys are blocked. Water or dirt on the key surface. - Foreign objects on the keys.
The dishes are in the heating zone. The dish material is suitable for induction heating. The small diameter of the dish relative to the heating zone.
The appearance of the symbol [E]:
- Turn off and then turn on the appliance. - Contact the service center.
It is from the heating zone or the appliance is turned off:
- The overheating protection system has been activated; the appliance was left on for too long in the on state;
- One or more keys are covered with something; - the dish is empty and overheated.
The fan continues to work after the appliance is turned off:
- This is normal: the fan protects the electronic control unit of the appliance from high temperatures.
- The fan stops automatically.
The appearance of the symbols [E2] or [EH]:
- The appliance has overheated; let it cool down, then turn it on again.
The appearance of the symbol [E6]:
- Malfunction of the electrical network. Check the voltage and frequency of the electrical network.
The appearance of the symbol [E8]:
Clean the inlet opening of the fan; clean the inlet opening.
CLEANING THE AIR DUCT

WARNING!
Do not use the machine for cleaning the pan.
Before cleaning the pan and the pan, make sure it has cooled down to the ambient temperature.
Be sure to clean the pan after each use with a mild detergent for glass-ceramic surfaces.
Do not use cleaning agents containing:
- Corrosive substances (soda, acids, ammonia). - Abrasive substances (powder or paste).
Do not use sharp abrasive instruments.
After cleaning, wipe the surface of the device with a soft cloth.
USEFUL TIPS FOR CARE
It is advisable to clean the pan regularly, preferably after each preparation. Try not to use abrasive sponges or abrasive cleaning agents. For cleaning the glass-ceramic surface, also avoid strong cleaning agents such as aerosol oven cleaners, rust removers, bath cleaners, or universal cleaning agents.
Once you have missed it...
Do not allow contact of the pan with plastic, aluminum foil, aluminum foil, sugar, or
sugar-containing products. Please remove the contamination from the pan as soon as possible.
Clean the hob with a soft scraper. If these items fall flat, they can
damage the glass-ceramic surface. Therefore, apply a special cleaning
agent before preparing foods containing large amounts of sugar.
Shine results in just three simple steps:
For a thorough cleaning of the surface, first remove heavy soiling or food residues with a suitable scraper.
Then apply a few drops of a suitable cleaning agent to the cooled hob surface and spread it with a paper towel or a cleaning cloth.
Finally, wipe the hob surface with a damp cloth and dry it. Done!
How to determine the correct scraper for cleaning glass-ceramic?
- The scraper is made of metal (not plastic and not flammable)
- The scraper is equipped with a protective guard that is easy to use
- The blade is straight and securely fixed in the housing, does not slip - the blade is clean, without signs of damage or rust. In the packaging or on the quality certificate (for example, the TUV quality mark)
- The user manual indicates safety techniques
If the appliance is installed under an electric oven with a pyrolysis cleaning system, do not switch it on during the operation of this system, as this may trigger the safety device and cut off the power supply (see the corresponding section).
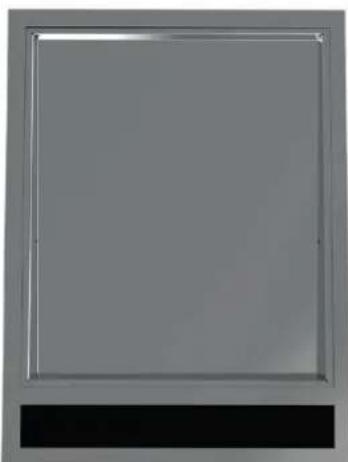
SAFETY TECHNIQUES AND PRECAUTIONARY MEASURES
Important safety measures have been compiled for your safety and the safety of others. Please read them carefully before using or cleaning the appliance.
The manufacturer declines any responsibility for direct or indirect damage caused to persons, property, or domestic animals as a result of failure to observe the safety instructions given in this manual.
It is recommended to keep the manual together with the appliance for future reference.

Intended Use
This equipment is intended exclusively for domestic use for the preparation of food products.
- The hotplate must not be installed outdoors or in places where it may be exposed to atmospheric conditions (rain, wind, etc.).
- Any use other than that specified above is not permitted.
- The appliance may be used by children aged 8 years and above, and by persons with reduced physical, sensory, or mental capabilities, or lack of experience and knowledge, provided they are supervised or have been given instruction on the safe use of the appliance and understand the hazards involved.
Children must not play with the appliance.
Cleaning and user maintenance must not be performed by children without supervision.
Do not leave the hotplate switched on unattended.

Fire hazard
Do not allow unauthorized persons to use the device to prevent burns.
Turn off the heating zones after use.
Do not place metal objects on the heating zones when they are switched on.
During operation and for at least 2 hours after use, some parts of the device remain very hot! Do not touch these parts without appropriate personal protective equipment.
Do not use the device as a supporting surface.
Never place objects sensitive to heat or easily flammable items near the device (e.g., handles, curtains, containers with alcohol-containing liquids, etc.).
Do not cover the device or its parts with aluminum foil or similar materials.
Never heat sealed cans or hermetically sealed containers on the device: the heat-generated increased pressure can cause them to explode, resulting in serious damage to property.

Safety instructions
In case of damage to the power cord or other components, the device must not be used: disconnect it from the power supply and contact the local dealer or an authorized service center.
Do not make any electrical, mechanical, or functional modifications to the device. Do not attempt to replace parts or repair the device yourself. Work performed by incompetent or unqualified personnel can cause damage, including serious damage, to property and/or persons, for which the manufacturer's warranty does not apply.

The electrical system to which the device is connected must comply with current standards, have a grounding device that meets the requirements of the country where it is installed, and also satisfy the requirements of European standards for radio interference.
Safety devices for the hot surface
Protective shutdown
The device switches off automatically in the event of the protective thermostat being triggered.
ELECTRICAL SAFETY
Electrical characteristics of the electric grill (voltage and frequency) must correspond to the data indicated on the rating plate of the Tefal appliance. Check the conformity of the above data before connecting the appliance to the electrical network. In case of doubt, contact an electrician. Do not use the Tefal appliance before its installation. It is forbidden to use it on moving devices. - It is strictly forbidden to open the appliance casing. - Tefal guarantees compliance with safety standards only when using original spare parts. - The appliance is not designed for connection to an external timer or for use with a remote control system.
INSTRUCTIONS FOR USE

- Before switching on the appliance for the first time, remove the protective films and stickers.
Do not use water to extinguish flames. Turn off the heating zone. Extinguish the flame with the lid, a fire-resistant cloth, or similar material. Always turn off the Tefal appliance after use. - Constantly monitor cooking when using oil or fat, as there is a risk of fire. - Be careful not to burn yourself when using the appliance. - Electrical cords must not come into contact with the hot surfaces of the Tefal appliance. Do not place objects on the sensor keys or indicators. - Keep the command keys and indicators clean. During cooking, take all precautions to avoid splashing on the control panel.

The electrical system to which the Tefal appliance is connected
must be installed in accordance with current standards, have a grounding device meeting the requirements of the country where the appliance is installed, and also satisfy European standards for radio interference.
Ensure that after installation, the power cord is not subject to mechanical stress and cannot be touched. After installing the appliance, the socket used to connect it to the power supply must be easily accessible. Otherwise, provide an easily accessible all-pole disconnection switch to disconnect the appliance if necessary.
Any necessary modifications to the electrical system must be carried out by a qualified electrician. In case of malfunction, do not attempt to repair it yourself, but contact the dealer or an authorized service center.
CONNECTION TO THE ELECTRICAL NETWORK
(section intended only for qualified personnel)

Before performing any operations on the appliance, disconnect it from the power supply.
Check that the electrical wires inside the appliance have not been disconnected or cut; if this is detected, contact the after-sales service center. Connection of the appliance to the electrical network must be carried out by qualified personnel. Connection must be made in compliance with current legislation.
Check that the electrical supply voltage corresponds to the voltage indicated on the rating plate; the standard socket must withstand the required load. Do not expose the appliance to temperatures above 70°C. The appliance is equipped with an effective earthing system that meets the requirements of applicable standards. Accessible sockets must be used for connection.
In the following cases:
- Appliance with plug: The plug must be properly connected. The plug must be connected in the following way: green-yellow for earthing, blue for neutral, and brown for live. The plug must be connected to a safe socket.
Fixed connection: The connection must include a disconnecting device that ensures complete disconnection under overvoltage category III conditions. The disconnecting device must be incorporated in the fixed wiring in accordance with installation rules.
The green-yellow earthing wire must not be interrupted by the switch. The manufacturer accepts no responsibility in case of failure to comply with safety rules.
OPERATION AND USE OF THE TEPRAN-8KN

Recommendations for preparation
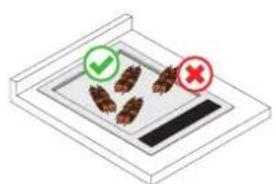
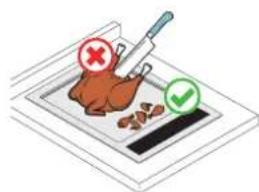
Distribute the food items evenly over the entire surface of the plate.
Turn the food items over. Pre-cooked foods should be cut into small pieces.
TIMER FUNCTION

The timer can be set for each heating zone separately. The timer can be set for a time from 1 to 99 minutes. After the set time has elapsed, an audible signal sounds.
and the corresponding heating zone switches off.
Press the button to turn off the audible signal.

CAUTION: The heating zone remains hot for a long time after switching off.
PROBLEMS AND SOLUTIONS
Check the electrical connection. - Blown fuse. - The command lock key is pressed. - Presence of water or dirt on the key surface. - Constant pressure on the keys.
They are switched off from the heating zones or when the hotplates are switched off:
- The overload protection system is activated;
CLEANING

WARNING!
Do not use steam cleaners for cleaning.
No special maintenance is required for the appliance, except cleaning.
CLEANING - Do not use abrasive cleaning agents:
- Corrosive substances (soda, acids, ammonia) - Abrasive substances (powders or pastes) FOR STAINLESS STEEL SURFACES: Use a soft cloth, slightly dampened with a mild detergent (follow the manufacturer's instructions for the detergent). For the hob: cleaning is carried out without particular difficulty when the hob is heated to approximately 50-60°C. Remove the most stubborn residues from the hob using rounded knife blades. Then wash the hob with water and a dishwashing product and leave it for a few minutes. With a cloth or paper towel, remove the product residues. Rinse several times with a damp cloth and dry thoroughly. - If it is necessary to clean the hob between two cooking operations: remove the most stubborn residues from the hob using rounded knife blades, place a little water on the hot hob and add a drop of dishwashing liquid. This will soften the hardened residues, and the water will remove the residues of previously cooked foods. Remove everything using the rounded knife blades.

HOB SAFETY
Safety shutdown
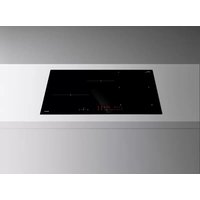
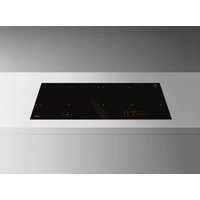
- WARNING FOR THE INSTALLER
- TECHNICAL SAFETY
- ELECTRICAL SAFETY
- FUMES DISCHARGE SAFETY
- USER WARNINGS
- INTENDED USE
- USE AND CLEANING WARNINGS
- DO NOT REST OBJECTS ON TOP OF THE MOTORISED FINS
- INSTALLATION
- TECHNICAL FEATURES
- POSITIONING
- ELECTRICAL CONNECTION
- FUMES DISCHARGE
- EXTERNAL EXHAUST HOOD (SUCTION)
- HOOD WITH INTERNAL RECIRCULATION (FILTERING)
- ASSEMBLY INSTRUCTIONS
- OPERATION
- WHEN TO TURN ON THE HOOD
- WHICH SPEED IS TO BE SELECTED
- WHEN SHOULD THE FILTERS BE WASHED OR REPLACED
- MAINTENANCE
- CLEANING OF EXTERNAL SURFACES
- CLEANING OF INTERNAL SURFACES
- METAL ANTI-GREASE FILTERS
- CARBON-ZEO FILTERS
- GREASE DRIP TRAY
- DISPOSAL AFTER END OF USEFUL LIFE
- INFORMATION ON DISPOSAL IN EUROPEAN UNION COUNTRIES
- INFORMATION ON DISPOSAL IN NON-EUROPEAN UNION COUNTRIES
- WARNING
- INDUCTION 2Z
- SAFETY INSTRUCTIONS AND WARNINGS
- DANGER OF BURNS
- USE WARNINGS
- KITCHENWARE HAVE DIFFERENT TYPES OF BOTTOMS
- SAFETY DEVICES ON THE COOKER
- SAFETY SHUTDOWN
- OVERHEATING DEVICE
- OPERATION AND USE OF THE COOKTOP
- BRIDGE FUNCTION
- DEACTIVATION OF THE BRIDGE FUNCTION
- BOOSTER FUNCTION
- BOOSTER ACTIVATION
- KEEP WARM FUNCTION
- SHUTDOWN OF THE COOKER
- TO SHUTDOWN THE COOKING AREA
- TURN OFF THE COOKER
- TIMER FUNCTION
- AND AUTOMATIC SHUTDOWN
- TIMER
- AUTOMATIC SHUTDOWN
- WHAT TO DO IN CASE OF PROBLEMS
- THE COOKER OR COOKING AREAS DO NOT TURN ON
- THE SYMBOL IS DISPLAYED
- THE SYMBOL [E] IS DISPLAYED
- ONE OF THE AREAS OR THE ENTIRE COOKER TURNS OFF
- THE FAN KEEPS ON WORKING AFTER THE COOKER SHUTDOWN
- THE SYMBOL [E2] OR [EH] IS DISPLAYED
- THE SYMBOL [E6] IS DISPLAYED
- THE SYMBOL [E8] IS DISPLAYED
- CLEANING AND MAINTENANCE INSTRUCTIONS
- ATTENTION
- USEFUL CARE TIPS
- ACCIDENTS HAPPEN
- SPARKLING RESULTS IN ONLY THREE STEPS
- HOW DO I IDENTIFY A SUITABLE GLASS-CERAMIC SCRAPER
- TEPPAN YAKI
- RISK OF BURNS
- SAFETY SWITCH-OFF
- IN CASE OF
- OPERATING AND USING THE TEPPAN YAKI
- FIRST SWITCH-ON
- CLEANING AND MAINTENANCE
- SAFETY INSTRUCTIONS AND PRECAUTIONS
- SAFETY INSTRUCTIONS
- NEKTPUECKA B3OJACHOCTB
- BE3OPIACHOCTB OTBODA DBIMOB
- SAFETY PRECAUTIONS FOR THE USER
- SAFETY PRECAUTIONS FOR USE AND CLEANING
- ANY OBJECTS OR MECHANICALLY MOVING PARTS
- BEFORE PROCEEDING WITH THE INSTALLATION OF THE HOOD, CAREFULLY READ THE SECTION "SAFETY AND PRECAUTIONS
- TECHNICAL CHARACTERISTICS
- IN CASE
- EXHAUST AIR DUCTING
- HOOD WITH EXTERNAL EXHAUST (SUCTION)
- EXHAUST AIR RECIRCULATION (FILTER)
- INSTALLATION INSTRUCTIONS
- WHEN TO TURN ON THE EXTRACTOR
- WHICH SPEED TO CHOOSE
- WHEN TO CHANGE THE FILTERS
- SENSOR CONTROL PANEL
- METAL GREASE FILTERS
- CHARCOAL FILTERS
- DRAIN COLLECTION TRAY
- DISPOSAL AFTER END OF SERVICE LIFE
- DISPOSAL INFORMATION IN EU COUNTRIES
- DISPOSAL INFORMATION IN COUNTRIES OUTSIDE THE EU
- BURN HAZARD
- IN CASE OF DAMAGE TO THE POWER CORD OR OTHER COMPONENTS, DO NOT USE THE STEAM IRON: DISCONNECT IT FROM THE POWER SUPPLY AND CONTACT YOUR LOCAL DEALER OR AN AUTHORIZED SERVICE CENTER
- INSTRUCTIONS FOR USE OF THE DEVICE
- KITCHEN UTENSILS MAY HAVE A BOTTOM MADE OF DIFFERENT MATERIALS
- DEACTIVATING THE BRIDGE FUNCTION
- ACTIVATING THE BOOSTER FUNCTION
- TURNING OFF THE STEAM FUNCTION
- AUTOMATIC SWITCH-OFF
- SETTING THE TIME
- AUTO SHUT-OFF FUNCTION
- PROBLEMS AND SOLUTIONS
- THE HOB OR HEATING ZONES DO NOT TURN ON
- THE APPEARANCE OF THE SYMBOL [E]
- IT IS FROM THE HEATING ZONE OR THE APPLIANCE IS TURNED OFF
- THE FAN CONTINUES TO WORK AFTER THE APPLIANCE IS TURNED OFF
- THE APPEARANCE OF THE SYMBOLS [E2] OR [EH]
- THE APPEARANCE OF THE SYMBOL [E6]
- THE APPEARANCE OF THE SYMBOL [E8]
- CLEANING THE AIR DUCT
- USEFUL TIPS FOR CARE
- ONCE YOU HAVE MISSED IT
- SHINE RESULTS IN JUST THREE SIMPLE STEPS
- HOW TO DETERMINE THE CORRECT SCRAPER FOR CLEANING GLASS-CERAMIC
- SAFETY TECHNIQUES AND PRECAUTIONARY MEASURES
- FIRE HAZARD
- SAFETY DEVICES FOR THE HOT SURFACE
- INSTRUCTIONS FOR USE
- CONNECTION TO THE ELECTRICAL NETWORK
- OPERATION AND USE OF THE TEPRAN-8KN
- RECOMMENDATIONS FOR PREPARATION
- THEY ARE SWITCHED OFF FROM THE HEATING ZONES OR WHEN THE HOTPLATES ARE SWITCHED OFF
- CLEANING
- HOB SAFETY
Brand : FALMEC
Model : Modula M2
Category : Cooker