Cleantec CTLC MIDI I - Vacuum Cleaner FESTOOL - Free user manual and instructions
Find the device manual for free Cleantec CTLC MIDI I FESTOOL in PDF.
| Product Type | Cordless vacuum cleaner category L (up to 1 mg/m³ of dust) |
| Brand | Festool |
| Model | Cleantec CTLC MIDI I |
| Motor Voltage | 36 V (2x 18 V) |
| Compatible Batteries | Festool BP 18 series |
| Maximum Volume Flow Rate | 108 m³/h (vacuum mode) / 202 m³/h (central mode) |
| Maximum Depression | 190 hPa |
| Filter Area | 3508 cm² |
| Suction Hose | D 27/32 x 3.5 m with by-pass |
| Sound Level | 67 dB(A) according to EN 60335-2-69 |
| Hand-Arm Vibration | < 2.5 m/s² (uncertainty 1.5 m/s²) |
| Protection Rating | IP X4 |
| Tank Volume | 15 L |
| Dimensions (L x W x H) | 550 x 320 x 495 mm |
| Weight (without batteries) | 11.7 kg |
| Bluetooth Frequency | 2402 - 2480 MHz |
| Isotropic Radiated Power (EIRP) | < 10 dBm |
| Main Functions | Manual and automatic on/off, power regulation, CT-F I remote control, Bluetooth tool connection, manual filter cleaning, liquid suction |
| Maintenance and Cleaning | Regular cleaning of level sensors, emptying the tank, replacing the filter bag and main filter, pulse filter cleaning |
| Safety | Automatic shut-off in case of overheating, volume flow monitoring (category M), liquid protection, parking brake |
| Spare Parts and Repairability | Recommended Festool original parts, repair by authorized service center, replaceable filter and filter bag |
| General Information | Manufacturer's warranty, recycling according to EU directives, data recording chip (data protection ensured) |
Frequently Asked Questions - Cleantec CTLC MIDI I FESTOOL
User questions about Cleantec CTLC MIDI I FESTOOL
0 question about this device. Answer the ones you know or ask your own.
Ask a new question about this device
Download the instructions for your Vacuum Cleaner in PDF format for free! Find your manual Cleantec CTLC MIDI I - FESTOOL and take your electronic device back in hand. On this page are published all the documents necessary for the use of your device. Cleantec CTLC MIDI I by FESTOOL.
USER MANUAL Cleantec CTLC MIDI I FESTOOL
CTLC MINI I CTLC MIDI I CTMC MIDI I
5
BP 18 Li 4,0 HPC-ASI
BP 18 Li 4,0 HPC-AS
BP 18 Li 5,2 ASI
BP 18 Li 6,2 ASI
BP 18 Li 5,2 AS
BP 18 Li 6,2 AS
6


HF-CT MINI/MIDI-2/CT15
204 200

NF-CT MINI/MIDI-2/CT15
204 202
7
8
9
Declaration of Conformity
We as the manufacturer Festool GmbH, Wertstraße 20, 73240 Wendlingen, Germany declare under our sole responsibility that the product(s):
Designation:
Battery operated mobile dust extractor
(in combination with remote control CT-F I (serial number 10029918))
Designation of Type(s):
Serial number[s]
CTLC MINI I, CTLC MIDI I, CTMC MIDI I
205512, 205509, 205508
fulfills all the relevant provisions of the following UK Regulations:
S.I. 2008/1597 Supply of Machinery (Safety) Regulations 2008
S.I. 2016/1091 Electromagnetic Compatibility Regulations 2016
S.I. 2017/1206 Radio Equipment Regulations 2017
S.I. 2012/3032 Restriction of the Use of Certain Hazardous Substances in Electrical and Electronic Equipment Regulations 2012
and are manufactured in accordance with the following designated standards:
BS EN 60335-1:2012 + A2:2019
BS EN 60335-2-69:2012
BS EN 55014-1:2017 + A11:2020
BS EN 55014-2:2015
EN303446-1V1.2.1
EN301489-1V2.2.3
EN301489-17V3.2.4
EN300328V2.2.2
BS EN IEC 62311:2020
BS EN IEC 63000:2018

Place and date of declaration: Wendlingen, 25.10.2021
Signed on behalf of and in name of Festool GmbH

v.O. Branod +
Ralf Brandt
Head of Productconformity
Akku-Absaugmobil
Seriennummer*
Battery operated mobile dust extractor
Serial number *
Aspirateur sans fil
EN303446-1V1.2.1,EN301489-1V2.2.3
EN 301 489-17 V3.2.4, EN 300 328 V2.2.2
EN 62311:2020, EN IEC 63000:2018

Signed on behalf of and in name of/
Head of Product Development

Ralf Brandt
Head of Product Conformity
12.5 Software Update
1 Safety warnings. 18
2 Symbols. 20
3 Intended use 20
4 Technical data. 21
5 Parts of the device. 21
6 Preparations. 22
7 Battery pack. 22
8 Commissioning. 22
9 Connecting a device 22
10 Settings. 23
11 Working. 24
12 Remote control. 25
13 Warning signals. 26
14 Maintenance and care. 27
15 Transportation 27
16 Environment. 27
17 General information. 27
1 Safety warnings


WARNING! Read all safety warnings, instructions, illustrations and specifications provided with this power tool. Failure to follow all instructions listed below may result in electric shock, fire and/or serious injury.
Save all warnings and instructions for future reference.
- This appliance must not be used by persons (including children) with reduced physical, sensory or mental capabilities, or lack of experience and knowledge. Children need to be supervised to ensure they do not play with the device.
- This machine must not be used by people who might have a particularly adverse reaction to an electric shock (e.g. people with cardiac pacemakers), because the possibility of the machine building up a static charge cannot be excluded.
- Ensure you are on a firm base. The effects of a shock moment, e.g. due to antistatic discharge, may lead to accidents.
- WARNING! Operators must be appropriately instructed in the use of this machine.


- WARNING! Device may contain hazardous dust. Only have the device maintained and emptied, and only have the filter replaced by an authorised specialist using suitable protective equipment.
- Always operate with the filter system installed!
WARNING! When extracting dust that exceeds the limit value or large volumes of oak or beechwood dust, only extract from one dust source (power or compressed-air tool).
- Risk of explosion and fire! Do not extract:
- Sparks, glowing particles or hot dust;
- combustible or explosive materials (e.g. magnesium, aluminium, petrol, diluting agents);
-
aggressive materials (e.g. acid, alkaline solutions, solvents);
-
chemically reactive materials which lead to the generation of heat, acids/bases, gases, etc. (e.g. reactive two-component materials, aluminium and water).
-
Observe all national safety regulations as well as the material manufacturer's specifications!
- WARNING! If foam or fluid starts to escape, switch off the machine immediately.
- CAUTION! Regularly clean the water level limiting device and inspect it for signs of damage.
- Always use suitable protective equipment!
- If intact following a visual inspection, work in a dry environment according to instructions!
- Do not lift or transport using a crane hook or lifting gear.
- Only carry the machine using the handle provided.
- Use only the original Festool suction hose.
- Check the battery interface and the filter regularly in order to prevent a hazard. In the event of damage, the battery interface must be replaced by an authorised service workshop only.
- Pay attention to the work environment and watch out for your own safety and the safety of others when transporting or working with the machine.
In this way, you can for example prevent tripping hazards caused by the suction hose or mains cable.
- Keep packaging film away from children.
There is a risk of suffocation.
- Follow the operating manual for the charger and the battery pack.
- Do not use power supply units or third-party battery packs to operate cordless devices. Do not use third-party chargers to charge the battery pack. The use of accessories not expressly authorised by the manufacturer can result in electric shocks and/or serious accidents.
- Keep the unused battery pack away from metal objects (e.g. nails, screws, keys, paper clips, etc.) that could cause bridging of the contacts. A short circuit between the battery contacts can cause burns or fire.
- Only use the battery pack in combination with your Festool device. This is the only way to protect the battery pack from dangerous overload. Use of another device can lead to injury and fire hazard.
- Do not use battery packs that are damaged or have been modified. Damaged or modified battery packs can lead to fire, explosion or injuries.
- Disconnect the battery pack from the device before you change the accessory parts/consumables, or place the device in storage. Such pre
ventative safety measures reduce the risk of unintentionally starting the device.
2 Symbols

Warning of general danger

Warning of electric shock

Read the operating manual and safety warnings.

Read the operating instructions and safety instructions.

Wear a dust mask.

Suitable for separation of dust with an exposure limit value greater than 1mg / m^3

Suitable for separation of dust with an exposure limit value greater than 0.1mg / m^3

WARNING! The machine may contain hazardous dust!

Do not climb on the unit

Inserting the battery pack

Removing the battery pack

Tip or advice

Handling instruction

CE marking: Confirms the conformity of the power tool with the European Community directives.

UKCA marking: The United Kingdom Conformity Assessed symbol is a marking for products being placed on the market in the United Kingdom. It is a manufacturers indication that the product is in conformance with the relevant regulations in the UK.

Do not dispose of it with domestic waste.

Tool contains a chip which stores data. See section 17.2
3 Intended use
CTLC MINI I
CTLC MIDI I
Cordless mobile dust extractor suitable
- for extracting dust up to 1mg / m^3 corresponding to dust class L,
- for absorbing water,
for increased loads during commercial use in accordance with IEC/EN 60335-2-69, - for use with BP Festool battery packs of the same voltage class which have been approved for this cordless mobile dust extractor.
CTMC MIDI I
Cordless mobile dust extractor suitable
- for extracting dust up to 0.1mg / m^3 according to dust class M including wood and paint dust,
for absorbing water,
for increased loads during commercial use in accordance with IEC/EN 60335-2-69, - for use with BP Festool battery packs of the same voltage class which have been approved for this cordless mobile dust extractor.

The user is liable for improper or non-intended use.
4 Technical data
5 Parts of the device
5.1 Cordless mobile dust extractor
| Cordless mobile dust extractor | ||
| Motor voltage 36 V (2x 18 V) | --- | |
| Compatible battery packs BP 18 series | [2] | |
| Max. suction capacity (air), extractor/turbine 108 m³/h / 202 m³/h | ||
| Max. vacuum, turbine 190 hPa | ||
| Filter surface area 3508 cm² | ||
| Suction hose D 27/32 x 3.5 m-AS/CTR | ||
| Sound pressure level as per EN 60335-2-69/uncertainty K 67 dB(A)/3 dB | ||
| Hand-arm vibration value as per EN 60335-2-69/uncertainty K < 2.5 m/s² / 1.5 m/s² | ||
| Type of protection IP X4 | ||
| Frequency (cordless mobile dust extractor/remote control) | 2402-2480 MHz | |
| Equivalent isotropically radiated power (EIRP) | < 10 dBm | |
| (cordless mobile dust extractor/remote control) | ||
| Container capacity CTLC MINI I 10 l | ||
| CTLC MIDI I | 15 l | |
| CTMC MIDI I | ||
| Dimensions L x W x H CTLC MINI I 550 x 320 x 455 mm | ||
| CTLC MIDI I | 550 x 320 x 495 mm | |
| CTMC MIDI I | ||
| Weight (without battery packs) CTLC MINI I 11.4 kg | ||
| CTLC MIDI I | 11.7 kg | |
| CTMC MIDI I | ||
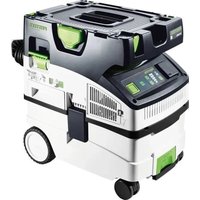
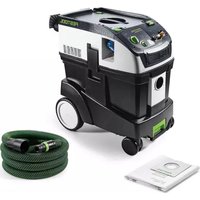
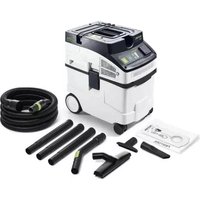
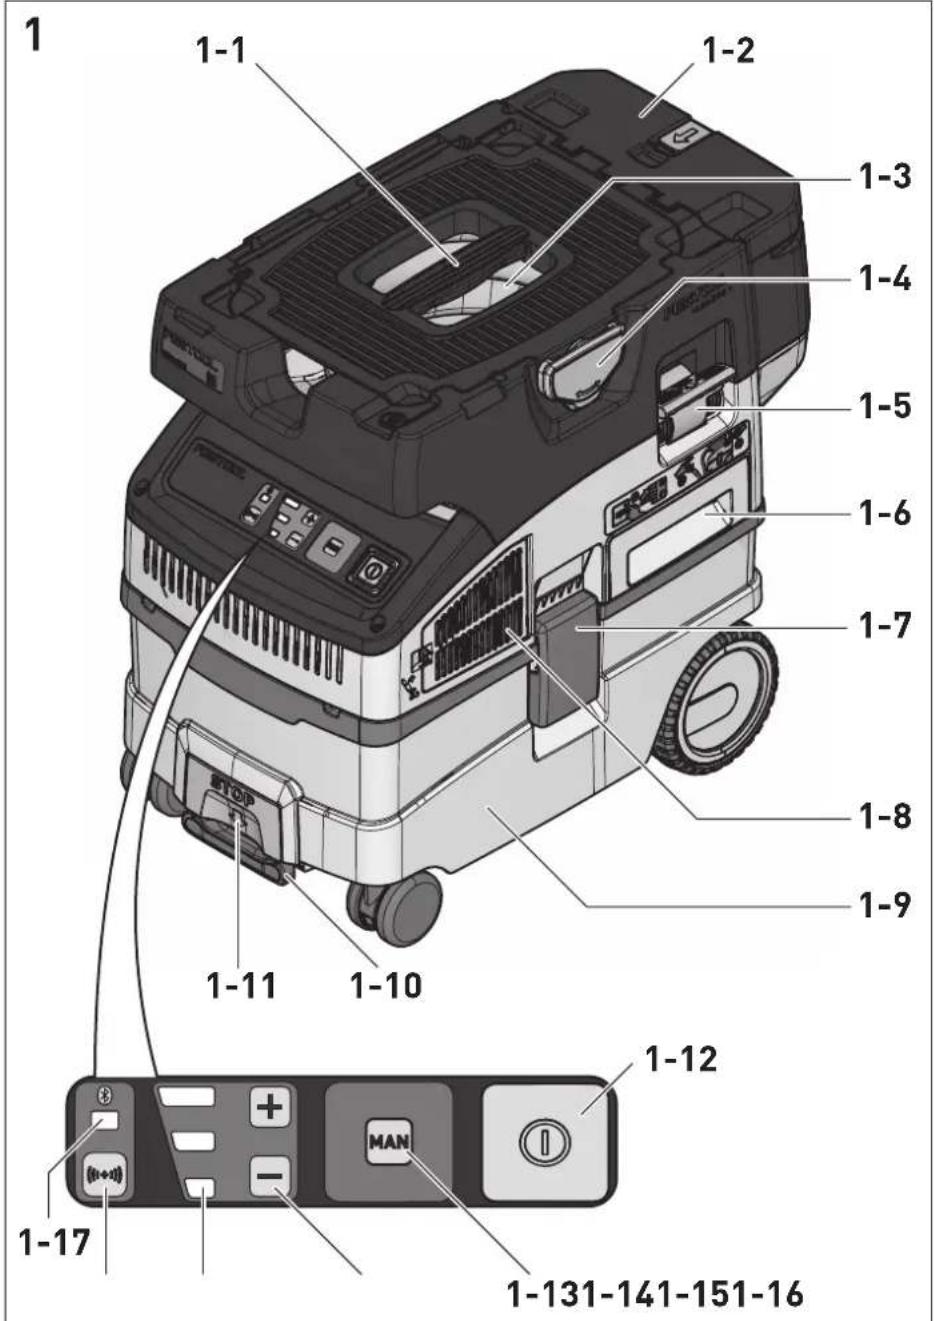
[1-1] Handle
[1-2] Battery case
[1-3] Hose garage
[1-4] T-Loc lock for Systainers
[1-5] Dedusting
[1-6] main filter
[1-7] Locking clip
[1-8] Exhaust-air outlet
[1-9] Dirt trap
[1-10] Brake
[1-11] Release button (brake)
[1-12] On/off button
[1-13] MAN button
[1-14] Suction power adjustment
[1-15] Status display (suction power/warning signals)
[1-16] Connection button
[1-17] Connection display
[1-18] Remote control CT-F I *
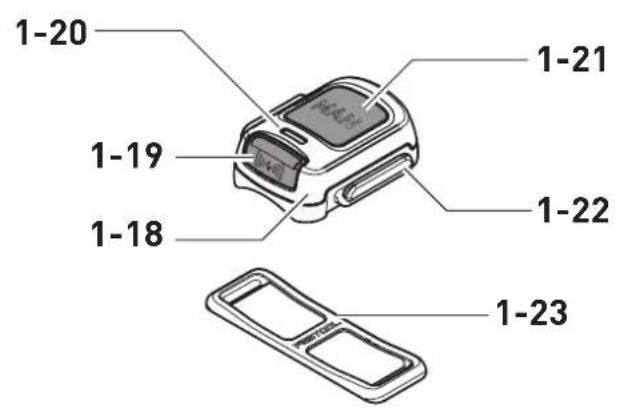
5.2 Remote control CT-F I
[1-19] Connection button
[1-20] LED indicator
[1-21] MAN button (for manually switching on)
[1-22] Attachment point for the fastening straps
[1-23] Fastening strap
The specified illustrations appear at the beginning of the Operating Instructions.
- Accessories shown or described are not always included in the scope of delivery.
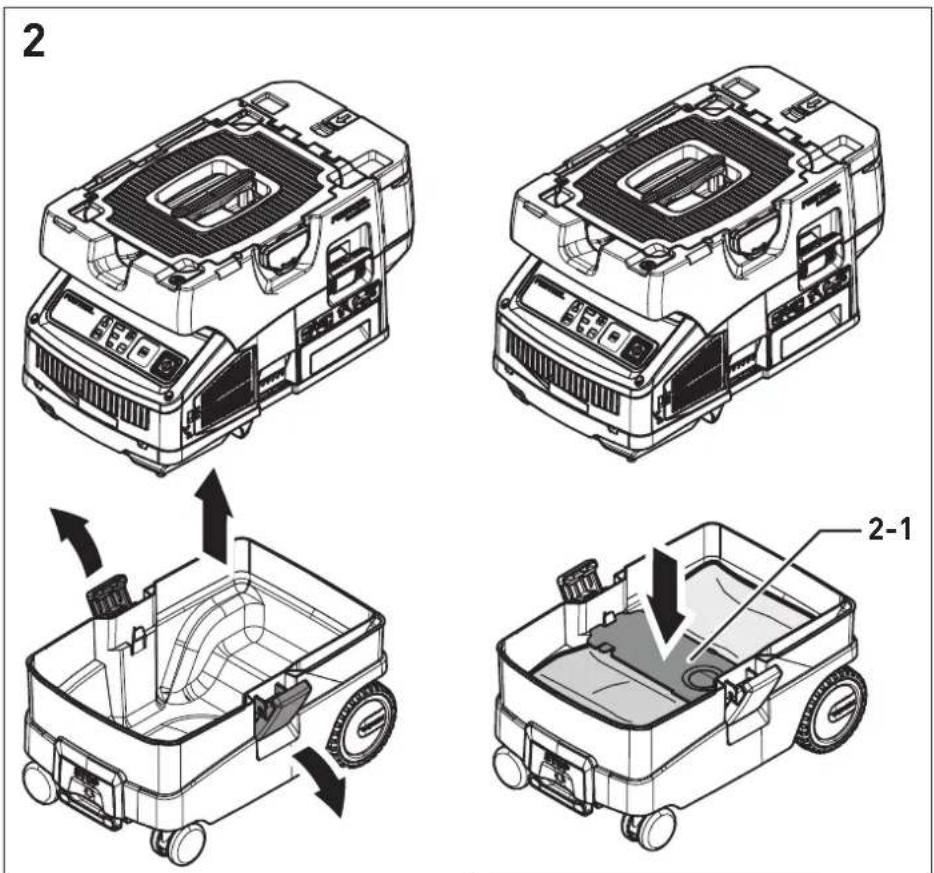
6 Preparations
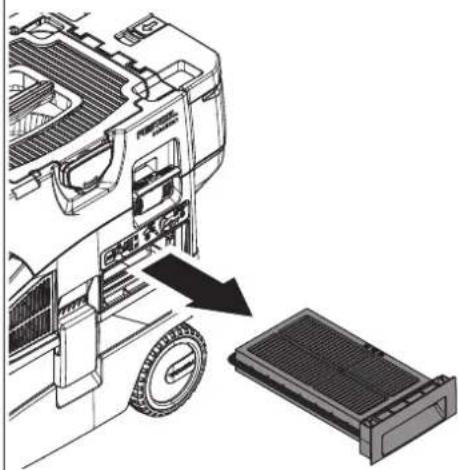
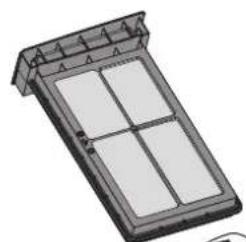
Insert the filter/disposal bag [2-1].
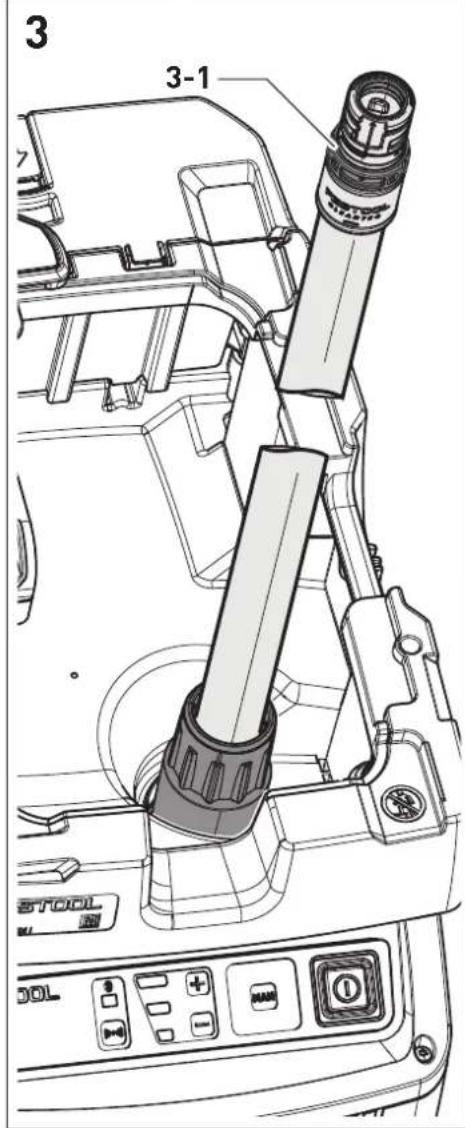
Connect the suction hose [3].
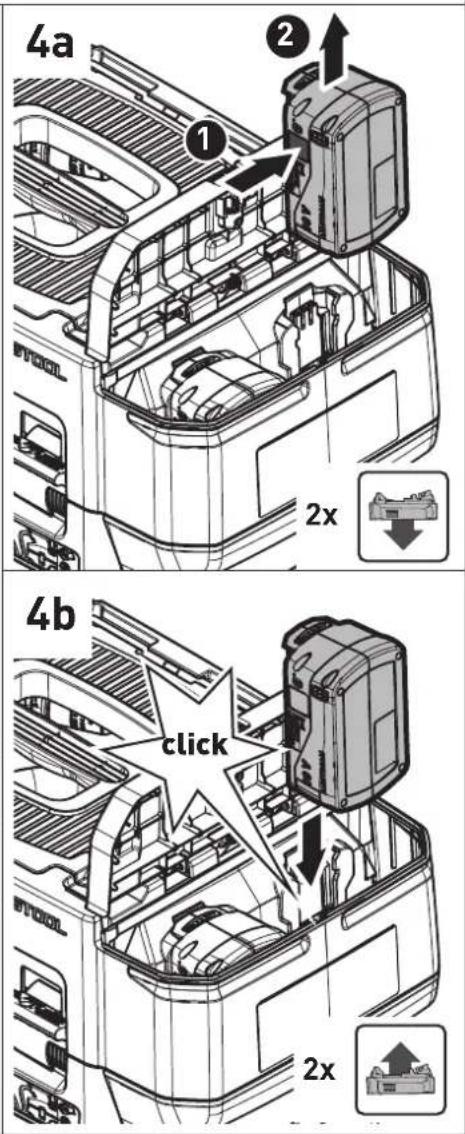
7 Battery pack
Before using the battery pack, check that the battery interface is clean. Any contamination of the battery interface may impair correct contact and lead to the contacts being damaged.
A faulty contact may result in the machine overheating or being damaged.
[4A]
Remove the battery pack.
[4B]

Insert the battery pack - until it clicks into place.
The cordless mobile dust extractor can only be operated with two battery packs. For a listing of possible battery pack variants for operation of the device, see table [5]. For newer battery packs that are not listed, follow the instructions from the Festool Work App or contact the Festool customer service team.
Further information about the charger and battery pack with capacity indicator can be found in the corresponding operating manual.
8 Commissioning
Standby mode
Press the on/off button [1-12].
The green LEDs on the status display [1-15] indicate standby mode.
Pressing the on/off button again will switch off the cordless mobile dust extractor.
Starting/stopping the cordless mobile dust extractor manually
The cordless mobile dust extractor is in standby mode.
Directly on the cordless mobile dust extractor:
Press the MAN button [1-13] to start/stop.
Alternatively, use the connected remote control CT-F I (see chapter 9.2):
Press the MAN button [1-21] on the remote control to start/stop.
Starting/stopping the cordless mobile dust extractor automatically
The cordless mobile dust extractor is in standby mode.
To start/stop the cordless mobile dust extractor automatically: Switch the connected battery-powered power tool on/off (see chapter 9.1).
9 Connecting a device

WARNING
Risk of injury from a cordless mobile dust extractor starting up unsupervised
Before performing any work with the cordless mobile dust extractor, check which remote control and which cordless power tool are connected to the cordless mobile dust extractor.
A battery-powered power tool must always be connected to the cordless mobile dust extractor via the suction hose. After finishing work, the connection to the cordless mobile dust extractor must be disconnected.
The remote control must only be attached to the suction hose.
9.1 Connecting a battery-powered power tool
In standby mode, press the connection button [1-16].
The connection display [1-17] slowly flashes blue. For a period of 60 seconds, the cordless mobile dust extractor is ready for connection.
- Switch on the power tool.
The cordless mobile dust extractor starts up. The cordless mobile dust extractor is connected until the on/off button [1-12] is pressed or a battery pack is removed (from the cordless mobile dust extractor). The power tool must then be connected again.
Connecting a new power tool overwrites the previous connection.
This function is only possible on Festool power tools with a Bluetooth® battery pack.
9.2 Connecting the CT-F I remote control
To be able to connect a remote control to a cordless mobile dust extractor, the remote control must be reset (see "Reset on the remote control").
Remote controls that have not been connected previously can be connected directly.
A connection that has been created between remote controls and the cordless mobile dust extractor will persist even after pressing the on/off button or removing a battery pack (from the cordless mobile dust extractor).
The cordless mobile dust extractor can be connected to as many as five remote controls at the same time. The cordless mobile dust extractor can only be connected to one battery-powered power tool at a time.
If a cordless mobile dust extractor which was initially switched on using the battery pack is switched off using the remote control, the temporary connection between the connected battery pack and the cordless mobile dust extractor will be lost. The battery pack can then be connected again.
Hold down the connection button [1-16] on the cordless mobile dust extractor for three seconds in standby mode.
The connection display [1-17] rapidly flashes blue. For a period of 60 seconds, the cordless mobile dust extractor is ready for connection.
Press the MAN button [1-21] on the remote control.
The remote control is permanently stored in the cordless mobile dust extractor.
Resetting on the remote control
Resetting deletes the connection between a remote control and the cordless mobile dust extractor.
Press and hold the connection button [1-19] and the MAN button [1-21] for 10 seconds.
The LED indicator [1-20] lights up purple, if the reset has taken place.
9.3 Connecting a mobile device
The cordless mobile dust extractor can be connected to a mobile device (e.g. for a software update) using the Festool Work app.
- Hold down the connection button [1-16] on the cordless mobile dust extractor for three seconds in standby mode.
The connection display [1-17] rapidly flashes blue. For a period of 60 seconds, the cordless mobile dust extractor is ready for connection. - Follow the instructions provided in the Festool Work app to authorise the secure connection.
10 Settings
10.1 Adjusting the suction power
Press the plus or minus button for the suction power adjustment [1-14] while extracting.
The green LEDs on the status display [1-15] indicate the current performance level.
10.2 Connecting sleeve
The bypass function of the connecting sleeve [3-1] prevents strong suction from sanding machines and floor nozzles on smooth surfaces.
Open
- Turn the adjusting ring to the "OPEN" position.
Close
- Turn the adjusting ring to the "CLOSE" position.
10.3 Volumetric flow monitoring (only for dust class M)

CAUTION
Hazardous dust
Damage to the respiratory passage
- Correct functioning of volumetric flow monitoring is only ensured with the suction hose D 27/32x3.5m-AS/CTR.
For safety reasons, an acoustic warning signal sounds if the air speed in the suction hose falls below 20m / s
Possible causes Solution
Filter bag full. Insert a new filter bag (see section 11.5).
| Dirty main filter. Clean the main filter (see section 11.4). Change the main filter (see section 11.6). | |
| Suction hose is blocked or kinked. | Eliminate the block or straighten the hose. |
| Value set on the suction power adjustment [1-14] is too low. | Set the suction power to a higher value (see section 10.1). |
| Battery charge level low. | - Charge the battery packs. - Use new battery packs. |
| Electronic monitoring malfunction. | Have the fault rectified by a Festool service workshop. |
| Working with sanders. | Activate the bypass function (see section 10.2). |
10.4 Temperature cut-out
To protect against overheating, the temperature cut-out switches off the cordless mobile dust extractor before it reaches the critical temperature. The status display LED [1-15] indicates a fault.
LED lights up red Excessive temperature
- Switch off the cordless mobile dust extractor, let it cool down.
- Switch the cordless mobile dust extractor on again after approx. ten minutes.
10.5 SysDoc

WARNING
Risk of injury
- Do not stand on the storage area of the cordless mobile dust extractor.

CAUTION
Risk of injury
- When transporting, ensure that the T-Loc is closed.
A Systainer can be fastened to the storage area of the hose holder [1-3] with the T-Loc lock [1-4].
10.6 Applying the brake
- Raise the front of the cordless mobile dust extractor slightly.
Push down the brake [1-10] until it engages into position. - Actuate the release button [1-11] to release it.
11 Working
11.1 Extracting dry materials

CAUTION
Hazardous dust
Damage to the respiratory passage
Always use a filter bag!
- Check that the main filter is undamaged before extracting.
When extracting dust that exceeds the limit value, only extract from one dust source (power or compressed-air tool).
Observe the following when extracting dust generated by operating power tools:
Ensure there is adequate ventilation! Observe regional regulations!
Limit values: Exhaust air max. 50% of the fresh air volume
Equation: Room volume V_R x air renewal rate L_W
11.2 Extracting wet materials/liquids

Remove the filter bag!
Use a special wet filter.
The dust extraction stops automatically when the maximum fill level is reached.
The bottom LED [1-15] lights up red.
- Switch off the mobile dust extractor [1-12].
- Open the locking clips [1-7] and remove the top section of the machine.
Empty the dirt trap [1-9].
After wet extraction, allow the main filter to dry! Dry the mobile dust extractor before extracting dry dust.


CAUTION
Hazardous dust
Damage to the respiratory passage
After extracting wet materials, remove the wet filter and replace it with the main filter for dry materials.

CAUTION
Escaping foam and liquids
- Switch off and empty the machine immediately.
11.3 Exhaust-air outlet


CAUTION
Hazardous dust
Damage to the respiratory passage
Do not blow off any dust!
The exhaust-air outlet offers the option of diverting the exhaust air outside a building using the suction hose.
- Open the grille in front of the exhaust-air outlet [1-8].
Insert the suction hose in the exhaust-air outlet [1-8].
11.4 Cleaning the main filter and filter bag manually
In standby mode, press the MAN button [1-13].
- Set the suction power to the maximum setting [1-14].
- Close the suction hose manually while at the same time briefly pressing down the cleaning lever [1-5] three times.
11.5 Changing the filter bag with minimal dust
- Open the locking clips and remove the top section of the machine [2].
Pull the tab on the filter bag until the filter bag opening is fully closed.
The filter bag is now securely closed and can be removed.
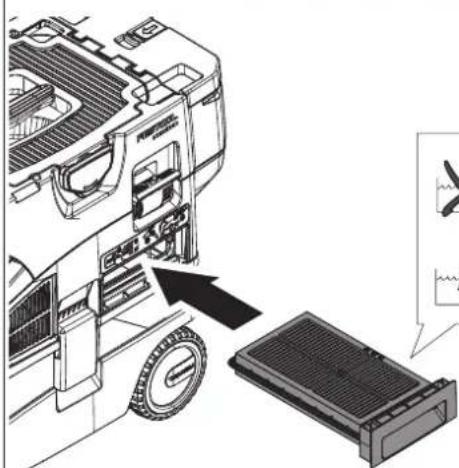
Fit the top section of the machine and close the locking clips.
11.6 Changing the main filter [6]
- Remove the used main filter [1-6].
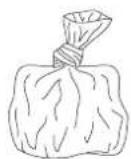
- Dispose of the used main filter in accordance with statutory regulations.
Insert the new main filter.
P0 numbers for accessories, filters and consumables in the Festool catalogue or online at "www.festool.com".
NOTICE
Damage to the motor
- Never extract material without a main filter or with a damaged main filter, as this can damage the motor.
11.7 After finishing work
- Switch off the cordless mobile dust extractor.
Remove the battery pack.
Note: Keep the unused battery pack away from metal objects (e.g. nails, screws, keys, paper clips, etc.) as these may cause bridging of the contacts.
Empty the dirt trap.
- Place the suction hose in the sealable hose holder [7].
Vacuum and wipe the inside and outside of the cordless mobile dust extractor to clean it.
- Place the cordless mobile dust extractor in a dry room inaccessible to unauthorised users.
i The lid of the hose holder [1-3] also serves as a storage area for tools.
12 Remote control
12.1 Intended use of remote control CT-F I
The remote control can manually start / stop a connected cordless mobile dust extractor.

The user is liable for improper or non-intended use.
12.2 Assembly
Attach the remote control [1-18] to the suction hose using the corresponding fastening strap [1-23].
To connect the remote control and the cordless mobile dust extractor, see section 9.2.
12.3 LED indicator [1-20]
The remote control's LED indicator displays, the charge status of the remote control in addition to the Bluetooth® functionality:
English
Flashes blue once
Confirmation of the connection button [1-19] or MAN button [1-21] having been pressed.
Flashes purple once
The remote control has been reset.
Flashes red
The remote control's battery is nearly empty and must be replaced.
12.4 Changing the remote control's battery [8]
The remote control is operated using a CR 2032 battery.
If the battery compartment is opened, we recommend that you replace the seal (20 x 1.3 mm).
- Open the battery compartment closure.
- Place the battery.
- Use the battery compartment.
12.5 Software update
To check whether a software update that will enhance the functions of the remote control or improve existing functions is available, a Bluetooth® connection to the Festool Work App can be established.
Press the connection button on the remote control [1-19] until the LED indicator [1-20] flashes blue.
The remote control is ready for connection for 60 seconds.
- Follow the instructions provided in the Festool Work App to authorise the secure connection.
13 Warning signals
| Warning signal | Description of warning signal Cause Action | ||
| Visual | LED [1-15] | Flashes green Battery pack empty. Charge the battery pack. | |
| Incorrect battery pack. | Use correct battery pack (see section 4). | ||
| Battery pack too cold. See battery pack operating manual for operating temperature. | |||
| Flashes red Battery pack faulty. - Change the battery pack. | |||
| - Use the charger to check that the battery pack is fully functional once it has cooled down. | |||
| Lights up red Cordless mobile dust extractor overheating | See section 10.4. | ||
| Battery pack overheating. | Leave the battery pack to cool for approx. ten minutes. | ||
| Water level limit: Maximum fill level reached | See section 11.2. | ||
| Acoustic Signal Regular Volume flow below | 20 m/s. | Only for dust class M (see section 10.3). | |
| Increasing, begin- ning with two short | Battery pack charge low. | - Charge the battery pack. - Use a newly charged battery pack. | |
14 Maintenance and care

WARNING
Risk of injury, electric shock
Before all maintenance and care work, always remove the battery pack from the cordless mobile dust extractor.
- All maintenance and repair work which requires the motor housing to be opened must always be carried out by an authorised service workshop.

Customer service and repairs must only be carried out by the manufacturer or service workshops. Find the nearest address at:
www.festool.co.uk/service
Always use original Festool spare parts. Order no. at:
www.festool.co.uk/service
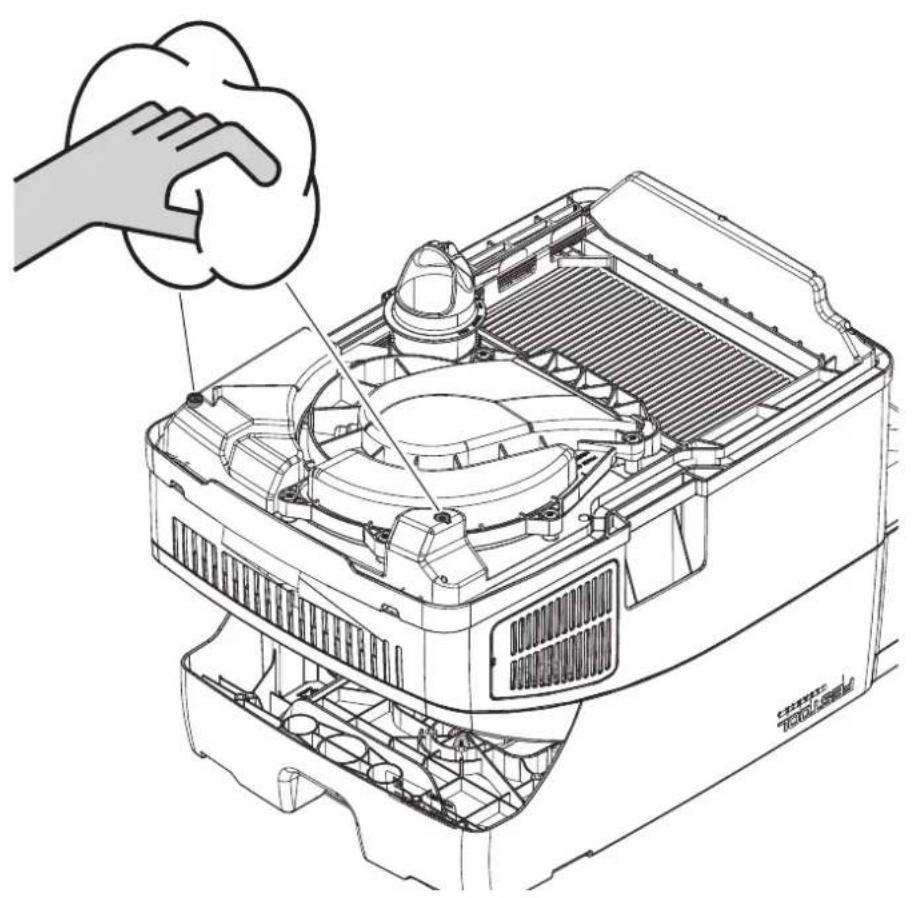
Regularly clean the fill level sensors [9] and empty the dirt trap [1-9].
Observe the following information:
- Dust-related inspection (e.g. for filter damage, tightness of the machine and function of the control devices) by the manufacturer or an instructed person at least once a year.
- Dispose of components that cannot be cleaned. Use impermeable bags to do so. Observe the applicable disposal provisions!
- Keep the contacts on the cordless mobile dust extractor, charger and battery pack clean.
Refer to the Festool catalogue for the order numbers of accessories and tools or find them online at www.festool.co.uk.
15 Transportation
Observe the following information:
- Always lock the T-Loc lock on the cordless mobile dust extractor prior to transportation.
- Only carry it by the handle [1-1].
- For transportation in vehicles, secure the cordless mobile dust extractor against slipping and tilting in accordance with the valid guidelines.
16 Environment

Do not dispose of the device in the household waste! Recycle devices, accessories and packaging. Observe appli-national regulations.
EU only: In accordance with the European Directive on waste electrical and electronic equipment and implementation in national law, used power tools must be collected separately and handed in for environmentally friendly recycling.
Information on REACH: www.festool.com/reach
17 General information
Imported into the UK by
Festool UK Ltd
1 Anglo Saxon Way
Bury St Edmunds
IP30 9XH
Great Britain
17.1 Information about Bluetooth®
As soon as the tool is connected to the Festool Work app via Bluetooth® and the secure connection has been authorised, the tool will connect automatically to the Festool Work app from this point onwards. The tool then regularly sends status information (ID, operating status, etc.) via Bluetooth®.
The Bluetooth® word mark and the logos are registered trademarks of Bluetooth SIG, Inc.; they are used by TTS Tooltechnic Systems AG & Co. KG, and therefore by Festool, under licence.
17.2 Information on data privacy
The tool contains a chip which automatically stores machine and operating data. The data saved cannot be traced back directly to an individual.
The data can be read in a contactless manner using special devices and shall only be used by Festool for fault diagnosis, repair and warranty processing and for quality improvement or enhancement of the device. The data shall not be used in any other way without the express consent of the customer.
Sommaire
Causes possibles Solution
Causes possibles Solution
Temperature excessive
Mobiele accu-stofzuiiger is in de stand-by-modus.
Direct op de mobiele accu-stofzuiiger:
Mobiele accu-stofzuiiger is in de stand-by-modus.
Varning for allman risk

Varning for elstotar

[1-22] Faste for fastband
[1-23] Fästband
- B3pbIbO- n noXapoonacHocTB! He donyckaTte BCacbBaHn:
Pycckn
- nckp, Tneuux MaTePnaIob nn ropaye nn;
- ropoux nIIN B3pbB0oNaChbIX MaTePnaJIOB (HaNPmep MaHnra, aHOMHHa, 6eH3nHa, pa36abnteJe);
-
eKnx BeueCTB (Ha npimep KncIotbl, 1eIouey, pactbopnteJe);
-XIMNUeCKn peaKTINBbIX BeIeCTB, BCTyNAIOxN B peaKcIIO C BblJeHHeM TeIIa, 6pa3OBaHNem KNCLOTb/ueLoOnu, ra3OB n T. d.(HaNPmeppeAKTINBhie 2-KOMNoHEHTHbIe MaTePnaJIbI, aJIOMHHn I BODa). -
CobIouaIte HaunOHaJIbHbIe npaBnla TexHnKn 6e3oNaChocTn I daHHbIe n3roTOBNTeJI MaTePnAJa!
- OCTOPOXHO! Пи ВьIxOe peHbI ИлжИДКОCTN HeMeДЛeHNO OTKJIIOuHnTe annapaT.
-BHIMAHHE! PeryIaRHO uNCTHTe yCTpoIcTBO orpaHnueHnry yPoBnRA BOI I npOBepaIte OTCytCTBne np3HaKOB NOBpeJKeHnra. - Pa3pewaetcpa60TaTb T0lbKo C nCnoJb3OBAHHeM NOxOJaXnx CpeICTB 3aUNTbl!
- Y6eI NTecb B NcnpaBHom COCTOHN aannapata, pa6oTaIe T0JIbKO B cyXOM NOMEUeHNN!
- 3anpeuetaetcnoHnMaTb n TpaHcnpToPoBaTb aannapat C noMoUo noDbEeMHnKa nn Kpana.
-Переньосте Инструмент Толбко за пешда зашиныдялг Зтого ручу. - Icnojb3yIe ToJIbKO opnHnHaJIbHbI BCacBaIOuIe NlaHr Festool.
- Peryulapno npOBepaTe pa3bEm aKKymyIaTopa n fNJIbTp Bo n36eKahne B03MoXHbIX NOBpeJdeHn. B clyuae nobpejdeHn 3ameHy pa3bEma ak-KymyIaTopa BblOJHnTe Toblko B aBTOpn3oBaHHo MaCTepckoN CepBnCHo cnJx6bl.
- Пи Транспортуовке и пабote с Инструментом следно за овсяновков, СвонMu DeйстВяMu и DeйстВяMu OKpyжанox.
Tak Bbl cmojte ncklouHTb onaCHocTB cnoTbIKaHnO uHaHr nnCteB0i Ka6eIb.
- He daBaIte deTЯM nIgpaTb c ynaKobOuHoi nIeHkoJ.
Onacnoctb ydyubja. - C6bIouaTe yKa3aHnB pyKOBoDCTBe nO 3KcPlyaTaun 3apJHOro ycTpoiCTBa n aKKymyIaTopa.
- He nCnoJb3yIe 6Iokn nHTaHn nn aKKymJrTOpbI cTOpOHnX npOn3BODnteJ dJa 3aNTbIBaHn aKKymJrTOphO rNcTpymEnTa. He nCNoJIb3yIe 3apAHNbIe yCTpOcTBa cTOpOHnX npOn3BOJrTeJe dJa 3aPraKn aKKymJrTOPOB. NcNoJIb3OBaHne He peKomeHIOBaHHoN u3rToBtTeJem OChactKn MoKeT npVBecTu K ydApy 3JIeKTPnueCKm TOKOM N/INn TjXkJIbIM TpaBMam.
-ДерхиTe HeucnoJb3yeMbI aKKymJrTop Ha 6e3oJacHom paccToHnOT MeaJIInueCKNX npeMToB, HApPIMep rBO3deN, BnHTOB, KJIoueN, KaHcJIepckNX cKpenOK n T. n., KOtOpblc MOryT cTaTb npuHOn nepe
MbikaHnaaKKyMaJrTophblX KOHTaKTOB.3aMbikaHne KOHTaKTOB aKKyMyJIaTopa MoKeT npNBecTN K OxOraM IJI N B03rOpAHIO.
- Историяа AkkymларTop Толбкoc Историям Festool. Толбков Здом сизуае Историяа Кергелятopa. История Здом сизуае Историяа AkkymларTopа. История Здом сизуае Историяа AkkymларTopа. История Здом сизуае Историяа AkkymларTopа. История Здом сизуае Историяа AkkymларTopа. История Здом сизуае Историяа Akkymлага История Здом сизуае Историяа Akkymлага История Здом сизуае Историяа Akkymлага История Здом сизуае Историяа Akkymлага История Здом сизуае Историяа Akkymлага
- He nCnoIb3yIe noBpeJdEHHbIe mOdnΦnUPOBaHHbIe aKKymJrTopbl. NOBpeJdEHHbIe mOdnΦnUPOBaHHbIe aKKymJrTopbl MoIgYT cTaTb npuHOn B03rOpAHn, B3pIbA nIi TpaBMnPOBaHn.
- OToeHNyIte aKKymJrTop ot annapaTa nepei 3ameHoi ochactKN/ pacxOndbIX MaTePnaIOB nII nepei y6npaHHeM Ha XpaHeHne. 3Ta npEdoXpaHntelhNa Mepa cHnXkaet pNcK HepeiHaMepeHHoro BKJIouYeHnY INCTpyMeHTa.
2 CnMBOJbI

PpeDynpexKdHne 06 06eJ onacHocTn

PpeDynpexKdEHe 6 ydaPe ToKOM

IpoHTte pyKOBoDCTBO NO 3KcNnyatau n yKa3aHn r No Texnke 6e3oNaC-HocTn!

IpoHTte pyKOBoDCTBO nO 3KcNpyaTauu nn yka3aHnno Texnke 6e3oNaCHoCTn!

Pa6oTaIe B pecnnpaTope!
IooXoJNT JnlaYdaJIeHnna NbIIN C IIK BpeJNbIX Jnla 3OpOBBaBe- uectB Bblwe 1Mg/M3

IooXoOHTdYdaJIeHnN PbIIN C IIK BpeIbIX dIg 3DOpOBBe- uectB bIwe 0,1 MR/M

OcToPOxHo! DaHHbI aHnapaT MoKeTe coAepKaTa b OnaChyU dJIra 3DOpOBbI nbJIb!

3anpeaetcB3bnpatbcaHa yctpoi-CTBO

YcTaHOBKa aKKymyIaTopa

ÖtcoeДиненеakkymyIЯTopa

HctpyKzna,pekomeHaazn

HCTpyKcIy no nCNoJIb3OBAHNIO

MapknpoBka CE: NpTBePjdaet coOT-BetCTBnE 3JIeKTPoHnHcTpymHa OCHOB-HbIM Tpe6OBAHNm DnpeKtNB EC.

He BbI6paCbIbAaIe BMeCTe C 6bITOBbIMN OTXoIaMn.

B nHcTpymeIte yctaHOBneH uIN dJa coXpaHeHHaHbIX. Cm. pa3deJ 17.2

MapknpoBka EAC: NpTBePxJaet coOTBeTCTBnE 3JIeKTPoHnHcTpymEnTa OCHOBhIM Tpe6OBAHnM INPeKTHB EBpa3NCKOTO 3KOHOmUeCKOTO COHO3a.

YkpanHcKn CmB0J SEPRO noTBeP- Xdaet COOTBeTCTBne 3JeKtpOnHCTpyMeHTa OCHOBHbIM Tpe6OBaHNrM DInpeK- TNB YkpanHbl.
AkkymyIaTOpHbI nbIeUdIaJIouIuI annapaT npirodeH
-ДЯудаленяпылнdo1MR/M3,YTOcoOTBeTCTByeTKlaccy‘L',
-ДяВсасьванЯВоДы,
-Дя пофессноньно И сплььзовая Вусявай NOБышених Harpy3OK corlacho IEC/EN 60335-2-69,
-ДЯИСПОЛБ30ВАнЯС AkKуМЛТОРAMN Festool cepи BP OdHOrO Klnacca no HanpjaXeHIO,doNyUeHHbIMДЯ pa60TbIC 3TUM aKKyMЛТOPHbIM nbIJIeYdaJIaIQUm anPa- pATOM.
CTMC MIDI I
AkkymyIaTOpHbI nbIeUdIaIouuI annapat npirodeH
Pycckn
-ДЯУдаленяпblлкласca'Mdo0,1 MΓ/M³,BKJIQUaJdpeBecHyIOblbNblIb, 6pa3yUOuYocnPnO6pa6OTkeJaKa,
-Дя BCacbIbAHn BOIbl,
-Дя npoфecnoHaJIbHOrO nCNoIb30BaHnB BycNoBnx NOBblWeHHbIX HaRpy30K corlaCHO IEC/EN 60335-2-69,
-ДяИСПОЛБ30ВанЯсakKуЛЯТOPAMN Festool cepи BP odHoro Klaassa no Hanpra-
XeHIO, DOnyUeHHbIMNДЯ pa6oTbIC 3TNMaKKyMylrTopHbIM NblJeYdaJIauOuIm aIpaTOM.

OTBeTCTBHeHocTh3aNcNoIb3OBAHHe He NOHa3HaueHnIO HecET NOpIb3OBATeJIb.
4 TexHnueckne daHHbIe
5.1 AkkymyIaTOpHbI nbIeYdaIaIoum annapaT
[1-1] PykoTka
[1-2] AkkyMnyTopHy oTceK
[1-3] OTeKДЯшанHa
[1-4] 3amok T-LocДлЯ сиTeиHepa
[1-5] Camoochnctka
[1-6] OchOBHOJ ΦnJIbTp
[1-7] 3aXmHa cko6a
[1-8] BbInyckHoe OToBepctne
[1-9] Pe3epByapДлггрази
[1-10] TopMo3
[1-11] KhoNka De6JoknpoBkn (TopMo3a)
[1-12] KhoNka BkIIOueHn/ByIKJIIOueHn
[1-13] KhoNka MAN
[1-14] PerjTOp INHTeHcNBHOCTN BCacbIBa-HnA
[1-15] HndkaTop coctoHnna (cnla BcablBaHnra / npedynpekdaiouune cnHaJIbI)
[1-16] Khoŋka coeɪnHeHnA
[1-17]Индikatop coeINHeHnA
[1-18] NylbTДYCT-FI*
5.2 NylbT Dy CT-FI
[1-19] Khoŋka coeɪnHeHnA
[1-20] CBeToIaIOHbI INHdNkATOp
[1-21] Khoŋka MAN (pyuHoe BkJIoueHne)
[1-22] BbIcTyn noi 6paCteBtI dIy KpePJIeHnnyIbTa Dv
[1-23]БpacIeTДЯКрenJIeHЯпЛьТаДY
HJIIOCTpaun HaxoJrTcB Haayane pyKOBoDCTBa no 3KcNpyaTu.
- HeKoToPbIe n3o6paXkEHHbIe IJN OINcblBaemble 3JIeMeHTbl OChAcTKn He BXOJaT B KOMJIeKTNoCTaBKN.
6 PodrotobtehbHbIe pa60TbI
BloKTe MeJok- nblnc6OpHNK/MeJok IyTnJn3aun [2-1].
- PoiocoeHnHTe BcacbBaHOuN WJHaHr [3].
7 AkkymyJrTop
Ipepe yctaHOBkoAkkymyIaTopa npOBepbTe, He 3aqr3HeHbI NkEmMbI. 3aqr3HcHHbIe KEmMbI He o6ecneuHBaOT xopoWNI KOHTN MOryt NOJyUHTb NOBpeXdEHHa.
HeicnpaBbI KOHTaKT MoKeT npNBecTu K nepe- rpeBy N NobpeXdEHNIO HcTpymeHTa.
[4A] OToeHNHTe aKKyMyJrTOp.
[4B] BcTaBbTe aKKymyIaTOp -do klick 1KcaUH.
i AkkymyIaTOpHbI nbIeUdAJaUoUsn annapat MoXHo 3KcIpyaTnpOBAt b TOnbKO c 2 aKKMyJIaTOpaMn.
IpeueHb aKKymyIaTOPOB,OT KOToPbIX Mo- kTe pa6oTaTb yCTpOcTBO,CM.B Ta6n- ue [5].B cnyae HObIx,HyeKa3aHHbIX B cnNcKe aKKymyIaTOPOB CJeDyIte HnCTpyK- zinm B npInoxeHnn Festool Work nIu 06paTntecb B cepBnchHyo cnyk6by Festool.
i Iopnp6nHa HOpMaun O 3apAnHom ycTpoNCTBe n aKKyMnyTope c HndKaTopom EMKoCTn CoepXHTcB COOTBeTCTByIOx npKOBOIDTBax NO 3KcnIyatauH.
8 PoiDroToBka K pa6ote
PexnM OxuaHna
HaxMMTe KHOKNy BKJIIOueHnra/BbIKIOue-Hnra [1-12].
3eIeHbIe CBTeOIOIObl HNdkaTopa CoCTOHN [1-15] yKa3bIBaIOT Ha peXIM OxNdaHn.
Pn NOBTOPHOM HaxaTN KHOKN BKNIOUeHn/ BbIKNoueHn aKKyMylTOpHbI nbIeYdaJIaHo- uan annapat OTKNouaetc.
PyuHoi nycK/ocTaHOB aKKyMylaTOpHoro nbIeYdaJauoero annapata
IbileydaIaIoun annapat haoDITcBpeKmE OxuHaHna.
HenocpeDCTBeHNo Ha aKKyMylrTopHom nbIeY-daJIouSe m annapate:
Для зауcke/octaHOBa HaXMMTe KhoNky MAN [1-13].
B kauectBe aIbTepeHaTnBbl c noIcOeHHeHHOro nyIbTa DY CT-F I (cm. pa3dE9 9.2):
Для 3ануcka/ocTaHOBa HaxMnte KhoNky MAN [1-21]Ha nyIbTe Dy.
ABTOMaTHueckn nyck/ocTaHOB aKKyMylrTopHoro nbileydaJauo oannapata
Пыileудаляюши annapat haxoДNTcB peЖиMe OЖиДанЯ.
Pycckn
Дя abTomatnueckoro 3anycka/octaHOBa пьileyaIauIooIero annapata: BKIOUHTe/ BbIKIOuHTe IOdcoEINHHeHHbI aKKyMylTOp- HbI 3JIeKTPoINHCTpyMeHT (cM. pa3deJ9.1).
9 CoeINHeHne c HnHcTpymeHTaMn

PPEyPExKdEHN
Onachoctb TpaBMpoBaHn npn HeKOHTpOJnyeMOM BkIIOyeHn aKKyMylrTopHo r nbIneydaJIouoero annapaTa
- Npeed hauaIom pa6oTbI c nbIyeJaIeHneM npOBepbTe, KaKo IyIbT DY n KaKo aKKyMyJrTOpHbI INCTpyMeHT nMeet CoeDnHeHne C aKKyMyJIrTOpHbIM nbIyeJaIaIIOuIm annapaTom.
AkkymyIaTOPbIeJIeKTPoHnCTpyMeHTdoJIxH 6bITb BceTdcoeINHeh BCacBbAIOUIM IlaHrom CaKKMyJrTOpHbIM nbIeYdaIaIOuIuM annapaTom. Pocne pa60TbI aKKmyJrTOpHbI nbIeYdaIaIOuN annapaT HxHoOTCoeHNHTb. - NylbT Dy MoXHo 3aKpePnIaTb TOnbKO Ha BCacbBaIOUeM UHaHre.
10.1 PerylnpobKa cnIbI BCacbBaHnA
HaxmMaTe KhoNKe IJIoc> NIN «MHyc》[1-14]Ha peYJrTope HHTeHCNBHOCTN BCacbIBaHnBpeKIme BCacbIBaHn.
3eJIeHbIe CBeToIONoIbI INHnKAtopa CoCTOHN [1-15] NOKa3bIBaIOT TeKyuN ypoBeHb HHTeHCNBHOCTN.
10.2 BcabsBaouaMyfTa
Функцябайпаса на BCacbBaIOошeMyΦ-Te [3-1] npedotBpaaetnpicaBbHne WlnMaaHnOK n HacaOkДЯ NOJa K rJaIaKm NOBepxHOCTaM.
OTKpbBaHne
Pa6oTa c ⅢnΦMa- Hkamn.
AKTNBnpyNe yHKuH06aInaca (cm. pa3-10.2).
10.4 3aunTa ot neperpeBa
ДяЗшпыOTперретаСпуньнлпсдoxpaHTeIbCTeNIOBbIMpeIeOTKJIQUaET nbI-NeydaJIAnIooHn annapatпepddoctnxKeHnemKpNTuueckoTEmpePaTypbI.CBeToJNOJHbINHnHnDKaTOPcoCTOraHn [1-15]CnHaJIIn3npyet Oc6oeBpa6ote.
Fopnt KpaChbI CBeToNoI NepepeB
- OTKIIOUHTe nbIeYdaIaIouIuI annapaT n daIte emy octbITb.
-Приимерно урет 10 мнут сюва вклочипьileудалгшй annapaT.
10.5 SysDoc

PPEyPPEKDEHNE
OnachocTb TpaBMnpoBaHn
He nCnoB3yIe aKKymyIaTOpHbI nbIeYdaJIouu annapat B KaueCTBe NODcTaBKN.

BHIMAHNE
Onachoctb TpaBMnpoBaHn
Pn TpaHcnpTnpOBKe cJeIte 3a TeM, T06bl 3amok T-Loc 6bl 3anept.
Cbepy Ha oTceke IJIaIHaHa [1-3] MoXHo 3a-KpeiNb cNCTeHep C NOMOuBIO 3aMka T-Loc [1-4].
10.6 YcTaHOBKa TopMo3a
PnnoHmnte nepedHIOuacTb nbIeydaJraHoo aannapaTa.
HaIaBHTe Ha TopMo3 [1-10] DBrJxKeHneM BHN3 Do 0Kcaun.
Для pactopmaЖиBaHЯ haXmTe KhoNky de6loKnpOBKn [1-11].
11 Bылненье pa60T
11.1 C6op cyxnx MaTePnaJIOB

BHIMAHNE
OnacnaJ3OpOBbIpbIb TpaBMnpOBaHne dblxatelbHbIX nyTei
Bcerda nCnoJb3yIte MeWoK-nyIeSc6OpHnK!
- Ipepepa6oToI npOBepeTe cocToHne oc-HOBHOO nIbTpA.
I npn BcacsBaHnn nbln, npeBbIaIOuSei npedeIbHbIe 3HaueHna, ouNuaTe TOnb- KO HENOCpeIcTBeHHbIe NCTOuHNKn PbIIN (JNeK- Tpo- nnPiHBMOnHcTpymEnT).
CoblaaTe cIeIyUoIne npaBnla npc6ope nbln, o6pa3yUoIeIcR npi pa6Ote 3JneKtpOnH-CTpyMeHTOB:
Obecneyte doctatoHyo BeHTnlauio! Co6IIO-daTe pernoHaBbIe npedncaHra!
3aBnHbTe HObI OCHOBHO HJbTp.
i KoBdIa3a3aOChAcTKn,ΦNbTpOB npacXoDhIx MaTePnaJIOB MOxHO HaHTNB katanore Festool n B NHTepHeTe Ha www.festool.ru.
YKA3AHNE
PobpeKdHne DnurTaTeJra
HnKoIa He pa6otaTe c NOBpeXdEHHbIM OCHOBHbIM fNtPOM NIN BO6ue 6e3 fNtPa, TaK KaK 3To MoKeT npNBecTN K NOBpeXDeHNIO DnIraTeJI.
11.7 Np OkohuaHn pa6oTbI
BbIKIOHTe nbIeYdAaIoun annapaT.
- N3BnKeKnte aKKyMyJrTOp.
BHHMaHHe: DepKHTe HeNCNoJIb3YeMbI aK-KymJrTOp Ha 6e30nacHom pacCToHn OT MeTaNuecknx PpeMToB, HAnpIMep rBO3dEi, BnHTOB, KJIouye, KaHcJIaRcKNX CKpeNOK T. n., KOtOpbIe MOrYT CTaTB pNpuHOn NepembIKaHnA AKKymJrTOpHBIX KOHTaKTOB.
OnopoxHnTe pe3epByap IraI rpa3n.
- Y6epnte ⅢaHr B 3aHpaembI OTCek [7].
OuHCTnTe nbIeYdaIaIouIi annapaT n3HyTpNI cHapyKcN C NOMoUbIO nbIeCoca IN TpIKN.
Ybepnte nbIeuydaJauoH annapat Ha xpa-HeHne B cyXoe NomeueHne, 3aunueHHoe OTHenpaBOMOuHOro nCnOJIb3OBaHn.
Ha KpbIkwky OTeKa IJnAwnHra [1-3] MoKHO KnaCTb INHcTpymeHTbl.
12Дистанционhoe упразьени
12.1 PpIMMeHHe No Ha3HaueHnIO nyIbTa Dy CT-F I
CnybTa DY moXHo BpyHyIO BKIIOaTb/BblKJIIO- cyTb NODcoEINHHeHHbI aKKyMyJrTOpHbI PbI neydaJIoUoN annapat.

OTBeTCTBeHHocTb 3a NcNoIb30BaHHe He No Ha3HaueHnIO HecET NOpIb30BaTeJIb.
12.2 MoHTaX
3aKpeHnTe nIbT y[1-18] cNoMoUcne-uaJIbHoTo 6paCNeTa [1-23] Ha BCaCbIBaIOuE M ShlaHre .
CoeHnTe npbT Dy n aKkymyIaTOPbI nblneYdaJauo annapaT, cm. pa3d9 9.2.
12.3 CBeToMDNoHbI NHdNkTaOp [1-20]
Kpome HndnKaun cTaTyca Bluetooth®-coeHHeHnCBetoNDnHbI INdNKaTOp DONoHHTeB-Ho NOKa3bIBAe TypOBeHb 3apra da 6aTapeKu B nyIbTe DY:
![FESTOOL Cleantec CTLC MIDI I - CBeToMDNoHbI NHdNkTaOp [1-20] - 1](/content/2026/03/561733/images/56065b3b5bc04e1df7649398ac38461eaefea58c0834c123a5b77db61a52b675.jpg)
1-KpaTHoe MrraHne cHHeRo CBeToDnOda 3aФИКсИрОвАн НжаТиЕ KНОПКи COeДи- HeHЯ [1-19] Ил KНОПКи MAN [1-21].
![FESTOOL Cleantec CTLC MIDI I - CBeToMDNoHbI NHdNkTaOp [1-20] - 2](/content/2026/03/561733/images/ce33a76bec3381c1d204f86fcccb0ae27c4f3aa3124570be93bad0b184e199a2.jpg)
1-KpaTHoe MURAHHe npynypHoro cBeTo- dnoa BbIOJIHeH c6poc HacTpoKn nyIbTa Dy.
![FESTOOL Cleantec CTLC MIDI I - CBeToMDNoHbI NHdNkTaOp [1-20] - 3](/content/2026/03/561733/images/291f3b55cd22d207fae16205605cdf25149643f8f849ca07b2c1f61d1e9dd187.jpg)
MuraHne Kpachoro CBeToaNoDa BaTapeiKa BnyIbTe DY noTu pa3PraNlaCb N Tpe6yET 3aMeHbl.
12.4 3aMeHa 6aTapeiKn B nyIbTe Dy [8]
① Пильт Ду paботаet Ha 6atapeйкax CR 2032.
i Pocne oTKpbBaHnO TceKa dJa 6aTapeKn peKOMeHnyetc3aMeHHTb yNIOTHHTeJIbHyIO npoknaKy (20x1,3 MM).
FcKcnpyTe KpbIuKy OToceKa IaTapeuKn.
32MeHnTe 6aTapeKy.
3KpoIte OTeck.
12.5 06HOBJIeHne IIO
He BbI6paCbBaIe HNCTpyMeHT BmecTe C
6bITOBbIMN OTXoJaMn! 06ecneyBte 3koIolrueckn 6e3onacHyu ytnJIn3aunH-
CTpyMeHToB, OCHaCTKN yNaKOBKn. Co6JIIOJaTe DeIcTByUOuNe HaunOHaJIbHbIe IpeDnncAHnI.
ToIbko dIra cTpaH EC: corIaCHO dIpuKeTKuBe EC 06 OTxOdaX 3JIeKTPnuecKO r N 3JIeKTPoHOrO 06OpuyIOBaHnra, a TaKxRe rApMOHN3IpOBaHHbIM HaIIOHaJIbHbIM CTaHdApTaM OTCJyXNBWe CBoi CpOK 3JIeKTPoHnCTpyMeHTbI DOJNXbI yTUNN3IpOBA TbCB pa3DJIbHO n HAnPaBJIrTBcR Ha 3KOJIoTNHeCKn 6e3OnacHyIO nepepa60TkY.
HΦopMaζη no ΠnpeKtNBe REACH:
www.festool.com/reach
17 06ие уka3aHHa
17.1 Информачи o Bluetooth®
Cpa3y nocJe yctaHOBJIeHnBa Bluetooth®-coeHNHeHn c npIIOKeHnEM Festool Work n 6e3-ONacHO ABTOPn3aUN CoeINHeHn INCTpyMeHT ABTOMATNUeCKN COeINHReTcN C Hm N HaunHaET peYJrPHo NocBlaTaB yBeDOMJIeHnO CTaTyCe (ID, pa6oyn peKIMn T. n.) uepe3 Bluetooth®.
Iorotnbl «Bluetooth»ЯьяOTc3apernctpnpoBaHbIMTOBapHbIM3HaKaAMn Bluetooth SIG,Inc.,илбоe nCnoJIb3OBAHne 3Tnx 3HaKOB komaHne TTS Tooltechnic Systems AG & Co. KGи,cJeIOBaTeIbHo,KomnaHneFestool Bo3-MoXkHO ToIbko npi HAnuN JInceH3N.
17.2 Hhopmaun o 3aunTe daHHbIX
HnctpymENT OchaueHen MetKoR RFID nIaABToMaTnueckoro coxpaHeHna pa6OuHX n3KcPnyata-uaHOHBIX daHHbIX. CoXpaHehHbIe daHHbIe He npNBra3aHbIK KaKOMy-Jn6o onpeJeHHomy Jn-uy.
ДаHHьe MoXHcUHTbIbA Tb 6eCKoHTaKTHbIM cnocobm c nOmoBcNeuaJIbHbIX yCTpoiCTB. 3TN daHHbIe uCnoJIb3yIOTcFestool TOnbKO B ueJx dnaHocTnK OUn6OK, peMOHTa NcNoJIHeHnra paHTnHbIX o6aTeJIbCTB, a TaKKe IЯ NOBbIseHnKaueCTBa NIn YCOBepWeHcTBOBa-HnnaJIeKTPoINHcTpymeHTa. JIO6oe HHOe NcNoJIb-3OBaHne DaHHbIX - 6e3 COOTBeTCTByIOSeFo (NncbMeHHoro) corIacn KJIneHTa - He DoNY- CkaETcR.
Obsah
10.1 Regulace sily sani
V sacim rezimu stisknete tlacitko plus nebo minus regulace sily sani [1-14].
Zelené LED ukazatele stavu [1-15] signalizuji aktuálni stupen vykonu.