IAN 347010 - Fitness Equipment CRIVIT - Free user manual and instructions
Find the device manual for free IAN 347010 CRIVIT in PDF.
| Product Type | Multi-function stepper with resistance bands and turntable |
| Brand | Crivit |
| Model | IAN 347010 |
| Dimensions (L x H x P) | Approx. 43 x 38 x 39 cm |
| Weight | Approx. 14.7 kg |
| Power supply | 1 LR44 battery 1.5 V |
| Power consumption | 0.009 mW |
| Maximum load capacity | 100 kg |
| Max. stretch length of bands | 165 cm at 19.5 N |
| Display | Step count, time, calories, RPM (accuracy class C, indicative) |
| Materials | Steel, plastic, elastomers |
| Use | Domestic, private use only |
| Standards | DIN EN ISO 20957-1, DIN EN ISO 20957-8, DIN 32935 |
| Warranty | 3 years |
| Delivery contents | 1 training cube, 2 resistance bands with handles, 1 LR44 battery, instruction manual |
| Maintenance | Clean with water and a soft cloth; do not use aggressive cleaning products |
| Safety | Do not use by children without supervision; avoid touching hydraulic springs after exertion; check screws regularly |
| Storage | Dry, clean, room temperature location; remove battery if not used for extended period |
Frequently Asked Questions - IAN 347010 CRIVIT
User questions about IAN 347010 CRIVIT
0 question about this device. Answer the ones you know or ask your own.
Ask a new question about this device
Download the instructions for your Fitness Equipment in PDF format for free! Find your manual IAN 347010 - CRIVIT and take your electronic device back in hand. On this page are published all the documents necessary for the use of your device. IAN 347010 by CRIVIT.
USER MANUAL IAN 347010 CRIVIT
natural_image
Two black plastic container enclosures with vertical supports, shown from different angles (no text or symbols visible)
WORKOUT-WÜRFEL
WORKOUT CUBE CUBE DE FITNESS
(2) (3) (4)
WORKOUT WÜRFEL
Geodactanicking
CUBE DE FITNESS
Noved no potentiatic
(8) (9)
WORKOUT CUBE
Instruction: 15-0%
WOU
Gebulkanejing
(3)
KOSTKA NA EVICENI
14.05.20.21
CE
BUTCHIN RESEARCH
(3) '30 Skin was left blank or open as part of the blood cell system to work a sense and without and like, rather an end of treatment.
(5) This program is a role in the world by an organization of various resources in the contemporary framework.
(2)
The first set of the first set is a separate set of two sets of different sets of the same set.
06/18 Usage and salary information Page 19
| R2/60 Cerebral Cross of the brain and Page 24 | |||
| R2/60 Color Lines in glialysis | Pages | 20 | |
| F1 | Wristenski et al. application of brain compressors | 30mm | 36 |
| L1 | Habby's joint in hippocampus | 30mm | 45 |
| M1 | Habby's post-ventricular impairment | 30mm | 47 |
(一)董事会全体成员保证信息披露的内容
natural_image
Illustration of a person performing a stretching exercise, showing two sequential poses with one highlighted (no text or symbols)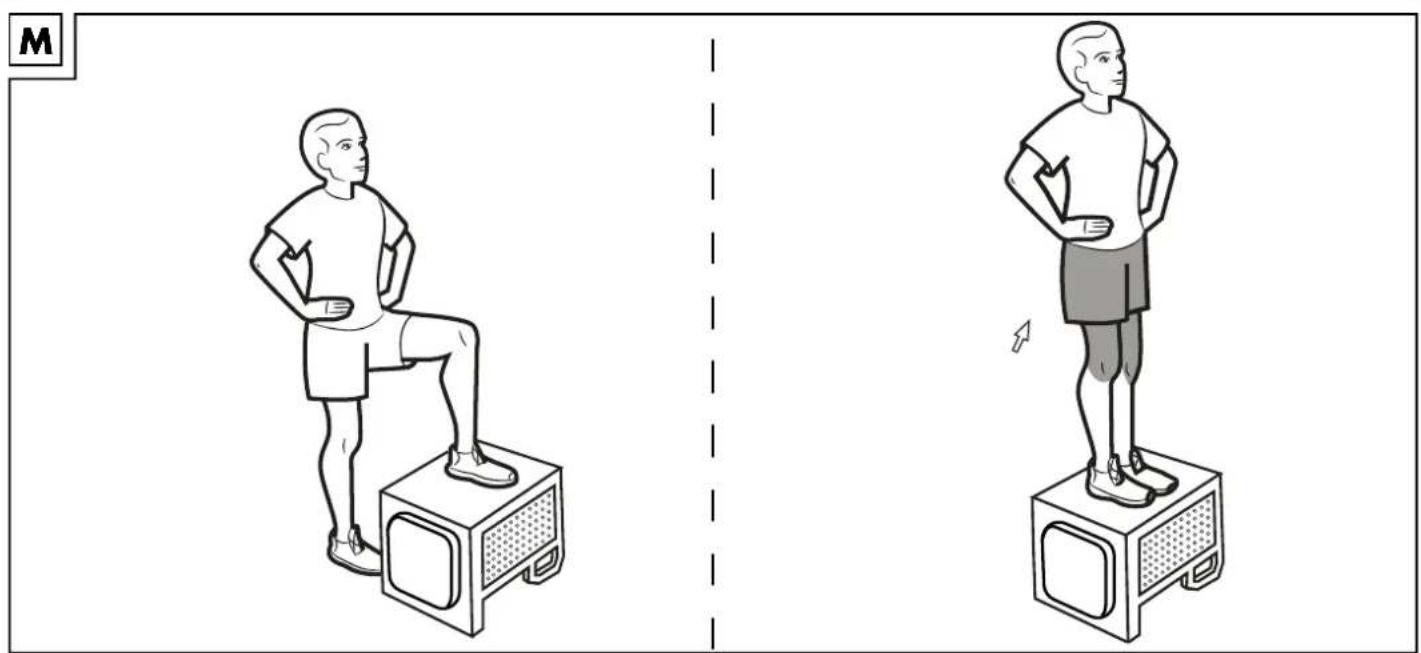
natural_image
Two identical line drawings of a person performing a standing exercise on a foam block, with no text or symbols present.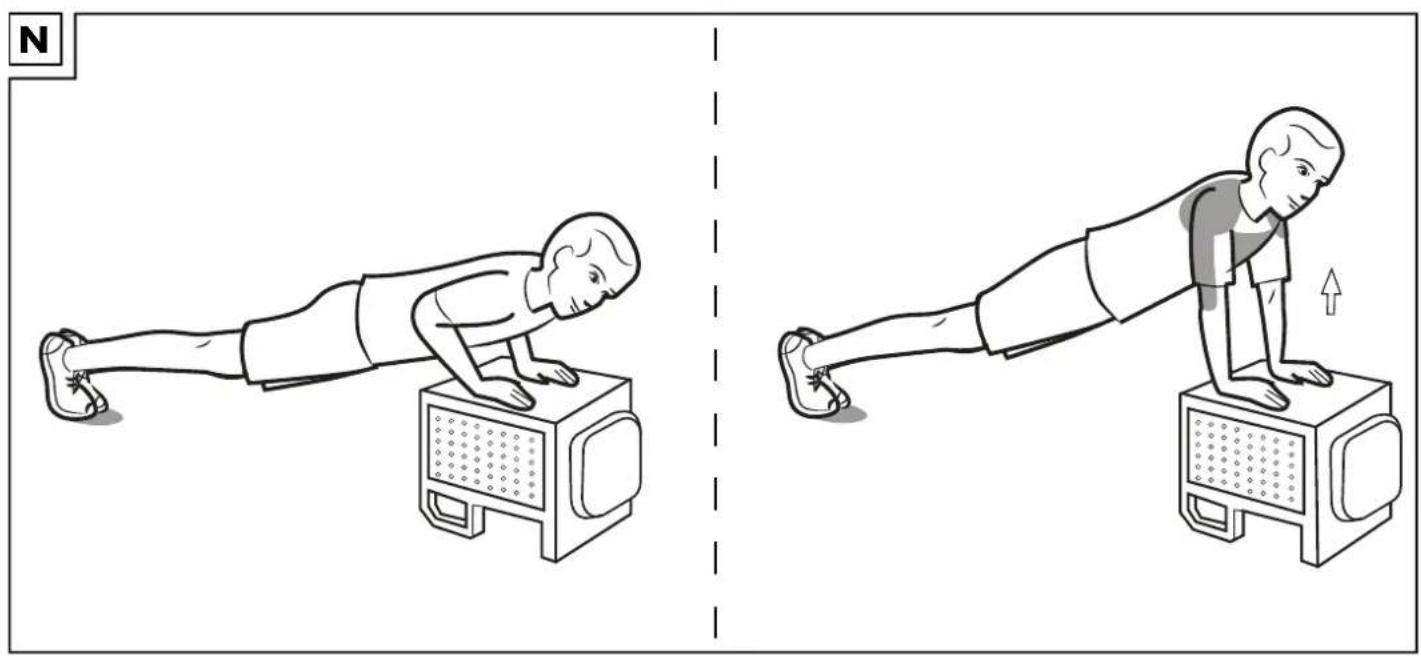
natural_image
Illustration of a person performing push-ups on a fitness platform, showing two sequential poses (no text or symbols)
natural_image
Illustration of a person performing push-ups on a TV, showing two sequential poses (no text or symbols)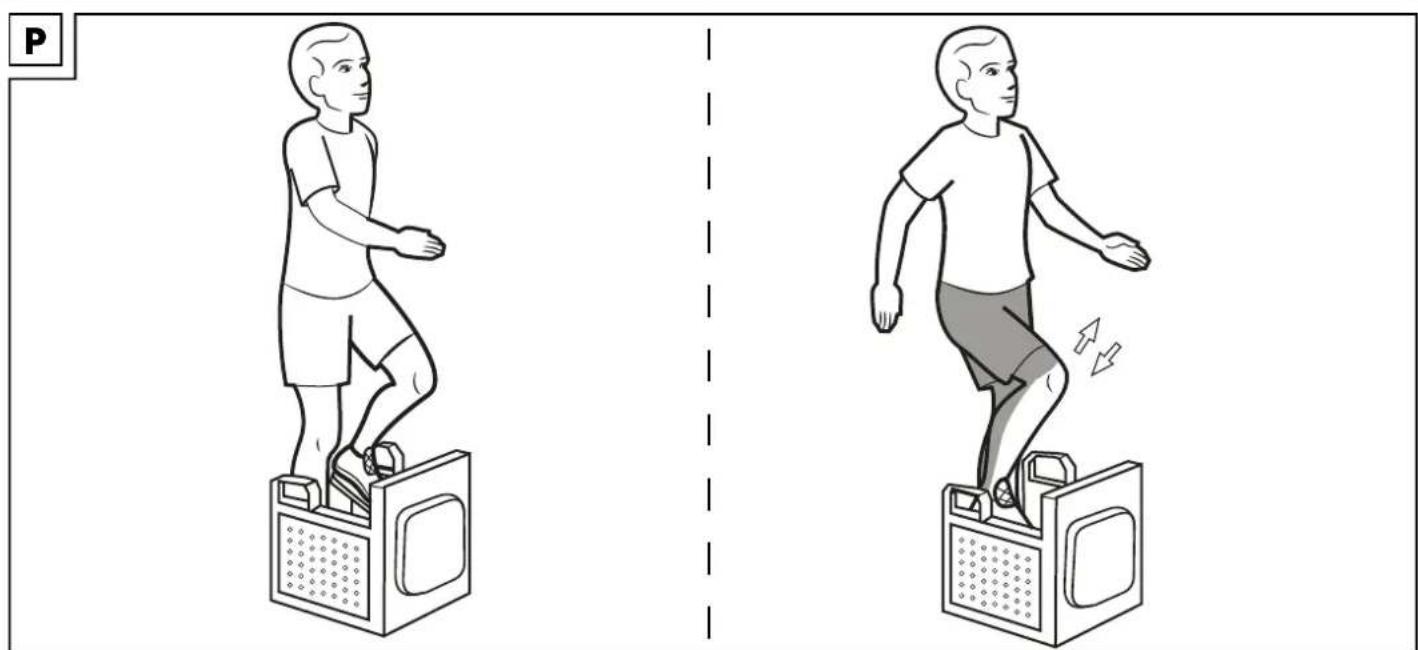
natural_image
Illustration of a person performing two different exercise poses on a device (no text or symbols present)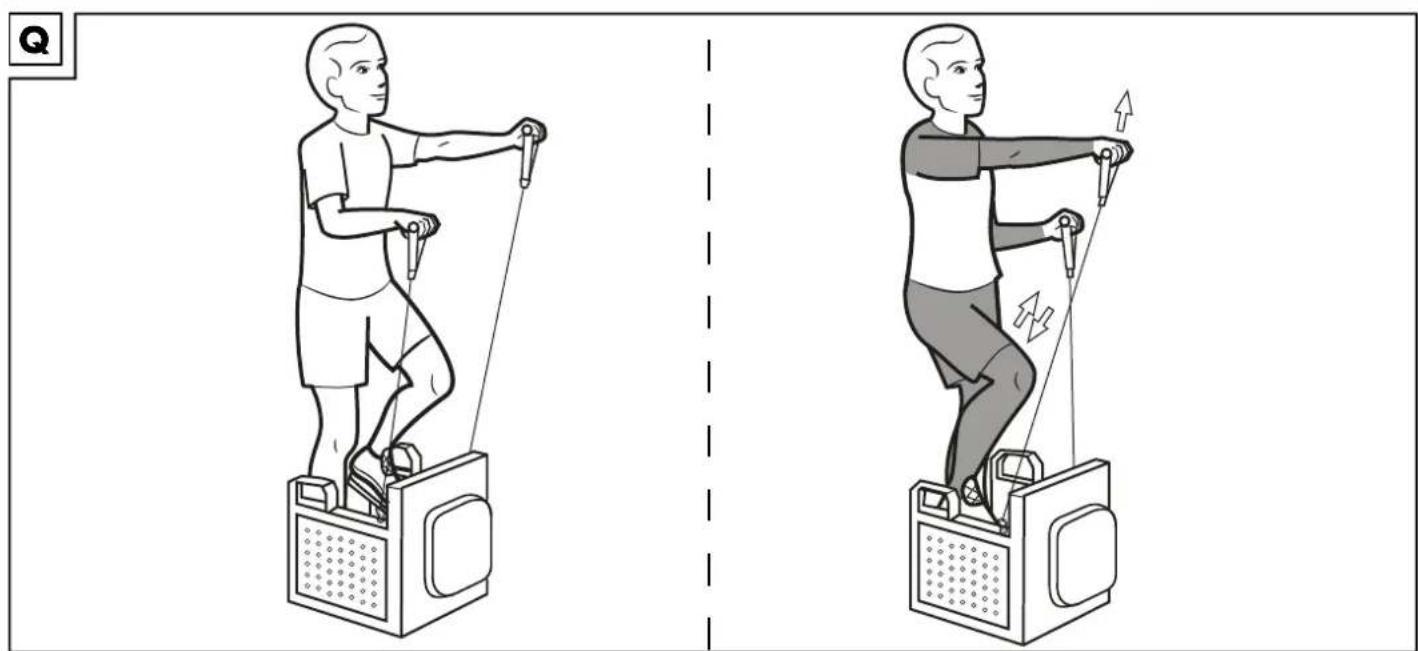
natural_image
Illustration of two people performing resistance band exercise using a stationary device (no text or symbols)R
natural_image
Line drawing of a person using a resistance band machine (no text or symbols)
natural_image
Illustration of a person using a resistance band device on a stand (no text or symbols)s
natural_image
Line drawing of a person using a resistance band exercise machine (no text or symbols)
natural_image
Line drawing of a person using a resistance band exercise machine (no text or symbols)
natural_image
Simple line drawing of a human figure with arms extended outward, no text or symbols presentT
natural_image
Line drawing of a person standing on a vintage television with a device (no text or symbols)
natural_image
Illustration of a person using a resistance band exercise machine (no text or symbols)U
natural_image
Line drawing of a person performing a seated exercise on a fitness apparatus (no text or symbols)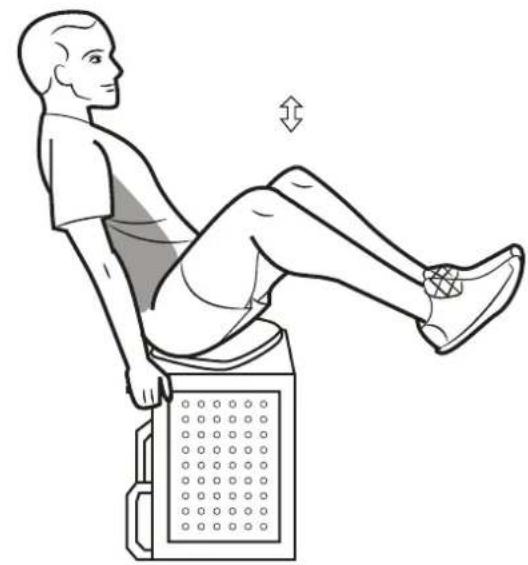
natural_image
Illustration of a person performing seated exercise on a reformer machine (no text or symbols)v
natural_image
Line drawing of a person performing a sit-up exercise on a fitness platform (no text or symbols)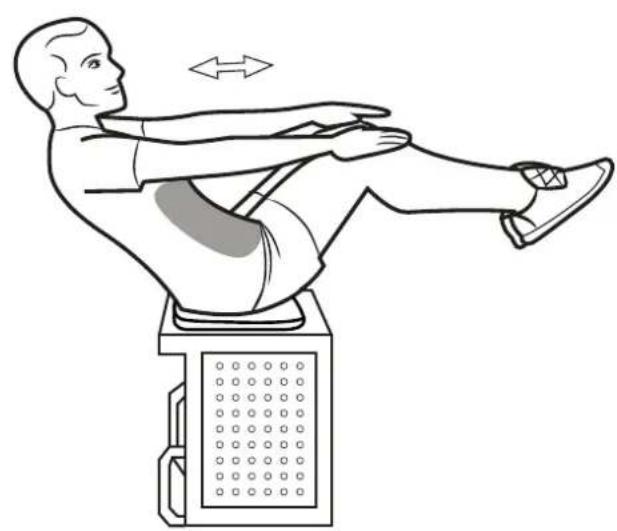
natural_image
Line drawing of a person performing a leg exercise on a fitness apparatus (no text or symbols)W
natural_image
Line drawing of a person performing a plank exercise on a fitness equipment (no text or symbols)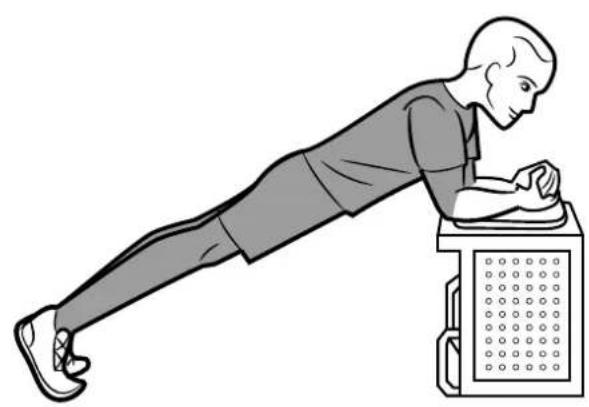
natural_image
Illustration of a person performing a plank exercise on a fitness equipment (no text or symbols)DE AT CH
Lieferumfang 13
Technische Daten 13
Risks due to incorrect/excessive training! ... 19
Damage to property! 19
Battery warning notices 19
Danger! 19
Replacing the battery 20
Training with the stepper 20
Operating the computer.... 20
Training instructions 20 - 21
Stretching exercises 21
Exercises with the training surface ..... 21 - 22
Exercise with the handles 22
Exercises with the stepper 22 - 23
Exercises with the swivel plate 23
Storage, cleaning 23
Disposal 23
Notes on the guarantee and
service handling 23
FR BE
Exercices d'étirements 26-27
text_image
Illustration showing two scenarios of a person performing a physical exercise with checkmarks and crosses indicating absence or rejection.You have chosen to purchase a high-quality product. Familiarise yourself with the product before using it for the first time.

Read the following instructions for use carefully.
Use the product only as described and only for the given areas of application. Store these instructions for use carefully. When passing the product on to third parties, please also hand over all accompanying documents.

Safety information Risks for children!
- This apparatus may be used by children from 8 years of age upwards, as well by persons with diminished physical, sensory or mental abilities, or those with little experience and knowledge, if they are supervised or instructed with regard to its safe use, provided they also understand the potential risks.
• Children may not play with the apparatus. - Cleaning and maintenance must not be carried out by children without supervision.
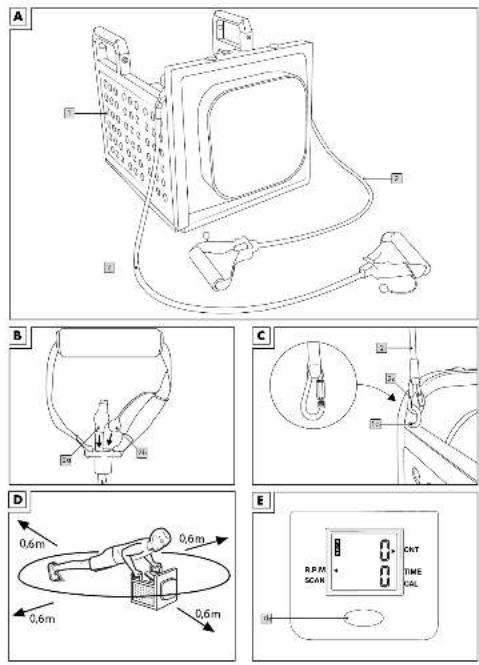
Package contents (Fig. A)
1 x workout cube (1)
2 x expansion band with handle (2)
1 x battery (1.5V = ER44)
1 x instructions for use
Technical data
Dimensions: approx. 43 x 38 x 39cm
(W × H × D)
Weight: approx. 14.7kg
Power supply:
1 × 1.5V === LR44
Rated power consumption: 0.009mW
Symbol for DC voltage

Maximum load: 100kg

Delta-Sport Handelskontor GmbH hereby declares that this product
complies with the following basic requirements as well as other relevant statutory provisions:
2014/30/EU - EMC Directive
2011/65/EU - RoHS Directive
Full declarations of conformity are available at http://www.conformity.delta-sport.com/

Date of manufacture (month/year): 07/2020
Device class: HC (for use in private households, accuracy C)/not intended for therapeutic training
Tested according to: DIN EN ISO 20957-1: 2014, DIN EN ISO 20957-8, Maximum stretch extension 165cm at 19.5N. The strength tolerance range is maximum 20% (+/-). Training appliance form A is compliant with DIN 32935.
Stepping motion
The stepper facilitates a stepper-determined stepping motion.
Brake resistance system
The stepper uses a speed-dependent system.
Intended use
The product is intended to be used exclusively as training equipment, and is approved for installation and use in the home only.

Safety information
General hazards
- Make sure the packaging foil does not result in child fatalities (there is a risk of suffocation).
- Never let children play with the battery. Swallowing it can cause serious harm to your health.
- Keep children away from the pedals while you are training (danger of crushing).
- The product is not a children's toy. When not in use, please store it so that it is inaccessible to children.
• Maximum load: the product is designed for a maximum body weight of 100kg.
- Do not pull the expander bands past the maximum stretch length of 165cm!
- The stretch length may not be adjusted beyond the 'MIN.' marking.
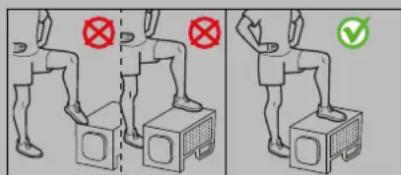
- There must be no adjustment devices protruding from the product that could impede the user's movements. The product must be positioned in an area that gives you enough space for training. An area of at least 2 × 2m is necessary.
- Position the product on a flat, level surface so it is stable during training and does not wobble.
- Ensure the product is in perfect condition before each use. Do not use it if this is not the case. Defective parts must be replaced, as otherwise function and safety are impaired.
• Repairs may only be performed by authorised technicians.
- Only original replacement parts may be used.
- The product must only be used with sports shoes.
- There must be approx. 0.6m of space around the training area (Fig. D).
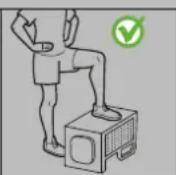
• Always step onto the middle of the training surface, otherwise it could tip!
text_image
Illustration showing two scenarios of a person performing a valve or press device, with red and green symbols indicating no or yes conditions.- The elastomers in the expander must be protected from direct sunlight.
Risk of burns!
- The hydraulic dampeners become hot during training. Do not touch them immediately after training under any circumstances.
Risks due to incorrect/excessive training!
- It is imperative that you observe all the instructions in the 'Training instructions' section.
Damage to property!
- Oil can leak from the hydraulic dampeners. To avoid staining of floors or carpets, place the product on a level, non-slip surface.
- Ensure that the fluid does not get into the computer. The sensitive electronics could become damaged. Protect the computer from direct sunlight.
- Regularly check that all screws and nuts are tight. Self-retaining nuts cannot be loosened by vibration.
However, this characteristic is only guaranteed when tightened once. If the product is ever disassembled, all self-retaining nuts must be replaced with new ones. - If the product is not needed for a long period, remove the battery from the computer, as it can go flat and cause damage.
• We recommend using an underlay during training to prevent damage to the floor.

Battery warning notices!
- Remove the batteries when they are flat, or if the product is not in use for an extended period.
- Do not use different types or brands of battery or new and used batteries together or batteries with different capacities as these can leak and cause damage.
- Ensure the polarity (+/-) is correct when inserting the batteries.
- Replace all batteries at the same time and dispose of the old batteries as prescribed.
- Warning! Batteries must not be charged or re-activated by other means, taken apart, thrown into fire or short-circuited.
• Always keep batteries out of reach of children. - Do not use rechargeable batteries!
- Cleaning and maintenance must not be carried out by children without supervision.
- Clean the battery and device contacts as needed and before inserting.
- Do not expose the batteries to extreme conditions (e.g. radiators or direct sunlight). Otherwise there is an increased risk of leakage.
- Batteries can be life-threatening if swallowed. Therefore, store batteries in a place inaccessible to small children. Medical attention must be sought immediately if a battery is swallowed.
Danger!
- Handle damaged or leaking batteries with extreme caution and dispose of them properly as soon as possible. Wear gloves when doing so.
- If you come into contact with battery acid, wash the affected area with soap and water. If battery acid gets in your eye, rinse it with water and seek medical attention immediately!
- The connection terminals must not be short-circuited.
Replacing the battery
WARNING! Observe the following instructions to avoid mechanical and electrical damage.

Danger!
There is one LR44 battery in the product. You can replace the battery if it stops working.
- Lever up the display on the side and carefully remove it. The battery is at the back of the display.
- Carefully slide the empty battery out of the battery holder and replace it with a new battery.
Note: ensure the battery is completely inside its holder. Pay attention to the plus/minus poles of the batteries and their correct insertion.
- Insert the display and the cable connections into the casing once again.
Note: ensure the display is properly seated in its casing.
Training with the stepper
Expansion bands
Note the max. stretch length of the expansion bands.
The shorter you adjust the expansion bands, the greater the strength required.
- Shorten the expansion bands by fixing the rubber tube (2a) in place with the securing ball (2b) (Fig. B).
IMPORTANT! Be careful not to shorten the expansion bands to much. Do not go past the 'MIN.' marking! Important! Before training, check that the expansion bands are securely attached and that the hook is securely screwed closed. Warning! The eyelets are secured for tensile loads upwards only, and may not be subjected to transverse loads. There is a risk of injury, or damage to the stepper.
When you are training with the expansion bands (2), unhook the carabiner (2c) from the eyelets (1a) to avoid the risk of tripping (Fig. C).
Mounting the stepper
Press one pedal down completely with your foot, so that the pedal arm rests with its stopper on the base frame.
Then step on the tread of the lowered pedal arm. Place the other foot on the other, upward-sloping tread.
Dismounting
Standing on the stepper, push one of the treads all the way down, so that the pedal arm stopper rests on the base frame.
Then take your foot from the pedal which is pointing upward, and place it on the floor. Then take your foot from the pedal which is pointing downward.
Muscle groups exercised
The exercises without the expander bands mainly exercise the leg and buttock musculature.
Exercises that involve stepping and the expander bands strengthen the buttock, leg, arm and shoulder musculature.
Exercise that involve the expander bands but not stepping strengthen your arm and shoulder musculature.
Body posture
Please ensure that you keep your body straight during training sessions. Avoid a hollow-back posture at all costs.
Important: while exercising, keep constant abdominal tension and keep your upper body erect!
The pedal arm stopper should not touch the base frame if you are stepping evenly. So you should always shift your weight from one leg to the other shortly before touchdown. It can also be helpful if you let your arms swing slightly bent in front of your upper body while stepping in a rhythmic motion.
Operating the computer
The stepper corresponds to accuracy class C, i.e. there is no guarantee that what is displayed on the computer is accurate.
Turning the product on and off
When you start exercising or operating the pedals, the computer switches on automatically. If the stepper is not used for approx. 4 to 5 minutes, the computer automatically switches off.
Note: 'STOP' appears in the top line of the display when the training is interrupted.
Selecting the mode
Briefly press the select button (1b) to switch from one mode to the next (Fig. E). The selected mode is marked by a small triangle next to it on the display.
- 'CNT': number of steps completed during the current training session from 0 to 9999
- 'TIME': previous training time from 0:00 to 99:59 min
- 'CAL': calories* burned from 0 to 9999kcal
- 'RPM': at the beginning of training, the average steps per minute are shown from 40 to 220bpm
* The calculation is based on pre-programmed standard values that only serve as a guide. Calories burned by using of the expander bands is not taken into account.
You can display all data one after another. To do this, press the 'MODE' button (1b) repeatedly until the 'SCAN' field is marked with a small triangle. The display switches from mode to mode every 4 seconds.
Resetting the display
The display is on 0 only when used for the first time. With all subsequent training sessions, the computer continues counting from the last time you trained. To reset the display, keep the 'MODE' button pressed down until all symbols can be seen at the same time.
Training instructions
Consult with your doctor before you start training!
Goal-setting
Various goals can be achieved through appropriate training:
- improving overall fitness
- increasing stamina
- greater wellbeing
Success is essentially dependent on the following points, which we would particularly like to bring to your attention:
• regular training for sufficient periods
• appropriate nutrition
• monitoring training success
Who can train?
If you haven't trained or participated in sport for an extended period, have cardiovascular or orthopaedic problems, take medication, or are pregnant, you should consult your doctor before you commence training. Tell him/her which training equipment you intend to use. Undergo an examination to ascertain which training programmes are suitable for you. To be sure, take these instructions for use with you, so your doctor can devise an individual training programme with you.
In general, every physically healthy person, whether young or old, can begin a fitness training programme, if he/she has consulted a doctor beforehand.
Note!
Incorrect or excessive training can endanger your health.
Strain
Intensive training strains your whole body. The body, especially the heart and circulatory system, requires time to adapt to the changes brought on by the training sessions. For this reason, it is important to increase levels slowly, and to ensure that appropriate breaks are taken during and after training. Ensure that you train at an appropriate level, i.e. one in which you do not over-strain yourself. Listen to your body; end the workout immediately if you feel unwell, are short of breath or experience dizziness.
You are exercising at the correct level if you can have a normal discussion during your training session.
Cooling down/relaxing
Cooling down and relaxing is just as important as a good warm-up routine. Always end your training session appropriately; reduce your pace and effort level, and do light stretching exercises when you have dismounted the product. This gives your pulse time to calm down, and your body is able to recover more effectively for future efforts.
The duration of recovery periods between training sessions should be based on your fitness level.
Avoid excessive exercise intensity to prevent overtraining. Excessive strain can cause health problems and lead to death. You must end the training immediately if you feel tired or weak. To determine your personal training intensity, you can determine your approximate maximum heart rate (MHR) using the following formula: MHR = 220 - your age
Depending on your training goal, there are 5 training zones within which you may push the effort level to your maximum heart frequency.
Zones
Regeneration zone = 50-60% of your MHR Fat-burning zone = 60-70% of your MHR Carbohydrate-burning zone = 70-80% of your MHR
Anaerobic zone = 80-90% of your MHR Warning zone = 90-100% of your MHR
- Regeneration zone/health zone
This training is aimed at basic physical fitness. It consists of longer endurance exercises, which are to be performed slowly. It is especially suitable for beginners and/or people in weak physical condition.
- Fat-burning zone
Optimised for fat-burning, the workout is designed for strengthening the cardiovascular system. In this zone, the body burns proportionately the most kilojoules from fat.
During your training session, you should feel relaxed and be able to converse.
• Carbohydrate-burning zone
In this zone, more carbohydrates are burned than fat. The training effort is more strenuous, but also more effective.
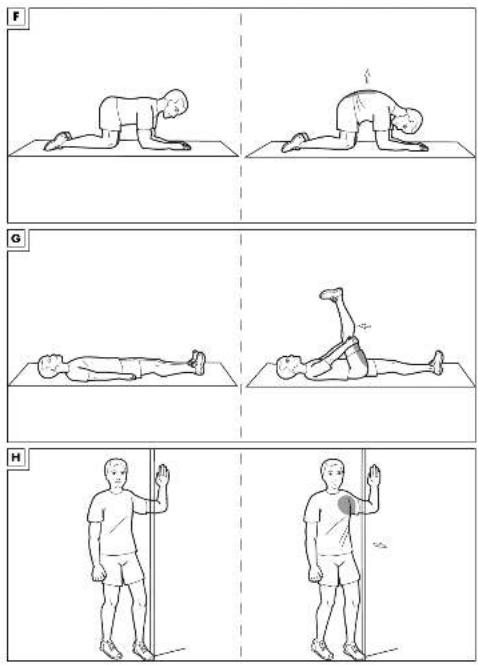
Stretching exercises
Stretching the lower back muscles (Fig. F)
Starting position
-
Go down onto all fours.
-
Position your wrists and knees below your shoulders and hips respectively.
End position
- Tense your abdominal muscles and arch your back up like a cat, until you feel a stretch across your entire back.
- Your gaze is directed at your hands.
- Remain in this position for a moment and then return to the starting position.
- Repeat this exercise 2–3 times in sets of three.
Important: keep your back and pelvis straight in the all-fours position.
Stretching the hamstrings (Fig. G) Starting position
- Lie with your back on the floor. Your legs are stretched out in a relaxed position.
End position
- Tense your abdominal muscles and lift one leg up into a vertical position.
- Hold your thigh with your hands and pull it towards you to increase the stretch.
- Your toes are pointing down and the other leg remains lying stretched out on the floor.
- Hold this position for a moment and then return to the starting position.
- Repeat this exercise 2–3 times in sets of three and then switch sides.
Important: some people have very short hamstrings. If this applies to you, you may use a towel to help pull your thigh towards yourself.
Stretching the chest muscles (Fig. H) Variation 1
Starting position
- Place your forearm and elbow against a wall with your hand pointing up, so that your upper arm and forearm form a right angle.
End position
- Maintain contact and turn your upper body slightly away from the wall.
- Repeat this exercise 2–3 times in sets of three and then switch sides.
Variation 2
Starting position
- Stretch your forearms up at your sides, so that you forearms and upper arms form a right angle.
- Lean yourself slightly in front of a door frame.
End position
- Gently push your upper body forwards through it, so that you feel the stretch in your chest area.
- Repeat this exercise 2-3 times in sets of three.
Important: hold the stretch for approx. 5 seconds.
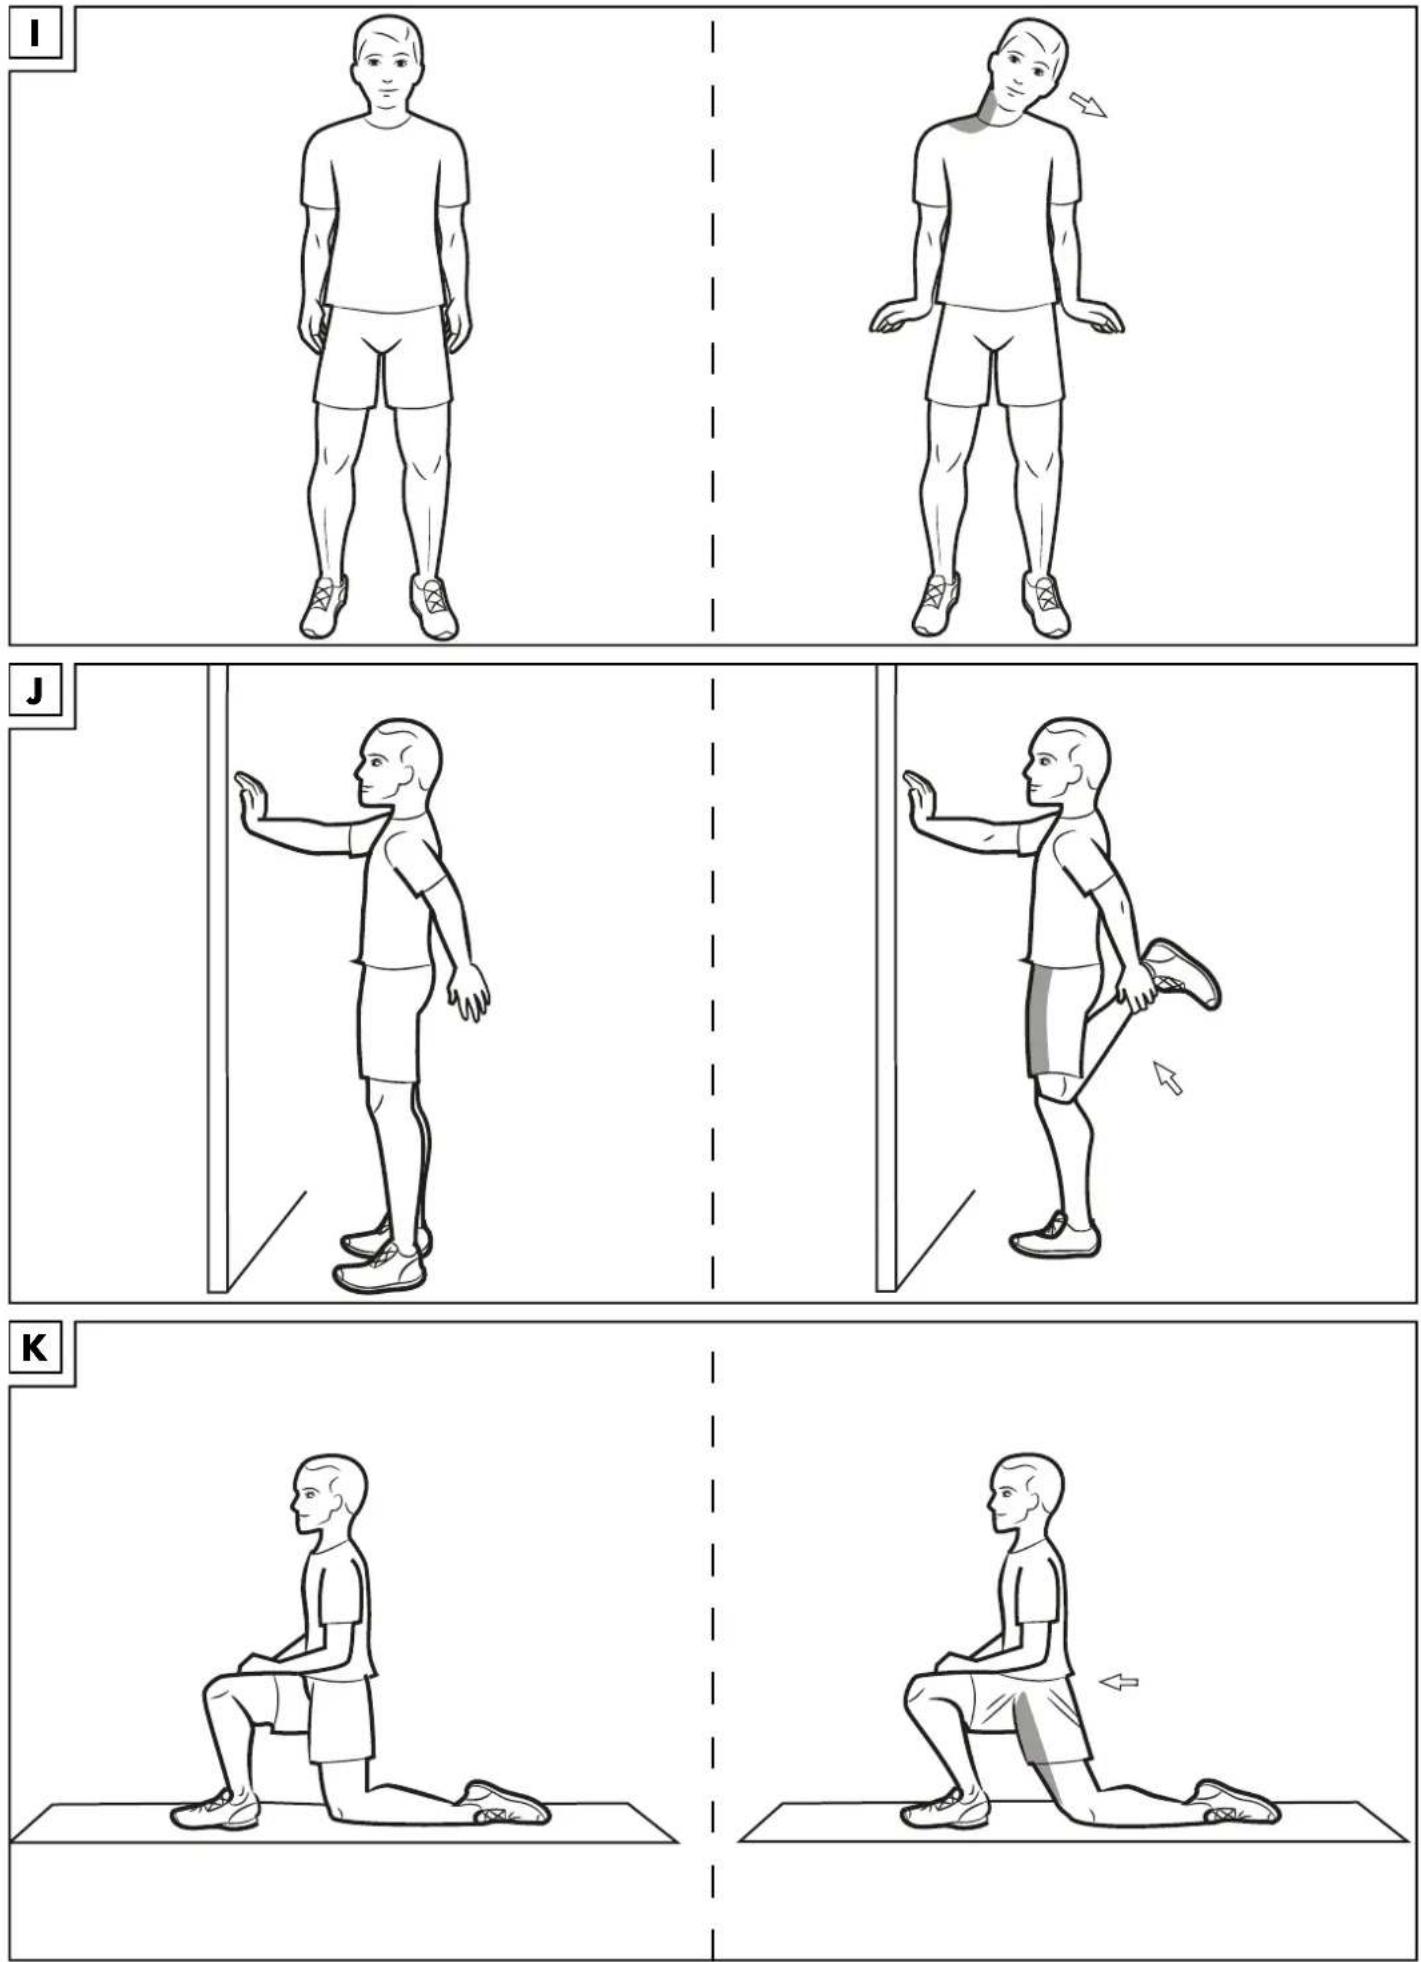
Stretching the neck muscles (Fig. I) Starting position
- Stand up straight.
End position
- Tilt your head to the side towards your shoulder, pulling the other shoulder down at the same time. You should feel the stretch on the side of your neck.
- Remain in this position for approx. 5 seconds and then return to the starting position.
- Repeat this exercise 2–3 times in sets of three and then switch sides.
Important: keep your head looking straight forward, without twisting your neck. Performing this exercise in front of a mirror will facilitate the correct posture.
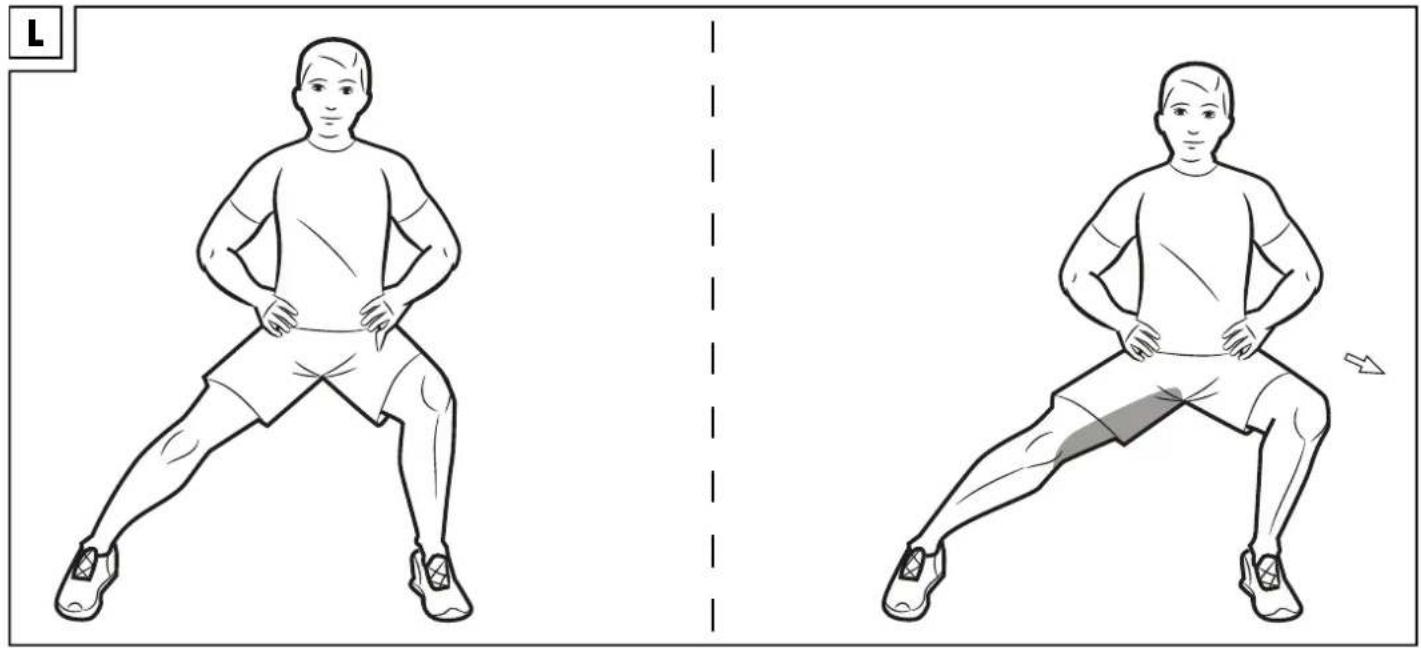
Stretching the front thigh muscles (Fig. J)
Starting position
- Stand up straight and tense your abdominal muscles.
- Pull your pelvis up to avoid a hollow back.
- To improve your posture you can support yourself with your hand on a wall.
End position
- While maintaining the tension, grasp one ankle and pull it up towards your buttock. Keep your legs parallel during this movement.
- You should feel the stretch in the front of the thigh of the bent leg.
- Remain in this position for approx. 5 seconds and then return to the starting position.
- Repeat this exercise 2–3 times in sets of three and then switch sides.
Important: some people have very short front thigh muscles. If this applies to you, you may use a towel to pull your foot toward yourself.
Stretching the hip flexors (Fig. K) Starting position
- Take a lunging step forward and lower the back leg with your shin on the floor.
- Your front knee is bent at a right angle and your arms rest on your front leg.
End position
- With a straight, upright back, push your pelvis forwards towards the floor, so that you feel a stretch in the hip area of your back leg.
- Your front knee should not extend beyond your toes.
- Ensure that your back leg and hip are aligned throughout the movement and that you do not twist your pelvis outwards.
-
Remain in this position for approx. 5 seconds and then return to the starting position.
-
Repeat this exercise 2–3 times in sets of three and then switch sides.
Important: keep your back straight during the exercise.
Stretching the inner thighs (Fig. L) Starting position
- Stand with your legs wide apart and bend one leg forwards in this position.
- Place the hands loosely on the hips.
End position
- Stretch the other leg out to the side and shift your body weight onto the bent leg.
- Keep the foot of the outstretched leg flat on the floor, so that you feel a stretch in the inner thigh of the outstretched leg.
- Remain in this position for approx. 5 seconds and then return to the starting position.
- Repeat this exercise 2–3 times in sets of three and then switch sides.
Important: keep your back and pelvis straight during the exercise.
Exercises with the training surface
Place the product on the floor so that the training surface is facing upwards.
Note: ensure the product is stable and not in danger of slipping.
The following applies for all exercises with the training surface:
- The duration of the exercise sets should be based on your personal fitness level. Divide the exercises into multiple sets and pause between individual sets.
• We recommend 3 sets per exercise, the duration of the repetitions dependent on your fitness level.
For buttocks and thighs (Fig. M) Starting position
- Stand in front of the product and place one foot on the middle of the training surface.
- Place your hands on your hips. Look straight ahead.
End position
- Tense your buttock and abdominal muscles.
- Mount the training surface by placing the second foot next to the first. Your head is an extension of your spine and your upper body is upright.
Note: make sure you are positioned in the middle. Otherwise there is a risk of tipping.
- Step off the training surface with the foot that first stepped up.
- Repeat this exercise 10–15 times in sets of three.
Important: alternate your feet and intensify the training by increasing the pace of your steps up and down.
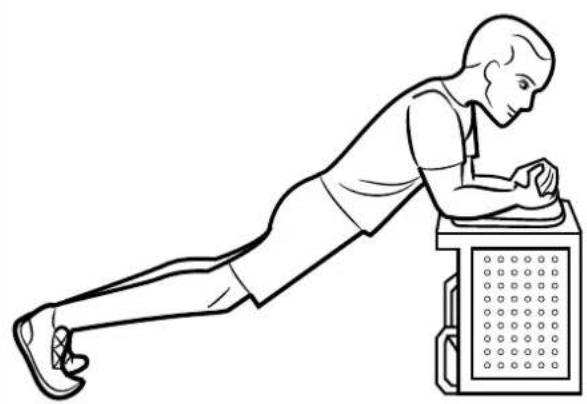
For chest muscles and triceps (Fig. N)
Starting position
- Position yourself in front of the product and place the palms of both hands on the middle of the training surface.
-
Stretch your legs out behind you, resting on the toes.
-
Lower your body, bending your arms, and keep your upper arms close to your sides. Your body should form a straight line. Tense your abdominal muscles.
End position
- Partially straighten your arms and lift your upper body in a controlled movement until your upper arms are at right angles to your upper body. Ensure that your arms remain slightly bent and that your elbows are not completely straightened.
- Lower your body to return to the starting position.
- Repeat this exercise 10-25 times in sets of three.
Important: maintain body tension throughout the exercise.
Exercise with the handles
Place the product on the floor so that the handles face upwards and towards you.
Note: ensure the product is stable and not in danger of slipping.
The following applies for all exercises with the handles:
- The duration of the exercise sets should be based on your personal fitness level. Divide the exercises into multiple sets and pause between individual sets.
• We recommend 3 sets per exercise, the duration of the repetitions dependent on your fitness level.
For chest muscles, triceps and shoulders (Fig. O)
Starting position
- Position yourself in front of the product and support yourself with both hands on the handles.
- Straighten your arms. Make sure that your elbows and wrists are not locked.
- Stretch your legs out behind you, resting on the toes. Your body is stretched out and forms a straight line. Tense your abdominal muscles.
End position
- Bend your arms and lower your upper body in a controlled movement until your upper arms are parallel to your upper body. Make sure your elbows are close to your body and pointing backwards. Your wrists form a line with your forearms.
- Push your body back up and return to the starting position without fully straightening your arms.
- Repeat this exercise 10–25 times in sets of three.
Important: maintain body tension throughout the exercise.
Exercises with the stepper
Place the product on the floor so that the stepper is facing upwards.
Note: ensure the product is stable and not in danger of slipping.
Without expansion bands
Unhook the expansion bands from the eyelets before starting the exercises without the expansion bands. Otherwise there is a risk of tripping (Fig. C).
The following applies for all exercises with the stepper:
- The duration of the exercise sets should be based on your personal fitness level. Divide the exercises into multiple sets and pause between individual sets. - We recommend 3 sets per exercise, the duration of the repetitions dependent on your fitness level.
For thighs, calves and buttocks (Fig. P)
Starting position
- Stand on the product and bend your arms forwards slightly. Your hands are outstretched.
End position
- Tense your buttock and abdominal muscles.
- Press the pedals down with your feet alternately. Your arms should move back and forth naturally, as if you were walking or climbing stairs.
- Your head is an extension of your spine and your upper body remains upright.
- Increase the intensity by gradually swinging your arms higher.
- Repeat this exercise 10–15 times in sets of three.
Important: swing your arms in the opposite direction to your legs and keep your pelvis straight.
With expansion bands
Notes on training with the expansion bands!
The expansion band may be stretched to a maximum length of 165cm. Otherwise it can become damaged and injure the user.
The further you stretch the expansion band, the more strength you will need to apply.
Ensure that you always hold the handles horizontally when pulling on the expansion bands.
Do not bend your wrists, as this can strain them.
The following applies for all exercises with the expansion bands:
• Take the handles in your hands.
- Execute the movements in a controlled fashion.
- Keep your arms tense.
- Before each training session with the expansion bands, check that the screwed connections and the carabiner are tightly closed.
- The duration of the exercise sets should be based on your personal fitness level. Divide the exercises into multiple sets and pause between individual sets.
We recommend 3 sets per exercise, the duration of the repetitions dependent on your fitness level.
For arms, shoulders, legs and buttocks (Fig. Q)
Starting position
- Stand on the product.
- Grip the expansion bands. The backs of your hands are pointing upwards.
End position
- Tense your arm, buttock and abdominal muscles.
- Raise your left arm, stretched up to shoulder height in front of your body while pressing the right pedal down with your right foot.
- Lower your left arm and simultaneously raise your right as you press the left pedal down with your left foot.
- Your head is an extension of your spine and your upper body is upright.
- Repeat this exercise 10–15 times in sets of three.
Important: swing your arms in the opposite direction to your legs and keep your pelvis straight.
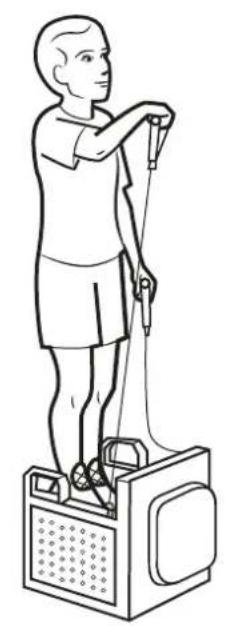
For arms and shoulders (Fig. R) Starting position
- Stand on the product. The pedals are not needed for this exercise.
- Grip the expansion bands and hold your hands at hip height.
- Tense your arm and abdominal muscles.
- Pull your left arm towards your chin. Move your elbow out to the side up to shoulder height, with the back of your hand pointing up. Your right arm is resting against your body.
End position
- Now pull your right arm towards your chin. Move your elbow out to the side up to shoulder height, with the back of your hand pointing up.
- At the same time, lower your left arm.
- Remain briefly in this position and then return to the starting position.
- Repeat this exercise 10–15 times in sets of three.
Important: during this exercise, keep your upper body and pelvis straight.
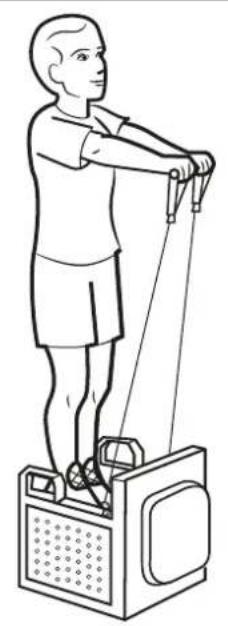
For upper back and shoulders (Fig. S)
Starting position
- Stand on the product. The pedals are not needed for this exercise.
- Grip the expansion bands and pull them up in front of you with your arms stretched out at shoulder height. Your arms are parallel and the backs of your hands are facing forwards. Your elbows and knees are slightly bent.
- Your spine is straight and your neck and head are an extension of your spine.
- Pull your shoulders in towards your spine and hold this upright position.
End position
- Tense your arms and stretch them out to the sides at shoulder height. Your arms and shoulders form a line.
- Remain briefly in this position and then return to the starting position.
- Repeat this exercise 10–15 times in sets of three.
Important: during this exercise, keep your upper body and pelvis straight.
For shoulders (Fig. T) Starting position
-
Stand on the product. The pedals are not needed for this exercise.
-
Grip the expansion bands and hold them with your arms hanging down at your sides, close to your body. The backs of your hands are pointing outwards. Your elbows and knees remain slightly bent.
- Your spine is straight and your neck and head are an extension of your spine.
- Pull your shoulders in towards your spine and hold this upright position.
End position
- Tense your arms and stretch them out to the sides at shoulder height. Your arms and shoulders form a line.
- Remain briefly in this position and then return to the starting position.
- Repeat this exercise 10–15 times in sets of three.
Important: during this exercise, keep your upper body and pelvis straight.
Exercises with the swivel plate
Place the product on the ground so that the swivel plate is facing upwards.
Note: ensure the product is stable and not in danger of slipping.
- The duration of the exercise sets should be based on your personal fitness level. Divide the exercises into multiple sets and pause between individual sets.
We recommend 3 sets per exercise, the duration of the repetitions dependent on your fitness level.
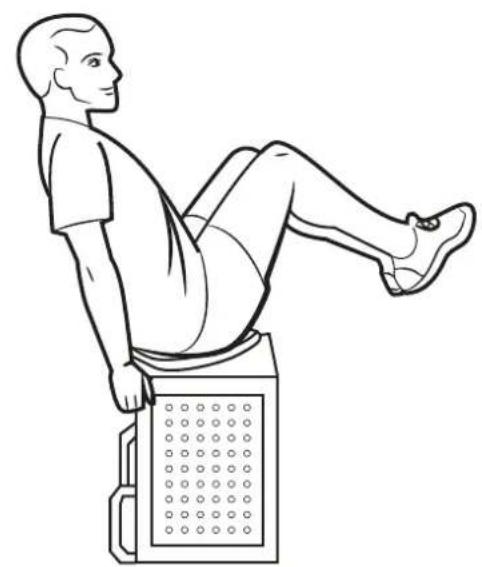
Oblique abdominals (Fig. U) Starting position
- Sit on the middle of the swivel plate.
- Lean back slightly and support yourself with your arms out to the side on the rear corners of the product.
- Lift your legs off the floor and bend them slightly. Make sure your legs are together and parallel.
- Twist your lower body to one side with the help of the swivel plate.
End position
- Straighten your upper body and pull your shoulders in towards your spine.
- Tense your abdominal muscles and slowly twist your lower body to the other side with the help of the swivel plate.
- Hold this position for 30 seconds, then switch sides and repeat the exercise 5 times in sets of three.
Important: keep your abdominal muscles tensed throughout and push your sternum forwards in order to stabilise the spine in this position. Remain in this upright position with your upper body and head forming a line.
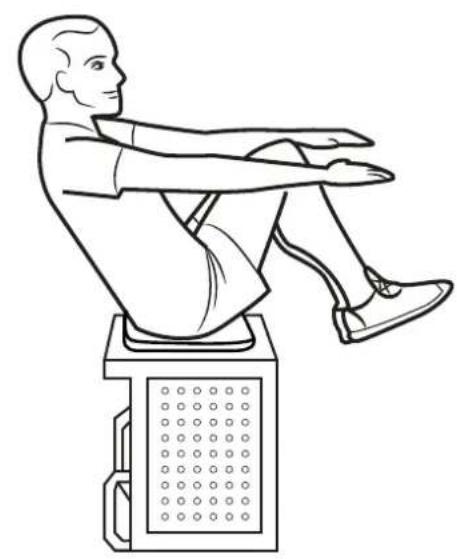
Rectus abdominis muscles (Fig. V) Starting position
- Sit on the middle of the swivel plate.
- Lean back slightly and stretch your arms out in front of you at chest height.
- Lift your legs off the floor and bend your knees until they are at the same height as your outstretched hands. Make sure your legs are together and parallel.
End position
- Straighten your upper body and pull your shoulders in towards your spine.
- Tense your abdominal muscles.
- Lean your upper body back a little further and simultaneously stretch your legs out in front of you.
- Hold this position for 30 seconds and then return to the starting position. Repeat this exercise 5 times in sets of three.
Important: keep your abdominal muscles tensed throughout and push your sternum forwards in order to stabilise the spine in this position.
Your upper body and head form a line.
For the whole body (Fig. W) Starting position
- Support yourself with your forearms on the swivel plate and clasp your hands together.
- Stretch your legs out behind you with your knees slightly bent.
End position
- Tense your abdominal muscles and straighten your upper body. Your elbows are below your shoulder joints.
- Raise yourself onto your toes so that your body forms a straight line. Be sure to place even weight on the tips of your toes.
- Keep your pelvis straight and be absolutely sure not to arch your back.
- Keep your head as an extension of your spine and do not overextend it!
- Hold this position for 30 seconds and then return to the starting position. Repeat this exercise 5 times in sets of three.
Important: keep your abdominal muscles tightened throughout so that your lumbar spine is stabilised. Your elbows are always below your shoulder joints!
Storage, cleaning
Do not forget that regular maintenance and cleaning contribute to the safety and preservation of the product.
When not in use, always store the product dry, clean, without batteries and at room temperature.
Clean only with water and wipe dry afterwards with a cloth.
IMPORTANT! Never clean the product with harsh cleaning agents.
Disposal

In the interest of protecting the environment, do not throw your product into the household waste once you are finished with it, but rather take it to a specialty
disposal facility. Find out about collection sites and their hours of operation from your local authority.
Defective or used batteries must be recycled pursuant to Directive 2006/66/EC and changes to it. Return batteries and/or the product via the collecting sites provided. Packaging materials, such as plastic bags, must be kept away from children. Keep the packaging materials out of reach of children.
Environmental damage caused by improper disposal of batteries! Batteries may not be disposed of with household waste. They may contain toxic heavy metals and are subject to hazardous waste treatment. The chemical symbols of the heavy metals are as follows: Cd = cadmium, Hg = mercury, Pb = lead. Dispose of used batteries at a municipal collection site.

Dispose of the product and packaging in an environmentally friendly manner.

Note the label on the packaging materials when separating waste, as these are labelled with abbreviations (a) and
numbers (b) with the following meaning: 1-7: plastics/20-22: paper and cardboard/80-98: composite materials.
The product and the packaging materials can be recycled, dispose of them separately for better treatment of waste. The Triman logo only applies to France. Find out how to dispose of the used product from your municipal or city administration.
Notes on the guarantee and service handling
The product was produced with great care and under constant supervision. You receive a three-year warranty for this product from the date of purchase. Please retain your receipt. The warranty applies only to material and workmanship and does not apply to misuse or improper handling. Your statutory rights, especially the warranty rights, are not affected by this warranty.
With regard to complaints, please contact the following service hotline or contact us by e-mail. Our service employees will advise as to the subsequent procedure as quickly as possible. We will be personally available to discuss the situation with you.
Any repairs under the warranty, statutory guarantees or through goodwill do not extend the warranty period. This also applies to replaced and repaired parts. Repairs after the warranty are subject to a charge.
IAN: 347010_2001
GB Service Great Britain Tel.: 0800 404 7657 E-Mail: deltasport@lidl.co.uk
IE Service Ireland
Tel.: 1890 930 034
(0,08 EUR/Min., (peak))
(0,06 EUR/Min., (off peak))
E-Mail: deltasport@lidl.ie
Félicitations !
2011/65/UE - Directive RoHS
text_image
Illustration showing two scenarios of a person performing a valve or press operation, with red and green symbols indicating no or yes conditions.Exercices d'étirements
text_image
Illustration showing two scenarios of a person performing a valve or press exercise, with red and green symbols indicating no or yes conditions.text_image
Diagram showing two human figures with red prohibition symbols indicating blocked actions, separated by a dashed line.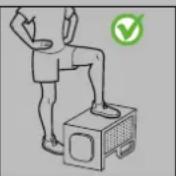
text_image
Diagram showing two human figures with red prohibition symbols on their feet, indicating blocked or restricted positions.