USER MANUAL BCN115 BLACK & DECKER
English (original instructions) 3
natural_image
Technical line drawing of a mechanical device with internal components, shown from two views (top: front view, bottom: side view)
Intended use
Your BLACK+DECKER™ BCN115 cordless stapler has been designed for craft applications. This product is intended for household, consumer use only. Not suitable for fixing electrical cables.
Safety instructions

Warning! Read all safety warnings, instructions, illustrations and specifications provided with this power tool. Failure to follow the warnings and instructions listed below may result in electric shock, fire and/or serious injury.
Save all warnings and instructions for future reference.
The term "power tool" in all of the warnings listed below refers to your mains operated (corded) power tool or battery operated (cordless) power tool.
natural_image
Line drawing of a hand holding a handheld device with a plus sign, no text or symbols present
- Work area safety
a. Keep work area clean and well lit. Cluttered or dark areas invite accidents.
b. Do not operate power tools in explosive atmospheres, such as in the presence of flammable liquids, gases or dust. Power tools create sparks which may ignite the dust or fumes.
c. Keep children and bystanders away while operating a power tool. Distractions can cause you to lose control.
- Electrical safety
a. Power tool plugs must match the outlet. Never modify the plug in any way.
Do not use any adapter plugs with earthed (grounded) power tools. Unmodified plugs and matching outlets will reduce risk of electric shock.
b. Avoid body contact with earthed or grounded surfaces such as pipes, radiators, ranges and refrigerators. There is an increased risk of electric shock if your body is earthed or grounded.
c. Do not expose power tools to rain or wet conditions.
Water entering a power tool will increase the risk of electric shock.
d. Do not abuse the cord. Never use the cord for carrying, pulling or unplugging the power tool. Keep cord away from heat, oil, sharp edges or moving parts. Damaged or entangled cords increase the risk of electric shock.
e. When operating a power tool outdoors, use an extension cord suitable for outdoor use. Use of a cord suitable for outdoor use reduces the risk of electric shock.
f. If operating a power tool in a damp location is unavoidable, use a residual current device (RCD) protected supply. Use of an RCD reduces the risk of electric shock.
- Personal safety
a. Stay alert, watch what you are doing and use common sense when operating a power tool.
Do not use a power tool while you are tired or under the influence of drugs, alcohol or medication. A moment of inattention while operating power tools may result in serious personal injury.
b. Use personal protective equipment. Always wear eye protection. Protective equipment such as a dust mask, non-skid safety shoes, hard hat, or hearing protection used for appropriate conditions will reduce personal injuries.
c. Prevent unintentional starting. Ensure the switch is in the off-position before connecting to power source and/or battery pack, picking up or carrying the tool. Carrying power tools with your finger on the switch or energising power tools that have the switch on invites accidents.
d. Remove any adjusting key or wrench before turning the power tool on. A wrench or a key left attached to a rotating part of the power tool may result in personal injury.
e. Do not overreach. Keep proper footing and balance at all times. This enables better control of the power tool in unexpected situations.
f. Dress properly. Do not wear loose clothing or jewellery. Keep your hair and clothing away from moving parts. Loose clothes, jewellery or long hair can be caught in moving parts.
g. If devices are provided for the connection of dust extraction and collection facilities, ensure these are connected and properly used. Use of dust collection can reduce dust-related hazards.
h. Do not let familiarity gained from frequent use of tools allow you to become complacent and ignore tool safety principles. A careless action can cause severe injury within a fraction of a second.
- Power tool use and care
a. Do not force the power tool. Use the correct power tool for your application.
The correct power tool will do the job better and safer at the rate for which it was designed.
b. Do not use the power tool if the switch does not turn it on and off. Any power tool that cannot be controlled with the switch is dangerous and must be repaired.
c. Disconnect the plug from the power source and/or remove the battery pack, if detachable, from the power tool before making any adjustments, changing accessories, or storing power tools. Such preventive safety measures reduce the risk of starting the power tool accidentally.
d. Store idle power tools out of the reach of children and do not allow persons unfamiliar with the power tool or these instructions to operate the power tool.
Power tools are dangerous in the hands of untrained users.
e. Maintain power tools and accessories. Check for misalignment or binding of moving parts, breakage of parts and any other condition that may affect the power tools operation. If damaged, have the power tool repaired before use. Many accidents are caused by poorly maintained power tools.
f. Keep cutting tools sharp and clean. Properly maintained cutting tools with sharp cutting edges are less likely to bind and are easier to control.
g. Use the power tool, accessories and tool bits etc. in accordance with these instructions, taking into account the working conditions and the work to be performed.
Use of the power tool for operations different from those intended could result in a hazardous situation.
h. Keep handles and grasping surfaces dry, clean and free from oil and grease. Slippery handles and grasping surfaces do not allow for safe handling and control of the tool in unexpected situations.
- Battery tool use and care
a. Recharge only with the charger specified by the manufacturer. A charger that is suitable for one type of battery pack may create a risk of fire when used with another battery pack.
b. Use power tools only with specifically designated battery packs. Use of any other battery packs may create a risk of injury and fire.
c. When battery pack is not in use, keep it away from other metal objects, like paper clips, coins, keys, nails, screws, or other small metal objects, that can make a connection from one terminal to another. Shorting the battery terminals together may cause burns or a fire.
d. Under abusive conditions, liquid may be ejected from the battery; avoid contact. If contact accidentally occurs, flush with water. If liquid contacts eyes, additionally seek medical help. Liquid ejected from the battery may cause irritation or burns.
e. Do not use a battery pack or tool that is damaged or modified. Damaged or modified batteries may exhibit unpredictable behaviour resulting in fire, explosion or risk of injury.
f. Do not expose a battery pack or tool to fire or excessive temperature. Exposure to fire or temperature above 130 °C may cause explosion. NOTE: The temperature „130 °C“ can be replaced by the temperature „265 °F“.
g. Follow all charging instructions and do not charge the battery pack or tool outside the temperature range specified in the instructions. Charging improperly or at temperatures outside the specified range may damage the battery and increase the risk of fire.
6. Service
a. Have your power tool serviced by a qualified repair person using only identical replacement parts. This will ensure that the safety of the power tool is maintained.
b. Never service damaged battery packs. Service of battery packs should only be performed by the manufacturer or authorized service providers.
Additional Safety Instructions for Cordless stapler
◆ Always wear safety glasses.
◆ Always wear ear protection.
- Only use fasteners of the type specified in the manual.
- Do not use any stands for mounting the tool to a support.
- Do not disassemble or block any parts of the fastener driving tool such as the contact trip.
- Prior to each operation check that the safety and triggering mechanism is functioning properly and that all nuts and bolts are tight.
◆ Do not use the tool as a hammer.
◆ Do not use the tool on a ladder.
- Never point any operational fastener driving tool at yourself or at any other person.
- While working, hold the tool in such a way that no injuries can be caused to the head or to the body in the event of a possible recoil due to a disruption in the energy supply or hard areas within the work piece.
- Never actuate the fastener driving tool into free space.
- In the work area, carry the tool at the workplace using only one handle, and never with the trigger actuated.
- Consider the conditions in the work area Fasteners can penetrate thin work pieces or slip off corners and edges of the work piece, and thus put people at risk.
- Do not drive fasteners close to the edge of the work piece.
- Do not drive fasteners on top of other fasteners.
- Always assume that the tool contains fasteners. Careless handling of the nailer can result in unexpected firing of fasteners and personal injury.
- Do not point the tool towards yourself or anyone nearby. Unexpected triggering will discharge the fastener causing injury.
Do not actuate the tool unless it is placed firmly against the workpiece. If the tool is not in contact, the fastener may be deflected away from your target.
- Disconnect the tool from the power source when the fastener jams in the tool. While removing a jammed fastener, the nailer may be accidentally activated if it is plugged in.
- Do not use this tool for fastening electrical cables. It is not designed for electric cable installation and may damage the insulation of electric cables thereby causing electric shock or fire hazards.
Labels on Appliance
The following symbols, along with the date code, are shown on the appliance:

Warning! To reduce the risk of injury, the user must read the instruction manual.
Vibration
The vibration and/or noise emission level given in this information sheet has been measured in accordance with a standardised test given in EN60745 and may be used to compare one tool with another. It may be used for a preliminary assessment of exposure.
WARNING: The declared vibration and/or noise emission level represents the main applications of the tool. However if the tool is used for different applications, with different accessories or poorly maintained, the vibration and/or noise emission may differ. This may significantly increase the exposure level over the total working period.
An estimation of the level of exposure to vibration and/or noise should also take into account the times when the tool is switched off or when it is running but not actually doing the job.
Warning! Read all safety warnings, instructions, and cautionary markings for the battery, charger and product. Failure to follow the warnings and instructions may result in electric shock, fire and/or serious injury.
◆ Never force a charger plug into the tool.
- DO NOT modify the charger plug of a non-compatible charger in any way to fit into the tool as the battery may rupture causing serious personal injury.
- DO NOT charge or use the battery in explosive atmospheres, such as in the presence of flammable liquids, gases or dust.
Inserting or removing the charger plug from the tool may ignite the dust or fumes.
- Only charge the battery with the provided charge lead and a suitable class 2 power supply.
♦ DO NOT splash or immerse in water.
◆ DO NOT allow water or any liquid to enter tool.
DO NOT store or use the tool in locations where the temperature may reach or exceed 104 °F (40 °C) (such as outside sheds or metal buildings in summer). For best life store tools in a cool, dry location.
- Do not store the tool with the switch locked on. Never tape the switch in the ON position.
DO NOT incinerate the tool even if it is severely damaged or is completely worn out. The battery can explode in a fire. Toxic fumes and materials are created when lithium-ion batteries are burned.
If battery contents come into contact with the skin, immediately wash area with mild soap and water. If battery liquid gets into the eye, rinse water over the open eye for 15 minutes or until irritation ceases. If medical attention is needed, the battery electrolyte is composed of a mixture of liquid organic carbonates and lithium salts.
- Contents of opened battery cells may cause respiratory irritation. Provide fresh air. If symptoms persist, seek medical attention.
◆ Battery liquid may be flammable if exposed to spark or flame.
- Never attempt to open the tool for any reason.
If the tool case is cracked or damaged, do not charge. Do not crush, drop or damage the tool.
Do not use a tool or charger that has received a sharp blow, been dropped, run over or damaged in any way (e.g., pierced with a nail, hit with a hammer, stepped on).
Damaged tools should be returned to the service center for recycling.
Storage recommendations
The best storage place is one that is cool and dry, away from direct sunlight and excess heat or cold.
Store the fully charged tool disconnected from the charger.
Transportation
Note: Integral Li-ion tools should not be put in checked baggage on airplanes and must be properly protected from short circuits if they are in carry-on baggage.
Important safety instructions for all integral battery charging
Warning! Read all safety warnings, instructions, and cautionary markings for the battery, charging cable and product. Failure to follow the warnings and instructions may result in electric shock, fire and/or serious injury.
◆ Use only with the Listed/Certified Information Technology (computer) Equipment.
- DO NOT expose charging cable to water, rain or snow.
◆ Pull by the plugs rather than the cord when disconnecting the charging cable. This will reduce the risk of damage to the plugs and cord.
- Make sure that the cord is located so that it will not be stepped on, tripped over or otherwise subjected to damage or stress.
- When charging the tool outdoors, always provide a dry location.
- DO NOT use a charging cable with a damaged cord or plugs. Have them replaced immediately.
- Foreign materials of a conductive nature, such as, but not limited to, grinding dust, metal chips, steel wool, aluminum foil or any buildup of metallic particles should be kept away from the charging and micro charging plugs and port.
◆ Always unplug the charging cable from the power supply when there is no tool attached to it.
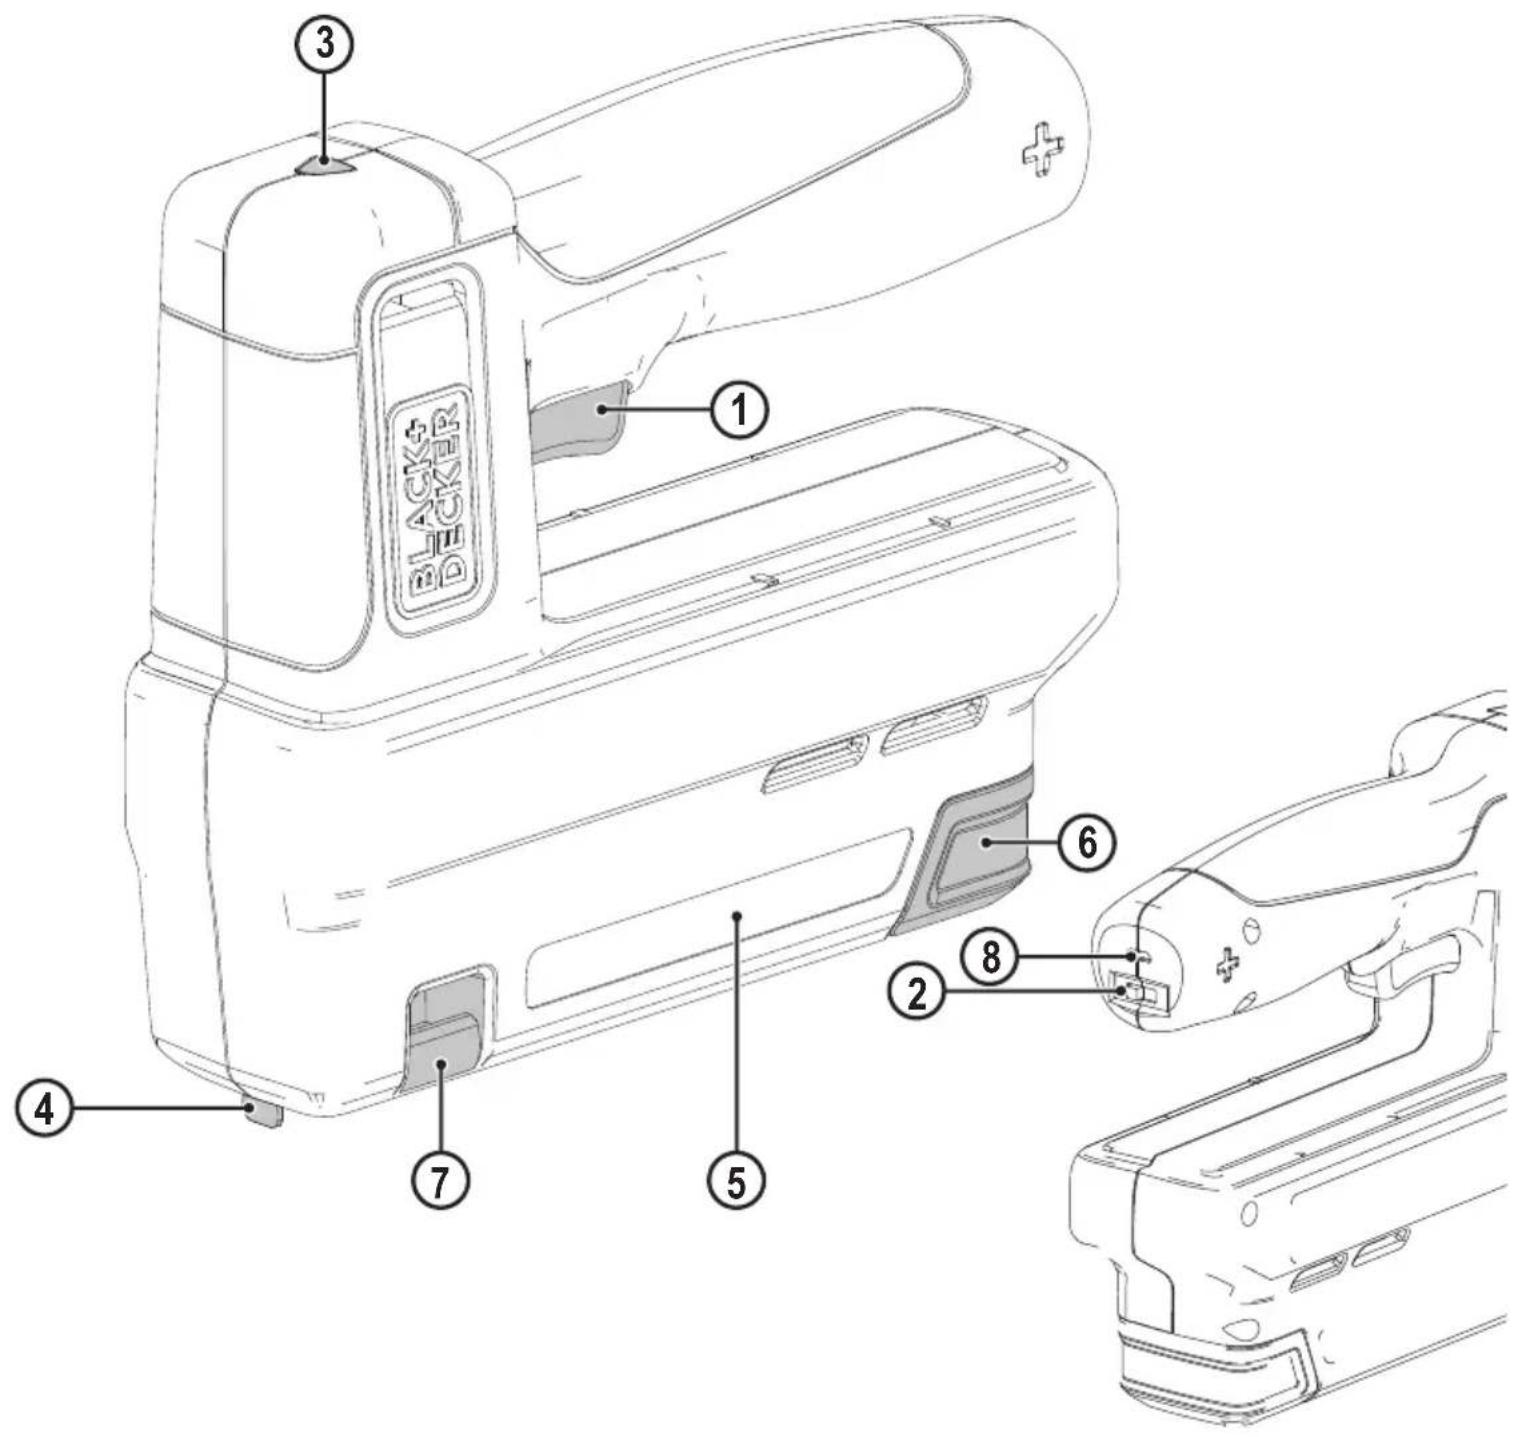
Features
This appliance includes some or all of the following features:
- Trigger
- Power switch
- Contact trip
- Magazine
- Magazine release clip
- Stapler viewing window
- Charge port
-
Charge lead
-
Charge indicator/ready to use LED
Assembly
Warning! To reduce the risk of serious personal injury, turn unit off and keep away from the on-off button before making any adjustments or removing/installing attachments or accessories. An accidental start-up can cause injury.
Charging procedure (fig. A)
Warning! Do not use tool while it is connected to the charger.
◆ Insert the charging plug (9) into the charge port (8).
◆ Plug the charging plug into any charging port (such as on a computer).
- The charging indicator LED (3) will flash red while charging.
- The charging indicator LED will change to solid green when fully charged.
◆ Battery can be left charging or charger can be disconnected.
Important charging notes
- The charger and tool may become warm to the touch while charging.
This is a normal condition, and does not indicate a problem. To facilitate the cooling of the tool after use, avoid placing the charger or tool in a warm environment such as in a metal shed or an uninsulated trailer.
- If the tool does not charge properly, take the tool and charger to your local service center.
- You may charge a partially used battery whenever you desire with no adverse effect on the tool.
Assembly and adjustments
Warning! To reduce the risk of serious personal injury, turn unit off and keep away from the trigger before making any adjustments or removing/installing attachments or accessories. An accidental start-up can cause injury.
Warning! Keep the tool pointed away from yourself and others. Serious personal injury may result.
Warning! To reduce the risk of serious personal injury, ensure power switch is in the off position and keep hands away from trigger and remove staples and brad nails from magazine before making adjustments.
Warning! NEVER spray or in any other way apply lubricants or cleaning solvents inside the tool. This can seriously affect the life and performance of the tool.
◆ Read the Safety Instruction section of this manual.
◆ Wear eye and ear protection.
◆ Ensure magazine 5 is empty of all fasteners.
◆ Place contact trip 4 onto work surface to check for smooth and proper operation of contact trip. Do not use tool if it is not functioning properly. NEVER use a tool that has the contact trip restrained in the actuated position.
◆ Keep tool pointed away from yourself and others.
Warning! Keep the tool pointed away from yourself and others. Serious personal injury may result.
Warning! Always ensure the power switch is in the off position before loading or unloading.
Warning! Never load staples/brad nails with the contact trip or trigger activated. Personal injury may result.
Universal compatibility with heavy duty staples 6mm-14mm, 10.6mm crown width, and 15mm brad nails.
◆ Pinch the magazine release clip (6) and pull out the sliding magazine (5).
◆ Load fasteners. Ensure staples are loaded so that crown of the staples sits against inside surface of the magazine.
Note: The head of the brad nail must sit against the left, inside surface of the magazine. If loaded on right side the magazine will not close.
◆ Close sliding magazine until the magazine latch clips snuggly in place.
Warning! Always ensure the power switch is in the off (0) position.
◆ Pinch the magazine release clip (6) and pull out the sliding magazine (5).
- Tip the tool to the side until the staples slide freely out of the bottom of the magazine.
◆ Check to ensure no loose staples remain inside magazine.
◆ Close sliding magazine fully.
Clearing a jammed staple
If a staple becomes jammed in the magazine, keep the tool pointed away from you and follow these instructions to clear:
Warning! Always ensure the power switch is in the off position before clearing a jammed staple
◆ Pinch the magazine release clip (6) and remove any loaded staples.
- Visually check inside magazine (5) for any jammed staples.
◆ Remove bent staple using pliers if necessary.
◆ Reinsert staples into magazine (see Loading the Tool).
Operation
Warning! To reduce the risk of serious personal injury, turn unit off and keep away from the trigger before making any adjustments or removing/installing attachments or accessories. An accidental start-up can cause injury.
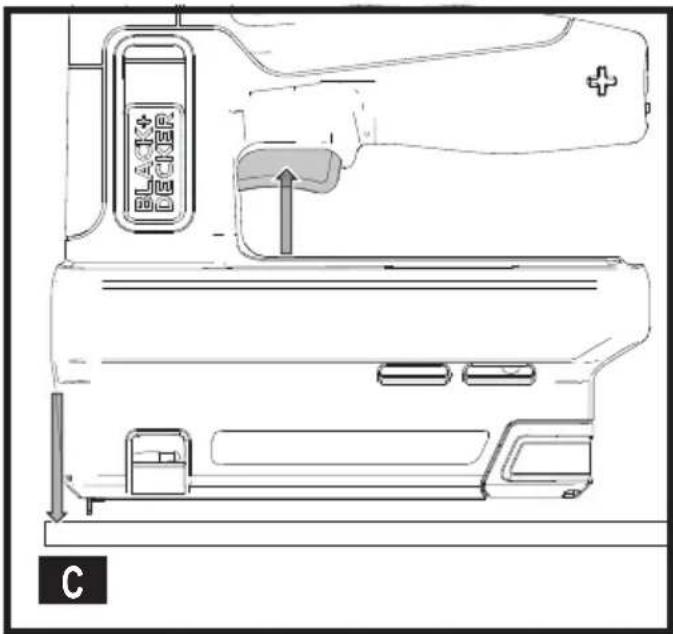
Trigger operation (Fig. C)
Warning! Always wear proper eye and hearing protection when operating tool.
Warning! Keep fingers AWAY from trigger when not driving staples to avoid accidental fastener discharge. NEVER carry tool with finger on trigger.
ENGLISH
(Original instructions)
◆ Push the power switch (2) from "O" to "I" to turn stapler on.
◆ Fully depress contact trip (4) against the work surface and the green indicator (3) should light up.
◆ Pull trigger (1) fastener will drive into work surface.
Note: Maintain downward pressure on work surface until the fastener is driven into the work surface.
◆ Release trigger.
◆ Lift contact trip off work surface.
◆ Repeat steps 1 through 4 for next application.
Note: The contact trip needs to be depressed followed by a trigger pull for each fastener followed by a release of both the contact trip and trigger after each fastener.
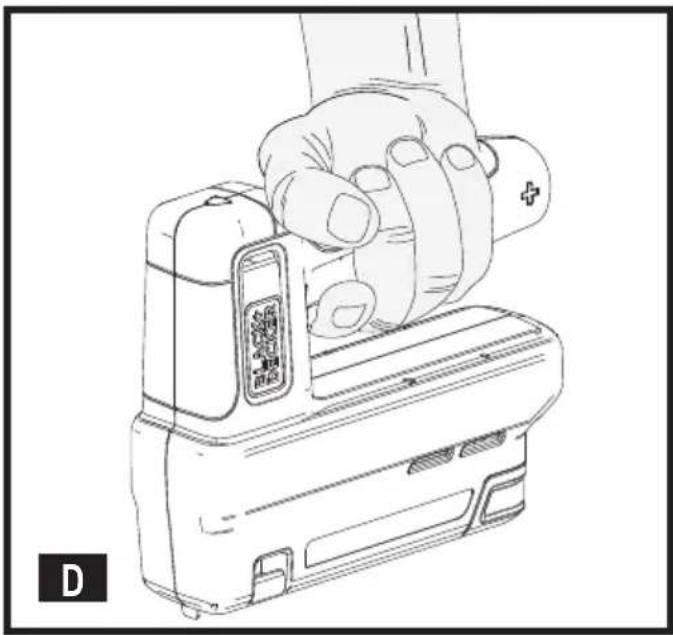
Correct hand position (Fig. D)
Warning! To reduce the risk of serious personal injury, ALWAYS use proper hand position as shown.
Warning! To reduce the risk of serious personal injury, ALWAYS hold securely in anticipation of a sudden reaction. Correct hand position requires one hand on the main handle.
Maintenance
Your BLACK+DECKER appliance has been designed to operate over a long period of time with a minimum of maintenance. Continuous satisfactory operation depends upon proper care and regular cleaning.
- Regularly clean the appliance using a damp cloth. Do not use any abrasive or solvent-based cleaner. Never let any liquid get inside the appliance and never immerse any part of the appliance into liquid.
Accessories
Warning! Since accessories, other than those offered by BLACK+DECKER, have not been tested with this product, use of such accessories with this tool could be hazardous. To reduce the risk of injury, only BLACK+DECKER recommended accessories should be used with this product.
Recommended accessories for use with your tool are available at extra cost from your local dealer or authorized service center.
♦ TRA704T – 6mm Flat Wire Staple 10.6x 1.26mm
♦ TRA705T – 8 mm Flat Wire Staple 10.6x 1.26mm
♦ TRA706T – 10mm Flat Wire Staple 10.6x 1.26mm
♦ TRA708T – 12mm Flat Wire Staple 10.6x 1.26mm
♦ TRA709T – 14mm Flat Wire Staple 10.6x 1.26mm
◆ SWK-BN0625T – 15mm/5/8"/18ga brad nails J type
Protecting the environment

Separate collection. Products and batteries marked with this symbol must not be disposed of with normal household waste.
Products and batteries contain materials that can be recovered or recycled reducing the demand for raw materials.
Please recycle electrical products and batteries according to local provisions.
Further information is available at www.2helpU.com
Technical data
| BCN115 |
| Voltage V | DC | 3.6 |
| Staple size mm 6 - 14 | | |
| Brad nail size mm 15 | | |
| Weight kg 0.9 | | |
Level of sound pressure according to EN 660745:
Emission Sound pressure level: (L _PA : 77 dB(A); K=3 dB(A);
Measured Sound power level: (L_WA) : 88 dB(A); K=3 dB(A);
Vibration total values (triax vector sum) according to EN 60745:
Vibration level: (ah): 5.7 m/s2; K=1.5 m/s ^4
Declaration of conformity
The Supply of Machinery (Safety)
Regulations 2008

BCN115 Crafting Stapler
Black & Decker declares that these products described under "technical data" are in compliance with:
The Supply of Machinery (Safety) Regulations, 2008, S.I. 2008/1597 (as amended),
EN60745-1:2009+A11:2010 and EN60745-2-16:2010.
These products conform to the following UK Regulations: Electromagnetic Compatibility Regulations, 2016, S.I.2016/1091 (as amended).
The Restriction of the Use of Certain Hazardous Substances in Electrical and Electronic Equipment Regulations 2012, S.I. 2012/3032 (as amended).
For more information, please contact Black & Decker at the following address or refer to the back of the manual.
The undersigned is responsible for compilation of the technical file and makes this declaration on behalf of Black & Decker.

Ed Higgins
Director - Consumer Power Tools
Black and Decker UK, 270 Bath Road, Slough
Berkshire, SL1 4DX
United Kingdom
15/12/2021
MACHINERY DIRECTIVE

BCN115 Crafting Stapler
Black & Decker declares that these products described under "technical data" are in compliance with:
2006/42/EC, EN60745-1:2009+A11:2010 and EN60745-2-
16:2010, These products also comply with Directives 2014/30/EU and 2011/65/EU.
For more information, please contact Black & Decker at the following address or refer to the back of the manual.
The undersigned is responsible for compilation of the technical file and makes this declaration on behalf of Black & Decker.
Patrick Dipenbach
Patrick Diepenbach
General Manager, Benelux
Black and Decker,
Black & Decker is confident of the quality of its products and offers consumers a 24 month guarantee from the date of purchase. This guarantee is in addition to and in no way prejudices your statutory rights. The guarantee is valid within the territories of the Member States of the European Union and the European Free Trade Area.
To claim on the guarantee, the claim must be in accordance with Black&Decker Terms and Conditions and you will need to submit proof of purchase to the seller or an authorised repair agent.
Terms and conditions of the Black&Decker 2 year guarantee and the location of your nearest authorised repair agent can be obtained on the Internet at www.2helpU.com, or by contacting your local Black & Decker office at the address indicated in this manual.
Please visit our website www.blackanddecker.co.uk to register your new BLACK+DECKER product and receive updates on new products and special offers.
General Manager, Benelux
Black and Decker,
General Manager, Benelux
Black and Decker,
General Manager, Benelux
Black and Decker,
Director General, Benelux
Black and Decker,
Director-Geral, Benelux
Black and Decker,
General Manager, Benelux
Black and Decker,
General Manager, Benelux
Black and Decker,
General Manager, Benelux
Black and Decker,