
BDBN1200 - Stapler BLACK & DECKER - Free user manual and instructions
Find the device manual for free BDBN1200 BLACK & DECKER in PDF.
| Product Type | Cordless Nailer |
| Brand | Black & Decker |
| Model | BDBN1200 |
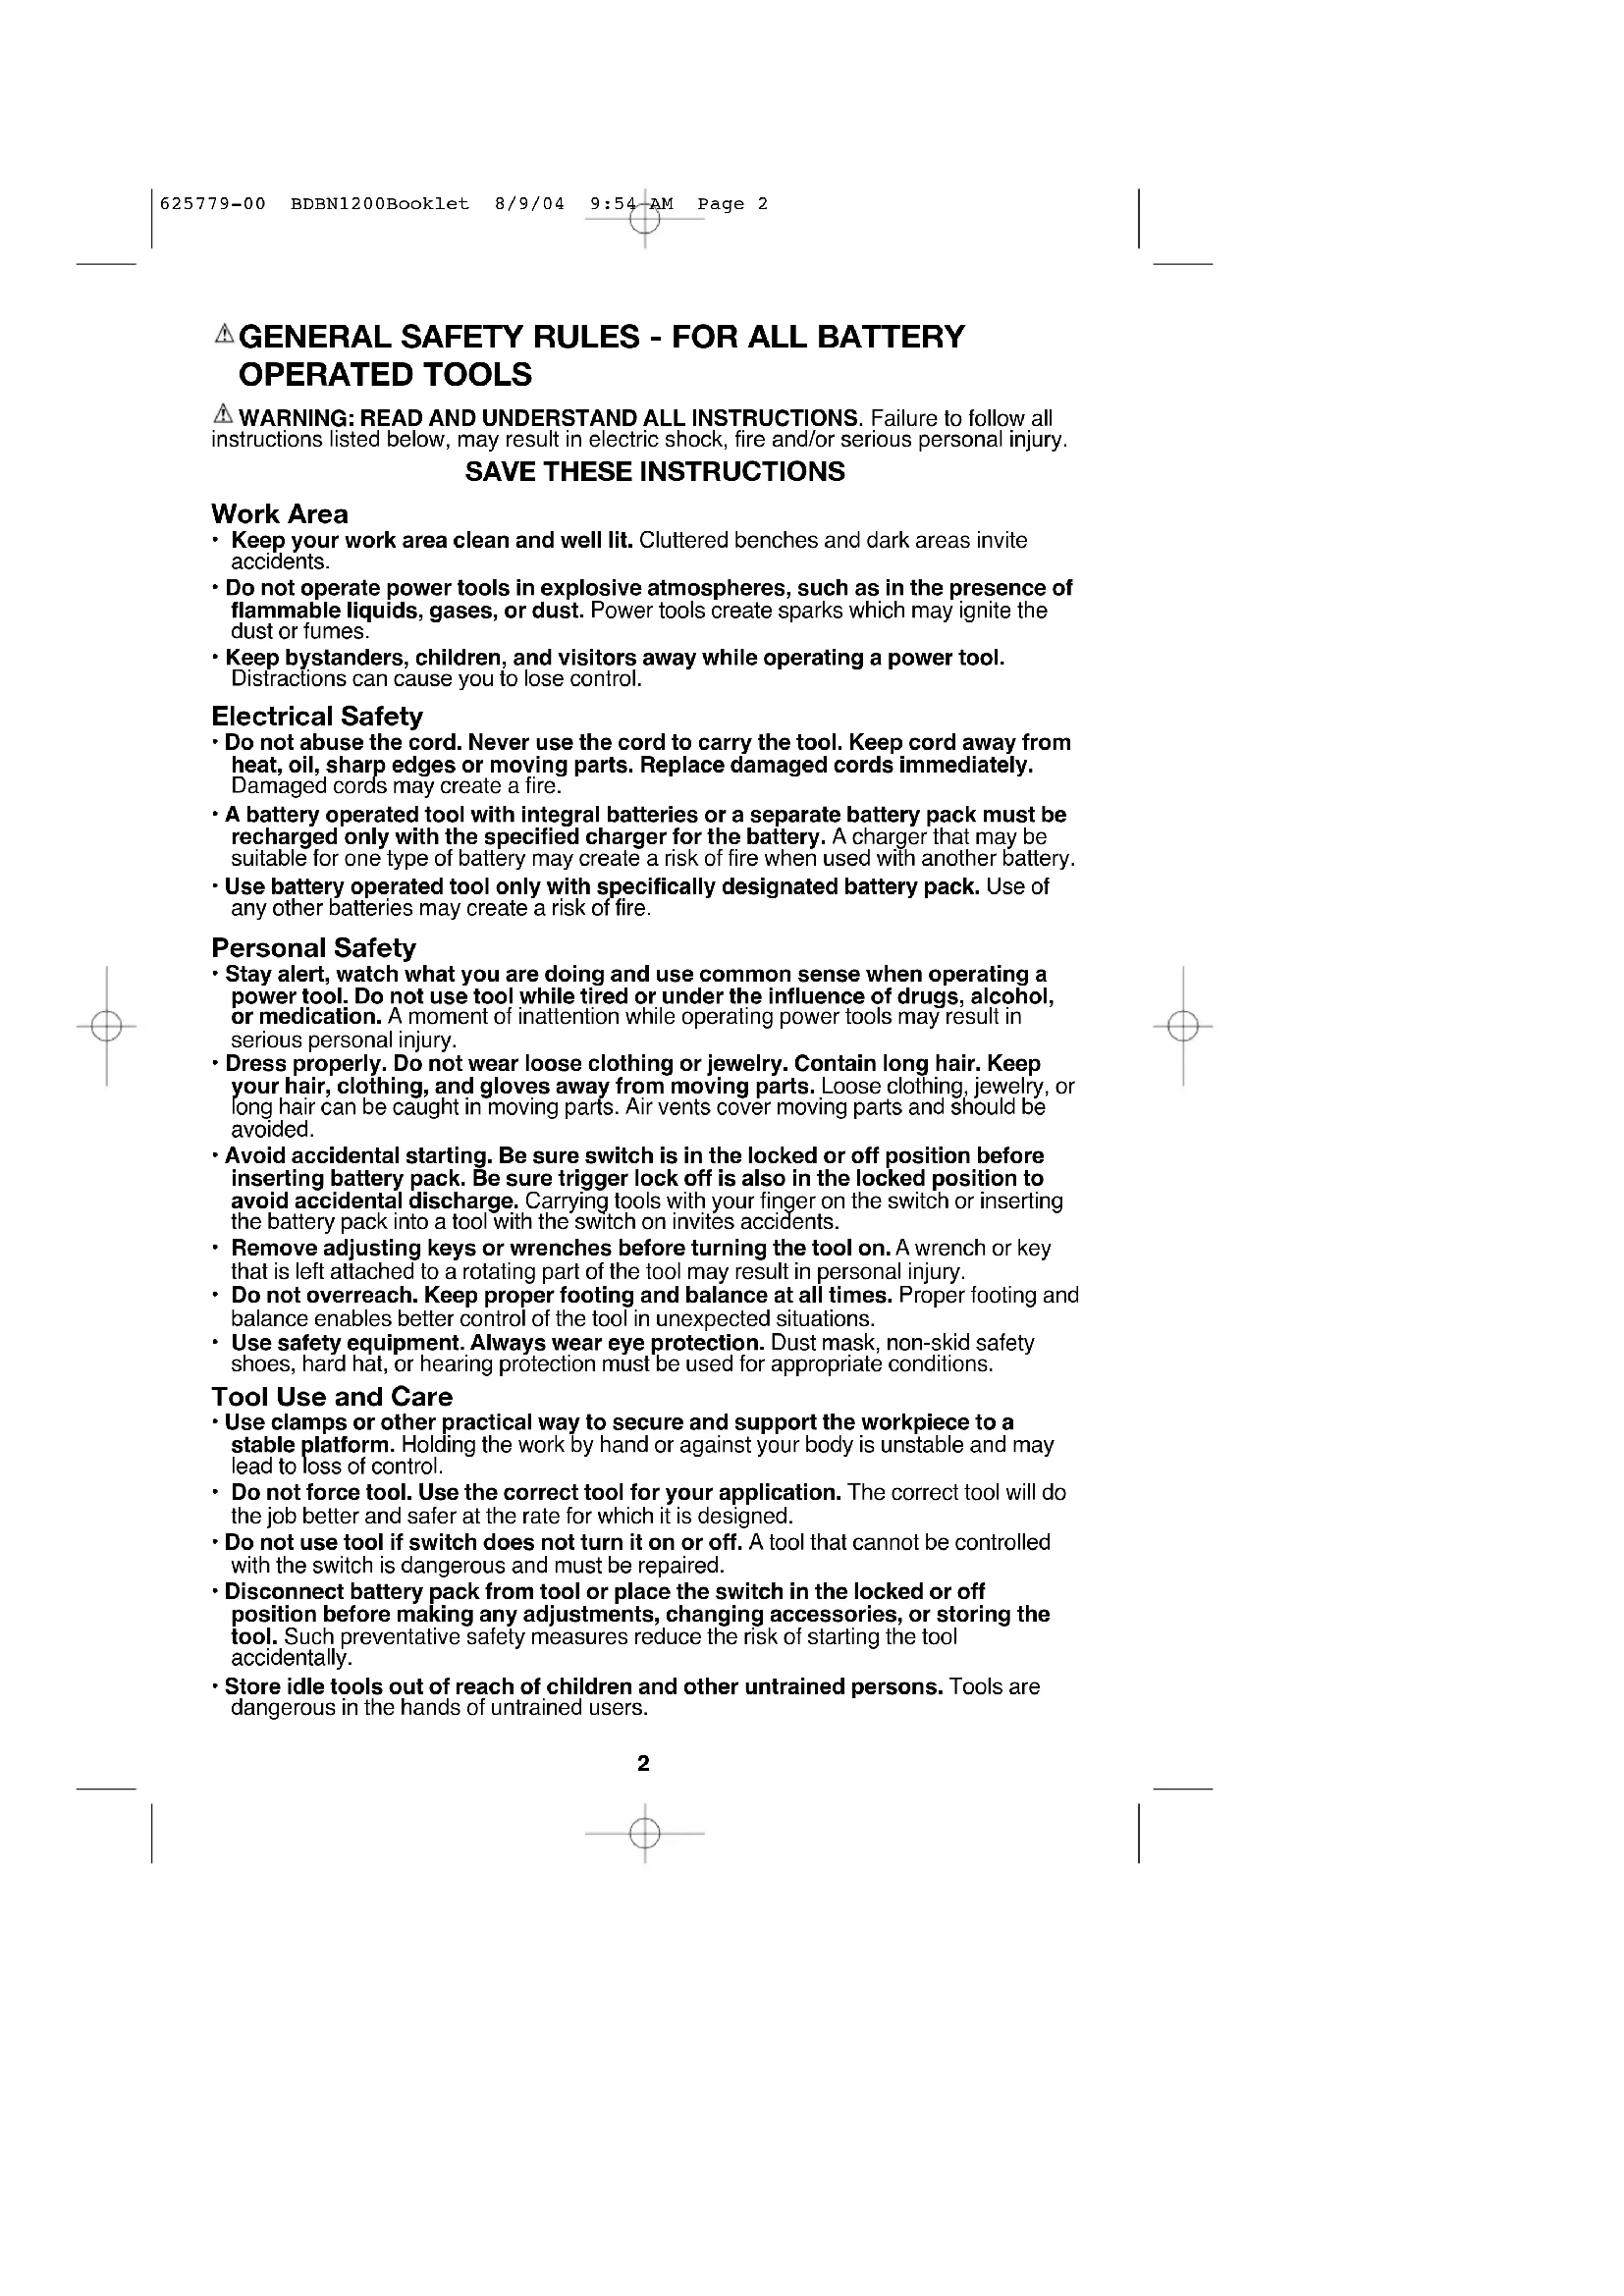
| Power Source | Rechargeable Battery Pack |
| Battery Type | Nickel-Cadmium (Ni-Cd) |
| Charger | 120 V, 60 Hz AC |
| Initial Charge Time | 9 hours |
| Charge Time After Use | 3 to 6 hours |
| Charging Temperature Range | 4.5 °C to 40.5 °C |
| Fastener Type | 18-gauge nails, length 16 to 50 mm (5/8 to 2 in) |
| Depth Adjustment | Yes, 2-position mechanism |
| Safety Mechanism | Lock-off, contact trip, trigger |
| Anti-Jam Device | Yes, front access panel |
| Viewing Window | Yes, for nail count check |
| Scratch Guard | Yes, on the nose |
| Maintenance | Clean with a damp cloth and mild soap |
| Warranty | 2 years for residential use |
| Environmental Certification | RBRC (battery recycling) |
| Country of Origin | Imported by Black & Decker |
Frequently Asked Questions - BDBN1200 BLACK & DECKER
User questions about BDBN1200 BLACK & DECKER
0 question about this device. Answer the ones you know or ask your own.
Ask a new question about this device
Download the instructions for your Stapler in PDF format for free! Find your manual BDBN1200 - BLACK & DECKER and take your electronic device back in hand. On this page are published all the documents necessary for the use of your device. BDBN1200 by BLACK & DECKER.
USER MANUAL BDBN1200 BLACK & DECKER
SAVE THIS MANUAL FOR FUTURE REFERENCE.
natural_image
Illustration of a handheld electronic device with black and gray casing (no text or symbols)BEFORE RETURNING THIS PRODUCT
FOR ANY REASON PLEASE CALL
1-800-544-6986
IF YOU SHOULD EXPERIENCE A PROBLEM
WITH YOUR BLACK & DECKER PRODUCT,
CALL 1-800-544-6986
BEFORE YOU CALL, HAVE THE FOLLOWING INFORMATION AVAILABLE, CATALOG No.,
TYPE No., AND DATE CODE. IN MOST CASES, A BLACK & DECKER REPRESENTATIVE
CAN RESOLVE THE PROBLEM OVER THE PHONE. IF YOU HAVE A SUGGESTION OR
COMMENT, GIVE US A CALL. YOUR FEEDBACK IS VITAL TO BLACK & DECKER.
Cat #. BDBN1200 Form # 625779-00
(AUG-04) Copyright © 2004 Black & Decker Printed in China
△GENERAL SAFETY RULES - FOR ALL BATTERY OPERATED TOOLS
⚠ WARNING: READ AND UNDERSTAND ALL INSTRUCTIONS. Failure to follow all instructions listed below, may result in electric shock, fire and/or serious personal injury.
SAVE THESE INSTRUCTIONS
Work Area
- Keep your work area clean and well lit. Cluttered benches and dark areas invite accidents.
- Do not operate power tools in explosive atmospheres, such as in the presence of flammable liquids, gases, or dust. Power tools create sparks which may ignite the dust or fumes.
- Keep bystanders, children, and visitors away while operating a power tool. Distractions can cause you to lose control.
Electrical Safety
- Do not abuse the cord. Never use the cord to carry the tool. Keep cord away from heat, oil, sharp edges or moving parts. Replace damaged cords immediately. Damaged cords may create a fire.
- A battery operated tool with integral batteries or a separate battery pack must be recharged only with the specified charger for the battery. A charger that may be suitable for one type of battery may create a risk of fire when used with another battery.
- Use battery operated tool only with specifically designated battery pack. Use of any other batteries may create a risk of fire.
Personal Safety
- Stay alert, watch what you are doing and use common sense when operating a power tool. Do not use tool while tired or under the influence of drugs, alcohol, or medication. A moment of inattention while operating power tools may result in serious personal injury.
- Dress properly. Do not wear loose clothing or jewelry. Contain long hair. Keep your hair, clothing, and gloves away from moving parts. Loose clothing, jewelry, or long hair can be caught in moving parts. Air vents cover moving parts and should be avoided.
- Avoid accidental starting. Be sure switch is in the locked or off position before inserting battery pack. Be sure trigger lock off is also in the locked position to avoid accidental discharge. Carrying tools with your finger on the switch or inserting the battery pack into a tool with the switch on invites accidents.
- Remove adjusting keys or wrenches before turning the tool on. A wrench or key that is left attached to a rotating part of the tool may result in personal injury.
- Do not overreach. Keep proper footing and balance at all times. Proper footing and balance enables better control of the tool in unexpected situations.
- Use safety equipment. Always wear eye protection. Dust mask, non-skid safety shoes, hard hat, or hearing protection must be used for appropriate conditions.
Tool Use and Care
- Use clamps or other practical way to secure and support the workpiece to a stable platform. Holding the work by hand or against your body is unstable and may lead to loss of control.
- Do not force tool. Use the correct tool for your application. The correct tool will do the job better and safer at the rate for which it is designed.
- Do not use tool if switch does not turn it on or off. A tool that cannot be controlled with the switch is dangerous and must be repaired.
- Disconnect battery pack from tool or place the switch in the locked or off position before making any adjustments, changing accessories, or storing the tool. Such preventative safety measures reduce the risk of starting the tool accidentally.
-
Store idle tools out of reach of children and other untrained persons. Tools are dangerous in the hands of untrained users.
-
When battery pack is not in use, keep it away from other metal objects like: paper clips, coins, keys, nails, screws or other small metal objects that can make a connection from one terminal to another. Shorting the battery terminals together may cause sparks, burns, or a fire.
- Maintain tools with care. Keep cutting tools sharp and clean. Properly maintained tools, with sharp cutting edge are less likely to bind and are easier to control.
- Check for misalignment or binding of moving parts, breakage of parts, and any other condition that may affect the tool's operation. If damaged, have the tool serviced before using. Many accidents are caused by poorly maintained tools.
- Use only accessories that are recommended by the manufacturer for your model. Accessories that may be suitable for one tool may create a risk of injury when used on another tool.
Service
- Tool service must be performed only by qualified repair personnel. Service or maintenance performed by unqualified personnel could result in a risk of injury.
- When servicing a tool, use only identical replacement parts. Follow instructions in the Maintenance section of this manual. Use of unauthorized parts or failure to follow Maintenance Instructions may create a risk of electric shock or injury.
Important Safety Instructions for Nailers
⚠ WARNING: When using any nailer, all safety precautions, as outlined below, should be followed to avoid the risk of death or serious personal injury. Read and understand all instructions before operating the tool.
- Hold tool by insulated gripping surfaces when performing an operation where the fastening tool may contact hidden wiring or its own cord. Contact with a "live" wire will make exposed metal parts of the tool "live" and shock the operator.
- When working on a ladder or on scaffolding be sure to lay the tool down on its side when not in use. Some tools with large battery packs will stand upright but may be easily knocked over
- Actuating tool may result in flying debris, collation material, or dust which could harm operator's eyes. The operator and all those persons in the general area should wear safety glasses with permanently attached side shields. Approved safety glasses are imprinted with the characters "Z87.1".
- Always wear appropriate personal hearing and other protection during use. Under some conditions and duration of use, noise from this product may contribute to hearing loss.
- Always engage lock off first then disconnect battery pack from the tool whenever clearing a jam, performing any maintenance or repair, moving the tool or when the tool is unattended.
- Do not remove, tamper with, or otherwise cause the tool, trigger, or contact trip to become inoperable. Do not tape or tie trigger or contact trip in the ON position. Do not remove spring from contact trip. Uncontrolled discharge could result.
- Do not operate a tool if any portion of the tool, trigger, or contact trip is inoperable, disconnected, altered, or not working properly. Damaged parts or missing parts should be repaired or replaced before use.
- Do not alter or modify the tool in any way.
• Always assume that the tool contains fasteners.
- Do not point the tool at others or yourself at any time. No horseplay! Work safe! Respect the tool as a working implement.
- Keep bystanders, children, and visitors away while operating a power tool. Distractions can cause you to lose control. When the tool is not in use, it should be locked in a safe place out of reach of children.
- Do not carry the tool from place to place holding the trigger. Accidental discharge could result.
- Always use lock-off when tool is not in immediate use. Using the lock-off will prevent accidental discharge.
- Use the tool only for its intended use. Do not discharge fasteners into open air, concrete, stone, hardwoods, knots or any material too hard for the fastener to penetrate. Discharged fasteners may cause injury.
- Do not use the body of the tool or top cap as a hammer.
- Always keep fingers clear of nail track of magazine to prevent injury from inadvertent release of the pusher.
- Do not overreach. Maintain proper footing and balance at all times.
- Refer to the Maintenance and Service sections for detailed information on the proper maintenance of the tool.
- Always operate the tool in a clean, lighted area. Be sure the work surface is clear of any debris and be careful not to lose footing when working in elevated environments such as rooftops.
- Do not drive fasteners near edge of material. The workpiece may split causing the fastener to ricochet, injuring you or a bystander. Be aware that the nail may follow the grain of the wood, causing it to protrude unexpectedly from the side of the work material. Drive the chisel point of the nail perpendicular to the grain to reduce risk of injury.
- Keep hands and body parts clear of immediate work area. Hold workpiece with clamps when necessary to keep hands and body out of potential harm. Be sure the workpiece is properly secured before pressing the nailer against the material. The contact trip may cause the work material to shift unexpectedly.
- Do not use tool in the presence of flammable dust, gases or fumes. The tool may produce a spark that could ignite gases causing a fire. Driving a nail into another nail may also cause a spark.
- Keep face and body parts away from back of the tool cap when working in restricted areas. Sudden recoil can result in impact to the body, especially when nailing into hard or dense material.
- Do not drive nails onto the heads of other fasteners. Recoil, jammed fasteners, or ricocheted nails may result.
- Be aware of material thickness when using the nailer. A protruding nail may cause injury.
- Do not actuate the tool unless the tool is placed firmly against the workpiece.
- DEPTH ADJUSTMENT: To reduce risk of serious injury from accidental actuation when attempting to adjust depth, ALWAYS;
- Engage lock-off.
- Remove battery pack.
- Avoid contact with trigger during adjustments
- Do not drive nails blindly into walls, floors or other work areas. Fasteners driven into live electrical wires, plumbing, or other types of obstructions can result in injury.
⚠ WARNING: Some dust created by power sanding, sawing, grinding, drilling, and other construction activities contains chemicals known to cause cancer, birth defects or other reproductive harm. Some examples of these chemicals are:
- lead from lead-based paints,
- crystalline silica from bricks and cement and other masonry products, and - arsenic and chromium from chemically-treated lumber (CCA).
Your risk from these exposures varies, depending on how often you do this type of work. To reduce your exposure to these chemicals: work in a well ventilated area, and work with approved safety equipment, such as those dust masks that are specially designed to filter out microscopic particles.
- Avoid prolonged contact with dust from power sanding, sawing, grinding, drilling, and other construction activities. Wear protective clothing and wash exposed areas with soap and water. Allowing dust to get into your mouth, eyes, or lay on the skin may promote absorption of harmful chemicals.
⚠ WARNING: Use of this tool can generate and/or disperse dust, which may cause serious and permanent respiratory or other injury. Always use NIOSH/OSHA
approved respiratory protection appropriate for the dust exposure. Direct particles away from face and body.
The label on your tool may include the following symbols.
V.....volts A .....amperes
Hz......hertz W ......watts
min .....minutes .....alternating current
= - - - = ....direct current n_0 ......no load speed
☐ .....Class II Construction .....earthing terminal
⚠️ ......safety alert symbol .../min....revolutions per minute
Before operating this tool, carefully read and understand all instructions in the "Important Safety Instructions" section. Battery Cap
Battery Cap Information
Battery storage and carrying caps are provided for use whenever the battery is out of the tool or charger. Remove cap before placing battery in charger or tool.
Battery Cap
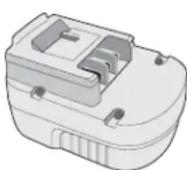
⚠ WARNING: Do not store or carry battery so that metal objects can contact exposed battery terminals. For example, do not place battery in
aprons, pockets, tool boxes, product kit boxes, drawers, etc. with loose nails, screws, keys, etc. without battery cap. Transporting batteries can possibly cause fires if the battery terminals inadvertently come in contact with conductive materials such as keys, coins, hand tools and the like. The US Department of Transportation Hazardous Material Regulations (HMR) actually prohibit transporting batteries in commerce or on airplanes (i.e. packed in suitcases and carryon luggage) UNLESS they are properly protected from short circuits. So when transporting individual batteries, make sure that the battery terminals are protected and well insulated from materials that could contact them and cause a short circuit."
⚠ Safety Warnings and Instructions: Charging
- This manual contains important safety and operating instructions.
- Before using battery charger, read all instructions and cautionary markings on (1) battery charger, (2) battery, and (3) product using battery.
- ⚠ CAUTION: To reduce the risk of injury, charge only Black & Decker Battery Packs. Other types of batteries may burst causing personal injury and damage.
- Do not expose charger to rain or snow.
- Use of an attachment not recommended or sold by Black & Decker may result in a risk of fire, electric shock, or injury to persons.
- To reduce risk of damage to electric plug and cord, pull by plug rather than cord when disconnecting charger.
- Make sure cord is located so that it will not be stepped on, tripped over, or otherwise subjected to damage or stress.
- An extension cord should not be used unless absolutely necessary. Use of improper extension cord could result in a risk of fire, electric shock or electrocution.
a. Two-wire cords can be used with 2-wire or 3-wire extension cords. Only round jacketed extension cords should be used, and we recommend that they be listed by Underwriters Laboratories (U.L.). If the extension is to be used outside, the cord must be suitable for outdoor use. Any cord marked for outdoor use can also be used for indoor work. The letters "W" or "WA" on the cord jacket indicate that the cord is suitable for outdoor use.
b. An extension cord must have adequate wire size (AWG or American Wire Gauge) for safety, and to prevent loss of power and overheating. The smaller the gauge number of the wire, the greater the capacity of the cable; that is, 16 gauge has more capacity than 18 gauge. When using more than one extension to make up the total length, be sure each extension contains at least the minimum wire size.
RECOMMENDED MINIMUM WIRE SIZE FOR EXTENSION CORDS
| TOTAL LENGTH OF CORD | ||||||
| 25 FT. 50 FT. 75 FT. 100 FT. 125 FT. 150 FT. 175 FT. | ||||||
| 7.6 M 15.2 M 22.9 M 30.5 M | 38.1 M 45.7 M 53.3 M | |||||
| WIRE SIZE AWG | ||||||
| 18 | 18 | 16 | 16 | 14 | 14 | 12 |
- Use only the supplied charger when charging your tool. The use of any other charger could damage the drill or create a hazardous condition.
- Use only one charger when charging.
- Do not attempt to open the charger. There are no customer serviceable parts inside. Return to any authorized Black & Decker service center.
- DO NOT incinerate the battery packs even if they are severely damaged or completely worn out. The batteries can explode in a fire.
- A small leakage of liquid from the battery cells may occur under extreme usage, charging or temperature conditions. This does not indicate a failure. However, if the outer seal is broken and this leakage gets on your skin:
a. Wash quickly with soap and water.
b. Neutralize with a mild acid such as lemon juice or vinegar.
c. If the battery liquid gets in your eyes, flush them with clean water for a minimum of 10 minutes and seek immediate medical attention. MEDICAL NOTE: The liquid is a 25 - 35% solution of potassium hydroxide.
Charging the Battery Pack
THE BATTERY PACK IS NOT FULLY CHARGED AT THE FACTORY. BEFORE ATTEMPTING TO CHARGE THE BATTERY PACK, THOROUGHLY READ ALL OF THE SAFETY INSTRUCTIONS.
The charger is designed to use standard household 120 volt 60 Hz power.
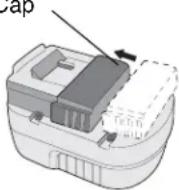
- Plug the charger into any standard 120 Volt 60 Hz electrical outlet. NOTE: Do not charge by means of an engine generator or DC power source. Use only 120V AC
- Slide the charger onto the battery pack as shown in Figure A and let the battery charge initially for 9 hours. After the initial charge, under normal usage, your battery pack should be fully charged in 3 to 6 hours.
natural_image
Illustration of hands holding a device with a close-up view showing the internal components (no text or symbols)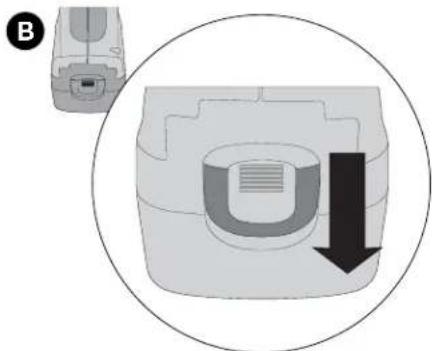
natural_image
Diagram showing a device with a U-shaped component and a downward arrow, enclosed in a circle (no text or symbols)- Unplug charger, and remove the battery pack. Place the battery in the tool and be certain that it is inserted fully into the tool cavity until it "clicks" into place.
NOTE: To remove the battery from the tool, press down on the release button on the back of the battery (Figure B) and slide out.
Important Charging Notes
- After normal usage, your battery pack should be fully charged in 3 to 6 hours. If the battery pack is run-down completely, it may take up to 6 hours to become fully charged. Your battery pack was sent from the factory in an uncharged condition. Before attempting to use it, it must be charged for at least 9 hours.
- DO NOT charge the battery pack in an air temperature below 40^ F ( 4,5^ C) or above 105^ F.( 40,5^ C) This is important and will prevent serious damage to the battery pack. Longest life and best performance can be obtained if battery pack is charged when air temperature is about 75^ F.( 24^ C).
- While charging, the charger may hum and become warm to touch. This is a normal condition and does not indicate a problem.
- If the battery pack does not charge properly—(1) Check current at receptacle by plugging in a lamp or other appliance. (2) Check to see if receptacle is connected to a light switch which turns power off when you turn out the lights. (3) Move charger and battery pack to a surrounding air temperature of 40^ F (4,5 °C) to 105^ F.(40,5 °C) (4) If the receptacle and temperature are OK, and you do not get proper charging, take or send the battery pack and charger to your local Black & Decker service center. See Tools Electric in yellow pages.
- The battery pack should be recharged when it fails to produce sufficient power on jobs which were easily done previously. DO NOT CONTINUE using product with its battery pack in a depleted condition.
- To prolong battery pack life, avoid leaving the battery pack on charge for extended periods of time (over 30 days without use). Although overcharging is not a safety concern, it can significantly reduce overall battery pack life.
- The battery pack will reach optimum performance after being cycled 5 times during normal usage. There is no need to run the batteries down completely before recharging. Normal usage is the best method of discharging and recharging the batteries.
Maintenance Stage
The trickle charge feature of the charger allows the battery pack to remain in the charger and ready for use. With the charger connected to standard household current, the red charging indicator light will glow constantly. The charger will keep the power pack fully charged. A battery pack will slowly lose its charge when kept out of the charger.
SAVE THESE INSTRUCTIONS FOR FUTURE USE
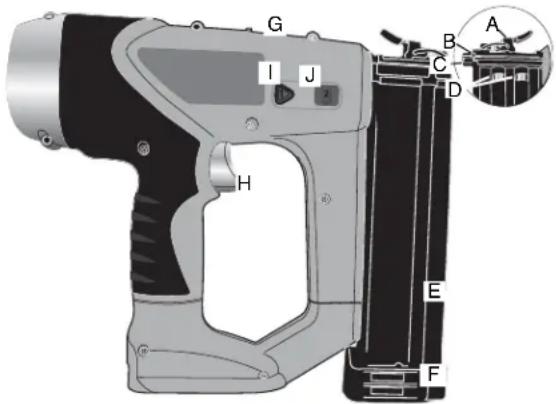
Features
A. jam clearing latch
B. contact trip
C. no-mar pad
D. low nail indicator windows
E. magazine
F. pusher release (other side)
G. lock-off
H. trigger
I. depth lock button
J. depth adjustment bar
NAIL SPECIFICATIONS - BDBN1200 18G CORDLESS NAILER
Lengths 5/8" - 2" (16 mm - 50 mm)
Diameters 18 gauge / calibre 18
Operating Instructions
Using the Lock-Off (Figure 1)
The nailer is equipped with a lock-off switch which prevents the tool from actuating. To engage, push the lock-off to the full rearward position as shown in figure 1.
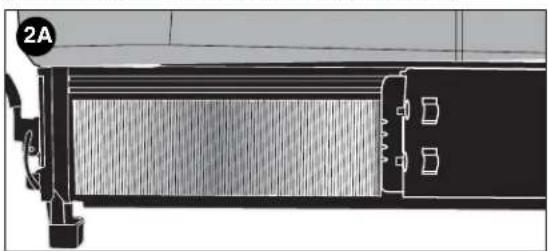
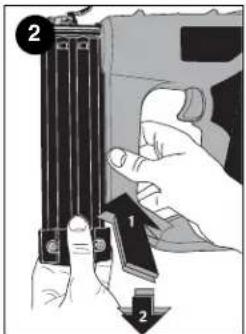
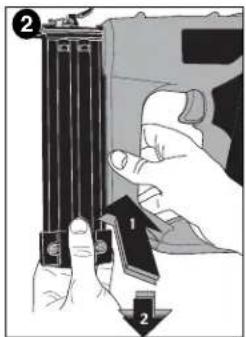
Loading the Tool (Figure 2)
⚠️ CAUTION: Keep tool pointed in a safe direction when loading nails.
⚠️ CAUTION: Never load nails with the contact trip or trigger activated.
⚠️ CAUTION: Always engage lock off and remove battery pack before loading or unloading nails.
To load fasteners:
- Read all "Safety Warnings" before using tool.
- Engage lock off.
- Remove battery.
- Depress pusher release and pull magazine back.
- Insert fasteners into the side of the magazine. Be sure the fasteners ride on their tips in the nail channel as shown in figure 2A.
- Push magazine closed until it locks in place.
natural_image
Technical diagram of a mechanical component with labeled section 2A (no readable text or symbols)
Actuating Tool
⚠ WARNING: Always wear eye and ear protection when operating tool.
To operate the nailer:
- Disengage lock off.
- Insert battery pack and lock in place.
- Depress the contact trip firmly against the work surface.
- Depress and maintain pressure on the trigger.
⚠ CAUTION: A nail will fire each time the trigger is depressed as long as the contact trip remains depressed.
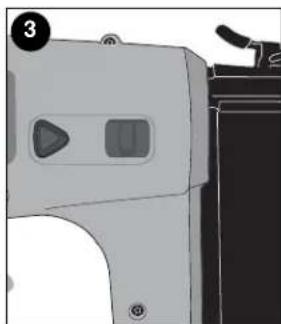
Adjusting Depth (Figure 3)
The depth that the fastener is driven can be adjusted using the depth adjustment buttons on the side of the tool.
⚠ WARNING: To reduce risk of serious injury from accidental actuation when attempting to adjust depth, ALWAYS:
- Engage lock off.
- Disconnect battery.
- Avoid contact with trigger during adjustments.
natural_image
Illustration of a gray electronic device with two side panels and a handle (no text or symbols)There are two drive positions:
- To drive the nail shallower, press the depth lock button and slide the depth adjustment bar to the forward position. Release the depth lock button.
- To sink a nail deeper, press the depth lock button and slide the depth adjustment bar to the full rear position. Release the depth lock button.
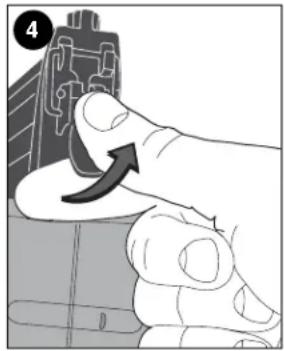
Clearing a Jammed Nail (Figure 4)
If a nail becomes jammed in the nosepiece, keep the tool pointed away from you and follow these instructions to clear:
- Engage lock off.
- Disconnect battery.
- Release pusher from behind nails.
- Pull up on latch then pull up to open front door.
- Remove bent nail, using pliers if necessary.
- If driver blade is in the down position, insert screwdriver or other rod into nosepiece and push driver blade back in position.
- Remove rod and close front door.
- Lift latch to engage wire and pull back to lock in place.
- Reinsert nails into magazine (see Loading the Tool).
- Push magazine closed until it locks in place.
natural_image
Close-up of a finger pressing a button on a circuit board (no text or symbols visible)Maintenance
Use only mild soap and damp cloth to clean the tool. Never let any liquid get inside the tool; never immerse any part of the tool into a liquid.
IMPORTANT: To assure product SAFETY and RELIABILITY, repairs, maintenance and adjustment (other than those listed in this manual) should be performed by authorized service centers or other qualified service organizations, always using identical replacement parts.
The RBRC™ Seal

The RBRC™ (Rechargeable Battery Recycling Corporation) Seal on the nickel-cadmium battery (or battery pack) indicates that the costs to recycle the battery (or battery pack) at the end of its useful life have already been paid by Black & Decker. In some areas, it is illegal to place spent nickel-cadmium batteries in the trash or municipal solid waste stream and the RBRC program provides an environmentally conscious alternative. RBRC in cooperation with Black & Decker and other battery users, has established programs in the United States and Canada to facilitate the collection of spent nickel-cadmium batteries. Help protect our environment and conserve natural resources by returning the spent nickel-cadmium battery to an authorized Black & Decker service center or to your local retailer for recycling. You may also contact your local recycling center for information on where to drop off the spent battery, or call 1-800-8-BATTERY.
Accessories
Recommended accessories for use with your tool are available from your local dealer or authorized service center. If you need assistance regarding accessories, please call:
1-800-544-6986.
⚠ WARNING: The use of any accessory not recommended for use with this tool could be hazardous.
Service Information
All Black & Decker Service Centers are staffed with trained personnel to provide customers with efficient and reliable power tool service. Whether you need technical advice or repair (this product is not user serviceable) contact the Black & Decker location nearest you. To find your local service location, refer to the yellow page directory under "Tools—Electric" or call:
1-800-544-6986 or visit www.blackanddecker.com
Full Two-Year Home Use Warranty
Black & Decker (U.S.) Inc. warrants this product for two years against any defects in material or workmanship. The defective product will be replaced or repaired at no charge in either of two ways.
The first, which will result in exchanges only, is to return the product to the retailer from whom it was purchased (provided that the store is a participating retailer). Returns should be made within the time period of the retailer's policy for exchanges (usually 30 to 90 days after the sale). Proof of purchase may be required. Please check with the retailer for their specific return policy regarding returns that are beyond the time set for exchanges.
The second option is to take or send the product (prepaid) to a Black & Decker owned or authorized Service Center for repair or replacement at our option. Proof of purchase may be required. Black & Decker owned and authorized Service Centers are listed under
"Tools-Electric" in the yellow pages of the phone directory.
This warranty does not apply to accessories. This warranty gives you specific legal rights and you may have other rights which vary from state to state or province to province. Should you have any questions, contact the manager of your nearest Black & Decker Service Center. This product is not intended for commercial use.
FREE WARNING LABEL REPLACEMENT: If your warning labels become illegible or are missing, call 1-800-544-6986 for a free replacement.
THIS PRODUCT IS COVERED BY US PATENT NOS. 6,705,503 AND 6,604,666. OTHER PATENTS PENDING.
Black & Decker (U.S.) Inc., 701 E. Joppa Rd.
Towson, MD 21286 U.S.A.

See 'Tools-Electric' – Yellow Pages – for Service & Sales

GUIDE D'UTILISATION
Hz ....hertz W ....watts
min....minutes ....courant\~
alternatif
=== courant continu
natural_image
Two-step illustration showing hands using a tool to adjust or install a device, with no visible text or symbols.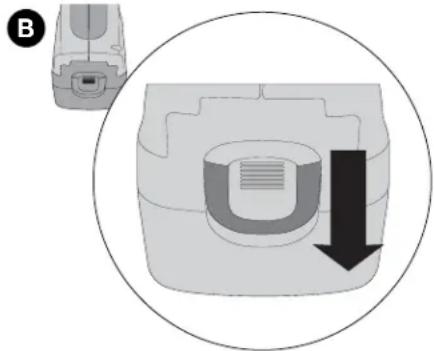
natural_image
Diagram showing a device with a U-shaped component and a downward arrow, enclosed in a circle (no text or symbols)natural_image
Side profile diagram of a vehicle showing front and side views with no visible text or symbols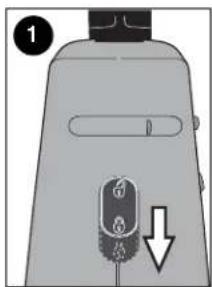
natural_image
Illustration of a mechanical device with a triangular button and handle (no text or symbols)natural_image
Illustration of a hand pressing a component with an arrow indicating rotation (no text or symbols present)Entretien / Nettoyage
Black & Decker Canada Inc.
100 Central Ave.
natural_image
Illustration of two hands holding a device with a close-up view of the internal components (no text or symbols)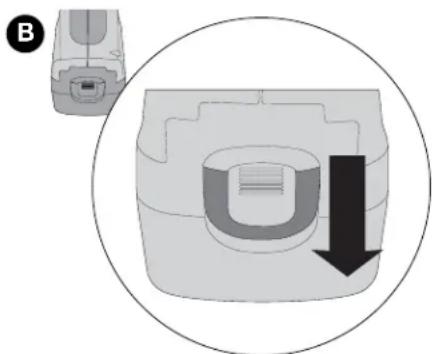
natural_image
Diagram showing a device with a U-shaped component and a downward arrow, enclosed in a circle (no text or symbols)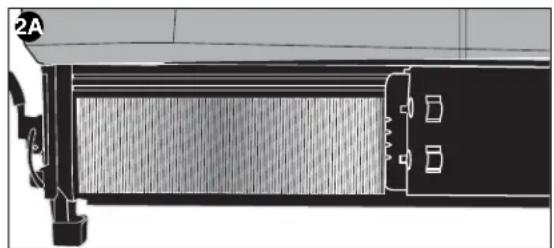
natural_image
Technical line drawing of a mechanical component or assembly (no visible text or symbols)natural_image
Illustration of a portable electronic device with control panel and buttons (no text or symbols)natural_image
Close-up of a finger pressing a component with an arrow indicating rotation (no text or symbols present)Col. Industrial Bravo
GUADALAJARA, JAL
Av. La Paz #1779
(33) 3825 6978
Col. Americana Sector Juarez
MEXICO, D.F.
Local D, Col. Obrera
MERIDA, YUC
Calle 63 #459-A
(999) 928 5038
Col. Centro
MONTERREY, N.L.
625779-00 BDBN1200Booklet 8/9/04 9:55 AM Page 32
625779-00 BDBN1200Booklet 8/9/04 9:55 AM Page 33


- △GENERAL SAFETY RULES - FOR ALL BATTERY OPERATED TOOLS
- SAVE THESE INSTRUCTIONS
- Work Area
- Electrical Safety
- Personal Safety
- Tool Use and Care
- Service
- Important Safety Instructions for Nailers
- Battery Cap Information
- ⚠ Safety Warnings and Instructions: Charging
- Charging the Battery Pack
- Important Charging Notes
- Maintenance Stage
- SAVE THESE INSTRUCTIONS FOR FUTURE USE
- Features
- NAIL SPECIFICATIONS - BDBN1200 18G CORDLESS NAILER
- Operating Instructions
- Using the Lock-Off (Figure 1)
- Loading the Tool (Figure 2)
- Actuating Tool
- Adjusting Depth (Figure 3)
- Clearing a Jammed Nail (Figure 4)
- Maintenance
- The RBRC™ Seal
- Accessories
- Service Information
- Full Two-Year Home Use Warranty
- GUIDE D'UTILISATION
- Entretien / Nettoyage
Brand : BLACK & DECKER
Model : BDBN1200
Category : Stapler