
BDCT12 - Stapler BLACK & DECKER - Free user manual and instructions
Find the device manual for free BDCT12 BLACK & DECKER in PDF.


| Product type | Cordless stapler-nailer |
| Brand | Black & Decker |
| Model | BDCT12 |
| Rated voltage | 12 V |
| Battery type | Lithium-ion (not included, model BDCB12) |
| Battery capacity | 1.5 Ah |
| Magazine capacity | 80 staples or 80 nails |
| Staple size | 6 to 14 mm |
| Nail size | 15 mm |
| Weight | 1.5 kg |
| Sound pressure level | 62.5 dB(A) (uncertainty 3 dB(A)) |
| Sound power level | 93.5 dB(A) (uncertainty 3 dB(A)) |
| Vibration | 2.1 m/s² (uncertainty 1.5 m/s²) |
| Actuation modes | Sequential and contact |
| Depth adjustment | Yes, via wheel |
| Safety | Trigger lock, contact trip |
| Main functions | Fastening materials with staples or nails |
| Maintenance and cleaning | Clean ventilation slots with a soft brush or dry cloth |
| Spare parts and repairability | Use only original parts, repair by authorized center |
| Warranty | 24 months |
Frequently Asked Questions - BDCT12 BLACK & DECKER
User questions about BDCT12 BLACK & DECKER
0 question about this device. Answer the ones you know or ask your own.
Ask a new question about this device
Download the instructions for your Stapler in PDF format for free! Find your manual BDCT12 - BLACK & DECKER and take your electronic device back in hand. On this page are published all the documents necessary for the use of your device. BDCT12 by BLACK & DECKER.
USER MANUAL BDCT12 BLACK & DECKER
natural_image
Line drawing of a hand holding a handgun, with no visible text or symbols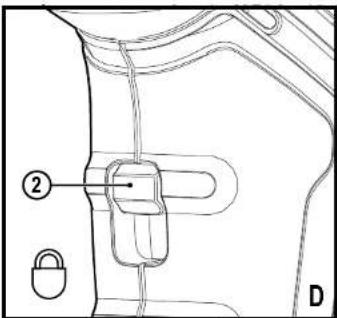
(Original instructions)
ENGLISH
Intended use
Your BLACK+DECKER BDCT12N tacker has been designed for fixing material together by nailing or stapling. This tool is intended for consumer use only.
Safety Instructions
General power tool safety warnings

Warning! Read all safety warnings and all instructions. Failure to follow the warnings and instructions listed below may result in electric shock, fire and/or serious injury.
Save all warnings and instructions for future reference. The term "power tool" in all of the warnings listed below refers to your mains operated (corded) power tool or battery operated (cordless) power tool.
- Work area safety
a. Keep work area clean and well lit. Cluttered or dark areas invite accidents
b. Do not operate power tools in explosive atmospheres, such as in the presence of flammable liquids, gases or dust. Power tools create sparks which may ignite the dust or fumes.
c. Keep children and bystanders away while operating a power tool. Distractions can cause you to lose control. - Electrical safety
a. Power tool plugs must match the outlet. Never modify the plug in any way. Do not use any adapter plugs with earthed (grounded) power tools. Unmodified plugs and matching outlets will reduce risk of electric shock.
b. Avoid body contact with earthed or grounded surfaces such as pipes, radiators, ranges and refrigerators. There is an increased risk of electric shock if your body is earthed or grounded.
c. Do not expose power tools to rain or wet conditions.
Water entering a power tool will increase the risk of electric shock.
d. Do not abuse the cord. Never use the cord for carrying, pulling or unplugging the power tool. Keep cord away from heat, oil, sharp edges or moving parts. Damaged or entangled cords increase the risk of electric shock.
e. When operating a power tool outdoors, use an extension cord suitable for outdoor use. Use of a cord suitable for outdoor use reduces the risk of electric shock.
1. If operating a power tool in a damp location is unavoidable, use a residual current device (RCD) protected supply. Use of an RCD reduces the risk of electric shock.
3. Personal safety
a. Stay alert, watch what you are doing and use common sense when operating a power tool. Do not use a power tool while you are tired or under the influence of drugs, alcohol or medication. A moment of inattention while operating power tools may result in serious personal injury.
b. Use personal protective equipment. Always wear safety eye protection with side shields. Protective equipment such as dust mask, non-skid safety shoes hard hat, or hearing protection used for appropriate conditions will reduce personal injuries.
c. Prevent unintentional starting. Ensure the switch is in the off-position before connecting to power source and/or battery pack, picking up or carrying the tool.
ENGLISH
(Original instructions)
Carrying power tools with your finger on the switch or energising power tools that have the switch on invites accidents.
d. Remove any adjusting key or wrench before turning the power tool on. A wrench or a key left attached to a rotating part of the power tool may result in personal injury.
e. Do not overreach. Keep proper footing and balance at all times. This enables better control of the power tool in unexpected situations.
f. Dress properly. Do not wear loose clothing or jewellery. Keep your hair, clothing and gloves away from moving parts. Loose clothes, jewellery or long hair can be caught in moving parts.
g. If devices are provided for the connection of dust extraction and collection facilities, ensure these are connected and properly used. Use of dust collection can reduce dust-related hazards.
h. Do not let familiarity gained from frequent use of tools allow you to become complacent and ignore tool safety principles. A careless action can cause severe injury within a fraction of a second.
4. Power tool use and care
a. Do not force the power tool. Use the correct power tool for your application. The correct power tool will do the job better and safer at the rate for which it was designed.
b. Do not use the power tool if the switch does not turn it on and off. Any power tool that cannot be controlled with the switch is dangerous and must be repaired.
c. Disconnect the plug from the power source and/or the battery pack from the power tool before making any adjustments, changing accessories, or storing power tools. Such preventive safety measures reduce the risk of starting the power tool accidentally.
d. Store idle power tools out of the reach of children and do not allow persons unfamiliar with the power tool or these instructions to operate the power tool.
Power tools are dangerous in the hands of untrained users.
e. Maintain power tools. Check for misalignment or binding of moving parts, breakage of parts and any other condition that may affect the power tools operation. If damaged, have the power tool repaired before use. Many accidents are caused by poorly maintained power tools.
f. Keep cutting tools sharp and clean. Properly maintained cutting tools with sharp cutting edges are less likely to bind and are easier to control.
g. Use the power tool, accessories and tool bits etc. in accordance with these instructions, taking into account the working conditions and the work to be performed.
Use of the power tool for operations different from those intended could result in a hazardous situation.
h. Keep handles and grasping surfaces dry, clean and free from oil and grease. Slippery handles and grasping surfaces do not allow for safe handling and control of the tool in unexpected situations.
5. Battery tool use and care
a. Recharge only with the charger specified by the manufacturer. A charger that is suitable for one type of battery pack may create a risk of fire when used with another battery pack.
b. Use power tools only with specifically designated battery packs. Use of any other battery packs may create a risk of injury and fire.
c. When battery pack is not in use, keep it away from other metal objects, like paper clips, coins, keys, nails, screws, or other small metal objects, that can make a connection from one terminal to another. Shorting the battery terminals together may cause bums or a fire.
d. Under abusive conditions, liquid may be ejected from the battery; avoid contact. If contact accidentally occurs, flush with water. If liquid contacts eyes, additionally seek medical help. Liquid ejected from the battery may cause irritation or burns.
e. Do not use a battery pack or tool that is damaged or modified. Damaged or modified batteries may exhibit unpredictable behaviour resulting in fire, explosion or risk of injury.
f. Do not expose a battery pack or tool to fire or excessive temperature. Exposure to fire or temperature above 130 °C may cause explosion.
g. Follow all charging instructions and do not charge the battery pack or tool outside the temperature range specified in the instructions. Charging improperly or at temperatures outside the specified range may damage the battery and increase the risk of fire.
6. Service
a. Have your power tool serviced by a qualified repair person using only identical replacement parts. This will ensure that the safety of the power tool is maintained.
b. Never service damaged battery packs. Service battery packs should only be performed by the manufacturer or authorised service providers.
Additional power tool safety warnings

Warning! Additional safety warnings tackers
(Original instructions)
ENGLISH
- Always assume that the tool contains fasteners.
Care- less handling of the tacker can result in unexpected discharge of fasteners and personal injury.
Do not point the tool towards yourself or anyone nearby. Unexpected triggering may discharge the fastener causing an injury.
Do not actuate the tool unless the tool is placed firmly against the workpiece. If the tool is not in contact with the workpiece, the fastener may be deflected away from your target. - Remove the battery from the tool when the fastener jams in the tool. While removing a jammed fastener, the tacker may be accidentally activated if it has the battery attached.
Use caution while removing a jammed fastener. The mechanism may be under compression and the fastener may be forcefully discharged while attempting to free a jammed condition.
Do not use this tacker for fastening electrical cables. It is not designed for electric cable installation and may damage the insulation of electric cables thereby causing electric shock or fire hazards.
Hold power tool by insulated gripping surfaces when performing an operation where the cutting accessory may contact hidden wiring or its own cord. Fasteners contacting a "live" wire may make exposed metal parts of the power tool "live" and could give the operator an electric shock.
Use clamps or another practical way to secure and support the workpiece to a stable platform. Holding the work by hand or against your body leaves it unstable and may lead to loss of control. - Always use safety glasses with side shields or goggles.
- The intended use is described in this instruction manual. The use of any accessory or attachment or performance of any operation with this tool other than those recommended in this instruction manual may present a risk of personal injury and/or damage to property.
◆ Do not eat, drink or smoke in the work area.
Residual risks
Additional residual risks may arise when using the tool which may not be included in the enclosed safety warnings. These risks can arise from misuse, prolonged use etc. Even with the application of the relevant safety regulations and the implementation of safety devices, certain residual risks can not be avoided. These include:
- Injuries caused by touching any rotating/moving parts.
- Injuries caused when changing any parts, blades or accessories.
- Injuries caused by prolonged use of a tool. When using any tool for prolonged periods ensure you take regular breaks.
◆ Impairment of hearing.
- Health hazards caused by breathing dust developed when using your tool (example:- working with wood, especially oak, beech and MDF.)
Vibration
The declared vibration emission values stated in the technical data and the declaration of conformity have been measured in accordance with a standard test method provided by EN62841 and may be used for comparing one tool with another. The declared vibration emission value may also be used in a preliminary assessment of exposure.
Warning! The vibration emission value during actual use of the power tool can differ from the declared value depending on the ways in which the tool is used. The vibration level may increase above the level stated.
When assessing vibration exposure to determine safety measures required by 2002/44/EC to protect persons regularly using power tools in employment, an estimation of vibration exposure should consider, the actual conditions of use and the way the tool is used, including taking account of all parts of the operating cycle such as the times when the tool is switched off and when it is running idle in addition to the trigger time.
Labels on tool
The following symbols, along with the date code, are shown on the tool:

Warning! To reduce the risk of injury, the user must read the instruction manual.
Additional safety instructions for batteries and chargers (not supplied)
Batteries (not supplied)
◆ Use only batteries manufactured by BLACK+DECKER to avoid personal injury and property damage.
◆ Never attempt to open for any reason.
◆ Do not expose the battery to water.
Do not store in locations where the temperature may exceed 40 °C.
◆ Charge only at ambient temperatures between 10 °C and 40 °C.
◆ Charge only using the charger recommended for the tool.
When disposing of batteries, follow the instructions given in the section "Protecting the environment".

Do not attempt to charge damaged batteries.
Chargers (not supplied)
Use your BLACK+DECKER charger only to charge the battery recommended for the tool. Other batteries could burst, causing personal injury and damage.
ENGLISH
(Original instructions)
- Never attempt to charge non-rechargeable batteries.
◆ Have defective cords replaced immediately. - Do not expose the charger to water.
- Do not open the charger.
◆ Do not probe the charger

The charger is intended for indoor use only.

Read the instruction manual before use.
Electrical safety

Your charger is double insulated; therefore no earth wire is required. Always check that the mains voltage corresponds to the voltage on the rating plate. Never attempt to replace the charger unit with a regular mains plug.
- If the supply cord is damaged, it must be replaced by the manufacturer or an authorised BLACK+DECKER Service Center in order to avoid a hazard.
Features
This tool includes some or all of the following features.
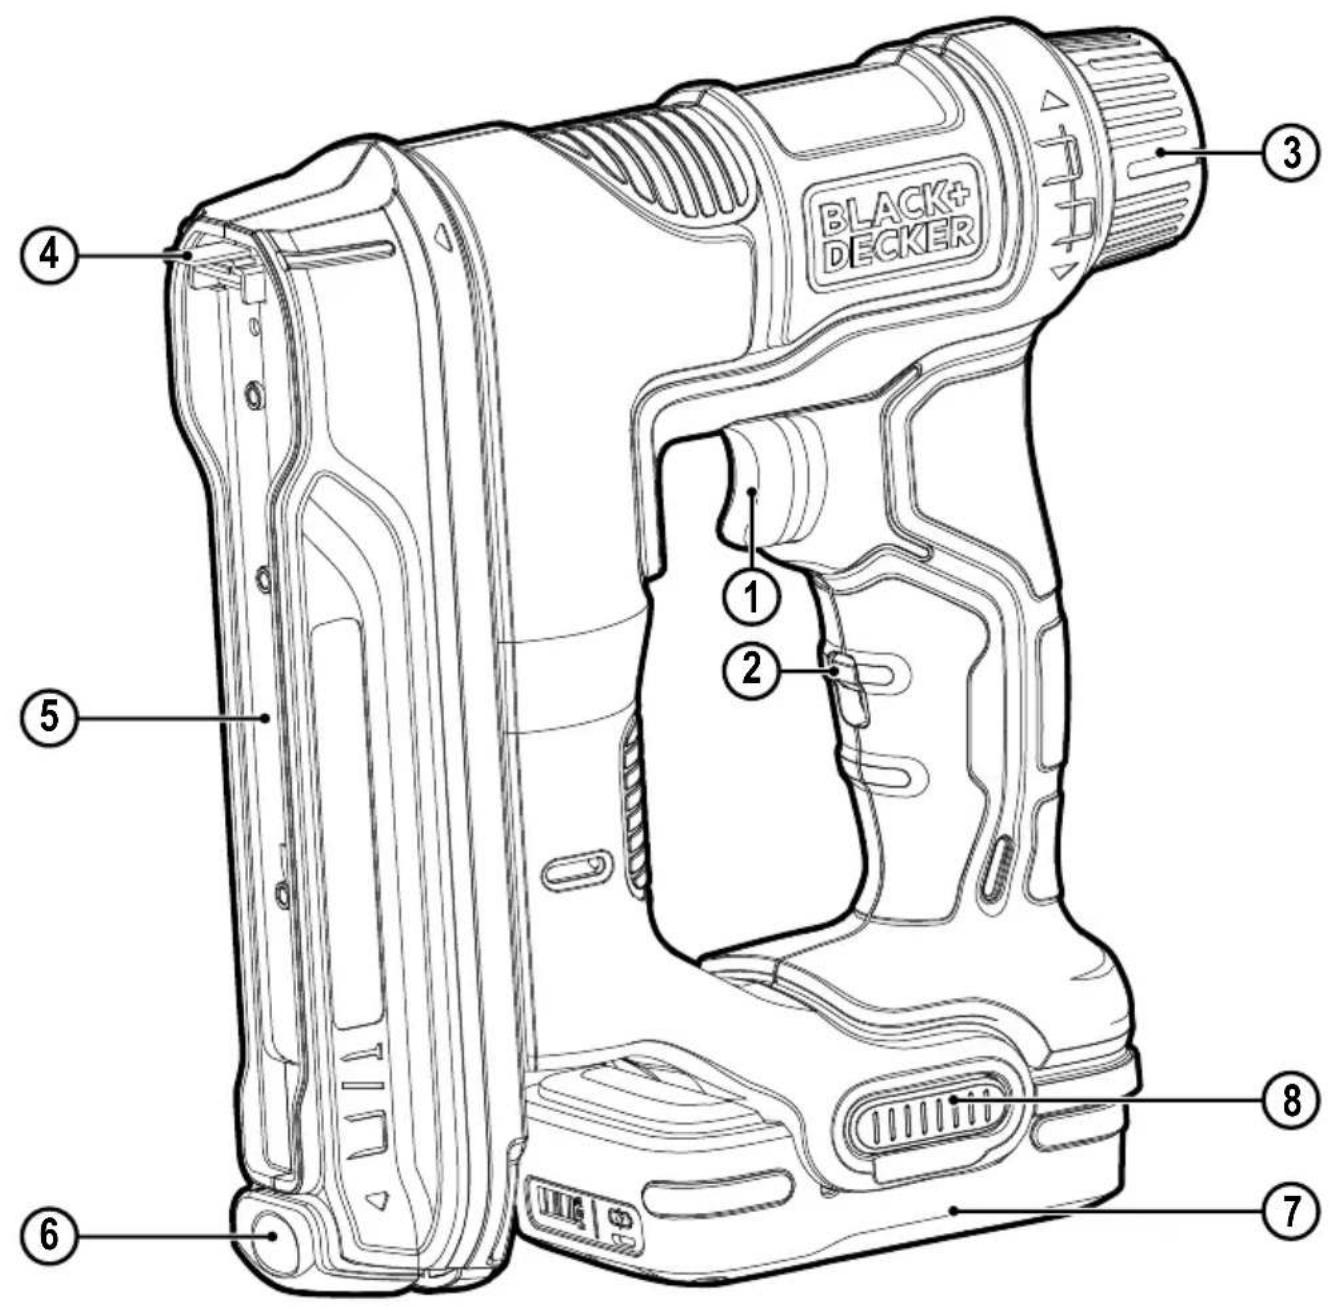
- Trigger
- Trigger lock-off button
- Depth adjustment wheel
- Contact trip
- Sliding magazine
- Magazine latch
- Battery (not supplied)
- Battery release button
Assembly
Warning! Before assembly, make sure that the tool is switched off and remove the battery.
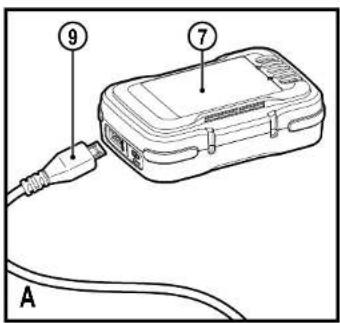
Charging the battery (fig. A) (not supplied)
The battery needs to be charged before first use and whenever it fails to produce sufficient power on jobs that were easily done before. The battery may become warm while charging; this is normal and does not indicate a problem.
Warning! Do not charge the battery at ambient temperatures below 10 °C or above 40 °C. Recommended charging temperature: approx. 24 °C.
Note: The charger will not charge a battery if the cell temperature is below approximately 10 °C or above 40 °C. The battery should be left in the charger and the charger will begin to charge automatically when the cell temperature warms up or cools down.
◆ To charge the battery (7) (not supplied), insert the USB charger (9) (not supplied).
◆ Connect the USB charger (9) to a power source.
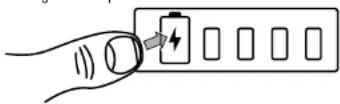
The charging indicator will blink. As the battery charges, the state of charge LEDs will illuminate. The illuminated LED(s) indicate the state of charge of the pack. The blinking LED indicates the next level of charge in progress. The state of charge button is disabled during charging only.
The completion of charge is indicated by all four LEDs turning off. Pressing the state of charge indicator button will illuminate all four LEDs. The battery is fully charged and may be used at this time or left on the charger
◆ The charger and the battery can be left connected indefinitely.
◆ Charge discharged batteries within 1 week. Battery life will be greatly diminished if stored in a discharged state.
State of charge indicator
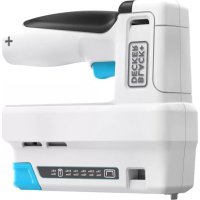
The BLACK+DECKER battery is equipped with a state of charge button with a four LED display.
The state of charge is an indication of approximate levels of charge remaining in the battery according to the following indicators:

96 - 100% charged

76 - 95%

51 - 75%

26 - 50%

Pack needs to be charged
Note: The state of charge LED will only display once the state of charge button is pressed.
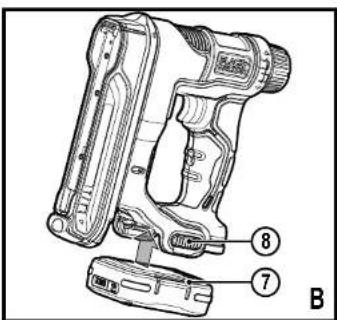
Fitting and removing the battery (fig. B) (not supplied)
- Make certain the trigger lock-off (2) is in the locked position before removing or installing the battery.
♦ Align the tool terminals on the foot of the tool with the terminal slots on the battery (7) as shown in Fig. B.
Note: The state of charge indicator will face the rear of the tool and the USB ports will face the front as shown in Fig. B
- Snap the BLACK+DECKER battery into the foot of the tool. Ensure the battery is fully seated and fully latched into position before using.
- To remove the BLACK+DECKER battery from the tool, depress the two battery release buttons (8) located on the tool and pull the BLACK+DECKER battery off the tool.
Note: The battery USB ports are disabled when the trigger is pulled.
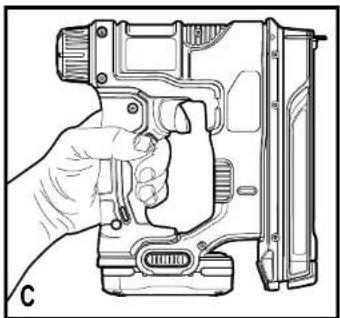
Proper hand hosition (Fig. C)
Warning! To reduce the risk of serious personal injury, ALWAYS use proper hand position as shown in Fig.C.
Preparing the Tool
Warning! Keep the tool pointed away from yourself and others. Serious personal injury may result.
Warning! To reduce the risk of serious personal injury, lock off the trigger, disconnect battery pack from tool and remove staples from magazine before making adjustments.
Warning! NEVER spray or in any other way apply lubricants or cleaning solvents inside the tool. This can seriously affect the life and performance of the tool.
◆ Read the Safety Instruction section of this manual
◆ Wear eye and ear protection.
◆ Ensure magazine is empty of all fasteners.
Place contact trip onto work surface to check for smooth and proper operation of contact trip. Do not use tool if it is not functioning properly. NEVER use a tool that has the contact trip restrained in the actuated position.
◆ Keep tool pointed away from yourself and others.
◆ Insert fully charged battery pack.
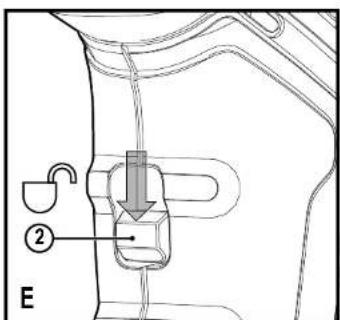
Using the trigger lock-off (Fig. D, E)
Warning! To reduce the risk of serious personal injury, do not keep trigger or contact trip depressed when tool is not in use. Keep the trigger lock-off switch LOCKED (Fig. D) when the tool is not in use.
This BLACK+DECKER stapler is equipped with a trigger lock-off (2) which when in the locked position as shown in Figure D, prevents the tool from discharging a staple by locking the trigger.
When the trigger lock-off (2) is in the unlocked position (Fig. E), the tool will be fully operational. The trigger lock-off (2) should always be locked off whenever any adjustments are made or when tool is not in immediate use.
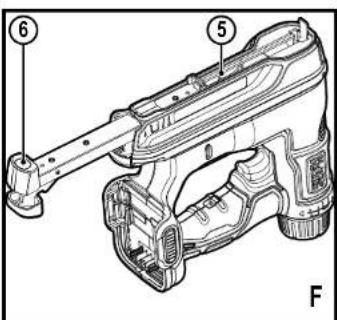
Loading the tool (Fig. F)
Warning! Keep the tool pointed away from yourself and others. Serious personal injury may result.
(Original instructions)
ENGLISH
Warning! Always remove battery pack before loading or unloading staples. Serious personal injury may result.
Warning! Never load staples/brad nails with the contact trip or trigger activated. Personal injury may result.
◆ Pinch the magazine latch (6) and pull out the sliding magazine (5).
◆ Load fasteners. Ensure staples/brad nails are loaded so that crown of staple or head of the brad nail sits against inside surface of the magazine (5).
Note: The head of the brad nail must sit against the left, inside surface of the magazine. If loaded on right side the magazine will not close.
- Close sliding magazine until the magazine latch clips snuggly in place.
Unloading the tool
◆ Pinch the magazine latch (6) and pull out the sliding magazine (5).
- Tip the tool to the side until the staples/brad nails slide freely out of the bottom of the magazine.
- Check to ensure no loose staples/brad nails remain inside magazine.
◆ Close sliding magazine fully.
Trigger Operation
Warning! Always wear proper eye and hearing protection when operating tool.
This tool is capable of discharging staples/brad nails using sequential or single bump actuation.
Warning! Keep fingers AWAY from trigger when not driving staples to avoid accidental fastener discharge. NEVER carry tool with finger on trigger.
Sequential actuation provides the maximum delivery of power for driving the longest fasteners.
To operate the tool in sequential mode:
◆ Fully depress contact trip (4) against the work surface.
◆ Pull trigger (1) fastener will drive into work surface.
Note: Maintain downward pressure on work surface until the fastener is driven into the work surface.
◆ Release trigger.
◆ Lift contact trip off work surface.
◆ Repeat steps for next application.
Note: The contact trip needs to be depressed followed by a trigger pull for each fastener followed by a release of both the contact trip and trigger after each fastener.
To operate the tool in single bump mode:
◆ Pull trigger (1).
◆ Fully depress contact trip (4) against the work surface. Note: Maintain downward pressure on work surface until the fastener is driven into the work surface.
◆ Release trigger.
◆ Lift contact trip off work surface.
◆ Repeat steps for next application.
ENGLISH
(Original instructions)
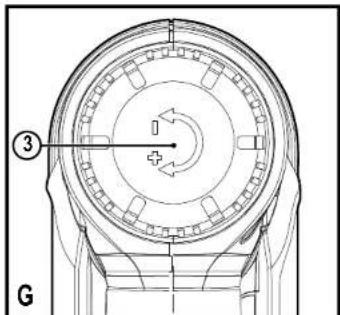
Adjusting Depth (Fig. G)
The depth that the fastener is driven can be adjusted using the depth adjustment wheel (3) on the back of the tool.
Warning! To reduce risk of serious injury from accidental actuation when attempting to adjust depth, ALWAYS:
◆ Remove battery pack.
◆ Engage trigger lock-off.
◆ Avoid contact with trigger during adjustments.
- To drive the fastener shallower rotate the depth adjustment wheel (3) to the left.
- To sink a fastener deeper rotate the depth adjustment wheel (3) to the right.
Clearing a jammed staple/brad nail
If a staple/brad nail becomes jammed in the magazine and the driver blade, keep the tool pointed away from you and follow these instructions to clear.
- Remove battery pack from tool and engage the trigger lock-off.
- Pinch the magazine latch (6) and remove any loaded staples/brad nails.
- Visually check inside magazine for any jammed staples/brad nails.
◆ Remove bent staple/brad nail, using pliers if necessary.
◆ Reinsert staples/brad nails into magazine (see Loading the Tool)
◆ Reinsert battery pack.
Note: The tool will disable itself and not reset until the battery pack has been removed and reinserted.
Misfiring (during use)
If the tool suddenly becomes inoperative after driving a staple/brad nail you will need to follow these instructions to perform a motor reset.
◆ Reinsert battery pack.
- With the battery pack installed, engage the contact trip firmly against your work surface. Do not pull trigger.
- Press and hold down the contract trip against the work surface for approximately 3 seconds.
◆ You will hear the motor cycle, resetting the tool.
- Once the motor has been reset, continue to operate tool as intended.
Hints for optimum use
◆ Do not exert too much pressure on the tool.
- Regularly check the condition of accessories. Replace when necessary.
◆ Clamp the workpiece securely.
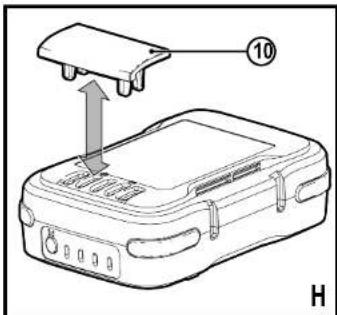
Battery Terminal Safety Cap (fig. H)
A power source storage and carrying cap (10) is provided for use whenever the power source is out of the tool. Remove the cap as shown before placing power source onto tool.

6mm, 8mm, 10mm, 12mm, 14mm

12mm, 15mm
| Fastner length capacity | |
| Soft woods up to 15mm | |
| Hard woods up to 10mm | |
Troubleshooting
| Problem Possible Cause Possible Solution | ||
| Unit will not start. Battery not installed properly. Check battery installation. | ||
Maintenance
Your BLACK+DECKER tool has been designed to operate over a long period of time with a minimum of maintenance. Continuous satisfactory operation depends upon proper tool care and regular cleaning.
Your charger does not require any maintenance apart from regular cleaning.
Warning! Before performing any maintenance on the tool, remove the battery from the tool. Unplug the charger before cleaning it.
◆ Regularly clean the ventilation slots in your tool and charger using a soft brush or dry cloth.
- Regularly clean the motor housing using a damp cloth. Do not use any abrasive or solvent-based cleaner.
- Regularly tap bit holder to remove any dust from the interior.
Protecting the environment
Separate collection. Products and batteries marked with this symbol must not be disposed of with normal household waste.
Products and batteries contain materials that can be recovered or recycled reducing the demand for raw materials. Please recycle electrical products and batteries according to local provisions. Further information is available at www.2helpU.com
Technical data
| Input voltage V | ∞ | 12 |
| Speed of operation Staples-Tads/min: 20 | ||
| Power levels η | ||
| Staple size | mm | 8.14 |
| Tack size | mm | 15 |
| Capacity | Staples | 90 |
| Capacity | Tacks | 90 |
| Weight | kg | 1.5 |
| Battery (Not supplied) | BDCB12 | |
| Voltage | V_DD | 12 |
| Capacity | Ah | 1.5 |
| Type | Li-ion | |
Level of sound pressure according to EN 60745:
Sound pressure (L _w ) 82.5 dB(A), uncertainty (K) 3 dB(A)
Sound power (L _out ) 93.5 dB(A), uncertainty (K) 3 dB(A)
Vibration total values (triax vector sum) according to EN 60745:
(a) 2.1 m/s ^2 , uncertainty (K) 1.5 m/s ^2
EC declaration of conformity
MACHINERY DIRECTIVE

BDCT12N Tacker
Black & Decker declares that these products described under "technical data" are in compliance with:
(Original instructions)
ENGLISH
2006/42/EC, EN60745-1:2009+A11:2010.
EN60745-2-16:2010.
These products also comply with directive
2014/30/EU and 2011/65/EU.
For more information, please contact Black & Decker at the
following address or refer to the back of the manual.
The undersigned is responsible for compilation of the technical file and makes this declaration on behalf of Black & Decker.
Ray Laverick
Director of Engineering
Black & Decker Europe, 210 Bath Road, Slough,
Berkshire, SL1 3YD
United Kingdom
12/01/2018
Guarantee
Black & Decker is confident of the quality of its products and offers consumers a 24 month guarantee from the date of purchase. This guarantee is in addition to and in no way prejudices your statutory rights. The guarantee is valid within the territories of the Member States of the European Union and the European Free Trade Area.
To claim on the guarantee, the claim must be in accordance with Black & Decker Terms and Conditions and you will need to submit proof of purchase to the seller or an authorised repair agent. Terms and conditions of the Black & Decker 2 year guarantee and the location of your nearest authorised repair agent can be obtained on the internet at www.2helpU.com, or by contacting your local Black & Decker office at the address indicated in this manual.
Please visit our website www.blackanddecker.co.uk to register your new Black & Decker product and receive updates on new products and special offers.
DEUTSCH
Batteries/piles (non fournies)
6mm, 8mm, 10mm, 12mm, 14mm
FRANÇAIS
Black & Decker Europe, 210 Bath Road, Slough,
Berkshire, SL1 3YD
Regno Unito
12/01/2018
Garanzia
6mm, 8mm, 10mm, 12mm, 14mm

12mm, 15mm
Director of Engineering
Black & Decker Europe, 210 Bath Road, Slough.
Berkshire, SL1 3YD
Verenigd Koninkrijk
12-10-2018
Garantie
Black & Decker Europa, 210 Bath Road, Slough,
Berkshire. SL1 3YD
Reino Unido
12/01/2018
Garantía
Director de Engenharia
Black & Decker Europe, 210 Bath Road, Slough,
Berkshire, SL1 3YD
Reino Unido
12/01/2018
Garantia
Ray Laverick Director of Engineering
Black & Decker Europe, 210 Bath Road, Slough, Berkshire, SL1 3YD Storbritannien
2018-01-12
SVENSKA
6mm, 8mm, 10mm, 12mm, 14mm

12mm, 15mm
| Kapasitet stiftlengde | |
| Mykt treverk opp II 15mm | |
| Hardt treverk opp II 10mm | |
Feilsøking
Director of Engineering
Black & Decker Europe, 210 Bath Road, Slough,
Berkshire, SL1 3YD
Storbritannia
12.01.2018
Garanti
Black & Decker Europe, 210 Bath Road, Slough,
Berkshire, SL1 3YD
Storbritannien
12/01/2018
Garanti
Black & Decker Europe, 210 Bath Road, Slough,
Berkshire, SL1 3YD
Iso-Britannia
12.01.2018
Takuu
Black & Decker Europe, 210 Bath Road, Slough,
Berkshire, SL1 3YD
United Kingdom
12/01/2018
Εγγύηση
- Intended use
- Safety Instructions
- General power tool safety warnings
- ENGLISH
- (Original instructions)
- Additional power tool safety warnings
- Residual risks
- Vibration
- Labels on tool
- Additional safety instructions for batteries and chargers (not supplied)
- Batteries (not supplied)
- Chargers (not supplied)
- Electrical safety
- Features
- Assembly
- Charging the battery (fig. A) (not supplied)
- State of charge indicator
- Fitting and removing the battery (fig. B) (not supplied)
- Proper hand hosition (Fig. C)
- Preparing the Tool
- Using the trigger lock-off (Fig. D, E)
- Loading the tool (Fig. F)
- Unloading the tool
- Trigger Operation
- Adjusting Depth (Fig. G)
- Clearing a jammed staple/brad nail
- Misfiring (during use)
- Hints for optimum use
- Battery Terminal Safety Cap (fig. H)
- Maintenance
- Protecting the environment
- EC declaration of conformity
- Guarantee
- DEUTSCH
- Batteries/piles (non fournies)
- FRANÇAIS
- Garanzia
- Garantie
- Garantía
- Garantia
- SVENSKA
- Garanti
- Takuu
- Εγγύηση
Brand : BLACK & DECKER
Model : BDCT12
Category : Stapler