VSS3 Native - Audio software TC ELECTRONIC - Free user manual and instructions
Find the device manual for free VSS3 Native TC ELECTRONIC in PDF.
| Product Type | Audio Software (Reverb Plugin) |
| Supported Plugin Formats | AAX (native), Audio Units, VST2.4, VST3 |
| Compatible Operating Systems | macOS 10.13 High Sierra or later, Windows 10 or later |
| Required License | PACE iLok License (free iLok account required) |
| Free Trial Period | 14 days, fully functional |
| Main Features | Hyper-realistic algorithmic reverb, editable early reflections, reverb and space modulation, frequency-dependent decay adjustment |
| Key Parameters | Master Decay, Pre-Delay, Hi/Lo Cut, Hi/Lo Decay, Early Type/Size/Color, Reverb Type/Width, Diffusion, Modulation Rate/Depth |
| Included Presets | Extensive factory presets, ability to create and save user presets |
| Favorite Presets | Up to 100 favorite slots, assignable via the Favorites menu |
| Updates | Automatic update checking available |
| Maintenance and Care | Regular software updates, no physical maintenance required |
| Security | Activation via iLok license; no detachable parts |
| Limited Warranty | Standard TC Electronic limited warranty, see official website |
Frequently Asked Questions - VSS3 Native TC ELECTRONIC
User questions about VSS3 Native TC ELECTRONIC
0 question about this device. Answer the ones you know or ask your own.
Ask a new question about this device
Download the instructions for your Audio software in PDF format for free! Find your manual VSS3 Native - TC ELECTRONIC and take your electronic device back in hand. On this page are published all the documents necessary for the use of your device. VSS3 Native by TC ELECTRONIC.
USER MANUAL VSS3 Native TC ELECTRONIC
Virtual Space Simulation Reverb Based on the Legendary and Award-Winning System 6000 as a Native DAW Plug-in for Mixing and Post-Production
2 VSSNATVUurMua
EN
Table of Contents
EN
- Introduction 12
- Financial Analysis 10
- Plug-in Installation: 12
- Activate the V6S3 NATIVE file or license: 13
- Connection and Setup. 14
- User Interface 15
- Constructing a Reverb Preset 22
- Presets 23
- Software Updates 25
- Specifications 25
ES
4
Terminals marked with this symbol carry
electrical current of sufficient magnitude to constitute risk of electrocable
to conlunt fioorec/ncck.
At any high quality professional speclal career with
morthostic should be performed early.
measurment of malnlaution should be performed only by qualified personnel.
This symbol,whenever it appears.
Alerts you to the presence of uninsulated
dangerous voltage inside the
risk of stock
This symbol will be visible again.
alert you to important operating and
mianuonnns in the
Literature. Please read the manual
Caution
To reduce the risk of electric shock, no net
No one can be part of. Before cooking to
quafic:personol
Caution
A To reduce the risk of fire or electronic shock,
do not expose this appliance to rain and moisture . The moisture shall not be exposed to drying
measures, the apparatus and mesh are exposed to shipping or polishing liquids and no objects filled with liquids.
such as vases, shall be placed on the apparatus.
A
These service instructions are for use
by qualified service personnel only.
To reduce the risk of elective shock, do not perform any
e 6
sino
1. Reducing activities
3.1.2.1.1
2. http://www.michigan.edu
3. Hoes al withrj
4. Follow all Instructions.
5. Do not use this apparatus near water.
6. Onany with the death
7.扣户销号及净值设置,如挂户
accordance with the manufacturer's instruction
8. Do not install near any heat sources such as
radion, heat registers, stones, or other apparatus
(Induding amplifiers) that produce heat.
-
Do not defeat the safety purpose of the powered or grounding-type plug. A powered plug has two blades with one wider than the other. A grounding-type plug has two blades and is third grounding plug. The wide blade or the third plug are provided for your safety. If the provided plug does not fit into your outlet, consult an equivalent for replacement of the absolute tighter.
-
Protect the position of non-wild boars from misbehavior and misbehavior at prices, convenience premiums,
and the point where they exit from the apparatus. - Use only attachments/accessories specified by
the manufacture.
- Use only with the cart, stand, tied, bracketed, or stabble specified by the manufacturer, or sold with the apparatus. When a cart is used, use caution when moving the cart/paracetamol combination to avoid
injury from hip over.
- Unplug this apparatus during lightning storms or
when unisod for long pons of time - Refer all servicing to qualified service personnel.
Serving is required when the apparatus has been damaged in any way, such as water, dust or smoking.
is damaged liquid has been spilled or drugs have fallen
into the apparatus, the apparatus has been exposed
to rain or moisture, does not operate normally, or has
been dropped. - The apparatus shall be connected to a MWS socket
outlet with a protective coating connection. - Where the MAKS plug or an appliance coupler is used?
used as the disconnected device, the disconnected device shall remain quality comparable.
- Correct disposal of this
product This symbol indicates
in this product must not be
B
your national law. This product
should be taken to a collection center licensed for the
Rey jing of wate hectical and electronic equipment
(eL). The misnomining of this type of waste could have a variable potential impact on the environment and
human health due to potentially hazardous substances
that are generally associated with LIL At the same time
your cooperation in the correct disposal of this product
will contribute to the efficient use of natural resources.
for more information about where you can take yourwork appointment for yourself , please contact us locally
city office, or your household waste collection service.
- Do not install in confined space, such as a book
can or similar unit.
- Do not place naked flame sources, such as lighted
Gndes, on the apparatus.
EN
LEGAL DISCLAIMER
Music Tribe accepts no liability for any loss which may
the summers by any person who relies either wholly or in part upon the new and new discoveries, photographs, or specimens.
Inclined brain Intensive Intensive Intensive
and other information are subject to chance without
notice. All trademarks are the property of their
respective owners. Midas, Klare Teknik, Lab Gruppen
Lake, Tinney, Turbassound, TC Electronic, TC Helicon
Bnrrnrnnrnnnne nnnnnnne
tiof m t t
Tribe Global Brands Ltd. 2021 All rights reserved.
LIMITED WARRANTY
For the applicable warranty terms and conditions
and additional Information regarding Music Tribes
Limited Warranty, please see complete e-mail: www.warranty.com/warranty


-
(see below)
-
Newthn Siree Hnrnnr
3.2015年1月16日
BESCHRANKTE GARANTIE
apparatus went bankrupt, then went bankrupt to join him. He became a part of an institution.
15.8. Answer on its use of approximate integers (see below). Show that the result holds for the last step of the proof.
- Correche (2013) Show that a product dx coefficient c in data is used to get the value of MEA (Huang 2017 [19]). On the other hand, we want to use an area under test to get the value of dx .
Congratulations on the purchase of your 2053 NATIVEL Stereo Source Revers. Originally launched in 1999 and available in Music, Mastering, Broadcast and Film Variants, TC Electronic's Flagship System 6000 processor is recognized as an industry standard for mix, mastering and post production applications. You will find the System 6000 in literally thousands of world-leading recording, film, post and mastering studies all over the world, and in quite a few QR vans and broadcast production studios as well. The platform has won no less than three of the prestigious BET Awards over the years. In 2000 for the original System 6000, in 2005 for Mastering 6000 and in 2010 for System 6000 MKI, no longer the preserve of the recording elite, these native DWV plugins will deliver all of the performance of the iconic original unit combined with modern day convenience. TC Electronic set about reimagining the legendary System 6000 as native DWV Plug-in, without sacrificing any performance, character or usability. The Danish engineers, including many from the original System 6000 team refined audio quality, whilst staying faithful to the original hardware version. The development team fastidiously re-engineered these new native plug-ins to offer full support for standards DWV automation and project recall with new optimized user interface ergonomics.
VSS3 NATIVE Main Features
Real-rcom realistic reyes
Individual 4-band decay controls
- Chaotic response
Tweakable early reflections
VSS3 NATVE is a hyper realistic and incredibly versatile algorithm that was designed to deliver the smoothest rework tail ever developed. The algorithm of VSS3 was fine-tuned by our engineers for more than a year before its initial release. Over the years, audio professionals around the world have adopted it as their go-to re-work for adding clear acoustics and realism to their source material. VSS3 can be heard on thousands of albums and films, and has elevated the sound of many more concerts and live productions. With a wealth of possibilities to adjust, VSS3 NATVE will deliver the precise sound you need.
V553 NATIVE features an exceptional dynamic range, bringing extra life to your mix. It does this through carefully-coated early reflection algorithms which stay true to the exact location you want for the source of your mix. No matter how much ambience you add, your recording will maintain its fidelity when collapsed to mono.
V553 NATIVE is perfectly suited for any mix projects and is also equally suitable for use for a wide variety of content material in music and post-production, ideal for single sources and buses.
The TC Electronic team with you all the best, and hope that you will enjoy using the V553 MATLAB in your audio projects.
About this manual
Read this manual to learn how to install and use your TC Electronic V53S NATIVE stereo source software plug-in. This manual is only available in PDF format from the TC Electronic website. To get the most from this manual, please read it from start to finish, or you may miss important information.
To download the most complete version of this manual, visit the web page: www.telerectronic.com/Category/07/GeotechnicalDownloads
if you still have questions about your TC electronic product after reading its manual, please get in touch with TC Support:
www.ttelectronico.com/benigns/telestronicsupport
2. Plug-in Installation
The VSS3 NATIVE plug-in Installer can be downloaded from the following page:
https://www.celelectronic.com/p/P0DSI
The V553 NATIVE plug in requires an active PACE Link license to work. Please see Chapter 3.
Save the installer file (.pkg or .msi file) in a convenient location on your hard drive.
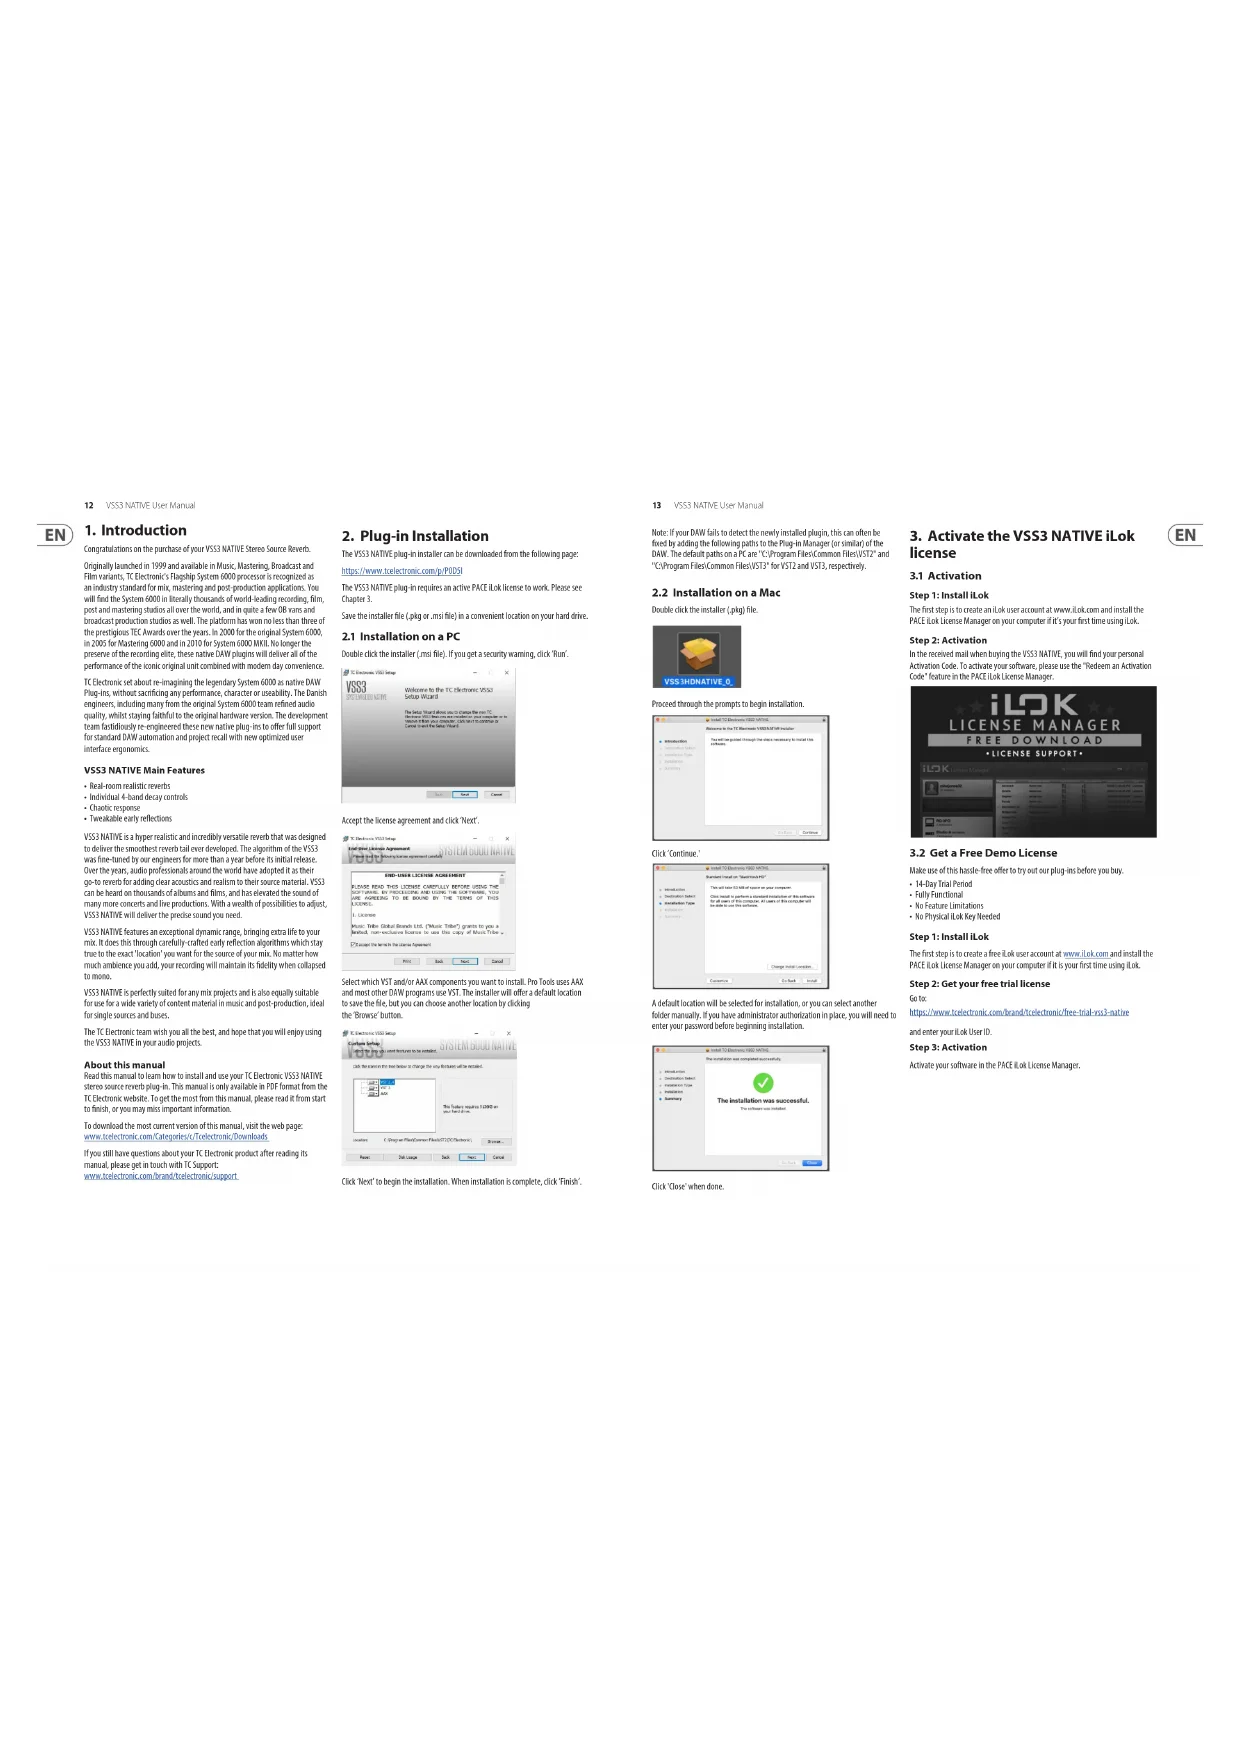
2.1 Installation on a PC
Double click the installer (msf file). If you get a security warning, click 'Run'.

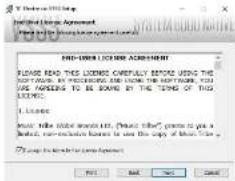
Accept the license agreement and click "Next".


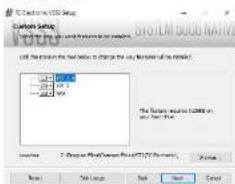
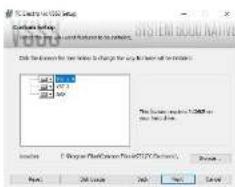
Select which VST and/or AAX components you want to install. Pro Tools uses AAX and most other DAV programs use VST. The installer will offer a default location to save the file, but you can choose another location by clicking the "Browse" button.
Click "Next" to begin the Installation. When installation is complete, click "Finish".
13 VSSNATVEUserVant
Note: If your DAW fails to detect the newly installed plugin, this can often be fixed by adding the following paths to the Plug-in Manager (or similar) of the DAW. The default path on a PC are "C:\Program Files\CommonFiles\VST2" and "C:\Program Files\CommonFiles\" for VST2 and VST3, respectively.
2.2 Installation on a Mac
Double click the installer (pkg) file.

Proceed through the prompts to begin installation.
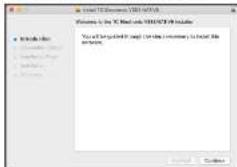
Click Continue
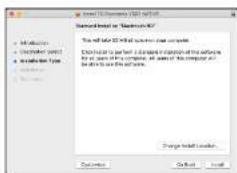
A default location will be selected for installation, or you can select another folder manually. If you have administrator authorization in place, you will need to enter your password before beginning installation.

Click Close when done.
3. Activate the VSS3 NATIVE iLok license
3.1 Activation
Step 1: Install iLok
The first step is to create an Lok user account at www.Lok.com and install the PACe Lok License Manager on your computer it's every time using Lok.
Step 2: Activation
In the received mail when buying the VSS3 KATIVE, you will find your personal Activation Code. To activate your software, please use the "Redeem an Activation Code" feature in the P4C12 kiosk License Manager.

3.2 Get a Free Demo License
Make use of this hasie-free offer to try out our sing-ins before you buy.
- 14-Day Trial Period
FulHfucal
No Resutute Limitations. 1. No Physical or Far Infrared
Step 1: Install iLok
The first step is to create a free Lick user account at www.lick.com and install the PACE Lick License Manager on your computer if it is your first time using Lick.
Step 2: Get your free trial license
Go to:
https://www.toelectronic.com/brand/toelectronic/free-trial-iss-native
and enter your Iok User ID.
Step 3: Activation
Activate your software in the PACE iLok License Manager.
14VSSNATFUEPManne

2553 NATVEUe Manne
4. Connection and Setup
4.1 Inserting the VSS3 NATIVE plug-in in your DAW project
Once you have downloaded the plug-in, you can now apply it to a channel in your DAM to begin using the effect. This process may vary slightly depending on your software, but generally should require these steps:
- Select a channel or bus in your 04w to which you would like to add the effect. Access the mixer page where you should see a section dedicated to offset斜杠.
- Open the menu where you can select a list of effect types, which probably includes many stock plug-ins that are included with the DAWN. There should be submenu to view general VSTA/JAX options.
- The plug-in will likely be found in a dedicated IC Electronic folder. Select the VSS1 MATE and it will now be added to the signal chain.
Double click on the effect slot that contains V553 NATIVE to view the plug-in UI.
4.2 Operating the VSS3 NATIVE
After you have installed the plug in, and activated the Rok license, you can begin working with the plug in on your tracks.
Adjustments to the effect are done using the plug-in user interface:
Most DAWs offer the ability to move or drag plug-ins from one track plus to another, and W53 NATVE supports this as well.
MOST DAVS also feature an on/off switch for plug-ins, accessible inside the plug in window and/or the track itself.
4.2.1 Insert vs Aux Effect
The V533 NATIVE can be used as an insert directly on a channel, sub mix bus or master bus, or as a send/receive function on an auxiliary bus.
When using the send/return method, make sure to remove the dry signal by turning the Dry Gain all the way off. Note that all of the factory pixels are made for the insert case, so we recommend using the lock button on the Dry Gain parameter to avoid adding the Dry signal when leading pulses.
4.2.2 Mono/Stereo Operation
On a mono track, the V551 NATVE can be used as mono-toMono, or mono-to-stereo instance, and on a stereo track it works as a stereo instance.
In case of a mono-one instance, the output signal is made by mixing the left and right outputs of the reverb. In that case, we recommend keeping the Early Balance and Reverb Balance parameters in the Center position:
4.2.3 Bypass
Press the BYPASS button at the top to bypass or engage the USSS3 NATIVE.
4.2.4 Automation
Please be aware that automation of certain parameters, can cause
a#ble a#tacts.
In case you need to automate these parameters, you should take care that changes only take place in parts where no audio is sent to the plug-in.
4.2.5 Parameter Overview
The V553 NATIVE is an award-winning free space simulation research. The Main features include:
Real-room realism with chaotic response
- Twekakable early reflections
- Review and Space modulation
- frequency specific decay adjustment
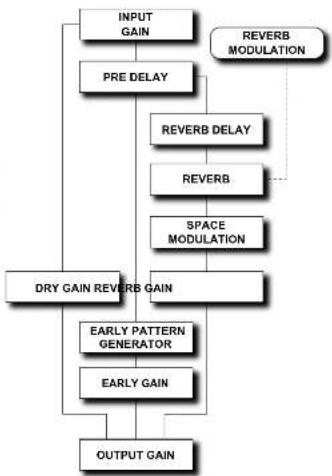
4.3 Signal flow through the algorithm:
15 V93 NATV (n#Mn)
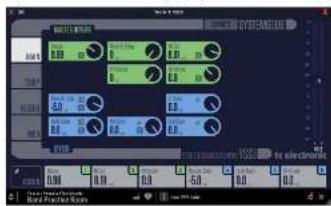
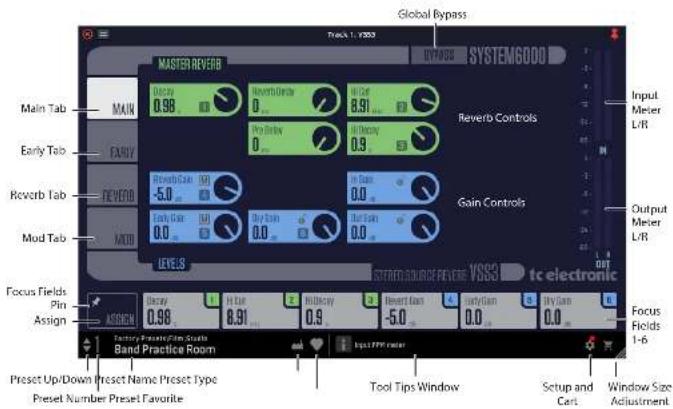
5. User Interface
5.1 Overview
There are four tabs along the left edge of the interface, that bring up various pages of controls. The controls and features are described in more detail in the following pages. As a general note, the parameters, controls, and graphics are color-coded as shown below:
The top part of the display:
- Bypass: Press this to bypass or engage the V531 NATIVE. This makes it easy for you to listen and compare the overall effect of your work
Tabsonthe Left
- Main Controls (green) for the master mesh, and gain controls (green)
- Early Controls (green) for the early reflections
- Reverbs: Controls [green] for reverbs, and controls [blue] for the decay and crossover
- Mode Controls (green) for reward modulation, and controls (blue) for space modulation
Controls
- Any of the circular controls can be adjusted either by dragging on the dial or numeric value in the box, or by double clicking and entering a numeric value.
Meters
-Input L/R meters (0 to -60 dB range)
- Output L/Rmeter (0 to 60 dB range)
- Use the input and output gain/trim controls in the Main page to adjust the levels if required.
Near the Bottom
- Assign Focus Hells: You can place your own favorite set of parameters in the 6 focus Hells. [See section 5.2.1 for more details]
Along the Bottom Left
- Present number, present name, present type, present favorite, present up/down
Along the bottom Middle:
Tool Tips shows useful information about the current selection
Bottom Right Corner
- Setup
Shopping cart
-User Interface size adjustment
16 553NATVIFHer Manal
EN
5.2 Main Page
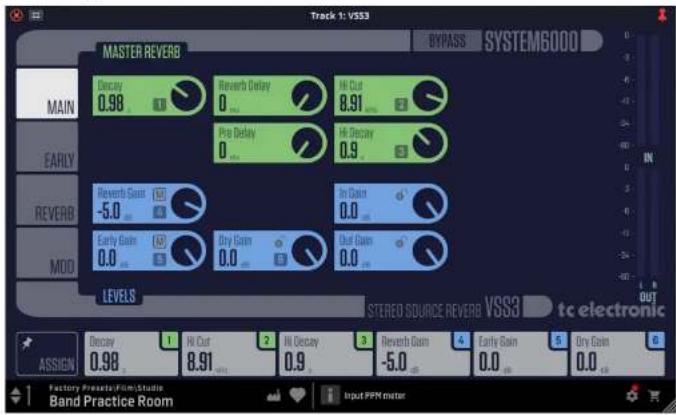
Master Reverb (green controls)
Decay
Range: 0.01 seconds to 20 seconds
<1secin0.01secsteps
1secin0.1secsteps
The decay time of the reverb. Usually associated with the time it takes the reverb tail to decay 50 dB. This is the overall master decay for the four hand decay parameters found in the seven page below, which are multiples of this base reverb time.
Reverb Delay
Range: 0 ms to 200 ms in 1 ms steps
A copy of the diffuse field part of the revew. This adds additional time between the early reflections and the onset of the 'diffuse field' of the revew.
Hi Cut
Range: 201k to 20k
Roids off the top end as it enters the revets. Used in conjunction with hi Solon and hi Decay to "darken" a room.
Pre Delay
Range: 0 ms to 100 ms in 1 ms steps
A copy placed at the input of the algorithm. This parameter defines how long after the dry sound the early reflections and the diffuse field will begin.
Hi Decay
Range: 0.01 to 2.5 in steps of 0.01
This is a multiplier for decay time of frequencies above the HI Cut crossover frequency. For example, if the main Decay parameter is set to 2.0 seconds, and this HI Decay parameter is set to 1.5s, frequencies above the HI Cut crossover will decay for 3 seconds: -2.0± 1.5 Conversely, if this parameter is set to 0.5s, then frequencies above the HI Cut crossover will decay for 1.0 second (= 2.0± 0.5)
Levels [blue controls]
Reverb Gain
Range:OFF-97dB10dB
-00dbin3dbstep
40dBin0.5dBsteps
The output level of the diffuse field part of the algorithm. When this is set to "off", the effect will consist entirely of early reflections.
Clicking on the "M" icon inside the control to mute the reverb for a quick comparison of its effect. Hold Shift while clicking the "M" icon to mute both Reverb and Early signals. This is useful for comparing the total effect of the reverb and early signals without changing the dry signal.

17V51NNTVELevVaeu
Early Gain
Range:OF-97db to 0 db
<-90dbin3db steps
40dBin0.5dB steps
The output level of the early reflections. When set to "Off," the reverse effect will consist entirely of the revew tail.
Clicking on the "M" icon inside the control to mute the early reflections for a quick comparison of its effect. Hold shift while clicking the "M" icon to mute both flevene and early signals. This is useful for comparing the total effect of the revert and early signals without changing the dry signal.

Dry Gain
Range:OFF,27dB10dB
<40dBin3dB step6
-10dB in 0.5 dB steps
Attenuates the dry signal level on the output of the plug in, thus leaving the reversion and early levels unaffected. "Off" equals a "kill dry" setting.
When a lock iron inside the control, and the dry gain value will not change when a new preset is chosen.

Input Gain
Range:0FF-97dBto0dB
<40dbin3db steps
40dB in 0.5 dB steps
Sets the input level for the algorithm.
Click on the Lock icon inside the control, and the input gain value will not change when a new preset is chosen.

Output Gain
Range:OF-97db to 0 db
<-90dbin3dbsteep
-40 dB in 0.5 dB steps
Sets the output level for the reward.
Click on the lock icon inside the control, and the output gain value will not change when a new pretest is chosen.

5.2.1 Focus Fields
Each of the six Focus Fields along the bottom can be assigned to any of the available controls. These useful assignments remain visible when you switch to different pages. For example, you can adjust the Master Decay while you are on the Early page.

Click on ASSIGN in the lower left, and you will notice that the control keys will become blank. This is a good reminder that you are in ASSIGN mode. Click and drag any of the controls and drop it down onto the desired focus field 1 to 8. You can also click the desired focus field and then click the control to assign to it. When finished assigning, select the ASSIGN button again.
Click on the Pin icon inside the ASSIGN button, and the Assigned Focus Fields will remain when prices are changed, although the numeric values within the Focus Fields will change to the new preset values.

In the example below, Focus Field 3 has become HI Decay by dropping the control down and releasing it over the Focus Field 3 button. It will stay like this, even when you move to another page. Note that Focus Field 3 is highlighted in colour while it is being assigned, as it is the HI Decay control.
When a control is assigned to a Focus Field, its number will appear in the control. In this example, there is a "3" in Hi Decy, as it is assigned to Focus Field 3.

EN
18 553NATVEFurManu
5.3 Early Page
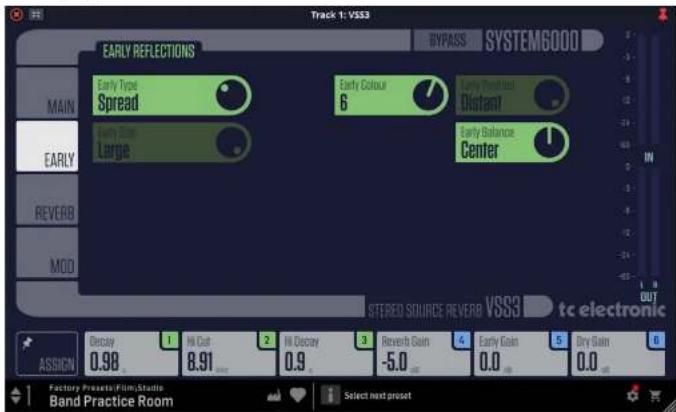
Early Reflections (green controls)
Early Type
Options: Concert Hall, Theater, Church, Venue, Studio, Self Hall, Kerer, Hard, Spread, Build, Random, Staxo, Car, Phase Booth, Bathroom, Room, Breakfast, Conference Room, Car Park,泳am Stadium, Airport, Street, Alley, Plaza, Forest The location type acts the rework diffuse field and the early picket locations to give an optimum starting point for further adjustments. Pick the type that best complements your material, or best represents the effect you are going for.
Early Size
Options:Small,Medium,Large
Adjust the size of the selected early type.
Some of the early types have only a fixed size. For these, the early size control will be backed out.
Early Colour
Range:-40to+40in1steps.0-defaull
Adjust the spectral balance in the high end frequencies. This is actually a simple way of adjusting a complex selection of frequencies.
Early Position
Options:Close, Distant
Select between a close or distant listening position. This enables you to change the distance between the listening position and the source in the same Early Reflection pattern. Some of the Early Types only have one position available. The Early Pos control will be faded out.
Early Balance
Range:-80to+80,0=Center
Adjust the left right balance of the early reflections. This control allows you to offset the early reflections from the normal center position by alternating the early reflections on the right or left channels.
19 VSSNATVEUserVant
5.4 Reverb Page

Reverb (green controls)
Reverb Type
Options: Smooth, Natural, Alive, Fast, AliveWide, FastWide
Adjust this parameter with the Early Level turned all the way off and the Rev Level all the way up. Change the type to get a feel of what each one sounds like.
Reverb Width
Options: Mono, Center, Stere or Wide
With this parameter you can change the width of the diffuse field. The Mono setting is where the left and right north tails are completely identical, the Center setting opens a bit up in the middle. Stereo is the normal stereo image width, and NISO covers the outside of the stereo lens.
Note: Key Types 'Fast/Wide' and Alive/Wide have only one width, and the control is failed out, and is not changable.
Lo Cut
Range: 20 Hz to 200 Hz in 1 Hz steps
This adjustable filter allows you to remove low frequencies from the reverber tail. The Io Cut frequency can be thought of as a threshold frequency. The cut will be performed according to the Io Damp parameter.
Lo Dampen
range: -18 dB to 0 dB in 0.5 dB steps.
Adjusts the level of the low frequency damper. Set the frequency using the Lo Cor control.
HiCut
Banr2016to2017
Rolls off the top end of the signal as it enters the rev. b used in conjunction with Hi Sifeno and Hi Decay to "skew" a zoom.
Range-50to+50,8=Default
High Soffer is a special filter used to "suffle" the high frequencies of the reverb diffuse field. This is not a simple Hi Cut filter, but a complex set of filters working together to remove the frequencies that gives a "brittle" or "harsh" standing reverb. Hi Soffer is scaled/linked to the Hi Cut and Hi Decay parameters.
Reverb Balance
Range: 80 dBL to 180 dBR, 0=Center
The left/right balance of the Revers. This allows you to offset the difference field from the normal center position by attenuating the reverse tail line on the right or left channel.
Diffuse
Range-50 to +50, 0 = Default
This parameter gives you more or less diffusion than the algorithm designer intended for the given decay time. For optimum performance, the diffusion is automatically adjusted behind the scenes whenever you change decay times. This parameter gives you the added control to vary the diffusion around this automatic setting.
20 853NATVUEHMane
EN
Reverb Page continued
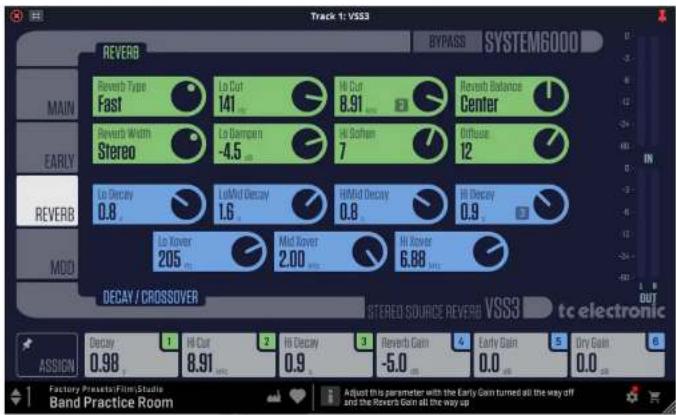
Decay/Crossover (blue controls)
Lo Decay
Range:0.01 to 2.50 in 0.01 steps
Decay multiplier, relative to the Master Decay, for the frequencies below the LoXavier.
Example: When a decay multiplier is set to 1.25 and the Master Decay 6.2.0 seconds, the resulting decay time will be 1.25 × 2 = 2.5 seconds.
Lo Mid Decay
Range: 0.01 to 2.50 in 0.01 steps
Decay multiplier relative to the Master Decay, for the frequencies above the L O Xover and below the Mild Xover settings.
Hi Mid Decay
Range:0.01 to 2.50 in 0.01 steps
Decay multiplier relative to the Master Decay, for the frequencies above the Mid Xover and below the Hill Xover settings.
Note: This parameter is normally set to 1.0, as it's the main parameter adjusted by the main decay parameter. This mid-range decay control would normally be omitted, however, TC Engineers felt you could use this parameter as a fine adjustment tool to "twice" per cent in sound just right without having to adjust the master decay parameter
Hi Decay
Range:0.01 to 2.50 in 0.01 steps
Decay multiplier relative to the Master Decay, for the frequencies above the Hörner settings.
LoXover
Race:20h1m
Sets the frequency at which the transition from the low to the low-mid frequencies takes place.
Mid Xover
Range:20Hz to 2kHz
Sets the frequency at which the transition from the low-mild to mild frequencies takes place.
Hi Xover
Range: 500 Hz to 20 kHz
Sets the frequency at which the transition from the mid frequencies to the high frequencies takes place.
21 V63NATVUserForm
5.5 Mod Page
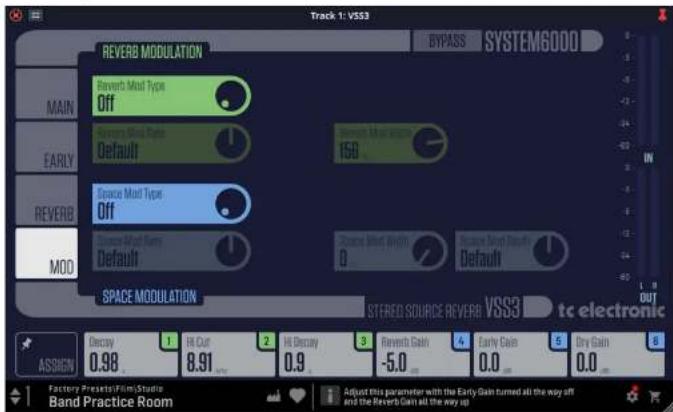
Reverb Modulation (green controls)
The Y553 NATIVE offers intense modulation facilities and to control these. The Modulation page gives you an extensive series of parameters. All these parameters are condensed into 2 easy to use modulation sections, where you can control different aspects of the modulation.
The modulation part of the V5S3 NATIVE has an in-built set of randomization methods. Every numm in this world sounds different from one second to the next, and with the "random" feature this is perfectly simulated.
The revetb modulatior type is a set of very complex LFO patterns that modulates various parts of the revetb, and these patterns are developed based on the many years of experience and knowledge of the IC crow.
Reverb Modulation Type
Options: Off, Smooth 1, Smooth 2, Percussion, Wow, Vintage, Will
Selects the type of reverb modulation
When the modulation type is OFF, then the rate and width controls are fixed out and are not adjustable.
Reverb Modulation Rate
Range: -100 to +100 in steps of 1, 0 = default;
Adjusts the speed of the LFO from the factory default assigned to each selected modulation type.
Reverb Modulation Width
Range:05 to 20% in steps of 1%
Sets the width of the selected modulation type.
Space Modulation (blue controls)
The space modulation part imitates the air movement of a room, and this is one of the things that make the VSS3 NATIVE very good at simulating the complex patterns of natural rooms. You can choose a modulation type, and then adjust its rate, width and depth.
Space Modulation Type
Options: Off, Normal, Fast, Slow, MidFreq, Syns
Selects the type of space modulation
When the space modulation type is OFF, then the rate, width, and depth controls are turned off and are not adjustable.
Space Modulation Rate
Range:100 to 110 in steps of 1,0-default
Adjusts the speed of the IFO from the factory default assigned to each selected modulation type.
Space Modulation Width
Range: 0% to 100% in steps of 75
Sets the width of the selected space modulation type.
Space Modulation Depth
Range-50to+50in steps of 7,0=default
Sets the depth of the selected space modulation type.
EN
6. Constructing a Reverb Preset
The relationship of early reflections and the revew tail is very important in this algorithm. Adjusting the balance between the Early Gain and the Revew Gain parameters is one of the easier ways to make a HIUE difference in the sound of your rever!
When you start building your preset you should try this:
- First turn the Reverb Gain all the way down and also turn the Dry Gain a little down (or all the dry downs if you are in a send/return configuration). In a send/return configuration, push up the return level. You should now hear early reflections, a little of the dry signal and no Reverb tail.
- Then begin changing the Early Type and Early Size parameters until you select a room shape that compliments the program material.
- Re-adjust the wet/dry balance until it is pleasing, then bring up the Reverb Gain until the tail of the reverb becomes available. Add just enough tail to make it work together.
Adjust the Decay time accordingly. - On some presets, you may choose to have very little early reflections, or none at all. Certain "ambience" style presets might have little or no "tall." This is up to you.
The V53 RATIVE was designed to have the smoothest recent tail ever developed, but it is the early reflections that define the "personality" of the room, so try and experiment with this relationship! By using these parameters correctly, you can create a BIG sound without having a mix swimming in recent wash.
Note: When using small room sizes and short decay times on persuasive signals, the Reversal Gain and Early Gain must have a level difference of approximately 4 dB in order to prevent a slap effect.
Getting the most out of the Early Reflection Patterns
Early reflections define the actual feel of the mom, where the record tail is the less defined "bow" of reflections that follows. The major part of the early reflection patterns of the VSS3 NATIE are simulations of existing moms and are based on a large number of reflections (40-100), which have been processed through an advanced algorithm.
There are a number of different types and sizes covering a lot of different acoustic spaces that you need for music and post production. As the patterns are simulations of real rooms, the delay times of the first reflections are sonic and spatially "connected" to the direct signal, using Pre Delay together with early reflections should therefore be considered very carefully, as the acoustic space created by the pattern tends to "collapse" of too much Pre Delay is added. If you want the well-known "slap back" reverse effect, you should use Reverse Delay on the收录 tail instead, and reduce the level of the early reflections.
Finding the right Early Type and Early Size
- Select Early Type and Early Size on the Early page
Tum the Revep Gain to -100 dB
Tum the Early Gain to 0 dB - Select an appropriate size. [Note that some sizes of the different types
may overlap, e.g. Church Small is bigger than Concert Hall medium etc.) - Switch between the different types until it matches the signal and the illusion that you wish to create.
Generally, it is advisable to use small room sizes for drums and percussion; medium sizes for piano, guitar & horns, and large sizes for vocals & strings. Large Church and Venue simulate very big rooms and can therefore be used to create an "echo line" effect if turned up loud. Many of the patterns can be used as a "Doubbling" effect if the rewind tail is not added.
Using the Early Colour parameter on the Early Reflections page
Once you have selected the desired type and size you can use the Early Colour controls to filter the early reflections. The Early Colour parameter is an advanced Hi Cut function. Please note that in most real rooms the reflections are generally much softer than the direct signal.
Often it is advisable to use the Early Colour parameter in the range between -4 to -9, to make the early reflections blend property with the direct signal rather than completing it.
We hope that you will enjoy working with the VSS3 NATIVE!
23 VSSNATVEUserVansal
7. Presets
The VSS3 NAIVS offers a collection of factory presets, as well as the option to create and save your own custom settings as user presets and favourites.
Note that most DAWs have a built-in preset function that appears on every plug in, which is often found at the top of the plug in window.
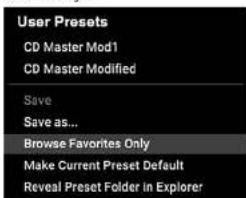
It is not recommended to use this as your primary method of saving presets, as it has limited functionality and does not allow the saved presets to be transferred easily to other DAVs. Instead, we suggest using the Preset section at the bottom corner of the user interface window:

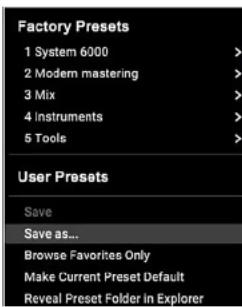
A single click on this PRESET twice covers brings up a menu with several preset-related options. You can recall a factory or user preset from the libraries, save the current preset, or create a new user preset with the Save as' option.
Note: The following illustrations are from a different plug-in, but the main features are the same.
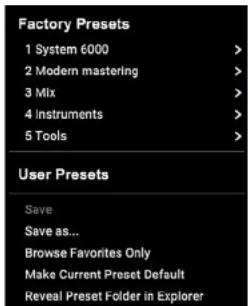
The preset menu is divided into Factory Presets and User Presets.
7.1 Factory Presets
Factory preset are built into the plug-in and cannot be overwritten, so if a factory preset is modified and you want to keep the changes, you need to save it as a User preset. User preset can be edited and organized as you like.
When recalling a Factory preset or saved User preset, the name will appear in plain text as shown below.
It will have a number to the left of the title, if it has been assigned as a favourite (see later), otherwise it will show "..." next to it. Do not be alarmed.

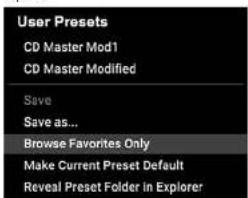
72User Presets
if you make an alteration to any of the parameters in the current preset, the preset name changes to italks as a reminder that something has changed from the original factory preset.

To save this new setting as a user preset, click in the PRESET window, then select Save As option. Save it with an appropriate name.
To discard the changes without saving, simply navigate away from that preset.
The altered preset will be saved as a user preset, with your new name for it, and its name will appear in the preset window.

If you modify a saved user preset, you have the option to "Save" (overwriting over the existing user preset) or "Save As" (save as a new user preset).
if you modify a factory preset, then only "Save As" is available (to save as a new user preset). Factory presets cannot be overwrites.
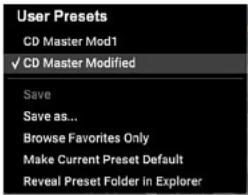
User presses are not given a number unless you assign them as favourites. (See Favourite Presets below.)
24 555NATFVEHnnae

73 Favorite Presets
Creating your icon preset will make them accessible from the Preset menu, but they will only appear in the list of 100 favorite preset in the plug-in if you set them as a favorite. This is done by assigning a favorite slot number to the preset using the Favorite menu.
Click the FAVOURI (heart-shaped) button at the right edge of the preset window, then select one of the 10 banks. Assign one of your custom prizes to a favorite slot, then save the preset.
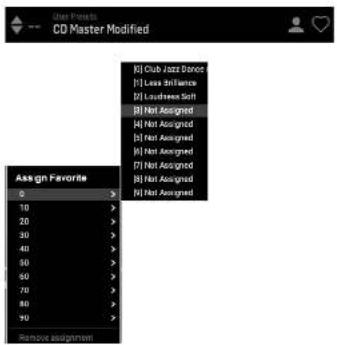
When a preset is assigned a favorite slot number:

The prese is part of the 100 presels that can be recalled
The favorite number will be located so that two presets cannot be assigned to the same favorite slot number. This is shown in the Favorite menu by passing out the number in question
The countercase number will be displayed in brackets when you choose the presses menu.
You can remove the favorite assignment by selecting the "Remove Assignment" feature in the Favorite menu, then saving the preset.
73.1 Browse Favorites Only
The Browse Facilities Only option in the menu slot allows the UP/DOWN arrows in the bottom bar of the plug-in. Otherwise, scrolling goes through
74 Make Current Preset Default
Selecting 'Nuke: current preset default' will cause this preset to appear every time a new instance of the plug-in is created.
7.5 Reveal User Preset Folder in Explorer
To change the name of a project, select "Visual User Project" Folder in Explorer and mandibly file the name. This will open a Finder (Max) or Explorer (PC) window where the user presents stored files. You can rename as well as delete, copy and paste projects. This allows you to share projects with other users online, simply pasting the new ones in this folder.
25 VSC3NATVEUserForml
8. Software Updates
New versions of the software may be released to add new features and improve performance. Updates can be detected from the plug-in directly and can be found in the Update section of the Web site.
If the 'Automatically check for updates' option is checked inside the update menu, the red dot will appear on the settings icon when a new plug-in is available.

Click the gear icon and select "Check for Updates" to perform a scan.
9. Specifications
Sound
Processing Rerber, early pattern generator
Sample rates 44.1,48,88.2,96,176.4,192 hz
Software Support
Operating systems Mac OS 10.11 High Sierra or above
Windows7orabove
Plugin formats A4X-native, Audio Units, VST2.4
45T3.64 bit

2553 NATVEUe Manne
1. Introduccion
www.treelronic.com/brand/treelronic/support
If you still have questions about your TC Electronic product after reading its manual, please get it touch with TC Support: www.tcElectronic.com/brand/telectronic/support
https://www.ielectronic.com/p/P0D5I
https://www.toelectronic.com/brand/toelectronic/free-trial-ss3-native
Range: 0 ms to 200 ms in 1 ms steps
The output level of the diffuse field part of the algorithm. When this is set to "off", the effect will consist entirely of early reflections.
Range: -80 a + 80, 0 = Centr.
www.celebronic.com/brand/celebronic/support
2. Installation du plug-in
https://www.celelectronic.com/p/P0DSI
https://www.toelectronic.com/brand/toelectronic/free-trial-vss3-native
ctrety
Étape 3: Activation
Master Reverb (commandes vertes)
Pourriture
Page:0,01 second a 20 seconds
<1sparpasde0.01s
1par pas de0.1s
Place: DFF, -97 DB 30 DB
-90Dparpds3D8
40dbparpsd0.5dB
Place: CFF, 97 dB #0 dB
<40dbparpaes3db
Place: CFF.97 dB 0 dB
<40dbparpaed3d
40dbparpsd 0.5dB
Suppose the extrinsic superelective diaphragm (or so) is within the cradification. Utilise it on conjunction over 40 Saffen and H Deedy para to assemble a piece.
Salutadoucir
Page: -50 a + 50, f=Par def aut
Page:80dBLa-80cB.0-Centre
www.techronic.com/brand/electronic/support/ www.electronic.com/brand/electronic/support
2. Plug-in-Installation
https://www.tceelectronic.com/p/P0DSI
Bereidir:40 his +40 in 1 Schitten, C = Standard
Option: Xeno Center, Stereopoder Node
Beneck 20 Hz his 200 Hz in 1-Hz Schmert
Bc:50b1 50.9=Standard
Brisbane: When we obtain Decay Multiplicative at 1.25 we get the result that we can find a 2.5 times larger decay at 2.5 seconds than before.
Lo Mid Decay
Decay-Wulpposition relation ≈ Mean Master Decay, for the frequency zones overhald the Loxer and unchiral of the Mid Loxer Firstorderings.
Halo Mid Decay
Berech 20 Hz his 1 kHz
Option: Off, Smooth 1, Smooth 2, Penetration, Now, Vintage, Wild
Beneicht 0% his 200% in Schitten on 156
Reveal Preset Folder in Explorer
The Option "Browse Favorites Only" In Preset-Word must accomplish the AUP?
AUP-Filter in the other direction: The Plug-In, Anonymals get this Screen through
www.treecronic.com/brand/treecronic/support
https://www.telectronic.com/p/P0DSI
https://www.toleotechnic.com/brand-tooleotechnic-free-trial-v23-native e-digitai 10 de 2018 no.16
Etapa 3: Ativação
Active seu software no PACEIok License Manager.
Double click on the effect slot that contains V5S3 NATVE to view the plug in UI.
4.2 Operando o VSS3 NATIVO
Deposits in instalde o plug-in a atterat libresignale, xoepe pode connerar a trabalhar com plug-in en ses trillas.
Opposite: Strange, Natural, Alive, Fast, Alive / Wide, Fast / Wide
Opces: Mono, Center, Stereou Wide
7.5 Reveal User Preset Folder in Explorer
To change the name of a project, select "Recall User Preset Folder in Explorer" and modify the file name. This will open a Finder (Max) or Explorer (PC) window where the user presets are stored. You can rename as well as delete, copy and paste presets. This allows you to share presets with other users online, simply pasting the new ones in this folder.
81 V593NATVEUserVarmul
8. Atualizacoes de software
www. tselechronic.com/brandtselechronic/support
https://www.celelectronic.com/p/P0DSI
Using in 9535 NATive tichide la nica PACE ilok attna per funnane. Si prepa dcide be Caplo 3.
https://www.toelectronic.com/brand/toelectronic/free-trial-css3-native
einserisitupIDutenteILOk
Add It two software in PACE Link License Manager.
Range: 0 ms to 100 ms in 1 ms steps
Intervallo:da0msa100msinpassdi1ms

Reverb Page continued

Decadimento/Crossover (controlli blu)
Lo decadimento
Intervallo:do0,01a2,50in pssidi 0,01
Option: Off, Smooth 1, Smooth 2, Percussion, Wow, Vintage, Wild
7.5 Reveal User Preset Folder in Explorer
www.telechronic.com/brand/telechronic/support
2. Plug-in-installatie
Hert V/S35 RATIPE plug-in installsteprogramma kan worden gedownloadkan ovelegende pagina:
https://www.icelecronic.com/p/P0DS1
De VSS3 NATIVE plug-in是一款 active PlotLix-10 license的eTM over 3.0.
Zhoohostbook 3.
Stap 1:InstallerILok
De doctapl spon en cem gratis Lok gcbrakersacount an to make np www.
LOc om en de PACE LOK license Manager op our computere instaillnien als dit
de eeste ker is dat oik luk gelaktud.
https://www.toelectronic.com/brand/tolepticfree-free-wps-361-native-on your web.Lok. get us to
Step 3:Activering
Activierer uysoftwareine dePACELokLicenseManagr.

3533NATFTEURManie
<60dB in stancen yin 3dB
240dBin stascon yen 0.5dB
≤-40dB in stapcen yan 3 dB
40dbin slapcon van 0.5dB
Bere: UT, 97 cd to: 0 dB
<40dbin stapgen an 3db
-90dbinstaepen yan 0.5dB
Stelt het inveernieau woor hct aortimein.
Benei: UT, -97 d8 to: 0 d5
<40dbinstappenxan3ds
Opties: Nong, Widden, Steep of Breed
Range-50 to +50.0 Default
Deutz parameter gesamt je mehr von mindest diffusie gegen an entworbener van het algorithmie besteadig voor de gevegen verwärtelijk. Voor optimalite primitives worden die diffusie automatisch anderer schieren aangepasst waarden in de decoupling gewicht. Deutz parameter gesamt u de extra contraste om de diffusie rond deutz automatische inschlagten zu halten.
NL
104 VSSNATFIPerManual
Bencic 6% to 2009 in stappen var 1%
We hope that we will please further benefit from your work on the VSS3 NATIVE.
107VSSNATVEUerVuaal
7. Voorinstallingen
Sampletareven 44,7,48,68,2,96,176,4,192 kHz
Software-odersteuning
Besturingsystemen Mac OS 10.13 High Sierra of hoge
Windows / of hoger
Plugin-indelingen AAX-native, audio-enceheden, VST2.4.
v5T3.6abeetje
1105SS3KATFVEJHerMnual
1. Introduktion
2. Plugin-installation
Installationprogrammet VSS3 NATIVE kan laddas ner frdan follancsida.
https://www.celelectronic.com/p/P0DSI
9553 NATIVE pluginprogrammedrkrteonaktiPACLEk licers for ant hunger. Se Kapit 3
Spora installationsfien ('pig aller.msi-filen') pa en bevaim pats pa din hardisk.
2.1 Installation pa en PC
Dobbickka p2 pl initialisatzprogrammer [mit-fien]. Em du fer en sikhevetskina. Koda p2 "Kia".

Aeepneria IcnensrataetochilictaPaNsta
(58) 6kja koka VST-och jahr AAK-komponente du vill installer. Pro Taks anvender AAK och de feste und aal DAW-program anvender Installatien. Installenprogramm eburader on standardplats for st ar spara filmen, den ku dan va'en aan annan plats geson mit likka pa kappen "Bildha".
Klicka p'kasta for at starta installationen. kar installationen je klar klickar du p'Shuffle'.
111 VSCNNTVEUsenManns
Otd om DAWI nak kupptika det mit nyinste iadace plugin,programmer
knd tdata otia gfranen comn at tga 0187 pRide xipar Hlpl In Manager
(aller klaandae) for DAWN. Stancantuugama pen a dater in C:1 Program Files
Common Files ^2 :ch c:1 Program Files ^3 for VST2
respective VST3).
2.2 Installation paen Mac
Dubbeldlicka pa installationsfilen (pkgj).

Forbitt genem syberingarna for all bijna installationes

KlckpaFntt
En standardis postels valils for installation,或者其他 du riljus en anan manacmp manuclit. Ocm du har administratienochigines pia plast mestre du ange dikt lscmonn anan installationen pibjorius.

Klicka pa'Stang' nar du ar khar.
3. Aktivera VSS3 NATIVE iLok-licensen
3.1 Aktivering
Step 1: Installera ilok
Der forsta stegar att skapa et tLok anandarionote pa www.tLok.com och installera PACE LOK License Manager pa dn dator cm dst aforsta gangen du andender LOK.
Steg 2: Aktlvering
I den montagna posten nár du kópez VSS3 NATVE hittar din personala aktivizierungstod. Für aktiklin din programmawirand funktionen Uss in anaktivierungstod 1PME UK License Manager.

3.2 Fä en Gratis demo-licens
Amend the hair problems by ebruidant for att testa via plug-ins in an unskilled.
14-dagrs propefied
Fultfungenerde
- Inge Funktionsbegänningar
Imgeyfiklikmyketbehia
Step 1: Installera Ilok
Den Christa stegre i ar alt skape eitt gratis Lok anandarkonto pwi www.Lokcom. cn installere PACE Ioc License Manager p di darotom der ar firste gingen din andanlder Ioc
Steg 2: Fá din gratis provlicens
G111:
https://www.toelectronic.com/brand/toelectronic/free-trial-ess3-native
ch ange dtIck amndar D.
Steg 3: Aktivering
Aktivora din programvara IPACE Lok License Manager.
V553 NATIVE non-ramified comm unis directi di p e manil, subluxions after垄断es after on sindinings - n trefelifted apn jihpuls.
Kad uandarana skida/returnema sete,seil attt bortornigen gen
art wria Dry Bina heta bilTOT. Oserwera at aia firdshtingnag
raignda for inrscfodat, sll recommender att du andananderktnapken
pa parametern dry gain for att unovka at tiga tll tornignai n ar da facor
fiintstalinggar.
4.2.2 Mono / stereo drift
PII: met spongianov 5V53 NATIVE antivirals on mono-till-meri oler mono-till-sterestransilin, uchai piet sterspiri fungenerat desum on sterensilin.
Vid mono-mono-institut designs usiagén provenat abblixin sténchr och higocinggama par revo. I sa fali rekomendarri au et cullier parametrama for big bolas ane echafectalismttigel.
4.2.3 Bypass
IrydkpB BYPASS-knppen higtuppp for attirnngq ater koppina VSS3 KATTE.
4.2.4 Automation
Tänk pää att automatisierung ovi sata parameter kan ösaka hörba artekfter. Öm du behöver automatiera dess a parameter ber do se till and ingärn bar särke ieder deir ingel od Sticksek bil plugin-programm.
4.2.5 Parameteroversikt
9553 NATIVE in an ependictiak: aktiva rynsdinselengisik. De vistigate Funktionen inkludan;
In Bondingplanning special ab initio investigations. Given parameter definition here, using idet det of the torra lying on the didefla bifurcation, one can find a direct bifurcation
Hejforfall
Orae:0,01 8125 stgom 001
Detta is an multiplicator for Felkster und Felkstererwerb Hl CuI deitengleitfremden. On example: hundertefolgsparamen in irstild 1,2,0 sekund er och denna higbrafogemessen am irstild pa 1,5 gängerkommen felkstererwerb Hl CuI overgangen at itfallada 13 sekunden = 2,0× 1,5 .Omwint, um denir Parameter eimindelpa 0,5a.Felkaler Felkstererwerb oerzufare Hl CuI detingements 1,1,0,sekund = 2,0× 0,5
Ommade:0.01 mll2,5016,01 steg
Failmultiportalization: Filiandlane til Master Decay, for frekewerma over Mid Xover und uber fliXover insltingamia.
Ob den har parameteren normal inattlid pla 1,0 eferencem den har hauwparameterum jesterad uhuwfohlartparameterum. Nenna medestora forfallkontroll skule normalit ulustianen, men TCEngineers angud attu kunde aminda har parameterum som et friftsteinsprechtigkryf for att "juster" en firstinstalling for att itla priductan att behaute parametera for hauwfohlart
Hejforfall
Range:0.01 to 2.50 in 0.01 steps
Decay multiplier relative to the Master Decay, for the frequencies above the HiXer settings.
LoXover
Orrace: 20 Hz till 1 kHz
Alternative. Au, Smooth 1, Smooth 2, Persusion, Wow, Vintage, Web
Valyer typ reav rever-modelling.
https://www.celelectronic.com/p/P0BSI
https://www.toelectronic.com/brand/toelectronic/free-trial-iss3-nznative
IpwrodzswjldentyfnatoruykownikeLok
Krok 3: Aktywacja
Opjc: Off, Nomal, Fast, Slow, Minfreq, Syn
7aes:50do+50vckachon1.2=nonstle