Live Gamer HD Lite GL510E - Video Capture Card AVERMEDIA - Free user manual and instructions
Find the device manual for free Live Gamer HD Lite GL510E AVERMEDIA in PDF.

| Product Type | Internal Video Capture Card |
| Brand | AVerMedia |
| Model | Live Gamer HD Lite GL510E |
| Interface | PCI Express x1 |
| Video Input | HDMI |
| Video Output | HDMI (pass-through) |
| Max Capture Resolution | 1920 x 1080 at 60 fps |
| Max Pass-Through Resolution | 1920 x 1080 at 60 fps |
| Audio Formats | Embedded HDMI audio |
| Included Software | RECentral (capture and streaming) |
| Supported Operating Systems | Windows 7, Windows 8 |
| Power | Via PCIe slot |
| Dimensions (approx.) | 140 mm x 80 mm x 20 mm |
| Weight (approx.) | 80 g |
| Package Contents | Capture card, quick start guide, HDMI cable |
| Main Functions | Real-time capture and streaming, lag-free pass-through |
| Maintenance and Cleaning | Dust with a soft, dry cloth. Do not use liquid. |
| Safety | Turn off the computer before installation. Handle with care. |
| Spare Parts and Repairability | Not user-serviceable. Contact AVerMedia support. |
| General Information | Compliant with Canada's NMB-003 standard. |
Frequently Asked Questions - Live Gamer HD Lite GL510E AVERMEDIA
User questions about Live Gamer HD Lite GL510E AVERMEDIA
0 question about this device. Answer the ones you know or ask your own.
Ask a new question about this device
Download the instructions for your Video Capture Card in PDF format for free! Find your manual Live Gamer HD Lite GL510E - AVERMEDIA and take your electronic device back in hand. On this page are published all the documents necessary for the use of your device. Live Gamer HD Lite GL510E by AVERMEDIA.
USER MANUAL Live Gamer HD Lite GL510E AVERMEDIA
European Community Compliance Statement

text_image
Class B This product is herewith confirmed to comply with the requirements set out in the Council Directives on the Approximation of the laws of the Member States relating to Electromagnetic Compatibility Directive 2004/108/EC.Responsible manufacturer:
AVerMedia Technologies, Inc.
No. 135, Jian 1st Rd., Zhonghe Dist., New Taipei City 23585, Taiwan
TEL: +886-2-2226-3630
European Community contact:
AVerMedia Technologies Europe B.V.
Kwartsweg 50, 2665 NN, Bleiswijk, The Netherlands
Technical Support: http://www.avermedia.com/avertv/Support/
FCC NOTICE (Class B)

This device complies with Part 15 of the FCC Rules. Operation is subject to the following two conditions: (1) this device may not cause harmful interference, and (2) this device must accept any interference received, including interference that may cause undesired operation.
Federal Communications Commission Statement
NOTE- This equipment has been tested and found to comply with the limits for a Class B digital device, pursuant to Part 15 of the FCC Rules. These limits are designed to provide reasonable protection against harmful interference in a residential installation. This equipment generates, uses and can radiate radio frequency energy and, if not installed and used in accordance with the instructions, may cause harmful interference to radio communications. However, there is no guarantee that interference will not occur in a particular installation. If this equipment does cause harmful interference to radio or television reception, which can be determined by tuning the equipment off and on, the user is encouraged to try to correct the interference by one or more of the following measures:
• Reorient or relocate the receiving antenna.
- Increase the separation between the equipment and receiver.
- Connect the equipment into an outlet on a circuit different from that to which the receiver is connected.
- Consult the dealer or an experienced radio/television technician for help.
CAUTION ON MODIFICATIONS
To comply with the limits for the Class B digital device, pursuant to Part 15 of the FCC Rules, this device must be installed in computer equipment certified to comply with the Class B limits. All cables used to connect the computer and peripherals must be shielded and grounded. Operation with non-certified computers or non-shielded cables may result in interference to radio or television reception.
Changes and modifications not expressly approved by the manufacturer could void the user's authority to operate this equipment.
Responsible manufacturer:
AVerMedia Technologies, Inc.
No. 135, Jian 1st Rd., Zhonghe Dist., New Taipei City 23585, Taiwan
TEL: +886-2-2226-3630
U.S.A Office Contact:
AVerMedia Technologies U.S.A.
47358 Fremont Blvd., Fremont, CA 94538
Technical Support: http://www.avermedia.com/avertv/Support/
ICES-003
"This B digital apparatus complies with Canadian ICES-003."
BSMI Registration of Product Certification (Taiwan)

D33183

The mark of Crossed-out wheeled bin indicates that this product must not be disposed of with your other household waste. Instead, you need to dispose of the waste equipment by handing it over to a designated collection point for the recycling of waste electrical and electronic equipment. For more information about where to drop off your waste equipment for recycling, please contact your household waste disposal service or the shop where you purchased the product.
WARNING
To prevent fire or shock hazard do not expose the unit to rain or moisture. Dangerously high voltages are present inside the unit. Do not open the unit. Refer servicing to qualified personnel only.
DISCLAIMER
All the screen shots in this documentation are only example images. The images may vary depending on the product and software version. Information presented in this documentation has been carefully checked for reliability; however, no responsibility is assumed for inaccuracies. The information contained in this documentation is subject to change without notice.
COPYRIGHT
©2013 by AVerMedia Technologies, Inc. All rights reserved. No part of this document may be reproduced or transmitted in any form, or by any means (Electronic, mechanical, photocopy, recording, or otherwise) without prior written permission of AVerMedia Technologies, Inc.
Information in this document is subject to change without notice. AVerMedia Technologies, Inc. reserves the right to modify, change, improve or enhance its products and to make changes in the content without obligation to notify any person or organization of such changes. Please visit www.avermedia.com to get the updates of the operation and use of AVerMedia products. "AVerMedia" is a trademark and logo of AVerMedia Technologies, Inc. Other trademarks used herein for description purpose only belong to each of their companies. Made in Taiwan (Expect Accessories).
natural_image
Simple line drawing of a computer monitor with ports and buttons (no text or symbols)
text_image
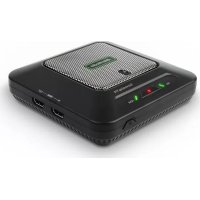
Quick GuideA. Live Gamer HD Lite B. Quick Installation Guide
natural_image
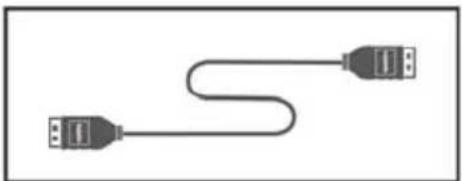
Pure diagram of two USB connectors without any text or symbolsC. HDMI Cable
2 Hardware Installation
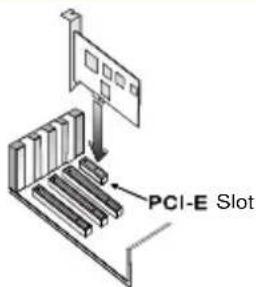
2.1 Installing Capture Card
- Turn off the PC.
- Remove the tower PC case.
- Insert the capture card into an empty PCIe expansion slot on the motherboard.
- Place the case back.
text_image
PCI-E SlotEnglish-1
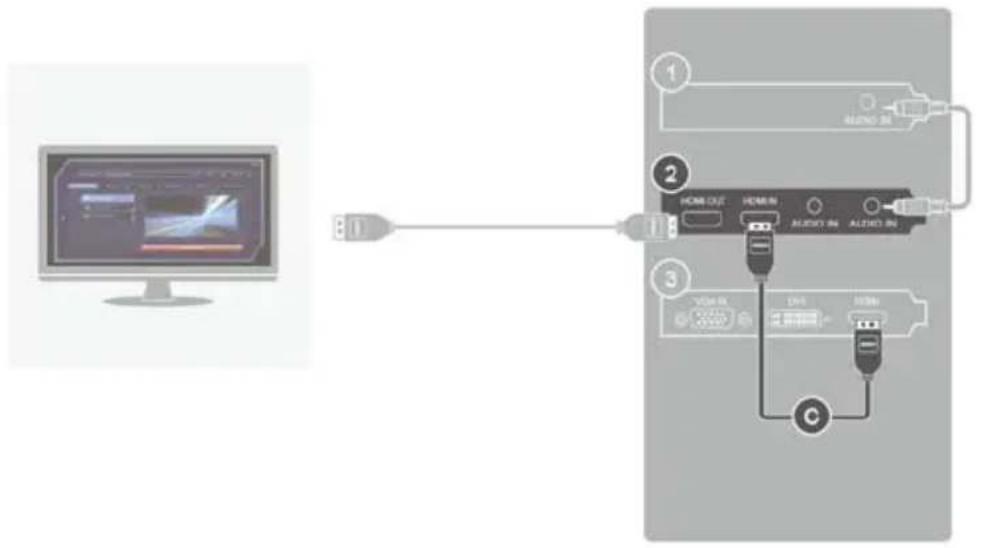
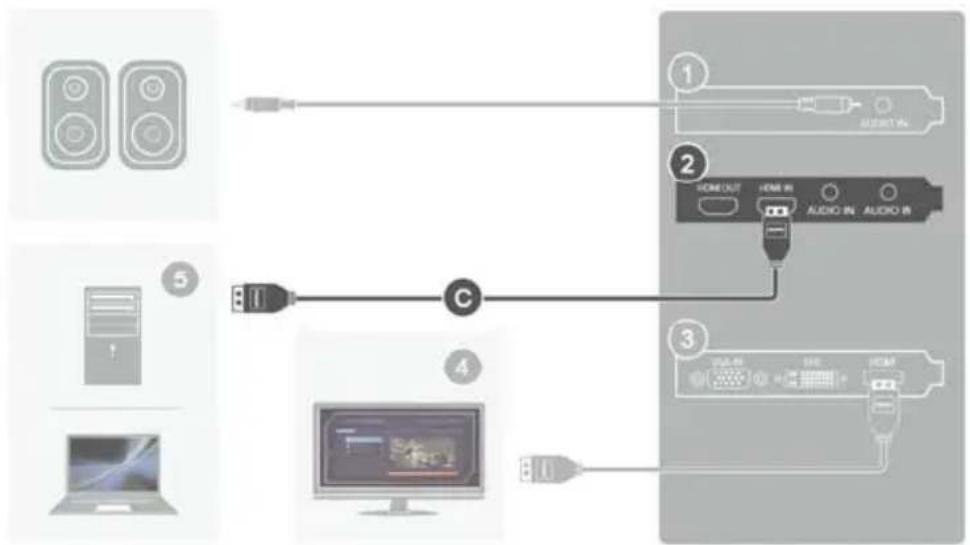
2.2 Making Connections
a. Current PC – capture from your local PC
Connect your graphics card output to the capture card input via the provided HDMI cable (or DVI to HDMI cable if no HDMI output on the graphics card).
Connect the capture card output to the PC monitor via the HDMI cable (or HDMI to DVI converter if no HDMI input on the PC monitor).
flowchart
graph LR
    A["Computer monitor"] -->|USB cable| B["Home audio"]
    B --> C["USB cable with USB port"]
    C --> D["Output ports: USB cable 1, USB cable 2, USB cable 3"]
Please purchase 3.5 mm Audio Cable separately.
Capture source directly passes through the capture card and shows on local PC monitor.
-
Sound Card
-
Capture Card
-
Graphics Card
Quick Installation Guide
b. Game Console - capture from your game console
Connect your game console output to the capture card input via the provided HDMI cable. Connect the capture card output to the TV set via the HDMI cable.

flowchart
graph TD
    A[" gaming "] -->|6| B[" Home OUT "]
    C[" gaming "] -->|5| B
    D[" Gaming "] -->|4| B
    B --> E[" Home IN "]
    E --> F[" USB "]
    F --> G[" Audio IN "]
    G --> H[" Audio IN "]
    H --> I[" USB "]
    I --> J[" PLERM "]
    J --> K[" USB "]
    style A fill:#f9f,stroke:#333
    style C fill:#f9f,stroke:#333
    style D fill:#f9f,stroke:#333
    style B fill:#ccf,stroke:#333
    style E fill:#cfc,stroke:#333
    style F fill:#fcc,stroke:#333
    style G fill:#cff,stroke:#333
    style H fill:#ffc,stroke:#333
    style I fill:#ffc,stroke:#333
    style J fill:#ffc,stroke:#333
    style K fill:#ffc,stroke:#333
- Sound Card
- Graphics Card
-
Capture source
-
Capture Card
- PC monitor with capture card
- TV set

PLEASE DO NOT USE HDMI SPLITTERS TO BYPASS COPY PROTECTION.
English-3
Quick Installation Guide
c. Other PC - capture from the other PC
Connect your graphics card output on the other PC to the capture card input on current PC via the provided HDMI cable (or DVI to HDMI cable if no HDMI output on the graphics card of the other PC).
Note: When using DVI to HDMI cable, please use an audio cable to connect the audio output on the other PC and audio input on the capture card for audio capture.
flowchart
graph TD
    A["Speaker 1"] --> B["Home Output"]
    C["Speaker 2"] --> D["Home Out"]
    E["Laptop"] --> F["Computer"]
    G["Audio In"] --> H["Audio In"]
    I["Audio In"] --> J["Audio In"]
For capture source without dual output graphics card, use the capture card output for monitor connection.
-
Sound Card
-
Capture Card
Quick Installation Guide
-
Graphics Card
-
PC monitor with capture card
-
Capture source
3 Driver and the Application Installation
Installing Drivers and the Application in Windows ^® 7 / Windows ^® 8
Follow the onscreen instructions to complete the installation of the RECentral. The InstallShield Wizard Completed page appears when the installation is complete.
4 Activating the Application
Windows ^® 7
To run the application from the Programs menu, go to Start → All Programs → AVerMedia AVerMedia RECentral. → RECentral.
Windows ^® 8
Click on RECentral on the Metro Start screen or double click on RECentral on the Desktop.
5 Uninstalling Application and Driver
Windows ^® 7
Please go to Start and select All Programs, AVerMedia RECentral, and Uninstaller. Follow the onscreen instructions to complete the uninstallation of the RECentral.
Windows ^® 8
Quick Installation Guide
- Right click on AVerMedia RECentral on the Metro Start screen, and click on Uninstall.
- In Programs and Features, select AVerMedia RECentral → Uninstall/Change.
natural_image
Simple line drawing of a computer monitor with ports and buttons (no text or symbols)
text_image
Quick GuideA. Live Gamer HD Lite B. Guide d'installation rapi

natural_image
Pure diagram of two USB connectors without any text or symbolsC. Câble HDMI
natural_image
Pure electrical circuit lines without any symbols
text_image
Quick Guide —natural_image
Pure diagram of two USB connectors without any text or symbolsC. Cavo HDMI
flowchart
graph TD
    A[" gaming "] --> B[" PC "]
    C[" gaming "] --> D[" PC "]
    E[" gaming "] --> F[" PC "]
    G[" Audio IN "] --> H[" HDMI OUT "]
    H --> I[" Audio IN "]
    I --> J[" HDMI OUT "]
    K[" Audio IN "] --> L[" HDMI OUT "]
    L --> M[" Audio IN "]
    M --> N[" HDMI OUT "]
    O[" Audio IN "] --> P[" HDMI OUT "]
    P --> Q[" Audio IN "]
    Q --> R[" HDMI OUT "]
    S[" Audio IN "] --> T[" HDMI OUT "]
    T --> U[" Audio IN "]
natural_image
Pure electrical circuit lines without any symbolsnatural_image
Pure diagram of two USB connectors without any text or symbolsC. Câble HDMI
natural_image
Simple line drawing of a room layout with furniture and fixtures (no text or symbols)A. Live Gamer HD Lite
text_image
Quick Guide —natural_image
Pure diagram of two USB connectors without any text or symbolsC. Cable HDMI
flowchart
graph TD
    A["Speaker with two speakers"] --> B["Switch"]
    C["Computer with monitor"] --> D["Switch"]
    E["Home Audio"] --> F["Home Audio"]
    G["Video Cable"] --> H["Video Cable"]
    style A fill:#f9f,stroke:#333
    style C fill:#ccf,stroke:#333
    style E fill:#cfc,stroke:#333
    style G fill:#fcc,stroke:#333
natural_image
Simple line drawing of a room layout with furniture and windows (no text or symbols)A. Live Gamer HD Lite
text_image
Quick Guide —natural_image
Pure diagram of two USB connectors without any text or symbolsC. Cabo HDMI
natural_image
Pure electrical circuit lines without any symbols
text_image
Quick Guidenatural_image
Pure diagram of two USB connectors without any text or symbolsC. Cabo HDMI
flowchart
graph LR
    A["Computer monitor"] -->|1| B["Audio device"]
    B --> C["Home OUT"]
    B --> D["Home IN"]
    B --> E["Altered IN"]
    B --> F["Altered IN"]
    B --> G["Altered IN"]
    B --> H["Altered IN"]
    B --> I["Altered IN"]
    B --> J["Altered IN"]
    B --> K["Altered IN"]
    B --> L["Altered IN"]
    B --> M["Altered IN"]
    B --> N["Altered IN"]
    B --> O["Altered IN"]
    B --> P["Altered IN"]
    B --> Q["Altered IN"]
    B --> R["Altered IN"]
    B --> S["Altered IN"]
    B --> T["Altered IN"]
    B --> U["Altered IN"]
    B --> V["Altered IN"]
    B --> W["Altered IN"]
    B --> X["Altered IN"]
    B --> Y["Altered IN"]
    B --> Z["Altered IN"]
flowchart
graph TD
    A["Speaker with two speakers"] --> B["Switch"]
    C["Computer with monitor"] --> D["USB"]
    E["Home Out"] --> F["Home In"]
    G["Audio In"] --> H["Audio In"]
    I["Video In"] --> J["Video In"]
natural_image
Simple line drawing of a computer monitor with no text or symbolsA. Live Gamer HD Lite

text_image
Quick Guide —natural_image
Pure diagram of two USB connectors without any text or symbolsC. Câble HDMI
flowchart
graph LR
    A["Computer monitor"] --> B["Switch"]
    B --> C["Audio IN"]
    C --> D["Audio OUT"]
    D --> E["Audio IN"]
    E --> F["Audio IN"]
    F --> G["Audio IN"]
    G --> H["Audio IN"]
    H --> I["Audio IN"]
    I --> J["Audio IN"]
    J --> K["Audio IN"]
    K --> L["Audio IN"]
    L --> M["Audio IN"]
    M --> N["Audio IN"]
    N --> O["Audio IN"]
    O --> P["Audio IN"]
    P --> Q["Audio IN"]
    Q --> R["Audio IN"]
    R --> S["Audio IN"]
    S --> T["Audio IN"]
    T --> U["Audio IN"]
    U --> V["Audio IN"]
    V --> W["Audio IN"]
    W --> X["Audio IN"]
    X --> Y["Audio IN"]
    Y --> Z["Audio IN"]
flowchart
graph TD
    A[" gaming "] -->|6| B[" PC "]
    C[" gaming "] -->|5| B
    D[" PC "] -->|4| B
    B --> E[" Audio IN "]
    E --> F[" I/O "]
    F --> G[" I/O OUT "]
    G --> H[" I/O IN "]
    H --> I[" I/O IN "]
    I --> J[" I/O IN "]
    J --> K[" I/O IN "]
    K --> L[" I/O IN "]
    L --> M[" I/O IN "]
    M --> N[" I/O IN "]
    N --> O[" I/O IN "]
    O --> P[" I/O IN "]
    P --> Q[" I/O IN "]
    Q --> R[" I/O IN "]
    R --> S[" I/O IN "]
    S --> T[" I/O IN "]
    T --> U[" I/O IN "]
    U --> V[" I/O IN "]
    V --> W[" I/O IN "]
    W --> X[" I/O IN "]
    X --> Y[" I/O IN "]
flowchart
graph LR
    A["Computer monitor with icon"] -->|USB| B["Device with USB port"]
    B --> C["Network ports: USB, network switch, network card, network port, network card, network card, network card, network card, network card, network card, network card, network card, network card, network card, network card, network card, network card, network card, network card, network card, network card, network card, network card, network card, network card, network card, network card, network card, network card, network card, network card, network card, network card, network card, network card, network card, network card, network card"]
5 Uninstalling Application and Driver
Windows® 7