EConvect defrost 400 - Electric heater Eurom - Free user manual and instructions
Find the device manual for free EConvect defrost 400 Eurom in PDF.

| Brand | Eurom |
| Model | EConvect defrost 400 |
| Product type | Electric convection heater |
| Dimensions (L × W × H) | 33 × 28.5 × 8.5 (with feet 20) cm |
| Weight | 1.3 kg |
| Power supply | 220-240 V ~ 50 Hz |
| Maximum power | 400 W |
| Adjustable thermostat | Yes, from 5 °C (frost protection) to max |
| IP rating | IP24 (suitable for damp rooms) |
| Tip-over protection | Yes (automatic shut-off if knocked over) |
| Overheating protection | Yes (automatic shut-off) |
| Operation indicator light | Yes (control lamp) |
| Feet included | Yes (screw attachment) |
| Minimum room volume | 9 m³ |
| Maintenance and cleaning | Clean exterior with a dry or damp cloth; vacuum the grilles; do not use chemical products |
| Repairability | User non-repairable; contact a qualified professional |
| Warranty | See manufacturer's conditions |
Frequently Asked Questions - EConvect defrost 400 Eurom
User questions about EConvect defrost 400 Eurom
0 question about this device. Answer the ones you know or ask your own.
Ask a new question about this device
Download the instructions for your Electric heater in PDF format for free! Find your manual EConvect defrost 400 - Eurom and take your electronic device back in hand. On this page are published all the documents necessary for the use of your device. EConvect defrost 400 by Eurom.
USER MANUAL EConvect defrost 400 Eurom
EN - Instruction booklet
electrical convector heater
radiator-convector electric
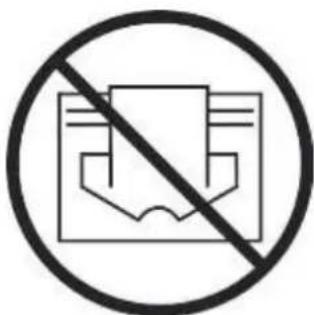
EN This symbol on your device means: do not cover!
General safety instructions
- Before using the machine, carefully read this entire instruction manual.
- Before using your new heater, check it, including cord and plug, for any visible damage. Do not use a damaged heater, but send it back to your dealer for replacement.
- Do not use the heater until it is been fully installed in accordance with the instructions under the heading 'Description, Composition and Installation'.
- This heater is strictly intended for normal domestic use. Only use it for the additional heating of your home.
- Under the terms and conditions described in this leaflet, the heater can be used in wet or damp indoor spaces such as bathrooms and laundry rooms. Do not place the heater in the vicinity of taps, bathtub, shower, pool, fountains or other sources of moisture. Make sure it cannot fall into water and prevent water from getting into the heater itself. If, at any time, the heater does fall into water, unplug it immediately! Do not use a heater that has a damp interior but have it repaired. Never immerse the heater, cord or plug in water and never touch it with wet hands.
- The supply voltage and utility frequency, specified on the machine, need to match those of the socket that is used. The socket used needs to be earthed and the electrical installation needs to be secured with a ground-fault circuit interrupter (max. 30 mAmp).
- Fully extend the cord before plugging in the heater. Make sure it does not come into contact with any part of the heater and prevent it from heating up any other way. Do not run the cord underneath carpeting; do not cover it with mats, carpet strips or similar and make sure it is not placed in any passageways. Make sure the cord cannot be stepped on and that no furniture is placed on top of it. Do not lead the cord around sharp corners and do not roll it up too tightly after use!
-
If possible, do not use an extension cord, as this poses the risk of overheating and fire. If the use of an extension cord is unavoidable, then make sure it is an undamaged, approved extension cord with a minimum diameter of 3 × 1.5 mm^2 and a minimum permissible power of 500W (E-Convect defrost 400) / 1200W (E-Convect metal 1000) / 1750W (E-Convect metal 1500). To prevent overheating, always fully extend the cord!
-
To prevent the circuit being overloaded and fuses blowing, make sure no other appliances are connected to the same socket or wired to the same electrical circuit as the heater.
- Do not use the heater outdoors and do not use it in spaces, smaller than 9/15/22 m³.
- A heater contains hot and/or glowing and sparking components. Do not, therefore, use it in areas where fuels, paint, flammable liquids and/or gasses etc. are stored.
- Do not place the heater near, under, or directly opposite a socket and do not place it near an open fire or other heat source.
- Do not use the heater near or directly opposite furniture, animals, curtains, paper, clothes, bedding or other inflammable objects. Keep them at least 1 metre away from the heater!
- Never cover a heater! The heater's air inlets and outlets should never be obstructed in any way, so as to prevent the possibility of fire. Never use the heater to dry clothes and do not place anything on top of the heater. Do not place it on soft surfaces such as beds or deep-pile carpets as they can block openings.
- Make sure that the air around the heater can circulate freely. Do not place the heater too close to walls or large objects and do not place it under shelves, cupboards or similar.
- Prevent foreign objects from entering the heater via the venting or exhaust openings as this may lead to electric shock, fire or damage.
- Never leave the heater unattended when switched on. Always switch the heater off before removing the plug from the socket. Always unplug the heater when not in use! Pull on the plug to remove from the socket, never pull on the cord.
-
Always switch the heater off, unplug it and leave to cool down before:
-
cleaning the heater
-
carrying out maintenance on the heater
touching or moving the heater. -
This machine gets hot when in use. To prevent burns, do not let bare skin come into contact with hot surfaces.
-
Do not use a timer or a similar product to automatically switch on the heater. Always perform safety checks before using the heater!
-
Close supervision is necessary if the product is used near children or incapacitated persons. Children of less than 3 years should be kept away unless continuously supervised. Children aged from 3 years and less than 8 years shall only switch on/off the appliance provided that it has been placed or installed in its intended normal operating position and they have been given supervision or instruction concerning use of the appliance in a safe way and understand the hazards involved. Children aged from 3 years and less than 8 years shall not plug in, regulate and clean the appliance or perform user maintenance.
This appliance is not suitable to be operated by children or persons who have physical, sensory and/or mental limitations, or by persons who have no knowledge of, or experience with, this appliance. This appliance can be used by children aged from 8 years and above and persons with reduced physical, sensory or mental capabilities or lack of experience and knowledge if they have been given supervision or instruction concerning use of the appliance in a safe way and understand the hazards involved. Children shall not play with the appliance. Cleaning and user maintenance shall not be made by children without supervision.
- Keep the heater clean. Dust, dirt and/or a build up of deposits in the heater are a common cause of overheating. Make sure these deposits are removed regularly.
- Do not turn on the appliance if you have discovered damage to the appliance itself, the cord or the plug, if the appliance is malfunctioning, if it has been dropped or if there are any other signs of a defect. Return the complete product to the vendor or to a certified electrician for inspection and/or repair. Always ask for the original parts.
- Do not use attachments and/or accessories that have not been recommended or supplied by the manufacturer.
- The appliance (incl. cord and plug) may only be opened and/or repaired by properly authorised and qualified persons.
- Only use this heater for its intended purpose and as described in this instruction manual.
Not abiding by instructions 24, 25 and 26 may lead to damage, fire and/or personal injuries. A failure to adhere to these rules also immediately nullifies the guarantee and vendor, importer and/or manufacturer do not take responsibility for any of the consequences!
Description, Composition and Installation
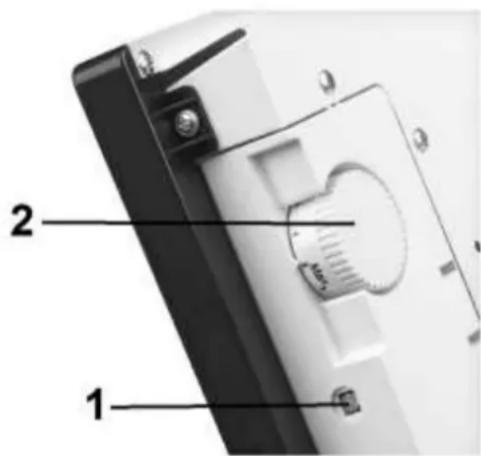
- Check light
- Thermostat knob
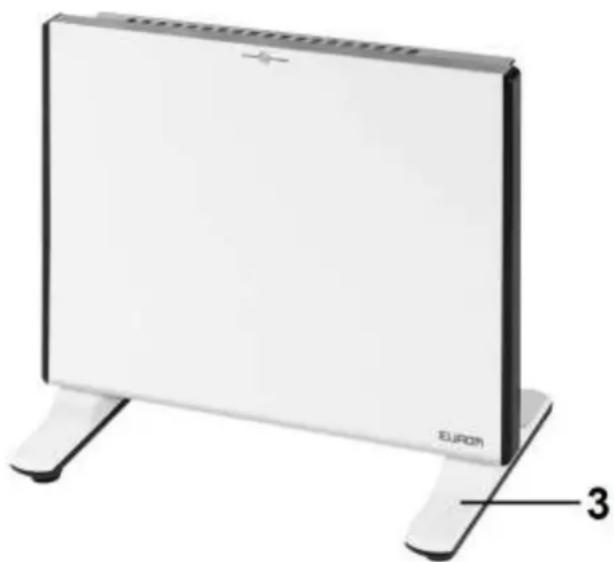
- Base
Remove all packaging material and keep out of reach of children. After removing packaging, check the appliance for damage or other signs that could indicate a fault/defect/malfunction. In case of doubt, do not use the appliance, but contact your vendor for inspection or replacement.
Do not use the heater before it has been installed in accordance with the following instructions!
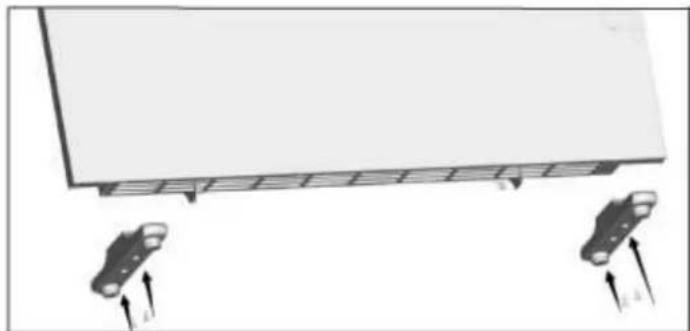
Attach the feet supplied to the underside of the heater (see picture):
- Turn the heater upside down. Place a blanket (or something similar) under the heater to prevent damage!
- Place the feet on their place on the bottom of the heater. This will ensure that the threaded holes will align correctly.
- Securely attach the feet to the heater using the 2 × 2 short self-tapping screws.
- Return the heater to the upright position.
- Make sure a working heater is always placed on a solid, flat and horizontal surface. Deep-pile carpeting is unsuitable!
Using for the first time and Operation
- Check that the heater stands firmly and that all safety requirements have been met.
- Set the thermostat button to 'max'.
- Now insert the plug into the earthed 220/-240V socket. The check lamp will come on and the heater will start to work.
- If the space has reached the required temperature, turn back the temperature knob slowly until you hear a click. The heater will now retain the set temperature by switching on and off at regular intervals. To set the temperature a little higher or lower, turn the knob a little towards 'max' or 'min' respectively.
- Turning the thermostat knob fully to 'min' will retain a temperature of 5^ in the space, this is the frost protection functionality.
- To switch the heater off, remove the plug from the socket.
Safety features
The heater is fitted with a tipping safeguard which automatically shuts off the appliance if it inadvertently falls over. When the heater is returned to its upright position, it will resume functioning as normal but, before reusing, switch off, unplug and check for damage. Do not use the heater if it is damaged or malfunctioning, but have it inspected/ repaired!
In case of internal overheating, the overheating safeguard will switch the heater off. This may occur if the heater cannot give off enough heat or if it cannot draw in enough fresh air. As mentioned above, this is generally caused by (partially) covering the heater, obstructing the air intake and/or outlet grills or installing the heater too close to a wall or something similar. In case of overheating, switch off the heater and unplug. Give the heater time to cool down, remove the source of the overheating and use as normal. If the problem persists or if you have not been able to trace the source of the overheating, turn the heater off immediately and unplug. Contact a servicing point to have the heater repaired.
Cleaning and Maintenance
Keep the heater clean. Deposits of dust and dirt in the appliance are a common cause of overheating so these should be removed regularly. Switch off the heater, remove the plug from the socket and allow the heater to cool down before cleaning or carrying out maintenance work.
- Wipe the outside of the heater regularly with a dry or slightly damp cloth. Do not use aggressive soaps, sprays, cleaners or abrasives, waxes, polishes or chemical solutions!
- Use a vacuum cleaner to carefully remove any dust and dirt from the grills and ensure that the air intake and outlet openings are clean. Be careful not to touch or damage any internal parts during cleaning!
- The heater contains no other parts which need maintenance.
- At the end of the season, store the cleaned heater in the original packaging if possible. Store it upright in a cool, dry and dust-free place.
- Do not dispose of heater with household waste when it becomes worn or damaged beyond repair. Take it to your local authority's collection point for electrical appliances where any reusable materials will be collected and redistributed.
Français
Données techniques
| Type | E-convect defrost 400 | E-convect metal 1000 | E-convect metal 1500 | |
| Tension | V/Hz | 220-240 / 50 | 220-240 / 50 | 220-240 / 50 |
| Puisance max. | W | 400 | 1000 | 1500 |
| Thermostat | + | + | + | |
| Classe de protectio | IP24 | IP24 | IP24 | |
| Dimensions | cm | 8,5(20)x33x28,5 | 8,5(20)x66,5x28,5 | 8,5(20)x95x28,5 |
| Weight | kg | 1,3 | 2,3 | 2,9 |
Information requirement for the electric local space heaters
| Model identifier(s):E-CONVECT DEFROST 400 | |||||
| Item | Symbol | Value | Unit | Item | Unit |
| Heat output | Type of heat input, for electric storage local space heaters only (select one) | ||||
| Nominal heat output | Pnom | 0.35-0.4 | kW | manual heat charge control, with integrated thermostat | No |
| Minimum heat output (indicative) | Pmin | 0,35 | kW | manual heat charge control with room and/or outdoor temperature feedback | No |
| Maximum continuous heat output | Pmax,c | 0,4 | kW | electronic heat charge control with room and/or outdoor temperature feedback | No |
| Auxiliary electricity consumption | fan assisted heat output | No | |||
| At nominal heat output | elmax | N/A | kW | Type of heat output/room temperature control (select one) | |
| At minimum heat output | elmin | N/A | kW | single stage heat output and no room temperature control | No |
| In standby mode | eISB | N/A | kW | Two or more manual stages, no room temperature control | No |
| with mechanic thermostat room temperature control | Yes | ||||
| with electronic room temperature control | No | ||||
| electronic room temperature control plus day timer | No | ||||
| electronic room temperature control plus week timer | No | ||||
| Other control options (multiple selections possible) | |||||
| room temperature control, with presence detection | No | ||||
| room temperature control, with open window detection | No | ||||
| with distance control option | No | ||||
| with adaptive start control | No | ||||
| with working time limitation | No | ||||
| with black bulb sensor | No | ||||
| Contact details | EUROM-KOKOSSTRAAT 20-8281JC-GENEMUIDEN-NETHERLANDS | ||||
Information requirement for the electric local space heaters
| Model identifier(s):E-CONVECT DEFROST 1000 | |||||
| Item | Symbol | Value | Unit | Item | Unit |
| Heat output | Type of heat input, for electric storage local space heaters only (select one) | ||||
| Nominal heat output | Pnom | 0.85-1.0 | kW | manual heat charge control, with integrated thermostat | No |
| Minimum heat output (indicative) | Pmin | 0,85 | kW | manual heat charge control with room and/or outdoor temperature feedback | No |
| Maximum continuous heat output | Pmax,c | 1,0 | kW | electronic heat charge control with room and/or outdoor temperature feedback | No |
| Auxiliary electricity consumption | fan assisted heat output | No | |||
| At nominal heat output | elmax | N/A | kW | Type of heat output/room temperature control (select one) | |
| At minimum heat output | elmin | N/A | kW | single stage heat output and no room temperature control | No |
| In standby mode | eISB | N/A | kW | Two or more manual stages, no room temperature control | No |
| with mechanic thermostat room temperature control | Yes | ||||
| with electronic room temperature control | No | ||||
| electronic room temperature control plus day timer | No | ||||
| electronic room temperature control plus week timer | No | ||||
| Other control options (multiple selections possible) | |||||
| room temperature control, with presence detection | No | ||||
| room temperature control, with open window detection | No | ||||
| with distance control option | No | ||||
| with adaptive start control | No | ||||
| with working time limitation | No | ||||
| with black bulb sensor | No | ||||
| Contact details | EUROM-KOKOSSTRAAT 20-8281JC-GENEMUIDEN-NETHERLANDS | ||||
Information requirement for the electric local space heaters
| Model identifier(s):E-CONVECT DEFROST 1500 | |||||
| Item | Symbol | Value | Unit | Item | Unit |
| Heat output | Type of heat input, for electric storage local space heaters only (select one) | ||||
| Nominal heat output | Pnom | 1.3-1.5 | kW | manual heat charge control, with integrated thermostat | No |
| Minimum heat output (indicative) | Pmin | 1,30 | kW | manual heat charge control with room and/or outdoor temperature feedback | No |
| Maximum continuous heat output | Pmax,c | 1,5 | kW | electronic heat charge control with room and/or outdoor temperature feedback | No |
| Auxiliary electricity consumption | fan assisted heat output | No | |||
| At nominal heat output | elmax | N/A | kW | Type of heat output/room temperature control (select one) | |
| At minimum heat output | elmin | N/A | kW | single stage heat output and no room temperature control | No |
| In standby mode | eISB | N/A | kW | Two or more manual stages, no room temperature control | No |
| with mechanic thermostat room temperature control | Yes | ||||
| with electronic room temperature control | No | ||||
| electronic room temperature control plus day timer | No | ||||
| electronic room temperature control plus week timer | No | ||||
| Other control options (multiple selections possible) | |||||
| room temperature control, with presence detection | No | ||||
| room temperature control, with open window detection | No | ||||
| with distance control option | No | ||||
| with adaptive start control | No | ||||
| with working time limitation | No | ||||
| with black bulb sensor | No | ||||
| Contact details | EUROM-KOKOSSTRAAT 20-8281JC-GENEMUIDEN-NETHERLANDS | ||||
EUROM
POWERFULPRODUCTS
EUROM, Kokosstraat 20, 8281 JC Genemuiden
e-mail: info@eurom.nl www.eurom.nl