EConvect Thermostaat - Electric heater Eurom - Free user manual and instructions
Find the device manual for free EConvect Thermostaat Eurom in PDF.
Frequently Asked Questions - EConvect Thermostaat Eurom
User questions about EConvect Thermostaat Eurom
0 question about this device. Answer the ones you know or ask your own.
Ask a new question about this device
Download the instructions for your Electric heater in PDF format for free! Find your manual EConvect Thermostaat - Eurom and take your electronic device back in hand. On this page are published all the documents necessary for the use of your device. EConvect Thermostaat by Eurom.
USER MANUAL EConvect Thermostaat Eurom
natural_image
White rectangular electronic device with mounting feet, no visible text or symbols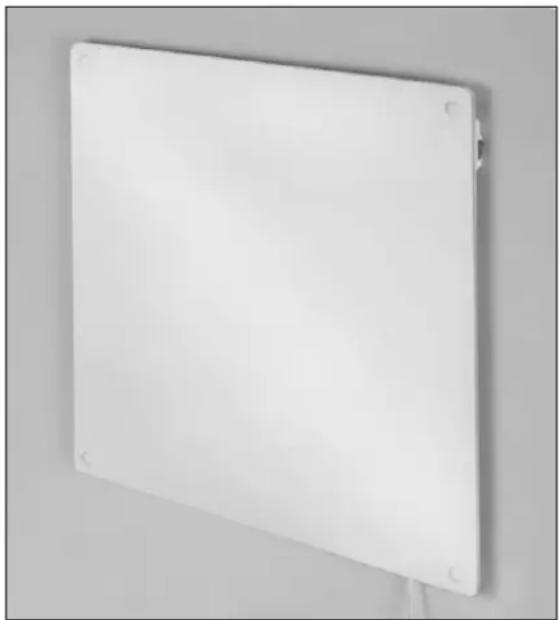
natural_image
Plain white rectangular panel with corner markers, no visible text or symbols
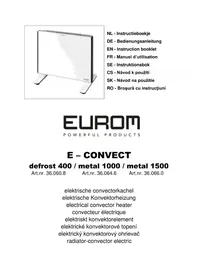
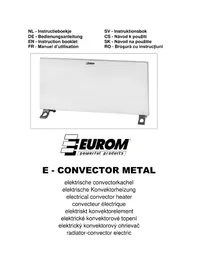
EUROM E-CONVECT
VERWARMINGSPANEEEL
without thermostat / with thermostat
PANNEAU DE CHAUFFAGE
EN This symbol on your device means: do not cover!
Bedieningspaneel:
natural_image
Hand using a power tool to paint a white surface on a white board (no text or symbols visible)natural_image
Close-up of a hand using a tool to lift a metal bracket (no text or symbols visible)natural_image
Simple line drawing of a pencil with a small object inside, no text or symbols present
natural_image
Line drawing of a hand holding a drill bit with a pointed tip (no text or symbols)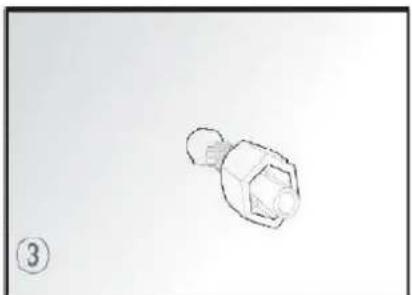
natural_image
Simple line drawing of a light bulb with a bulb-like base and internal structure, labeled with number 3 (no text or symbols on the bulb itself)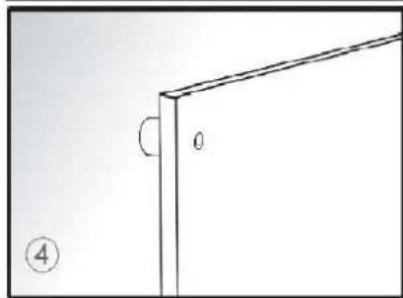
natural_image
Simple line drawing of a corner joint with a circular hole and a numbered label (no text or symbols)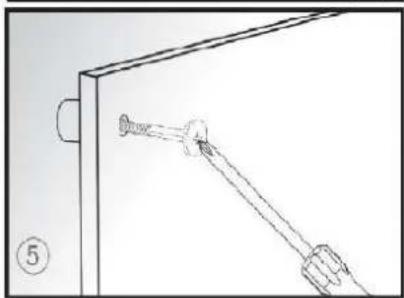
natural_image
Simple line drawing of a hand holding a tool near a wall, no text or symbols present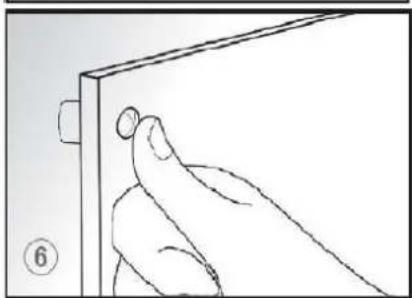
natural_image
Line drawing of a hand holding a rectangular object with a circular mark, no text or symbols present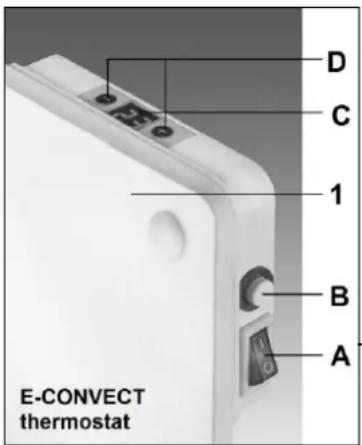
Bedienungspult:
1 – Heitzplatte
natural_image
Hand applying paint to a white surface with a brush (no text or symbols visible)natural_image
Close-up of a hand using a tool to adjust a curved metal bracket (no text or symbols visible)natural_image
Simple line drawing of a pen inserted into a wall, no text or symbols present
natural_image
Hand holding a screwdriver with a pointed tip, no text or symbols visible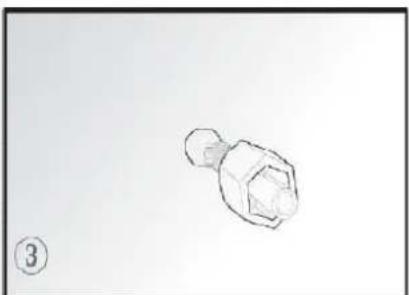
natural_image
Simple line drawing of a light bulb with a bulb-shaped tip, labeled with number 3 (no text or symbols on the bulb itself)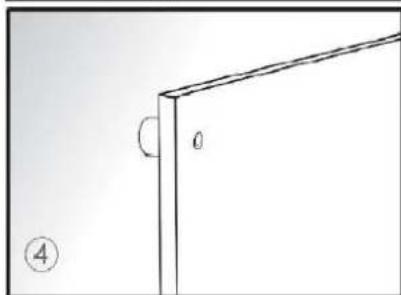
natural_image
Simple line drawing of a corner joint with a circular hole and dimension label (no text or symbols)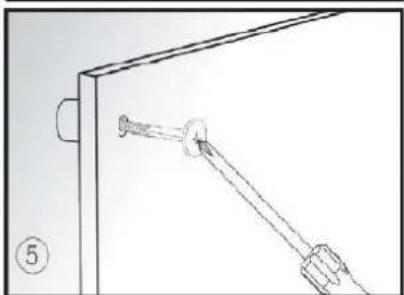
natural_image
Technical line drawing of a mechanical assembly with a bolt and rod (no text or symbols)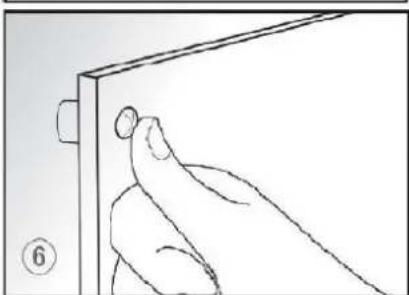
natural_image
Line drawing of a hand holding a rectangular object with a circular mark, no text or symbols presentInsulation class II, double insulated II, double insulated
Maximum capacity 425 Watt 425 Watt
Suitable for 9 tot 16 m ^2 9 tot 16 m ^2
Thermostat - +
Dimensions 3,3 (24,8) x 60 x 60 (63) cm. 3,3 (24,8) x 60 x 60 (63) cm.
Weight 5,3 kg. 5,4 kg.
General safety instructions
-
Before using the machine, carefully read this entire instruction manual.
-
Before using your new heater, check it, including cord and plug, for any visible damage. Do not use a damaged heater, but send it back to your dealer for replacement.
-
Do not use the heater until it is been fully installed in accordance with the instructions under the heading 'Description, Composition and Installation'.
-
This heater is strictly intended for normal domestic use. Only use it for the additional heating of your home.
-
This heater in not suitable for use in wet or damp spaces such as bathrooms and laundry rooms. Do not place the heater in the vicinity of taps, bathtub, shower, pool, fountains or other sources of moisture. Make sure it cannot fall into water and prevent water from getting into the heater itself. If, at any time, the heater does fall into water, unplug it immediately! Do not use a heater that has a damp interior but have it repaired. Never immerse the heater, cord or plug in water and never touch it with wet hands.
-
The supply voltage and utility frequency, specified on the machine, need to match those of the socket that is used. The electrical installation needs to be secured with a ground-fault circuit interrupter (max. 30 mAmp). The electrical socket that you are using must be to hand at all times in order to be able to remove the plug from the socket in the event of an emergency
-
Fully extend the cord before plugging in the heater. Make sure it does not come into contact with any part of the heater and prevent it from heating up any other way. Do not run the cord underneath carpeting; do not cover it with mats, carpet strips or similar and make sure it is not placed in any passageways. Make sure the cord cannot be stepped on and that no furniture is placed on top of it. Do not lead the cord around sharp corners and do not roll it up too tightly after use!
-
If possible, do not use an extension cord, as this poses the risk of overheating and fire. If the use of an extension cord is unavoidable, then make sure it is an undamaged, approved extension cord with a minimum diameter of 3 × 1.5 mm^2 and a minimum permissible power of 500 Watt. To prevent overheating, always fully extend the cord!
-
During use the plug can feel a little warm, that's normal. Is it really warm, then there is probably something wrong with the socket. Contact your electrician.
-
To prevent the circuit being overloaded and fuses blowing, make sure no other appliances are connected to the same socket or wired to the same electrical circuit as the heater.
-
Do not use the heater outdoors and do not use it in spaces, smaller than 4,5 m ^2 .
-
A heater contains hot and/or glowing and sparking components. Do not, therefore, use it in areas where fuels, paint, flammable liquids and/or gasses etc. are stored.
-
Do not place the heater near, under, or directly opposite a socket and do not place it near an open fire or other heat source.
-
Do not use the heater near or directly opposite furniture, animals, curtains, paper, clothes, bedding or other inflammable objects. Keep them at least 1 metre away from the heater!
-
Never cover a heater! Never use the heater to dry clothes and do not place anything on top of the heater. Do not place it on soft surfaces such as beds or deep-pile carpets.
-
Make sure that the air around the heater can circulate freely. Do not place the heater too close to walls or large objects and do not place it under shelves, cupboards or similar. For hanging installation: don't block the space between stove and wall.
-
Always switch the heater off, unplug it and leave to cool down before:
- cleaning the heater
- carrying out maintenance on the heater
- touching or moving the heater.
-
Never leave the heater unattended when switched on. Always switch the heater off before removing the plug from the socket. Always unplug the heater when not in use! Pull on the plug to remove from the socket, never pull on the cord.
-
This machine gets hot when in use. To prevent burns, do not let bare skin come into contact with hot surfaces.
-
Do not use a timer or a similar product to automatically switch on the heater. Always perform safety checks before using the heater!
-
Close supervision is necessary when the product is used near children, incapacitated persons or pets. The device is not suitable for use by persons (including children) with a physical, sensual or mental limitation or a lack of experience and knowledge, irrespective of whether they are being supervised or have been issued with instructions in relation to the use of the device by a person who is responsible for their safety. Always ensure that children cannot play with the device.
-
Keep the heater clean. Dust, dirt and/or a build up of deposits in the heater are a common cause of overheating. Make sure these deposits are removed regularly.
-
Do not turn on the appliance if you have discovered damage to the appliance itself, the cord or the plug, if the appliance is malfunctioning, if it has been dropped or if there are any other signs of a defect. Return the complete product to the vendor or to a certified electrician for inspection and/or repair. Always ask for the original parts.
-
Do not use attachments and/or accessories that have not been recommended or supplied by the manufacturer.
-
The appliance (incl. cord and plug) may only be opened and/or repaired by properly authorised and qualified persons.
-
Only use this heater for its intended purpose and as described in this instruction manual.
Not abiding by instructions 24, 25 and 26 may lead to damage, fire and/or personal injuries. A failure to adhere to these rules also immediately nullifies the guarantee and vendor, importer and/or manufacturer do not take responsibility for any of the consequences!
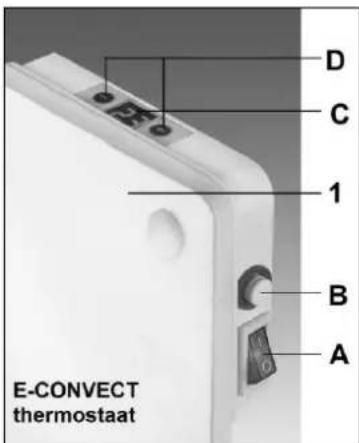
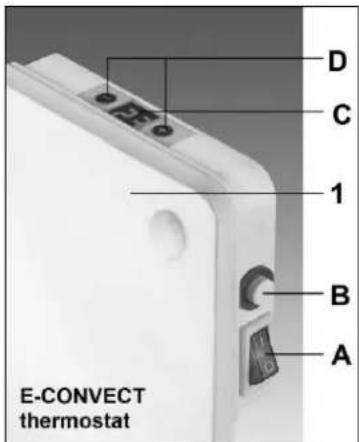
Description, Composition and Installation
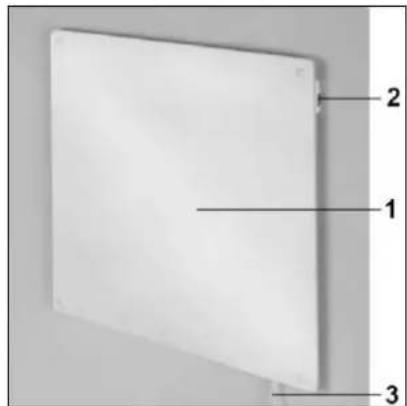
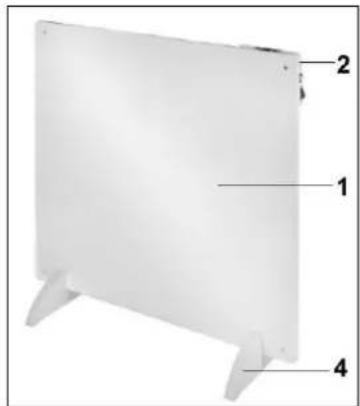
1 - heatpanel
2 - Control panel
3 - electric cable with plug
4-base
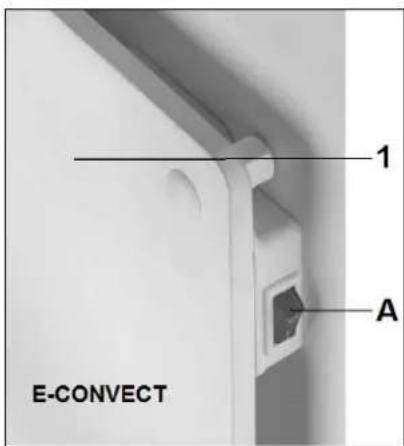
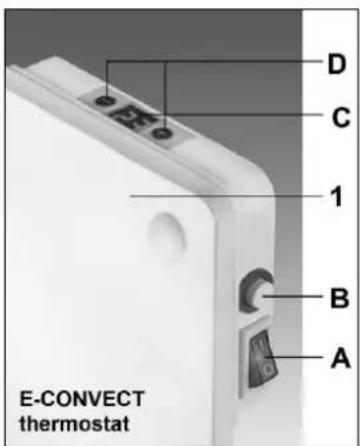
Control panel:
1 - heatpanel
A. ON/OFF switch & pilot light
B. Temperature sensor
C. Display
D. Up/down key

natural_image
Hand using a brush to paint a rectangular object on a white surface (no text or symbols visible)What is unique about the E-convect, is that it can be painted. You can paint the E-convect in any colour you wish, with any water resistant paint. Do not paint the box with the switch and remove the plug from the socket before you start painting. Allow the panel to dry before using it again!
Remove all packaging material and keep out of reach of children.
You will find: - the heating panel
- wall mount material (4x) with drill (8mm)
- foot (2x)
After removing packaging, check the appliance for damage or other signs that could indicate a fault/defect/malfunction. In case of doubt, do not use the appliance, but contact your vendor for inspection or replacement.
Do not use the heater before it has been installed in accordance with the following instructions!
This radiator can be used as a free-standing device or mounted on the wall.
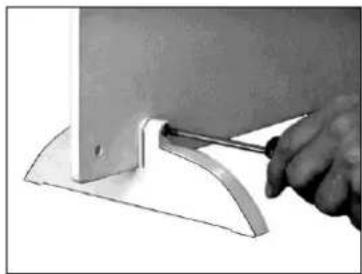
Free-standing:
Secure the feet supplied to the underside of the radiator (see diagram):
- Place both feet on the ground, ± 50 cm. apart, screws to the back
- Slide the heating panel into the slot of the feet, so the panel sticks out ± 5 cm on each side. The switch is at the top right, at the rear (see fig. on front of this booklet).
- Secure both screws and thereby clamp the panel in the feet.
- Your E-convect is ready to use.
natural_image
Close-up of a hand using a tool to adjust a metal bracket or angle (no text or symbols visible)Mounted on the wall:
The heater must be at least 150 mm removed from all objects, walls, etc.; the distance to the floor must be at least 200 mm and there must be at least 150 mm above the heater.
- Choose a firm, smooth, vertical wall of heat resistant material.
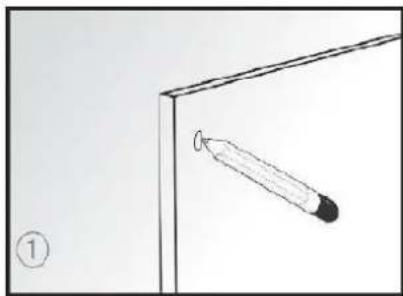
- Mark the places where the holes are to be drilled (fig. 1).
- Drill the holes at the marked places with the drill provided (fig. 2).
- Tap the distance plugs as far as possible into the drill holes; the E-convect will now keep sufficient distance to the wall (fig. 3).
- Hang the E-convect with its 4 holes over the 4 plugs on the wall (fig. 4). Check whether the distance to the floor is at least 20 cm!
- Now screw the 4 bolts through the E-convect into the plugs (fig. 5)
- Press the cover caps over the heads of the bolts; for extra safety you can use some regular glue (fig. 6).
- To remove the E-convect from the wall, you open the caps and unscrew the bolts.
natural_image
Simple line drawing of a pencil inside a corner, with no text or symbols present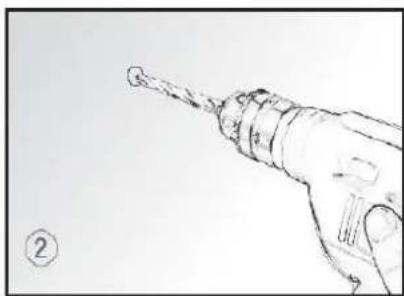
natural_image
Line drawing of a hand holding a drill bit, no text or symbols present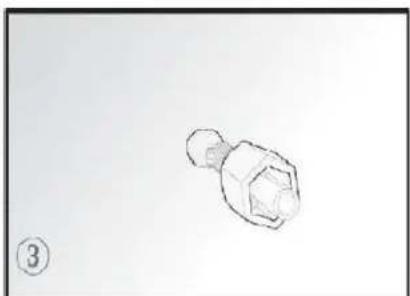
natural_image
Simple line drawing of a bolt and nut on a plain background (no text or symbols)
natural_image
Simple line drawing of a corner joint with a circular mark and label '0' (no text or symbols beyond basic geometry)
natural_image
Simple line drawing of a mechanical assembly with a bracket and rod (no text or symbols)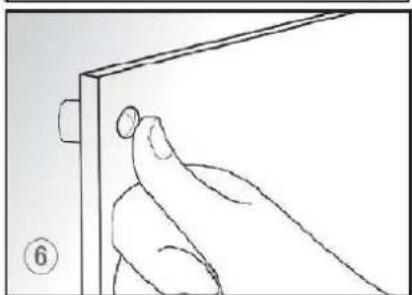
natural_image
Line drawing of a hand holding a small object near a rectangular panel (no text or symbols)Use and Working
- Make sure the heater is not damaged.
- Insert the plug in the socket
- Turn the switch on (I): the light will turn on
- To switch the E-convect off, you turn the switch off (O); the light goes out. Remove the plug from the socket.
Only applicable to the thermostat version
- When in operation, the display shows the room temperature
- If you press the + or - key, the temperature setting will flash 5x on the display.
- You can adjust the temperature setting by pressing the + or - key while it is flashing. With each key press, the temperature will be increased (+) or decreased (-) by one degree.
- The device will retain the temperature setting by switching itself on and off automatically.
Safety feature
In case of internal overheating, the overheating safeguard will switch the heater off. This may occur if the heater cannot give off enough heat or if it cannot draw in enough fresh air. As mentioned above, this is generally caused by (partially) covering the heater, or installing the heater too close to a wall or something similar. In case of overheating, switch off the heater and unplug. Give the heater time to cool down, remove the source of the overheating and use as normal. If the problem persists or if you have not been able to trace the source of the overheating, turn the heater off immediately and unplug. Contact a servicing point to have the heater repaired.
Cleaning and Maintenance
Keep the heater clean. Switch off the heater, remove the plug from the socket and allow the heater to cool down before cleaning or carrying out maintenance work.
- Wipe the outside of the heater regularly with a dry or slightly damp cloth. Do not use aggressive soaps, sprays, cleaners or abrasives, waxes, polishes or chemical solutions!
- You can keep the back of the heater free of dust with a feather duster. For thorough cleaning of the back, you can unscrew the heater from the wall.
- If you want to clean away the E-convect at the end of the season, you can simply unscrew it and store it, if possible in the original packaging, upright in a cool. Dry and dust-free place.
CE-statement
Euromac bv, Genemuiden-NL hereby declares that the EUROM electrical convector heater, type E-CONVECT & E-CONVECT with thermostat, complies with the LVD guideline 2006/95/EG and the EMC guideline 2004/108/EC and meets the following standards:
EN 60335-1 :2012
EN 60335-2-30 :2009+A11 :2012
EN 62233 :2008
Genemuiden, 26-06-2014
W.J. Bakker, alg.dir.
EN 55014 :2006+A1 :2009+A2 :2011
natural_image
Hand painting a textured object on a white surface, no visible text or symbolsnatural_image
Close-up of a hand using a tool to cut or mark a curved metal bracket (no text or symbols visible)Montage mural :
natural_image
Simple line drawing of a pencil inside a corner, no text or symbols present
natural_image
Line drawing of a hand holding a drill bit, no text or symbols present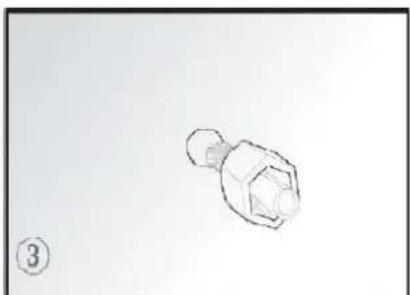
natural_image
Simple line drawing of a light bulb with a bulb-like top and base, labeled with number 3 (no text or symbols on the object itself)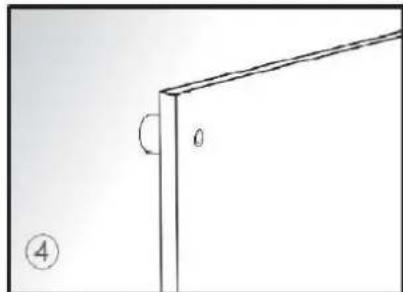
natural_image
Simple line drawing of a corner joint with a circular mark and label '0', no text or symbols present.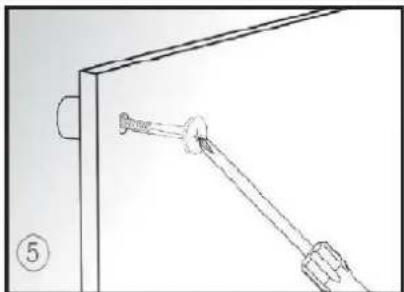
natural_image
Simple line drawing of a mechanical assembly with a spring and connecting rod (no text or symbols)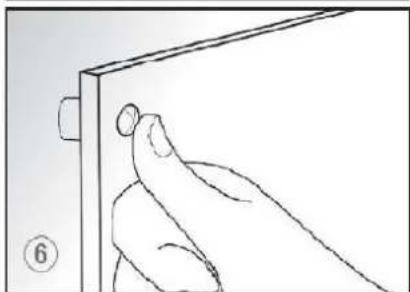
natural_image
Hand holding a rectangular object with a circular mark, no visible text or symbolsEUROMAC BV., Kokosstraat 20, 8281 JC Genemuiden e-mail: info@euromac.nl www.euromac.nl