Rowlympic - Rowing Machine Capital Sports - Free user manual and instructions
Find the device manual for free Rowlympic Capital Sports in PDF.
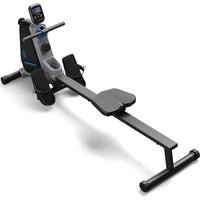
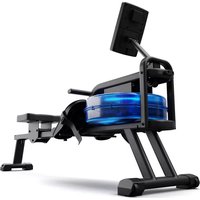
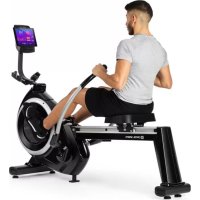
| Product Type | Water Resistance Rowing Machine |
| Brand | Capital Sports |
| Model | Rowlympic |
| Water Tank Capacity | Approximately 17 liters (half calibration level) |
| Resistance Type | Water |
| Computer Power | 2 AAA batteries (not included) |
| Computer Functions | Time, speed, distance, calories, odometer, pulse |
| Pulse Sensor | Integrated, manual sensor (hands on handles) |
| Materials | Steel frame, plastic tank, seat and rails |
| Assembly Required | Yes, parts and tools included |
| Vertical Storage | Possible (lean against a wall) |
| Maintenance | Check screws regularly, add a chlorine tablet every 2-3 months, clean cables and rails with a damp cloth |
| Safety Instructions | Consult a doctor before use, keep hands away from moving parts, use on a flat surface |
| Included Accessories | Water pump, funnel (if applicable), multi-tool, Allen key |
| Recommended Water Type | Tap water (contains anti-algae additives) |
| Manufacturer | Chal-Tec GmbH, Wallstraße 16, 10179 Berlin, Germany |
| Importer (United Kingdom) | Chal-Tec UK limited |
| Recycling | Do not dispose of with household waste, drop off at collection point for electrical and electronic equipment |
Frequently Asked Questions - Rowlympic Capital Sports
User questions about Rowlympic Capital Sports
0 question about this device. Answer the ones you know or ask your own.
Ask a new question about this device
Download the instructions for your Rowing Machine in PDF format for free! Find your manual Rowlympic - Capital Sports and take your electronic device back in hand. On this page are published all the documents necessary for the use of your device. Rowlympic by Capital Sports.
USER MANUAL Rowlympic Capital Sports
Unit 6 Riverside Business Centre
Brighton Road
Shoreham-by-Sea
BN436RE
United Kingdom
Dear Customer,
Congratulations on purchasing this device. Please read the following instructions carefully and follow them to prevent possible damages. We assume no liability for damage caused by disregard of the instructions and improper use. Scan the QR code to get access to the latest user manual and more product information.

CONTENTS
Assembly 18
Device Overview and Accessories 20
Filling the Water Tank 21
Rowing Instructions 24
Emptying Water Tank 25
Adjusting the Heel Support 27
Training Computer 28
Maintenance and Care 29
Hints on Disposal 30
SAFETY INSTRUCTIONS
- As with any piece of fitness equipment, consult a physician before beginning your Rower exercise program.
- Stop immediately if you feel faint or dizzy.
- Follow instructions provided in this manual for correct foot
- position and basic rowing techniques.
- The Rower can stand vertically for storage. Make sure a secure location is chosen, such as the corner of a room or against a wall.
- Keep hands and fingers away from moving parts, as indicated by the warning sticker on the mainframe of your machine.
ASSEMBLY
1 Install Rower Seat on Seat Rail, then install the Rear Rubber Bumpstop.


2 Install the Seat Rail on the Rower Leg.

3 Install the Seat Rail on the Main Frame.


4 Install the Footplate and tighten the vertical frame until the mid leg rises approximately 3 - 5mm off the floor. Tighten the upper vertical frame tension bold using the allen key, tighten the bottom with a Multi-Tool (see arrows in illustration 3).


DEVICE OVERVIEW AND ACCESSORIES

| 1 Main Frame 5 Seat | |
| 2 Rower Counter 6 Seat Rail | |
| 3 Handle 7 Water Tank | |
| 4 Footplate |
Accessories:

FILLING THE WATER TANK
For the correct use of the rowing machine, the water tank must be filled up to the halfway point (Calibration Level). This requires about 17 liters of water. For filling, we recommend the use of tap water, as this contains additives that inhibit algae. Distilled water does not contain these and therefore it deteriorates faster.
If you want to train harder, simply row faster.
Attention: Before you start fi lling the tank, please check that the drain plug on the bottom of the tank is in the correct position so that water that is filled in does not directly leak out.

1 Place the unit horizontally on the floor.

2 Open the tank plug at the top of the water tank.

3 If you have a water hose connection, you may use it to fill the tank directly. To simplify fi lling, you may also use a funnel. Otherwise, fi II a 20-liter bucket with water and use the enclosed water pump. To do this, insert the straight end of the water pump into the bucket and insert the fl exible end into the tank opening. By pressing the pump bag, water will be sucked through the pump into the tank.

5 Fill the tank until the water level reaches the "Calibration Level" mark (see arrow).

ROWING INSTRUCTIONS
1 Start: bend straight forward with your arms straight.
2 Pull: push with your legs while keeping your arms straight.
3 End: stretch legs and pull back with arms.
4 Return movement: move forward with the upper body over the pelvis.
5 Start: start the movement from the beginning.

EMPTYING WATER TANK
Note: Please note that it is not necessary to empty the tank if you want to regulate the amount of water for your workout.
It is best to drain the tank directly above a drain - then you can simply open the drain plug on the underside of the tank and let the water run out.

1 If this is not possible, set up the rowing machine vertically.

2 Wait until the water reservoir is filled. Now set up the rowing machine again horizontally and open the filler plug on top of the tank.

3 Use the supplied hand pump to empty the water reservoir. Insert the straight piece of the water pump into the water tank and the fl exible end into a bucket to catch the water. By pushing the pump bag, you will pump the water through the pump.
4 As soon as you can no longer pump water from the reservoir, set the resistance regulator to maximum and wait until the remaining water has flowed into the lower half of the tank. Now place the rowing machine vertically (1). The level in the lower half of the tank should be slightly below the drain plug at this time so that no water leaks when it is opened (2). Now use the pump as before to empty the lower part of the water tank. If the water level is still above the drain opening, carefully tip over the rowing machine so that some of the water flows back into the reservoir until you can open the tank stopper. Now use the pump as before to empty the lower part of the water tank (3 + 4) . Repeat these steps until you have removed all water from the tank.

Attention: Please note that complete emptying of the residual water is only possible via the drain plug on the underside of the tank.
5 Place the device horizontally with the tank stopper open. Place a bowl or similar under the tank to catch any remaining water. Keep washcloths at hand to wipe up any water splashes.


ADJUSTING THE HEEL SUPPORT
For optimum fit during exercise, adjust the footrest to your foot as follows:
1 Place your foot with the ball under the holding strap.
2. Guide the heel support to your foot. To do this, pull the tab above your toe (see arrow) towards you until the retaining clips release. After adjusting the heel support, press the tab firmly back onto the retaining clips.
3 Tighten the holding strap over your foot.

TRAINING COMPUTER
Insert battery
The rowing machine has a built-in training computer. It requires two AAA batteries for operation, which are inserted in the rear battery compartment. On the display of the training computer, you can monitor your performance data or set goals for your training session.
Parameters
| Time 00:00 - 99:59 (minutes:seconds) | |
| Speed 0.0 - 999.9 (km/h or mi/h) | |
| Distance 0.00 - 99.99 (km or mi) | |
| Calories 0.0 - 999.9 (kcal) | |
| Odometer - if have 0.00 - 99.99 (km or mi) | |
| Pulse - if have 40 - 200 (bpm) |

Function Keys
Mode: To select the desired function. Press and hold for 4 seconds to reset all function values (except odometer).
- Set: Enter the setpoint (except odometer).
- Reset: To reset the value (except odometer).
Note: The monitor is automatically turned off when no signal is received for 4 minutes. The monitor is automatically powered when you start the exercise or press the button.
Functions
- TIME (TMR): Automatic storage of training time during training.
- SPEED (SPD): Display of the current speed.
- DISTANCE (DST): Accumulate the distances during training.
CALORIES (CAL): Automatic storage of calories burned during training. - ODOMETER (TOTAL): Display of the total distance during training. If you train again, the distance covered will be added to the total distance. The odometer cannot be reset unless you replace the battery.
- PULSE: Displays the user's heart rate per minute. To do this, you must hold on to the pulse sensor with both hands.
- SCAN: Displays the values of the functions in the following order: Time > Speed > Distance > Calories > Pulse > Odometer.
Note: If the display on the monitor is incorrect or difficult to see, replace the batteries. Always replace all batteries.
MAINTENANCE AND CARE
As with all exercise equipment with mechanical, moving components, the screws of the water rowing machine can also loosen due to frequent use. We therefore recommend that you check them regularly and, if necessary, tighten them with a suitable key. So that the water remains algae-free, it is recommended to add a commercially-available 20g quick-dissolving chlorine tablet to the tank every 2-3 months.
For low-noise training, it is important to keep the moving parts such as the cable pull, rollers and track as free of dirt as possible. You can easily clean the cables with a vacuum cleaner. The rollers and rails can be wiped with a damp cloth. Please do not use harsh detergents as these may attack the plastic surfaces.
DISPOSAL CONSIDERATIONS

If there is a legal regulation for the disposal of electrical and electronic devices in your country, this symbol on the product or on the packaging indicates that this product must not be disposed of with household waste. Instead, it must be taken to a collection point for the recycling of electrical and electronic equipment. By disposing of it in accordance with the rules, you are protecting the environment and the health of your fellow human beings from negative consequences. For information about the recycling and disposal of this product, please contact your local authority or your household waste disposal service.
This product contains batteries. If there is a legal regulation for the disposal of batteries in your country, the batteries must not be disposed of with household waste. Find out about local regulations for disposing of batteries. By disposing of them in accordance with the rules, you are protecting the environment and the health of your fellow human beings from negative consequences.
MANUFACTURER & IMPORTER (UK)
Manufacturer:
Chal-Tec GmbH, Wallstrasse 16, 10179 Berlin, Germany.
Importer for Great Britain:
Chal-Tec UK limited
Unit 6 Riverside Business Centre
Brighton Road
Shoreham-by-Sea
BN436RE
United Kingdom
Estimado cliente:
Unit 6 Riverside Business Centre
Brighton Road
Shoreham-by-Sea
BN436RE
United Kingdom
Cher client,
Unit 6 Riverside Business Centre
Brighton Road
Shoreham-by-Sea
BN436RE
United Kingdom
Gentile Cliente,
PRODUTTORE IMPORTATORE (UK)
Produtlore:
Chal-Tec GmbH, Wallstraße 16, 10179 Berlin, Germania.
Unit 6 Riverside Business Centre
Brighton Road
Shoreham-by-Sea
BN436RE
United Kingdom