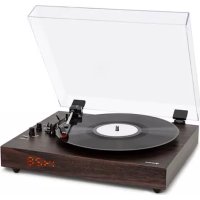
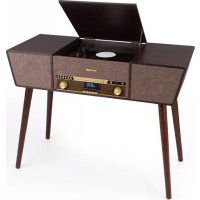
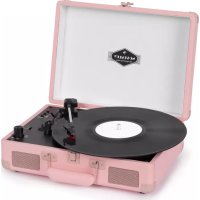
TT92W - Turntable Auna - Free user manual and instructions
Find the device manual for free TT92W Auna in PDF.

| Product type | Turntable with FM radio and MP3 player |
| Brand | Auna |
| Model | TT92W |
| Playback speeds | 33 ⅓, 45, 78 RPM |
| Main functions | Vinyl playback, FM radio, MP3 playback from USB/SD, AUX input, MP3 recording |
| Power supply | 220-240 V ~ 50/60 Hz |
| Built-in speakers | Yes |
| Audio output | RCA (Line out) |
| AUX input | 3.5 mm jack |
| Storage media | USB, SD/MMC card |
| Supported formats | MP3 (32-256 kbps, 32/44.1/48 kHz) |
| FM radio | Yes, with wire antenna and mono/stereo selection |
| Special features | Auto-stop, repeat, random playback, direct recording, track separation |
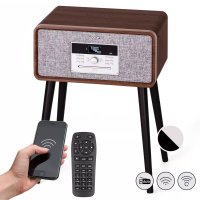
| Remote control | Yes (AAA batteries not included) |
| Included accessories | 45 RPM adapter, power cable, manual |
| Spare parts | Replacement stylus (ref. 10008988) |
| Dimensions | Not specified |
| Weight | Not specified |
| Safety instructions | Read manual before use; do not open device; unplug during storms |
| Maintenance and cleaning | Clean with a dry cloth; do not use chemical products |
| Recycling | Do not dispose of with household waste; take to collection point |
Frequently Asked Questions - TT92W Auna
User questions about TT92W Auna
0 question about this device. Answer the ones you know or ask your own.
Ask a new question about this device
Download the instructions for your Turntable in PDF format for free! Find your manual TT92W - Auna and take your electronic device back in hand. On this page are published all the documents necessary for the use of your device. TT92W by Auna.
USER MANUAL TT92W Auna
INHALTSVERZEICHNIS
Technische Daten 4
Hinweise
natural_image
Symbol of a trash bin crossed with a diagonal line, no text or numbers presentCongratulations on purchasing this device. Please read the following instructions carefully and follow them to prevent possible damages. We assume no liability for damage caused by disregard of the instructions and improper use. Scan the QR code to get access to the latest user manual and more product information.
CONTENT
Technical Data 20
Safety Instructions 20
Product Overview 22
Remote Control 24
Getting Started 25
Listening to Radio 25
Listening to Phono 26
AUX-IN Connection 26
Play MP3 Files from USB/SD Port 27
Playback 28
Line Out 29
Recording 29
Disposal Considerations 31
Declaration of Conformity 31
TECHNICAL DATA
| Item number 10008989 | |
| Power supply 220-240 V ~ 50/60 Hz | |
| Note: You can also purchase a replacement needle for this plate player under item number 10008988. Please visit our website: https://www.hifi-tower.co.uk/ | |
SAFETY INSTRUCTIONS
General information
- Lightning - If you are not going to use the device for a long time or if there is a storm, disconnect the plug from the electrical outlet and disconnect the device from the antenna connector. This will avoid damage to the product that may be caused by lightning or overvoltage.
• Overload - Do not overload power outlets, extension cords, or built-in power outlets, as this may result in a fire or electric shock.
- Foreign objects and liquid - Never push objects of any kind through openings in the device as they may touch dangerous voltage points or short out parts, which could result in a fire or electric shock. Never spill liquids of any kind on the device.
- Repairs and maintenance - Do not attempt to service this product yourself, as opening or removing covers will expose you to dangerous voltages or other hazards. Leave all maintenance to qualified service personnel.
- Damage requiring service - Disconnect the power plug from the outlet and consult a qualified specialist if any of the following conditions occur:
a) If the power cord or plug is damaged.
b) If liquid has been spilled or objects have fallen onto the product.
c) If the product has been exposed to rain or water.
d) If the product has been dropped or damaged.
e) If the product has a markedly reduced performance.
- Replacement parts - When replacement parts are required, make sure that the service professional who replaces the parts only uses replacement parts that have been approved by the manufacturer or that have the same characteristics as the original part. Unauthorized replacement may result in fire, electric shock or other hazards.
- Heat - Do not place the unit near heat sources such as radiators, heaters, stoves or other products (including amplifiers).
Special Instructions
- This device may be only used by children 8 years old or older and persons with limited physical, sensory and mental capabilities and / or lack of experience and knowledge, provided that they have been instructed in use of the device by a responsible person who understands the associated risks.
- Children should be supervised to ensure that they do not play with the appliance.
- Ensure children and babies do not play with plastic bags or any packaging materials.
- Mains plug/Power adaptor is used as disconnect device and it should remain readily operable during intended use.
- In order to disconnect the apparatus from the mains completely, the main plug/power adaptor should be disconnected from the mains socket outlet completely.
PRODUCT OVERVIEW
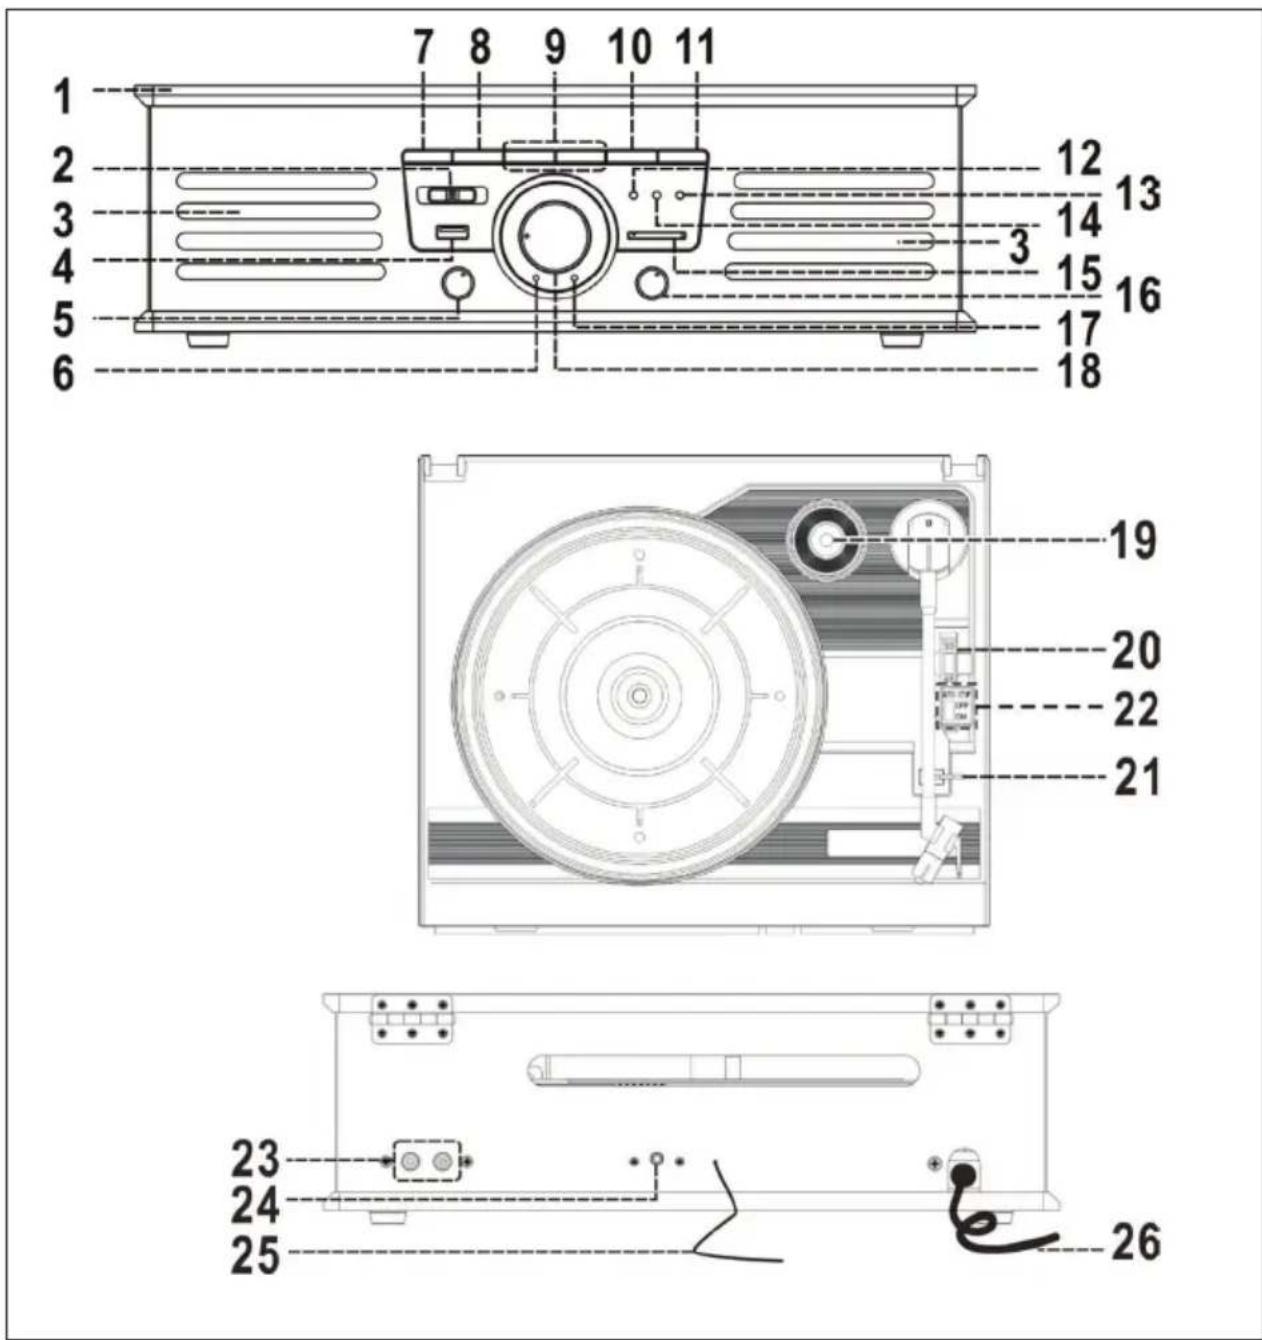
| 1 Dust Cover 14 Repeat/Random indicator | ||
| 2 Radio Band Selector 15 SD/MMC | Card Slot | |
| 3 Loud speaker 16 Power On/Off/Volume knob | ||
| 4 USB Socket 17 Power LED indicator | ||
| 5 Function knob 18 Tuning Knob | ||
| 6 FM Stereo LED Indicator 19 Spindle Adaptor | ||
| 7 Repeat/Random Button 20 Turntable Speed Selector | ||
| 8 Record Button 21 Pick-Up Holder | ||
| 9 Skip Up/ Down Button 22 Auto Stop On/Off Switch | ||
| 10 Play/Pause/Stop Button 23 Line Out Socket | ||
| 11 +10 Button | 24 3.5 mm Aux-In Jack | |
| 12 Record LED indicator | 25 FM Wire Antenna | |
| 13 Play LED indicator | 26 AC Power Cord | |
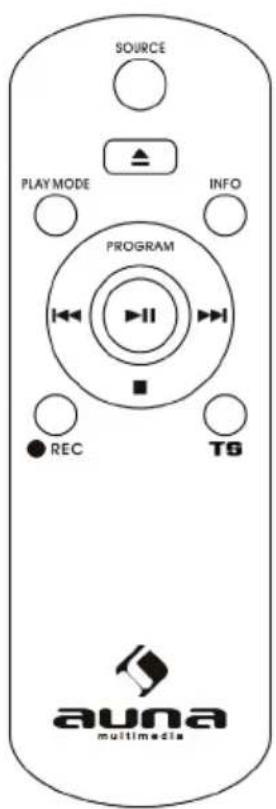
REMOTE CONTROL
The infra-red transmitter require 2 pcs "AAA" size battery for operation (not provided).
| Skip/Serch forward ▶▶◀Skip/Search backward ◀◀◀ | Skip to next trackSkip to previous track |
| Play/Pause ▶II | Play/Pause |
| +10/-10 MP3: skip 10 tracks forward/ | backward |
| Stop ■ | Stop |
| REP/RAN Repeat/Random function | |
| Track Separation TS | Divide recording track |
| REC Record function | |
| DELETE Press & hold to delete current MP3 file | |
GETTING STARTED
Installation
- Unpack all parts and remove protective material.
- Do not connect the unit to the mains before checking the mains voltage and before all other connections have been made.
- Do not cover any vents and make sure that there is a space of several centimeters around the unit for ventilation.
Connection
- Connect the Power Cord (26) to AC outlet.
- Turn the Power On/Off Knob (16) clockwise until Power LED Indicator (17) light up. It's mean the power supply is normal. Now your system is ready to play music.
LISTENING TO RADIO
1 Turn on the Power (16) and select Function knob (5) to "Tuner" position.
2 Select the desired band by Radio Band Selector(2)
3 Tune to the required station by turning the Tuning Knob (18).
4 Adjust the Volume Knob (16) to desired volume level.
FM & FM-stereo reception
- Set the Radio Band Selector (2) at "FM" position, program are received in Mono mode. In particular when stereo signal are weak. It is preferable to receive the program in Mono.
- Set the Radio Band Selector (2) at FM-ST" position for receiving stereo programs. The FM-Stereo LED Indicator (6) will light up to show FM Stereo program is receiving.
Hints for best reception: The receiver has a built-in FM Wire Antenna (25) hanging at the rear cabinet. This wire should be totally unraveled and extended for best reception.
LISTENING TO PHONO
- Remove the stylus protector.
- Be sure that the tone arm is being detached from the tone arm rest before operating and re-secured again after wards.
1 Select to "Phono" function from Function Selector(5)
2 Set the speed selector to the proper position depending on the record to be played.
3 Place the record on the platter(use the Spindle Adaptor if required).
4 Lift the tone arm from the rest and slowly move it to the record side.
5 The platter will start to rotate.
6 Place the tone arm to the desired position of the record.
7 Adjust the volume to the desired level.
8 At the end of the record, the platter will automatically stop rotating.
9 Lift the tone arm from the record and return to the rest.
10 To stop manually, lift the tone arm from the record and return it to the rest.
Remark
As some kind of record the auto-stop area was out of the unit setting, so it will stop before the last track finish. In this case, select the Auto-Stop Switch (22) to "Off" position. Then it will run to the end of the record but will not stop automatically.(Turn off the unit by power button or switch back the Auto-Stop Switch (22) to "On" position to stop the platter rotate). Then put back the tone arm to the rest position. Due to Aux and Phono were designed at the same position of this system. When Aux in jack(24) plugged by 3.5mm plug. The channel will change to Aux automatically and turntable will stop to ro-tate. Please ensure the Aux in jack (24) without plugged by anything before playing Phono.
AUX-IN CONNECTION
1 Slide the Function knob(5) to Phono/Aux position.
2 Adjust the Power ON-OFF/ Volume Control Knob(16) to desired volume level.
3 Start to play your external device
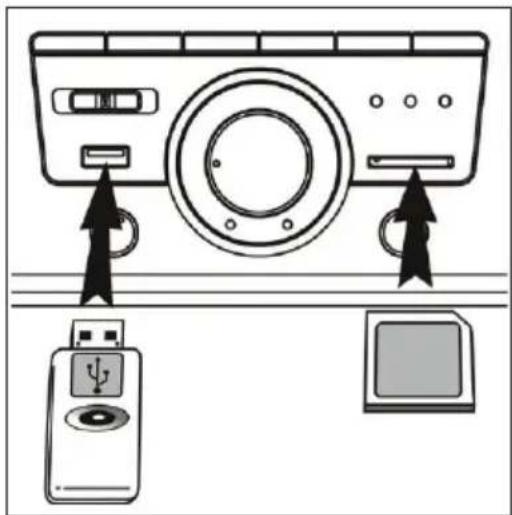
PLAY MP3 FILES FROM USB/SD PORT
1 Set the selector switch (5) to "USB" or "SD".
2 Connect a USB/SD memory device. If you try to insert the storage media the wrong way round, the unit may be damaged. Check the correct orientation before inserting.
3 The unit will automatically start loading and display the number of MP3 files.
Notes
• The device can only read MP3 files via USB.
- If you connect an MP3 player to the unit via USB, it may not be recognized as USB memory. This is not a malfunction.
- The USB port is not designed for USB extension or direct connection to a PC.
Removing USB / Memory Card
Before removing it, you must switch off the device or change the mode to "PHONO" or "TUNER". Now you can remove the storage medium.
PLAYBACK
Play/Pause/Stop
- To pause playback, press the button (10) once, to resume playback, press the button again.
- Press and hold the button longer (2 sec.) stop the playback, to start the playback you have to press the button once.
Skip/Search Mode (Skip/Search Forward/Search Back)
- Press during playback, the unit switches to the next track.
- Press during playback, the unit will move to the beginning of the title.
- During playback, press the above buttons twice to skip to the next or previous track.
MP3 track format requirement:
- MP3 bit rate : 32 KBPS\~256 KBPS.
- The system can detect and read the file under MP3 format only though the USB port or SD Card slot.
- If connect the system to MP3 player via the USB socket, due to variances in MP3 encoding format, some MP3
player may not be able to play via the USB socket. This is not a malfunction of the system.
Repeat/Random mode
Press the Repeat/Random Button (7) before or during playback, a single track or all the tracks can be played in different mode ass follow: (1) Repeat 1 > (2) Repeat 1 file > (3) Repeat all > (4) Random > (5) Off.
| Play Mode LCD Indicator | |
| Repeat single track flash in red color | |
| Repeat all tracks light up in red color | |
| Random mode light up in green color | |
| Off mode ---- |
Repeat play: You can listen the desired track, or all tracks repeatedly by this function.
Random play: You can listen all the tracks in a random order by this function.
LINE OUT
You can connect the unit to a stereo system via the line output (23). Connect the line output to the AUX input of the stereo system: Use an RCA cable (not supplied.
Notes:
- The sound from the built-in speakers will not be interrupted, even if the device is connected to a Hi-Fi system. Turn the volume to a minimum.
- The unit automatically switches to standby mode if no music is played for more than 15 minutes.
RECORDING
The device is able to make recordings from the board/AUX/Line-IN and save them in MP3 format on USB/SD.
Recording from the board
1 Set the switch (5) to „Phono/Aux“ and press „REC“ (8).
2 The indicator (8) lights up. The system is ready for recording.
3 Start playback.
4 To stop recording, press the button (8) again.
Note: The recording speed is 1:1 to the playback speed. To stop recording, press the „REC“ button (8) and recording will pause. To resume recording, press button (8) again.
AUX-IN Recording
1 Connect an external device using the AUX IN connector (24).
2 Set the switch (5) to „Phono/Aux“ and press „REC“ (8).
3 The indicator (8) lights up. The system is ready for recording.
4 Start playback.
5 To stop recording, press the button (8) again.
Title separation (remote control)
During recording, you can separate the tracks by pressing the „TS“ button. A new title is created, the indicator (12) lights up once if successful and recording continues.
Track delete
You can delete the current playback MP3 file from your USB/SD media, just press and hold the delete button on the remote control during playback the current file, the Play LED indicator (13) will flash once, it means the current already deleted and system will just to next file and continue playback.
DISPOSAL CONSIDERATIONS

natural_image
Symbol of a trash bin crossed with a diagonal line, no text or numbers presentIf there is a legal regulation for the disposal of electrical and electronic devices in your country, this symbol on the product or on the packaging indicates that this product must not be disposed of with household waste. Instead, it must be taken to a collection point for the recycling of electrical and electronic equipment. By disposing of it in accordance with the rules, you are protecting the environment and the health of your fellow human beings from negative consequences. For information about the recycling and disposal of this product, please contact your local authority or your household waste disposal service.
This product contains batteries. If there is a legal regulation for the disposal of batteries in your country, the batteries must not be disposed of with household waste. Find out about local regulations for disposing of batteries. By disposing of them in accordance with the rules, you are protecting the environment and the health of your fellow human beings from negative consequences.
DECLARATION OF CONFORMITY

Manufacturer:
Chal-Tec GmbH, Wallstrasse 16, 10179 Berlin, Germany.
Importer for Great Britain:
Berlin Brands Group UK Ltd
PO Box 1145
Oxford, OX1 9UW
United Kingdom
Hereby, Chal-Tec GmbH declares that the radio equipment type TT-92W is in compliance with Directive 2014/53/EU. The full text of the EU declaration of conformity is available at the following internet address: use.berlin/10008989
For Great Britain: Hereby, Chal-Tec GmbH declares that the radio equipment type TT-92W is in compliance with the relevant statutory requirements. The full text of the declaration of conformity is available at the following internet address: use.berlin/10008989
Cher client,
SOMMAIRE
Fiche technique 34
Remarque
natural_image
Symbol of a trash bin crossed with a diagonal line, no text or numbers presentDÉCLARATION DE CONFORMITÉ

Fabricant : Chal-Tec GmbH, Wallstraße 16, 10179 Berlin, Allemagne.
Berlin Brands Group UK Ltd
PO Box 1145
Oxford, OX1 9UW
United Kingdom
ÍNDICE DE CONTENIDOS
Datos técnicos 48
Observaciones
natural_image
Symbol of a trash bin crossed with a diagonal line, no text or numbers presentBerlin Brands Group UK Ltd
PO Box 1145
Oxford, OX1 9UW
United Kingdom
INDICE
Dati tecnici 62
Note
natural_image
Symbol of a trash bin crossed with a diagonal line, no text or numbers presentBerlin Brands Group UK Ltd
PO Box 1145
Oxford, OX1 9UW
United Kingdom