TTClassic Chrono - Turntable Auna - Free user manual and instructions
Find the device manual for free TTClassic Chrono Auna in PDF.

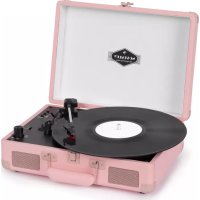
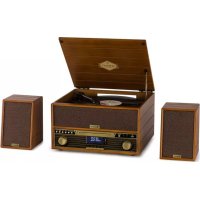
| Brand | Auna |
| Model | TTClassic Chrono |
| Product type | Turntable with built-in speakers, Bluetooth and clock |
| Power supply | Mains adapter 220-240 V~, output 12 V= 1 A; backup batteries: 2 x LR6 (AA) for clock |
| Playback speeds | 33, 45 and 78 rpm |
| Bluetooth | Version not specified, frequency 2.402-2.48 GHz, max power 8 dBm, typical range 10 m |
| Audio inputs | AUX-IN jack (3.5 mm), line input via RCA (not detailed) |
| Audio outputs | Headphone jack (3.5 mm), RCA output for external speakers |
| Built-in speakers | Yes, stereo |
| Auto stop | Yes, switchable (ON/OFF) mainly for 33 rpm records |
| Display | Digital clock (adjustable) |
| Special features | 45 rpm adapter included, time setting, stylus replacement |
| Weight | Approximately 3.5 kg (estimated) |
| Dimensions (W x D x H) | Approximately 420 x 350 x 120 mm (estimated) |
| Cleaning and maintenance | Clean the stylus with a soft brush; cabinet and cover with a soft cloth and mild detergent; avoid harsh chemicals |
| Safety | Do not expose to water, do not block ventilation, keep away from heat sources, use in a temperate climate |
| Spare parts | Replacement stylus available; AA batteries for clock |
Frequently Asked Questions - TTClassic Chrono Auna
User questions about TTClassic Chrono Auna
0 question about this device. Answer the ones you know or ask your own.
Ask a new question about this device
Download the instructions for your Turntable in PDF format for free! Find your manual TTClassic Chrono - Auna and take your electronic device back in hand. On this page are published all the documents necessary for the use of your device. TTClassic Chrono by Auna.
USER MANUAL TTClassic Chrono Auna
INHALT
Technische Daten 4
Seitenansicht
Vorderansicht


Unterseite
natural_image
Close-up of a black mechanical component with a downward arrow and labeled point A (no text or symbols beyond labels)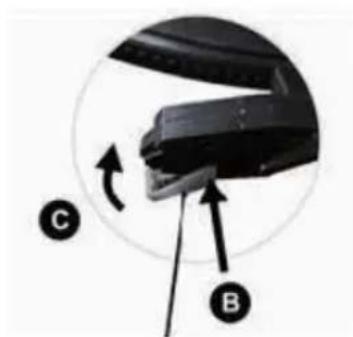
natural_image
Close-up of a black mechanical component with labeled parts (B and C) and directional arrows indicating motion or movement (no text or symbols beyond labels)Member of Berlin Brands Group
Handwerkerstr. 11
15366 Dahlwitz-Hoppegarten
Deutschland
natural_image
Symbol of a trash bin crossed with a diagonal line, representing no waste or discharge (no text or labels)Congratulations on purchasing this equipment. Please read this manual carefully and take care of the following hints to avoid damages. Any failure caused by ignoring the items and cautions mentioned in the instruction manual are not covered by our warranty and any liability. Scan the QR code to get access to the latest user manual and other information about the product.

CONTENTS
Technical Data 16
Safety Instructions 16
Product Overview 18
Phono: record playback 20
LINE IN Mode 20
BT Mode 21
Time Setting 21
How to replace the Turntable Stylus (Needle) 22
Tips for better Turntable Performance 23
Disposal Considerations 24
Declaration of Conformity 24
TECHNICAL DATA
| Item number 10039050, 10039051 | |
| Power supply | |
| Power adapter | Input: 220 - 240 V~Output: 12 V=, 1 A |
| Batteries for time display | 2x LR6 (Typ AA) |
| BT | |
| Frequency | 2,402 - 2,48 GHz |
| Maximum radio-transmission power | 8 dBm |
| Record player | |
| Playback speeds 33/ 45/ 78 rpm |
SAFETY INSTRUCTIONS
Read these instructions. All uses guidelines must be read before using the device. Keep the instructions for future use.
- Attention, use and security guidelines must be respected.
- The device must not be used near water or be put in contact with moisture.
- Make sure has no liquid is spilled on device and device openings.
- Move device carefully, avoid shocks.
- Do not block the breakdown of the device outputs.
- Do not place the device near from a heat source (e.g. radiator). Do not expose it to the sun.
- Plug the device as indicate on this information form.
- For cleaning the device, please follow the recommendations of the notice.
- The power cord should be unplugged when not using for a long period of time.
• Device shall be repaired by a qualified person when:
a. the power cord is damaged,
b. objects have fallen into the apparatus or a liquid has been spilled
into device,
c. device was exposes to the rain,
d. device does not work correctly without notable exterior change,
e. device is broken.
- The user shall not try to maintain device beyond that which is described in this information form.
- The apparatus shall not be exposed to dripping or splashing and that no objects filled with liquids, such as vases, shall be placed on apparatus.
- To be completely disconnect the power input, the mains plug of apparatus shall be disconnected from the mains." as the disconnect devices is the mains plug of apparatus.
- The mains plug of apparatus should not be obstructed or should be easily accessed during intended use.
- Excessive sound pressure form earphones and headphones can cause hearing loss.
- Minimum distance (8 cm) around the apparatus for sufficient ventilation.
- The ventilation should not be impeded by covering the ventilation opening with items such as newspaper, table-cloths, curtain etc;
- No naked flame sources such as lighted candles should be placed on the device.
- The apparatus is suitable to be used in moderate climates.
- The main plug shall remain readily operable.
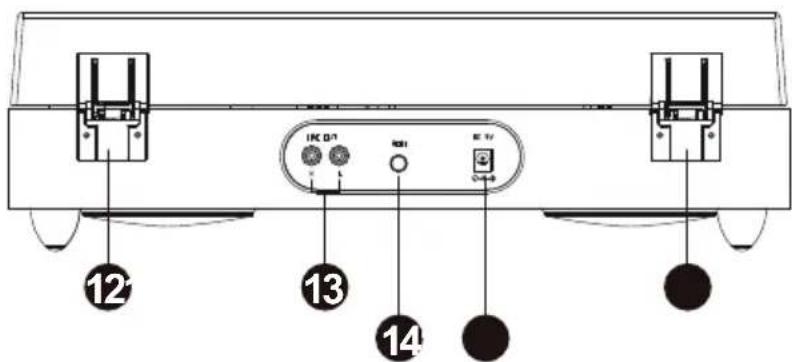
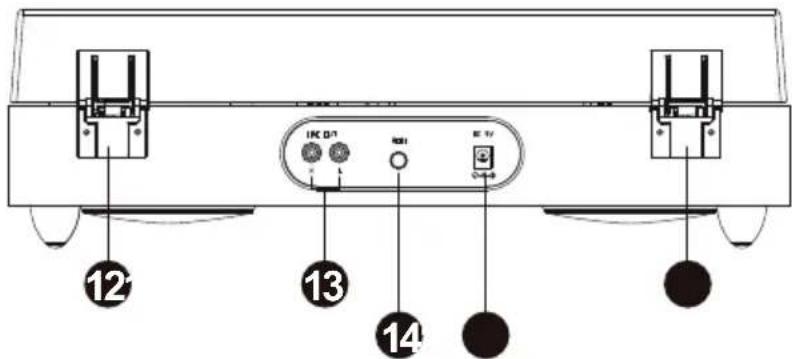
PRODUCT OVERVIEW
Top view
Side view
Front view
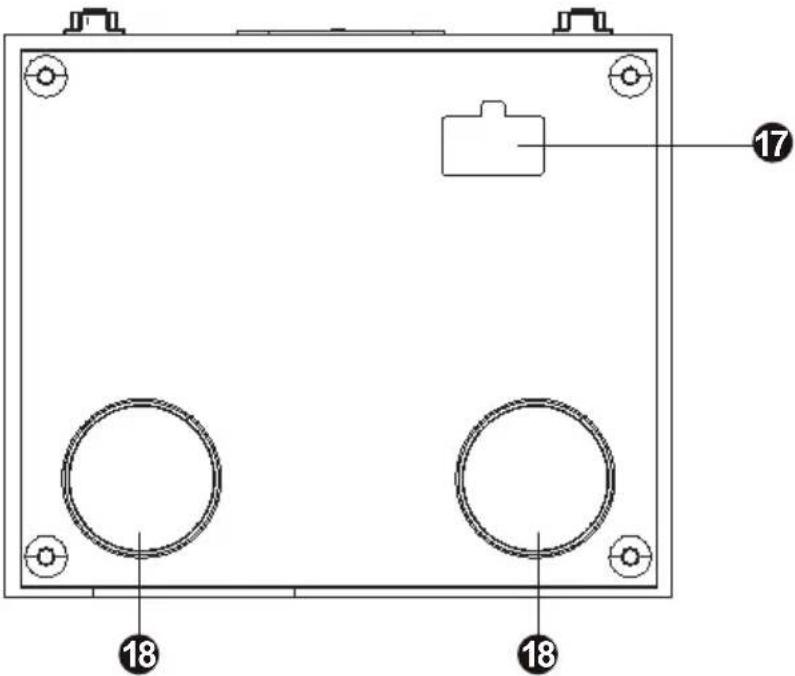
Bottom view
-
Lift lever
-
AUX IN jack
-
33/45/78 rpm switch – This switch controls the rpm of the turntable platter.
-
Mode selection knob
-
AUTO STOP ON/OFF switch
-
Power on/off and volume control knob
-
Headphones jack — to connect headphones or earphones to enjoy music privately
-
Cartridge
-
Tone arm clip
-
Platter: Place your record here.
-
45-rpm adapter – Used for 45-rpm vinyl records
-
Hinge
-
RCA output: Used to connect to external speakers (not included)
-
MODE: Used to set the time
-
DC port: Used to connect power adapter
-
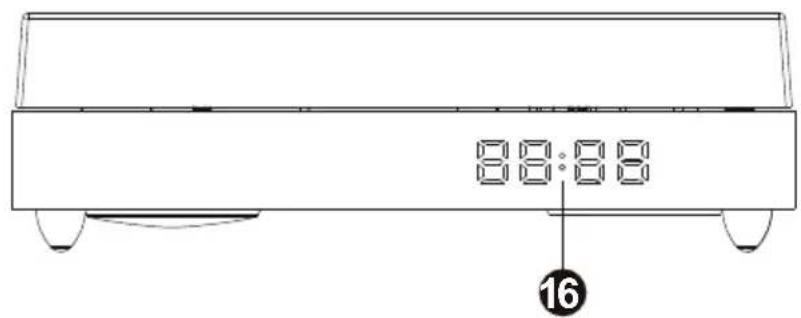
Time display
-
BATTERY COMPARTMENT- Remove the cover and place 2 AA batteries into this compartment. Be sure the positive and negative poles of the batteries are facing the proper direction. (Batteries are not included)
-
Speakers
PHONO: RECORD PLAYBACK
- Turn the mode selection knob to PH/LINE IN. (Remark: please make sure that the AUX IN jack is not plugged in with any cable).
- Connect the power adapter to the unit and mains socket.
- Turn the power & volume control knob clockwise. The indicator light will illuminate red.
- Place a record on the turntable platter and select the desired speed (33/45/78) according to the record.
When playing a 45-rpm record, use the included 45-rpm adapter located in the holder besides the platter(one more 45-rpm adaptor can be found in the accessory bag).
- Open the tone arm clip to release the tone arm. Push the lift lever backward to raise the tone arm and gently move the tone arm to the desired position over the record.
- The auto stop function applies to most 33-rpm vinyl records. If the auto stop control switch is turned ON, the record will stop automatically when finished. If the auto stop control switch is turned OFF, the record will not stop automatically when finished.
LINE IN MODE
- Connect your iPod, MP3 player, mobile phones etc. to the AUX IN port with a 3.5mm to 3.5mm audio cable (not included).
- Turn the mode selection knob to PH/LINE IN. You can play music from an auxiliary device through the unit. Turn the VOLUME CONTROL KNOB to adjust the volume.
Note: The iPod, MP3 player, mobile phones' volume control may also impact the volume level. So ensure this is also turned up.
BT MODE
- Turn the mode selection knob to BT. The indicator light will become blue colour ashing.
- Turn on BT function of your smart phone and search the name TT-Classic Chrono.
- After connection is successful, the indicator light will become blue colour without ashing. Then start to play your device. Turn the VOLUME CONTROL KNOB to adjust the volume. (The mobile phone or tablet PC's volume control may also impact on Volume Level so ensure this is also turned up).
TIME SETTING
- Connect the power adapter to the unit and mains socket.
- Long Press the MODE button, the Hour Time will start to ash, then short press the MODE button to set the hour time, and then long press the button again to confirm the Hour Time; at the same time, minutes time start to ash, then short press the MODE button to set the minutes time, and then long press the button to confirm the minutes time.
Remark: Put 2 AA batteries in the battery slot to maintain the time set. Without battery, when power on the turntable, the time will be 00:00, cannot maintain the local correct time, end user need re-set the time.
Music playback on your own speaker system
- Connect your own speaker system to the RCA port with a RCA-3.5mm audio cable (not included).
- You can enjoy the music of the vinyl records at your own speaker system.
EN
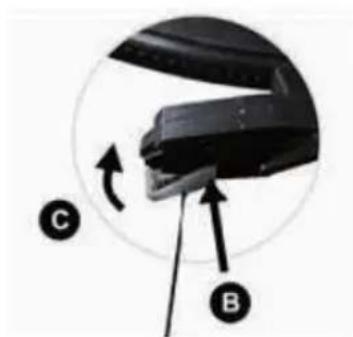
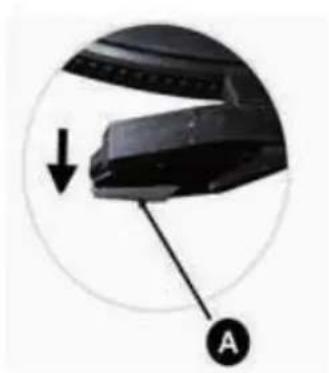
HOW TO REPLACE THE TURNTABLE STYLUS (NEEDLE)
Removing the Stylus from the cartridge.
-
Place a screwdriver at the tip of the stylus and push downward as shown in direction "A".
-
Remove the stylus by pulling the stylus forward and pushing downward.
natural_image
Close-up of a black mechanical component with a downward arrow and labeled point A (no text or symbols beyond labels)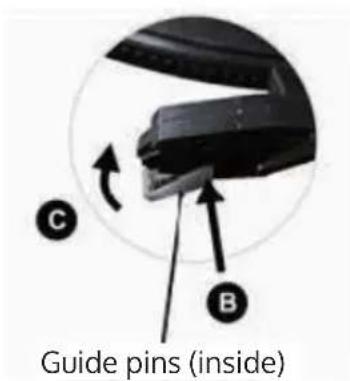
TIPS FOR BETTER TURNTABLE PERFORMANCE
- When opening or closing the turntable cover, handle it gently, gripping it either at the centre or at each side.
- Do not touch the needle tip with your fingers; avoid bumping the needle against the turntable platter or record edge.
- Frequently clean the needle tip-use a soft brush in a back-to-front motion only.
- If you must use a needle cleaning fluid, use very sparingly.
- Gently wipe the dust cover and turntable housing with a soft cloth. Use only a small amount of mild detergent to clean the turntable and dust cover.
- Never apply harsh chemicals or solvents to any part of the turntable system.
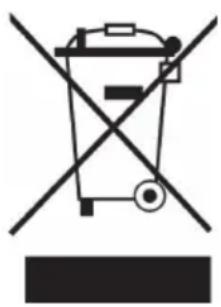
DISPOSALCONSIDERATIONS
natural_image
Symbol of a trash bin crossed with a diagonal line, representing no waste or discharge (no text or labels)If there is a legal regulation for the disposal of electrical and electronic devices in your country, this symbol on the product or on the packaging indicates that this product must not be disposed of with household waste. Instead, it must be taken to a collection point for the recycling of electrical and electronic equipment. By disposing of it in accordance with the rules, you are protecting the environment and the health of your fellow human beings from negative consequences. For information about the recycling and disposal of this product, please contact your local authority or your household waste disposal service.
This product contains batteries. If there is a legal regulation for the disposal of batteries in your country, the batteries must not be disposed of with household waste. Find out about local regulations for disposing of batteries. By disposing of them in accordance with the rules, you are protecting the environment and the health of your fellow human beings from negative consequences.
DECLARATION OF CONFORMITY

Manufacturer:
Chal-Tec GmbH, Wallstrasse 16, 10179 Berlin, Germany.
Importer for Great Britain:
Berlin Brands Group UK Ltd PO Box 1145 Oxford, OX1 9UW United Kingdom
Hereby, Chal-Tec GmbH declares that the radio equipment type TT-Classic Chrono is in compliance with Directive 2014/53/EU. The full text of the EU declaration of conformity is available at the following internet address: use.berlin/10039050
For Great Britain: Hereby, Chal-Tec GmbH declares that the radio equipment type TT-Classic Chrono is in compliance with the relevant statutory requirements. The full text of the declaration of conformity is available at the following internet address: use.berlin/10039050
Cher client, chère cliente,
SOMMAIRE
Fiche technique 26
Vue de côté

Vue de face


Vue de dessous
natural_image
Close-up of a black mechanical component with a downward arrow and labeled point A (no text or symbols beyond labels)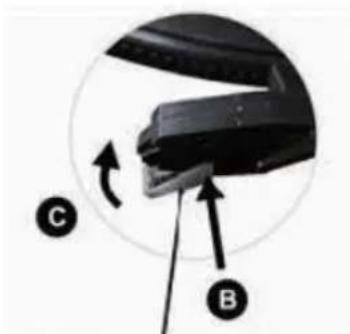
natural_image
Close-up of a mechanical component with labeled parts C and B, showing a curved arrow indicating rotation (no text or symbols beyond labels)natural_image
Symbol of a trash bin crossed with a diagonal line, representing no waste or discharge (no text or labels)DÉCLARATION DE CONFORMITÉ

Fabricant :
Chal-Tec GmbH, Wallstraße 16, 10179 Berlin, Allemagne.
CONTENIDO
Datos técnicos 36
Vista lateral
Vista frontal


Parte inferior
natural_image
Close-up of a black mechanical component with a downward arrow and labeled point A (no text or symbols beyond labels)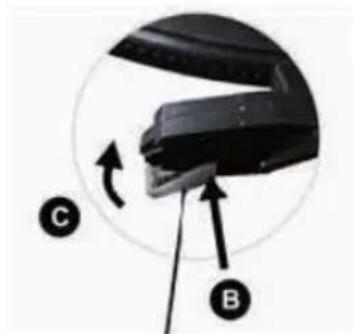
natural_image
Close-up of a mechanical component with labeled parts (C and B) and directional arrows indicating motion or movement (no text or symbols beyond labels)natural_image
Symbol of a trash bin crossed out by a diagonal line, with no text or labels present.Berlin Brands Group UK Ltd
PO Box 1145
Oxford, OX1 9UW
United Kingdom
INDICE
Dati tecnici 46
Vista laterale

Vista anteriore

Vista inferiore
natural_image
Close-up of a black mechanical component with a downward arrow and labeled point A (no text or symbols beyond labels)