Mary Ann - Turntable Auna - Free user manual and instructions
Find the device manual for free Mary Ann Auna in PDF.

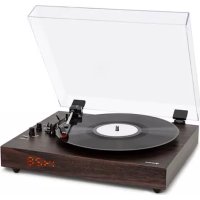
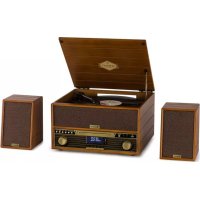
| Product type | Turntable with radio, CD player, Bluetooth and USB |
| Brand | Auna |
| Model | Mary Ann |
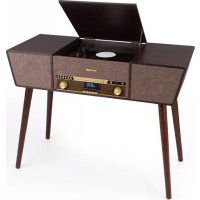
| Dimensions (W x H x D) | 49 x 33 x 22.5 cm |
| Weight | 7.00 kg |
| Power supply | DC 12 V / 2000 mA (230 V ~ 50 Hz mains adapter) |
| Turntable speeds | 33, 45, 78 rpm |
| Radio | FM 88-108 MHz with wire antenna and DAB+ |
| CD player | CD, CD-R, CD-RW, MP3 |
| USB port | Compatible with MP3 files on USB flash drive |
| Output power | 2 x 10 W |
| Connectivity | Bluetooth (pairing named Mary Ann), AUX-IN 3.5 mm input |
| Additional functions | Equalizer (POP, CLASSIC, ROCK, JAZZ, FLAT), memory for 10 FM and DAB stations, USB recording, clock, sleep timer, silent mode |
| Included accessories | Remote control, 45 rpm adapter, support feet (for some models), transport lock |
| Safety | Transport lock to protect the turntable, tonearm lock, automatic stop after 15 minutes of inactivity |
| Maintenance and cleaning | Clean the cabinet with a soft dry cloth; for CDs, wipe from the center outward with a soft cloth without solvent |
| Repairability and spare parts | Contact a specialized dealer in case of malfunction; the stylus is not covered by warranty if damaged |
| General information | EU declaration of conformity available at use.berlin/10039055; do not dispose of with household waste (recycle) |
Frequently Asked Questions - Mary Ann Auna
User questions about Mary Ann Auna
0 question about this device. Answer the ones you know or ask your own.
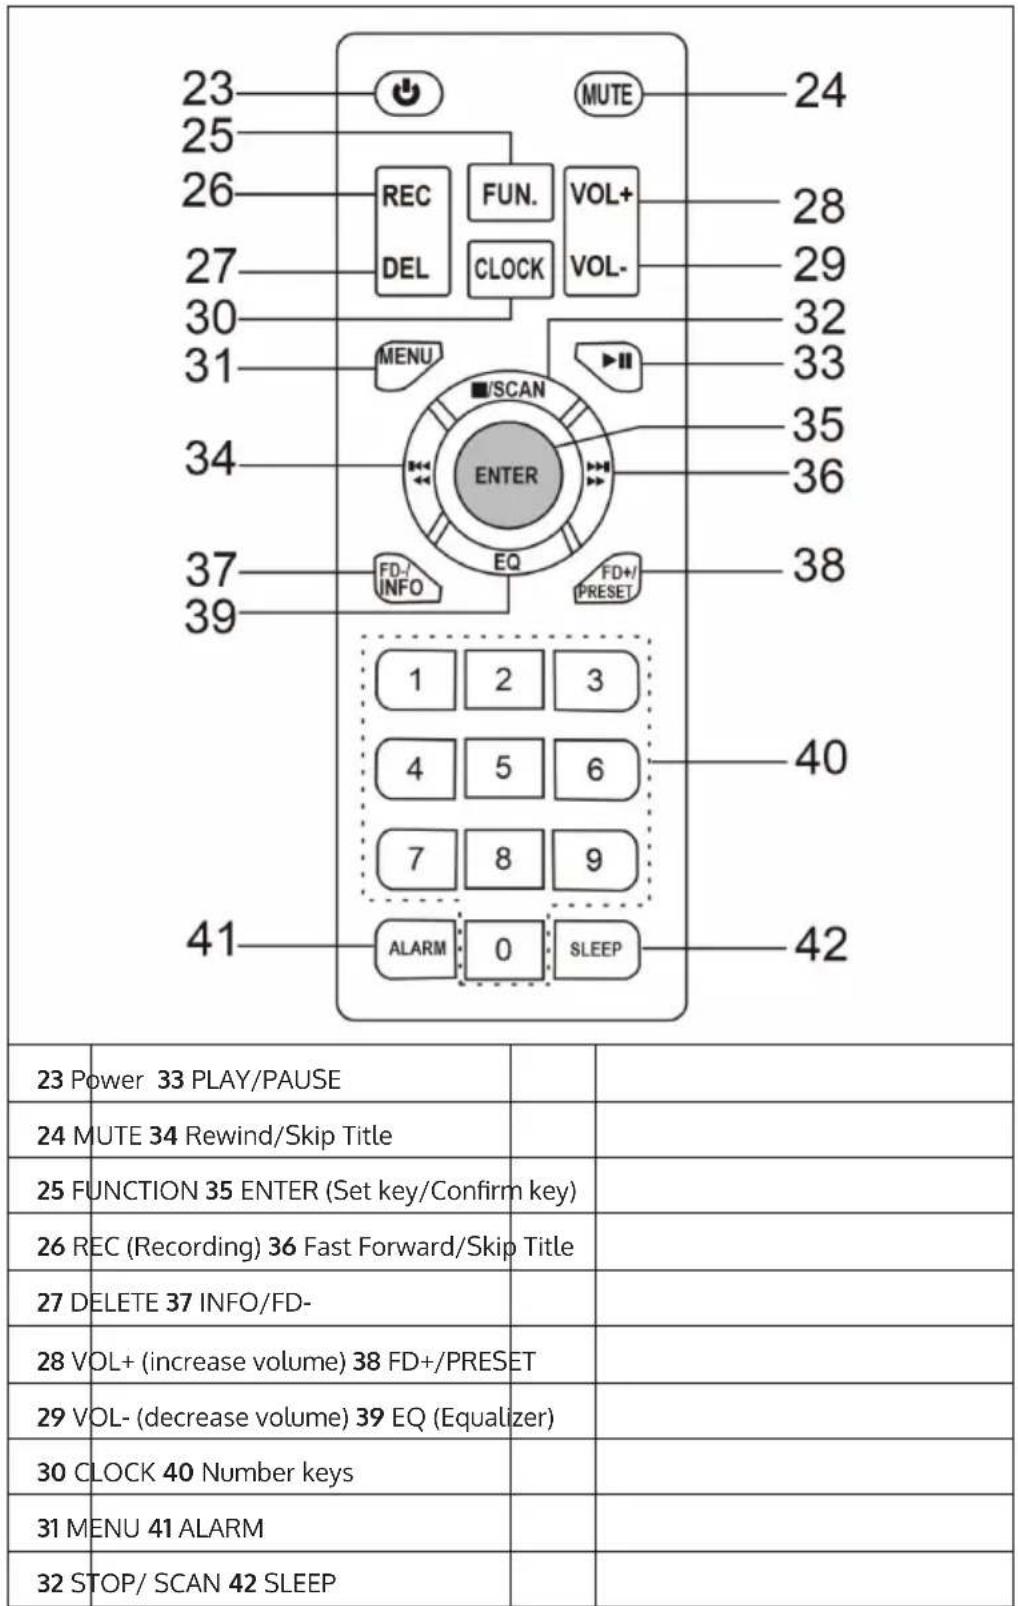
Ask a new question about this device
Download the instructions for your Turntable in PDF format for free! Find your manual Mary Ann - Auna and take your electronic device back in hand. On this page are published all the documents necessary for the use of your device. Mary Ann by Auna.
USER MANUAL Mary Ann Auna
INHALTSVERZEICHNIS
Technische Daten 4
natural_image
Two open vintage portable cassette devices with metal legs and a lid, shown from different angles (no text or symbols visible)
other
| Component | Value | |---|---| | 23 | 24 | | 25 | 28 | | 26 | 29 | | 27 | 32 | | 30 | 33 | | 31 | 35 | | 34 | 36 | | 37 | 38 | | 39 | 40 | | 41 | 42 | The image contains a schematic representation of a device layout with labeled boxes (e.g., 'MENU', 'SCAN', 'ENTER') and a grid of boxes (e.g., '1', '2', '3'), some containing numerical labels like '40' or '41'. The table below is a table for the same chart.PLATTENSPIELER

natural_image
Two technical diagrams showing mechanical assembly or tool positioning, with no visible text or symbols.Member of Berlin Brands Group
Handwerkerstr. 11
15366 Dahlwitz-Hoppegarten
Deutschland
natural_image
Symbol of a trash bin crossed with a diagonal line, representing no waste or discharge (no text or labels)Congratulations on purchasing this equipment. Please read this manual carefully and take care of the following hints to avoid damages. Any failure caused by ignoring the items and cautions mentioned in the instruction manual is not covered by our warranty and any liability. Scan the QR code to get access to the latest user manual and other information about the product:

CONTENTS
Safety Instructions 24
Device Overview and Function Keys 25
Function Keys 26
Remote Control 27
Turntable 28
Rear View 28
Installation 29
Installing the Feet 30
Commissioning and Operation 31
Additional Functions 36
Cleaning and Care 38
Disposal Considerations 40
Declaration of Conformity 40
TECHNICAL DATA
| Item number | 1004138810039054 | 1003905210039053 | 1004138910039055 |
| Power supply DC 12 V / 2000 mA | |||
| Playback speed 33 / 45 / 78 rpm | |||
| FM Radio 88-108 MHz | |||
| CD CD / CD-R / CD-RW / MP3 | |||
| USB | Compatible with MP3 files stored in the USB memory. | ||
| Output 2 x 10 W 2 x 10 W 2 x 10 W | |||
| Power consumption 24 W max. | |||
| Dimensions (mm) 49 x 33 x 22.5 49 x 33 x 66.5 73 x 32.5 x 64 | |||
| Weight 7.00 kg 7.75 kg 8.90 kg | |||
SAFETY INSTRUCTIONS
- Choose a safe location and avoid placing the unit in direct sunlight or near any heat source.
- Avoid environments subject to vibration, excessive dust, cold or moisture.
- Due to the risk of electrical shock, do not open the cabinet. Should a foreign object accidentally find its way into the interior of the unit, contact your local dealer.
- Do not attempt to clean the unit with chemical solvents as this might damage the finishing. A clean, dry cloth is recommended for cleaning.
- Keep this manual for future reference.
This device may be only used by children 8 years old or older and persons with limited physical, sensory and mental capabilities and / or lack of experience and knowledge, provided that they have been instructed in use of the device by a responsible person who understands the associated risks.
DEVICE OVERVIEW AND FUNCTION KEYS
natural_image
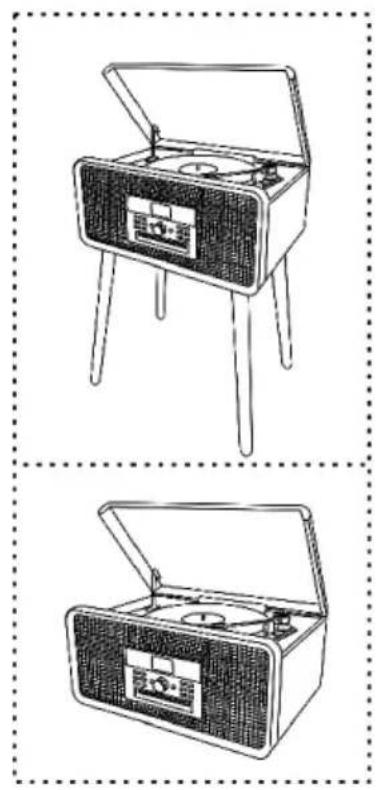
Two line drawings of vintage portable cassette devices with open doors and buttons (no text or symbols)
| 1 | Turntable cover | 3 | Turntable |
| 2 | Support bracket | 4 | Speed selection |
FUNCTION KEYS
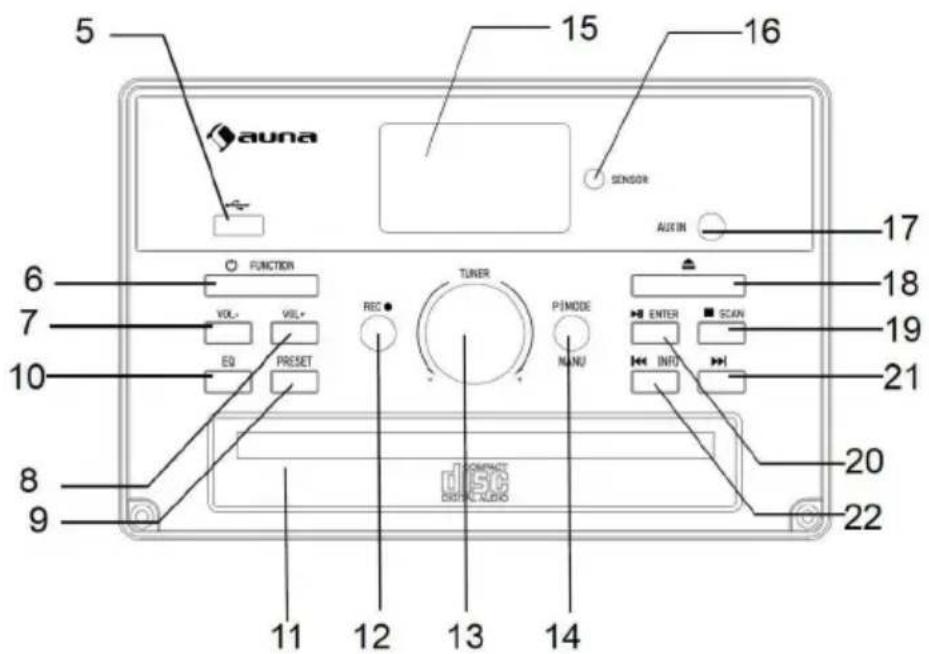
| 5 USB port 14 P/MODE (Playback/Mode) | |||
| 6 | FUNCTION (switch on/function key) | 15 Display | |
| 7 VOL- (decrease volume) 16 SENSOR (remote sensor) | |||
| 8 VOL+ (Increase volume) 17 AUX-IN | |||
| 9 PRESET (memory button) 18 Open/Close CD Tray | |||
| 10 EQ (equalizer button) 19 Stop recording/rewind title | |||
| 11 CD compartment 20 Play/Pause | |||
| 12 REC (Record button) 21 Skip | |||
| 13 TUNER (transmitter setting) 22 Skip/fast forward title | |||
REMOTE CONTROL
other
| Position | Label | Value | | :--- | :--- | :--- | | 1 | 2 | 3 | | 2 | 3 | 4 | | 3 | 5 | 5 | | 4 | 6 | 6 | | 5 | 7 | 7 | | 6 | 8 | 8 | | 7 | 9 | 9 | | 8 | 10 | 10 | | 9 | 11 | 11 | | 10 | 12 | 12 | | 11 | 13 | 13 | | 12 | 14 | 14 | | 13 | 15 | 15 | | 14 | 16 | 16 | | 15 | 17 | 17 | | 16 | 18 | 18 | | 17 | 19 | 19 | | 18 | 20 | 20 | | 19 | 21 | 21 | | 20 | 22 | 22 | | 21 | 23 | 23 | | 22 | MUTE | MUTE | | 23 | REC DEL | REC | | 24 | FUN. CLOCK | FUN. | | 25 | VOL+ VOL- | VOL+ | | 26 | MENU | MENU | | 27 | 30 | 30 | | 28 | 31 | 31 | | 29 | 32 | 32 | | 30 | 33 | 33 | | 31 | ENTER EQ FD+/PRESET | ENTER | | 32 | 34 | 34 | | 33 | 35 | 35 | | 34 | 36 | 36 | | 35 | 37 | 37 | | 36 | 38 | 38 | | 37 | ALARM | ALARM | | 38 | SLEEP | SLEEP | | 39 | [SCAN] [EQ] [PRESET] [OPEN] [CONTINER] [CONTINER] [CONTINER] [CONTINER] [CONTINER] [CONTINER] [CONTINER] [CONTINER] [CONTINER] [CONTINER] [CONTINER] [CONTINER] [CONTINER] [CONTINER] [CONTINER] 40 41 42 23 Power: Power: Power: Power: Power: Power: Power: Power: Power: Power: Power: Power: Power: Power: Power: Power: Power: Power: Power: Power: Power: Power: Power: Power: Power: Power: Power: Power: Power: Power: Power: Power: Power: Power: Power: Power: Power: Power: Power: Power: Power: Power: Power: Power: Power: Power: Power: Power: Power: Power: Power, [MUTE] [REND] [FUN.] [VOL+] [VOL-] [MUTE] [MUTE] [MUTE] [MUTE] [MUTE] [MUTE] [MUTE] [MUTE] [MUTE] [MUTE] [MUTE] [MUTE] [MUTE] [MUTE] [MUTE] [MUTE] [MUTE] (CONTINER) (CONTINER) (CONTINER) (CONTINER) (CONTINER) (CONTINER) (CONTINER) (CONTINER) (CONTINER) (CONTINER) (CONTINER) (CONTINER) (CONTINER) (CONTINER) (CONTINER) ALARM : -0 : -SLEEP : -40 ALARM : -0 : -SLEEP : -42 ALARM : -0 : -SLEEP : -40 ALARM : -0 : -SLEEP : -42 ALARM : -0 : -SLEEP : -40 ALARM : -0 : -SLEEP : -42 ALARM : -0 : -SLEEP : -40 ALARM : -0 : -SLEEP : -42 ALARM : -0 : -S Sleep : -40 ALARM : -0 : -S Sleep : -42 ALARM : -0 : -S Sleep : -40 ALARM : -0 : -S Sleep : -42 ALARM : -0 : -S Sleep : -40 ALARM : -0 : -S Sleep : -42 ALARM : -0 : -S Sleep : -40 ALARM : -0 : -S Sleep : -42 ALARM : - ALARM : - ALARM : - ALARM : - ALARM : - ALARM : - ALARM : - ALARM : - ALARM : - ALARM : - ALARM : - ALARM : - ALARM : - ALARM : - ALARM : - ALARM : - ALARM : - ALARM : - ALARM : - ALARM : - ALARM :- ALARM : - ALARM : - ALARM : - ALARM : - ALARM : - ALARM : - ALARM : - ALARM : - ALARM : - ALARM : - ALARM : - ALARM : - ALARM : - ALARM : - ALARM : - ALARM : - ALARM : - ALARM : - ALARM : - ALARM : . ALARM : - ALARM : - ALARM : - ALARM : - ALARM : - ALARM : - ALARM : - ALARM : - ALARM : - ALARM : - ALARM : - ALARM : - ALARM : - ALARM : - ALARM : - ALARM : - ALARM : - ALARM : - ALARM : - ALARM : > ALARM : - ALARM : - ALARM : - ALARM : - ALARM : - ALARM : - ALARM : - ALARM : - ALARM : - ALARM : - ALARM : - ALARM : - ALARM : - ALARM : - ALARM : - ALARM : - ALARM : - ALARM : - ALARM : - ALARM : -0 .TURNTABLE

| 43 | 45 RPM adapter | 47 | Tonearm fuse |
| 44 | Transport lock | 48 | Tonearm and needle |
| 45 | Pull lever | 49 | Rotary plate |
| 46 | RPM selection (33, 45 & 78 rpm) |
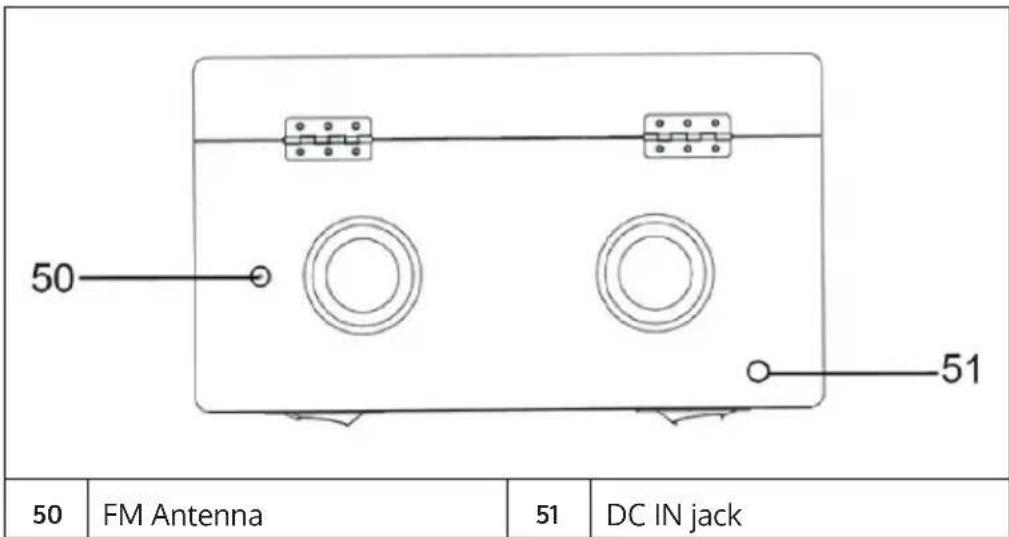
REAR VIEW
INSTALLATION
- Carefully remove the unit from its packaging and all packaging materials from the unit.
- Unwind the power cord and unplug it to its full length.
- Unwind the FM cable antenna completely and pull it out to the full length.
- Place the device on a flat and stable surface close to a wall outlet and away from strong magnetic fields.
- Plug the power plug into the wall outlet.
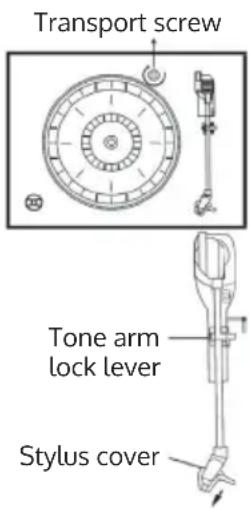
- Lift the turntable cover. The turntable has been provided with a transport lock for shipping. To remove the transport lock, use a coin or screwdriver and unscrew the transport lock clockwise. This may cause the platter to rotate.
- Remove the white plastic guard from the needle by sliding it down in the direction of the arrow.
- Be careful not to damage the needle during use, as this is not covered by the warranty.
- Remove the tonearm fuse.
- Release the tonearm locking lever.
- Insert the plug of the power adapter into a 230 V \~ 50 Hz socket and the power cord into the power connector at the back of the device.
INSTALLING THE FEET
Valid only for: 10039052, 10039053, 10041389, 10039055
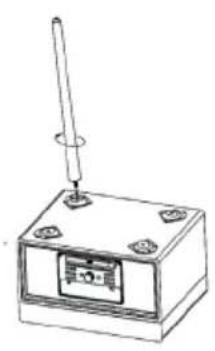 | 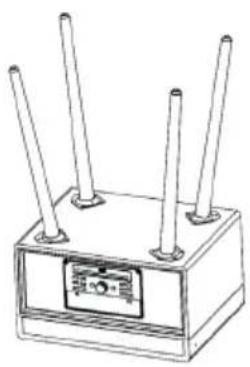 |  |
| Place the unit upside down on a flat surface. Insert the support legs into the openings provided in the device and fix them by turning them clockwise. | In this way, attach all four support legs to the unit. | If one of the legs does not touch the floor properly, unscrew the leg and insert one or two washers to level all feet. |
COMMISSIONING AND OPERATION
Power source
- Ensure that the mains voltage (230 V \~ 50 Hz) of your home corresponds to the operating voltage of the adapter.
- Connect the power adapter to the wall outlet.
- Connect the DC connector to the DC IN jack (12 V / 2000 mA) on the rear of the unit.
Note: If the power plug does not fit into the outlet, it is likely that the outlet is obsolete. Have it replaced by a qualified electrician.
Raising and Lowering the Turntable Cover
Raise the cover as far as possible until the support brackets engage and the cover remains open. To close, slide the cover slightly upwards so that the support brackets are no longer engaged and then carefully lower the cover downwards.
Note: Never force the cover down to prevent damage to the cabinet or cover. Always make sure that the support brackets are no longer engaged when lowering.
Power On/Off
- Press the POWER/FUNCTION button to turn on the unit.
- Press the FUNCTION button to select the desired mode.
- Use the volume control to adjust the volume.
- Press the POWER/FUNCTION button again to turn off the power.
Note: If no button is pressed 15 minutes after stopping playback, the unit will turn off automatically.
USB
- Press the FUNCTION button and select the USB mode.
- Connect a USB device to the USB port. The unit will automatically play the first track of the USB device.
- When MP3 is detected, the display shows „MP3“.
- The /▶/ buttons have the same functions as in CD mode.
Playing in MP3 mode (in CD/USB mode)
- To start playback in CD/USB mode, press the button.
- During title playback, the title and folder numbers are shown on the display. The MP3 icon also appears on the display.
- Press the button to stop playback.
Skip/ Forward/ Rewind tracks
- During CD/USB playback, press the / button is repeatedly to skip tracks forward or backward. Release the button when the desired track appears on the display. Playback will resume from the selected track.
- Press and hold the / button to fast forward or rewind a track. Release the button when the desired section is reached. Playback will then resume from this section.
Note: Press the number buttons to select the desired music.
Repeat/Random Playback
| When you press the P/MODE button on the front of the unit, the unit repeats the current playback track. The corresponding icon will appear on the display. | |
| FOLDER | If you press the button a second time, all tracks within a selected folder will be repeated. |
| ALL | If you press the button a third time, all tracks will be repeated and the corresponding icon will appear on the display. |
| RDM | If you press the P/MODE button a fourth time, all tracks will be played back in random order. The display will show "RANDOM". |
Press the ◀◀/▶buttons to select any title. To stop random playback, press the P/MODE button again. Press the STOP button to stop playback.
Note: If there is no folder on an MP3 media, the folder repeat function will not work.
Memory function in CD/MP3 mode
- In CD mode, press the STOP button first. Then press the P./MODE button on the unit or the PRESET button on the remote control to enter memory mode.
- Press the ◀◀/▶buttons to select the title you want to save. Press ENTER to confirm.
- Repeat step 2 to save more tracks.
4 In MP3 mode, saving tracks works the same as in CD mode (see above). - Press the PLAY/PAUSE button to play back the saved tracks. Press the /buttons to select a stored track from the memory list. Press the STOP button to exit the save mode. All previously saved tracks will be deleted.
Note: You can store up to 99 MP3 tracks and 20 CD tracks.
Recording function
- In PHONO/TAPE/CD/BT or AUX-IN mode, press the RECORD button.
- Press the RECORD button again to confirm. During recording, the "USB" indicator in the upper right corner of the display will blink until recording is finished.
Note: The recording speed is 1:1.
Deleting Recorded Titles or Files
In USB Playback mode, pressing the DELETE button on the remote twice will erase the currently recorded track.
Radio
- Set the volume to a low level, then press the POWER button to turn on the power. Set the FM mode with the FUNCTION button.
- Turn off the desired radio station using the TUNER control.
- If you no longer want to listen to the radio, press the POWER/FUNCTION button again to turn off the unit. The backlight will also turn off.
FM antenna
The FM antenna is located on the back of the unit. Adjust the position and direction of the FM antenna for best reception.
Playing CDs
- Press the FUNCTION button and select the CD mode. The unit is capable of playing CD, CD-R and CD-RW.
- Open the CD compartment by pressing the button ▲.
- Insert the CD (MP3 is compatible) into the CD compartment with the label side facing up.
- Press the button again to close the CD compartment. The CD will rotate for a few seconds while the unit reads the CD. Then the CD stops spinning and the first track of the CD is played.
Reproduction of records
The unit is equipped with a full-size turntable with belt drive and three speed levels. You can play 33, 45 and 78 RPM records.
- Press the POWER/FUNCTION button to turn on the unit then set the volume to a low level.
- Use the POWER/FUNCTION button to enter Phono mode. PHONO will be displayed on the top of the display. You can now start the record playback.
- Make sure that you have removed the needle guard and unlocked the tonearm lock.
- Set the correct speed (33, 45 or 78 RPM). If you want to play 45 RPM records, place the 45 RPM adapter on the center spindle.
- Place the record on the center spindle.
- Pull the lever up to lift the tonearm off the holder. Move the tonearm to the edge of the record. The turntable will begin to rotate automatically. Carefully move the tonearm onto the record using the lever.
- Adjust the desired volume.
- As soon as the tonearm reaches the end of the record, the platter will stop rotating automatically. Fix the tonearm manually to the holder before ending use or change for another record.
- Press the POWER button again to turn the unit off.
Note: Do not turn or stop the turntable manually. If you move the turntable manually without fixing the tonearm to the holder, it may be damaged.
BT Connection
- Select the BT mode by pressing the FUNCTION button
- Select the unit from the device list of your mobile device.
- Once the BT connection is established, you can listen to music from your mobile device on your radio. Settings can only be made via your device.
Note: If BT is not deactivated on the device, the BT connection is automatically re-established as soon as BT is activated on the mobile device and the mobile device is within range.
AUX-IN
Press the POWER/FUNCTION button and select the AUX IN mode. Then connect a 3.5 mm audio cable to the external media player and connect the other end of the cable to the AUX-IN connector of the unit. Use your external device to control playback.
ADDITIONAL FUNCTIONS
DAB radio
- Press the POWER/FUNCTION button and select the DAB mode.
- The unit will automatically start a station scan until DAB stations are received.
- Turn the TUNER/SELECT knob to select DAB stations manually. Press the ENTER button or wait about 3 seconds to confirm your selection. When you select a DAB stereo station, DAB appears on the display.
- When you press the INFO button in DAB mode, the information provided by the DAB transmitter such as type, program number, frequency range, signal strength, time, date and other values are displayed.
FM/DAB
- In DAB/FM Playback mode, select the desired radio station. Press and hold the PRESET button for 2 seconds. The display will show „Preset Store 1: (Empty)“. Press the TUNER/SELECT knob to save the selected station. The display will show „Preset 1 Stored“.
- Turn the TUNER/SELECT knob or press the SKIP+/- buttons on the remote control to select another radio station to store.
- Repeat steps 1 and 2. You can store a total of 10 DAB stations and 10 FM stations.
- Press the PRESET button once to play back the preset stations. Turn the TUNER/SELECT knob or press the SKIP+/- buttons on the Remote Commander to play the desired preset tracks.
Language setting
During FM/DAB mode, press the MENU button and use the TUNER/SELECT knob to select „System“. Use the TUNER/SELECT knob to select „Language“ and press the ENTER button to enter the language setting. You can choose between English-Nederlands-Deutsch-Norsk-Svenska.
Setting the Time and Date
- While in FM and DAB mode, press the MENU button and turn the TUNER/SELECT knob to select „System“. Press the ENTER button to confirm.
- Turn the TUNER/SELECT knob to select „Time“ and press the ENTER button to confirm. The display will show „Time“ and „Set Time/Date“.
- Select „Set Time/Date“. „Auto update“ and „Set 12/24 hour“ will appear on the display when you turn the TUNER/SELECT knob.
- After confirming „Auto Update“: If you turn the TUNER/SELECT knob, the display will show „No update“, „Update from any“, „Update from DAB“, „Update from FM“. Use the knob to select the desired setting and press it to confirm your selection.
- After confirming „Set 12/24 hour“, „Set 12 hour“ and „Set 24 hour“ are shown on the display.
- To set the time, confirm the 12-hour or 24-hour mode. „Set Time“/“Hour“, „Minute“ („AM or PM“) will be shown on the display. Press the ENTER button to confirm.
- Once the time setting is complete, the date can be set. "Set Date" "9-12-2013" is shown on the display. Set the date with the TUNER/SELECT knob and confirm by pressing the ENTER button.
Mute/Equalizer
If you press the MUTE button on the remote control once, the speaker will automatically turn off and the display will show „MUTE ON“. You can cancel muting by pressing the MUTE buttons again. The speaker will turn on again and music will sound. If you press the EQ button in any operating mode, you can choose from five different sound effects: POP/CLASSIC/ROCK/JAZZ/FLAT. The effect you set depends on your personal preferences.
Reset to factory settings
In DAB mode, press and hold the P/MODE button to enter SYSTEM setting. Then press 1/4 till "FACTORY RESET" appears. Press ENTER button to enter settings, press 1/4 to choose "YES" or "NO". If you choose "YES", you just need to press ENTER button to finish the factory re-settings.
CLEANING AND CARE
Furniture protector
This device is equipped with non-slip rubber feet that prevent the device from slipping during operation. These rubber feet are made of non-slip rubber that leaves no marks or stains on your furniture. However, it may happen that the rubber feet are „softened“ by oil-based furniture polishes, wood care products or cleaning sprays, which may leave traces on the furniture. We therefore recommend that self-adhesive felt glides be attached to the rubber feet to prevent damage to the furniture and that the appliance be placed on the furniture only afterwards.
Housing care
• Take care of the housing just as carefully as you take care of your furniture.
- If the cabinet is dusty, rub it with a soft cloth.
- If there are fingerprints on the cabinet, remove them with a high quality spray cleaner. Make sure it does not get onto the metal and plastic parts of the unit. It is best not to spray the cleaner directly onto the case, but first onto a cloth and then rub the case with the cloth.
Cleaning CDs
- Remove a CD from the CD case by pressing down in the middle of the case. Gently hold the CD by the edges.
- Remove fingerprints from the CD and dust should be removed with a soft cloth. Since CDs, compared to conventional recording media, have no grooves in which dust and microscopic residue can accumulate, cleaning with a soft cloth is sufficient. Clean the CD from the center to the outside. Small dust particles and light soiling have no effect on the playback quality of a CD.
- Clean CDs regularly with a soft, solvent-free, dry cloth. Never use solvents or aggressive cleaning agents. If necessary, use a CD cleaning kit.
- Never write on the CD or stick labels on its surface.
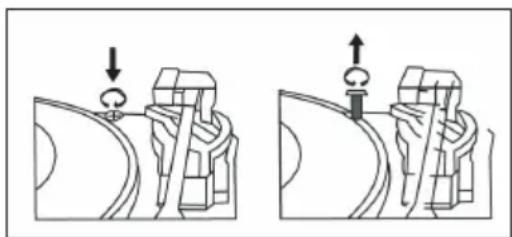
Transport Lock
- To protect the record player from transport damage, there is a silver transport screw in the upper right corner of the record player.
- Before playback, use a screwdriver to unlock the turntable by turning the transport screw clockwise downwards.
- Turn the transport screw counterclockwise if you want to transport the unit again.
natural_image
Two technical diagrams showing mechanical assembly or tool positioning, with no visible text or symbols.DISPOSAL CONSIDERATIONS

natural_image
Symbol of a trash bin crossed with a diagonal line, representing no waste or discharge (no text or labels)If there is a legal regulation for the disposal of electrical and electronic devices in your country, this symbol on the product or on the packaging indicates that this product must not be disposed of with household waste. Instead, it must be taken to a collection point for the recycling of electrical and electronic equipment. By disposing of it in accordance with the rules, you are protecting the environment and the health of your fellow human beings from negative consequences. For information about the recycling and disposal of this product, please contact your local authority or your household waste disposal service.
This product contains batteries. If there is a legal regulation for the disposal of batteries in your country, the batteries must not be disposed of with household waste. Find out about local regulations for disposing of batteries. By disposing of them in accordance with the rules, you are protecting the environment and the health of your fellow human beings from negative consequences.
DECLARATION OF CONFORMITY

Manufacturer:
Chal-Tec GmbH, Wallstrasse 16, 10179 Berlin, Germany.
Importer for Great Britain:
Berlin Brands Group UK Ltd
PO Box 1145
Oxford, OX1 9UW
United Kingdom
Hereby, Chal-Tec GmbH declares that the radio equipment type Mary Ann / Julie Ann / Bella Ann is in compliance with Directive 2014/53/EU. The full text of the EU declaration of conformity is available at the following internet address: use.berlin/10039055
For Great Britain: Hereby, Chal-Tec GmbH declares that the radio equipment type Mary Ann / Julie Ann / Bella Ann is in compliance with the relevant statutory requirements. The full text of the declaration of conformity is available at the following internet address: use.berlin/10039055
Estimado cliente:
ÍNDICE
Datos técnicos 42
natural_image
Two technical diagrams showing mechanical assembly or tool positioning, with no visible text or symbols.RETIRADA DEL APARATO

natural_image
Symbol of a trash bin crossed out by a diagonal line, with no text or labels present.Berlin Brands Group UK Ltd
PO Box 1145
Oxford, OX1 9UW
United Kingdom
SOMMAIRE
Fiche technique 60
natural_image
Two line drawings of vintage portable cassette devices with open doors, no text or symbols present.
natural_image
Technical diagram of a circular mechanical component with mounting holes and a vertical rod (no text or labels)natural_image
Two technical diagrams showing mechanical assembly or tool positioning, with no visible text or symbols.CONSEILS POUR LE RECYCLAGE

natural_image
Symbol of a trash bin crossed with a diagonal line, representing no waste or discharge (no text or labels)DÉCLARATION DE CONFORMITÉ

Fabricant :
Chal-Tec GmbH, Wallstraße 16, 10179 Berlin, Allemagne.
Berlin Brands Group UK Ltd
PO Box 1145
Oxford, OX1 9UW
United Kingdom
INDICE
Dati tecnici 78
natural_image
Two open vintage portable cassette devices with metal legs and a lid, shown in line drawings (no text or symbols)
natural_image
Two technical diagrams showing mechanical assembly or tool positioning, with no visible text or symbols.
natural_image
Symbol of a trash bin crossed out by a diagonal line, with no text or labels present.Berlin Brands Group UK Ltd
PO Box 1145
Oxford, OX1 9UW
United Kingdom