Belle Epoque 1910 - Turntable Auna - Free user manual and instructions
Find the device manual for free Belle Epoque 1910 Auna in PDF.

| Product type | Turntable with integrated retro hi-fi system |
| Brand | Auna |
| Model | Belle Epoque 1910 |
| Article number | 10033179 |
| Power supply | 220-240 V ~ 50/60 Hz |
| Dimensions (approx.) | 40 x 30 x 20 cm |
| Weight (approx.) | 5 kg |
| Audio power (approx.) | 2 x 10 W |
| Speeds | 33, 45, 78 rpm |
| CD player | Yes, audio CD |
| Cassette player | Yes, playback and recording |
| Radio | FM/MW with external antenna |
| Bluetooth | Yes, for wireless playback |
| AUX input | Yes (RCA) |
| USB port | Yes, audio file playback |
| Headphone output | Yes (3.5 mm jack) |
| Equalizer | 5 modes: CLR, FLR, AOC, POP, TAZ |
| CD programming function | Up to 99 tracks |
| Included accessories | Power cable, 33T adapter, manual |
| Maintenance | Clean with a dry cloth, avoid moisture |
| Repairability | Spare parts available from the manufacturer |
Frequently Asked Questions - Belle Epoque 1910 Auna
User questions about Belle Epoque 1910 Auna
0 question about this device. Answer the ones you know or ask your own.
Ask a new question about this device
Download the instructions for your Turntable in PDF format for free! Find your manual Belle Epoque 1910 - Auna and take your electronic device back in hand. On this page are published all the documents necessary for the use of your device. Belle Epoque 1910 by Auna.
USER MANUAL Belle Epoque 1910 Auna
INHALTSVERZEICHNIS
natural_image
Symbol of a trash bin crossed with a diagonal line, no text or numbers presentCongratulations on purchasing this equipment. Please read this manual carefully and take care of the following hints to avoid damages. Any failure caused by ignoring the items and cautions mentioned in the instruction manual is not covered by our warranty and any liability. Scan the QR code to get access to the latest user manual and other information about the product:

CONTENT
Safety Instructions 14
Product Overview 14
FM/MW Radio Mode 17
Tape Mode 17
CD Mode 17
Phono Mode 19
AUX Mode 19
BT Mode 20
USB Mode 20
Hints on Disposal 21
TECHNICAL DATA
| Item number 10033179 | |
| Power supply 220-240 V ~ 50/60 Hz |
SAFETY INSTRUCTIONS
-
Choose a safe location and avoid placing the unit in direct sunlight or near any heat source.
-
Avoid environments subject to vibration, excessive dust, cold or moisture.
-
Due to the risk of electrical shock, do not open the cabinet. Should a foreign object accidentally find its way into the interior of the unit, contact your local dealer.
-
Do not attempt to clean the unit with chemical solvents as this might damage the finishing. A clean, dry cloth is recommended for cleaning.
-
Keep this manual for future reference.
PRODUCT OVERVIEW
Front
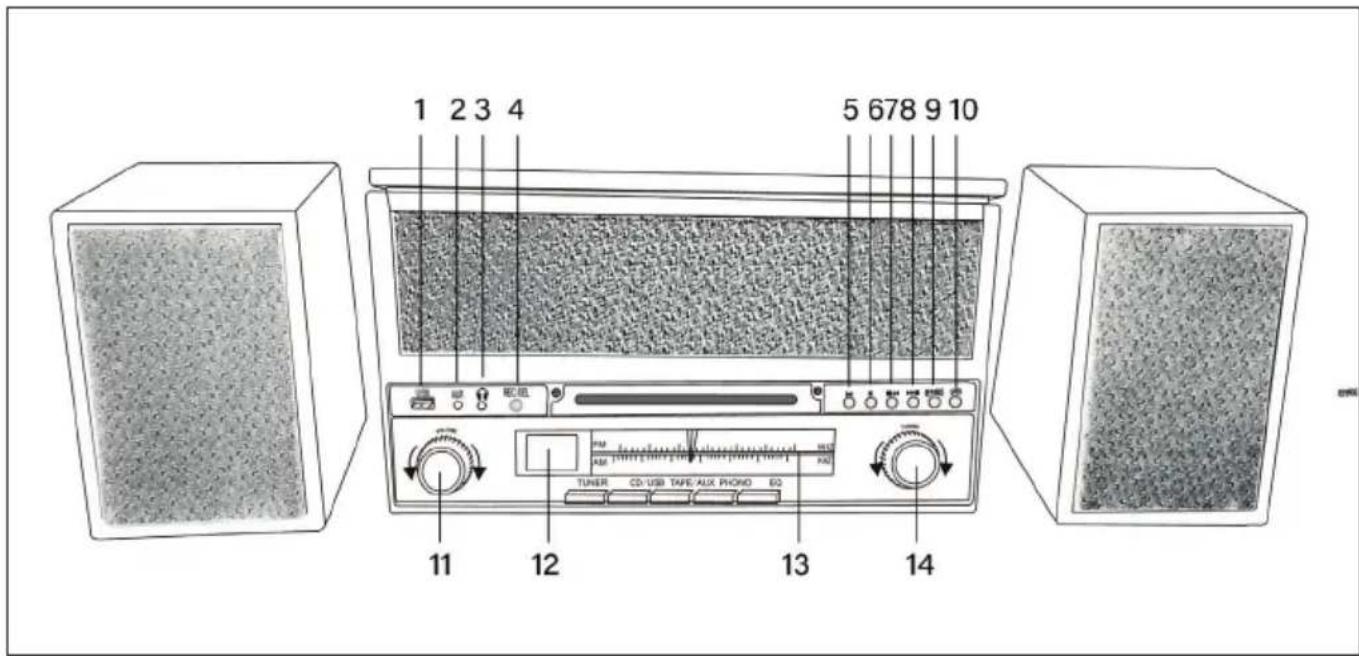
| 1 | USB port | 5 | Play/Pause |
| 2 | AUX-IN | 6 | Stop |
| 3 | Headphone jack | 7 | Back |
| 4 | REC/DEL button | 8 | Forward |
| 9 | REP/PROG | 12 | Display |
| 10 | Open CD slot | 13 | Tuner |
| 11 | Volume control | 14 | Tuning knob |
Rear
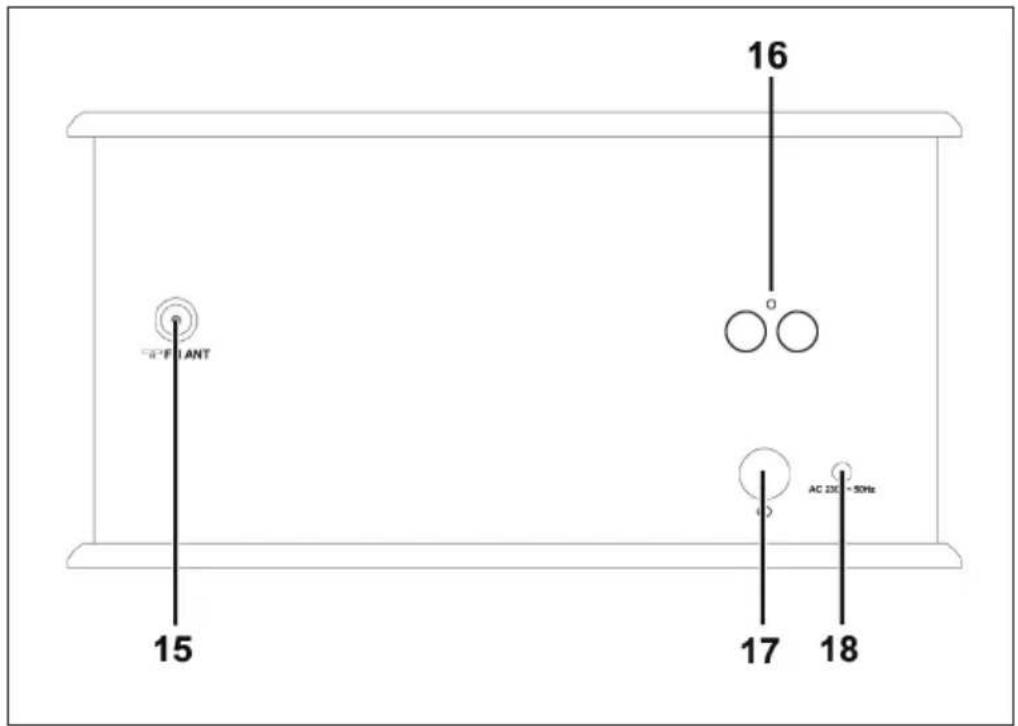
| 15 | FM Antenna | 17 | On/Off switch |
| 16 | Speaker terminal | 18 | Mains connection |
| 19 | TUNER key | 22 | PHONO key |
| 20 | CD/USB key | 23 | EQ key |
| 21 | TAPE/AUX key |
Upside
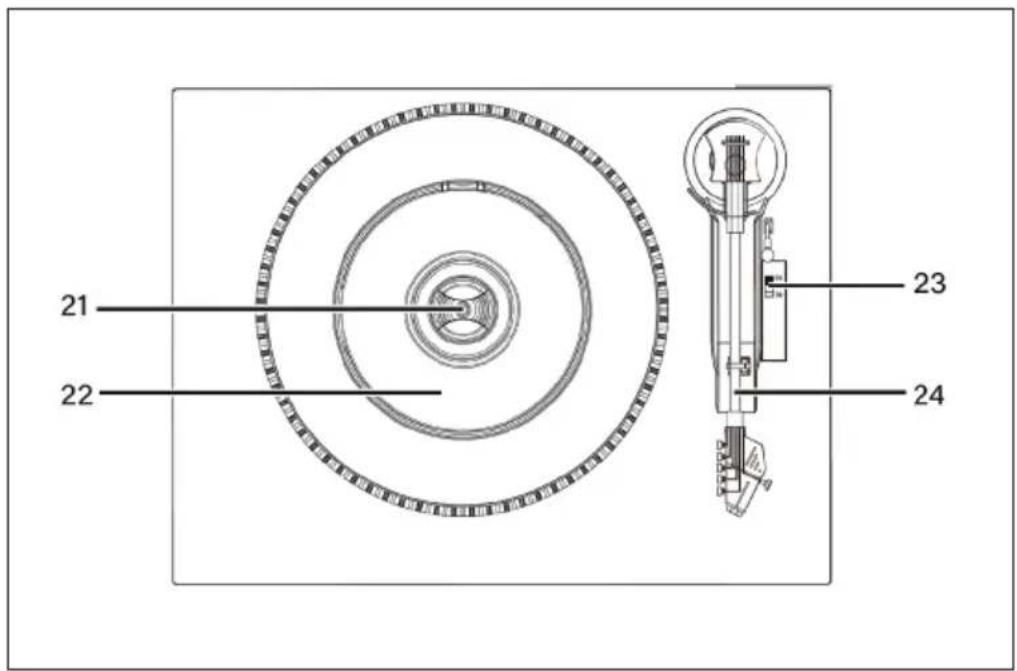
| 21 | Spindle adaptor | 24 | 33/45/78 RPM speed selector |
| 22 | Turntable | 25 | Tone arm |
Side
- Press the TUNER button repeatedly to select FM/MW. [TUN] appears on the display.
- Turn the Tuning knob to select your desired radio station.
- Turn the volume control to adjust the volume.
Antenna
For better reception you can plug in (23) an external antenna. You may need to adjust the position of the antenna to get optimum reception.
TAPE MODE
1 Press the TAPE/AUX button to switch to TAPE mode. [TAP] appears on the display.
2 Insert a cassette into the machine. The system starts playback automatically after the cassette is inserted.
3 Press the button next to the cassette deck halfway. The cassette is then prewound. Touch the button lightly to resume playback.
4 Press the button next to the cassette deck fully in to eject the cassette.
CD MODE
5 Press the CD/USB button to switch to the CD Mode. [CD] is shown on the display.
6 Press the Open/Close CD Compartment button to open the CD Compartment. Place a CD in the tray with the printed side facing up and close it. Playback of the first track begins.
- Press the Forward/Rewind button to select your favorite tracks. Press and hold the buttons to fast forward or reverse the current track until you release the button.
- Press PLAY/PAUSE to pause playback. The track number starts flashing. Press PLAY/PAUSE again to resume playback.
- Press STOP to stop playback.
Repeat title
During playback, press the REP button repeatedly to select how to repeat the tracks:
- Repeat 1: The current track is played repeatedly. REP flashes in the display.
- Repeat Folder: The current folder is repeated. REP flashes slowly on the display.
- Repeat All: All tracks are repeated. REP lights up continuously in the display
Programming CD tracks
You can program a playlist of up to 99 songs to play in the order you entered.
1 Insert a disc and press STOP when it plays.
2 Press PROG. [P01] is shown on the display.
3 Press Forward/Rewind to select your favorite tracks.
4 Press PROG to save the title. [P02] appears on the display.
5 Repeat steps 3-4 to select and save all desired songs.
6 Press PLAY/PAUSE to play the saved tracks in the order you entered.
7 Press STOP once to stop program playback. Press STOP twice to delete the playlist.
PHONO MODE
1 Press the PHONO button to enter PHONO mode. [PHO] appears on the display.
2 Open the lid of the turntable. Release the tonearm lock and remove the protective cap from the needle. Place a record on the turntable.
Note: When playing back 17 cm diameter EPs, place the EP adapter over the spindle. Set the speed selector to 33/45/78 RPM depending on the type of plate.
3 Lift the tonearm by the lift. Move the tonearm to the beginning of the disk or to the beginning of a specific title.
4 Slowly lower the tonearm onto the disc using the lift to start playback. When the disc is played, the tonearm automatically lifts and returns to its holder.
5 To stop playback manually, lift the tonearm from the disc and place it in its holder like the one.
Note: Moving or shaking the platter without securing the tonearm may damage the tonearm. Place the protective cap on the needle when not using the turntable.
AUX MODE
This unit provides an auxiliary audio input jack for connecting external audio device like MP3 pla-yers, CD players and allow playback of your external source through the system speakers.
- Use an audio cable (not included) with a RCA stereo plugs on one end of the cable. Plug one end into the AUX-IN jack on the main unit and plug the other end of the cable into the LINE OUT or HEADPHONE Jack of your external audio device.
- Turn ON the unit and your external audio device. Press TAPE/AUX to select AUX function. [AUX] will be shown on the display.
- Start to play the external device.
BT MODE
1 Press the CD/USB button to switch to BT-Mode. [BT] is shown in the display.
2 Find the stereo in the BT list and confirm the connection.
3 If the pairing is successful, the LED flashes.
4 Now you can play the music on the stereo and control it from your external BT device.
USB MODE
1 Plug the USB device into the USB port.
2 Press the CD/USB button to switch to USB mode. [USB] is shown on the display.
3 The device automatically starts to read out the USB device after it is connected.
4 Proceed as for CDs to listen to music from your USB device.
EQ Title
In PHONO/TAPE/BT/AUX or CD mode, press the EQ key to select available music style [CLR/FLR/AOC/POP/TAZ].
HINTS ON DISPOSAL
natural_image
Symbol of a trash bin crossed with a diagonal line, representing no waste or discharge (no text or labels)According to the European waste regulation 2012/19/EU this symbol on the product or on its packaging indicates that this product may not be treated as household waste. Instead it should be taken to the appropriate collection point for the recycling of electrical and electronic equipment. By ensuring this product is disposed of correctly, you will help prevent potential negative consequences for the environment and human health, which could otherwise be caused by inappropriate waste handling of this product. For more detailed information about recycling of this product, please contact your local council or your household waste disposal service.
DECLARATION OF CONFORMITY

Producer:
Chal-Tec GmbH, Wallstraße 16, 10179 Berlin, Germany.
This product is conform to the following European Directives:
2011/65/EU (RoHS)
2014/53/EU (RED)
The complete declaration of conformity of the manufacturer can be found at the following link: https://use.berlin/10033179
Estimado cliente:
ÍNDICE DE CONTENIDOS
natural_image
Symbol of a trash bin crossed with a diagonal line, no text or numbers presentSOMMAIRE
natural_image
Symbol of a trash bin crossed with a diagonal line, no text or numbers presentDÉCLARATION DE CONFORMITÉ
CE
Fabricant :
Chal-Tec GmbH, Wallstraße 16, 10179 Berlin, Allemagne.