
ADD5910M - Water dispenser PHILIPS - Free user manual and instructions
Find the device manual for free ADD5910M PHILIPS in PDF.
| Product type | Instant hot water dispenser |
| Brand | Philips |
| Model | ADD5910M |
| Rated voltage | 220-240 V~ |
| Rated frequency | 50-60 Hz |
| Rated power | 2000-2400 W |
| Protection class | I |
| Protection type | IPX0 |
| Admissible inlet water temperature | 5 °C - 38 °C |
| Water tank capacity | 2 L |
| Compatible filter | Micro X-Clean (AWP210, AWP211, AWP212) |
| Filter service life | 100 liters or 30 days (whichever comes first) |
| Instant heating | Yes, hot water in seconds |
| Temperature ranges | Ambient, 40 °C, 85 °C, 100 °C (estimated) |
| Selectable water volume | 150 ml, 250 ml, 350 ml (estimated) |
| Child safety | Safety lock for water ≥ 40 °C |
| Descaling indicator | Yes, lights up when descaling is needed |
| Water level indicator | Yes, lights up if minimum level |
| Filter life indicator | 4-grid display |
| Removable drip tray | Yes |
| Tank material | Plastic |
| Package contents | Dispenser, filter cartridge, drip tray, manual, quick guide |
Frequently Asked Questions - ADD5910M PHILIPS
User questions about ADD5910M PHILIPS
0 question about this device. Answer the ones you know or ask your own.
Ask a new question about this device
Download the instructions for your Water dispenser in PDF format for free! Find your manual ADD5910M - PHILIPS and take your electronic device back in hand. On this page are published all the documents necessary for the use of your device. ADD5910M by PHILIPS.
USER MANUAL ADD5910M PHILIPS
natural_image
Exterior view of a Philips water dispenser with digital display and control buttons (no text or symbols on main body)EN User manual 01
IT Manuale d'uso 11
① Control panel
② Nozzle
③ Drip tray plate
④ Drip tray
⑤ Water tank cover
⑥ Filter
⑦ Inner water tank
⑧ Water tank
Necessary precautions must be taken when using electrical appliances, and these include the following:
- Read all instructions carefully before using.
• Install the appliance according to the installation instructions in this user manual. - Never use the appliance if the power cord or plug are damaged or if the appliance itself is faulty.
- Ensure that the power cord does not come into contact with hot surfaces.
- Never place the appliance body, plug or power cord in water or other liquids. Always wipe it clean with a damp cloth.
- Do not operate the appliance when the water is below the minimal water level to avoid damaging the heating elements.
- Do not store or use this appliance outdoors.
- Do not let the cord hang over the edge of table or counter, and do not place the appliance on hot surface.
- Do not place the appliance on or near any gas or electric burner or inside heated oven.
- Do not put the appliance into a working disinfection cabinet.
- Do not freeze the appliance in the refrigerator.
- Do not lean the appliance or operate it upside down.
- This appliance can be used by children aged from 8 years and above and persons with reduced physical, sensory or mental capacities or lack of experience and knowledge if they have been given supervision or instruction concerning use of the appliance in a safe way and understand the hazards involved.
- Children shall not play with the appliance and user maintenance shall not be made by children without supervision.
- Make sure to operate the appliance when children are under good custody.
- Please ensure the appliance is used on a firm and flat surface out of reach of children, to avoid being overturned in a sudden and result in the scald or hitting injury.
- To protect against a fire, electric shock or other personal injury, do not immerse any part of the appliance in water or other liquid.
- Do not touch the hot surface, water spout when the appliance is operating.
-
While the appliance is under working, do not touch or block the steam outlet by hand or other stuff, do not open the water tank lid in a rush, in order to avoid the scald by the hot steam or any other malfunctions.
-
To avoid being scalded, it is prohibited to use hand or any parts of your body to feel the temperature or steam when the appliance is being used.
- Do not use the appliance to heat anything other than water. Do not fill above the "max" indication. Do not operate it if water is below minimum.
- Unplug the appliance before cleaning and make sure it is cooled down thoroughly.
- If the power cord is damaged, in order to avoid any hazard, the cord must be replaced by the manufacturer or its service agent or a similar qualified person.
- The power cord could only be replaced by the exclusive power cord if any damages.
- Do not operate the appliance when it is out of order or with malfunctions, and return it to the nearest authorized service agent or manufacturer for examination, repair or replacement, do not try to disassemble it by yourself.
• This appliance is intended to be used in household and similar locations such as:
– staff kitchen areas in shops, offices and other working environments;
-farm houses;
– hotels, motels and other residential type environments;
- bed and breakfast type environments.
- Warning: misuse may cause injury.
- The heating element surface is subject to residual heat after use.
- Please keep this user manual for future reference.
- This product is intended to filter municipal water only. Do not put water of unknown quality or that has been microbiologically impaired into the product. Use only cold or ambient temperature water. Do not use the appliance for baby food.
- Consume the filtered water within 24 hours.
- Appliance outlet and other items may be hot after using.
- Be cautious of the hot steam when dispensing water ≥ 40^ .
- Do not move the appliance unless the power is cut off.
- Failure to follow these instructions could cause scalding or damage to the product.
- WARNING: do not locate multiple portable socket-outlets or portable power supplies at the rear of the appliance.
- If only a small amount of water is dispensed, there may be a temperature deviation. We suggest preheating the before use.
- There may be a big water volume or temperature deviation if limescale builds up inside the heating element. Please descale the appliance according to chapter 5.
2. Parts and features
This is an instant heating water dispenser. With instant heating technology, it provides hot water with different temperatures within seconds. Thanks to the Philips Micro X-Clean filter, you can always enjoy the crispy and pure tasting water at home.
Control panel

Tea program
Press to quickly set 100°C, 250ml.

Safety lock
When hot water ≥40^ is chosen, press to unlock before pressing the dispense button. It can also be used to wake up the appliance when it is under the sleep mode.

Water temperature selection
Press to choose desired water temperature.

Water volume selection
Press to choose desired water volume.

Dispense button
Press to start or stop dispensing.

Cleaning/descale button
Long press for 3 seconds to start the cleaning/descaling process. During cleaning/descaling, press the button to pause, and press it again to restart. Note: the whole descale process is around 10 minutes and cannot be cancelled until it is finished.

Descale indicator
Lights up when it is time to descale. Lights off after the descaling process completes.

Water shortage indicator
Lights up when the water in the water tank is below the minimal level. Please refill the water tank.

Filter lifetime indicator
4 grids light up: the filter has a full lifetime.
2 grids light up: the filter has half of the lifetime left.
4 grids flashes: the filter reaches the end of life.


Filter lifetime reset
Long press both buttons for 3 seconds to reset the filter lifetime.
Main technical specifications
| Product model ADD5910M | |
| Filter model | Micro X-Clean:AWP210 (1-pack) AWP211 (3-pack) AWP212 (6-pack) |
| Rated voltage | 220-240V~ |
| 50/60HzRated frequency | |
| Rated power consumption | 2200W-2600W |
| Applicable water source | Municipal tap water |
| Anti-shock level | I |
| Type of protection | IPX0 |
| Applicable inlet water temperature | 5°C-38°C |
3. Installation
Before using the appliance for the first time
- Remove all packaging.
- Remove the tank lid and extract the inner water tank and water tank. Wash, rinse and dry them thoroughly.
- Clean the appliance following the first time cleaning instruction in chapter 5.
WARNING: PLEASE DO NOT DISASSEMBLE THIS APPLIANCE BY YOURSELF.
ELECTRIC ELEMENTS WILL BE EXPOSED AND THERE IS A RISK OF ELECTRIC SHOCK.
Positioning of appliance
- Do not install this appliance in a very damp or hot place, or near heat source.
- Place appliance on a flat and even surface.
- Do not use this appliance outdoors. This appliance is only suitable for indoor use.
- WARNING: DO NOT INSTALL THIS APPLIANCE IN DIRECT SUNLIGHT.
- Ensure that the ventilation on both sides is never blocked or covered.
4. How to use
Clean the appliance first according to the first time cleaning instruction in chapter 5.
Fill water tank until the water reaches the "MAX" mark; water will flow through the filter at a set rate and it may take some time due to the action of the filter cartridge.
- Plug in.
- Place a mug or a glass on drip tray.
- Select the desired temperature and volume (A-1).
- Press the safety lock button to unlock the appliance (not applicable for ambient water) (A-2).
- Press the dispense button to start dispensing (A-3).

natural_image
Abstract line drawing of a stylized human figure with raised arms (no text or symbols)A-1

natural_image
Simple line drawing of a padlock (no text or symbols)A-2

natural_image
Simple line drawing of a flame or smokestack with a pointed tip and circular opening (no text or symbols)A-3
Note
- The appliance will automatically go to sleep mode if there is no operation within 1 minute. Touch the safety lock button to wake up the appliance.
- Please discard the water in the drip tray when it's full.
- There could be a temperature deviation of ± 5^ . There could be a volume deviation of ± 10% . The actual temperature and volume depends on the using environment and local tap water quality.
5. Clean and Maintenance
First time cleaning
-
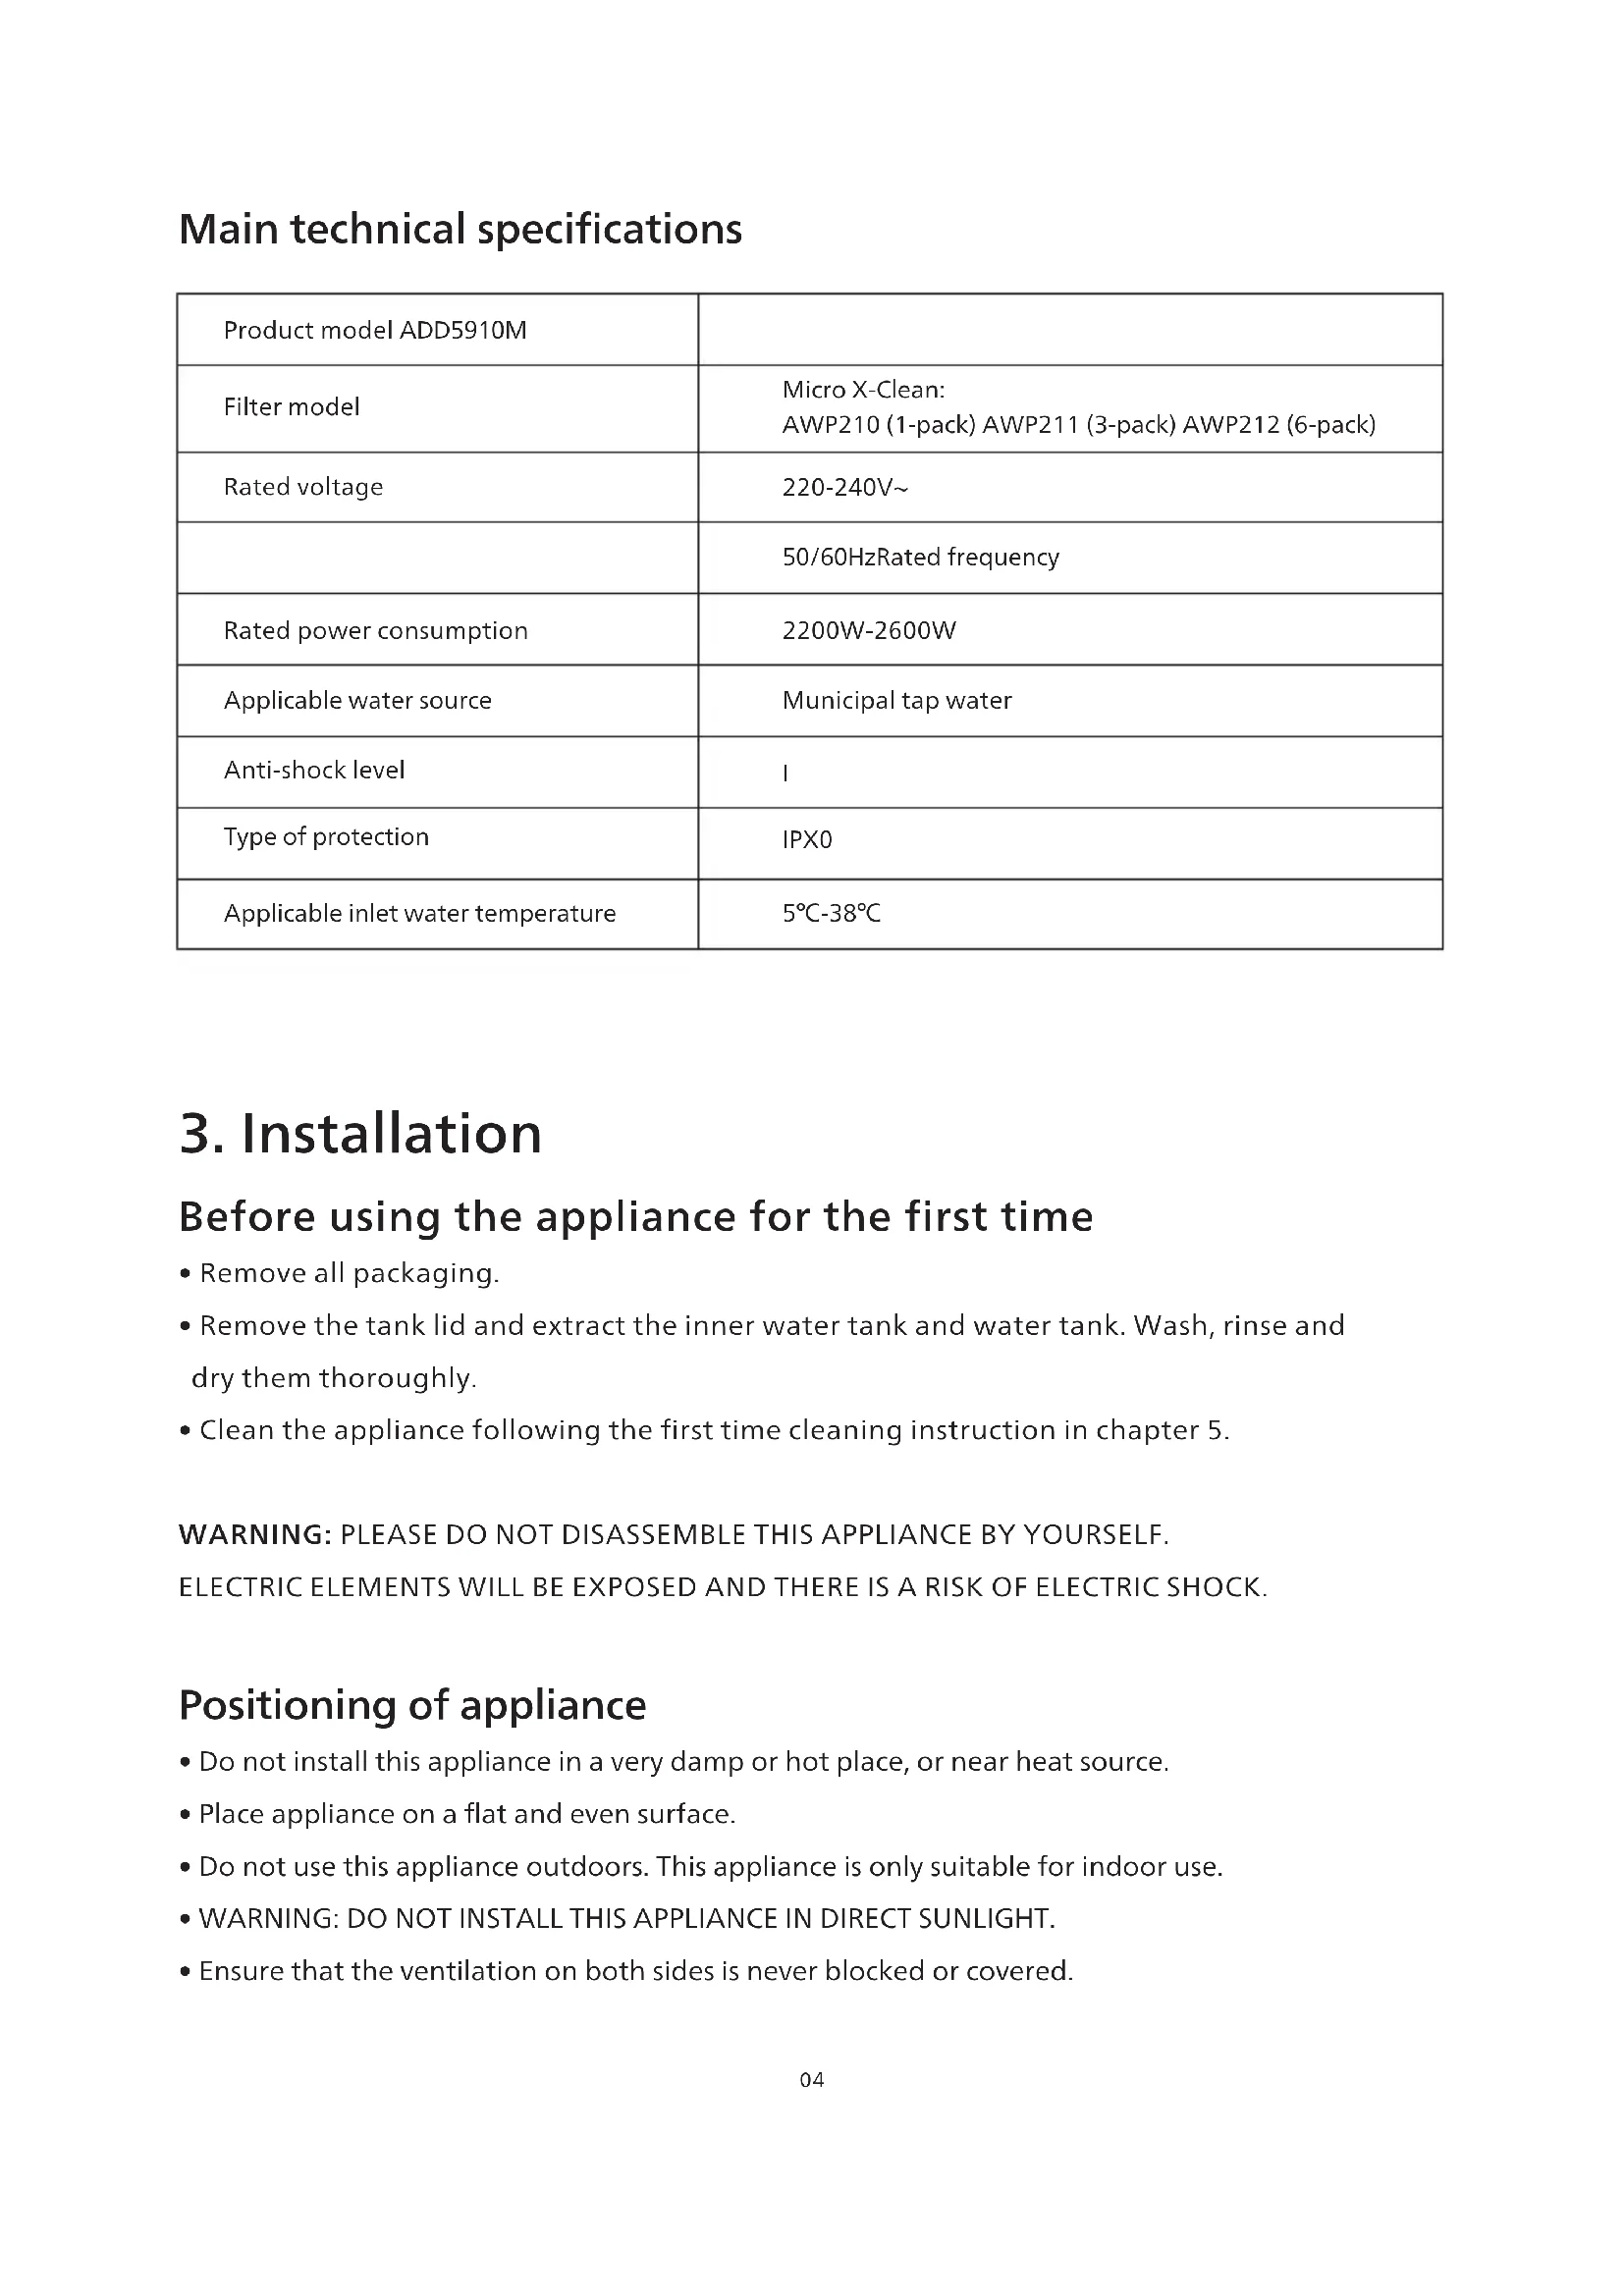
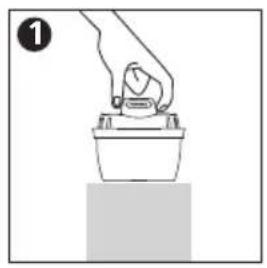
Preparing the filter cartridge
-
Remove the packaging. It is common that there is some powder on the surface of the cartridge. These particles are harmless and can be washed off during the preparation process.
- Soak the filter cartridge in clean water for 15 minutes. Shake the filter cartridge in water slightly to wash off the carbon powder on the surface.
natural_image
Hand holding a small container with a lid, placed above a rectangular base (no text or symbols visible)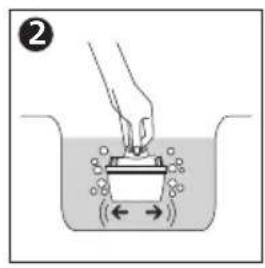
2. Preparing the appliance
- Remove the inner water tank.
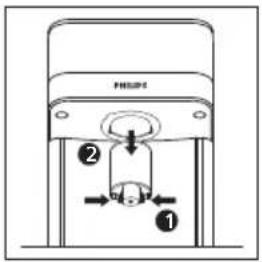
- Ensure the seal ring is installed correctly.
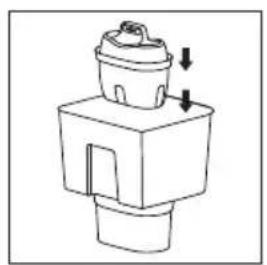
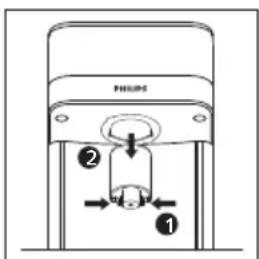
- Press the filter cartridge into the inner water tank. Ensure it is firmly secured (B-1).
- Reinsert the inner water tank into the water tank.
- Fill the water tank with 2L of cold tap water and refit the water tank into the appliance.
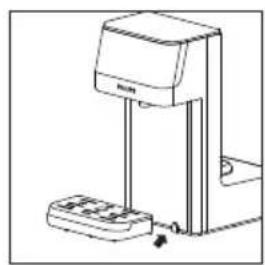
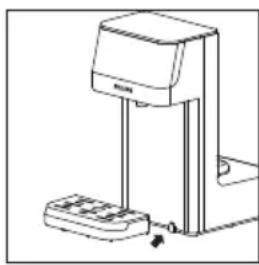
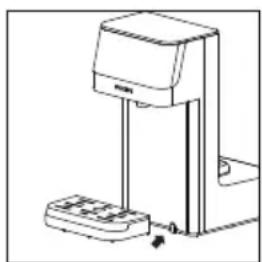
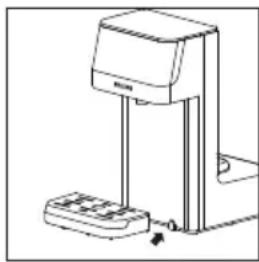
- Place the drip tray and drip tray plate in front of the appliance (B-2).
- Place a jug or vessel under the dispense outlet.
- Plug in.
- Dispense ambient water till the water tank is empty.
- Discard the dispensed water. Your appliance is now ready to use.
natural_image
Simple line drawing of a mechanical component with arrows indicating direction (no text or symbols)
natural_image
Line drawing of a desktop computer with monitor and keyboard (no text or symbols)
Routine maintenance
- If the appliance is not used for more than 72 hours, we recommend cleaning it before use.
- Discard the water in the water tank. Rinse the tank.
- Refill the water tank with 1L of fresh tap water.
- Dispense ambient water till the water tank is empty.
- The appliance is ready to use.
- Wash, rinse and dry the inner water tank, water tank and the tank cover regularly, at least when the filter cartridge is replaced.
- Wash drip tray with soapy water. Rinse all soap away with clean water. Allow the drip tray to air dry.
Note
- Water is a foodstuff. We recommend using the filtered water within 24 hours.
- If the appliance will not be used for an extended period of time (for example, a holiday), we recommend removing the filter and placing it in a sealed plastic bag, and then storing it in the fridge. This will help to maintain the hygiene of the filter. Before using the filter after storage, follow the preparation and installation instructions for use as normal.
- Always switch off and unplug the appliance before cleaning.
- Ensure the appliance is cooled down before cleaning.
- Do not use scouring pads, solvents or abrasives to clean as they may damage the appliance.
Descaling
- The descale Indicator lights up when the appliance requires the descale process.
- For safe and efficient operation of your appliance, it is important to descale regularly.
- Untreated scale deposits prevent the element conducting heat efficiently and may affect its performance.
- Ensure the inner water tank and filter are removed before starting the descale process.
Descale Procedure
- Remove the filter and the inner water tank.
- Fill water tank with 2 liters of 4% vinegar solution.
- Place a 2L container under the dispense nozzle.
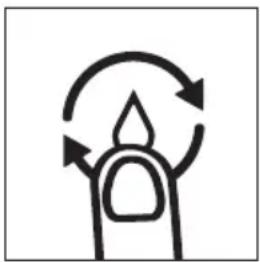
- Long press the descale button for 3 seconds. (C-1)
- The descale indicator will flash and the appliance will run a descale process. It will take around 5 mins. Caution: dispensed liquids will be hot.
-
When the water shortage indicator lights up, discard the remaining citric acid solution, refill the water tank with fresh tap water to the maximal water level.
-
The appliance will run a cleaning cycle.
- The descale indicator will turn off once the descaling completes.
natural_image
Simple line drawing of a finger with three curved arrows indicating rotation or cycle (no text or symbols)C-1
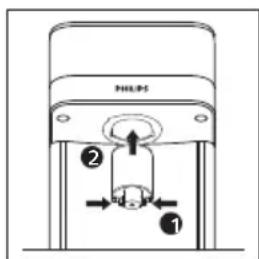
-
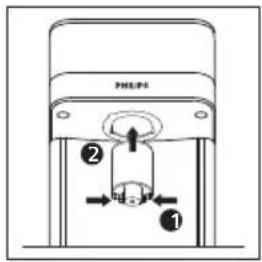
Pull out the nozzle downwards. Rinse it with clean tap water. (C-2)
-
Install the nozzle back. Ensure it is assembled in place. (C-3)
-
Re-insert the filter and inner water tank. The appliance is ready to use.
C-2
C-3
Note
- During descaling, press the descale button to pause, press it again to restart.
- DO NOT cut off the power during descaling.
- The descale process cannot be cancelled till it is finished.
Replacing the filter cartridge
To ensure the best performance, please change the filter cartridge according to the filter lifetime indicator, or the suggested replacement cycle.
- Please clean and install the filter cartridge according to the first time cleaning instruction above.
- Reset the filter lifetime by long press and for 3 seconds.
| Model | Suggested Replacement Cycle |
| AWP210/AWP211/AWP212 | After 100 liters or every 30 days, whichever comes first. |

Filter lifetime indicator
4 grids light up: the filter has a full lifetime.
2 grids light up: the filter has half of the lifetime left.
4 grids flashes: the filter reaches the end of life.
6. Trouble shooting
| Problem Possible causes Solutions | ||
| The display panel does not light up. | The appliance is in sleep mode. | Touch the safety lock button to wake up the appliance. |
| The appliance is not connected to power. | Plug in the power plug. If it does not work, please contact consumer care. | |
| The appliance does not dispense hot water. | The appliance is not connected to power. | Plug in the power plug. |
| The water in the water tank is below the minimal water level. | Fill the water tank up to the maximal water level. | |
| The dispense button is locked. Press the safety lock button to unlock. | ||
| Button/display panel does not respond. | The appliance is not connected to power. | Plug in the power plug. |
| The appliance is in sleep mode. | Touch safety lock button to wake up the appliance. | |
| There is condensed water on the display after dispensing hot water. | Wipe the panel with a dry cloth. If it does not work, please contact consumer care. | |
| Leakage of the water tank | The water tank is not sitting well on the base. | Lift up the water tank and refit it into the appliance. Ensure it is firmly inserted. |
| The sealing valve at the bottom of the tank is faulty. | Please contact consumer care. | |
| The appliance does not dispense ambient water. | The appliance is not connected to power. | Plug in the power plug. |
| The water in the water tank is below the minimal water level. | Fill the water tank up to the maximal water level. | |
| The water pump is damaged. Please contact consumer care. | ||
| Unstable water flow. | Limescale builds up in the heating element. | Follow the descaling instruction in chapter 5 to descale. |
| Slow water flow. | Limescale builds up in the heating element. | Follow the descaling instruction in chapter 5 to descale. |
| There is air in the water pump. | Fill the water tank up to the maximal water level. | |
| Water shortage indicator lights up. | The water in the water tank is below the minimal water level. | Fill the water tank up to the maximal water level. |
| Odd taste of the water. | The appliance is not cleaned thoroughly after descaling. | Follow step 6-9 in chapter 5 descale instruction to clean the appliance. |
| The filtered water is not used for a long time. | Discard the remaining water in the water tank and refill with fresh tap water. | |
| The filter has reached the end of life. | Please replace with a new filter cartridge. | |
| Error Code What does it mean Solutions | ||
| E1 | The inlet water temperature sensor is abnormal. | Please contact consumer care. |
| E2 | The outlet water temperature sensor is abnormal. | Please contact consumer care. |
| E5 | Dry heating alarm Cut off the power. Contact consumer care. | |
| EU | Display panel malfunction. Please contact consumer care. | |
7. Guarantee and service
If you need information or if you have any questions, please visit the Philips website at www.philips.com or contact the consumer care center in your country. If there is no consumer care center in your country, go to the local dealer.
8. Packing list
| Water dispenser x1 | |
| Filter cartridge | x1 |
| Drip tray | x1 |
| User manual | x1 |
| Quick start guide | x1 |
This symbol on the products and accompanying documents means that used electrical and electronic products should not be mixed with general household waste. For proper disposal or treatment, recovery and recycling, please take these products to designated collection

points where they will be accepted on a free of charge basis. In some countries you may
be able to return your products to your local retailer upon the purchase of a new product.
Disposing of this product correctly will help you save valuable resources and prevent any possible effects on human health and the environment, which could otherwise arise from inappropriate waste handling.
Please contact your local authority for further details of your nearest collection point for WEEE.
Penalties may be applicable for the incorrect disposal of this product in accordance with national legislation.
1. Importante
natural_image
Abstract line drawing of a stylized human figure with raised arms (no text or symbols)A-1

natural_image
Simple line drawing of a padlock (no text or symbols)A-2

natural_image
Simple line drawing of a flame or flame shape with no text or symbolsA-3
Nota
natural_image
Hand placing a small object into a container with a label '1' (no text or symbols on the object itself)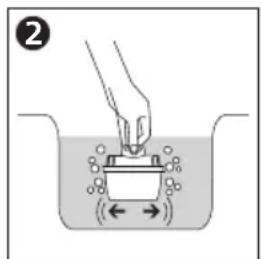
natural_image
Simple line drawing of a mechanical component with arrows indicating direction (no text or symbols)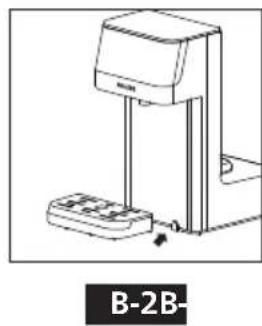
natural_image
Line drawing of a desktop computer with a stand and base, labeled B-2B- (no text or symbols on the device itself)natural_image
Simple line drawing of a finger with three curved arrows indicating rotation or cycle (no text or symbols)C-1
natural_image
Simple line drawing of a hand holding a stylized object (no text or symbols)A-1

natural_image
Simple line drawing of a padlock inside a rectangular frame (no text or symbols)A-2

natural_image
Simple line drawing of a flame or flame shape with no text or symbolsA-3
Hinweis
natural_image
Simple line drawing of a hand pressing down on a container (no text or symbols)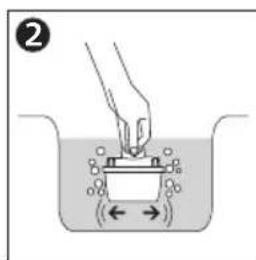
natural_image
Simple line drawing of a mechanical component with arrows indicating direction (no text or symbols)The Ground Truth image displays a single, solid horizontal line. According to Rule 2 (UNDERSCORE & LINE RULES), this is a stylistic or background line, not a placeholder underscore. Therefore, the OCR result must ignore it and output nothing or only meaningful text. The provided OCR content is "____", which consists of four underscores. This is an incorrect interpretation of the line as a placeholder, violating the rule that stylistic lines must be ignored. The OCR has hallucinated underscores where none should exist based on the GT's visual context. Hence, the OCR result is inconsistent with the Ground Truth.

natural_image
Line drawing of a desktop computer with monitor, keyboard, and mouse (no text or symbols)B-2B-
natural_image
Simple line drawing of a finger with three curved arrows indicating rotation or cycle (no text or symbols)C-1
natural_image
Simple line drawing of a hand holding a stylized object (no text or symbols)A-1

natural_image
Simple line drawing of a padlock inside a rectangular frame (no text or symbols)A-2

natural_image
Simple line drawing of a flame or flame shape with no text or symbolsA-3
Nota
natural_image
Hand holding a small container with a lid, placed on a surface (no text or symbols visible)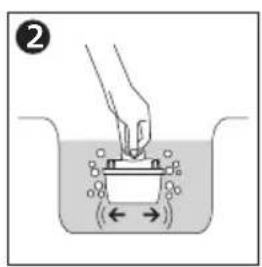
natural_image
Simple line drawing of a mechanical component with arrows indicating direction (no text or symbols)The Ground Truth image displays a single, solid horizontal line. According to Rule 2 (UNDERSCORE & LINE RULES), this is a stylistic or background line, not a placeholder underscore. Therefore, the OCR result must ignore it and output nothing or only meaningful text. The provided OCR content is "____", which consists of four underscores. This is an incorrect interpretation of the line as a placeholder, violating the rule that stylistic lines must be ignored. The OCR has hallucinated underscores where none should exist based on the GT's visual context. Hence, the OCR result is inconsistent with the Ground Truth.

natural_image
Line drawing of a desktop computer with monitor, tower, and keyboard (no text or symbols)B-2B-
natural_image
Simple line drawing of a finger with three curved arrows indicating rotation or cycle (no text or symbols)C-1
natural_image
Simple line drawing of a hand holding a stylized object (no text or symbols)A-1

natural_image
Simple line drawing of a padlock inside a rectangular frame (no text or symbols)A-2

natural_image
Simple line drawing of a flame or flame shape with no text or symbolsA-3
Remarque
natural_image
Hand placing a small object into a container on a surface (no text or symbols visible)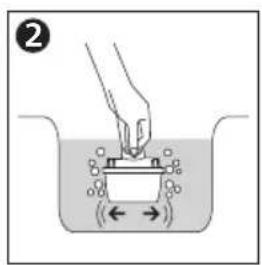
natural_image
Simple line drawing of a mechanical component with arrows indicating direction (no text or symbols)The image is too blurry to recognize any text content.
natural_image
Line drawing of a desktop computer with a stand and mouse (no text or symbols)B-2B-
Entretien courant
natural_image
Simple line drawing of a finger with three curved arrows indicating rotation or cycle (no text or symbols)C-1
C-3
Remarque
natural_image
Abstract line drawing of a stylized human figure with raised arms (no text or symbols)A-1

natural_image
Simple line drawing of a padlock with handle and base (no text or symbols)A-2

natural_image
Simple line drawing of a flame with a pointed tip and circular opening (no text or symbols)A-3
Примечание.
natural_image
Hand placing a small object into a container on a surface (no text or symbols visible)
natural_image
Simple line drawing of a mechanical component with arrows indicating direction (no text or symbols)
natural_image
Line drawing of a desktop computer with monitor, tower, and keyboard (no text or symbols)
natural_image
Simple line drawing of a finger with three curved arrows indicating rotation or cycle (no text or symbols)C-1
C-2

C-3
Примечание.
Positioning of appliance
natural_image
Simple line drawing of a hand holding a stylized object with no text or symbolsA-1

natural_image
Simple line drawing of a padlock-like object with no text or symbolsA-2A

natural_image
Simple line drawing of a flame with a circular opening, resembling a stylized flame or smoke (no text or symbols)The image is too blurry to recognize any text content.
Uwaga
natural_image
Hand placing a small object into a container on a surface (no text or symbols visible)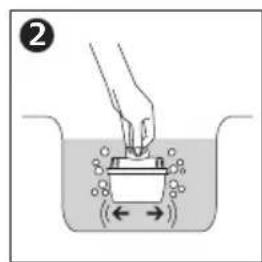
natural_image
Simple line drawing of a mechanical component with arrows indicating direction (no text or symbols)The image is too blurry to recognize any text content.

natural_image
Line drawing of a desktop computer with monitor and keyboard (no text or symbols)B-2B-
natural_image
Simple line drawing of a finger with three curved arrows indicating rotation or cycle (no text or symbols)C-1
natural_image
Simple line drawing of a hand holding a stylized object (no text or symbols)A-1

natural_image
Simple line drawing of a padlock inside a rectangular frame (no text or symbols)A-2

natural_image
Simple line drawing of a flame or flame shape with no text or symbolsA-3
Upozornění
natural_image
Simple line drawing of a hand pressing down on a container (no text or symbols)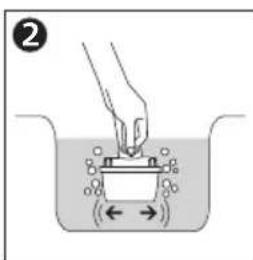
natural_image
Simple line drawing of a mechanical component with arrows indicating direction (no text or symbols)The image is too blurry to recognize any text content.
natural_image
Line drawing of a desktop computer with a stand and mouse (no text or symbols)B-2B-
Běžná údržba
natural_image
Simple line drawing of a finger with three curved arrows indicating rotation or cycle (no text or symbols)C-1
C-2
C-3
Upozornění
Register your product and learn more via the website link below:
www.philips.com/water
Specifications are subject to change without notice
© 2022 AquaShield
All rights reserved.
Philips and the Philips Shield Emblem are registered trademarks of
Koninklijke Philips N.V. and are used under license.
This product has been manufactured by and is sold under the responsibility of
Hong Kong AquaShield Health Technology Company Limited
and Hong Kong AquaShield Health Technology Company Limited is the warrantor in relation to this product.
Rev A OCT 22


- Parts and features
- Control panel
- Main technical specifications
- Installation
- Before using the appliance for the first time
- Positioning of appliance
- How to use
- Note
- Clean and Maintenance
- First time cleaning
- Preparing the appliance
- Routine maintenance
- Descaling
- Descale Procedure
- Replacing the filter cartridge
- Trouble shooting
- Guarantee and service
- Packing list
- Importante
- Nota
- Hinweis
- Remarque
- Entretien courant
- Примечание.
- Uwaga
- Upozornění
- Běžná údržba
Brand : PHILIPS
Model : ADD5910M
Category : Water dispenser