
WP3870 - Water dispenser PHILIPS - Free user manual and instructions
Find the device manual for free WP3870 PHILIPS in PDF.


| Product Type | Water Dispenser |
| Brand | Philips |
| Model | WP3870 |
| Dimensions (H x W x D) | Approximately 500 x 300 x 300 mm |
| Weight | Approximately 5 kg |
| Power Supply | AC 220-240V, 50/60Hz |
| Power Consumption (Heating) | 500W |
| Power Consumption (Cooling) | 100W |
| Hot Water Capacity | 2 L |
| Cold Water Capacity | 5 L |
| Hot Water Temperature | Up to 95°C |
| Cold Water Temperature | 5-15°C |
| Water Source | Bottled or direct water line connection |
| Dispensing Buttons | Hot, Cold, and Room Temperature |
| Child Safety Lock | Yes, on hot water button |
| Overheat Protection | Automatic shut-off |
| Maintenance | Descale every 3 months |
| Spare Parts Availability | Replacement parts available through Philips authorized service centers |
| Repairability | Designed for easy access to internal components |
| Warranty | 2 years (check local regulations) |
Frequently Asked Questions - WP3870 PHILIPS
User questions about WP3870 PHILIPS
0 question about this device. Answer the ones you know or ask your own.
Ask a new question about this device
Download the instructions for your Water dispenser in PDF format for free! Find your manual WP3870 - PHILIPS and take your electronic device back in hand. On this page are published all the documents necessary for the use of your device. WP3870 by PHILIPS.
USER MANUAL WP3870 PHILIPS
natural_image
Exterior view of a Philips rice cooker (no signage or text beyond brand name)
Congratulations on your purchase and welcome to Philips! To fully benefit from the support that Philips offers, register your product at www.philips.com/welcome.
You have made an excellent choice. The Philips Ultra Pure is an advanced, top performance water purifier that removes viruses, bacteria and cysts from your water. It also improves the taste of your drinking and cooking water by removing chlorine and other impurities. Pure water guaranteed, by Philips.
General description (Fig. 1)
A Pure water reservoir
B Water reservoir cover
C Lock lever of water reservoir cover
D Water reservoir tap
E Wall holder
F Filter holder release lever
G Hose
H Swivel nut
1 Decompression button
J Filter holder cap
K Filter holder
L Filter
M Water supply connector
N Adapter ring
Cap
P Cross-section of filter
1 Pre-filter
2 Granular Activated Carbon (GAC)
3 Ultra Filtration (UF) membranes
4 Filter stop
Important
Read this user manual carefully before you use the water purifier and save it for future reference. This user manual contains very important information on hygiene/cleaning and filter replacement. Keep it available at all times.
Hygiene awareness
The Philips water purifier offers you clean, safe and great-tasting drinking water you can trust. For optimal performance of the water purifier it is important to handle it hygienically. If the appliance is cleaned in the wrong way, microbes could recontaminate the purified water, which could cause the person who drinks the water to become ill.
- Always be aware of hygiene when you clean or touch surfaces that are in contact with purified water, especially the inside of the water reservoir, the connection between the water reservoir and the wall holder, and the water reservoir tap.
-
Do not use a kitchen sponge or cloth to clean or dry the inside of the water reservoir because they are likely to contain bacteria. To clean the water reservoir in a hygienic way, follow the cleaning instructions in chapter 'Cleaning and maintenance'.
-
Always use clean, disinfected cloths and cleaning equipment to clean the connection between the water reservoir and the wall holder and the water reservoir tap.
- Always disinfect cloths and cleaning equipment either by boiling them or by using a disinfectant to clean them. We advise you to soak a cloth or sponge for one minute in a solution of 10ml of household bleach (5% solution of sodium hypochlorite) added to 1 liter of water.
- Always clean surfaces that are frequently touched by hands hygienically with a cleaner or a disinfectant. For more details, see chapter 'Cleaning and maintenance'.
- Always wash your hands after handling cloths, sponges or other cleaning equipment.
Warning
- The water purifier is not intended for use by persons (including children) with reduced physical, sensory or mental capabilities, or lack of experience and knowledge, unless they have been given supervision or instruction concerning use of the water purifier by a person responsible for their safety.
- Children should be supervised to ensure that they do not play with the water purifier.
- Only use the water purifier to purify water that is delivered to your house by the local water company, as this water is pretreated and meets the drinking water standards
- This water purifier is only intended for household use.
Caution
- Make sure you mount the water purifier properly according to the instructions in this user manual.
- Make sure the wall holder is mounted in a stable and level way.
- Make sure you install the water purifier according to state and local regulations.
- Do not mount the water purifier in a place exposed to direct sunlight or in a hot location, e.g. close to a stove or over the cooker.
- Always use original Philips replacement filters (WP3970).
- Replace the filter according to the instructions in this user manual.
- Do not open the main water valve if the filter holder is not in place.
- Fully drain the water reservoir if the water purifier has not been used for 2 days or more and throw away the water.
- Do not connect the water purifier to an electrical faucet.
- Do not connect the water purifier to a hot water outlet.
- Do not connect ordinary tubes or hoses to the tap of the water reservoir to redirect the flow of purified water.
- Do not place anything on top of the water purifier.
- Do not hang anything on the tube of the water purifier.
- Do not use any other chemicals than the ones mentioned in chapter 'Cleaning and maintenance' to clean the inside of the water reservoir.
- Do not clean any plastic parts in a dishwasher nor use boiling water to clean them.
- Do not tamper with the water purifier.
- Keep heat sources away from the water purifier to prevent distortion or breakage.
- This water purifier does not soften water.
- Do not install the water purifier in a place where the temperature drops below 0^ C.
- Do not clean the filter with any type of detergent or hot water, as this damages the filter.
Before first use

natural_image
Diagram showing two identical buckets with hooks and a blue crossed-out valve on a grid background (no text or symbols)Only connect this water purifier to wall-mounted cold water kitchen faucets or secondary water outlets. Do not connect this water purifier to sink-mounted faucets.
Make sure that there are no electric cables or water pipes inside the wall at the location where you want to mount the water purifier.
Make sure that there is no electric outlet under the water purifier.
Installation
1 Close the main water valve before you install the water purifier.
2 Determine the location where you want to mount the water purifier to the wall. This depends on the location of the water outlet and the available hose length.
3 Remove the drilling template from the box and use it to mark the points on the wall where to drill the holes.
- Make sure the two top holes are level.
- The recommended distance between the countertop and the lower mounting hole of the wall holder is 35cm. If you want to be able to fill high bottles, i.e. 1.5 or 2 liter soft drink or mineral water bottles, drill the lower hole at 50cm for your convenience. Also make sure that you leave a free space of at least 15cm above the upper two mounting holes of the wall holder when you place the water purifier under a kitchen cupboard or shelf.
4 Drill the holes with a 6mm drill and put the fixing plugs in the holes.
- The fixing plugs and screws are supplied with the water purifier
Note: In case of a wooden wall, skip this step.
Note: In case of a hollow wall, use special hollow wall fixing plugs (not supplied).
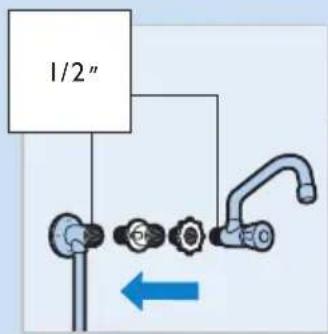
5 If the water outlet has 1/2" thread, screw the water supply connector onto the water outlet first. Then attach the adapter ring and finally screw the original kitchen faucet onto the adapter ring. Wind Teflon tape round all threaded parts to prevent leakage.
Note: If the water outlet is a secondary water outlet, screw the cap onto the open end of the adapter ring.

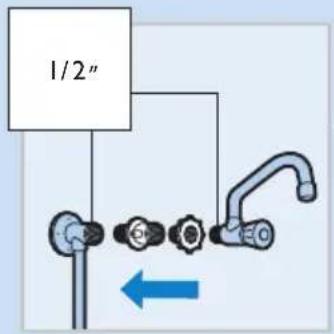

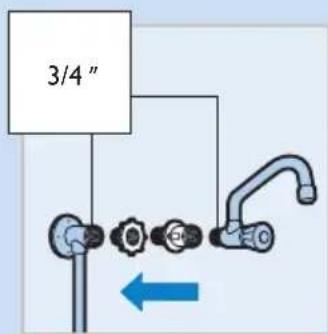
6 If the water outlet has 3/4" thread, screw the adapter ring onto the water outlet first. Then attach the water supply connector and finally screw the original kitchen faucet onto the water supply connector. Wind Teflon tape round all threaded parts to prevent leakage.
Note: If the water outlet is a secondary water outlet, screw the cap onto the open end of the water supply connector.

7 Take the water purifier out of its packaging and put it on a flat surface. Then pull the lock lever to unlock the water reservoir cover (1) and remove it from the water reservoir (2). Now you can remove the water reservoir from the wall holder.
8 Clean the outside of the water reservoir and its cover (see chapter 'Cleaning and maintenance').

natural_image
Illustration of a hand operating a switch mechanism with a magnified inset showing the handle (no text or symbols present)9 Swing the transport lock to the left and push it into the wall holder.

natural_image
Diagram showing cable installation with two views of a device (no text or symbols present)10 Turn the elbow connector located on the rear of the wall holder to the left or right, depending on the location of the water outlet you want to connect it to and push the hose in its slot.

natural_image
3D mechanical component diagram with dimension lines and mounting points on grid background (no text or symbols)11 Attach the wall holder with the screws to the wall. Make sure the hose remains properly positioned.
- The fixing plugs and screws are supplied with the water purifier.

natural_image
Illustration of a pipe fitting with a blue arrow indicating direction (no text or symbols)12 Unscrew the swivel nut from the water supply connector and slide it on the hose.

natural_image
Illustration of a pipe fitting with a blue arrow indicating direction (no text or symbols)13 Push the end of the hose onto the water supply connector and tighten the swivel nut.
Preparing for use

natural_image
Illustration of a hand holding a cylindrical object with a magnified inset showing the process (no text or symbols)Now that the wall holder is attached to the wall, proceed as follows to prepare the water purifier for first use.
1 Unscrew the cap from the filter holder. Take the filter out of its packaging and attach it to the cap of the filter holder. Place the filter with cap into the filter holder and screw the cap onto the filter holder.

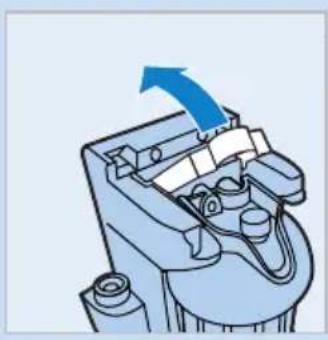
2 Pull the filter holder release lever forward (1) and lift it up (2).

natural_image
Illustration of a blue mechanical component with a cartoon character and blue arrow indicating direction (no text or symbols)3 Place the filter holder with filter into the wall holder.
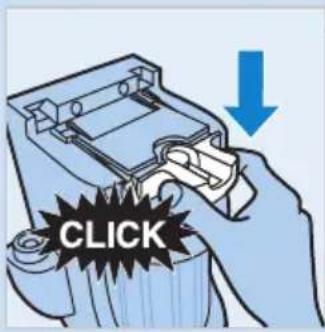

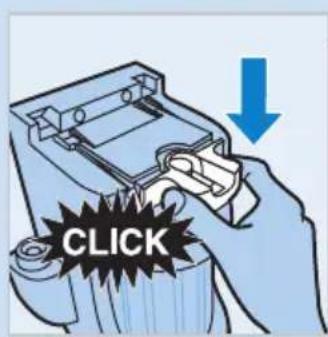
4 Push down the filter holder release lever to lock the filter holder into place ('click').
5 Place the water reservoir onto the wall holder (1). Put the cover on the water reservoir (2). To lock the cover, push the lock lever towards the wall (3). Make sure that the water reservoir tap is in closed position (turned all the way to the left or right).
6 Open the main water valve. Observe the water purifier for 5 minutes to check for any leakage between connections.
7 If leakage occurs, locate the connection that leaks. Turn off the main water valve. Loosen the connection that leaks and fasten it again in the proper manner. Reopen the main water valve. Check again. Repeat all steps in 'Installation' and 'Preparing for use', if necessary.
8 The water reservoir now automatically fills with purified water to its maximum volume of approximately 4 liters. An internal mechanism prevents the reservoir from overflowing.
9 After the reservoir has filled up to its maximum volume for the first time, remove the reservoir cover and add 30ml of household bleach (5% solution of sodium hypochlorite). If your household bleach contains a solution of only 2.5% sodium hypochlorite, you should use 60ml. Mix the bleach thoroughly through the water with a spoon. This disinfects the inside of the water reservoir. After 1 minute, drain the reservoir and throw away the water. After the reservoir has filled up again to its maximum volume, check if the water still has a chlorine taste. If it does, throw away the second full reservoir of water as well.
The water purifier is now ready for use.
The water reservoir is only intended to contain purified water. Do not put ice or any other ingredients in the water reservoir.
Using the water purifier
If you have not used the water purifier for 2 days or more, drain the water reservoir completely and throw away the water. If necessary, clean the water reservoir. See chapter ‘Cleaning and maintenance’.
Note: Keep the main water valve always open. This ensures that the pure water reservoir refills automatically. The filling speed of the water reservoir depends on the state of the filter and the quality and pressure of the input water.
Dispensing water

natural_image
Illustration of a hand pouring liquid from a water dispenser into a cup (no text or symbols)1 Put a glass under the water reservoir tap to collect purified water.
Note: Besides a glass, you can also use a jar or a properly cleaned used mineral or soft drink bottle.
- To increase the water flow, turn the tap lever to the front.
- To reduce the water flow, turn the tap lever to the left or right.
Cleaning and maintenance
Caution: Never use scouring pads, detergents, abrasive cleaning agents or aggressive fluids such as thinner, alcohol, petrol or acetone to clean the water purifier. These substances may cause the material of the water purifier to crack, discolor or distort. Do not clean any part of the water purifier in a dishwasher.
Do not use a kitchen sponge or cloth to clean or dry the inside of the water reservoir because they are likely to contain bacteria. To clean the water reservoir in a hygienic way, follow the cleaning instructions below.
You can remove the water reservoir for cleaning purposes without closing the main valve. No leakage will occur thanks to a one-way valve that blocks the water flow.
We advise you to drain the water reservoir before you remove it from the water purifier. This makes the water reservoir easier to handle.
Cleaning the outside surface of the water purifier
- Clean the outside of the water purifier with a damp cloth and some washing-up liquid.
- If necessary, you can also remove the front panel from the reservoir. To release the front panel push down the tab on the reservoir (1), then slide the panel from the reservoir (2). Clean the reverse side of the front panel and the outside of the water reservoir with a soft sponge and some washing-up liquid.
Clean the water reservoir tap and the connection between the reservoir and the wall holder only with a properly disinfected sponge or cloth. See 'Hygiene awareness' in chapter 'Important'.
Thorough cleaning of the water reservoir
Philips advises you to clean the inside of the water reservoir thoroughly on a regular basis (once a month). To clean the water reservoir in a hygienic and simple way, follow the instructions below.
- Make sure the reservoir has filled up to its maximum volume. Remove the reservoir cover and add 30ml of household bleach in case of a 5% solution of sodium hypochlorite, or 60ml in case of a 2.5% solution.
- Mix the bleach thoroughly through the water with a spoon. This disinfects the inside of the water reservoir.
- After 1 minute, drain the reservoir and throw away the water.
- After the reservoir has filled up again to its maximum volume, check if the water still has a chlorine taste.

- If it does, throw away the second full reservoir of water as well.
Filter holder
The filter holder does not require regular cleaning. Only clean it when you replace the filter (see chapter 'Filter replacement').
Note: The filter itself does not require any cleaning.
Filter replacement
Do not open the main water valve if the filter holder is not in place.
Note: After the filter has purified 2000 liters of water, the Ultra Pure Protect lock is activated. This lock closes off the flow of water through the filter and as a consequence the water reservoir does NOT refill. When this happens, you know it is time to replace the filter.
Note: If the Ultra Pure Protect lock has not been activated after 6 months of use, Philips advises you to replace the filter anyway. This prevents deterioration of the taste of the purified water due to diminished effectiveness of the activated carbon in the filter. The purified water is still pure, but a deteriorated taste can reduce your pure water experience. If there are many impurities in the water, the Ultra Pure Protect lock is activated before 2000 liters of water have been purified.
Note: Collect a few liters of water in a clean container before you replace the filter, as the main water valve is closed during the replacement procedure. You need this water to clean the filter holder.
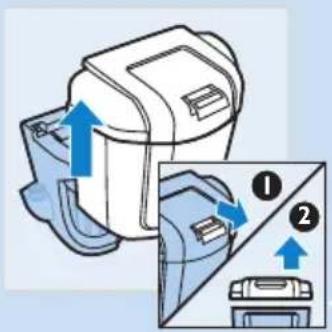
1 Close the main water valve before you replace the filter.
2 Open the water reservoir tap and drain the water reservoir completely.
3 Pull out the lock lever (1), lift the cover (2) and remove the water reservoir from the wall holder.
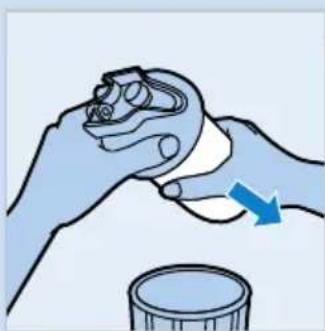
4 Hold a cup under the spout to collect any water that may come out of the filter holder during decompression and press the decompression button. Keep the decompression button pressed until no water or air comes out of the spout anymore.
5 To open the filter holder release lever, press the decompression button with one hand (1) and pull the front part of the release lever towards you with your other hand (2).

natural_image
Illustration of a hand using a tool to adjust or install a mechanical component, with no visible text or symbols.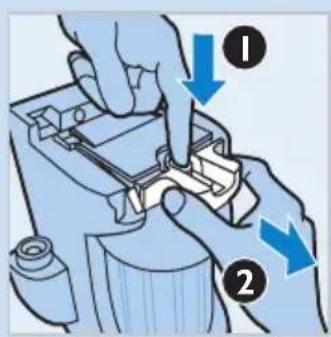
natural_image
Mechanical component diagram showing a blue arrow indicating direction (no text or symbols present)6 Now you can lift the filter holder release lever.

natural_image
Illustration of a blue mechanical device with a cartoon character and directional arrow (no text or symbols)7 Remove the filter holder from the wall holder.
natural_image
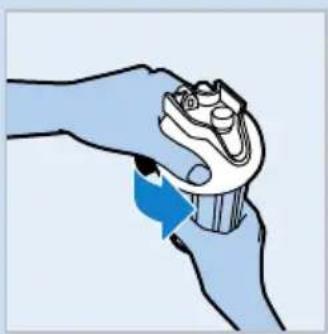
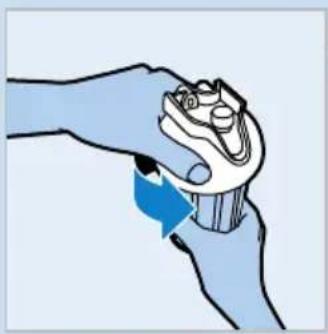
Illustration of a hand gripping a small object with a blue arrow indicating rotation (no text or symbols)8 Unscrew the cap from the filter holder.

natural_image
Illustration of hands holding a cylindrical object with a blue arrow indicating motion (no text or symbols)9 Pull the filter from the cap.
10 If necessary, clean the inside of the filter holder with the water you collected before.
Do not open the main water valve until after you have placed the filter holder with filter and the water reservoir back onto the wall holder.

natural_image
Illustration of a hand holding a cylindrical object with a magnified inset showing the process (no text or symbols)11 Attach a new filter to the cap and place the filter with cap in the filter holder. Screw the cap back onto the filter holder.
Note: Always replace the filter with an original Philips replacement filter, type WP3970.

12 If the filter holder release lever is not in upright position, pull the lever forward (1) and lift it up (2).

natural_image
Illustration of a mechanical component with a blue arrow indicating direction (no text or symbols)13 Place the filter holder with filter into the wall holder.

14 Push down the filter holder release lever to lock the filter holder into place ('click').

15 Place the water reservoir onto the wall holder. Put the cover on the water reservoir. Make sure that the water reservoir tap is closed.
16 Open the main water valve. Observe the water purifier for 5 minutes to check for any leakage between connections.
17 If leakage occurs, repeat all previous steps in this chapter.
18 The water reservoir now automatically fills with purified water to its maximum volume of approximately 4 liters. An internal mechanism prevents the reservoir from overflowing.
19 After the reservoir has filled up to its maximum volume for the first time, remove the reservoir cover and add 30ml of household bleach (5% solution of sodium hypochlorite). If your household bleach contains a solution of only 2.5% sodium hypochlorite, you should use 60ml. Mix the bleach thoroughly through the water with a spoon. This disinfects the inside of the water reservoir. After 1 minute drain the reservoir and throw away the water. After the reservoir has filled up again to its maximum volume, check if the water still has a chlorine taste. If it does, throw away the second full reservoir of water as well.
The water purifier is now ready for use.
Environment

natural_image
Symbol of a trash bin crossed out by two crossed lines (no text or numbers present)- Do not throw away the water purifier with the normal household waste at the end of its life, but hand it in at an official collection point for recycling. By doing this, you help to preserve the environment.
- Throw away used filters with the normal household waste.
Guarantee and service
If you need service or information or if you have a problem, please visit the Philips website at www.philips.com or contact the Philips Consumer Care Center in your country (you find its phone number in the worldwide guarantee leaflet). If there is no Consumer Care Center in your country, go to your local Philips dealer.
Guarantee restrictions
1 The guarantee does not cover the water purifier parts that are subject to wear and tear, that can be considered as consumable parts by their nature.
2 The filter is a consumable and is therefore not covered by the two year worldwide guarantee. However, a 90-day guarantee on manufacturing defaults does apply.
3 This guarantee does not extend to accessories (hose, clamps, adapter, sealings etc.), supplied with the water purifier.
4 Philips or its authorized service personnel are entitled to retain all defective parts replaced under guarantee.
5 All expenses incurred due to reinstallation, collection and delivery as part of the service provided regarding the water purifier by an authorized Philips service center or dealer are for the account of the customer.
6 The warranty/guarantee policy is only valid for those products that have not been tampered with and on which repairs/modifications have only been provided by authorized Philips service centers.
7 The guarantee becomes invalid when the water purifier is not used and/or not maintained properly or when it is damaged by dropping.
8 The guarantee becomes invalid if the water purifier is used for commercial purposes.
Technical data
UltraPure Protect features
Note: See figure 1 for a cross-sectional drawing (P) of the filter.
- This Philips water purifier uses filter cartridge type WP3970, which contains (1) a pre-filter, (2) Granular Activated Carbon (GAC), (3) Ultra Filtration (UF) membranes, and (4) a filter stop.
- The pre-filter removes big particles, e.g. sand.
- GAC is generally known to remove many kinds of unwanted dissolved chemicals such as chlorine, volatile organic compounds (VOCs), chlorination by-products (CBPs), pesticides and medicine residues, and in this way improves the quality, taste, color and odor of the water.

- The UF membranes act like a sieve with extremely small pores (approximate size 10-15 nanometers) capable of removing all particles and microorganisms that are bigger in size. The triple gold seal certificate granted by the Water Quality Association (WQA) implies that this water purifier supplies you with microbiologically safe drinking water as tested according to the USEPA Microbiological Guide. More specifically this water purifier effectively removes at least 99.9999% of bacteria, 99.99% viruses and 99.9% of cysts.
- The filter cartridge has an integrated mechanism to count the amount of water that is purified by the filter, called Ultra Pure Protect lock. To guarantee that the purified drinking water remains safe and retains its high quality, this mechanism shuts down the filter after it has purified 2000 liters of water. When the mechanism shuts down the filter it is time to replace the filter. See chapter 'Filter replacement'.
- This water purifier conforms to NSF/ANSI 42 for particulates removal (class I) and esthetic chlorine removal, NSF/ANSI 53 for turbidity removal and USEPA Microbiological Guide for bacteria, virus and cyst removal, as verified and substantiated by test data.
- This water purifier also complies with the Brazilian standard ABNT-NBR 14908 (2004) as tested by Falcão Bauer.
Product name and type number Water purifier WP3870
| Category Wall-mounted, non-electrical, with permanent connection to the water supply |
| Major filter components Polyethersulfone Ultra Filtration membrane and Granular Activated Carbon |
| Proven removal of microorganisms* Removal of bacteria, viruses and cysts, as tested according to the USEPA Microbiological Guide. Certified by the triple gold seal of the Water Quality Association (WQA). |
| Rated capacity of filter 2000 liters, or approximately 6 months, at a consumption of 10 liters a day. Actual life depends on input water quality and input water pressure. |
| Replacement filter type WP3970 |
| Purifying flow rate 0.4 ltrs/min (max) |
Product name and type number Water purifier WP3870
| Dispensing flow rate from water reservoir tap | 2.5 ltrs/min (max) |
| Minimum water input pressure 0.2 bar, 20 kPa, 2 meters of water column | |
| Maximum water input pressure 4.0 bar, 400 kPa, 40 meters of water column | |
| Minimum temperature of input water 5°C | |
| Maximum temperature of input water 40°C | |
| Dimensions of appliance (WxDxH) and weight | 295 × 195 × 330mm, approx. 2.2kg |
| Dimensions of packaging (WxDxH) and weight | 355 × 245 × 445mm, approx. 3.0kg |
| Country of origin Brazil | |
\*Proven removal of microorganisms
This water purifier has been tested according to NSF/ANSI 42, NSF/ANSI 53 and the USEPA Microbiological Guide reduction of substances below. The concentration of the indicated substances in water entering the system was reduced to a concentration less than or equal to the permissible limit for water leaving the system, as specified by NSF/ANSI 42, 53 and USEPA Microbiological Guide. Although testing was done under standard laboratory conditions, the actual performance may have varied.
Removal of Removal efficacy (Log) Removal efficacy (%)
| Bacteria 6 99.9999 | |
| Viruses 4 99.99 | |
| Cysts | 3 99.9 |
The statistics shown in the table below have not been evaluated by the product certification process of Inmetro in Brazil. Compliance with WQA requirements for the Triple Gold Seal.
| Substance Max. allowable concentration (mg/L) | Average influent (mg/L) | Average effluent (mg/L) | Minimum percent reduction (%) | Average percent reduction (%) |
| Turbidity 0.1 10.0 0.1 98.9 99.01 | ||||
| Particulate class I | 989 47701 529 97.9 98.9 | |||
| Cysts 2 255125 2 | 99.99 | 99.99 | ||
| Chlorine >50% reduction | 1.89 0.02 98.9 98.9 | |||
| Micro-organism | Influent | Effluent | Log reduction | Minimum log reduction |
| Bacteria | 6.2*107 | <1 | >7.62 | >5.94 |
| Cysts | 255125 | 2 | 99.99 | 99.99 |
| Viruses 1.0*107 | <3.4 | 6.46 | >3.79 |
Troubleshooting
This chapter summarizes the most common problems you may encounter with your water purifier. If you are unable to solve the problem, contact the Consumer Care Center in your country.
| Problem Cause Solution | ||
| The water purifier leaks. | One of the connections is not fitted properly. | Locate the connection that leaks. Turn off the main water valve. Loosen the connection that leaks and fasten it again in the proper manner. Check again. Repeat all steps in ‘Installation’ and ‘Preparing for use’, if necessary. |
| The hose is not long enough to reach the installation point. | Obtain a longer hose from an authorized Philips service center or from an authorized dealer. Do not interconnect two or more hoses, as this may cause leakage. | |
| There is no flow of purified water. | The main valve is closed. Open the main valve. | |
| The filter has reached the end of its life. | When the filter has reached the end of its life, the Ultra Pure Protect lock is activated. The flow immediately stops for your safety. Buy a new filter from an authorized Philips service center or from an authorized dealer. | |
| The water reservoir tap leaks. | The valves inside the tap are soiled with small particles present in non-purified tap water or fibres from a cleaning cloth. | Open the water reservoir tap and drain the reservoir in order to flush away the dirt. |
| The decompression button leaks. | The decompression valve is soiled with small particles present in non-purified tap water or fibres from a cleaning cloth. | Press the decompression button to flush away the dirt. Collect the water that comes out of the filter holder cap. |
Frequently asked questions
This chapter lists the questions most frequently asked about the water purifier. If you cannot find the answer to your question, contact the Customer Care Centre in your country.
Question Answer
| Can I use the Philips water purifier to purify well or bore hole water? | No. The water purifier has been designed to purify pre-treated drinkable water from local water sources. It is not intended to purify lake water, river water or other types of untreated raw water. |
| Can I store purified water in the refrigerator? | Yes. To prevent purified water from becoming contaminated, store it in a clean container with a tight-fitting lid. If properly refrigerated in an airtight container, purified water can be stored for up to 24 hours. |
| Does this Philips water purifier change the taste of water? | The taste of water depends on what is in the water. The water purifier removes many dissolved substances such as particulates and chlorine, thereby improving the taste, odor, and transparency of the water. |
| Where can I buy type WP3970 replacement filters? | You can buy them from an authorized Philips service center or from an authorized Philips dealer. For further information on where to find the authorized distributors in your city, please, contact the Consumer Care Center in your country. |
บทนำ
natural_image
Diagram showing two identical buckets with hooks and a blue crossed-out valve on a grid background (no text or symbols)


natural_image
Diagram showing a hand operating a device with a scroll arrow, no text or symbols presentnatural_image
Diagram showing cable installation with two views of a device (no text or symbols present)natural_image
3D mechanical part diagram with dashed alignment lines and blue circular features on grid background (no text or symbols)natural_image
Illustration of a blue arrow pointing to a pipe fitting with a hexagonal bolt (no text or symbols)natural_image
Illustration of a pipe fitting with a blue arrow indicating direction (no text or symbols)natural_image
Illustration of a hand holding a cylindrical object with a magnified inset showing the process (no text or symbols)natural_image
Cartoon illustration of a blue mechanical device with a blue arrow pointing to it (no text or symbols)natural_image
Illustration of a hand pouring liquid from a water dispenser into a cup (no text or symbols)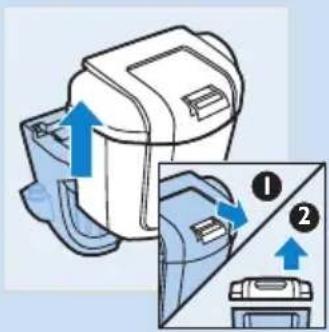
natural_image
Illustration of a hand using a mechanical device to adjust or install a cup, with no visible text or symbols.natural_image
Mechanical component diagram showing a blue arrow indicating direction (no text or symbols present)natural_image
Illustration of a blue mechanical component with a magnified view showing a small object and a blue arrow indicating direction (no text or symbols)natural_image
Illustration of a hand gripping a small object with a blue arrow indicating rotation (no text or symbols)natural_image
Illustration of a hand holding a small object with a blue arrow pointing to it, above a cylindrical container (no text or symbols)natural_image
Illustration of a hand holding a cylindrical object with a magnified inset showing the process (no text or symbols)natural_image
Illustration of a cartoon character inside a blue mechanical device with a blue arrow indicating direction (no text or symbols)natural_image
Symbol of a trash bin with crossed lines indicating no waste or restriction, and a solid black rectangle below (no text or labels)natural_image
Illustration of two buckets with a valve and a blue crossed-out sink symbol on a grid background (no text or labels)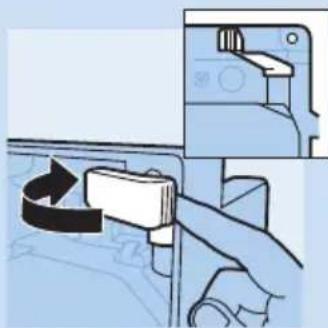
natural_image
Illustration of a hand operating a device with a scroll arrow, showing no text or symbolsnatural_image
Diagram showing cable installation with two views of a device (no text or symbols present)natural_image
3D mechanical component diagram with labeled parts and alignment lines on grid background (no readable text or symbols)natural_image
Illustration of a blue arrow pointing to a pipe fitting with a hexagonal nut (no text or symbols)natural_image
Illustration of a pipe fitting with a blue arrow indicating direction (no text or symbols)natural_image
Illustration of a hand holding a cylindrical object with a magnified inset showing the process (no text or symbols)使用前準備
natural_image
Illustration of a mechanical component with a blue arrow indicating direction (no text or symbols)3 將濾芯固定座和濾芯裝入壁式固定座。

natural_image
Illustration of a hand pouring liquid from a water dispenser into a glass (no text or symbols)注意:濾芯本身不需要任何清洗。
更換濾芯
natural_image
Illustration of a hand using a mechanical clamp to adjust or install a cup (no text or symbols visible)6 現在您可以提起濾芯固定座釋放桿。

natural_image
Mechanical component diagram showing a blue arrow indicating direction (no text or symbols present)
natural_image
Mechanical component diagram showing a blue housing with a white connector and a blue arrow indicating direction (no text or symbols)7 從壁式固定座取下濾芯固定座。
natural_image
Illustration of a hand holding a small object with a blue arrow indicating rotation (no text or symbols)8 轉開濾芯固定座的護蓋。

natural_image
Illustration of hands performing a medical or laboratory procedure with a blue arrow indicating direction (no text or symbols present)9 從護蓋拉出濾芯。
natural_image
Illustration of a hand holding a cylindrical object with a magnified inset showing the process (no text or symbols)natural_image
Illustration of a mechanical component with a blue arrow indicating direction (no text or symbols)

natural_image
Symbol of a trash bin crossed with no text or numbers, representing waste sorting or disposal (no text present)natural_image
Illustration of two buckets with a valve and a blue prohibition symbol (no text or labels)
natural_image
Illustration of a hand operating a device with a scroll arrow, showing no text or symbolsnatural_image
Diagram showing cable connection with arrows indicating rotation, no text or symbols presentnatural_image
3D mechanical component diagram with labeled parts and alignment lines on grid background (no readable text or symbols)natural_image
Illustration of a blue arrow pointing to a pipe fitting with a hexagonal nut (no text or symbols)natural_image
Illustration of a pipe fitting with a blue arrow indicating direction (no text or symbols)natural_image
Illustration of a hand holding a cylindrical object with a magnified inset showing the process (no text or symbols)natural_image
Illustration of a mechanical component with a blue arrow indicating direction (no text or symbols)3 将带过滤网的滤芯固定架放到墙架上。
natural_image
Illustration of a hand pouring liquid from a water dispenser into a small cup (no text or symbols)1 在更换过滤网之前,请先关好主水阀。
natural_image
Illustration of a hand using a mechanical clamp to adjust or install a cup (no text or symbols visible)6 现在您可以提起滤芯固定架释放杆。

natural_image
Mechanical component diagram showing a blue arrow indicating direction (no text or symbols present)简体中文54

natural_image
Illustration of a cartoon character inside a blue mechanical device with a blue arrow indicating direction (no text or symbols)7 从墙架取下滤芯固定架。

natural_image
Illustration of a hand gripping a small object with a blue arrow indicating rotation (no text or symbols)8 从滤芯固定架拧下护盖。
natural_image
Illustration of a hand holding a small object with a blue arrow pointing to it, above a cylindrical container (no text or symbols)natural_image
Illustration of a hand holding a cylindrical object with a magnified inset showing the process (no text or symbols)natural_image
Illustration of a mechanical component with a blue arrow indicating direction (no text or symbols)产品名称和型号 净水器 WP3870


- General description (Fig. 1)
- Important
- Hygiene awareness
- Warning
- Caution
- Before first use
- Installation
- Preparing for use
- Using the water purifier
- Dispensing water
- Cleaning and maintenance
- Cleaning the outside surface of the water purifier
- Thorough cleaning of the water reservoir
- Filter holder
- Filter replacement
- Environment
- Guarantee and service
- Guarantee restrictions
- Technical data
- UltraPure Protect features
- Note: See figure 1 for a cross-sectional drawing (P) of the filter.
- \*Proven removal of microorganisms
- Troubleshooting
- Frequently asked questions
- บทนำ
- 使用前準備
- 更換濾芯
- 简体中文54
Brand : PHILIPS
Model : WP3870
Category : Water dispenser