
ADD4968 - Water dispenser PHILIPS - Free user manual and instructions
Find the device manual for free ADD4968 PHILIPS in PDF.


| Product Type | Water Dispenser |
| Brand | Philips |
| Model | ADD4968 |
| Dimensions (H x W x D) | 40 cm x 30 cm x 25 cm |
| Weight | 5.0 kg |
| Power Supply | 220-240 V, 50/60 Hz |
| Power Consumption | 550 W (heating) / 100 W (cooling) |
| Water Tank Capacity | 5 L |
| Water Temperature Options | Hot (85-95°C), Cold (5-10°C), Room temperature |
| Functions | Child lock, self-cleaning mode, energy saving mode |
| Material | ABS plastic, stainless steel heating element |
| Installation | Freestanding, no plumbing required (bottle type) |
| Safety Features | Overheat protection, dry boil protection, child lock |
| Maintenance | Clean exterior with soft damp cloth; descale every 3 months |
| Spare Parts Availability | Drip tray, water tank, hot water safety lock |
| Repairability Index | 7.5 / 10 |
| Warranty | 2 years |
| User Manual | Available for free download on notice-facile.com |
Frequently Asked Questions - ADD4968 PHILIPS
User questions about ADD4968 PHILIPS
0 question about this device. Answer the ones you know or ask your own.
Ask a new question about this device
Download the instructions for your Water dispenser in PDF format for free! Find your manual ADD4968 - PHILIPS and take your electronic device back in hand. On this page are published all the documents necessary for the use of your device. ADD4968 by PHILIPS.
USER MANUAL ADD4968 PHILIPS
User Manual
Content
1 Main technical specification 1
2 Product overview 2
3 Indicator panel and switch 3
4 Instruction 4
-Filter 5
-UV-LED light 6
5 Precautions 6
6 Cleaning and maintenance 8
7 Trouble shooting 9
8 Guarantee and Service 10
9 Packing list 10
1 Main technical specification
| Model | ADD4965 ADD4968 |
| Filter model | ADD502 |
| Rated voltage | 220-240V~ |
| Rated frequency | 50Hz/60Hz |
| Heating power | 500W |
| Cooling power | 85W |
| Hot water | ≥90°C, 5L/h |
| Cold water | ≤10°C, 2L/h |
| Environmental temp. | ST/T |
| Coolant | R134a, 38g |
| Relative humidity | ≤90% |
| Protection of anti-electric shock | I |
2 Product overview

① Child safety lock
② Indicator panel
③ Water faucet
④ Drip tray
⑤ Lower cabinet door
⑥ Filter reset button
⑦ Water bottle cap with hose
⑧Filter
⑨ Water bottle
⑩ Power switch
⑪ Condenser
⑫ Power cord
⑬ Dispenser flushing drain
⑭ Filter drain

3 Indicator panel and switch

When the dispenser is heating up the water in the hot water tank, the heating indicator light will be on.
When the dispenser is cooling the water in the cold water tank, the cooling indicator light will be on.
When there's no water left in the bottle, the water shortage indicator will be on. Replace with a new bottled water and the indicator will switch off automatically.
The filter lifetime indicator red light will start to flash when there are 15 days filter lifetime left, it will stay on until the filter reaches the end of life. Replace the filter and reset the lifetime indicator as instructed, the indicator will switch off automatically afterwards.

At the back of the dispenser there is a red switch which controls the heating power, and a green switch controlling the cooling power.
You can turn it on when you need hot or cold water.
If you first turn on the switch, for optimal temperature, the dispenser will need around 20 minutes for hot water and around an hour for cold water.
4 Instruction
(1) Unpacking the water dispenser
- Cut and remove the straps from the box. DO NOT turn the box upside down, or lay it on its side. The bottom of the box is separate from the top section. Lift straight up on the top box section to remove the top box section. Remove the Styrofoam packaging and plastic bag. Lift the water dispenser off the bottom of the bottom of the box. Wipe it clean if necessary.
- Place the machine on a hard, flat surface. Make certain the unit is leveled. The unit should not be placed near direct sunlight or other source of heat.
- It is best to place the water dispenser in an area with good air circulation. Make sure there is at least 4 inches (10cm) of space between the back of your water dispenser and the wall. Keep a minimum distance of 2 inches (5cm) on each side of your water dispenser.
Warning: the drain plug on the back of the unit may become loose during shipping. Fasten the drain plug tightly before you start to operate the unit. If the drain plug is loose, the unit may leak and cause floor damage.
(2) Settling water bottle
- Make sure the water dispenser is not plugged into an electrical outlet.
- Open the door of the lower cabinet.
- Place full water bottle on floor. Remove the plastic cover over the mouth of the water bottle.
- Place the stainless tube inside the bottle and place the water bottle cap firmly over the mouth of the water bottle.
- Attach the hose to the top of the cap using the quick connect system shown below*.
- Slide the bottle inside the cabinet and close the lower cabinet door.
* Your new water dispenser features an adjustable quick connect system. For proper operation, make sure the connector is sealed tight (Fig. 1);
The connector can be removed easily for cleaning with warm soapy water (Fig. 2);
The stainless steel tube can be adjusted up and down to accommodate both 3 gallon and 5 gallon water bottle (Fig. 3).

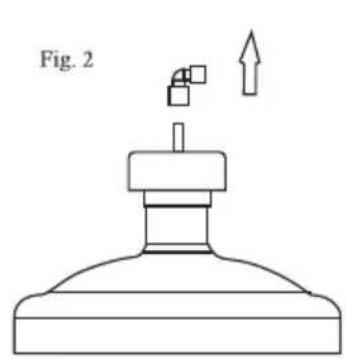

Note: If there is not a secure connection between the hose cap and the connector on the water dispenser, the water pump will operate but the water dispenser will not dispense water. Make sure the hose is connected to the water dispenser correctly.
(3) Dispense water
- Plug the water dispenser into a grounded power outlet. The unit will pump the water from the water bottle into the cooling and heating tanks.
- Press the hot water button until water flows out.
- Turn on the power switch on the back of the unit to heat or cool the water. The indicator light will be on when heating or cooling is working. To get optimal temperature, do not turn off the power switch until heating or cooling is done.
- Enjoy the hot or cold water you need.
· If you do not need hot or cold water, turn off the power switch to conserve energy.
Note: please wait until the water pump stops running before using the unit. If the water tank is not full, no water will dispense from the water faucet.
Filter
(1) Function of the filter
The filter is made of carbon block, which can remove particles such as micro-plastics, as well as improving the taste and texture of water.
(2) Flushing the filter for first time usage
- Unplug the filter drain at the back of the dispenser, and connect the filter drain with the PE pipe provided. Put the other end of the PE pipe in a container or a bucket which can hold at least 5L water.

- Plug the water dispenser into a grounded power outlet. Insert the stainless steel pipe into the bottle, and slide the bottle in. Close the cabinet door. Water that is used to flush the filter will flow into the container automatically from the filter drain. Flush the filter for 3 minutes.
- Once it's done, open the cabinet door, remove the PE pipe from the filter drain and plug the filter drain.
- Close the cabinet door. Now the filter is ready to use.
(3) Replacing the filter and resetting filter lifetime indicator
- Open the cabinet door and remove stainless steel pipe from the bottle. Press the cold water button to empty the water tank inside.
- Turn the filter counterclockwise to take off the old filter.
- Screw the new filter clockwise into the filter holder until the dots on the filter and the holder is fully aligned.
- Press and hold the reset button for 5 seconds to reset

the filter lifetime indicator. Once successful, the filter lifetime indicator on the panel will switch off.
- Flush the filter as instructed above.
- If you reset the lifetime by mistake, continuously short press the reset button for 5 times within 5 minutes, then the filter lifetime indicator will flash for 3 times which means you revoke the reset successfully.
UV-LED light (applicable for ADD4967, ADD4968)
The UV-LED light is installed in the cold water tank to kill the bacteria which may grow inside. It's controlled automatically by the software program once the dispenser is connected with power.
5 Precautions
Warning
When using electrical appliances, basic safety precautions should be followed to reduce the risk of fire, electric shock, and injury to persons or property. Read all instructions before using any appliance.
- Do not let hot water touch bare skin. Keep combustible material such as furniture, bedding, pillows, clothes, and/or papers away from the back of the unit.
- Do not operate this, or any other appliance with a damaged power cord. No other appliance should be plugged into the same outlet. Be sure that the plug is fully inserted into the outlet.
- Do not run the power cord over carpeting or other heat insulators. Do not cover the cord. Keep cord away from high traffic areas, and do not submerge in water.
- We do not recommend the use of extension cord as it may overheat and cause a risk of fire.
· Exercise caution and use reasonable supervision when the appliance is used by or near children. - Do not use your water dispenser outdoors. Place the water dispenser away from direct sunlight and make sure that there is at least 4 inches (10cm) of space between the back of your unit and wall. Keep a minimum of 2 inches (5cm) on each side of your unit free.
- Do not use this product to dispense anything other than water.
- To avoid a hazard due to instability of the appliance, it must be placed on even and flat surface.
- If the supply cord is damaged, please contact aftersales personnel to replace it in order to avoid a hazard.
- This water dispenser must be positioned so that the plug is accessible.
- Disconnect the plug from the outlet when not in use.
- Remove power plug or disconnect from the main power source before servicing the appliance.
- The appliance is not to be used by persons (including children) with reduced physical, sensory or mental capabilities, or lack of experience and knowledge, unless they have been given supervision or instruction.
- Children being supervised should not play with the appliance.
- Do not store explosive substances such as aerosol cans with a flammable propellant in this appliance.
- This appliance is intended to be used in household and similar applications such as: IEC 60335-2-15.
- staff kitchen areas in shops, offices and other working environments;
- farm houses;
- by clients in hotels, motels and other residential type environments;
- bed and breakfast type environments.
- WARNING: When positioning the appliance, ensure the supply cord is not trapped or damaged.
- WARNING: Do not locate multiple portable socket outlets or portable power supplies at the rear of the appliance.
6 Cleaning and maintenance
· To avoid accidents, turn off and unplug the water dispenser from the outlet before cleaning.
- A soft damp cloth may be used to clean the surface of the water dispenser. When necessary, a mild detergent may be used. DO NOT use corrosive chemical solvents to clean the unit, as this may damage the surface of the water dispenser.
- DO NOT pour water on the exterior of the unit to avoid getting the internal electrical system wet. DO NOT immerse the unit in water when cleaning.
· The water bottle cap, hose, and drip tray may be washed in a dishwasher (top rack only).
- Keep the water dispenser 6 inches (15cm) away from the wall so it can work properly. Make certain all ventilation openings are clear of obstruction.
- Do not damage the heating or cooling system, paying particular attention to the black condenser or heating radiator on the back of the water dispenser.
- If you will not use the water dispenser for a long period of time, please unplug the power cord and drain the water dispenser. Drain the water from all faucets, then remove the drain cap on back and allow it to drain. Make certain the drain cap is fastened tightly when finished.
7 Trouble shooting
| Trouble Possible causes Solutions | ||
| Unit does not dispense hot and cold water. | 1. Unit is unplugged.2. Main power supply is off.3. Damaged water dispenser.4. The water bottle cap is not attached properly to the connector on the water dispenser. | 1. Plug the power cord into an socket.2. Reestablish main power supply.3. Replace the dispenser or send for service4. Connect properly. |
| Unit does not dispense cold water. | 1. Over consumption of cold water in a short time.2. System Malfunction3. The ventilation around the unit is insufficient.4. The temperature of water in the water bottle is too high. (When the bottle is exposed to direct sunlight for a long time. | 1. Wait a moment for the water to cool.2. Contact aftersales personnel for support.3. Space the unit from the wall by more than 15 cm.4. Place the water bottle in a cool location out of direct sunlight. |
| Unit does not dispense hot water. | 1. Over consumption of hot water in a short time.2. System Malfunctions | 1. Wait a moment for the water to heat.2. Contact aftersales personnel for support |
| Water leaks from the faucet. | 1. The top portion of the faucet has become loose.2. The faucet has been damaged. | 1. Tighten the top threaded portion of the faucet.2. Contact aftersales personnel for support. |
| Water is dripping out of the water dispenser and onto the floor. | 1. The Hose Connector is not connected properly or the inside hot or cold water tanks is leaking.2. The drain cap on the back is not fastened properly. | 1. Make sure the hose connector is properly connected. Contact dealer if a water tank is leaking2. Tighten the drain cap. If the sealing silicon material inside the drain cap is torn or damaged, then replace with a new one. |
| The water being dispensed has a strange taste. | This is not uncommon with new water dispensers. Do not worry, this is not dangerous to your health. This water dispenser is FDA approved. | Clean the hose in the dishwasher (top rack only) or let it soak in dish soap. The strange taste usually goes away after the first bottle has been used up. |
8 Guarantee and Service
This product includes a two-year warranty for the dispenser and three-year warranty for compressor from the date of purchase. If you need more information, please
visit: www.Philips.com.
Within the warranty period, you will receive free warranty service for any
damage caused by the manufacturing process or components under normal operation confirmed by our maintenance service.
The warranty service does not include frequent replaced consumable components (water purifier filter, pitcher filter, granular activated carbon, ion exchange resin, hollow fiber membrane, etc.), auxiliary devices, transportation fee and door-to-door service.
Please show the proof of purchase to the service personnel during maintenance.
You cannot receive free warranty service under the following conditions:
- Damage by improper operation, such as improper components connection, improper installation, deprived of manual use, misoperation.
- Negligence and damage because of transportation or other accident.
- Maintenance and modification without approval.
- Other damage caused by force majeure (such as natural disaster, abnormal voltage, etc.).
- Damage caused by general use outside home (e.g. industrial and commercial use).
- Aging, wear and tear caused by normal operation of the product without affecting normal operation of the product.
This statement serves as a publicity for free maintenance within the specified time limit and conditions, and does not limit the legal rights of consumers.
9 Packing list
| Water dispenser | 1x |
| PE pipe | 1x |
| User Manual | 1x |
| Quick Start Guide | 1x |
| Supporting bracket kit | 1x |

Register your product and learn more in the website link below: www.philips.com/welcome
Specifications are subject to change without notice
© 2019 AquaShield
All rights reserved.
The Philips trademark and the Philips Shield Emblem are registered trademarks
of Koninklijke Philips N.V. used under license.
This product has been manufactured by and is sold under the responsibility of Hong Kong AquaShield Health
Technology Company Limited and Hong Kong AquaShield Health Technology Company Limited is the warrantor in relation to this product.
Rev A Sep 19

- CONTENT
- 1 MAIN TECHNICAL SPECIFICATION
- 2 PRODUCT OVERVIEW
- 3 INDICATOR PANEL AND SWITCH
- 4 INSTRUCTION
- UNPACKING THE WATER DISPENSER
- SETTLING WATER BOTTLE
- DISPENSE WATER
- FILTER
- FUNCTION OF THE FILTER
- UV-LED LIGHT (APPLICABLE FOR ADD4967, ADD4968)
- 5 PRECAUTIONS
- WARNING
- 6 CLEANING AND MAINTENANCE
- 7 TROUBLE SHOOTING
- 8 GUARANTEE AND SERVICE
- 9 PACKING LIST
Brand : PHILIPS
Model : ADD4968
Category : Water dispenser