Oakland DAB - Hi-fi system Auna - Free user manual and instructions
Find the device manual for free Oakland DAB Auna in PDF.
User questions about Oakland DAB Auna
0 question about this device. Answer the ones you know or ask your own.
Ask a new question about this device
Download the instructions for your Hi-fi system in PDF format for free! Find your manual Oakland DAB - Auna and take your electronic device back in hand. On this page are published all the documents necessary for the use of your device. Oakland DAB by Auna.
USER MANUAL Oakland DAB Auna
The lighting flash and arrow head within the triangle is warning sign alerting you of dangerous voltage inside the product
CAUTION
RISK OF ELECTRIC SHOCK DO NOT OPEN
CAUTION:TO REDUCE THE RISK OF ELECTRIC SHOCK DO NOT REMOVE COVER (OR BACK).NO USER SERVICIABLE PARTS INSIDE.REFER SERVICING TO QUALIFIED SERVICE PERSONNEL.

The excclamation point within the triangle is a warning sign alerting you of important instructions accompanying the product
Ensemble/Multiplex (Gruppenname)
Unit 6 Riverside Business Centre
Brighton Road
Shoreham-by-Sea
BN436RE
United Kingdom
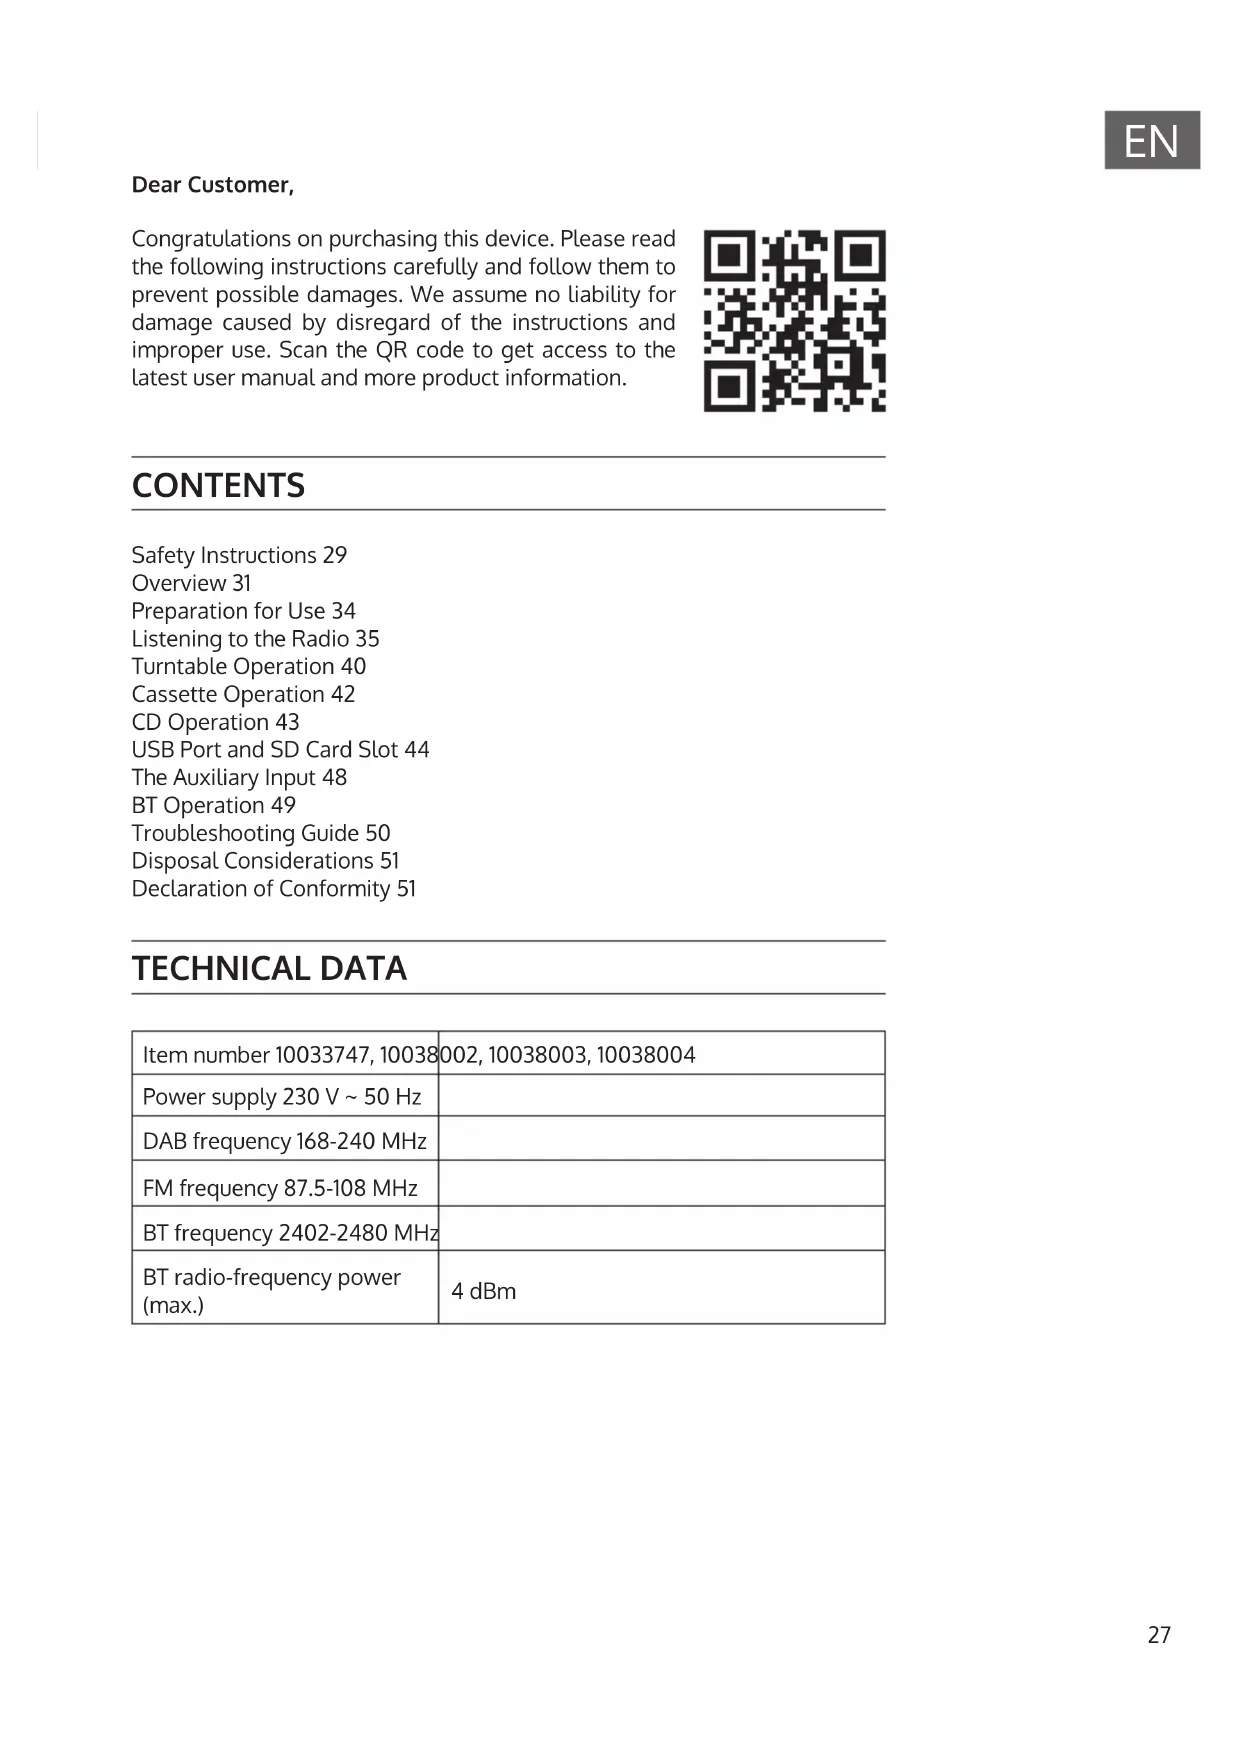
Congratulations on purchasing this device. Please read the following instructions carefully and follow them to prevent possible damages. We assume no liability for damage caused by disregard of the instructions and improper use. Scan the QR code to get access to the latest user manual and more product information.

CONTENTS
Safety Instructions 29
Overview 31
Preparation for Use 34
Listening to the Radio 35
Turntable Operation 40
Cassette Operation 42
CD Operation 43
USB Port and SD Card Slot 44
The Auxiliary Input 48
BT Operation 49
Troubleshooting Guide 50
Disposal Considerations 51
Declaration of Conformity 51
TECHNICAL DATA
| Item number 10033747, 10038 | 002, 10038003, 10038004 |
| Power supply 230 V ~ 50 Hz | |
| DAB frequency 168-240 MHz | |
| FM frequency 87.5-108 MHz | |
| BT frequency 2402-2480 MHz | |
| BT radio-frequency power (max.) | 4 dBm |
WARNING
| CAUTION RISK OF ELECTRIC SHOCK DO NOT OPEN | |
| CAUTION: TO REDUCE THE RISK OF ELECTRIC SHOCK AND SERIOUS PERSONAL INJURY, DO NOT REMOVE ANY COVER. NO USER-SERVICABLE PARTS INSIDE. REFERServICING TO QUALIFIED SERVICE PERSONNEL ONLY. WARNING. TO REDUCE THE RISK OF FIRE OR ELECTRICAL SHOCK, DO NOT EXPOSE THIS PRODUCT TO WATER, RAIN OR MOISTURE. | |
| 4 | Triangle with lightning plus explanation as follows: DANGEROUS VOLTAGE: The lightning flash with arrowhead symbol within the equilateral triangle is intended to alert the user to the presence of uninsulated dangerous voltage within the product's enclosure that may be of sufficient magnitude to constitute a risk of electric shock to persons. |
| ! | Triangle with exclamation point plus explanation as follows: ATTENTION: The exclamation point within the equilateral triangle is intended to alert the user to the presence of important operating and maintenance (servicing) instructions in the literature accompanying this product. |
To reduce the risk of electric shock do not use this plug with an extension cord or receptacle.
SAFETY INSTRUCTIONS
Read these instructions. All uses guidelines must be read before using the device. Keep the instructions for future use.
- Attention, use and security guidelines must be respected.
- The device must not be used near water or be put in contact with moisture.
- Make sure has no liquid is spilled on device and device openings.
- Move device carefully, avoid shocks.
- Do not block the breakdown of the device outputs.
- Do not place the device near from a heat source (e.g. radiator). Do not expose it to the Sun.
- Plug the device as indicate on this information form.
- This device has a connection with overload protection. Replacement should only be done bt an experienced technician or the device manufacturer.
- For cleaning the device, please follow the recommendations of the notice.
- The power cord should be unplugged when not using for a long period of time.
Device shall be repaired by a qualified person when:
a. the power cord is damaged,
b. objects have fallen into the apparatus or a liquid has been spilled into device,
c. device was exposes to the rain,
d. device does not work correctly without notable exterior change,
e. device is broken.
- The user shall not try to maintain device beyond that which is described in this information form.
- The apparatus shall not be exposed to dripping or splashing and that no objects filled with liquids, such as vases, shall be placed on apparatus.
- To be completely disconnect the power input, the mains plug of apparatus shall be disconnected from the mains, as the disconnect devices is the mains plug of apparatus.
- The mains plug of apparatus should not be obstructed OR should be easily accessed during intended use.
- Battery shall not be exposed to excessive heat such as sunshine, fire or the like.
-
Excessive sound pressure form earphones and headphones can cause hearing loss.
-
Minimum distance (8 cm) around the apparatus for sufficient ventilations;
- The ventilation should not be impeded by covering the ventilation opening with items such as newspaper, table-cloths, curtain etc;
- No naked flame sources such as lighted candles should be placed on the apparatus;
- Attention should be drawn to the environmental aspects of battery disposal;
- The use of apparatus in moderate climates.
- Danger of explosion if battery is incorrectly replaced.
- Replace only with the same or equivalent type.
- The main plug shall remain readily operable.
Before use
Avoid installing this unit in places exposed to direct sunlight or close to heat radiating appliances such as electric heaters, on top of other stereo equipment that radiates too much heat, places lacking ventilation or dusty areas, places subject to constant vibration and/or humid or moist areas.
Do not attempt to clean this unit with chemical solvents as this might damage the finish. Use a clean dry cloth. Operate controls and switches as described in the manual. Before turning On the power, make certain the AC power cord is plugged in.
Store your CDs, Cassettes in a cool area to avoid damage from heat. When moving the set, be sure to first disconnect the power cord.
OVERVIEW
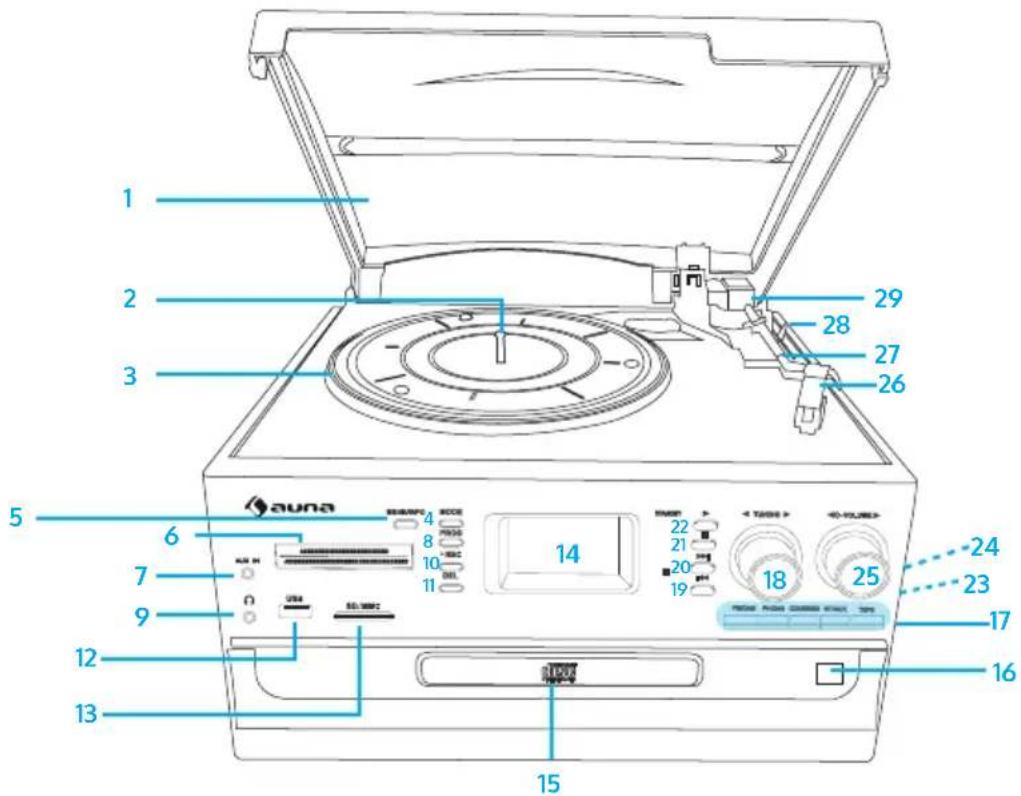
1 Dust cover
2 Revolving shaft
3 Turntable
4 Mode (USB/SD)
5 Menu/Info
6 Radio band
7 Auxiliary input
8 Program button
9 3.5 mm headphone socket
10 Record button
11 Delete button
12 USB socket
13 SD/MMC card slot
14 LCD display screen
15 Disk tray door
16 CD open/close button
17 Function selection
18 Tuning knob
19 Skip down button
20 Skip up button
21 Stop button
22 Play/Pause button
23 Right speaker
24 Cassette Player Slot.
25 Volume knob
26 Stylus
27 Tone arm
28 Lift lever
29 Tone arm
Phonograph
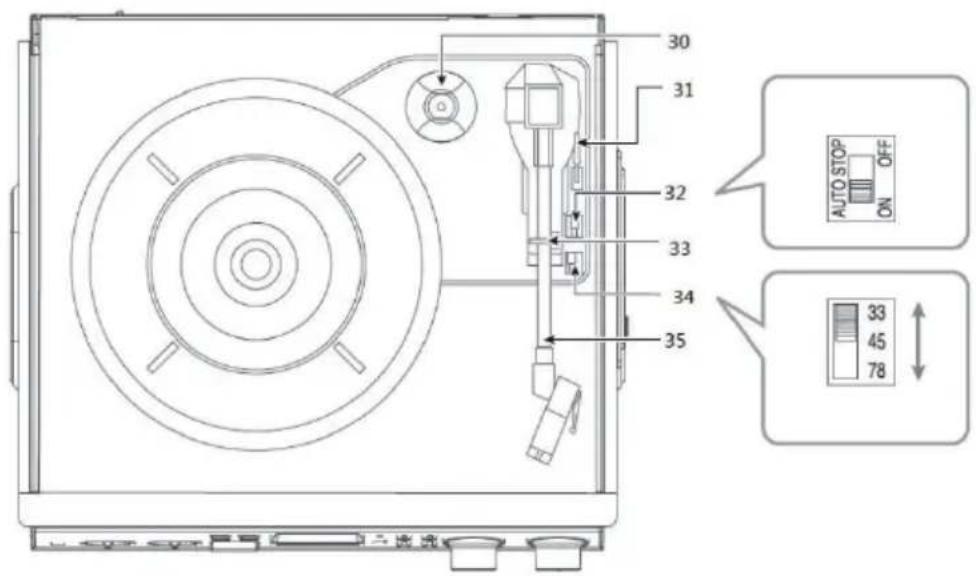
30 45 rpm adaptor
31 Lift lever
32 Auto stop control
33 Tone arm lock
34 Speed selector (33/45/78 rpm)
35 Tone arm
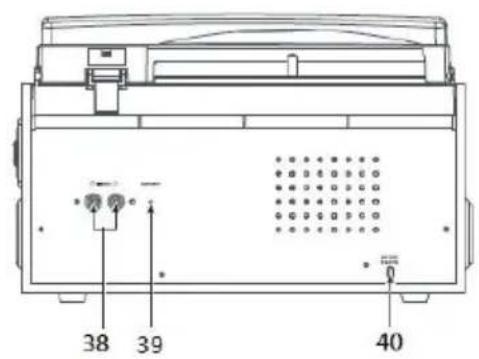
Back panel
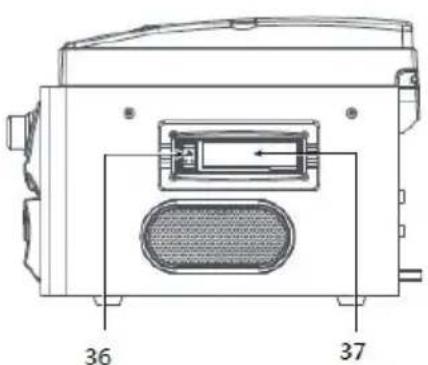
36 Cassette EJ/FF Button (Eject/Fast Forward.)
37 Cassette Player Slot.
38 RCA Line out jack
39 FM wire antenna
40 AC power cord
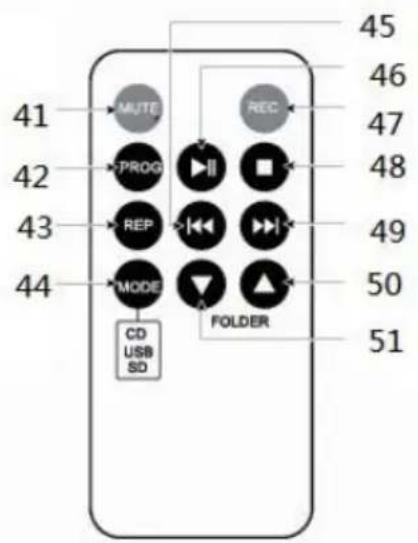
41 Mutebutton
42 Program button
43 Repeatbutton
44 Modebutton
45 Skip down button
46 Play/Pausebutton
47 Recordbutton
48 Stopbutton
49 Skip up button
50 Folder up button
51 Folder down button
PREPARATION FOR USE
Unpacking and setup
- Carefully remove the unit from the display carton and remove all packing material from the unit.
- Unwind the AC power cord and extend it to its full length.
- Unwind the FM Antenna wire and extend it to its full length.
- Place the unit on a stable, level surface, convenient to an AC outlet, out of Direct sunlight, and away from sources of excess heat, dust, moisture, humidity or strong magnetic fields.
- Remove the opaque white plastic stylus cover from the phonograph stylus by sliding it forward and down.
- Discard the stylus cover
- Remove the twist-tie that was used to secure the tone arm during shipment.
- Release the tone arm lock lever.
- Connect the plug to your AC outlet.
Power source
This product is designed to operate on 230V 50Hz AC Mains only. Attempting to operate this system from any other power source may cause damage to the system, and such damage is not covered by your warranty.
- Turn the volume knob in a clockwise direction to turn the equipment on.
- Use the function selector to select TUNER mode.
- Use the radio band selector to select the desired band (AM, FM or FM-Stereo).
- Turn and hold the tuning knob for a few seconds to tune into a radio station. The unit will start searching automatically and stop when a radio station is found. Release the knob once a station has been found.
- Repeat the above step until your desired radio station is found.
- Adjust the volume knob to your desired volume level.
- AM reception: the receiver has a built-in AM bar antenna. If reception is weak, slightly rotate or reposition the unit to improve AM reception.
- FM reception: the receiver has a built-in FM wire antenna hanging at the rear cabinet. For best reception, completely unravel and extend this wire.
FM and FM-stereo mode
- FM mode: use the radio band selector to select the FM band. Programs are received in mono mode. Use this mode when stereo reception is weak.
- FM-Stereo mode: use the radio band selector to select FM-ST for receiving stereo programs. Once a stereo signal is received, the ST icon will light up on the display.
AM/FM Radio memorization for preselected channel
- Turn the volume knob clockwise to turn the equipment on.
- Use the function selector to select TUNER mode.
- Use the radio band selector to select the desired band (AM, FM or FM-Stereo)
- Turn and hold the tuning knob for a few seconds to choose a desired radio station need to save. Then press PROG button Press or to set the Saved Number (such as P01,P02)
- Repeat the 4th operation to save other preselect radio stations.
DAB Radio
If the system is switched on for the first time, it will automatically enter into the DAB mode and perform auto scan function. During the scan the display will show "Scanning ..." together with a slide bar that indicates the progress of the scan and the amount of stations that have been found so far. Once the scan has finished, the radio will select the first alphabetically found station. You can now press the or button to explore the found stations followed by pressing the button to select listening to the station.
DAB Full Scan
The full scan will search for the entire DAB Band III channels. After the scan has finished, the first alphabetically found station will be automatically selected.
- To activate full scan, press and hold the Info/Menu button to enter into the Menu, repeatedly press the or button followed by pressing the button to select and confirm "Full scan", the display will show "Scanning ..." and a progressing slide bar.
- All the stations that have been found will be stored automatically, to explore the stations that have been found, press the or button and when you find a station that you would like to listen to, press the button.
DAB Manual Tune
- To activate manual tune, press and hold the Info/Menu button to enter into the Menu, then press the or button followed by pressing the button to select and confirm "Manual tune".
- The display will show "5A" to "13F" and their associated frequencies, press the or button to move through the DAB channels, when your desired frequency appears in the display, press the button to confirm. The name of the station group (ensemble/multiplex) will be displayed.
- To listen to the station selected, press the button again.
DAB Secondary Services
On some occasions you will see a " > " symbol directly after the name of the station, this indicates that there are secondary services available to that station. These secondary services contain extra services that relate to the primary station. E.g. a sports station may want to add extra commentaries. The secondary services are inserted directly after the primary station. To select the secondary station, press on the button once.
DRC
DRC stands for Dynamic Range Control. The dynamic range for each radio programme is set by the broadcaster for each radio station and may be different for the types of programme broadcast, such as pop or classical music or a chat show. The dynamic range control signal is transmitted in
parallel with the audio signal for each programme, And with your radio, you can use this control signal to expand or compress the dynamic range (the difference between the loudest and quietaet sounds) of the reproduced audio signal. Changing the dynamic range can affect the 'loudness' and/or 'quality of sound' of the programme that you hear so that it will be more suited to your listening conditions and your own personal listening requirements. E.g. In a noisy environment, where quiet sounds might be swamped, setting the compression to maximum will 'boost' the quiet sounds, whilst keeping the loudest sounds at their original level. There are 3 levels of compression:
| DRC off No compression, this is the default setting. |
| DRC low Medium compression |
| DRC high Maximum compression |
- To adjust DRC, in DAB mode, press and hold the Info/Menu button to enter into the Menu, repeatedly press the or button followed by pressing the button to select "DRC".
- Press the or button followed by pressing the button to select and confirm the DRC level - DRC high/low/off.
Prune
You can remove the DAB stations in the station list that cannot be received in your area. These are listed with a '?' prefix.
- To perform Prune, in DAB mode, press and hold the Info/Menu button to enter into the Menu, repeatedly press the or button followed by pressing the button to select "Prune".
- Again press the or button followed by pressing the button to select <Yes> .
DAB Display Modes
During DAB operation, every time you press the Info/Menu button, the display will cycle through the following display modes: DLS > Signal strength > Programme Type > Ensemble/Multiplex (Group name) > Frequency > Signal error > Audio Bit Rate > Time > Date > DLS > ... DLS DLS stands for Dynamic Label Segment which is a scrolling message that the broadcaster may include in their transmissions. The message usually includes information such as programme details etc.
Signal strength
The display will show a slide bar to indicate the signal strength, the stronger the signal, the longer the bar will be from left to right.
Programme type
This describes the style of the programme that is being broadcast. If the information is not available, the display will show "<Programme Type)".
Ensemble/Multiplex (Group name)
The Ensemble/Multiplex is a collection of radio stations that are bundled and transmitted together in a single frequency. There are national and local multiplexes, local ones contain stations that are specific to that area.
Frequency
The frequency of the present station will be displayed.
Signal error
This is displayed as a number between 0-99. It would not be possible to satisfactorily listen to a radio station with a signal error rate of 30 or above. Try adjusting the antenna or relocating your radio to improve reception.
Audio bit rate
The display will show the digital audio bit rate being received.
Problems with sound
- Clockwise rotate the power/volume knob to increase the volume.
- Make sure the unit's power cord is connected to an appropriate electrical outlet.
- Make sure the wall socket is switched on.
- Make sure the function switch is set to your desired function: PHONO, USB/SD, TUNER, TAPE/AUX.
- When playing records, make sure you've selected correct speed (33, 45, 78 rpm).
- When playing a cassette, make sure it is properly inserted.
- When playing a CD, make sure the CD is dealt face up.
- When playing a CD via the AUX IN connection, make sure the cable is firmly connected, all controls on the CD player are properly set, the disc tray is closed and the disc is clean and undamaged.
- When playing music from USB device (or SD/MMC card), make sure the memory device is properly inserted in USB port (SD/MMC card slot) and correct MODE is selected.
Problems with radio reception
- Make sure you are in an area that can receive signals for your selected radio station.
- If AM reception is weak, rotate or reposition the equipment to improve reception.
If FM reception is weak, try the following to improve reception: - Completely unravel the wire aerial at the back of the cabinet.
- Slightly move the wire aerial for better reception.
- If none of these measures improve stereo reception, try the same station on the FM (mono) band.
- Try moving your radio to an alternative location to see if the reception improves.
- Check that you do not have other electrical equipment too close to your radio, which may cause interference.
TURNTABLE OPERATION
- Open the dust cover and turn the volume knob clockwise to turn the equipment on.
- Use the function selector to select PHONO mode.
- Set the speed selector to the appropriate position: 33, 45 or 78, depending on the record to be played.
- Set the auto stop control to ON if you want the turntable to stop turning when it has reached the end of the record. If the switch is set to OFF, the turntable will continue turning at the end of the record.
- Place the record on the turntable (use the 45 rpm adaptor, if required).
- Move the lift lever towards the back to raise the tone arm from the arm park, then slowly move the arm to the record, as illustrated on the right. The turntable will start rotating.
- Move the lift lever towards the front, the tone arm will gently drop onto the record and playback will start.
- To stop playback, move the lift lever towards the back to raise the tone arm. The turntable will still be rotating but the record will stop playing. To continue playback, move the lift lever towards the front.
- To play a different piece on the record, move the lift lever towards the back, move the raised tone arm to the start of the piece and then move the lift lever towards the front to lower the tone arm and start playback.
- To adjust the volume level, turn the volume knob to the right or left.
- At the end of the record, move the lift lever towards the back to raise the tone arm and move it back to the tone arm park, and then move the lift lever towards the front to lower the arm onto its rest.
- Alternatively, lift the tone arm off the record and return it to the arm rest manually.
- When you have finished playing records, engage the tone arm lock to protect it from accidental movement. Turn the volume knob in a counterclockwise direction to switch the unit off. Unplug it from the power supply if you are not going to use it for a while.
NOTE: Should your record stop before the last track finishes, set the auto stop control to OFF. Your record will now play to the end, but you will have to stop the turntable rotation manually. (Return the tone arm to its rest manually and if the turntable is still rotating, switch off the unit by the volume control knob. Then set the auto stop control back to ON.)
Phono encoding
- Set the function button to PHONO mode and then insert a memory device (USB drive, SD or MMC card).
- Put your record onto the turntable and get it ready for playback.
- Press the record REC button. It will take about 3-4 seconds to read the memory device, then the USB or SD icon will be flashing on the LC display.
- Press the SKIP UP or SKIP DOWN button to select the desired mode (USB or SD) for encoding, then press the record REC button again to confirm. (You can skip this step if only a USB drive or an SD/MMC card is inserted.)
- The system will start the encoding mode after a few seconds.
- Lower the tone arm to start playback of the record. During encoding, the USB or SD icon will be flashing on the display.
- To finish encoding, press the stop button. The display will show "END" and return to PHONO mode.
NOTE:
- The recording speed is 1:1. Recording will take as long as playing the record.
- The recording format is preset at MP3 bit rate 128 kbps.
CASSETTE OPERATION
- Turn the volume knob clockwise to turn the equipment on.
- Use the function selector to select TAPE/AUX mode.
- Insert a cassette with the tape facing away from you, as illustrated on the right. The EJECT/FAST FORWARD button will pop out and the system will start playing the tape automatically.
- Turn the volume knob to your desired level.
- To fast forward the cassette tape, press the EJECT/FAST FORWARD button halfway down while the cassette is playing. The tape will be advanced forward rapidly.
- To resume normal playback, slightly press the EJECT/FAST FORWARD button again. The button will fully pop out again.
- To stop playback, press the EJECT/FAST FORWARD button completely. Playback will be stopped and the cassette tape will be ejected.
When using the cassette deck:
- Make sure to insert the cassette in the correct direction.
- To avoid damaging the cassette, we strongly recommend taking it out of the equipment after playing the cassette.
Cassette encoding
- Set the function button to TAPE/AUX mode and then insert a memory device (USB drive, SD or MMC card).
- Press the REC button, it will take 3-4 second to read the memory device, then the USB or SD icon will be flashing on the LC display.
- Press the SKIP UP or SKIP DOWN button to select the desired mode (USB or SD) for encoding, then press the record REC button again to confirm. (You can skip this step if only a USB drive or an SD/ MMC card is inserted.)
- The system will start the encoding mode after a few seconds. Insert your cassette into the playback slot. During encoding, the USB or SD icon will be flashing on the display.
- To finish encoding, press the stop button. The display will show "END" and return to TAPE/AUX mode.
Notes:
- The recording format is preset at MP3 bit rate 128 kbps.
- The recording speed is 1:1. Recording will take as long as playing the record.
CD OPERATION
- Turn the volume knob clockwise to turn the equipment on.
- Press the CD-Rom switch, then the disk tray door opens.
- Place the CD face up inside, making sure it is fully placed. Then press the CD-Rom switch again, the disk tray door closes.
- To play a different piece on the record, Press the SKIP UP or SKIP DOWN button to select the desired piece.
- To adjust the volume level, turn the volume knob to the right or left.
CD encoding
- Set the function button to CD/USB/SD mode and then insert a memory device (USB drive, SD or MMC card).
- Press the record REC button, it will take 3-4 second to read the memory device, then the USB or SD icon will be flashing on the LC display.
- Press the SKIP UP or SKIP DOWN button to select the desired mode (USB or SD) for encoding, then press the record REC button again to confirm. (You can skip this step if only a USB drive or an SD/ MMC card is inserted.)
- The system will start the encoding mode after a few seconds. Insert your cassette into the playback slot. During encoding, the USB or SD icon will be flashing on the display.
- To finish encoding, press the stop button. The display will show "END" and return to CD/USB/SD mode
NOTE: The recording speed is 1:1. Recording will take as long as playing the record. The recording format is preset at MP3 bit rate 128 kbps.
USB PORT AND SD CARD SLOT
Playback of music in MP3/WMA format via USB device or memory card The system is able to decode and playback all MP3/WMA files stored in the memory media connected to the USB port or SD/MMC card slot.
- Turn the volume knob clockwise to turn the equipment on.
- Following the illustration below, insert a USB device face up into the USB port, making sure it is fully inserted. Alternatively, insert a memory card in the direction of the arrow (as shown on the label next to the memory card slot), making sure to insert it straight without bending.
Connecting the USB device upside down or backwards could damage the audio system or storage media (USB drive, SD or MMC card). Check to ensure the direction is correct before connection.
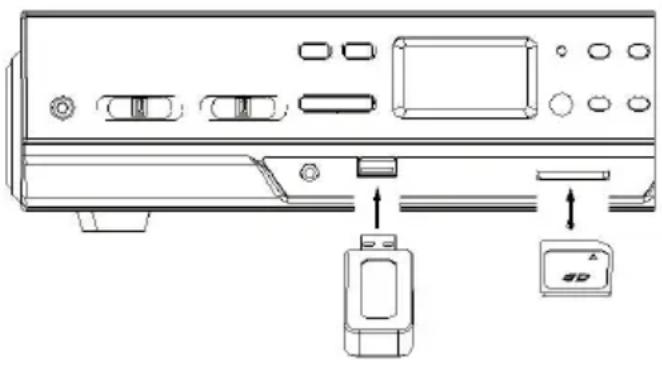
- Set the function selector to USB/SD mode. (If you have both a USB device and a memory card inserted, press the MODE button to toggle between USB and SD mode.) The system will start reading the storage medium automatically after mode selection and will display the total number of folders and MP3/WMA files.
- The system will then start audio playback from the media storage device (USB or SD card) automatically.
Playback controls
| PLAY/PAUSE Press this button once to stop playing, press it again to continue |
| STOP Press this button to stop audio playback, the display will then show the total number of MP3/WMA files. |
| SKIP UP Press this button once to play the next file, press and hold this button to fast forward through the files/tracks. |
| SKIP DOWN Press this button once to play the previous file, press and hold this button to fast reverse through the files/tracks. |
| TUNING KNOB Turn this knob to the right/left to search a folder backward or forward. |
| MODE Press this button to toggle between USB and SD Card mode. |
Important notes
- The system can detect and read files in MP3 / WMA format only via the USB port or SD card slot.
- You can connect an MP3 player to the system via the USB socket, however, some MP3 players may not be able to play via the USB socket. This is due to variances in the MP3 encoding format; it is not a malfunction of the system.
- There are numerous USB and SD device producers and their products vary in solution and format. We therefore cannot guarantee that this unit will support all USB and SD devices from every brand.
- This system supports SD cards up to 8GB.
- MP3 / WMA track format requirements:
MP3 bit rate: 32 - 256 kbps; WMA bit rate: 32 - 320 kbps.
Programming tracks for playback
Up to 64 tracks can be programmed for MP3 / WMA file playback in any order. Before programming, however, be sure the system is in STOP mode.
- Set the function selector to CD/ USB/SD mode, then press the stop button.
- Press the program PROG button, MEM will be flashing on the LC display, and it will indicate the program number and digits for the track number to be programmed.
- Press the SKIP UP or SKIP DOWN button to select a desired track.
- Press the program PROG button to store the track into the memory.
-
Repeat steps 3 and 4 to enter additional tracks into the memory.
-
When all desired tracks have been programmed, press the PLAY/PAUSE button to play the tracks in the assigned order.
- To cancel programming, press the STOP button twice.
Copying of MP3 / WMA files
The system allows you to copy files from USB to SD/MMC or vice versa. You can copy a single file/track, a folder of files/tracks, or all files/tracks on the storage medium.
Copying a single file/track
- Insert a USB storage device and SD/MMC card, then select USB/SD mode (as described previously).
- Press the record REC button during playback of the track you want to copy: "ONE" will be flashing on the display. Press the record REC button again to confirm.
- The USB or SD icon will be flashing on the display while the system is copying the file.
- Once the file has been copied, the unit will stop playback automatically. "END" will be shown on the display and the system will revert to USB or SD mode.
Copying a folder
- Insert a USB storage device and SD card, then select USB/SD mode (as described previously). When the system has recognised the device, press the stop button.
- Turn the tuning knob to select the desired folder for copying.
- Press the record REC button: "ONE" will be flashing on the display. Press the SKIP UP or SKIP DOWN button to select "FOL" (folder) on the display. Press the record REC button again to confirm.
- The USB or SD icon will be flashing on the display while the system is copying the folder.
- When the folder has been copied, the USB or SD icon will stop flashing on the display.
Copying all files/tracks
- Insert a USB storage device and SD card, then select USB/SD mode (as described previously). When the system has recognised the device, press the stop button.
- Press the record REC button; "ONE" will be flashing on the display. Press the SKIP UP or SKIP DOWN button to select "ALL" on the display. Press the record REC button again to confirm.
-
The USB or SD icon will be flashing on the display while the system is copying the files/ tracks.
-
When all files/tracks have been copied, the USB or SD icon will stop flashing on the display.
NOTE: If you press the record REC button during playback in USB or SD mode, the file will copy from USB to SD or vice versa.
Deleting files from the USB device / SD card
The system is able to erase files stored on the USB drive or SD card. You can delete a single file/track, a folder of files/tracks, or all files/tracks on the storage medium.
Deleting a single file/track
- Insert the USB storage device or SD card, then select USB/SD mode (as described previously).
- Press the delete DEL button during the playback of the track you want to delete: "ONE" will be flashing on the display. Press the delete DEL button again to confirm.
- "DEL" will show on the display while the file/track is being deleted until the deletion is complete.
Deleting a folder
- Insert a USB storage device and SD card, then select USB/SD mode (as described previously). When the system has recognised the device, press the stop button.
- Turn the tuning knob to select the desired folder for deleting.
- Press the delete DEL button: "ONE" will be flashing on the display. Press the SKIP UP or SKIP DOWN button to select "DIR" (directory) on the display. Press the delete DEL button again to confirm.
- "DEL" will show on the display while the folder is being deleted until the deletion is complete.
Deleting all files/tracks
- Insert a USB storage device and SD card, then select USB/SD mode (as described previously). When the system has recognised the device, press the stop button.
- Press the delete DEL button: "ONE" will be flashing on the display. Press the SKIP UP or SKIP DOWN button to select "ALL" on the display. Press the delete DEL button again to confirm.
- While the system is deleting the files/tracks, the USB or SD icon will be flashing on the display until the deletion is complete.
NOTE: Pressing the delete DEL button will completely delete all files/tracks on the USB device or SD card.
Removing the USB device / SD card
- First move the function selector to another mode (tuner, phono, tape), then turn the volume knob counterclockwise to turn off the power.
- To remove a USB device, pull it out of the USB port.
- To remove a memory card, press the memory card inwards and then release it. The card will be released (partially ejected) and you can remove it by hand.
THE AUXILIARY INPUT
Listening to a CD (or other auxiliary input)
- Turn the volume knob clockwise to turn the equipment on.
- Use the function selector to select TAPE/AUX mode, then connect the external audio device (such as a CD player) to the AUX IN socket at the front of the equipment. The audio signal from the external audio device will now be played through the system.
- If an external audio device is connected to the AUX IN socket, playing of the auxiliary device takes priority over cassette playback.
NOTE: If you won't use the unit for a long time, you had better take the CD out from the disk tray door.
AUX IN encoding
- Use the function selector to select TAPE/AUX mode and then insert a memory device (USB drive, SD or MMC card).
- Press the record REC button, it will take 3-4 seconds to read the memory device, then the USB or SD icon will be flashing on the LC display.
- Press the SKIP UP or SKIP DOWN button to select the desired mode (USB or SD) for encoding, then press the record REC button again to confirm. (You can skip this step if only a USB drive or an SD/ MMC card is inserted.)
- The system will start the encoding mode after a few seconds. During encoding, the USB or SD icon will be flashing on the display.
- To finish encoding, press the stop button. The display will show "END" and return to TAPE/AUX mode.
NOTE:
- The recording speed is 1:1. Recording will take as long as playing the CD (or other auxiliary input).
The recording format is preset at MP3 bit rate 128 kbps.
BT OPERATION
- Turn the volume knob clockwise to turn on the equipment on.
- Set the function selector to select TAPE button.
- Press the MODE button on the front panel once to BT mode, and the LCD will show "BT" all the time.
- Turn on your bt device and scan, "BT" will be found on your bt device. Paired and connect the unit and your bt device.
- Play your bt device as normally do, and the music will be played from the unit.
TROUBLESHOOTING GUIDE
If you are experiencing problems with your USB Turntable with Cassette Deck and Radio, check in the section below whether there are any quick and easy checks you can do that may help you solve the problem. If you cannot solve the problem by yourself, contact our after sales support line for advice. Do not attempt to open, repair or modify the equipment yourself.
Notes
- Make sure your bt device and the unit is within 10 meters.
- Check and see if there are other bt devices nearby interfering the signal and connection.
Problems with sound
- Clockwise rotate the power/volume knob to increase the volume.
- Make sure the unit's power cord is connected to an appropriate electrical outlet.
- Make sure the wall socket is switched on.
- Make sure the function switch is set to your desired function: PHONO, USB/SD, TUNER, TAPE/AUX.
- When playing records, make sure you've selected correct speed (33, 45, 78 rpm).
- When playing a cassette, make sure it is properly inserted.
- When playing a CD, make sure the CD is dealt face up.
- When playing a CD via the AUX IN connection, make sure the cable is firmly connected, all controls on the CD player are properly set, the disc tray is closed and the disc is clean and undamaged.
Problems with radio reception
- Make sure you are in an area that can receive signals for your selected radio station.
- If AM reception is weak, rotate or reposition the equipment to improve reception.
If FM reception is weak, try the following to improve reception: - Completely unravel the wire aerial at the back of the cabinet.
- Slightly move the wire aerial for better reception.
- If none of these measures improve stereo reception, try the same station on the FM (mono) band.
- Try moving your radio to an alternative location to see if the reception improves.
- Check that you do not have other electrical equipment too close to your radio, which may cause interference.

If there is a legal regulation for the disposal of electrical and electronic devices in your country, this symbol on the product or on the packaging indicates that this product must not be disposed of with household waste. Instead, it must be taken to a collection point for the recycling of electrical and electronic equipment. By disposing of it in accordance with the rules, you are protecting the environment and the health of your fellow human beings from negative consequences. For information about the recycling and disposal of this product, please contact your local authority or your household waste disposal service.
This product contains batteries. If there is a legal regulation for the disposal of batteries in your country, the batteries must not be disposed of with household waste. Find out about local regulations for disposing of batteries. By disposing of them in accordance with the rules, you are protecting the environment and the health of your fellow human beings from negative consequences.
DECLARATION OF CONFORMITY

Manufacturer:
Chal-Tec GmbH, Wallstrasse 16, 10179 Berlin, Germany.
Importer for Great Britain:
Chal-Tec UK limited
Unit 6 Riverside Business Centre
Brighton Road
Shoreham-by-Sea
BN436RE
United Kingdom
The complete declaration of conformity of the manufacturer can be found at the following link: https://use.berlin/10033747
Cher client, chere clientele,
The lighting flash and arrow head within the triangle is warning sign alerting you of dangerous voltage inside the product
CAUTION
RISK OF ELECTRIC SHOCK DO NOT OPEN
CAUTION:TO REDUCE THE RISK OF ELECTRIC SHOCK DO NOT REMOVE COVER (OR BACK).NO USER SERVICIABLE PARTS INSIDE.REFER SERVICING TO QUALIFIED SERVICE PERSONNEL.

The exclamation point within the triangle is a warning sign alerting you of important instructions accompanying the product
ATTENTION: N'OUVREZ PAS LE BOITIER POUR EVITER UN CHOC ÉLECTRIQUE ET DES BLESSURES GRAVES. L'APPAREIL NE CONTIENT AUCUNE PIECE REPARABLE PAR L'UTILISATEUR. ADRESSEZ-VOUS EXCLUSIVEMENT À UN PERSONNEL QUALIFIÉ. MISE EN GARDE. POUR RÉDUIRE LES RISQUES D'INCENDIE OU DE CHOC ÉLECTRIQUE, N'EXPOSEZ PAS CET APPAREIL À L'EAU, À LA PLUIE OU À L'HUMIDITE.
The lighting flash and arrow head within the triangle is warning sign alerting you of dangerous voltage inside the product
CAUTION
RISK OF ELECTRIC SHOCK DO NOT OPEN
CAUTION:TO REDUCE THE RISK OF ELECTRIC SHOCK DO NOT REMOVE COVER (OR BACK).NO USER SERVICIABLE PARTS INSIDE.REFER SERVICING TO QUALIFIED SERVICE PERSONNEL.

The exclamation point within the triangle is a warning sign alerting you of important instructions accompanying the product
PRECAUCION: NO ABRA LA CARCASA DEL APARATO, ASI EVITARÁ DESCARGAS ELECTRICAS Y LESIONES PERSONALES GRAVES. EN EL INTERIOR NO HAY ELEMENTOS QUE PUEDAN SER REPARADOS POR EL CLIENTE. REMITASE UNICAMENTE A UN SERVICIO TÉCNICO CUALIFICADO.
ADVERTENCIA. PARA REDUCIR EL RIESGO DE INCENDIO O DESCARGA ELECTRICA, NO EXPONGA Este APARATO AL AGUA, LA LLUVIA O LA HUMEDAD.

Chal-Tec UK limited.
Unit 6 Riverside Business Centre
Brighton Road
Shoreham-by-Sea
BN43 6RE
Reino Unido
The lighting flash and arrow head within the triangle is warning sign alerting you of dangerous voltage inside the product
CAUTION
RISK OF ELECTRIC SHOCK DO NOT OPEN
CAUTION:TO REDUCE THE RISK OF ELECTRIC SHOCK DO NOT REMOVE COVER (OR BACK).NO USER SERVICIABLE PARTS INSIDE.REFER SERVICING TO QUALIFIED SERVICE PERSONNEL.

The excclamation point within the triangle is a warning sign alerting you of important instructions accompanying the product
ATTENZIONE: NON APRIRE L'ALLOGGIAMENTO, IN MODO DA EVITARE SCOSSE ELETTRICHE E SERIE LESIONI. ALL'INTERNO NON CI SONO COMPONENTI CHE NECESSITANO DELLA MANUTENZIONE DA PARTE DELL'UTENTE. RIVOLGERSI ESCLUSIVAMENTE A TECHNICI QUALIFICATI.
AVVERTimento PER RIDURRE IL RISCHIO DI INCENDI E SCOSSE ELETTRICHE, NON ESPORRE IL DISPOSITIVO A PIOGGIA, ACQUA O UMIDITA.
Unit 6 Riverside Business Centre
Brighton Road
Shoreham-by-Sea
BN43 6RE
Regno Unito
The lighting flash and arrow head within the triangle is warning sign alerting you of dangerous voltage inside the product
CAUTION
RISK OF ELECTRIC SHOCK DO NOT OPEN
CAUTION:TO REDUCE THE RISK OF ELECTRIC SHOCK DO NOT REMOVE COVER (OR BACK).NO USER SERVICIABLE PARTS INSIDE.REFER SERVICING TO QUALIFIED SERVICE PERSONNEL.

The exclamation point within the triangle is a warning sign alerting you of important instructions accompanying the product
LET OP! OPEN DE BEHUIZING NIET OM EEN ELEKTRISCHE SCHOK EN ERNSTIG LETSEL VOORKOMEN ER BEVINDEN ZICH BINNENIN GEEN COMPONENTEN DIE DOOR DE KLANT MOETEN WORDEN ONDERHOUDEN. WENDT U ZICH HIERVoor UIITSLUITEND TOT GEKWALIFICEERDE PERSONEN.
WAARSCHUWING. OM HET RISICO OP BRAND OF EEN ELEKTRISCHE SCHOK TE VERMINDEREN, HET APPARAAT NIET AAN WATER, REGEN OF ANDERE VORMEN VAN VOCHT BLOOTSTellen.
INSTRUCTIES VOOR AFVOER
Unit 6 Riverside Business Centre
Brighton Road
Shoreham-by-Sea
BN436RE
Verenigd Koninkrijk