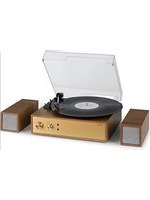
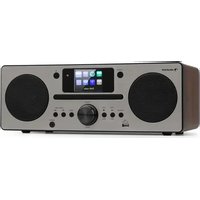
USER MANUAL 388DAB+ Auna
INHALT
Technische Daten 3
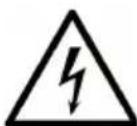
The lighting flash and arrow head within the triangle is warning sign alerting you of dangerous voltage inside the product
CAUTION
RISK OF ELECTRIC SHOCK
DO NOT OPEN
CAUTION: TO REDUCE THE RISK OF ELECTRIC SHOCK DO NOT REMOVE COVER (OR BACK). NO USER SERVICIABLE PARTS INSIDE. REFER SERVICING TO QUALIFIED SERVICE PERSONNEL.

The exclamation point within the triangle is a warning sign alerting you of important instructions accompanying the product
natural_image
Diagram of a battery pack with an arrow indicating direction, showing internal components and battery casing (no text or symbols)
FM : the receiver work with detachable DAB/FM wire antenna, made sure the antenna had plugged into the antenna socket (29) and place it on proper location for the best reception.
natural_image
Diagram of a computer monitor front panel with an attached remote control unit (no text or symbols)
WIEDERGABE VON MP3 VON USB-DATENTRÄGERN
Verbinden
natural_image
Illustration of a hand holding a thin bundle of wires with an arrow indicating direction (no text or symbols)
Member of Berlin Brands Group
Handwerkerstr. 11
15366 Dahlwitz-Hoppegarten
Deutschland
natural_image
Symbol of a trash bin crossed with a diagonal line, representing no waste or discharge (no text or labels)
Berlin Brands Group UK Limited
PO Box 42
272 Kensington High Street
London, W8 6ND
United Kingdom
Congratulations on purchasing this equipment. Please read this manual carefully and take care of the following hints to avoid damages. Any failure caused by ignoring the items and cautions mentioned in the instruction manual are not covered by our warranty and any liability. Scan the QR code to get access to the latest user manual and other information about the product.

CONTENTS
Technical Data 29
Safety Instructions 31
Overview 33
Getting Started 36
Listening to FM Radio 38
BT Connecting and Playback 40
Playing Compact Disc 40
Playback of MP3 Song via USB Storage Media 43
Encoding of CD Disc / Phono or Cassette Tape into MP3 File 44
Phono 46
Listening to Tape 47
Aux-in Connection 49
Disposal Considerations 50
Declaration of Conformity 50
TECHNICAL DATA
| Item number | 10034091, 10038373 |
| Power input 230 V~ 50 Hz | |
| Power rating 20 W | |
| Speakers 2 x 5 W RMS | |
| Radio frequencies FM: 87.5 – 108 MHzDAB Band III:174.92-239.2 MHz |
| BT specificationsFrequency bandMaximum radio-frequency power | 2402–2480 MHz4 dBm |
WARNING

The lighting flash and arrow head within the triangle is warning sign alerting you of dangerous voltage inside the product
CAUTION
RISK OF ELECTRIC SHOCK
DO NOT OPEN
CAUTION: TO REDUCE THE RISK OF ELECTRIC SHOCK DO NOT REMOVE COVER (OR BACK). NO USER SERVICIABLE PARTS INSIDE. REFER SERVICING TO QUALIFIED SERVICE PERSONNEL.

The exclamation point within the triangle is a warning sign alerting you of important instructions accompanying the product
CAUTION: TO REDUCE THE RISK OF ELECTRIC SHOCK AND SERIOUS PERSONAL INJURY, DO NOT REMOVE ANY COVER. NO USER-SERVICABLE PARTS INSIDE. REFER SERVICING TO QUALIFIED SERVICE PERSONNEL ONLY.
WARNING. TO REDUCE THE RISK OF FIRE OR ELECTRICAL SHOCK, DO NOT EXPOSE THIS PRODUCT TO WATER, RAIN OR MOISTURE.
Triangle with lightning plus explanation as follows:
DANGEROUS VOLTAGE: The lightning flash with arrowhead symbol within the equilateral triangle is intended to alert the user to the presence of uninsulated dangerous voltage within the product's enclosure that may be of sufficient magnitude to constitute a risk of electric shock to persons.

Triangle with exclamation point plus explanation as follows:
ATTENTION: The exclamation point within the equilateral triangle is intended to alert the user to the presence of important operating and maintenance (servicing) instructions in the literature accompanying this product.
SAFETY INSTRUCTIONS
Read these instructions. All uses guidelines must be read before using the device. Keep the instructions for future use.
- Attention, use and security guidelines must be respected.
- The device must not be used near water or be put in contact with moisture.
- Make sure has no liquid is spilled on device and device openings.
- Move device carefully, avoid shocks.
- Do not block the breakdown of the device outputs.
- Do not place the device near from a heat source (e.g. radiator). Do not expose it to the Sun.
- Plug the device as indicate on this information form.
- This device has a connection with overload protection. Replacement should only be done by an experienced technician or the device manufacturer.
- For cleaning the device, please follow the recommendations of the notice.
- The power cord should be unplugged when not using for a long period of time.
• Device shall be repaired by a qualified person when:
a. the power cord is damaged,
b. objects have fallen into the apparatus or a liquid has been spilled into device,
c. device was exposes to the rain,
d. device does not work correctly without notable exterior change,
e. device is broken.
- The user shall not try to maintain device beyond that which is described in this information form.
- The apparatus shall not be exposed to dripping or splashing and that no objects filled with liquids, such as vases, shall be placed on apparatus.
- To be completely disconnect the power input, the mains plug of apparatus shall be disconnected from the mains." as the disconnect devices is the mains plug of apparatus.
- The mains plug of apparatus should not be obstructed OR should be easily accessed during intended use.
- Battery shall not be exposed to excessive heat such as sunshine, fire or the like.
- Excessive sound pressure form earphones and headphones can cause hearing loss.
- Minimum distance (8 cm) around the apparatus for sufficient ventilations;
- The ventilation should not be impeded by covering the ventilation opening with items such as newspaper, table-cloths, curtain etc;
- No naked flame sources such as lighted candles should be placed on the apparatus;
- Attention should be drawn to the environmental aspects of battery disposal;
- The use of apparatus in moderate climates.
- Danger of explosion if battery is incorrectly replaced.
- Replace only with the same or equivalent type.
- The main plug shall remain readily operable.
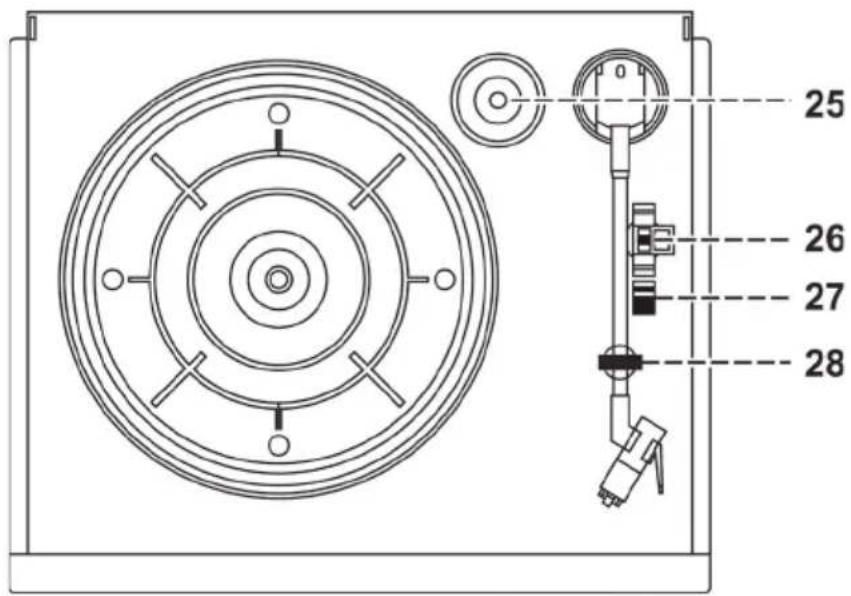
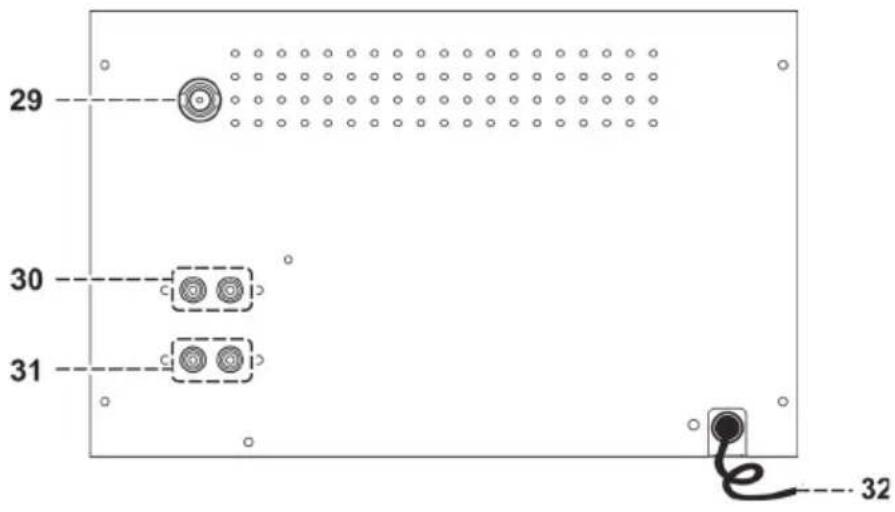
OVERVIEW
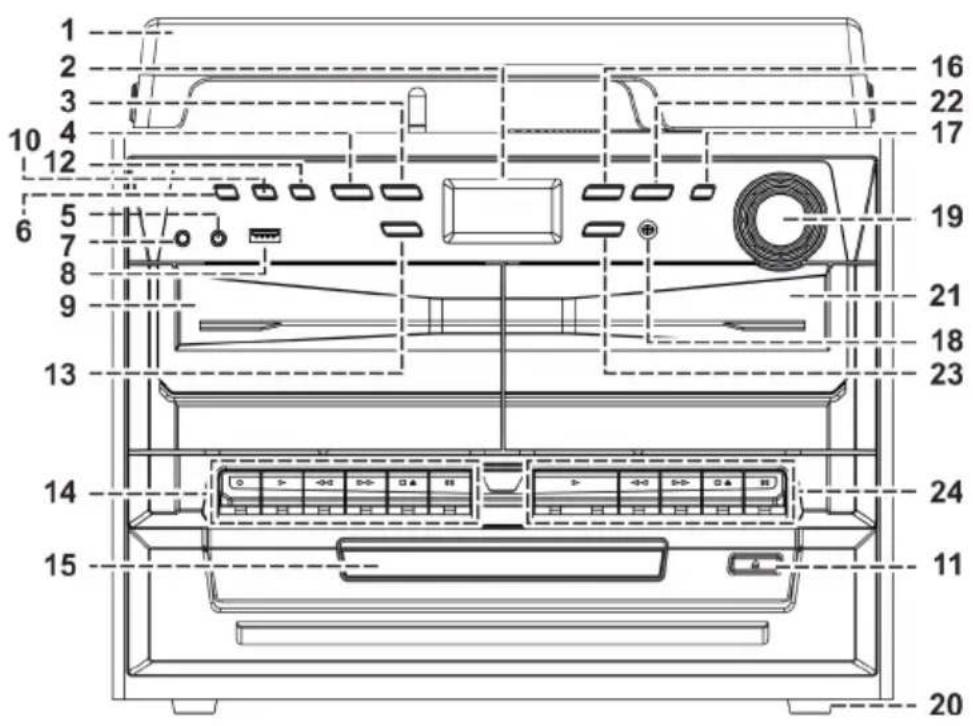

1 Turntable cover
2 LCD display
3 Stop ■ /Enter button
4 Record button
5 Aux-in jack
6 On/Standby button
7 Earphone jack
8 USB Socket
9 Cassette door (1)
10 Function button
11 CD tray open/close button
12 Mem/Clock-Adjust button
13 Skip/tuning Down ◀ button
14 Cassette 1 control key
15 CD tray
16 Play/Pause ▶ II /band button
17 Preset EQ button
18 Remote sensor
19 Volume knob
20 Rubber feet
21 Cassette door (2)
22 Folder/Preset Up button
23 Skip/Tuning Up ▶ button
24 Cassette 2 control key
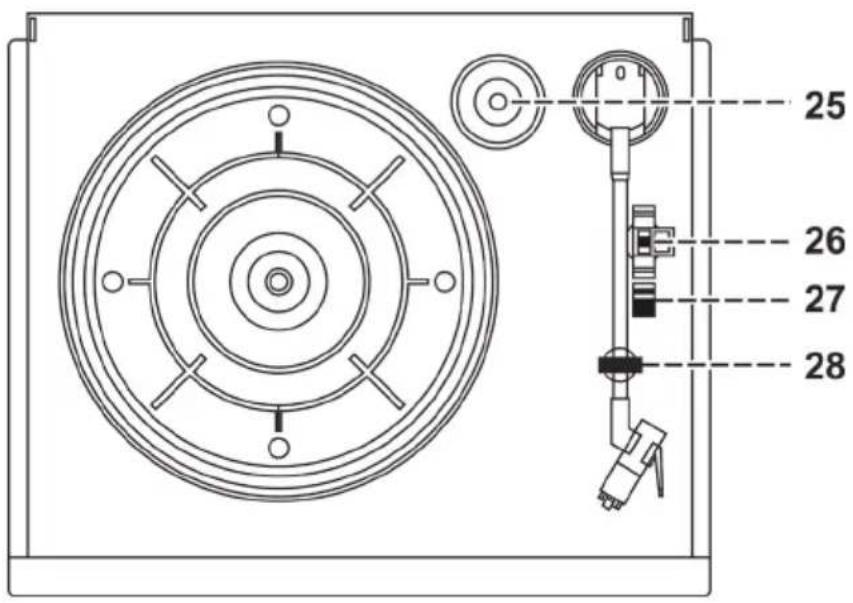
25 Spindle adaptor
26 Turntable speed selector
27 Auto switch
28 Pick-up holder
29 Antenna socket
30 Line out socket
31 Speaker socket
32 AC cord
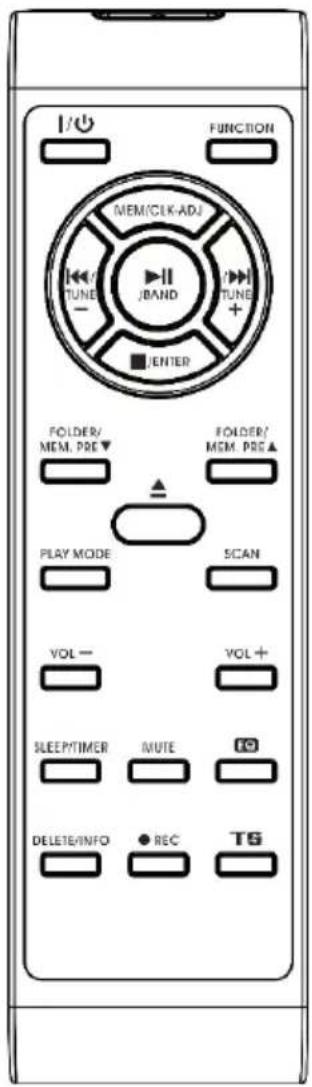
| Power On/Off Press to power on/standby the system |
| Play/pause / Enter In | CD/USB mode, press once to start playback. Press again to enter pause mode.In FM mode, press to select mono/auto FM mode. |
| Skip/search up Press | once to skip to next track, press & hold for search forward. |
| Stop /Enter In CD/USB mode: press to stop the playbackIn Tuner mode: select stereo/mono mode. |
| Folder/Pre Up-Down | In Tuner mode: press to select preset memory up/downIn USB mode: press to select folder up/down. |
| Play mode In CD mode: press to active random/repeat function. |
| Open/close Press to open/close the CD tray |
| Volume -/+ Press to adjust volume level up/down. |
| Sleep/Timer In power on mode: press to active sleep functionIn standby mode: press and hold to enter timer set up mode and press once to active/de-active timer function. |
| Del/info In USB mode: press to delete the file in the USB memoryIn MP3 playback mode: press to active ID3 functionIn DAB/FM mode, press to see the broadcast information. |
| Rec Press to active encoding/Mp3 file copy function. |
| Function Press to select the function. |
| Mem/Clk-adj In standby mode: press & hold to adjust clock.In CD/USB/Tuner mode: press to preset memory.In FM/DAB mode, press to search the station. |
| Scan In FM/DAB mode, press to search the station |
| Preset EQ Press to select difference EQ mode for enjoyment |
| TS In encoding mode: press to active track separation function |
| Mute | Press to cut the sound temporarily |
GETTING STARTED
Precautions for use
Installation: Unpack all parts and remove protective material. Do not connect the unit to the mains before checking the main voltage and before all other connections have been made. Do not cover any vents and make sure that there is a space of several centimeters around the unit for ventilation.
Connection
- Plug in the AC cord (32) to the AC outlet. The unit will go to standby mode and the LCD display (2) will dim light up.
- Turn on the unit (6), if the LCD display (2) is on with backlighting, it means the power supply is normal. Now your system is ready to play the music.
Setting the clock
- Set unit in standby mode.
- Press and hold the "Mem/Clk-Adj" button (12) until display will flash "24HR". press the Skip Up or Skip Down button (23/13) to select the clock format between 12 or 24Hour. Then press the "Mem/Clk-Adj" button (12).
- The first digit of "0:00" is flashing on the LCD display (2). Press Skip Up or Skip Down button (23/13) to set the correct hour. Press "Mem/Clk-Adj" button (12) to store the correct hour.
-
The third & fourth digit of "00" is flashing; press the Skip Up or Skip Down button (23/13) to set the correct minutes. Then press "Preset/Clk-Adj" button (12) to store the correct minute.
-
The clock setting mode will automatically quit if no button is being pressed in a period of about 5 seconds after pressing the "Mem/Clk-Adj" button.
- The pre-set time will be re-set completely if dis-connecting the main power supply except backup battery installed. You are recommended to switch the system into standby mode for convenience usage.
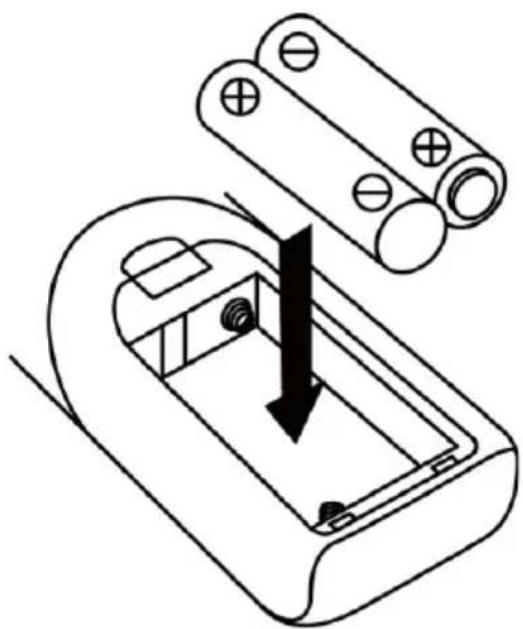
Inserting the batteries in the remote control
The battery compartment is located on the back of the remote control.
- Remove the battery compartment door by pressing in on the tab and lifting it off.
- Insert two (2) AAA size batteries (not included) into the battery compartment following the polarity markings inside the battery compartment.
- Replace the battery compartment door.
natural_image
Diagram of a battery internal structure with an arrow indicating force or direction (no text or symbols present)
Battery Precautions
- Replacement of batteries must be done by an adult.
- Do not mix old and new batteries.
- Do not mix alkaline, standard (carbon-zinc) or rechargeable (nickel-cadmium) batteries.
- The supply terminals are not to be short-circuited.
• Non-rechargeable batteries are not to be recharged.
• Exhausted batteries are to be removed.
- Only batteries of the equivalent type are to be used.
- Batteries are to be inserted with the correct polarity.
- Dispose of batteries properly. Do not dispose of batteries in fire. The batteries may explode or leak.

LISTENING TO FM RADIO
Manual tuning
- Plug in the provided DAB/FM tuner antenna to the antenna socket (29) then switch on the unit by On/Standby button (6), then press Function button (10) to select "DAB" mode then press Band button (16) to select FM mode.
- Tune to the required station by pressing the Tuning Up or Down button (23/13).
- Turn the Volume knob (19) to the desired volume level.
Auto tuning (on the remote control only)
- Set the unit to FM mode.
- Press the Scan button once on the remote control; unit will start to scan at tuning up direct until radio station received. Press and hold the Scan button on the remote control for a second, the unit will scan to tuning down direction. If the radio data system (RDS) broadcasting signal received, the unit will set the actual time automatically.
- Turn the Volume knob (19) to the desired volume level.
Radio data system (RDS)
This is the features to display the information which released from the radio broadcast and will show on LCD display step by step as below by pressing the Info button (on the remote control) continuously. Radio text → program type → signal strength → date/time → frequency → mono/stereo.
Digital audio broadcasting (DAB) radio
- Set the unit to "DAB" mode by Function button (10).
- Press the Scan button on the remote control once; unit will start to full scan from range 11b-12d one time within around 2 seconds. Then press Tune up/down button (23/13) to select your desired DAB channel.
- Press the Info button continuously to check the below info released by DAB.
Group name → frequency → transfer rate → signal strength → date/time → program type → scrolling text
- Press the Volume knob (19) to the desired volume level.
Preset stations
You can store up to total of 40 radio stations in the memory (20-FM/20-DAB).
- Set to FM/DAB mode
- Turn to the desired radio station by "manual" or "auto" tuning method.
- Press and hold the Mem/Clock-Adjust button (12) around four seconds to enable memory state, the preset station will flash on LCD display.
- Preset the Folder/ Pre up button (22) to select the desired station memory for storage.
- Press Mem/Clock-Adjust button (12) to confirm the preset memory.
- Repeat step 2 to 5 to store other stations.
Recall preset stations
- Press the Mem/Clock-Adjust button (12) once to enable recall state
- Press Folder/ Pre up button (22) to select the desired memory station.
- Press Memory/Clock-Adjust button (12) to confirm the recall memory station.
- The pre-set memories will be cancelled completely if dis-connecting the main power supply and back up battery did not installed. You are recommended to switch the system into standby mode for convenience usage.
- There are 3 seconds for program state, after 3 sec, this state would resume to normal tuner mode automatically.
- You can overwrite a present station by storing another frequency in its place.
FM-Stereo reception
Press the "Enter" knob (3) repeatedly; the FM programs are receiving in mono and stereo mode repeatedly. In particular when stereo signals are weak, it is preferable to receive the program in Mono.
If stereo signal is being received, the stereo indicator "ST" will appear on LCD display (2) to show FM Stereo program is now receiving.
Hints for best reception:-
FM : the receiver work with detachable DAB/FM wire antenna, made sure the antenna had plugged into the antenna socket (29) and place it on proper location for the best reception.
BT CONNECTING AND PLAYBACK
- Press Function button to select (10) to BT mode.
- The LCD display (2) will flashing with "BT", it means the BT is ready for connection & under searching mode.
- Switch on the BT feature of your BT device (such as mobile phone) and select "388 DAB+" on the BT equipment to connecting.
- Once the connecting was finish and connect successfully, the word "BT" will be remained without flashing on LCD display (2).
- Start to playback your BT device and enjoy the music from the main unit.
- To disconnect the BT connection, press and hold the "Play/Pause" (16) button
You can press the "Play/Pause" (16), "Skip Up" or "Skip Down" button" (23/13) of the main unit or remote to control the music playback.
PLAYING COMPACT DISC
Getting started
- Press Function button (10) to select "CD" mode.
- Push the CD tray open (11) to open the CD tray.
- Place a CD with the printed side facing up and then close the CD tray.
- Focus search will perform and the LCD display (2) will show the total number of tracks & total playing time. Then, the unit will start automatically.
- Turn Volume knob (19) to the desired volume level.
Play/Pause mode
To interrupt, press the "Play/Pause" button (16) once; "PAUSE" will show on the LCD display (2). Press again to resume normal playback.
Stop mode
If "Stop" button (3) is pressed during play or pause mode, system will go to stop mode.
Skip mode (skip up /skip down)
-
During play or pause mode, if "skip up" button (23) is pressed. It will go to next track and display the track no. and then remain the play or pause mode.
-
During play or pause mode, if "skip down" button (13) is pressed. It will go to the previous track, original track no. is display and remains the play or pause mode.
For MP3 Disc
- After focus search is performing, the total number of track and album will be shown on the LCD display (2). The unit will start to plat directly.
- Turn "Folder/Pre up/down" knob on the remote control to select the folder number.
- Pess "Skip Up or Skip Down" button (23/13) to select the track number.
ID3/Display function (on remote control only)
Press the "Info" button repeatedly, the LCD display (2) show "file" during playback of MP3 file, the song file/album/song/artist name is being displayed few seconds in sequence. Then will change back to current clock time.
- In that case of no name or not supportive languages had been assigned for the track, LCD display will blank (2) when press the Info button.
- No Title/Album name can be recognized if the input format on the Disc is not supporting by the system.
- The system support only English and Arabic number for ID3 function.
- Bit rate : 32 kbps\~320kbps, sampling rate: 32khz, 44.1khz and 48 kHz decodable
- The performance of playing MP3 Disc is various from the quality of recording disc and the method of recording. Furthermore, the searching lead-time for MP3-CD is longer than normal CD due to difference format.
Repeat/Random mode (on remote control only)
Press the "Play Mode" button on the remote control during playback to select repeat and random function, a single track, all the tracks repeat or folder repeat (MP3 only) and random can be played in difference mode as follow:-
For CD:
| Play mode Indicator on LCD display |
| Repeat track Rep1 | |
| Repeat all Rep A | |
| Random Rand | |
| Off mode ---- | |
For MP3 disc

flowchart
graph TD
    A["(1) Repeat 1"] --> B["(2) Repeat 1 folder"]
    B --> C["(3) Repeat all folders"]
    C --> D["(4) Random"]
    D --> E["(5) Off mode"]
    E --> A
| Play mode Indicator on LCD display |
| Repeat track Rep1 | |
| Repeat folder Rep F | |
| Repeat all Rep A | |
| Random Rand | |
| Off mode ---- | |
Repeat play
You can listen the desired track or folder repeatedly by this function.
Random play
You can listen all the tracks or folder in a random order by this function.
CD/MP3 disc programming (by remote control)
Up to 20 tracks can be programmed for CD or MP3 file and play in any order. Before use, be sure the system is at stop mode before programming:-
- Set in CD/USB mode & stop the CD/MP3 disc playback.
- Press the "Program" button on the remote control, "MEM" indicator will appear on LCD display. Moreover, it will indicate program no. and digits for track no. to be programmed.
- Select a desired track by pressing skip ▶ or ◀ buttons.
- Press the "Program" button to store the track into memory.
- Repeat steps 3 and 4 to enter additional tracks into the memory if necessary.
- When all the desired tracks have been programmed, press CD "Play/Pause" button to play the disc in assigned order.
- To cancel the programmed file, press "Stop" button twice until the MEM indicator is disappear on LCD display.
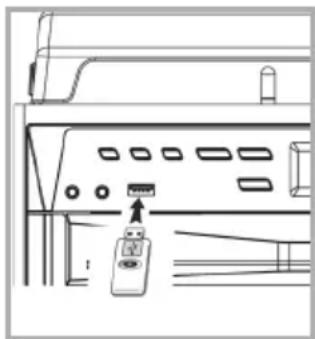
Connecting
The system is able to decode and playback all MP3 file which stored in the memory media with USB connecting port.
- Press the Power on/off / Function button (13) to turn on the unit and press the button again to switch the function to USB mode.
- Plug-in the USB plug with the face up & make sure it going into completely. Insert straight without bending.
Connecting the USB upside down or backwards could damage the audio system or the storage media. Check to be sure the direction is correct before connection.
- The system will start reading the storage media automatically after connecting, and LCD display will show the track no. and the playback time.
- Repeat the same playback procedure as playing CD/MP3 disc as above.
- The system can detect and read the file under MP3 format only though the USB socket.
natural_image
Line drawing of a computer monitor with ports and a small device on the front panel (no text or symbols)
- If connect the system to MP3 player via the USB socket, due to variances in MP3 encoding format, some MP3 player may not be able to play via the USB socket. This is not a malfunction of the system.
- USB port does not support connection with USB extension cable and is not designed for communication with computer directly.
ENCODING OF CD DISC / PHONO OR CASSETTE TAPE INTO MP3 FILE
The system is able to encode normal CD/Tuner/Phono or cassette tape file to MP3 format and recording at memory media with USB connecting port and below explanation was encode to USB port. The system will create a music folder name – "RIP" for CD-DA encode, "REC" for Tuner, Aux, Cassette encode and "FROMCD" for CD-MP3 disc copy and encode bitrate default at 128kbps
A) CD encoding
I) encoding 1 track / 1 disc at 1x speed
- Perform normal playback of the CD track you want to encode & record,
- Press REC button (4) during the playback of the desire track and the isplay will show "REC" and "USB" flashing.
- Press REC button (4) again the display will show "REC" and "ONE" flashing.
- Press REC button (4) again, the system will flashing with "REC USB" icon. Encoding is performing now.
- After completing of recording, unit will stop playback automatically.
- Press "stop" button (3) to interrupt the recording mode anytime.
- For encode whole CD track, please stay CD in stop mode then press REC button (4) three times until the display flashing "REC USB", then system will start to playback CD and encoding whole disc.
- The recording speed is 1:1 and according to the actual plying time of the CD track
- The recording format is preset at – MP3 bit rate: 128 kbps, sampling rate: 44.1khz
- Press STOP button (3) to interrupt the recording mode at any time
B) Copying of MP3 file
If putting a MP3 disc instead of a CD-disc, the system will copy the files to the USB if press the REC button (4). The operation procedures is same as CD encoding as stipulate on above, and the system will switch to copying mode only if MP3 file being read.
C) DAB encoding
- Operate tuner mode refer above listening to radio section to receive the station you would like to encode.
- Press the REC button (4) twice until the unit will display flashing with "REC USB" icon. Encoding is now performing.
- After finish of recoding, press STOP button (3) until the symbol "REC USB" disappear.
D) Cassette/Phono/AUX-in/BT encoding
- Plug in the USB pen drive for recording (make sure it had enough empty space).
- Set the unit to your desired encoding mode by function button (10) such as "tape" mode or "phono/aux-in" or "BT"...etc and then start to playback the track would like to encode, then press the ● button (4) twice.
- The LCD display (2) will flash with "REC USB" icon. Now the system is starting the encoding mode.
- Start playback the track of cassette tape or your external Aux device or BT device that you prepare to encoding to MP3 format. Now the system is starting the encoding mode.
- After finishing of recoding, press "Stop" button (3) until the symbol "USB" "REC USB" disappear.
E) track separation (On remote control only)
You can divide the recording music from tape or DAB...etc in to USB track by track during encoding. Every time when press the "TS" (track separation) button (on remote control) once during encoding from tape or Aux in, the system will generate a new track and continuous the recording. The text "SAVE" at LCD display will flash one time, it mean the unit is creating a new track successfully.
F) Copying of MP3 file
If putting a MP3 disc instead of a CD-disc, the system will copy the files to the USB if press the "REC" button (3). The operation procedures is same as CD encoding as stipulate on above, and the system will switch to copying mode only if MP3 file being read.
File delete at USB card (by remote control)
The system is able to erase the file stored inside the USB pen drive by following:-
- Insert the media storage and set at "USB" mode.
- Press the "delete" button and the LCD display (2) will show (del ---001)
- Press skip forward ▶ or skip backward ◀ button to select the file going to delete
- Press the "delete" button to enter "yes/no" mode and then press skip forward ▶ or skip backward ◀ to select "yes" or "no".
- Press the "delete" button again to confirm the setting.
Press "stop" button once at remote handset to quite delete mode.

natural_image
Illustration of a hand holding a thin bundle of wires with an arrow indicating direction (no text or symbols)
PHONO
- Remove the stylus protector.
-
Be sure that the tone arm is being detached from the tone arm rest before operating and re-secured again afterwards.
-
Press the Power on/off / Function button (13) to turn on the unit and press the button again to switch the function to PHONO mode.
- Set the speed selector to the proper position depending on the record to be played.
- Place the record on the platter (use the spindle adaptor if required).
- Lift the tone arm from the rest and slowly move it to the record side. The platter will start to rotate.
- Place the tone arm to the desired position of the record.
- Adjust the volume (9) to the desired level.
- At the end of record, the platter will automatically stop rotating. Lift the tone arm from the record and return it to the rest.
- To stop manually, lift the tone arm from the record and return it to the rest.
Remark : As some kind of record the auto-stop area was out of the unit setting, so it will stop before the last rack finish. In this case, select the auto-stop switch (24) to "off" position, then it will run to the end of the record but will not stop automatically (turn off the unit by power button or switch back the auto-stop switch to " on " position to stop the platter rotate). Then put back the tone arm to the rest position.
LISTENING TO TAPE
| Stop/eject key | Press to stop all deck operation. Press again to open the cassette door |
| Fast forward key & Fast rewind key | Press to start rapid tape winding in either forward or reverse direction. Press stop / fast rewind key eject keys when the cassette spools stop turning. |
| Play key | Press to start playing tape |
| Pause key | Press to stop tape operation temporarily. Press again to resume play. |
Playback
- Select "tape" function (10).
- Put in the cassette tape.
- Press play key to active playback
- Adjust the volume control (14/24) to the desire level.
- Use pause key when you want to stop playback temporarily.
- Press stop/eject key when finished.
It is possible to play both cassette players one after the other. If you press the button "pause" and "play" at deck 1 and button "play" at deck 2, than the tape of deck 1 will be start to play automatically after the tape of deck 2 is finished.
More features
A. Sleep function (on remote control only)
- Press "Sleep" button on remote control, "SLP-120" will be shown on the LCD display (6).
- Keep pressing the button to adjust the sleep timer in the order of 120>90>60>45>....15 minutes respectively and sleep icon zzz will indicate on LCD.
- System will stop and go to standby mode automatically after running the selected time.
- To cancel the sleep mode, press "Sleep" button until "SLP-off" is displayed and the zzz indicator disappear on LCD display.
B. Timer clock setting (on remote control only)
This function allows the system to turn on automatically and wake you up by CD, DAB, FM Radio, USB mode respectively.
First, set the unit at standby mode and then press & hold the "Timer" button on the remote control to enter the setting mode, the LCD display will show "SET TIMER"; then change to "SELECT SOURCE" and timer 🔊 icon will flash on display :-
-
Wake up source: press the "Function" button repeatedly to select the source from "CD" -- "FM" -- "DAB" -- "USB. Press "Timer" button to confirm the selected source.
-
Wake up volume: press the ◀/▶ button to adjust the wake up volume level then press "Timer" button to confirm the wake up level.
-
Wake up time: press ◀◀/▶◀ button to set the hour & then press "Timer" button to enter the hours. Press Skip up /down button to set minutes and press "Timer" button to store the memory.
- If there is no music source being detected (such as USB/CD) when the preset time is reached, system will default to FM mode automatically.
- For FM or DAB radio wake up, the system will preset at the latest radio frequency being listened before switching off.
- Please switch off the system manually during alarm wake up mode as the system will not turn off automatically after alarm on mode.
Active/de-active timer function
- To active the timer, press once the "Timer" button on remote handset until the timer indicator ⏻ is shown on LCD display (2).
- To cancel timer function by press once again "Timer" button until the timer indicator ⏻ disappears.
C. Pre-set EQ function
This unit provides 4 differences sound mode to enhance your listening experience. You can select the desired effect by pressing the "Preset EQ" button (22) repeatedly at following sequence:-
AUX-IN CONNECTION
Connect the unit to other device by connecting the Aux in jack (5) with a 3.5mm cable(not provided) and other end connect to the external device such as Discman/MP3 player to perform the music playback or encoding function etc.
- Press the Function button (10) to Phono/Aux position.
- Adjust the Power ON-OFF/ Volume Control Knob (19) to desired volume level.
- Start to play your external device.
DISPOSALCONSIDERATIONS

natural_image
Symbol of a trash bin crossed with a diagonal line, representing no waste or discharge (no text or labels)
If there is a legal regulation for the disposal of electrical and electronic devices in your country, this symbol on the product or on the packaging indicates that this product must not be disposed of with household waste. Instead, it must be taken to a collection point for the recycling of electrical and electronic equipment. By disposing of it in accordance with the rules, you are protecting the environment and the health of your fellow human beings from negative consequences. For information about the recycling and disposal of this product, please contact your local authority or your household waste disposal service.
This product contains batteries. If there is a legal regulation for the disposal of batteries in your country, the batteries must not be disposed of with household waste. Find out about local regulations for disposing of batteries. By disposing of them in accordance with the rules, you are protecting the environment and the health of your fellow human beings from negative consequences.

Manufacturer:
Chal-Tec GmbH, Wallstrasse 16, 10179 Berlin, Germany.
Importer for Great Britain:
Berlin Brands Group UK Limited
PO Box 42
272 Kensington High Street
London, W8 6ND
United Kingdom
Hereby, Chal-Tec GmbH declares that the radio equipment type 388-DAB+ is in compliance with Directive 2014/53/EU. The full text of the EU declaration of conformity is available at the following internet address: use.berlin/10034091
For Great Britain: Hereby, Chal-Tec GmbH declares that the radio equipment type 388-DAB+ is in compliance with the relevant statutory requirements. The full text of the declaration of conformity is available at the following internet address: use.berlin/10034091
Chère cliente, cher client,
SOMMAIRE
Fiche technique 51
The lighting flash and arrow head within the triangle is warning sign alerting you of dangerous voltage inside the product
CAUTION
RISK OF ELECTRIC SHOCK
DO NOT OPEN
CAUTION: TO REDUCE THE RISK OF ELECTRIC SHOCK DO NOT REMOVE COVER (OR BACK). NO USER SERVICIABLE PARTS INSIDE. REFER SERVICING TO QUALIFIED SERVICE PERSONNEL.

The exclamation point within the triangle is a warning sign alerting you of important instructions accompanying the product
ATTENTION : POUR RÉDUIRE LES RISQUES DE CHOCS ÉLECTRIQUES, NE DÉMIONTEZ AUCUN CACHE. L'APPAREIL NE CONTIEN AUCUNE PIÈCE À ENTRETENIR. ADRESSEZ-VOUS UNIQUEMENT À DES PERSONNELS QUALIFIÉS POUR LA MAINTENANCE. MISE EN GARDE : POUR RÉDUIRE LE RISQUE D'INCENDIE ET DE CHOC ÉLECTRIQUE, NE PLONGEZ PAS L'APPAREIL DANS L'EAU ET NE L'EXPOSEZ PAS À LA PLUIE OU À L'HUMIDITÉ.


natural_image
Diagram of a battery pack assembly with an arrow indicating direction (no text or symbols present)
natural_image
Line drawing of a computer monitor setup with ports and a small electronic device (no text or symbols)
LECTURE DE MP3 SUR SUPPORT USB
Connexion
natural_image
Illustration of a hand holding a plant stem with an arrow indicating movement (no text or symbols)
PHONO
natural_image
Symbol of a trash bin crossed with a diagonal line, representing no waste or discharge (no text or labels)

Fabricant :
Chal-Tec GmbH, Wallstraße 16, 10179 Berlin, Allemagne.
Berlin Brands Group UK Limited
PO Box 42
272 Kensington High Street
London, W8 6ND
United Kingdom
ÍNDICE
Datos técnicos 75
The lighting flash and arrow head within the triangle is warning sign alerting you of dangerous voltage inside the product
CAUTION
RISK OF ELECTRIC SHOCK
DO NOT OPEN
CAUTION: TO REDUCE THE RISK OF ELECTRIC SHOCK DO NOT REMOVE COVER (OR BACK). NO USER SERVICIABLE PARTS INSIDE. REFER SERVICING TO QUALIFIED SERVICE PERSONNEL.

The exclamation point within the triangle is a warning sign alerting you of important instructions accompanying the product
PRECAUCIÓN: NO ABRA LA CARCASA PARA EVITAR DESCARGAS ELÉCTRICAS Y LESIONES GRAVES. EN EL INTERIOR NO HAY COMPONENTES A MANTENER POR EL CLIENTE. PÓNGASE EN CONTACTO ÚNICAMENTE CON ESPECIALISTAS CUALIFICADOS. ADVERTENCIA: PARA REDUCIR EL RIESGO DE INCENDIO O DESCARGA ELÉCTRICA, NO EXPONGA EL APARATO AL AGUA, LA LLUVIA O LA HUMEDAD.


natural_image
Diagram of a battery pack with an arrow indicating a process or movement, no text or symbols present.
natural_image
Line drawing of a computer monitor with ports and an attached remote control (no text or symbols)
natural_image
Illustration of a hand holding a plant stem with an arrow indicating movement (no text or symbols)
PHONO
natural_image
Symbol of a trash bin crossed with a diagonal line, representing no waste or discharge (no text or labels)
Berlin Brands Group UK Limited
PO Box 42
272 Kensington High Street
London, W8 6ND
United Kingdom
INDICE
Dati tecnici 99
The lighting flash and arrow head within the triangle is warning sign alerting you of dangerous voltage inside the product
CAUTION
RISK OF ELECTRIC SHOCK
DO NOT OPEN
CAUTION: TO REDUCE THE RISK OF ELECTRIC SHOCK DO NOT REMOVE COVER (OR BACK). NO USER SERVICIABLE PARTS INSIDE. REFER SERVICING TO QUALIFIED SERVICE PERSONNEL.

The exclamation point within the triangle is a warning sign alerting you of important instructions accompanying the product


1 Copertura giradischi
2 Display LCD
3 Stop ■ /Enter
4 Record
5 Connessione Aux-In
6 On/Standby
16 Play/Pausa ▶II/Banda
17 Preset EQ
Telecomando
natural_image
Diagram of a battery holder assembly with an arrow indicating direction (no text or symbols present)
natural_image
Illustration of a hand holding a plant stem with an arrow indicating movement (no text or symbols)
PHONO
natural_image
Symbol of a trash bin crossed out by a diagonal line, with no text or labels present.
Berlin Brands Group UK Limited
PO Box 42
272 Kensington High Street
London, W8 6ND
United Kingdom
INHOUD
The lighting flash and arrow head within the triangle is warning sign alerting you of dangerous voltage inside the product
CAUTION
RISK OF ELECTRIC SHOCK
DO NOT OPEN
CAUTION: TO REDUCE THE RISK OF ELECTRIC SHOCK DO NOT REMOVE COVER (OR BACK). NO USER SERVICIABLE PARTS INSIDE. REFER SERVICING TO QUALIFIED SERVICE PERSONNEL.

The exclamation point within the triangle is a warning sign alerting you of important instructions accompanying the product
LET OP! OPEN DE BEHUIZING NIET OM EEN ELEKTRISCHE SCHOK EN ERNSTIG LETSEL TE VOORKOMEN ER BEVINDEN ZICH BINNENIN GEEN COMPONENTEN DIE DOOR DE KLANT MOETEN WORDEN ONDERHOUDEN. WENDT U ZICH HIERVOOR UITSLUITEND TOT GEKWALIFICEERDE PERSONEN.
WAARSCHUWING: OM HET RISICO OP BRAND OF EEN ELEKTRISCHE SCHOK TE VERMINDEREN, HET APPARAAT NIET AAN WATER, REGEN OF ANDERE VORMEN VAN VOCHT BLOOTSTELLEN.


natural_image
Diagram of a battery pack assembly with an arrow indicating direction (no text or symbols present)
Radio Data System (RDS)
BT VERBINDING EN WEERGAVE
Weergavemodi (repeat/ random play)
natural_image
Diagram of a computer monitor front panel with an attached remote control unit (no text or symbols)
natural_image
Illustration of a hand holding a plant stem with an arrow indicating movement (no text or symbols)
PHONO
INSTRUCTIES VOOR AFVOER

natural_image
Symbol of a trash bin crossed out by a diagonal line, with no text or labels present.
Berlin Brands Group UK Limited
PO Box 42
272 Kensington High Street
London, W8 6ND
United Kingdom
natural_image
Abstract white logo design on dark background, resembling stylized letter 'S' or wave form (no text or symbols)