Subi88 Harmony - MIDI Keyboard Schubert - Free user manual and instructions
Find the device manual for free Subi88 Harmony Schubert in PDF.
User questions about Subi88 Harmony Schubert
0 question about this device. Answer the ones you know or ask your own.
Ask a new question about this device
Download the instructions for your MIDI Keyboard in PDF format for free! Find your manual Subi88 Harmony - Schubert and take your electronic device back in hand. On this page are published all the documents necessary for the use of your device. Subi88 Harmony by Schubert.
USER MANUAL Subi88 Harmony Schubert
natural_image
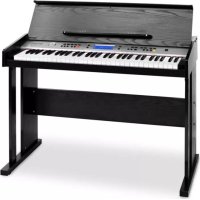
Technical line drawing of a mechanical support structure with no text or symbolsSubi88 Harmony
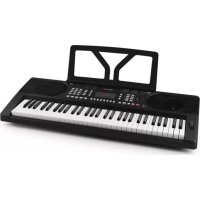
Keyboard
Teclado
Clavier
Tastiera
text_image
QR code image containing encoded data, no visible human-readable textINHALT
Technische Daten 4
natural_image
Technical line drawing of a mechanical enclosure or enclosure with vertical supports and horizontal panels (no text or symbols)MONTAGE
natural_image
Illustration of various mechanical components including a bolt, screw, and nut (no text or symbols)text_image
Diagram showing audio equipment connections with labeled buttons and audio devices, including a monitor and audio jack.
text_image
USB (TO DEVICE) OUTPUT SUSPEDAL FN — PUSH — OUT USB (TO HOST)DE
natural_image
Simple line drawing of a USB device with an arrow pointing to its port (no text or symbols)Netzschalter
text_image
LOADING...


Member of Berlin Brands Group
Handwerkerstr. 11
15366 Dahlwitz-Hoppegarten
Deutschland
natural_image
Symbol of a trash bin with crossed lines indicating no waste, and a solid black rectangle below (no text or labels)Berlin Brands Group UK Ltd
PO Box 1145
Oxford, OX1 9UW
United Kingdom
Dear Customer,
Congratulations on purchasing this equipment. Please read this manual carefully and take care of the following hints to avoid damages. Any failure caused by ignoring the items and cautions mentioned in the instruction manual are not covered by our warranty and any liability. Scan the QR code to get access to the latest user manual and other information about the product.

text_image
QR code image containing encoded data, no visible human-readable textCONTENTS
Technical Data 30
Safety Instructions 31
Panel Control and Display Illustration 32
Installation 35
Getting Stated & Operation 37
Accompaniments 41
Function Menu 45
Appendix 52
Disposal Considerations 53
Manufacturer & Importer (UK) 53
TECHNICAL DATA
| Item number 10035596, 10035847 | |
| Keyboard 88-key standard | keyboard with touch response |
| Display LED | |
| Voice 360 kinds of voices | |
| Style 160 styles | |
| Demo 80 demo songs | |
| Effect control Touch, reverb, chorus, dual, split, function menu, sound console | |
| Record Single track, multi tracks, combined record | |
| Accompaniment control Accompaniment volume, transpose control, MP3 function | |
| Chord control ABC, auto akkord | |
| Pedal Soft pedal, sustain pedal | |
| External function USB (MP3), USB (MIDI), MIDI IN/OUT | |
| Power adapter 220 V~, 12-15 V | === |
| Power input 12-15 V , 2-3 A | === |
SAFETY INSTRUCTIONS
- Read the operating instructions carefully before using the appliance to avoid damage to property and/or personal injury.
- Only connect the unit to a mains socket using the mains power adapter supplied. The use of other mains adapters could damage your unit.
- Do not open the casing of the instrument under any circumstances.
- Do not attempt to disassemble the unit or replace any parts inside the unit yourself. If any malfunction occurs during use, stop using the unit and contact the service centre.
- Do not place the unit where it will be exposed to extreme dust, vibration, low or high temperatures (such as places exposed to direct sunlight, near heat sources, in a car when it is parked in the sun, etc.), as this may damage both the external appearance and the internal components of the unit.
- Never place the appliance on unstable or uneven surfaces, as this could cause it to fall over or be damaged.
- Never place containers filled with liquids on top of the appliance, as they may fall over and spill into the interior of the appliance.
- Before switching on the unit, turn the volume down to 0. Then adjust the volume gradually to avoid damaging the speakers.
- Never turn the volume up to "maximum" to prevent hearing loss from playing.
- Never use extreme force against the unit, the play buttons, the power button and the connectors, nor place heavy objects on the unit.
- The unit must be unpacked by an adult as the packaging materials may pose a choking hazard to babies and young children. Store the plastic packaging in a safe place or dispose of it properly.
- The small components inside may pose a danger to children under 3 years of age and are not suitable for them.
- The technical characteristics of the unit are subject to change without notice.
- This unit can be used in all climates except tropical climates.
- The unit can only be used in areas that are below 2000 metres above sea level.
- Do not allow water drops or splashes to get on the power plug or power cord.
PANEL CONTROL AND DISPLAY ILLUSTRATION
Left control panel

text_image
1 2 MASTER VOLUME 3 LESSON 9 LEFT 11 RIGHT 4 DSP 10 DUAL 12 LOWER 5 STARTISTOP 13 ▶ ▪ □ 14 15 16 17 ACCOMP VOLUME 6 FILLINA ▶ ▶ ▷ 18 PIANO 20 A.S.C. 21 SOUND CONSOLE 17 FUNCTION MENU 8 METRONOME 21 TOUCH ②21 POWER button
Open/Close power
2 MASTER VOLUME button
Adjust volume size
3 LESSON button
Enter into learning mode
4 DSP button
Open/Close DSP
5 Tempo v/∧] button
Adjust present tempo
6 Accompaniment volume v/ ∧
Adjust accompaniment volume
7 SOUND CONSOLE button
Enter into sound console menu
8 FUNCTION MENU button
Enter into function menu
9 LEFT button
Choose left hand voice part of learning songs
10 DUAL button
Open or close dual voice function
11 RIGHTbutton
Choose right hand voice part of learning songs
12 LOWER button
Open/Close Lower
In the song mode
13 Set the beginning and ending position of song paragraph loop
14 Pause to play or continue to play the songs
15 To play songs fast backward
16 To play songs fast forward
17 Start or stop to play the songs
In style mode
13 START/STOP Start or stop to play accompaniment
14 SYNC - Open/Close sync function
15 FILL IN A - Fill in variation A
16 FILL IN B - Fill in variation B
17 INTRO/ENDING - Play the intro/ending of auto
18 PIANO - Start the record function
19 METRONOME - Open or Close metronome
20 A.B.C.
Switch to chord selection mode.
21 TOUCH button
Choose keyboard touch curve
22 LCD display screen
Display all important setting information about this equipment
Right control panel

text_image
23DATA WHEEL

VOICE

STYLE

SONG


23 Data wheel: Adjust the value.
24 VOICE: Switch to voice function state
25 Number/+: Adjust parameters
26 REC button: Start the record function
27 TRACK1 button: Choose track 1 in record
28 TRACK2 button: Choose Track 2 in record
29 TRACK3 button: Choose Track 3 in record
30 PLAY/PAUSE: Play/ Pause MP3
31 STYLE button: Switch to style function state
32 Song
Switch to song function state
33 STORE
Register the current panel settings.
34 M1
To tune out panel setting1 promptly
35 M2
To tune out panel setting2 promptly
36 BANK
Switch memory bank
37 SONG v/VOLUME v
Switch to previous song MP3
Press this button longer time to reduce MP3 play volume
38 SONG ∧/VOLUME ∧
Switch to next song MP3
Press this button longer time to increase
MP3 play volume
LCD

text_image
1 2 3 4 5 6 7 8 9 10 11 VOICE R L12 STYLE SONG TEMPO REVERB CHORUS DUAL &PLIT NOR VAR 14 15 16 17 MEMORY dim 6#US4 mM7aug TOUCH B-1 Digital code display area
2 Characters display area
3 Volume
4 Voice selection
5 Style selection
6 Songs
7 Tempo
8 Reverb
9 Chorus
10 Dual voice
11 Keyboard split
12 Chord display area
13 Metronome
14 FILL IN A/FILL IN A
15 Record/Play
16 Touch
17 State memory
18 Staff display area
Back panel

text_image
39 40 41 42 43 44 45 USB (TO DEVICE) OUTPUT SUSPEDAL IN—MIDI—OUT USB (TO HOST)39 External power jack: Connect to external power adaptor 40.USB(MP3) equipment jack
40 Connect USB equipment
41 Audio out jack:: Connect to external audio equipment
42 Pedal input jack: Connect to pedal
43 MIDI IN jack: Receiving MIDI information that was sent out by external MIDI equipment or computer
44 MIDI OUT jack: Sending data of this piano to computer or MIDI equipment by this jack
45 USB(MIDI) jack.
natural_image
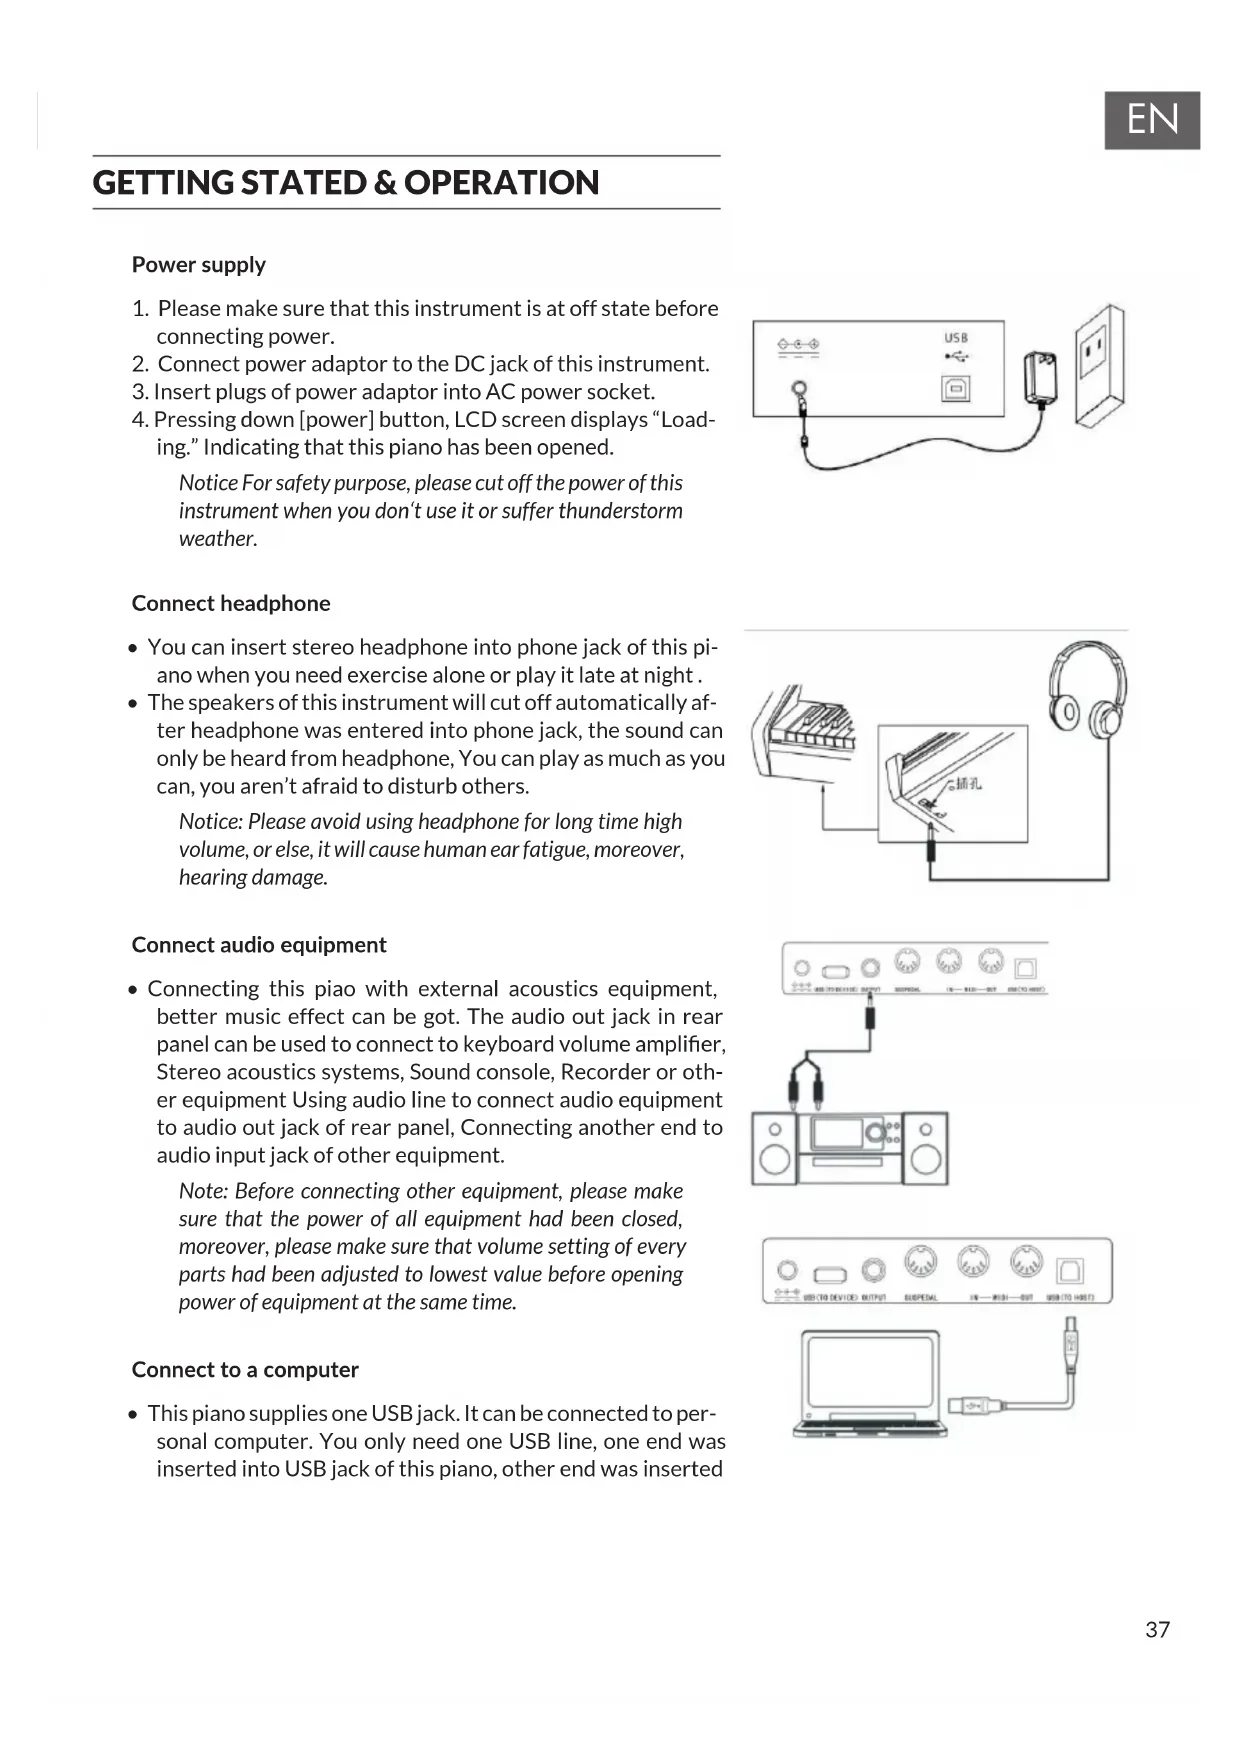
Line drawing of a mechanical enclosure or enclosure with vertical supports and a horizontal shelf (no text or symbols)INSTALLATION
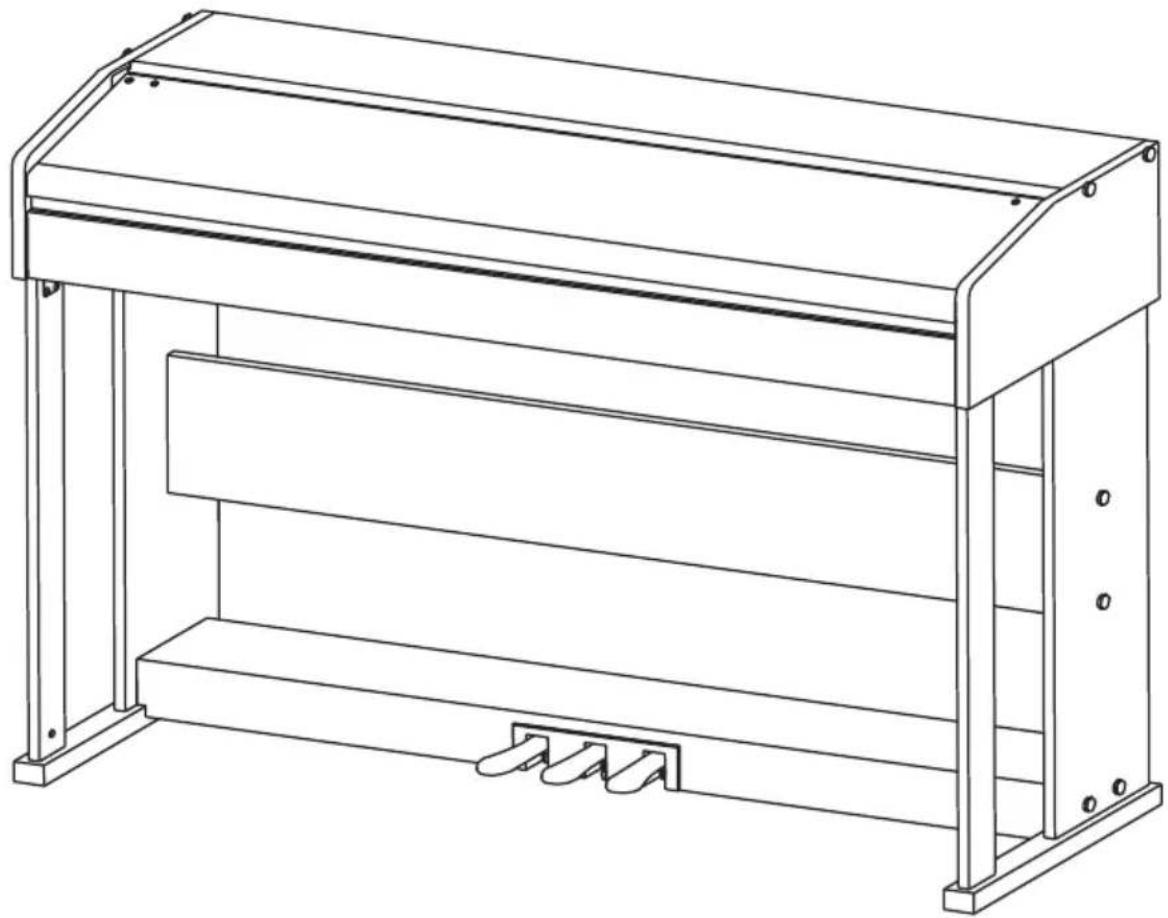
Assembly parts
| 1 | M6 screw plastic cap | 8pcs | |
| 2 | TM6*50 screw | 14pcs | |
| 3 | TM6*20 screw | 6pcs | |
| 4 | Nut | 10pcs | |
| 5 | M6 plum-blossom screw | 1pcs |
Piano body assembly
- Using 1 pcs of plum-blossom M6 screw to fix on the plastic pedal box
- Press 10 pcs of nuts into the corresponding holes of left & right stand board, left & right stand pillars and connection board
- Using 6 pcs of TM6*50 screws to connect left & right stand board and left & right stand pillars with the 2 pcs of fallen feet.
- Using 4 pcs of TM6*50 screws to connect left & right stand board with connection board through 4 pcs of M6 screw caps separately, then close the caps.
- Using 4 pcs of TM6*50 screws to connect stand board and pedal box through 4 pcs of M6 screw caps separately, then close the caps.
- Put the piano body on the piano stand, and then fix it with 6 pcs of TM6*20 screws.
- Plug the MIDI pedal connection line into the sustainjack on the back of piano.
text_image
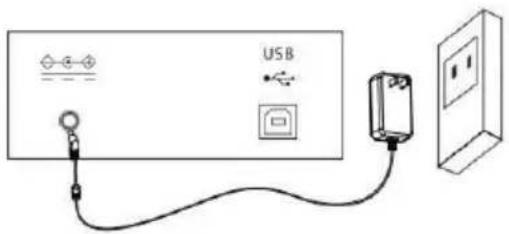
Piano body Piano stand Right stand pillar Rear plastic plugboard Left stand pillar Right stand board Back panel board Left stand board Right fallen foot Pedal box Left fallen foot- Please make sure that this instrument is at off state before connecting power.
- Connect power adaptor to the DC jack of this instrument.
- Insert plugs of power adaptor into AC power socket.
- Pressing down [power] button, LCD screen displays "Loading." Indicating that this piano has been opened.
Notice For safety purpose, please cut off the power of this instrument when you don't use it or suffer thunderstorm weather.
text_image
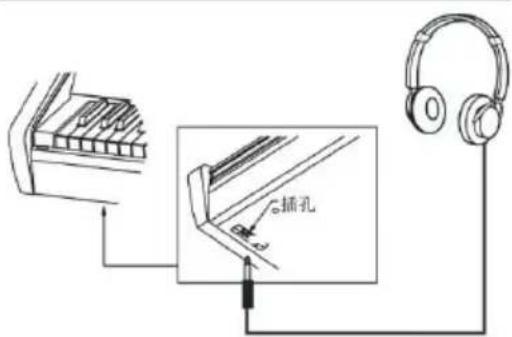
USBConnect headphone
- You can insert stereo headphone into phone jack of this piano when you need exercise alone or play it late at night.
- The speakers of this instrument will cut off automatically after headphone was entered into phone jack, the sound can only be heard from headphone, You can play as much as you can, you aren't afraid to disturb others.
Notice: Please avoid using headphone for long time high volume, or else, it will cause human ear fatigue, moreover, hearing damage.
text_image
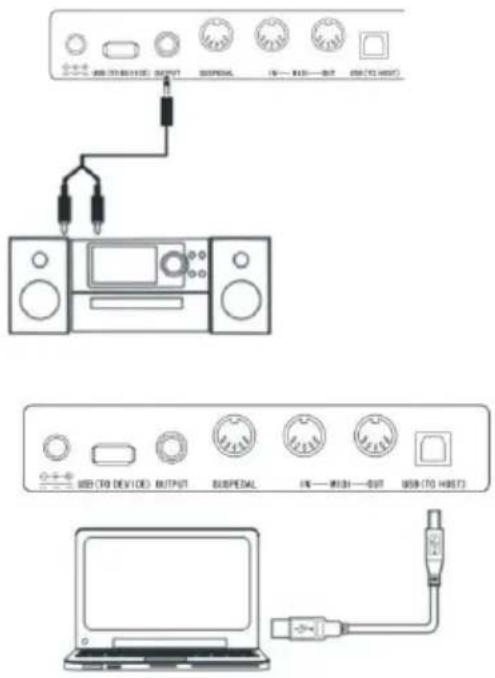
插孔Connect audio equipment
- Connecting this piao with external acoustics equipment, better music effect can be got. The audio out jack in rear panel can be used to connect to keyboard volume amplifier, Stereo acoustics systems, Sound console, Recorder or other equipment Using audio line to connect audio equipment to audio out jack of rear panel, Connecting another end to audio input jack of other equipment.
Note: Before connecting other equipment, please make sure that the power of all equipment had been closed, moreover, please make sure that volume setting of every parts had been adjusted to lowest value before opening power of equipment at the same time.
text_image
Diagram showing three electronic device setups: a front panel with audio, audio jack, and connected ports, a back panel with USB interface labels, and a laptop connected to an Ethernet port.Connect to a computer
- This piano supplies one USB jack. It can be connected to personal computer. You only need one USB line, one end was inserted into USB jack of this piano, other end was inserted
into USB port of computer, it can transfer information with computer in both direction. Such as you can store the music that you had played on this piano to the computer, you also can play MIDI document of your computer by this piano as well.
Note: The USB audio equipment cannot be set for input and output at the same time when you do the setting of the computer software or else the sound will be overlapping when you play the keys.
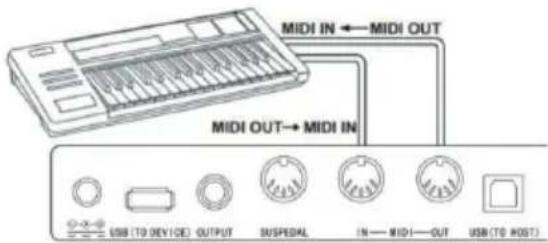
Connect to other equipment
- Connecting MIDI IN of this instrument to MIDI OUT of other equipment, you can use this instrument as sound source.
- Connecting MIDI OUT of this instrument to MIDI IN of other equipment, you can use this instrument as MIDI controller.
Connect pedal
Three pedals group parts was connected to SUSPEDAL jack of rear panel of piano, then, this piano can own three different function pedal: Soft Pedal, Sustain Pedal:
- Soft Pedal
The soft pedal was stepped on, the played notes will occur pianissimo effect. - Sostenuto Pedal
After this pedal was stepped on the play - Sustain Pedal
The sustain pedal was stepped on, playing notes will occur sustain effect, before this pedal was stepped on.
Connect USB equipment
- The piano support to connect largest 32G USB equipment, such as U plate etc.
- The MP3 files in USB equipment can be played.
Note: Do not not pull out USB equipment in playing process, or else it will cause mistake or USB equipment damage.
text_image
MIDI IN ← MIDI OUT MIDI OUT→ MIDI IN USB (TO DEVICE) OUTPUT SUSPEDAL IN— MIDI—OUT USB (TO HOST)
natural_image
Simple line drawing of a USB device with an arrow pointing to it, no text or symbols present.Power switch
- Firstly, Please make sure that the power had been connected correctly.
- Press down Power button, LCD display screen will become lighter, displaying boot screen, indicating that the piano had been opened.
Note: If the LCD screen has not been lit when you pressed down POWER button, please check that whether the power was connected correctly.
Adjust the volume
Rotate Master Volumeknob to the right after the piano was opened. The overall volume will become higher from lower. Rotate Master Volume knob to the left, the overall volume will become smaller from larger. You can adjust the volume based on your requirement.
Play various kinds of instruments voice
- This piano has built-in hundreds kinds of vivid voice, including the timbre of chinese folk music, percussion tone etc.
- The detailed information, please see voice list. We also supply the effect function that it is relative to voice for your better playing voice.
Choose and play voice (Master voice)
- Pressing the TONE button, The voice selection mode can be entered into, the reminding mark "R1" lights in LCD at the same time, moreover, the present voice name and no. display as well.
- Using number button and +/- button to choose the voice that you need.
- To play keys to start play and appreciate wonderful voice.
To change voice selection sourcing you can press Voice button again and again if you had opened dual voice function. The corresponding R1/R2/L cursor will switch to light to display in LCD display screen.
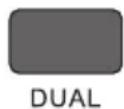
Play two kinds of voice Dual voice
This piano has a dual voice function. The casual two kinds of voice can be superposed and sounded at the same time by this function, The new voice effect will occur to enrich the layers of music. It seems that two kinds of instruments play at the same time. The voice will be fist "R1" voice before the dual voice function was started, The chosen voice will be second "R2" after dual voice function had been started.
- Pressing Dual voice button to open dual voice function, The "R2" mark lights in LCD, the present dual voice name and No. Display as well at the same time.
- To choose the dual voice that you want to play by number buttons and
text_image
LOADING...


+/-buttons.
-
The voice effect that was superposed by two kinds of different voices can be heared when you play the keyboard, it seems that two kinds of instruments are playing at the same time.
-
Press Dual voice button again, the dual voice effect can be closed, "R2" cursor goes out in LCD, LCD display screen recovers previous state.
.When the music range of keyboard was divided, Only the keyboard in right hand area has dual voice function, the keyboard in left hand area doesn't have this function.
Lower
The lower function splits the keyboard into two independent sections by the key split point and each section has different voice. The left section voice is lower voice, and the key split point can be set on any key as required.
- Pressing the LOWER button to start lower function. The LCD displays the current lower voice name and number, and the indication "L" and "SPLIT".
- You can use the data dial, number button or [+]/[-]button to select the lower voice you want to play.
- Play the keyboard in different sections, and you will hear two different voices.
- Press LOWER button again will turn lower function off, "L" will goes out on LCD, LCD display screen recovers previous state.
Keysplit: The position to split master voice or double voice from lower voice in keyboard is called "KEYSPLIT". The default setting for the keysplit is F#3 (34).
You can also set the keysplit anywhere else on the keyboard, as described in the function menu Settings section for details.
Touch Response
The keyboard of this piano has touch response function, It can help to enrich performance expression. It can reflect the touch that you had used to every notes correctly, It seems that you are playing real instrument. This piano has three pcs touch curves for choosing.
- Press Touch button to enter into touch function choosing state. The touch curve no.of present keyboard displays in LCD screen temporarily, The default touch curve is second one in Boot-Up State, there are three pcs touch curves in total(001-003).
- Choose touch curve In the state of touch curve that displays in LCD screen temporarily, you can choose different touch curves by press Touch button continuously.
- Close touch response
- The present touch displays "OFF" in LCD, The relative "Touch" state mark goes out in LCD, it indicates that present keyboard is without touch re-

TOUCH

TOUCH
sponse state.
Piano performance mode
This piano designs this function specially, you can tune out piano tone of full keyboard promptly in other state.
-
Pressing the PIANO button, the piano performance mode can be entered into or exited directly.
-
Choosing and starting style in piano performance mode. The accompaniment control can be operated same other mode, but style only play percussion music part, there is no harmony accompaniment part.
Note: The sound console function and function menu can be entered into in piano performance mode. The chord function will be closed automatically after the piano performance mode was entered into.
Metronome
If you are afraid that you are't sure about beat when you are practing music or recording, you can get special metronome reminder by metronome function.
- Open Metronome
- Pressing Metronome button to open metronome function, beat sounds, Pressing Metronome button again to close metronome function.
- Metronome style setting
- Please jump to beat type setting in function menu to see setting method.
Notes:
- If the metronome was opened in style playing process, the beat sound will be responded to at the beginning of next beat, the beat point will change followed styles.
- If the metronome was opened fistly, then, play style, this piano will adjust metronome automatically at the same time that the first beat of style sounded to make it match with styles.
- The metronome can be opened in recording, but the sound of metronome wasn't stored as recorded data.

PIANO

METRONOME
ACCOMPANIMENTS
Playing various kinds of style accompaniments
Using auto accompaniment function, you play piano alone and you can enjoy the accompaniment effect of whole band, moreover, the Orchestra, you only need to start the different styles of accompaniment that you had chosen and use left hand to play suitable chord, the music will go ahead all the time.
text_image
STYLE STYLE SYNC FILLINA FILLIN B(INTROFENGING)This instrument has built in various kinds of auto accompaniment (The detailed information, please see style appendix list), you can choose your favorite accompaniment style and enjoy the pleasure that accompaniments bring to you as much as you can.
Play auto accompaniment (Only play percussion music voice part).
- Pressing Style button to enter into style mode. The top-left "STYLE" reminder marking lights in LCD and displays present style name and seria no.at the same time.
- Choose style: You can choose the styles you need by number buttons or +/-buttons.
- Start style: he percussion music part of style can be played immediately by pressing Start/Stop button, you also can press Sync button to make the style to be in sync stat.. The beat point shines in LCD at the same time, then, play any keys to start style perucussion music performance.
Play auto accompaniment (all tracks)
- Start the automatic bass chord accompaniment: A.B.C. Press the [A.B.C.] button for the first time to enter auto bass chord mode. The keyboard is splitted into two sections. Left hand section is chord detect section. The LCD will show the indication of A.B.C. temporarily. Then pressing any key in chord detect section (Sync Start status) you will hear the fantastic accompaniment. Press the [A.B.C. I button for the second time to enter FULL RANGE mode. The LCD will show the indication of Full Ran. At this time, the whole keyboard is chord detect section.
- Start A.B.C. accompaniment
- You can press [Sync] button, and then play a chord in the chord detect section to start accompaniment of A.B.C. When you change a chord, the accompaniment automatically changes. You also can press [Start/Stop] button to start auto accompaniment of rhythm track, then play a chord in chord detect section. It will start auto accompaniment of all track.
Accompaniment Paragraphs
The auto accompaniment itself of this piano contains many kinds of different accompaniment paragraphs, it is convenient that you arrange your own accompaniments in various kinds of ways. These paragraphs including: Main play(A B) FILL IN(1 2) Intro Ending. When you play accompaniment, you can make more professional performance effect easily by simple switch of these paragraphs.
- Intro part: Intro is suitable for the beginning of one music, when the intro was played over, the accompaniment will enter into preset main play part. The length of intro will be different based on the difference of chosen style type.
- Main play part: Main play is suitable to the main part of one song, the main play will loop play all the time before you had pressed other style control button.
- FILL IN PART: It can produce various kinds of rich change for songs by FILLING IN paragraph 1 or 2, It enables your performance to be more professional. The accompaniment will switch to relative main play part automatically when FILL IN paragraphs had been played over.
- Ending sound part: Ending sound is suitable to the ending of one song, The song will stop immediately when the ending sound was played over, the length of ending is relative to chosen styles.
Note: Holding one of FILL IN1, FILL IN2 button when the accompaniment are going on, the variation will be loop filled in , until releasing this button to enter into relative main play part. Pressing FILL IN button will change initial default main play paragraph in the state that the accompaniment has stopped, LCD display screen will display relative marking.
Play different accompaniment paragraphs
- Pressing STYLE button, the styles can be selected by pressing +/- button, numbers buttons at this time.
- Pressing AUTO CHORD button to enter into auto bass chord mode.
- Pressing SYNC button to open sync start function.
- Pressing FILL IN 1 to choose main play 1.
- Pressing INTRO/ENDING button, FILL IN - "NOR" marking continue to shine in LCD, the style is in play preparation state at this time.
- The auto accompaniment will start immediately when you pressed one chord in left hand area of keyboard. The accompaniment will switch to relative main play part when intro part was played over.
- Pressing FILL IN 2 button, one small paragraph of variation will be filled in the accompaniment that are playing at this time. The accompaniment will switch to relative main play 2 automatically when the variation was played over.
- Pressing INTRO/ENDING button, the accompaniment will enter into ending part at this time, the auto accompaniment will be stopped when the ending was played over.
Accompaniment volume control
The accompaniment volume is used for adjusting the overall volume of auto accompaniment. This function can get balance between auto accompaniment part and the volume of keyboard tone.
- Pressing ACCOMP VOLUME ∨/∨ the LCD display screen. will displays present accompaniment volume size temporarily, the accompaniment volume size can be adjusted by pressing ACCOMPANIMENT VOLUME ∨/ACCOMPANIMENT VOLUME again at this time. Adjustment range: 0–127.
- Pressing ACCOMPANIMENT VOLUME and ACCOMPANIMENT VOLUME buttons at the same time, the accompaniment volume can be closed. LCD display screen displays "Accompaniment volume OFF. The accompaniment volume can be opened by pressing ACCOMPANIMENT VOLUME and ACCOMPANIMENT VOLUME buttons OFF Accomp again at the same time.
Tempo
Every style has different best tempo value, you can change tempo value based on your hobby and songs requirement.
- The initial default tempo value can be changed by Tempo ∨ /Tempo ∧ button.
- The tempo can recover initial default value by pressing Tempo ∨ /Tempo ∧ buttons at the same time.
Note: The tempo will be setted for the preset value of present style automatically if you choose style when the styles stopped, The tempo will keep same if you switch style when the style are playing.
DSP
DSP is a sound field localization technology that imitates sound in real environment. Use this function will enable you to hear more open and full performance.
- The DSP effect is automatically turned on when starting up, and the "REVERB" and "CHORUS" mark lights on LCD.
- Pressing [DSP] button to turn DSP effect on or off.
Note: In the process of rhythm or song playing, switching on/off the DSP may cause a short pause or noise,
which is a normal caused by switching effect switches.
Sound console
The played volume of every tracks can be controlled solely by sound console function.
- Pressing the SOUND CONSOLE button to enter into sound console function menu.LCD will display corresponding value temporarily.The fist time to enter into the sound console menu when the power is on, The first option is "Percussion music track volume" of sound console menu.The option that was entered into again later is same as the option that exited from last time.
- Pressing the SOUND CONSOLE button again and again to choose the track item that you want to do the setting, then, pressing [-] / [ + I buttons to set parameters.
Concrete function items and parameters range are as following list:
| Adjustment content LCD display Adjustment range | ||
| Percussion music track volume XXX Rhythm 0 - 127 | ||
| Bass track volume XXX Bass 0 - 127 | ||
| Harmony track volume XXX Chord 0 - 127 | ||
| Phrase track volume XXX Phrase 0 - 127 | ||
| Left hand track volume XXX Lower 0 - 127 | ||
| Right hand track volume XXX Upper 0 - 127 |
Note: If there is no any setting operation in 5 seconds in sound console setting state.the sound console function state wil exit automatically
FUNCTION MENU
Pressing[FUNCTION MENU]button to enter into function menu, LCD displays present function menu option temporarily, to set the parameters of present menu by pressing [-]/[+] buttons..
Note: If there is no any setting operation in 5 seconds in function menu setting state.the function menu state will exit automatically.
Tune setting
This function is used to adjust pitch detailedly.
- Pressing the FUNCTIN MENU button to select tune menu. LCD displays "xxx Tune" temporarily, You can press [+] / [-] buttons to adjust pitch. the largest adjustment range is ±50, it is to rise or reduce one half-tone.
- Pressing [+] and [-] buttons at the same time.the pitch will recover to presetting value: 000.This parameter adjustment is valid for keyboard and styles.
Keyboard split setting
The position to split auto bass chord area and right hand area in keyboard is called "KEYBOARD SPLIT POINT". The keyboard in left hand area are used for controlling auto bass chord accompaniment generally when auto bass chord function was opened. the keyboard in left hand area also can be used for playing voice.
- Pressing[FUNCTION MENU]button to choose keyboard split point setting menu.LCD displays "xxx KeySplit" temporarily. You can press [-]/[+] buttons to set keyboard split point at this time, you also can play keys directly to do prompt setting. The adjustment range: 1 -88.
- Pressing [-)and[+]buttons at the same time.the keyboard split point will recover to presetting value.
Beat type setting
-
Pressing [FUNCTIN MENU)button to choose beat type menu,LCD displays "xxx BeatType"temporarily,You can press [-]/[+)button to choose beat type at this time,this funtion supplys 0,2\~9(total 9 kinds of beats)for your selection.
-
Pressing [-] and [+1 buttons at the same time.beat type will recover to presetting value:004.
Metronome volume setting
- Pressing[FUNCTION MENU+)or[FUNCTION MENU-] button to choose metronome volume setting menu,LCD displays "xxx MetroVol" temporarily,You can press [+]/[-] button to set metronome volume at this time,range:0\~127.
- Pressing [+land[-] buttons at the same time, metronome volume will recover to presetting value:080.
Reverb depth settinge
- Pressing [FUNCTION MENU) button to choose reverb depth setting menu,LCD displays "xxx Reverblev" temporarily.You can press [-]/[+]button to set reverb depth at this time.Range:0\~127.
- Pressing [-]/[+] buttons at the same time, reverb depth will recover to presetting value:050..
Chorus depth setting
- Pressing [FUNCTION MENU) button to choose chorusdepth setting menu.LCD displays "xxx Chorus level emporarily.You can press [-]/[+]button to set chorus depth at this time.Range:0\~127.
- Pressing [-) and [+I buttons at the same time, Chorus depth will recover to presetting value:000..
MIDI receiving setting
- Pressing[FUNCTION MENU]button to choose MIDI receiving channel setting menu.LCD displays "xxx Midi In" temporarily,You can press [-]/[+)button to set MIDI receiving channels at this time.Setting range: 1 \~ 16,ALL.
- Pressing [-] and [+I buttons at the same time, MIDI channel will recover to presetting value:ALL..
MIDI sending setting
- Pressing[FUNCTION MENU)button to choose MIDI sending channel setting menu.LCD displays "xxx Midi Out" temporarily.You can press [-]/[+)button to set MIDI sending channels at this time.Range: 1 \~16
- Pressing [-)and[+)buttons at the same time,MIDI channel will recover to presetting value:001.
Factory reset
Pressing [-]and[+]buttons when power is off, then, open the power, the system will recover to factory rest, and delete all users' data in this piano, including: Users' songs, users' registration memory. The system will be entered into automatically after deletion was finished, then recover to normal open state.
Panel registration memory setting
This instrument has panel registration memory function, it can be used for saving your most favorite setting as to the setting can be tuned out easily and promptly when you need it, moreover, it can enable your performance to be more efficient. Panel registration memory function can almost store all setting of panel, you only need to press one button simply, the setting can be tuned out immediately.
Save setting to storage
- registration bank includes 2 groups storage memory state (M1-M2)
- When you press [STORE]button, press one of [M1]-[M2] button at the same time, present panel can be set to registration memory. Please notice: This operation will cover previous stored registration memory.
Note: Holding [STORE] and [M 1] buttons at the same time, open the power again, all registration memory will all recover to factory reset state at this time.
Tune out registration memory
Pressing one of [M 1] - [M2] button to tune out one group setting to replace present state.
Choose memory bank
- Pressing [BANK]button,LCD displays memory bank serial no.temporarily.
- Pressing [BANK] button again and again at this time, you can choose to set memory bank. Range: 1-4
- The following content can be stored in M1-M2 storage memory state
• Voice parameters: Main voice, Dual voice, Keyboard split point voice, Digital effect Sound console.
- Accompaniment parameters:Style, tempo, Auto bass chord open/close, paragraphs selection.
- Function parameters: Touch, partial parameters in function menu.
Record your own songs
The record function of this piano can record/replay your performance, you can appreciate your own opus by replaying. You can record many pieces of users' songs in this piano, every song can record 3pcs tracks at most, it is 1 pc accompaniment track and 2pcs melody tracks.
The accompaniment track was used for recording style, it is songs' accompaniment, The melody track was used for recording playing melody. The accompaniment track and melody track can record at the same time, but, it can't record 2pcs melody tracks at the same time, of course, you also can only record melody or accompaniment separately; The accompaniment track and melody track can replay at the same time. The users' song has storage function if there is power-fail, the data can't loss when the power is off.
Start record
You need to choose one pc user's song that will be used for storing record before the record was starting and set record tracks.
- Pressing [RECORD] button to enter into users' songs selection interface. The left top of LCD displays serial no. of users' songs, The characters display area displays users' songs name, The default name is "RecSong1". You can choose users' songs that need to store record by [-]/[+] buttons.
-
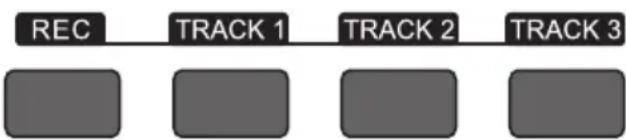
Pressing [RECORD]button to enter into record preparation state,"REC"marking lights in bottom part of LCD,4pcs beat points shine at the same time in beat display area.This piano will choose one melody track that has no data to store your record automatically. The track cursor shines in LCD ,it refers to the present track that stored record.
-
You can choose voice, style, adjustment tempo etc. that you want to record in record preparation state. You can press [TRACK1], [TRACK2] \~ [TRACK3] button to choose the tracks that you want to record, it means that the track was chosen when cursor shines. The accompaniment track and melody track can record at the same time, but cannot record 2 melody tracks at the same time.
-
To press[START/STOP]button or play piano's keys directly to start record after the record tracks were chosen. When the record accompaniment was chosen and the auto bass chord accompaniment function was opened, to play one effective chord in keyboard left hand area, the record can be started as well.
text_image
REC TRACK1 TRACK 2 TRACK 3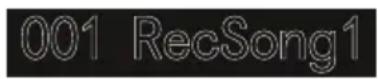

Notes:
The style data can only be recorded in accompaniment track.
The record track cursor has three kinds of state: Shine, Light, Go out.
Shining, it means that this track has been chosen for record, if this track has already have data, the original data will be covered if you continue to record in this track. Lighting, it means that this track has data, it will replay recorded data synchronously in record process. Going out, it means that this track has no data or has data, but has been prohibited to replay when the record was going on. The tracks state can be switched by pressing [TRACK1] \~ [TRACK3] again and again in record preparation state.
This piano will choose one empty melody track to store record automatically (the system will choose automatically in the order of small to large.such as:if track2 has data,then,the system will choose track3 to store this time record)in record preparation state,if two tracks had already have data,then,it will choose track2 to store record.
Track1: Accompaniment track
Track2/Track3: Melody track
Stop recording
- Pressing the Start/Stop button can stop record immediately in record process, Pressing Style or Voice selection button can enter into other function.
- If the internal memory is full, the record will stop and store automatically in record process, "Rec_Full" will display in LCD temporarily to remind that the internal memory has been recorded full.
- The record will stop automatically after the style had played ending over if you had chosen record ccompaniment.
Replay recorded songs
- The record wil stop and enter into songs state automatically and loop play previous recorded users'songs immediately if theRECORD button was pressed in record process.
- Pressing the SONG button to enter into song state in standby mode, all songs will loop play automatically. The serial no.of users' songs can be selected directly by pressing [-]/[+] buttons, such as: If there is no recorded data in one user's songs, "NoFile!" will display in LCD display screen, reminding that there is no recorded data in present files, moreover, the loop play will stop.
- Choosing one user's song that has data in the state that songs has stopped. Pressing the START/STOP button to start loop play this song.
text_image
REC TRACK 1 TRACK 2 TRACK 3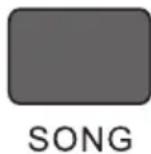

Delete recorded songs
- Pressing the RECORD and the SONG at the same time when the power is off, then, open the power, all users' songs will be cleared.
- Pressing the RECORD button for 2 seconds to enter into tracking deleting state in record preparation state, The LCD displays "Delete?". Pressing TRACK1, TRACK2, TRACK3 to choose the track you want to delete in deleting state, when the cursor of one certain track lights, it indicates that the data of this track will be deleted, when the cursor of track goes out, it indicates that the data of this track will be kept. If the cursors of all tracks light, the data of complete song will be deleted when the deleting operation was carried out.
- Pressing the [+] button to carry out deleting operation after the tracks that you want to delete was chosen, it will return to record preparation state automatically after the operation was finished, Pressing [-] button to cancel deleting operation and return to record preparation state.
Play and control songs
This instrument has presetting many kinds of different types songs. Every song has learning function.(For detailed information, please see songs list).
Enjoy songs
- Pressing the SONG button to enter into song mode, LCD lights "SONG" marking, All songs will begin with loop play now.
- You can choose the songs that you want to appreciate by numbers button or [-]/[+]buttons.
- To press START/STOP button to stop playing in the state that songs are playing, but does not exit song state, pressing. START/STOP button again, the present song will loop play.
- Pressing STYLE, RECORD, VOICE, DUAL VOICE, etc function buttons, the song mode can be exited when the song has stopped playing.
Song control
- Guiding beat function
The song will have guiding beat instructions before intro was played formally. -
Fast forward, Fast backward, Play/Pause and stop functions of songs.)>)>)>)
Pressing down ▶ button can speed up to play songs when songs are playing.pressing down [ .. ] button can return back songs.pressing down [ ▶ / ■ ]button can pause to play songs, pessing down ▶ / ■ button again to continue to play songs, pressing down [ II ] button can stop playing present songs. -
The fragment loop function of song
Pressing down button can set starting point and ending point of loop play when the song are playing, pressing this button first time to set loop starting point.pressing this button second time to set loop ending point.when ending point was finished setting.the song will loop play the content between the two points.
Pressing down button can exit loop and continue to play songs in the state of fragment loop.
Song learning mode
The learning function of song are consist of [Lesson], [Left], [Right] these three buttons. these three buttons are valid only in song mode. All songs can be learned by three mode: Durationlearning, Pitch learning and play mode.
This piano can give score based on your learning situation when the learning was over, it helps you to make progress continuously in learning process.
- Enter into song learning mode.
Pressing [Lesson]button to enter into song learning mode in the state of the song had been stopped play.
- Choose left hand or right hand to learn songs. The songs of this instrument can be chosen for three different kinds of way to learn. You can choose the learning part you RIGHT need by [Left] or [Right] buttons, if you haven't proceed with selection. the system will choose right hand learning for you automatically.
Note: The content of left hand learning will aslo be different based on different songs type. For style type songs, the left hand will be used for learning chords; For piano songs, the left hand will be used for learning part melody of left hand. The MIDI type songs doesn't support left hand learning function. The staff and chord display area in LCD will display melody or chords of songs when the songs are playing. It is convenient for following learning.
Learning mode 1: Duration learning
-
Pressing [Lesson] button to enter into learning mode1 in the state that the songs were stopped playing."Les1 R"will displays in LCD temporarily.The system will estimate the played duration of learner,it doesn't estimate the correctness of notes and chords in learning mode1,the song plays normally.
-
Pressing[Start/ Stop]button to begin with songs learning. If you choose right hand to learn songs, the melody part of right hand will be concealed. The learner only needs to play correct duration.the melody will sound in the process of song playing, it is no need to consider that the played notes are correct or wong. If you choose left hand to learn songs.the chords of songs or left hand melody part will be concealed, the learner only need to play correct duration.it is no need to consider that the played notes are correct or wong, the chords or left hand melody part can sound. Pressing[Left]&[Right]buttons at the same time, the left hand and right hand can be learned at the same time.The system will make estimation after thelearning was over.
Learning mode2: Pitch learning
-
Pressing [Learn]button repeatedly to enter into learning mode2 in the state that song has been stopped play."Les2 R"reminder marking lights in LCD .The system only estimates the correctness of pitch of notes that learner has played,The song can go ahead backwards when it needs learner to play correct notes. If the pitch of played notes is wrong,the song will be in waiting state until the correct notes was played.
-
Pressing [Start/Stop)button to begin to learn song, it will give estimation after the learning was over.
Learning mode3: P lay mode
- Pressing [Learn] button repeatedly to enter into learning mode3 in the state that song has been stopped play."Les3 R"reminder marking lights in LCD .The system only estimate the correctness of duration and pitch that learner are playing comprehensively. The song plays normally,learner must play correct pitch based on originalduration of song,then,it can be estimated correct by system
- Pressing[Start/Stop]button to begin to learn song, it will give estimation after the learning was over.
MP3 Play
MP3 Jack:MP3 song can play by this jack Pressing [Play/Pause) button can switch present state of songs Pressing [SongA)button ,one song goes backward,pressing [Volumev)button for longer time,the volume will reduce small. Pressing [Songv) button ,one song goes forward,pressing [Volume/) button for longer time.the volume will increase large.
APPENDIX
Voice List 52
Style List 61
Song List 64
DISPOSAL CONSIDERATIONS
natural_image
Symbol of a trash bin with crossed lines indicating no waste, and a solid black rectangle below (no text or labels)If there is a legal regulation for the disposal of electrical and electronic devices in your country, this symbol on the product or on the packaging indicates that this product must not be disposed of with household waste. Instead, it must be taken to a collection point for the recycling of electrical and electronic equipment. By disposing of it in accordance with the rules, you are protecting the environment and the health of your fellow human beings from negative consequences. For information about the recycling and disposal of this product, please contact your local authority or your household waste disposal service.
This product contains batteries. If there is a legal regulation for the disposal of batteries in your country, the batteries must not be disposed of with household waste. Find out about local regulations for disposing of batteries. By disposing of them in accordance with the rules, you are protecting the environment and the health of your fellow human beings from negative consequences.
MANUFACTURER & IMPORTER (UK)
Manufacturer:
Chal-Tec GmbH, Wallstrasse 16, 10179 Berlin, Germany.
Importer for Great Britain:
Berlin Brands Group UK Ltd
PO Box 1145
Oxford, OX1 9UW
United Kingdom
Cher client, chère cliente,
text_image
QR code image containing encoded data, no visible human-readable textSOMMAIRE
natural_image
Technical line drawing of a mechanical enclosure or enclosure with vertical supports and horizontal panels (no text or symbols)MONTAGE
text_image
WOR TO B110C 50V SOPRSL (N—N)—B1—B2 SOT TO 400T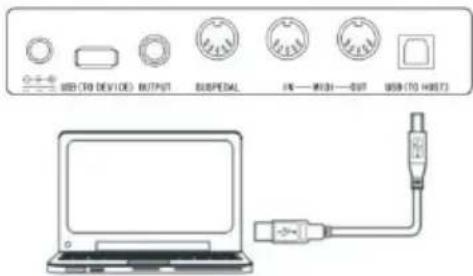
text_image
USB (TO DEVICE) OUTPUT SUSPEDAL FN — PUSH — OUT USB (TO HOST)natural_image
Simple line drawing of a USB device with an arrow indicating upward motion (no text or symbols)text_image
LOADING...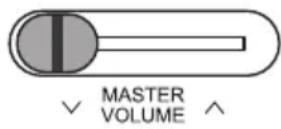


natural_image
Symbol of a trash bin crossed with a diagonal line, no text or numbers presentBerlin Brands Group UK Ltd
PO Box 1145
Oxford, OX1 9UW
United Kingdom
Estimado cliente:
text_image
QR code image containing encoded data, no visible human-readable textCONTENIDO
Datos técnicos 80
natural_image
Technical line drawing of a mechanical enclosure or enclosure with vertical supports and horizontal panels (no text or symbols)MONTAJE
natural_image
Simple line drawing of a USB device with an arrow pointing to its port (no text or symbols)Interruptor principal
text_image
LOADING...


natural_image
Symbol of a trash bin crossed with a diagonal line, no text or numbers presentBerlin Brands Group UK Ltd
PO Box 1145
Oxford, OX1 9UW
United Kingdom
Gentile Cliente,
text_image
QR code image containing encoded data, no visible human-readable textINDICE
Dati tecnici 104
natural_image
Technical line drawing of a mechanical enclosure or support structure (no text or symbols)MONTAGGIO
natural_image
Illustration of various mechanical components including a bolt, screw, and adjustment knob (no text or symbols)natural_image
Simple line drawing of a USB device with an arrow pointing to its port (no text or symbols)text_image
LOADING...


natural_image
Symbol of a trash bin crossed with a diagonal line, no text or numbers presentBerlin Brands Group UK Ltd
PO Box 1145
Oxford, OX1 9UW
United Kingdom
Liste der Instrumente ● Voice List
| Instrument Nr. Name | AbkürzungAbbreviation | ||
| Piano 1 Stereo Grand Piano StGrdPno | |||
| Piano 2 Acoustic Grand Piano (wide) 1 GrandPnW | |||
| Piano 3 Acoustic Grand Piano (dark) GrandPnD | |||
| Piano 4 Octave Piano 1 OctPno1 | |||
| Piano 5 Octave Piano 2 OctPno2 | |||
| Piano 6 Piano & Strings Pno&Str | |||
| Piano 7 Piano & Choir Pno&Cho | |||
| Piano 8 Acoustic Grand Piano GrandPno | |||
| Piano 9 Stereo Bright Piano StBr tPno | |||
| Piano 10 Bright Acoustic Piano BritePno | |||
| Piano 11 Bright Acoustic Piano (wide) 1 BritePnW | |||
| Piano 12 Chorus Piano ChoruPno | |||
| Piano 13 Electric Grand Piano E.Grand | |||
| Piano 14 Electric Grand Piano (wide) E.GrandW | |||
| Piano 15 Stereo Honk-Tonk StHonkTo | |||
| Piano 16 Honky-tonk Piano | HnkyTonk | ||
| Piano 17 Honky-tonk Piano (wide) 1 | HnyTonkW | ||
| Piano 18 Stereo Hard Electric Piano | StHarEp | ||
| Piano 19 Detuned Electric Piano 1 | DetunEP1 | ||
| Piano 20 Detuned Electric Piano 2 | DetunEP2 | ||
| Piano 21 Electric Piano 1 | E.Piano1 | ||
| Piano 22 Electric Piano 2 | E.Piano2 | ||
| Piano 23 Electric Piano (wide) 1 | EPnoW1 | ||
| Piano 24 Electric Piano (wide) 2 | EPnoW2 | ||
| Piano 25 EP Legend | EPLegend | ||
| Piano 26 EP Phase | EPPhase | ||
| Piano 27 60's Electric Piano | 60'sEP | ||
| Piano 28 Electric Piano 1 (velocity mix) | E.PnoV1 | ||
| Piano 29 Electric Piano 2 (velocity mix) | E.PnoV2 | ||
| Piano 30 Velocity Crossfade Electric | Piano | VeCrosEP | |
| Piano 31 Layered Electric Piano 1 | LayerEP1 | ||
| Piano 32 Layered Electric Piano 2 | LayerEP2 | ||
| Piano 33 Nylon Electric Piano | NylonEP | ||
| Piano 34 Warm Electric Piano | WarmEP | ||
| Piano 35 Grand Harpsichord | GraHarps | ||
| Piano 36 Harpsichord 1 | Harpsi | ||
| Piano 37 Harpsichord 2 | Harpsi2 | ||
| Piano 38 Harpsichord (wide) HarpsiW | |||
| Piano 39 Harpsichord (octave mix) 1 HarpsiO | |||
| Piano 40 Harpsichord Release HarpsiR | |||
| Piano 41 Harpsichord (with key off) HarpsiOf | |||
| Piano 42 Clavi 1 Clavi | |||
| Piano 43 Clavi 2 Clavi 2 | |||
| Piano 44 Clavi (wide) 1 ClaviW1 | |||
| Piano 45 Clavi (wide) 2 ClaviW2 | |||
| Piano 46 Clavi Wah ClaviWa | |||
| Piano 47 Pulse Clavi PulseClv | |||
| Chromatic Percussion 48 Celesta 1 Celesta | |||
| Chromatic Percussion 49 Celesta 2 Celesta2 | |||
| Chromatic Percussion 50 Birght Celeasta BirCelea | |||
| Chromatic Percussion 51 Celesta & Sine Celes&Si | |||
| Chromatic Percussion 52 Reecho Bell ReechBell | |||
| Chromatic Percussion 53 Celesta & Music Box Celes&MB | |||
| Chromatic Percussion 54 Glockenspiel 1 | Glocken | ||
| Chromatic Percussion 55 Glockenspiel 2 | Glocken2 | ||
| Chromatic Percussion 56 Music Box 1 | MusicBox | ||
| Chromatic Percussion 57 Music Box 2 | MusicBo2 | ||
| Chromatic Percussion 58 Music Box 3 | MusicBo3 | ||
| Chromatic Percussion 59 Toy Box | ToyBox | ||
| Chromatic Percussion 60 Music Box & Harp | Mbx&Harp | ||
| Chromatic Percussion 61 Stereo Vibrapho | StVibes | ||
| Chromatic Percussion 62 Rigid Vibraphone | RigiVibe | ||
| Chromatic Percussion 63 Vibraphone 1 | Vibra | ||
| Chromatic Percussion 64 Vibraphone 2 | Vibra2 | ||
| Chromatic Percussion 65 Vibraphone (wide) 1 | VibraW | ||
| Chromatic Percussion 66 Vibraphone (wide) 2 | VibraW2 | ||
| Chromatic Percussion 67 Vibraphone & Bell | Bell&Vib | ||
| Chromatic Percussion 68 Marimba 1 | Marimba | ||
| Chromatic Percussion 69 Marimba 2 | Marimba2 | ||
| Chromatic Percussion 70 Marimba (wide) | MarimbaW | ||
| Chromatic Percussion 71 Stereo Marimba | StMarim | ||
| Chromatic Percussion 72 Marimba & Vibraphone | Mar&Vib | ||
| Chromatic Percussion 73 Xylophone 1 | Xylophone | ||
| Chromatic Percussion 74 Xylophone 2 | Xylopho2 | ||
| Chromatic Percussion | 75 | Tubular Bells | TubulBell |
| Chromatic Percussion 76 Church Bell | ChurBell | ||
| Chromatic Percussion 77 Carillon | Carillon | ||
| Chromatic Percussion 78 Dulcimer | Dulcimer | ||
| Chromatic Percussion 79 Santur | Santur | ||
| Organ | 80 Drawbar Organ 1 | DrawbOrgan | |
| Organ | 81 Drawbar Organ 2 | DrawbOrgan 2 | |
| Organ | 82 Soft Stereo Drawbar Organ | SfDrawOrgan | |
| Organ 83 Mellow Drawbar Organ | MellDrOr | ||
| Organ 84 Detuned Drawbar Organ | 1 DeDraOr | ||
| Organ 85 Detuned Drawbar Organ | 2 DeDraOr2 | ||
| Organ 86 Italian 60's Organ 60'sOrgn | |||
| Organ 87 1970 Percussive Organ | 1970PcOr | ||
| Organ 88 Percussive Organ 1 PercOrgn1 | |||
| Organ 89 Percussive Organ 2 PercOrg2 | |||
| Organ 90 Light Click Organ LClickOr | |||
| Organ 91 Detuned Percussive Organ | DePerOrg | ||
| Organ 92 Stereo Rotar y Organ StRotaOr | |||
| Organ 93 Rock Organ RockOrgn | |||
| Organ 94 Rotar y Organ RotaOrgn | |||
| Organ 95 Slow Rotar y Organ Slo RotOr | |||
| Organ 96 Detuned Church Organ | DeChuOrg | ||
| Organ 97 Church Organ 1 ChurOrgn | |||
| Organ 98 Church Organ 2 ChurOrg2 | |||
| Organ 99 Church Organ (octave mix) | ChurOrgO | ||
| Organ 100 Reed Organ ReedOrgn | |||
| Organ 101 Puff Organ | PuffOrgn | ||
| Organ 102 Accordion 1 | Accordion | ||
| Organ 103 Accordion 2 | Accordin2 | ||
| Organ 104 Accordion 3 | Accordin3 | ||
| Organ 105 Mustte | Mustte | ||
| Organ 106 Accord It Solo | AccordSo | ||
| Organ 107 Sweet Harmonica SwetHarm | |||
| Organ 108 Harmonica 1 | Harmonica | ||
| Organ 109 Harmonica 2 | Harmonic2 | ||
| Organ 110 Tango Accordion | TangoAcd | ||
| Guitar | 111 Acoustic Guitar (nylon) 1 | NylonGtr | |
| Guitar | 112 Acoustic Guitar (nylon) 2 | NylonGt2 | |
| Guitar | 113 Acoustic Guitar (nylon + key off) | NylGtrOf | |
| Guitar | 114 Ukulele | Ukulele | |
| Guitar | 115 Velocity Nylon Guitar | NyInGtVe | |
| Guitar | 116 Chorus Nylon Guitar | ChoNyGt | |
| Guitar | 117 Bright Nylon Guitar | BrNyGt | |
| Guitar | 118 Acoustic Guitar (steel) 1 | SteelGtr | |
| Guitar | 119 Acoustic Guitar (steel) 2 | SteelGt2 | |
| Guitar | 120 Steel Guitar with Body Sound | SteelBdy | |
| Guitar | 121 | Tremolo Steel Guitar | TremGt |
| Guitar | 122 Mandolin | Mandolin | |
| Guitar | 123 12-Strings Guitar | 12StrGtr | |
| Guitar | 124 Chorus Steel Guitar | ChoSteGt | |
| Guitar | 125 Nylon & Steel Guitar | Ny&SteGt |
| Guitar 126 Stereo Steel Guitar StSteGt | ||
| Guitar 127 Steel Guitar Bend GtBend | ||
| Guitar 128 Steel Guitar Harmonics GtHarm | ||
| Guitar 129 Velocity Steel Guitar 1 VelSte1 | ||
| Guitar 130 Velocity Steel Guitar 2 VelSte2 | ||
| Guitar 131 Velocity Steel Guitar 3 VelSte3 | ||
| Guitar 132 Electric Guitar ( jazz) 1 JazzGtr | ||
| Guitar 133 Electric Guitar ( jazz) 2 JazzGt2 | ||
| Guitar 134 Electric Guitar (pedal steel) PedalGtr | ||
| Guitar 135 Mellow Guitar MellGt | ||
| Guitar 136 Velocity Jazz Guitar JazzGtVe | ||
| Guitar 137 Jazz Guitar Detuned JazzGtDt | ||
| Guitar 138 Mid Tone Guitar MidTonGt | ||
| Guitar 139 Electric Guitar (clean) 1 CleanGtr | ||
| Guitar 140 Electric Guitar (clean) 2 CleanGtr2 | ||
| Guitar 141 Stereo Clean Guitar StCleGtr | ||
| Guitar 142 Velocity Clean Guitar CleGtVel | ||
| Guitar 143 Electric Guitar (detuned clean) | DetClnGt | |
| Guitar 144 Electric Guitar (muted velo-sw) | MutVelGt | |
| Guitar 145 Electric Guitar (muted) | MutedGtr | |
| Guitar 146 Electric Guitar (funky cutting) | FunkGt | |
| Guitar 147 Jazz Man | JazzMan | |
| Guitar 148 Stereo Muted Guitar | StMuGt | |
| Guitar 149 Guitar Pinch | GtPinch | |
| Guitar 150 Overdriven Guitar | Overdrive | |
| Guitar 151 Distortion Guitar 1 | DistGt | |
| Guitar 152 Distortion Guitar 2 | DistGtr2 | |
| Guitar 153 Distortion Guitar (with feedback) 1 | FeedbkGt | |
| Guitar 154 Distortion Rhythm Guitar | DistRyth | |
| Guitar 155 5th Distortion | 5thDist | |
| Guitar 156 Stereo Distortion Guitar | StDistor | |
| Guitar 157 Guitar Feedback | GtFedbk | |
| Guitar 158 Guitar Harmonics | GtrHarmo | |
| Bass | 159 Acoustic Bass 1 | AcoBass |
| Bass | 160 Acoustic Bass 2 | AcoBass2 |
| Bass | 161 Jazz Style | JazzSty |
| Bass | 162 A.Bass & Mute G.T. | Ba&GtMu |
| Bass | 163 Resonant Bass | ResBass |
| Bass | 164 Wah Bass 1 | WahBass1 |
| Bass | 165 Electric Bass (finger) 1 | FngrBass |
| Bass | 166 Electric Bass (finger) 2 | FngrBas2 |
| Bass | 167 Electric Bass (finger) 3 | FngrBas3 |
| Bass | 168 Finger Slap Bass FngrSlap | |
| Bass 169 Electric Bass (pick) 1 PickBass | ||
| Bass 170 Electric Bass (pick) 2 PickBas2 | ||
| Bass 171 Fretless Bass 1 Fretless | ||
| Bass 172 Fretless Bass 2 Fretless2 | ||
| Bass 173 Slap Bass 1 SlapBass | ||
| Bass 174 Slap Bass 2 SlapBass2 | ||
| Bass 175 Synth Bass 1 SynBass | ||
| Bass 176 Synth Bass 2 SynBass2 | ||
| Bass 177 Synth Bass 3 (resonance) ResoBass | ||
| Bass 178 Synth Bass 4 (attack) AttackBass | ||
| Bass 179 Synth Bass (warm) WarmBass | ||
| Bass 180 Clavi Bass ClavBass | ||
| Bass 181 Hammer Hammer | ||
| Bass 182 Synth Bass (rubber) RubbBass | ||
| Bass 183 Attack Pulse AttackPls | ||
| Strings & Orchestral Instruments 184 The Violin TheVin | ||
| Strings & Orchestral Instruments 185 Violin 1 Violin | ||
| Strings & Orchestral Instruments 186 Violin 2 Violin2 | ||
| Strings & Orchestral Instruments 187 Violin (slow attack) SlViolin | ||
| Strings & Orchestral Instruments 188 Soft Violin SoftVin | ||
| Strings & Orchestral Instruments 189 Viola 1 Viola | ||
| Strings & Orchestral Instruments 190 Viola 2 Viola2 | ||
| Strings & Orchestral Instruments 191 Cello 1 Cello | ||
| Strings & Orchestral Instruments 192 Cello 2 Cello2 | ||
| Strings & Orchestral Instruments 193 Celloen 16' Celloen | ||
| Strings & Orchestral Instruments 194 Contrabass 1 Contrabs | ||
| Strings & Orchestral Instruments 195 Contrabass 2 Contrbs2 | ||
| Strings & Orchestral Instruments 196 Tremolo Strings 1 TremStr | ||
| Strings & Orchestral Instruments 197 Tremolo Strings 2 TremStr2 | ||
| Strings & Orchestral Instruments 198 Pizzicato Strings 1 PizzStr | ||
| Strings & Orchestral Instruments 199 Pizzicato Strings 2 PizzStr2 | ||
| Strings & Orchestral Instruments 200 Orchestral Harp 1 Harp | ||
| Strings & Orchestral Instruments 201 Orchestral Harp 2 Harp2 | ||
| Strings & Orchestral Instruments 202 Timpani 1 Timpani | ||
| Strings & Orchestral Instruments 203 Timpani 2 Timpani2 | ||
| Ensemble 204 String Ensembles 1 Strings1 | ||
| Ensemble 205 String Ensembles 2 Strings2 | ||
| Ensemble 206 Synth Strings 1 SynStrs1 | ||
| Ensemble 207 Synth Strings 2 SynStrs2 | ||
| Ensemble 208 Synth Strings 3 SynStrs3 | ||
| Ensemble 209 Synth Strings 4 SynStrs4 | ||
| Ensemble 210 Stereo Slow Strings SSlowStr | ||
| Ensemble 211 Strings and Brass Str&Bras | ||
| Ensemble 212 Legato Strings LegatStr | |||
| Ensemble 213 Orchestra Orchstr | |||
| Ensemble 214 60's Strings 60'sStr | |||
| Ensemble 215 Solo Strings SoloStr | |||
| Ensemble 216 Choir Aahs 1 ChoirAah | |||
| Ensemble 217 Choir Aahs 2 ChoirAh2 | |||
| Ensemble 218 Humming Humming | |||
| Ensemble 219 Voice Oohs VoiceOoh | |||
| Ensemble 220 Analog Voice AnaVoice | |||
| Ensemble 221 Synth Voice SynVoice | |||
| Ensemble 222 Bass Hit Plus BassHit | |||
| Ensemble 223 Orchestra Hit 1 OrchHit | |||
| Ensemble 224 Orchestra Hit 2 OrchHi2 | |||
| Ensemble 225 Euro Hit EuroHit | |||
| Ensemble 226 6th Hit 6thHit | |||
| Brass 227 Trumpet 1 | Trumpet | ||
| Brass 228 Trumpet 2 | Trumpet2 | ||
| Brass 229 Trumpet 3 | Trumpet3 | ||
| Brass 230 Dark Trumpet Soft | DarkTrp | ||
| Brass 231 Sweet Trumpet | SweetTp | ||
| Brass 232 Trombone 1 | Trombone | ||
| Brass 233 Trombone 2 | Trmbone2 | ||
| Brass 234 Bright Trombone | BritBone | ||
| Brass 235 Tuba 1 | Tuba | ||
| Brass 236 Tuba 2 | Tuba2 | ||
| Brass 237 Muted Trumpet 1 | MuteTrp1 | ||
| Brass 238 Muted Trumpet 2 | MuteTrp2 | ||
| Brass 239 French Horn 1 | FrHorn | ||
| Brass 240 French Horn 2 (warm) | FrHorn2 | ||
| Brass 241 Brass Section 1 | Brass | ||
| Brass 242 Brass Section 2 (octave mix) | Brass2 | ||
| Brass 243 Brass Section 3 | Brass3 | ||
| Brass 244 Brass Section 4 | Brass4 | ||
| Brass 245 Brass Section 5 | Brass5 | ||
| Brass 246 Brass Band | BrasBand | ||
| Brass 247 Bright Brass Section | BrBraSec | ||
| Brass 248 Brass & Strings | Bras&Str | ||
| Brass 249 Synth Brass 1 | SynBras1 | ||
| Brass 250 Synth Brass 2 | SynBras2 | ||
| Brass 251 Synth Brass 3 | SynBras3 | ||
| Brass 252 Synth Brass 4 | SynBras4 | ||
| Brass 253 Analog Synth Brass 1 | AnaBras1 | ||
| Brass 254 Analog Synth Brass 2 | AnaBras2 | ||
| Brass 255 Jump Brass JumpBras | |||
| Brass 256 Synth Brass & Strings 1 | SyBr&St1 | ||
| Reed 257 Soprano Sax 1 SprnoSax | |||
| Reed 258 Soprano Sax 2 SprnSax2 | |||
| Reed 259 Sweet Soprano Sax Swe SpSax | |||
| Reed 260 Alto Sax AltoSax | |||
| Reed 261 Soft Alto Sax SoftAlto | |||
| Reed 262 Tenor Sax 1 TenorSax | |||
| Reed 263 Tenor Sax 2 TenoSax2 | |||
| Reed 264 Baritone Sax BariSax | |||
| Reed 265 Sweet Oboe SwetOboe | |||
| Reed 266 Oboe 1 Oboe | |||
| Reed 267 English Horn 1 EngHorn | |||
| Reed 268 Bassoon 1 Bassoon | |||
| Reed 269 Clarinet 1 Clarinet | |||
| Reed 270 Clarinet 2 Clarine2 | |||
| Pipe 271 Piccolo Piccolo | |||
| Pipe 272 Flute | Flute | ||
| Pipe 273 Sweet Flute | SweeFlut | ||
| Pipe 274 Recorder | Recorder | ||
| Pipe 275 Sweet Pan Flute | SwPanFu | ||
| Pipe 276 Pan Flute | PanFlute | ||
| Pipe 277 Blown Bottle | Bottle | ||
| Pipe 278 Shakuhachi Shakhchi | |||
| Pipe 279 Whistle 1 | Whistle | ||
| Pipe 280 Whistle 2 | Whistle2 | ||
| Pipe 281 Ocarina | Ocarina | ||
| Synth Lead | 282 Lead 1 (square) | SquareLd | |
| Synth Lead | 283 Square | Square | |
| Synth Lead | 284 Lead 1b (sine) | SineLead | |
| Synth Lead | 285 Square Lead 1 SquarLd1 | ||
| Synth Lead | 286 Lead 1a (square 2) | SquarLd2 | |
| Synth Lead | 287 Lead 2a (sawtooth 2) | SawLead2 | |
| Synth Lead | 288 Lead 2d (sequenced analog) | SquAnaLd | |
| Synth Lead | 289 Lead 2 (sawtooth) | SawLead1 | |
| Synth Lead | 290 | Lead 2b (saw + pulse) | SawPlsLd |
| Synth Lead | 291 | Lead 2c (double sawtooth) | DubSawLd |
| Synth Lead | 292 | Lead 3 (calliope) | CaliopLd |
| Synth Lead | 293 Lead 4 (chiff ) | ChiffLd | |
| Synth Lead | 294 | Lead 5 (charang) | CharanLd |
| Synth Lead | 295 Lead 5a (wire lead) | WireLead | |
| Synth Lead | 296 | Lead 6 (voice) | VoiceLd |
| Synth Lead | 297 Lead 7 (fifths) | FifthsLd | |
| Synth Lead | 298 Lead 8 (bass + lead) | BassLead | |
| Synth Lead | 299 Lead 8a (soft wrl) | SftWrlld | |
| Synth Pad | 300 Pad 1 (new age) | NewAgePd | |
| Synth Pad | 301 New Year Pad | NewYrPd |
| Synth Pad 302 Pad 2 (warm) War mPad | ||
| Synth Pad 303 Pad 2a (sine pad) SinePad | ||
| Synth Pad 304 Pad 3 (polysynth) 1 PolySyPd | ||
| Synth Pad 305 Pad 4 (choir) Choir Pad | ||
| Synth Pad 306 Pad 4a (itopia) ItopiaPd | ||
| Synth Pad 307 Pad 5 (bowed) 1 BowedPad | ||
| Synth Pad 308 Pad 6 (metallic) 1 MetalPad | ||
| Synth Pad 309 Pad 7 (halo) 1 Halo Pad | ||
| Synth Pad 310 Pad 8 (sweep) 1 SweepPad | ||
| Synth Pad 311 FX 1 (rain) FXRain | ||
| Synth Pad 312 FX 2 (soundtrack) Soundtrk | ||
| Synth Pad 313 FX 3a (synth mallet) SynMalet | ||
| Synth Pad 314 FX 3 (cr ystal) Cr ystal | ||
| Synth Pad 315 FX 4 (atmosphere) | Atmosphr | |
| Synth Pad 316 Warm Air | WarmAir | |
| Synth Pad 317 FX 5 (brightness) | Bright | |
| Synth Pad 318 FX 6 (goblins) Goblins | ||
| Synth Pad 319 FX 7 (echoes) 1 | Echoes | |
| Synth Pad 320 FX 7a (echo bell) 1 | EchoBell | |
| Synth Pad 321 FX 7b (echo pan) | EchoPan | |
| Synth Pad 322 FX 8 (sci-fi) | Sci-Fi | |
| Ethnic Misc. | 323 Sitar 1 | Sitar |
| Ethnic Misc. | 324 Sitar 2 (bend) Sitar2 | |
| Ethnic Misc. | 325 Banjo | Banjo |
| Ethnic Misc. | 326 Shamisen | Shamisen |
| Ethnic Misc. | 327 Koto | Koto |
| Ethnic Misc. | 328 | Taisho Koto |
| Ethnic Misc. | 329 Kalimba | Kalimba |
| Ethnic Misc. | 330 Bag Pipe | Bagpipe |
| Ethnic Misc. | 331 Fiddle | Fiddle |
| Ethnic Misc. | 332 Shanai | Shanai |
| Percussive | 333 Tinkle Bell | TnklBell |
| Percussive | 334 Steel Drums | SteelDrm |
| Percussive | 335 Woodblock | WoodBlok |
| SFX | 336 Seashore | Seashore |
| SFX | 337 Thunder Thunder | |
| SFX | 338 Telephone Ring 1 Telephone | |
| SFX | 339 Applause | Applause |
| Combined Voice | 340 Stereo Piano & Strings Pad | StPn&Str |
| Combined Voice | 341 Stereo Piano & Choir | StPn&Cho |
| Combined Voice | 342 Stereo Piano & Synth Strings | StPn&Syn |
| Combined Voice | 343 Stereo Piano & Warm Pad | StPn&Pad |
| Combined Voice | 344 Rock Organ & Strings | RoOr&Str |
| Combined Voice | 345 Steel Guitar & Warm Pad | StGt&Pad |
| Combined Voice 346 Orchestra Orchest | ||
| Combined Voice 347 Full Strings 1 FullStr1 | ||
| Combined Voice 348 Symphonic Symphon | ||
| Chinese Instruments 349 GuZheng GuZheng | ||
| Chinese Instruments 350 PiPa PiPa | ||
| Chinese Instruments 351 ErHu 1 ErHu1 | ||
| Chinese Instruments 352 Bandi Bandi | ||
| Chinese Instruments 353 Hulusi Hulusi | ||
| Chinese Instruments 354 LuSheng 1 LuShen1 | ||
| Chinese Instruments 355 SuoNa SuoNa | ||
| Chinese Instruments 356 PaiXiao PaiXiao | ||
| Drum Set 357 Standard Set | StandSet | |
| Drum Set 358 Room Set | RoomSet | |
| Drum Set 359 Power Set PowerSet | ||
| Drum Set 360 Jazz Set JazzSet |
List der Stile ● Style List
| Genre No. Name Abkürzung | Abbreviation | ||
| 8 BEAT 1 8 Beat Piano 8BtPiano | |||
| 8 BEAT 2 8 Beat 1 8 Beat1 | |||
| 8 BEAT 3 8 Beat Shuffle 8BtShufl | |||
| 8 BEAT 4 Guitar Pop 1 GtPop1 | |||
| 8 BEAT 5 8 Beat Hip Hop 8BtHiHop | |||
| 8 BEAT 6 8 Beat R&B 8BeatR&B | |||
| 8 BEAT 7 8 Beat Pop 8BtPop | |||
| 8 BEAT 8 Pop Funk 1 PopFunk1 | |||
| 8 BEAT 9 Rhythm & Beat 1 Rhy&Bt1 | |||
| 8 BEAT 10 8 Beat Disco 1 8BtDisc1 | |||
| 8 BEAT 11 8 Beat Rock 8BtRock | |||
| 8 BEAT 12 8 Beat 2 8Bt2 | |||
| 8 BEAT 13 Sweet Beat | SweetBt | ||
| 8 BEAT 14 8 Beat Dance | 8BtDance | ||
| 8 BEAT 15 8 Beat 3 8Bt3 | |||
| 8 BEAT 16 60's 8 Beat 60's8Bt | |||
| 16 BEAT | 17 16 Beat 1 | 16Beat1 | |
| 16 BEAT | 18 16 Beat Funk 1 | 16BtFuk1 | |
| 16 BEAT | 19 16 Beat Ballad 1 | 16BtBld1 | |
| 16 BEAT | 20 16 Beat R&B | 16BtR&B | |
| 16 BEAT | 21 Pop 16 Beat 1 Pop16Bt1 | ||
| 16 BEAT | 22 16 Beat Dance | 16BDanc | |
| 16 BEAT | 23 16 Beat 2 | 16Beat2 | |
| 16 BEAT | 24 Modern 16 Beat | Modrn16B | |
| 16 BEAT | 25 16 Beat Hot | 16BtHot | |
| 16 BEAT | 26 16 Beat Modern | 16BtModr | |
| 16 BEAT | 27 16 Beat 3 | 16Beat3 | |
| 16 BEAT | 28 Cool Beat | CoolBeat | |
| 16 BEAT | 29 16 Beat Ballad 2 | A6BtBld2 | |
| 16 BEAT | 30 16 Beat 4 | 16Beat4 | |
| 16 BEAT | 31 Pop Shuffle PopShufl | ||
| POP | 32 Pop Rock 1 | PopRock1 | |
| POP | 33 Pop Dance 1 PopDanc1 | ||
| POP | 34 Pop Fusion | PopFusn | |
| POP | 35 Analog Night 1 | AnalgNt1 | |
| POP | 36 6/8 Pop | 6/8Pop | |
| POP | 37 Brit. Pop 1 | BritPop1 | |
| POP | 38 Brit. Pop 2 | BritPop2 | |
| POP | 39 Pop Hit | PopHit | |
| POP | 40 Fusion Shuffle | FusShufl | |
| POP | 41 Pop Beat | PopBeat | |
| POP | 42 Soft Beat | SoftBeat | |
| POP | 43 60's Pop | 60'sPop | |
| POP | 44 Sting Latin | StigLatn | |
| BALLAD 45 R&B Ballad 1 R&BBad1 | ||
| BALLAD 46 Guitar Ballad GtBallad | ||
| BALLAD 47 Ballad Rock BalladRk | ||
| BALLAD 48 Piano pop PianoPop | ||
| BALLAD 49 Soft Ballad SoftBald | ||
| BALLAD 50 Natural Ballad NatuBld | ||
| BALLAD 51 Love Ballad LoveBld | ||
| BALLAD 52 Easy Ballad EasyBld | ||
| BALLAD 53 Slow Ballad SlowBald | ||
| BALLAD 54 Folk Ballad FolkBld | ||
| BALLAD 55 Pop Ballad 1 PopBld1 | ||
| BALLAD 56 EP Ballad EPBallad | ||
| ROCK 57 Rock Rock | ||
| ROCK 58 New Wave | NewWave | |
| ROCK 59 Ska | Ska | |
| ROCK 60 Slow Rock | SlowRock | |
| ROCK 61 70's Rock & Roll | 70's Rock | |
| ROCK 62 Folk Rock | FolkRock | |
| ROCK 63 Soft Rock | SoftRock | |
| ROCK 64 Easy Rock | EasyRock | |
| ROCK 65 New Shuffle | NewShufl | |
| ROCK 66 Rock Hip Hop | RkHipHop | |
| ROCK 67 Rock & Roll 1 R'N'R1 | ||
| ROCK 68 Rock & Roll 2 R'N'R2 | ||
| BALLROOM | 69 Tango 1 | Tango1 |
| BALLROOM | 70 Spain Matador Matador | |
| BALLROOM | 71 Twist 1 Twist1 | |
| BALLROOM | 72 Big Band Fox BandFox | |
| BALLROOM | 73 Tango 2 | Tango2 |
| BALLROOM | 74 Slow Fox SlowFox | |
| BALLROOM | 75 Slow Waltz 1 SlowWlz1 | |
| BALLROOM | 76 Swing Fox SwingFox | |
| BALLROOM | 77 Salsa 1 Salsa1 | |
| BALLROOM | 78 Cha Cha 1 ChaCha1 | |
| BALLROOM | 79 Cha Cha 2 ChaCha2 | |
| BALLROOM | 80 Beguine 1 Beguine1 | |
| BALLROOM | 81 Beguine 2 Beguine2 | |
| BALLROOM | 82 Rumba 1 Rumba1 | |
| BALLROOM | 83 Samba 1 Samba1 | |
| BALLROOM | 84 Jive Jive | |
| BALLROOM | 85 Fox Trot | FoxTrot |
| DANCE | 86 Techno 1 | Techno1 |
| DANCE | 87 Hip Hop 1 HipHop1 | |
| DANCE | 88 Dream Dance DrmDance | |
| DANCE | 89 House House | |
| DANCE | 90 Down Beat DownBeat | |
| DANCE | 91 Progressive Progress | |
| DANCE 92 Rap 1 Rap1 | ||
| DANCE 93 Disco Disco | ||
| DANCE 94 Soft Disco SoftDisc | ||
| DANCE 95 Disco Party DscParty | ||
| DANCE 96 70's Disco 70'sDisc | ||
| DANCE 97 Club Dance ClubDanc | ||
| DANCE 98 Euro Dance EuroDanc | ||
| DANCE 99 Hip Hop 2 HipHop2 | ||
| SOUL & FUNK 100 Funk 1 Funk1 | ||
| SOUL & FUNK 101 Classic Funk ClasFunk | ||
| SOUL & FUNK 102 Gospel Swing GopSwing | ||
| SOUL & FUNK 103 Gospel Gospel | ||
| SOUL & FUNK 104 Funk 2 Funk2 | ||
| SOUL & FUNK 105 Electric Funk ElecFunk | ||
| SOUL & FUNK 106 Groove Funk GrooveFk | ||
| SOUL & FUNK 107 Cool Funky ColFunky | ||
| SOUL & FUNK 108 Jazz Funk JazzFunk | ||
| SOUL & FUNK 109 Groove | Groove | |
| SOUL & FUNK 110 Soul | Soul | |
| SOUL & FUNK 111 Hip Hop Beat HipHopBt | ||
| SOUL & FUNK 112 R&B | R&B | |
| SOUL & FUNK 113 Soul Beat | SoulBeat | |
| SWING & JAZZ 114 Latin Jazz 1 LatinJz1 | ||
| SWING & JAZZ 115 Big Band | BigBand | |
| SWING & JAZZ 116 Dixieland 1 Dixland1 | ||
| SWING & JAZZ 117 Broadway Big Bang | BwayBand | |
| SWING & JAZZ 118 Swing | Swing | |
| SWING & JAZZ 119 Latin Jazz 2 LatinJz2 | ||
| SWING & JAZZ 120 Fusion | Fusion | |
| SWING & JAZZ 121 Acid Jazz | AcidJazz | |
| SWING & JAZZ 122 Cool Jazz Ballad | CoolJzBd | |
| SWING & JAZZ 123 Swing Shuffle | SwingSfl | |
| SWING & JAZZ 124 Big Band Medium | BandMid |
Liste der Lider ● Song List
| GenreClassify | Nr.No. | Name Abkürzung | Abbreviation |
| FOLK & COUNTRY 1 Jambalaya Jambalaya | |||
| FOLK & COUNTRY 2 Ding! Dong! Merril on High DingDong | |||
| FOLK & COUNTRY 3 Battle Hymne of the Republic Battle | |||
| FOLK & COUNTRY 4 The Old Gray Mare GrayMare | |||
| FOLK & COUNTRY 5 American Patrol USPatrol | |||
| FOLK & COUNTRY 6 Christmas is Coming IsComing | |||
| FOLK & COUNTRY 7 Sippin/Cider through a Stray SCTStraw | |||
| FOLK & COUNTRY 8 Christmas Sound Sound | |||
| GOLDEN & POP 9 On London Bridge LdBridge | |||
| GOLDEN & POP 10 Are You Lonesome Tonight Lonesome | |||
| GOLDEN & POP 11 Der Deitcher's Dog DerDDog | |||
| GOLDEN & POP 12 Joy to the World JoyWordl | |||
| GOLDEN & POP 13 Silent Night Sltnight | |||
| GOLDEN & POP 14 Ave Maria AveMaria | |||
| GOLDEN & POP 15 Five Hundred Miles FHMiles | |||
| GOLDEN & POP 16 Happy New Year HappyNY | |||
| GOLDEN & POP 17 It's beginning to look a lot like Christmas | LikeXmas | ||
| GOLDEN & POP 18 Jeanie with the light brown hair LightHair | |||
| GOLDEN & POP 19 My Bonnie MyBonnie | |||
| GOLDEN & POP 20 Song oft he Pearlfisher SongOfTP | |||
| CLASSICAL | 21 Swan | Swan | |
| CLASSICAL | 22 Prelude to Act 2 (Swan Lake) SwanLak1 | ||
| CLASSICAL | 23 Valse (Swan Lake) SwanLak2 | ||
| CLASSICAL | 24 The Happy Farmer HpFarmer | ||
| CLASSICAL | 25 The Sleeping Beauty SleepBty | ||
| CLASSICAL | 26 La Traviata | LaTravia | |
| CLASSICAL | 27 Wiegenlied Wiegenli | ||
| CLASSICAL | 28 Mov.2 Adagio Non Troppo Piano Sonata No. 9 D | Sonata 9 | |
| CLASSICAL | 29 Mov.1 Andante Grazioso Piano Sonata No. 11 in A | Sonata 11 | |
| CLASSICAL | 30 Prelude in C Prelude | ||
| CLASSICAL | 31 Chinese Dance CHDance | ||
| CLASSICAL | 32 Emperors Waltz EmprWaltz | ||
| CLASSICAL | 33 March Militaire MilMar1 | ||
| CLASSICAL | 34 Symphony No.40 Symphony | ||
| JAZZ & FUSION | 35 ShanZhaShu ShanZaS | ||
| JAZZ & FUSION | 36 You are my sunshine | MySun | |
| JAZZ & FUSION | 37 June Samba JunSamba | ||
| JAZZ & FUSION 38 Funk Funk | |||
| JAZZ & FUSION 39 I Can... I Can... | |||
| JAZZ & FUSION 40 Sea Shore SeaShore | |||
| JAZZ & FUSION 41 Guitar & Saxphone Gt&Sax | |||
| JAZZ & FUSION 42 The Hip Hop's Night HipHopNt | |||
| JAZZ & FUSION 43 Blue Lunch BlueLunch | |||
| JAZZ & FUSION 44 Cobweb Cobweb | |||
| JAZZ & FUSION 45 Wine Wine | |||
| JAZZ & FUSION 46 Jazz Old Man JzOldMan | |||
| JAZZ & FUSION 47 Dark Eyes DarkEyes | |||
| JAZZ & FUSION 48 Carlos Carlos | |||
| JAZZ & FUSION 49 Sad | Sad | ||
| JAZZ & FUSION 50 The Jazz | TheJazz | ||
| PIANO | 51 Für Elise | FürElise | |
| PIANO | 52 Military March | Mmarch | |
| PIANO | 53 Habanera Habanera | ||
| PIANO | 54 Minuet | Minuet | |
| PIANO | 55 Austria Variation | Avariati | |
| PIANO | 56 Old Macdonald had a Farm | OldAFarm | |
| PIANO | 57 Wedding March | Wedding | |
| PIANO | 58 2-Part Invention #13 In A Minor. B.W. lii | Invention | |
| PIANO | 59 Minuet in G | MinuetG | |
| PIANO | 60 | Turkish March | TurkishM |
| PIANO | 61 Hey Diddle Diddle | HeDiddle | |
| PIANO | 62 Italian Polka | ItaPolka | |
| PIANO | 63 Moseta Dance | MosetaDn | |
| PIANO | 64 Bulie Dance | BulieDn | |
| PIANO | 65 Waltz in A Flat Op.39 No. 15 | Waltz 1 | |
| PIANO | 66 Wild Rose WildRose | ||
| PIANO | 67 Away in A Manger | AwayInAM | |
| PIANO | 68 Jack & Jill | JackJill | |
| PIANO | 69 Angels We Have Heard on High | Angels | |
| PIANO | 70 Waltz | Waltz | |
| PIANO | 71 Did you ever see a Lassie | Lassie | |
| PIANO | 72 Chopsticks Chopstick | ||
| PIANO | 73 Four Little Swans | FLSwans | |
| PIANO | 74 Old France | OldFrance | |
| PIANO | 75 Jesus Saviour pilot Me | PilotMe | |
| PIANO | 76 Eclogue | Eclogue | |
| PIANO | 77 Santa Claus is coming to towen | SantaCT | |
| PIANO | 78 Brave Cavalier | Cavalier | |
| PIANO | 79 America The Beautiful | USFair | |
| PIANO | 80 Music Box Dancer | Dancer | |