Etude 61 MK II - MIDI Keyboard Schubert - Free user manual and instructions
Find the device manual for free Etude 61 MK II Schubert in PDF.
User questions about Etude 61 MK II Schubert
0 question about this device. Answer the ones you know or ask your own.
Ask a new question about this device
Download the instructions for your MIDI Keyboard in PDF format for free! Find your manual Etude 61 MK II - Schubert and take your electronic device back in hand. On this page are published all the documents necessary for the use of your device. Etude 61 MK II by Schubert.
USER MANUAL Etude 61 MK II Schubert
text_image
QR code image containing encoded data, no visible human-readable textINHALTSVERZEICHNIS
Technische Daten 4
text_image
Wood Block L Hand Clap Hi-Hat Open Hi-Hat Closed Snare L Bongo L Bass Drum H Soft Bass Drum L| 00 | Acoustic Grand Piano | 60 | French Horn | 120 | Guitar Fret Noise | 180 | Bright Violin | 240 | Psychedelic Synth Lead |
| 01 | Bright Acoustic Piano | 61 | Brass Section | 121 | Breath Noise | 181 | Stringed violin | 241 | Vibraphone Synth Lead |
| 02 | Electric Grand Piano | 62 | Synth Brass 1 | 122 | Seashore | 182 | Trill violin | 242 | Marimba Synth Lead |
| 03 | Honky-tonk Piano | 63 | Synth Brass 2 | 123 | Bird Tweet | 183 | Electronic violin | 243 | Metal FX |
| 04 | Rhodes Piano | 64 | Soprano Sax | 124 | Telephone Ring | 184 | Rock violin | 244 | Electronic FX |
| 05 | Chorused Piano | 65 | Alto Sax | 125 | Helicopter | 185 | Rhythm Orchestra | 245 | Electronic String Ensenbci |
| 06 | Harpsichord | 66 | Tenor Sax | 126 | Applause | 186 | Pizzicato Violin | 246 | Wind FX |
| 07 | Clavichord | 67 | Baritone Sax | 127 | Gunshot | 187 | Pizzicato Ensemble 1 | 247 | Clarinet FX |
| 08 | Celesta | 68 | Oboe | 128 | Percussion | 188 | Pizzicato Ensemble 2 | 248 | Organ FX |
| 09 | Glockenspiel | 69 | English Horn | 129 | Rhythm electric Piano | 189 | Percussion band | 249 | Crystal FX |
| 10 | Music box | 70 | Bassoon | 130 | Baritone Xylophone | 190 | Baritone Synth Contrabass | 250 | Synth Shamisen |
| 11 | Vibraphone | 71 | Clarinet | 131 | Glass instrument | 191 | Bass Flute | 251 | Electronic Shamisen |
| 12 | Marimba | 72 | Piccolo | 132 | Bright Dulcimer | 192 | Distortion Contrabass | 252 | Bright Sitar |
| 13 | Xylophone | 73 | Flute | 133 | Rhythm Grand Piano | 193 | Contrabass Lead | 253 | Whistle Accord |
| 14 | Tubular Bells | 74 | Recorder | 134 | Traditional Piano | 194 | Violin Lead | 254 | rhythm Nation |
| 15 | Dulcimer | 75 | Pan Flute | 135 | Aluminium jean | 195 | Cello Lead | 255 | Bright Koto |
| 16 | Hammond Organ | 76 | Bottle Blow | 136 | Rock Grand Piano | 196 | Pizzicato rhythm | 256 | Koto Lead |
| 17 | Percussive Organ | 77 | Shakuhachi | 137 | Electronic organ | 197 | high Harp | 257 | Diplophonia Koto |
| 18 | Rock Organ | 78 | Whistle | 138 | Psychedelic electronic | 198 | Harp ensemble | 258 | Baritone Koto |
| 19 | Church Organ | 79 | Ocarina | 139 | Water jean | 199 | Synth Harp | 259 | Synth Koto |
| 20 | Reed Organ | 80 | Lead 1 (square) | 140 | Bright Guitar | 200 | Baritone Trumpet | 260 | Environmental Lead |
| 21 | Accordian | 81 | Lead 2 (sawtooth) | 141 | Orchestra piccolo | 201 | Trumpet ensemble | 261 | Metal Lead |
| 22 | Harmonica | 82 | Lead 3 (caliope lead) | 142 | Heavy metal guitar | 202 | Rhythm Trumpet | 262 | Orchestra Lead |
| 23 | Tango Accordian | 83 | Lead 4 (chiff lead) | 143 | Crystal guitar | 203 | High Trumpet | 263 | Glockenspiel Lead |
| 24 | Acoustic Guitar (nylon) | 84 | Lead 5 (charang) | 144 | Queer electric Piano | 204 | Synth Trumpet | 264 | Bass Lead |
| 25 | Acoustic Guitar (steel) | 85 | Lead 6 (voice) | 145 | Bright bass | 205 | Baritone Trombone | 265 | Fifths Lead |
| 26 | Electric Guitar (jazz) | 86 | Lead 7 (fifths) | 146 | Rock Electric Bass | 206 | Trombone ensemble | 266 | Wind Lead |
| 27 | Electric Guitar (clean) | 87 | Lead 8 (bass+lead) | 147 | Rhythm Electric Bass | 207 | Rhythm Trombone | 267 | Atmosphere Lead |
| 28 | Electric Guitar (muted) | 88 | Pad 1 (new age) | 148 | Psychedelic Bass | 208 | High Trombone | 268 | Sharp Lead |
| 29 | Overdriven Guitar | 89 | Pad 2 (warm) | 149 | Heavy metal bass | 209 | Mediant Trombone | 269 | Bright Lead |
| 30 | Distortion Guitar | 90 | Pad 3 (polysynth) | 150 | Magic electronic | 210 | Synth Trombone | 270 | East Nation Pad |
| 31 | Guitar Harmonics | 91 | Pad 4 (choir) | 151 | Bright violin | 211 | Violin French Horn | 271 | Atmosphere Pad |
| 32 | Acoustic Bass | 92 | Pad 5 (bowed) | 152 | Atonic violin | 212 | French Horn ensemble | 272 | Clear Pad |
| 33 | Electric Bass(finger) | 93 | Pad 6 (metallic) | 153 | Heavy bass orchestra | 213 | Electronic French Horn | 273 | Electric Piano Pad |
| 34 | Electric Bass (pick) | 94 | Pad 7 (halo) | 154 | Synth clarinet | 214 | Synth French Horn | 274 | Clean Guitar Pad |
| 35 | Fretless Bass | 95 | Pad 8 (sweep) | 155 | Interactive Lead | 215 | Psychedelic Synth Brass | 275 | Western Pad |
| 36 | Slap Bass 1 | 96 | FX 1 (rain) | 156 | For the keyboard | 216 | Distortion Synth Brass | 276 | Sci-fi Pad |
| 37 | Slap Bass 2 | 97 | FX 2 (soundtrack) | 157 | Bagpipes | 217 | Vibraphone Synth Brass | 277 | Metal Sci-fi Pad |
| 38 | Synth Bass 1 | 98 | FX 3 (crystal) | 158 | Suona | 218 | Rock Synth Brass | 278 | Clarinet Pad |
| 39 | Synth Bass 2 | 99 | FX 4 (atmosphere) | 159 | Pipa | 219 | Synth Muted Trumpet | 279 | Electronic dance Pad |
| 40 | Violin | 100 | FX 5 (brightness) | 160 | Church Piano | 220 | Soprano Sax ensemble | 280 | Psychedelic electronic |
| 41 | Viola | 101 | FX 6 (goblins) | 161 | Church electric Piano | 221 | rhythm Soprano Sax | 281 | Double Kalimba |
| 42 | Cello | 102 | FX 7 (echoes) | 162 | Synth Piano | 222 | Synth Soprano Sax | 282 | Bright Kalimba |
| 43 | Contrabass | 103 | FX 8 (sci-fi) | 163 | Baritone Piano | 223 | National Sax | 283 | Crystal Kalimba |
| 44 | Tremolo Strings | 104 | Sitar | 164 | Piano PAD | 224 | Metal Sax | 284 | Synth Kalimba |
| 45 | Pizzicato Strings | 105 | Banjo | 165 | String Piano | 225 | Baritone Sax ensemble | 285 | Wind Bagpipe |
| 46 | Orchestral Harp | 106 | Shamisen | 166 | Metal Piano | 226 | Crystal Sax | 286 | high Bagpipe |
| 47 | Timpani | 107 | Koto | 167 | Light rhythm Piano | 227 | Soft Baritone Sax | 287 | Orchestra Bagpipe |
| 48 | String Ensemble 1 | 108 | Kalimba | 168 | electric Piano Pad | 228 | Synth Baritone Sax | 288 | Bright Bagpipe |
| 49 | String Ensemble 2 | 109 | Bagpipe | 169 | Classical piano | 229 | Heavy metal Sax | 289 | Baritone Bagpipe |
| 50 | Synth Strings 1 | 110 | Fiddle | 170 | Guitar organ | 230 | Church Oboe | 290 | Slap Bagpipe |
| 51 | Synth Strings 2 | 111 | Shanai | 171 | An electric guitar | 231 | Bass Oboe | 291 | Environmental Shanai |
| 52 | Choir Aahs | 112 | Tinkle Bell | 172 | synthesis Nylon Guitar | 232 | Bright Oboe | 292 | Mediant Shanai |
| 53 | Voice Oohs | 113 | Agogo | 173 | Synthetic electronic guitar | 233 | Bright Oboe | 293 | Baritone Shanai |
| 54 | Synth Voice | 114 | Steel Drums | 174 | Bright clean Guitar | 234 | Distortio oboe | 294 | Synth Shanai |
| 55 | Orchestra Hit | 115 | Woodblock | 175 | Orchestra Guitar | 235 | English Horn ensemble | 295 | high Shanai |
| 56 | Trumpet | 116 | Taiko Drum | 176 | Psychedelic Guitar | 236 | Pizzicato English Horn | 296 | Bright Steel Drums |
| 57 | Trombone | 117 | Melodic Tom | 177 | Bright organ | 237 | Diplophonia English Horn | 297 | Lyric Steel Drums |
| 58 | Tuba | 118 | Synth Drum | 178 | Pick organ | 238 | Bright English Horn | 298 | Orchestra Steel Drums |
| 59 | Muted Trumpet | 119 | Reverse Cymbal | 179 | Synth accordion | 239 | Synth English Horn | 299 | Synth Steel Drums |
TABELLE DER RHYTHMEN
| 00 | Beat 1 | 60 | Country3 | 120 | India samba1 | 180 | Jump Blues | 240 | Western Swing |
| 01 | Beat 2 | 61 | Country4 | 121 | India samba2 | 181 | New Orleans Blues | 241 | Alt-Country |
| 02 | Beat 3 | 62 | Country waltz1 | 122 | Jazz soul | 182 | New York Blues | 242 | Americana |
| 03 | Beat 4 | 63 | Country waltz2 | 123 | Country swing1 | 183 | Piano Blues | 243 | Charanga |
| 04 | Beat 5 | 64 | Country5 | 124 | Country swing2 | 184 | Soul Blues | 244 | Tropical |
| 05 | Beat 6 | 65 | Country6 | 125 | Country swing3 | 185 | Urban Blues | 245 | Ambient |
| 06 | Beat 7 | 66 | Country7 | 126 | Pop waltz | 186 | Afro Beat | 246 | Punk Metal |
| 07 | Beat 8 | 67 | Slow country1 | 127 | Pop classic | 187 | Afro Pop | 247 | Experimental Rock |
| 08 | Beat 9 | 68 | Slow country2 | 128 | OrientalBeat1 | 188 | Celtic Pop | 248 | Noise-Rock |
| 09 | Beat 10 | 69 | Soul country | 129 | OrientalBeat2 | 189 | Hawaiian Pop | 249 | Celtic New Age |
| 10 | Beat 11 | 70 | Baiao | 130 | OrientalBeat3 | 190 | Indian Pop | 250 | Ethnic Fusion |
| 11 | Beat 12 | 71 | Bequine | 131 | OrientalBeat4 | 191 | European Traditions | 251 | Techno-Tribal |
| 12 | Beat 13 | 72 | Bolero | 132 | OrientalBeat5 | 192 | World Fusion | 252 | Experimental |
| 13 | Beat 14 | 73 | Bossanoval | 133 | OrientalBeat6 | 193 | Dou Jin | 253 | Minimalism |
| 14 | Rock 1 | 74 | Lambada | 134 | OrientalBeat7 | 194 | Shima Uta | 254 | Traditional Pop |
| 15 | Rock 2 | 75 | Mambo | 135 | OrientalBeat8 | 195 | Enka | 255 | Noise |
| 16 | Cntr Rock | 76 | Samba | 136 | OrientalBeat9 | 196 | Japanese Folk Music | 256 | Classical beat1 |
| 17 | Country Rock | 77 | Reggae | 137 | OrientalBeat10 | 197 | Middle East Pop | 257 | Classical beat2 |
| 18 | Dance Rock | 78 | Rhumba | 138 | OrientalBeat11 | 198 | Pop baiao | 258 | Classical beat3 |
| 19 | Easy Rock | 79 | Tango | 139 | OrientalBeat12 | 199 | Pop bequine | 259 | Classical beat4 |
| 20 | Glam Rock | 80 | Habanera | 140 | OrientalBeat13 | 200 | New Age Latin | 260 | Classical beat5 |
| 21 | Hard Rock1 | 81 | March1 | 141 | OrientalBeat14 | 201 | New bossanoval | 261 | Classical beat6 |
| 22 | Hard Rock2 | 82 | March2 | 142 | Jazz Rock1 | 202 | Rock lambada | 262 | Classical beat7 |
| 23 | Pop Rock | 83 | Polka1 | 143 | Jazz Rock2 | 203 | Bluse mambo | 263 | Classical beat8 |
| 24 | Rock+Roll | 84 | Polka2 | 144 | Soft Rock | 204 | Pop samba | 264 | Classical beat9 |
| 25 | Rock Beat | 85 | Polka3 | 145 | Classic Rock | 205 | Reggae Ballad | 265 | Classical beat10 |
| 26 | Rock Folk | 86 | Vallenato | 146 | Folkrock1 | 206 | Pop Rhumba | 266 | Classical beat1 1 |
| 27 | Rocky Pop | 87 | Waltz1 | 147 | Folkrock2 | 207 | Rock Tango | 267 | Classical beat1 2 |
| 28 | Dance 1 | 88 | Waltz2 | 148 | Waltz Rock | 208 | Britpop1 | 268 | Classical beat1 3 |
| 29 | Dance 2 | 89 | Waltz3 | 149 | Heavy metal rock1 | 209 | Britpop2 | 269 | Classical beat1 4 |
| 30 | Dance 3 | 90 | Pop | 150 | Heavy metal rock2 | 210 | Britpop3 | 270 | Contemporary R&b1 |
| 31 | Dance 4 | 91 | Love ballad | 151 | 70' Rock | 211 | Britpop4 | 271 | Contemporary R&b2 |
| 32 | Dance 5 | 92 | Easy Beat | 152 | 80' Rock | 212 | Trip Hop1 | 272 | Contemporary R&b3 |
| 33 | Dance 6 | 93 | Soft Beat | 153 | Middle Eastern rock | 213 | Trip Hop2 | 273 | Contemporary R&b4 |
| 34 | Dance 7 | 94 | Shuffle | 154 | Traditional Rock | 214 | Chamber pop | 274 | Contemporary R&b5 |
| 35 | Dance 8 | 95 | Cobmo | 155 | Rock Disco | 215 | Britpopwaltz1 | 275 | Deep Funk |
| 36 | Dance 9 | 96 | Shuffle1 | 156 | Modern dance1 | 216 | Britpopwaltz2 | 276 | Doo Wop |
| 37 | Dance 10 | 97 | Shuffle2 | 157 | Modern dance2 | 217 | Britpopwaltz3 | 277 | Left-Field Hip-Hop |
| 38 | Soul funk | 98 | Slow folk | 158 | Modern dance3 | 218 | Classical ballad1 | 278 | Motown |
| 39 | Euro soul | 99 | Step | 159 | Modern dance4 | 219 | Classical ballad2 | 279 | Neo-Soul1 |
| 40 | Funky soul1 | 100 | Euro pop | 160 | Modern dance5 | 220 | Light Ballad | 280 | Neo-Soul2 |
| 41 | Funky soul2 | 101 | Bachata beat1 | 161 | New century1 | 221 | Rhythm Ballad | 281 | Neo-Soul3 |
| 42 | Funky soul3 | 102 | Bachata beat2 | 162 | New century2 | 222 | Hard House | 282 | New Jack Swing |
| 43 | Funky soul4 | 103 | Africa bossanova | 163 | New century3 | 223 | Deep House | 283 | Urban |
| 44 | Funky soul5 | 104 | China dance | 164 | RockDance1 | 224 | Acid House | 284 | Contemporary Instrumental |
| 45 | Slow soul1 | 105 | Pop beat | 165 | RockDance2 | 225 | Progressive House | 285 | Meditation |
| 46 | Slow soul2 | 106 | Vienna waltz | 166 | Psyche delic 1 | 226 | Epic House | 286 | Neo-Classical1 |
| 47 | Soul | 107 | Africa beat | 167 | Psyche delic 2 | 227 | Trible House | 287 | Neo-Classical2 |
| 48 | big band1 | 108 | Africa mambo | 168 | Soft Rock | 228 | Big Beat | 288 | Neo-Classical3 |
| 49 | big band2 | 109 | Euro march1 | 169 | Post Rock | 229 | Down tempo | 289 | New Acoustic |
| 50 | blue grass | 110 | Euro march2 | 170 | Goth Psychedelic ic | 230 | Electro1 | 290 | Solo Instrumental |
| 51 | jazz samba | 111 | Euro merengue1 | 171 | Soul Psychedelic 1 | 231 | Electro2 | 291 | Space |
| 52 | jazz waltz | 112 | Euro merengue2 | 172 | Soul Psychedelic 2 | 232 | Electro3 | 292 | Spiritual |
| 53 | Jazz1 | 113 | Middle East dance | 173 | Soul Psychedelic 3 | 233 | House dance | 293 | Rock New Age |
| 54 | Jazz2 | 114 | Africa dance | 174 | Soul Psychedelic 4 | 234 | Idm | 294 | Ragtime |
| 55 | Swing1 | 115 | Pop samba1 | 175 | Soul Psychedelic 1 | 235 | Jungle Drum | 295 | Bebop or Bop |
| 56 | Swing2 | 116 | Pop samba2 | 176 | Country Blues | 236 | Techno | 296 | Cool jazz |
| 57 | Swing3 | 117 | Africa reggae | 177 | Electric Blues | 237 | Trance | 297 | Free jazz |
| 58 | Country1 | 118 | Euro rhumba1 | 178 | Folk Blues | 238 | Trip-Hop | 298 | Jazz-Rock & Fusion |
| 59 | Country2 | 119 | Euro rhumba2 | 179 | Jazz Blues | 239 | Experimental Electronic | 299 | Jazz Funk |
TABELLE DER DEMOS
| 00 | London Bridge Is Falling Down | 17 | Hand in hand | 34 | Prom queen |
| 01 | Fantasy | 18 | Two hundred and fourteen | 35 | Ni Mengruoze |
| 02 | The twist | 19 | Fkey | 36 | Nen blauen Donau |
| 03 | Butter fly | 20 | Mozart Symphonies | 37 | Hawthorn |
| 04 | Paddle a canoe | 21 | The girl's Prayer | 38 | Mary had a little lamb |
| 05 | Country songs | 22 | Nocturne | 39 | Yellow ribbon |
| 06 | Rhythm of the rain | 23 | Another day in paradise | 40 | Toreador Song |
| 07 | Serenade | 24 | Red River Valley | 41 | Radetzky march |
| 08 | Bluegrass Music | 25 | Green sleeves | 42 | Radiant |
| 09 | Music moment | 26 | Mozart Piano Sonatas | 43 | Long Long Ago |
| 10 | Merry Christmas | 27 | Orange and lemon | 44 | Katyusha |
| 11 | American Patrol | 28 | Hallelujah | 45 | Susanna |
| 12 | Flower | 29 | Minuet | 46 | Little star |
| 13 | Pour Elise | 30 | Handshake | 47 | I Don't Care |
| 14 | Direct seeding | 31 | Rain | 48 | Minuet in G major |
| 15 | Turkey March | 32 | Pamela | 49 | Carman Overture |
| 16 | A cradle | 33 | Bnnie Edgar |
FEHLERBEHEBUNG
Member of Berlin Brands Group
Handwerkerstr. 11
15366 Dahlwitz-Hoppegarten
Deutschland
natural_image
Symbol of a trash bin crossed with a diagonal line, no text or numbers presentBerlin Brands Group UK Ltd
PO Box 1145
Oxford, OX1 9UW
United Kingdom
Dear customer,
Congratulations on the purchase of your device. Please read the following instructions carefully and follow them to prevent potential damage. We accept no liability for damage caused by disregarding the instructions and improper use. Please scan the QR code to access the latest operating instructions and further information about the product.

text_image
QR code image containing encoded data, no visible human-readable textCONTENTS
Technical Data 24
Safety Instructions 25
Buttons and Connections 26
Before Use 27
Operation 28
Effect and Control 29
Rhythm Accompaniment and its Functions 31
Automatic Accompaniment 32
Cleaning and Care 34
Table of Instruments 35
Table of Rhythms 36
Table of Demos 38
Troubleshooting 39
Disposal Considerations 40
Manufacturer & Importer (UK) 40
TECHNICAL DATA
| Article number 10033244, 10033245 | |
| Keyboard 61-key standard piano keyboard | |
| Display LED display | |
| Sounds 300 different sounds | |
| Rhythms 300 different accompaniments | |
| Demo 50 demo songs | |
| Drums 8 drums | |
| Effects Sustain, vibrato, offset | |
| Recording Recording, playback | |
| Programming Rhythm programming function | |
| Accompaniment Start/stop, synchronise, fill, speed | |
| Chord Single finger, fingers | |
| Learning function Demo songs, guide | |
| Other On/off switch, overall volume, | accompaniment volume |
| External connections Power connector, headphone output, audio output L/R | |
| Power supply unit | AC 220 V, DC 9 V |
| DC voltage input | DC 9 V |
SAFETY INSTRUCTIONS
- Read the user manual carefully before using the device to avoid damage to property and/or personal injury.
- Only connect the device to an electrical outlet using the provided AC adapter. Using other power adapters could damage your device.
- Never open the case of the instrument.
- Do not attempt to disassemble the device or replace any internal parts yourself. If malfunctions occur during use, stop using the device and contact customer service.
- Do not place the device in places subject to extreme dust, vibration, low or high temperatures (such as places exposed to direct sunlight or near heat sources), as this may damage both the external appearance and the internal components of the device.
- Never place the device on an unstable or uneven surface, as this could cause it to tip over or fall and become damaged.
- Never place containers filled with liquid on the device, as they could fall over and the liquid could get inside the device.
- Before turning on the device, turn the volume down to 0. Then gradually adjust the volume to avoid damaging the speakers.
- To avoid hearing loss from playing, never turn the volume up to "maximum".
- Never use extreme force against the device, keys, power button, or connectors, or place heavy objects on the device.
- The device must be unpacked by an adult as the packaging materials present a choking hazard for babies and small children. Store the plastic packaging in a safe place or dispose of it properly.
- The small components inside may pose a hazard to children under 3 years of age and are not suitable for them.
- The technical characteristics of the device are subject to change without prior notice.
- This device can be used in all climates except tropical climates.
- The device can only be used in areas below 2000 metres above sea level.
- Be careful not to drop or splash water on the power plug or power cord.
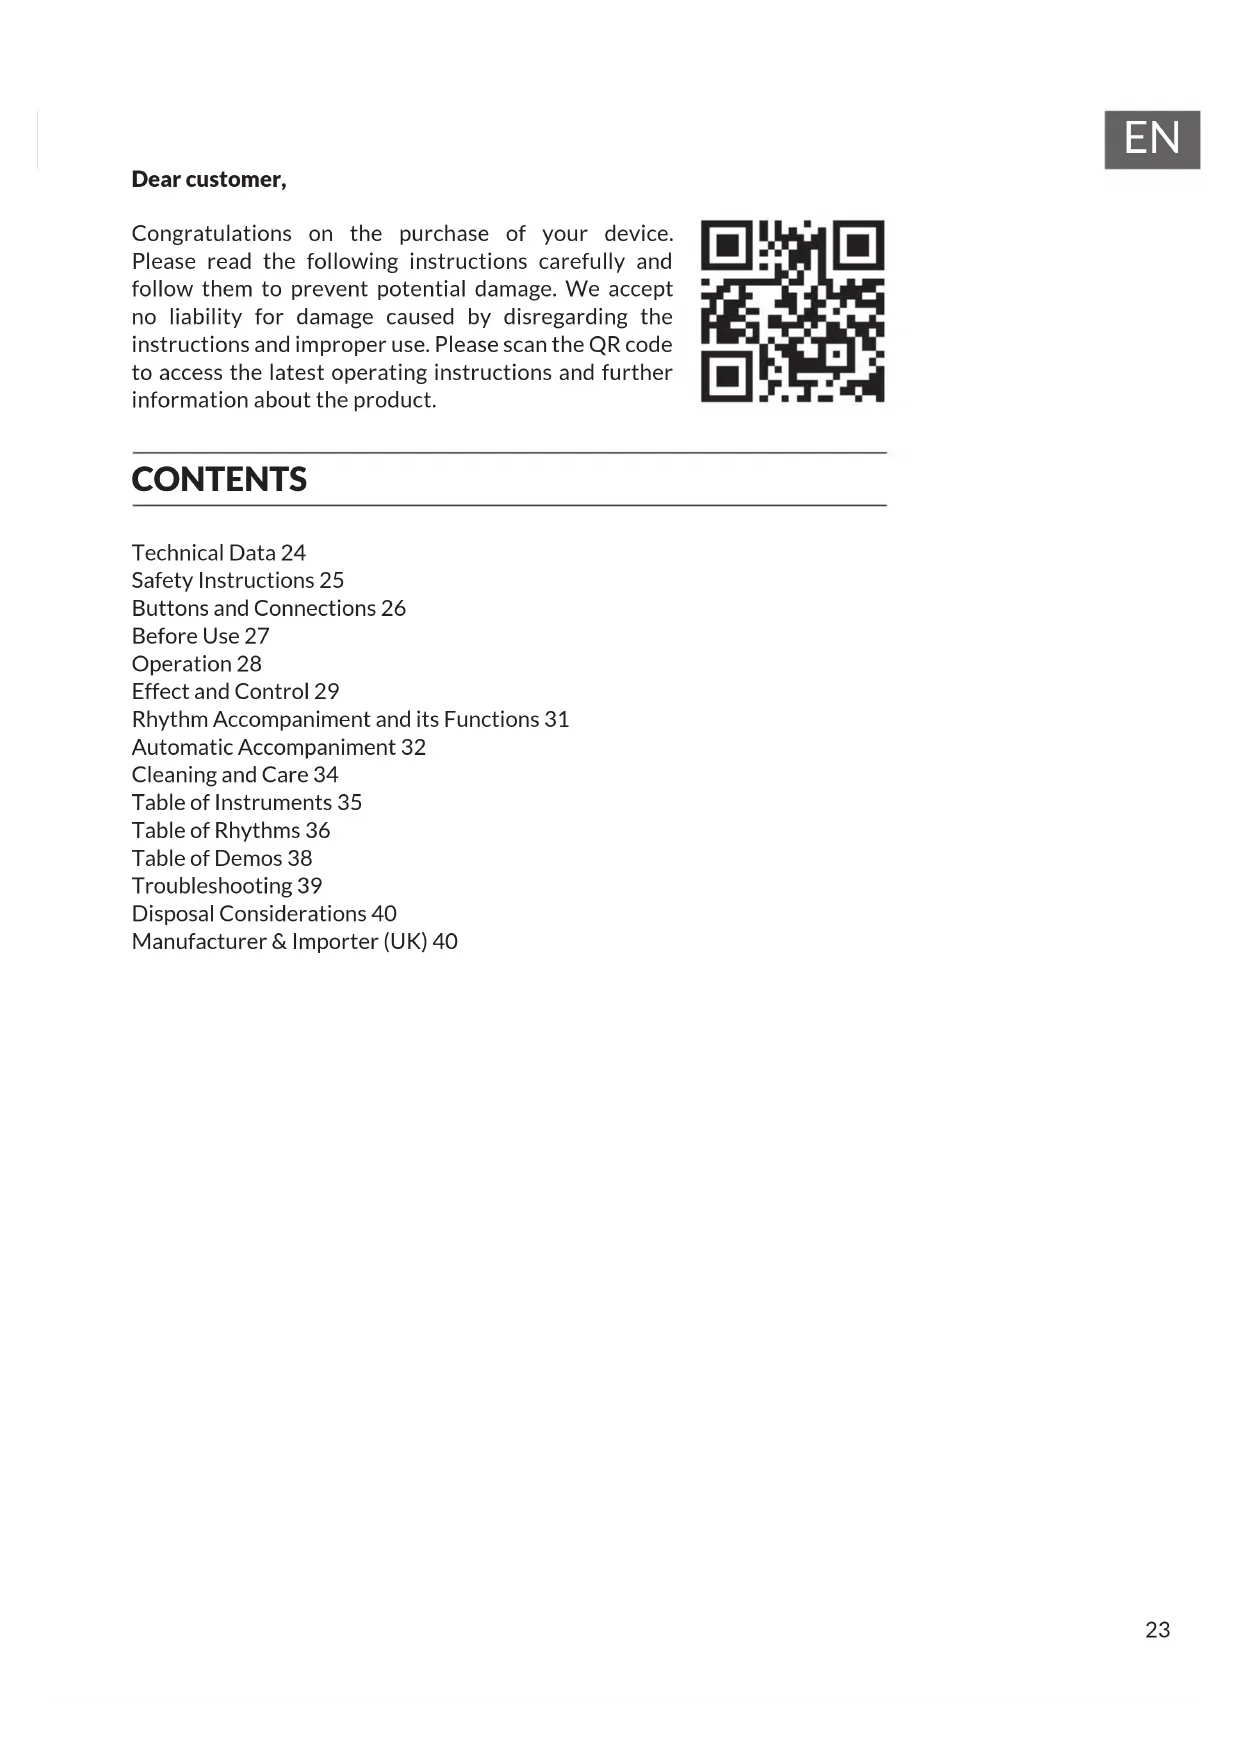
BUTTONS AND CONNECTIONS
text_image
1 2 3 4 5 6 7 8 9 10 11 12 13| 1 Power - on and off button 8 | Start / Stop / Sync / Intro / Ending / Fill in / Metronome | ||
| 2 | Master volume / Tempo / Accomp volume / Transpose | 9 Panel percussion | |
| 3 | Single chord / Fingered / Chord clear | 10 Sustain / Vibrato / Split | |
| 4 LED digital display 11 One key / Follow | |||
| 5 Voice / Rhythm / Demo 12 Auto chord | |||
| 6 | Record / Play / Program / Keyboard perc | 13 Speakers | |
| 7 | Digital numbers 1-9/ +/- button | ||
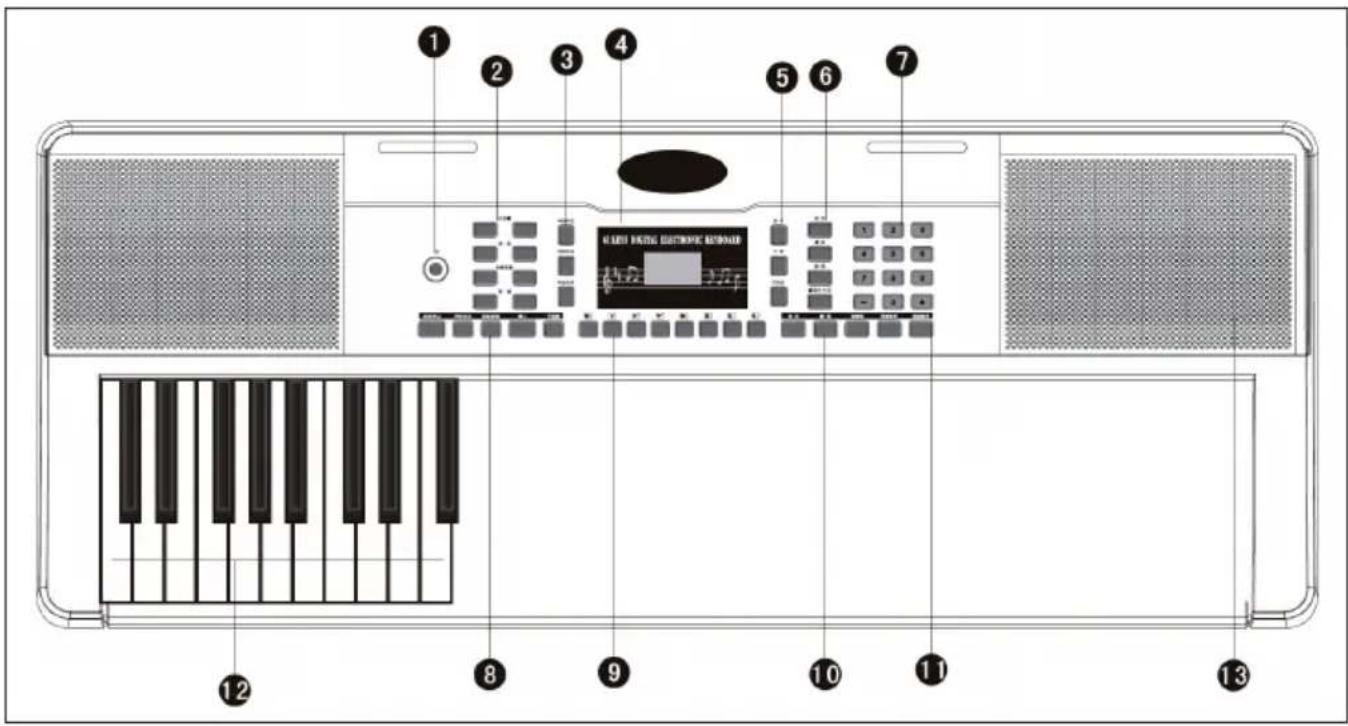
Connections on the back
text_image
HEADPHONES MIC DC 9V 1. 9V power supply connection 2. Microphone output 3. Headphone connectionBEFORE USE
Using the AC adapter
- Only use the supplied DC 9 V mains power adapter, which has an output power of 500 mA and a central anode plug.
- Plug the DC power connector into the DC) V port on the back of the unit and plug the power cord into a power outlet.
Note: The input power of the AC adapter must conform to the power of the outlet. Then press the power button to use the device.
If you will not be using the device for a long period of time, turn off the power and unplug the power cord from the outlet to avoid damage caused by sustained power connection.
Using batteries (not included in delivery)
- Open the battery compartment on the underside of your instrument's control panel.
- Insert eight LR-20 size 1.5 V batteries into the battery compartment. Note the polarity mark on the housing.
- Replace the battery compartment cover and make sure it is securely closed.
Important note on the use of batteries
- If some batteries are dead, replace all 8 at once to avoid using different types of batteries at the same time.
- Never mix old and new batteries.
- If battery acid leaks out, clean the battery compartment completely before inserting new batteries.
- Remove all batteries from the battery compartment if you will not be using the device for a long period of time. This can prevent the battery acid from leaking into the battery compartment.
Connecting a microphone
A standard microphone (3.5 mm) can be connected to the microphone connector with a cable.
Using headphones
- Standard headphones can be connected to the unit via the headphone jack for silent or late night playing.
- The internal speakers are automatically muted when headphones are connected to the headphone jack.
Note: Microphone, connection cable and headphones are not included in the scope of delivery and must be purchased separately.
OPERATION
Switching on
- Press the on/off button to switch on the device
- Press the button again to turn off the device after connecting an AC power cord or replacing the batteries.
Main volume
- The device has 9 volume levels from 00 to 08. The default volume is 07.
- The volume can be adjusted by pressing the + and - buttons.
- If you press and hold the + and - buttons at the same time, the volume will automatically reset to the preset value.
Sounds
- This device has 300 different sounds. The default sound for the instrument is
- "Voice".
- Press the Voice button if the device is not in sound mode.
- Select one of 300 sounds from the sound table.
- Then enter the corresponding number on the numeric keypad or press the + or - buttons to change the currently entered sound number.
EFFECT AND CONTROL
Keystroke
If you press the Keyboard perc button, a different instrument will sound when you play the keyboard. The keyboard can be restored to its original state by pressing the "Keyboard perc" button again.
Sustain
If you press the Sustain button once, the notes played on the keyboard will reverberate a little. Pressing the button again turns off the effect.
Vibrato
- Press the Vibrato button to activate the vibrato effect.
- The vibrato effect is produced by pressing the black and white keys.
Split
- Press the Split button to split the keyboard into left and right keyboards.
- The 24 keys on the left are mapped to the left keyboard and the 24 keys on the right are mapped to the right keyboard.
- The key of the right keyboard can be selected by pressing the number keys.
- The key of the left keyboard is initially determined by the manufacturer.
- Press the Split button again to stop splitting the keyboard.
Tempo
- Press the tempo button and increase the tempo for the rhythm, metronome and demo song by pressing the + and - buttons.
- There are 210 different speed settings ranging from 30 to 240 beats per minute.
- Press the + and - buttons simultaneously to return to the default value of 120 beats per minute.
Transpose
- Press the Transpose button and increase or decrease the transpose value by 6 steps at a time and shift the pitch of the keyboard in semitone intervals by pressing the + or - buttons.
- Press and hold the + and - buttons at the same time to return to the factory setting.
Metronome
- Press the Metronome button. The time signature will be displayed.
- Choose from 4 options a 1/4, 2/4, 3/4, or 4/4 bar by repeatedly pressing the button.
Top panel percussion
Select and press one of the 8 keys according to the list below (a total of 8 types of percussion are available for this instrument) to produce the percussion as you play.
Panel percussion list
| Wood Block L | Hand Clap | Hi-Hat Open | Hi-Hat Closed | Snare L | Bongo L | Bass Drum H Soft | Bass Drum L |

natural_image
Row of eight gray rectangular icons with icons below each, no text or symbols presentRHYTHM ACCOMPANIMENT AND ITS FUNCTIONS
Rhythm selection
To start, press the Rhythm button and select an accompaniment from 0 - 299 (see table) by pressing the appropriate number or the + and - buttons.
Start / stop
To start, press the Start / stop button and select an accompaniment from 0 - 299 (see table) by pressing the appropriate number or the + and - buttons.
Sync
- To start the sync effect, press the Sync button and for the rhythm, press any of the remaining 19 keys while playing.
- In this case, when you play, if one of the left 19 keys is pressed, the automatic chord function will be activated and the chord effect will start.
- To stop the rhythm effect, press the Sync button and start the sync effect when the rhythm is played.
- If you press the Sync button while the sync effect is active, it will stop.
Intro / end
- If you press the Intro / ending button before starting the rhythm, the unit will play an intro and then return to the normal rhythm.
- If the Sync button is pressed after the rhythm has started, the unit will play an ending melody and then stop playing.
Fill in
- You can insert a small rhythm variation at any time while the rhythm is playing by pressing the Fill in button.
• From the next measure, the rhythm will play normally again.
Accomp volume
- There are 8 levels of accompaniment volume. The default accompaniment volume is 06.
- The accompaniment volume can be adjusted by pressing the + or - buttons. The volume is displayed on the screen.
- Simultaneously press the + and - buttons to restore the default accompaniment volume.
AUTOMATIC ACCOMPANIMENT
Single chord
• To start the auto accompaniment, press the Start / stop button.
- Then press the Single chord button to start single chord accompaniment.
- Press any of the 19 keys on the left keyboard to start the rhythm.
- If another key is pressed on the left side of the keyboard, then a different chord will be selected since the key that was pressed always determines the origin of the chord.
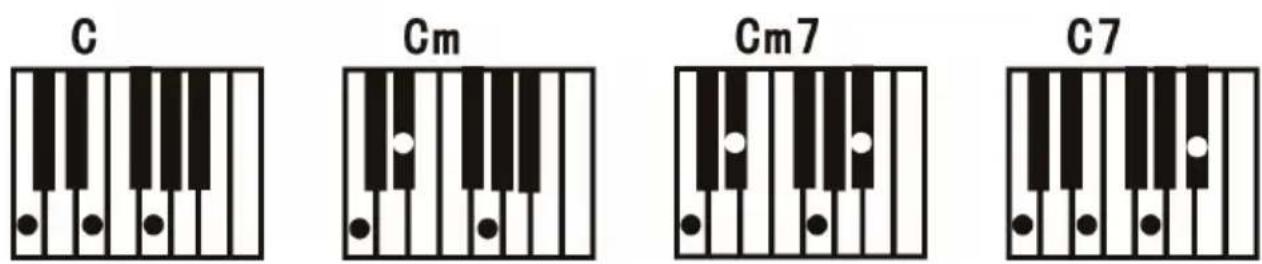
- Refer to the illustration below when playing the chords "C", "C minor", "C dominant seventh chord" and "C minor seventh chord" in single finger mode.

text_image
C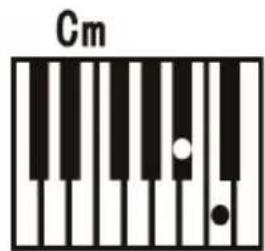
text_image
Cm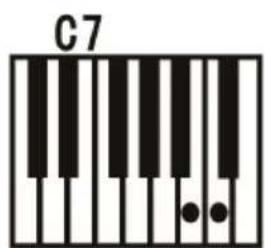
text_image
C7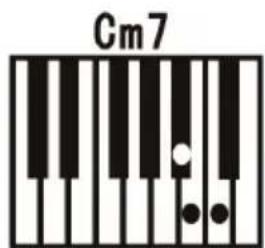
text_image
Cm7Fingered
• To start the auto accompaniment, press the Start / stop button.
- Then press the Fingered button to start finger accompaniment.
- Press any of the 19 keys on the left keyboard to start the rhythm.
- To select a different chord, press a different key on the left side of the keyboard.
- As soon as you play a chord in the auto accompaniment section of the keyboard, the chord will play along with the rhythm automatically.
• Refer to the illustration for playing different chords.
- To end the function, press the Start / stop button again.
Chord clear
When you press this button, auto accompaniment stops in chord mode. The rhythm continues to play.
Recording
- Press the Record button to activate the recording mode.
- Then press any key on the keyboard or select a sound profile to
- start recording at maximum volume 08. The number is shown on the digital display.
- Recording will stop automatically when the maximum recording time is reached. The digital display will then show "FUL".
- When a new recording is made, all previous recordings are overwritten and thus deleted.
- Press the Play button to play your recording.
• To enter programme mode, press the Program button.
Demo
- This device has 50 demo versions. See the demo table for detailed information.
- Press the Demo button to play the current demo.
- If you press the Demo button again, the next demo will be played.
- Select another demo by pressing the + and - buttons.
Lesson function
- Press the One key button or the Follow button to go to the lesson function.
- Press the + and - buttons to choose another song to practice on.
- Press the One key button again to close the function.
Note: Whether you play correctly or incorrectly, the song will automatically play through.
Follow
- Follow the on-screen instructions to play the note correctly.
- The next note to be played is then automatically displayed.
CLEANING AND CARE
Clean the outside of the device with a dry and soft cloth. Never use a cloth soaked in paint, varnish or organic or chemical solutions to clean the outside.
TABLE OF INSTRUMENTS
| 00 | Acoustic Grand Piano | 60 | French Horn | 120 | Guitar Fret Noise | 180 | Bright Violin | 240 | Psychedelic Synth Lead |
| 01 | Bright Acoustic Piano | 61 | Brass Section | 121 | Breath Noise | 181 | Stringed violin | 241 | Vibraphone Synth Lead |
| 02 | Electric Grand Piano | 62 | Synth Brass 1 | 122 | Seashore | 182 | Trill violin | 242 | Marimba Synth Lead |
| 03 | Honky-tonk Piano | 63 | Synth Brass 2 | 123 | Bird Tweet | 183 | Electronic violin | 243 | Metal FX |
| 04 | Rhodes Piano | 64 | Soprano Sax | 124 | Telephone Ring | 184 | Rock violin | 244 | Electronic FX |
| 05 | Chorused Piano | 65 | Alto Sax | 125 | Helicopter | 185 | Rhythm Orchestra | 245 | Electronic String Ensenbci |
| 06 | Harpsichord | 66 | Tenor Sax | 126 | Applause | 186 | Pizzicato Violin | 246 | Wind FX |
| 07 | Clavichord | 67 | Baritone Sax | 127 | Gunshot | 187 | Pizzicato Ensemble 1 | 247 | Clarinet FX |
| 08 | Celesta | 68 | Oboe | 128 | Percussion | 188 | Pizzicato Ensemble 2 | 248 | Organ FX |
| 09 | Glockenspiel | 69 | English Horn | 129 | Rhythm electric Piano | 189 | Percussion band | 249 | Crystal FX |
| 10 | Music box | 70 | Bassoon | 130 | Baritone Xylophone | 190 | Baritone Synth Contrabass | 250 | Synth Shamisen |
| 11 | Vibraphone | 71 | Clarinet | 131 | Glass instrument | 191 | Bass Flute | 251 | Electronic Shamisen |
| 12 | Marimba | 72 | Piccolo | 132 | Bright Dulcimer | 192 | Distortion Contrabass | 252 | Bright Sitar |
| 13 | Xylophone | 73 | Flute | 133 | Rhythm Grand Piano | 193 | Contrabass Lead | 253 | Whistle Accord |
| 14 | Tubular Bells | 74 | Recorder | 134 | Traditional Piano | 194 | Violin Lead | 254 | rhythm Nation |
| 15 | Dulcimer | 75 | Pan Flute | 135 | Aluminium jean | 195 | Cello Lead | 255 | Bright Koto |
| 16 | Hammond Organ | 76 | Bottle Blow | 136 | Rock Grand Piano | 196 | Pizzicato rhythm | 256 | Koto Lead |
| 17 | Percussive Organ | 77 | Shakuhachi | 137 | Electronic organ | 197 | high Harp | 257 | Diplophonia Koto |
| 18 | Rock Organ | 78 | Whistle | 138 | Psychedelic electronic | 198 | Harp ensemble | 258 | Baritone Koto |
| 19 | Church Organ | 79 | Ocarina | 139 | Water jean | 199 | Synth Harp | 259 | Synth Koto |
| 20 | Reed Organ | 80 | Lead 1 (square) | 140 | Bright Guitar | 200 | Baritone Trumpet | 260 | Environmental Lead |
| 21 | Accordian | 81 | Lead 2 (sawtooth) | 141 | Orchestra piccolo | 201 | Trumpet ensemble | 261 | Metal Lead |
| 22 | Harmonica | 82 | Lead 3 (caliope lead) | 142 | Heavy metal guitar | 202 | Rhythm Trumpet | 262 | Orchestra Lead |
| 23 | Tango Accordian | 83 | Lead 4 (chiff lead) | 143 | Crystal guitar | 203 | High Trumpet | 263 | Glockenspiel Lead |
| 24 | Acoustic Guitar (nylon) | 84 | Lead 5 (charang) | 144 | Queer electric Piano | 204 | Synth Trumpet | 264 | Bass Lead |
| 25 | Acoustic Guitar (steel) | 85 | Lead 6 (voice) | 145 | Bright bass | 205 | Baritone Trombone | 265 | Fifths Lead |
| 26 | Electric Guitar (jazz) | 86 | Lead 7 (fifths) | 146 | Rock Electric Bass | 206 | Trombone ensemble | 266 | Wind Lead |
| 27 | Electric Guitar (clean) | 87 | Lead 8 (bass+lead) | 147 | Rhythm Electric Bass | 207 | Rhythm Trombone | 267 | Atmosphere Lead |
| 28 | Electric Guitar (muted) | 88 | Pad 1 (new age) | 148 | Psychedelic Bass | 208 | High Trombone | 268 | Sharp Lead |
| 29 | Overdriven Guitar | 89 | Pad 2 (warm) | 149 | Heavy metal bass | 209 | Mediant Trombone | 269 | Bright Lead |
| 30 | Distortion Guitar | 90 | Pad 3 (polysynth) | 150 | Magic electronic | 210 | Synth Trombone | 270 | East Nation Pad |
| 31 | Guitar Harmonics | 91 | Pad 4 (choir) | 151 | Bright violin | 211 | Violin French Horn | 271 | Atmosphere Pad |
| 32 | Acoustic Bass | 92 | Pad 5 (bowed) | 152 | Atonic violin | 212 | French Horn ensemble | 272 | Clear Pad |
| 33 | Electric Bass(finger) | 93 | Pad 6 (metallic) | 153 | Heavy bass orchestra | 213 | Electronic French Horn | 273 | Electric Piano Pad |
| 34 | Electric Bass (pick) | 94 | Pad 7 (halo) | 154 | Synth clarinet | 214 | Synth French Horn | 274 | Clean Guitar Pad |
| 35 | Fretless Bass | 95 | Pad 8 (sweep) | 155 | Interactive Lead | 215 | Psychedelic Synth Brass | 275 | Western Pad |
| 36 | Slap Bass 1 | 96 | FX 1 (rain) | 156 | For the keyboard | 216 | Distortion Synth Brass | 276 | Sci-fi Pad |
| 37 | Slap Bass 2 | 97 | FX 2 (soundtrack) | 157 | Bagpipes | 217 | Vibraphone Synth Brass | 277 | Metal Sci-fi Pad |
| 38 | Synth Bass 1 | 98 | FX 3 (crystal) | 158 | Suona | 218 | Rock Synth Brass | 278 | Clarinet Pad |
| 39 | Synth Bass 2 | 99 | FX 4 (atmosphere) | 159 | Pipa | 219 | Synth Muted Trumpet | 279 | Electronic dance Pad |
| 40 | Violin | 100 | FX 5 (brightness) | 160 | Church Piano | 220 | Soprano Sax ensemble | 280 | Psychedelic electronic |
| 41 | Viola | 101 | FX 6 (goblins) | 161 | Church electric Piano | 221 | rhythm Soprano Sax | 281 | Double Kalimba |
| 42 | Cello | 102 | FX 7 (echoes) | 162 | Synth Piano | 222 | Synth Soprano Sax | 282 | Bright Kalimba |
| 43 | Contrabass | 103 | FX 8 (sci-fi) | 163 | Baritone Piano | 223 | National Sax | 283 | Crystal Kalimba |
| 44 | Tremolo Strings | 104 | Sitar | 164 | Piano PAD | 224 | Metal Sax | 284 | Synth Kalimba |
| 45 | Pizzicato Strings | 105 | Banjo | 165 | String Piano | 225 | Baritone Sax ensemble | 285 | Wind Bagpipe |
| 46 | Orchestral Harp | 106 | Shamisen | 166 | Metal Piano | 226 | Crystal Sax | 286 | high Bagpipe |
| 47 | Timpani | 107 | Koto | 167 | Light rhythm Piano | 227 | Soft Baritone Sax | 287 | Orchestra Bagpipe |
| 48 | String Ensemble 1 | 108 | Kalimba | 168 | electric Piano Pad | 228 | Synth Baritone Sax | 288 | Bright Bagpipe |
| 49 | String Ensemble 2 | 109 | Bagpipe | 169 | Classical piano | 229 | Heavy metal Sax | 289 | Baritone Bagpipe |
| 50 | Synth Strings 1 | 110 | Fiddle | 170 | Guitar organ | 230 | Church Oboe | 290 | Slap Bagpipe |
| 51 | Synth Strings 2 | 111 | Shanai | 171 | An electric guitar | 231 | Bass Oboe | 291 | Environmental Shanai |
| 52 | Choir Aahs | 112 | Tinkle Bell | 172 | synthesis Nylon Guitar | 232 | Bright Oboe | 292 | Mediant Shanai |
| 53 | Voice Oohs | 113 | Agogo | 173 | Synthetic electronic guitar | 233 | Bright Oboe | 293 | Baritone Shanai |
| 54 | Synth Voice | 114 | Steel Drums | 174 | Bright clean Guitar | 234 | Distortio oboe | 294 | Synth Shanai |
| 55 | Orchestra Hit | 115 | Woodblock | 175 | Orchestra Guitar | 235 | English Horn ensemble | 295 | high Shanai |
| 56 | Trumpet | 116 | Taiko Drum | 176 | Psychedelic Guitar | 236 | Pizzicato English Horn | 296 | Bright Steel Drums |
| 57 | Trombone | 117 | Melodic Tom | 177 | Bright organ | 237 | Diplophonia English Horn | 297 | Lyric Steel Drums |
| 58 | Tuba | 118 | Synth Drum | 178 | Pick organ | 238 | Bright English Horn | 298 | Orchestra Steel Drums |
| 59 | Muted Trumpet | 119 | Reverse Cymbal | 179 | Synth accordion | 239 | Synth English Horn | 299 | Synth Steel Drums |
TABLE OF RHYTHMS
| 00 | Beat 1 | 60 | Country3 | 120 | India samba1 | 180 | Jump Blues | 240 | Western Swing |
| 01 | Beat 2 | 61 | Country4 | 121 | India samba2 | 181 | New Orleans Blues | 241 | Alt-Country |
| 02 | Beat 3 | 62 | Country waltz1 | 122 | Jazz soul | 182 | New York Blues | 242 | Americana |
| 03 | Beat 4 | 63 | Country waltz2 | 123 | Country swing1 | 183 | Piano Blues | 243 | Charanga |
| 04 | Beat 5 | 64 | Country5 | 124 | Country swing2 | 184 | Soul Blues | 244 | Tropical |
| 05 | Beat 6 | 65 | Country6 | 125 | Country swing3 | 185 | Urban Blues | 245 | Ambient |
| 06 | Beat 7 | 66 | Country7 | 126 | Pop waltz | 186 | Afro Beat | 246 | Punk Metal |
| 07 | Beat 8 | 67 | Slow country1 | 127 | Pop classic | 187 | Afro Pop | 247 | Experimental Rock |
| 08 | Beat 9 | 68 | Slow country2 | 128 | OrientalBeat1 | 188 | Celtic Pop | 248 | Noise-Rock |
| 09 | Beat 10 | 69 | Soul country | 129 | OrientalBeat2 | 189 | Hawaiian Pop | 249 | Celtic New Age |
| 10 | Beat 11 | 70 | Baiao | 130 | OrientalBeat3 | 190 | Indian Pop | 250 | Ethnic Fusion |
| 11 | Beat 12 | 71 | Bequine | 131 | OrientalBeat4 | 191 | European Traditions | 251 | Techno-Tribal |
| 12 | Beat 13 | 72 | Bolero | 132 | OrientalBeat5 | 192 | World Fusion | 252 | Experimental |
| 13 | Beat 14 | 73 | Bossanoval | 133 | OrientalBeat6 | 193 | Dou Jin | 253 | Minimalism |
| 14 | Rock 1 | 74 | Lambada | 134 | OrientalBeat7 | 194 | Shima Uta | 254 | Traditional Pop |
| 15 | Rock 2 | 75 | Mambo | 135 | OrientalBeat8 | 195 | Enka | 255 | Noise |
| 16 | Cntr Rock | 76 | Samba | 136 | OrientalBeat9 | 196 | Japanese Folk Music | 256 | Classical beat1 |
| 17 | Country Rock | 77 | Reggae | 137 | OrientalBeat10 | 197 | Middle East Pop | 257 | Classical beat2 |
| 18 | Dance Rock | 78 | Rhumba | 138 | OrientalBeat11 | 198 | Pop baiao | 258 | Classical beat3 |
| 19 | Easy Rock | 79 | Tango | 139 | OrientalBeat12 | 199 | Pop bequine | 259 | Classical beat4 |
| 20 | Glam Rock | 80 | Habanera | 140 | OrientalBeat13 | 200 | New Age Latin | 260 | Classical beat5 |
| 21 | Hard Rock1 | 81 | March1 | 141 | OrientalBeat14 | 201 | New bossanoval | 261 | Classical beat6 |
| 22 | Hard Rock2 | 82 | March2 | 142 | Jazz Rock1 | 202 | Rock lambada | 262 | Classical beat7 |
| 23 | Pop Rock | 83 | Polka1 | 143 | Jazz Rock2 | 203 | Bluse mambo | 263 | Classical beat8 |
| 24 | Rock+Roll | 84 | Polka2 | 144 | Soft Rock | 204 | Pop samba | 264 | Classical beat9 |
| 25 | Rock Beat | 85 | Polka3 | 145 | Classic Rock | 205 | Reggae Ballad | 265 | Classical beat10 |
| 26 | Rock Folk | 86 | Vallenato | 146 | Folkrock1 | 206 | Pop Rhumba | 266 | Classical beat1 1 |
| 27 | Rocky Pop | 87 | Waltz1 | 147 | Folkrock2 | 207 | Rock Tango | 267 | Classical beat1 2 |
| 28 | Dance 1 | 88 | Waltz2 | 148 | Waltz Rock | 208 | Britpop1 | 268 | Classical beat1 3 |
| 29 | Dance 2 | 89 | Waltz3 | 149 | Heavy metal rock1 | 209 | Britpop2 | 269 | Classical beat1 4 |
| 30 | Dance 3 | 90 | Pop | 150 | Heavy metal rock2 | 210 | Britpop3 | 270 | Contemporary R&b1 |
| 31 | Dance 4 | 91 | Love ballad | 151 | 70' Rock | 211 | Britpop4 | 271 | Contemporary R&b2 |
| 32 | Dance 5 | 92 | Easy Beat | 152 | 80' Rock | 212 | Trip Hop1 | 272 | Contemporary R&b3 |
| 33 | Dance 6 | 93 | Soft Beat | 153 | Middle Eastern rock | 213 | Trip Hop2 | 273 | Contemporary R&b4 |
| 34 | Dance 7 | 94 | Shuffle | 154 | Traditional Rock | 214 | Chamber pop | 274 | Contemporary R&b5 |
| 35 | Dance 8 | 95 | Cobmo | 155 | Rock Disco | 215 | Britpopwaltz1 | 275 | Deep Funk |
| 36 | Dance 9 | 96 | Shuffle1 | 156 | Modern dance1 | 216 | Britpopwaltz2 | 276 | Doo Wop |
| 37 | Dance 10 | 97 | Shuffle2 | 157 | Modern dance2 | 217 | Britpopwaltz3 | 277 | Left-Field Hip-Hop |
| 38 | Soul funk | 98 | Slow folk | 158 | Modern dance3 | 218 | Classical ballad1 | 278 | Motown |
| 39 | Euro soul | 99 | Step | 159 | Modern dance4 | 219 | Classical ballad2 | 279 | Neo-Soul1 |
| 40 | Funky soul1 | 100 | Euro pop | 160 | Modern dance5 | 220 | Light Ballad | 280 | Neo-Soul2 |
| 41 | Funky soul2 | 101 | Bachata beat1 | 161 | New century1 | 221 | Rhythm Ballad | 281 | Neo-Soul3 |
| 42 | Funky soul3 | 102 | Bachata beat2 | 162 | New century2 | 222 | Hard House | 282 | New Jack Swing |
| 43 | Funky soul4 | 103 | Africa bossanova | 163 | New century3 | 223 | Deep House | 283 | Urban |
| 44 | Funky soul5 | 104 | China dance | 164 | RockDance1 | 224 | Acid House | 284 | Contemporary Instrumental |
| 45 | Slow soul1 | 105 | Pop beat | 165 | RockDance2 | 225 | Progressive House | 285 | Meditation |
| 46 | Slow soul2 | 106 | Vienna waltz | 166 | Psyche delic 1 | 226 | Epic House | 286 | Neo-Classical1 |
| 47 | Soul | 107 | Africa beat | 167 | Psyche delic 2 | 227 | Trible House | 287 | Neo-Classical2 |
| 48 | big band1 | 108 | Africa mambo | 168 | Soft Rock | 228 | Big Beat | 288 | Neo-Classical3 |
| 49 | big band2 | 109 | Euro march1 | 169 | Post Rock | 229 | Down tempo | 289 | New Acoustic |
| 50 | blue grass | 110 | Euro march2 | 170 | Goth Psychedelic ic | 230 | Electro1 | 290 | Solo Instrumental |
| 51 | jazz samba | 111 | Euro merengue1 | 171 | Soul Psychedelic 1 | 231 | Electro2 | 291 | Space |
| 52 | jazz waltz | 112 | Euro merengue2 | 172 | Soul Psychedelic 2 | 232 | Electro3 | 292 | Spiritual |
| 53 | Jazz1 | 113 | Middle East dance | 173 | Soul Psychedelic 3 | 233 | House dance | 293 | Rock New Age |
| 54 | Jazz2 | 114 | Africa dance | 174 | Soul Psychedelic 4 | 234 | Idm | 294 | Ragtime |
| 55 | Swing1 | 115 | Pop samba1 | 175 | Soul Psychedelic 1 | 235 | Jungle Drum | 295 | Bebop or Bop |
| 56 | Swing2 | 116 | Pop samba2 | 176 | Country Blues | 236 | Techno | 296 | Cool jazz |
| 57 | Swing3 | 117 | Africa reggae | 177 | Electric Blues | 237 | Trance | 297 | Free jazz |
| 58 | Country1 | 118 | Euro rhumba1 | 178 | Folk Blues | 238 | Trip-Hop | 298 | Jazz-Rock & Fusion |
| 59 | Country2 | 119 | Euro rhumba2 | 179 | Jazz Blues | 239 | Experimental Electronic | 299 | Jazz Funk |
TABLE OF DEMOS
| 00 | London Bridge Is Falling Down | 17 | Hand in hand | 34 | Prom queen |
| 01 | Fantasy | 18 | Two hundred and fourteen | 35 | Ni Mengruoze |
| 02 | The twist | 19 | Fkey | 36 | Nen blauen Donau |
| 03 | Butter fly | 20 | Mozart Symphonies | 37 | Hawthorn |
| 04 | Paddle a canoe | 21 | The girl's Prayer | 38 | Mary had a little lamb |
| 05 | Country songs | 22 | Nocturne | 39 | Yellow ribbon |
| 06 | Rhythm of the rain | 23 | Another day in paradise | 40 | Toreador Song |
| 07 | Serenade | 24 | Red River Valley | 41 | Radetzky march |
| 08 | Bluegrass Music | 25 | Green sleeves | 42 | Radiant |
| 09 | Music moment | 26 | Mozart Piano Sonatas | 43 | Long Long Ago |
| 10 | Merry Christmas | 27 | Orange and lemon | 44 | Katyusha |
| 11 | American Patrol | 28 | Hallelujah | 45 | Susanna |
| 12 | Flower | 29 | Minuet | 46 | Little star |
| 13 | Pour Elise | 30 | Handshake | 47 | I Don't Care |
| 14 | Direct seeding | 31 | Rain | 48 | Minuet in G major |
| 15 | Turkey March | 32 | Pamela | 49 | Carman Overture |
| 16 | A cradle | 33 | Bnnie Edgar |
TROUBLESHOOTING
| Problem Possible cause and solution | |
| A tone can be heard whenever the device is turned on/off. | This is normal and no cause for concern. |
| When I press a key, there is no sound even though the device is switched on. | Check that the main and accompaniment volumes are set correctly. |
| The internal speaker system is automatically disabled when headphones are connected to the device. | |
| The sound is distorted or interrupted. | An unsuitable mains adapter may be connected or the batteries are dead and need to be replaced. |
| The device has crashed. | |
| The notes played and the note quality are slightly different. | This is normal. |
| The reverb effect is sometimes set longer or shorter individually when used. | This is normal. The reverb effect for each key is set by the manufacturer. |
| Main and accompaniment volume have changed. | Check if something has changed in the sound setting. |
| The clef changes as you play. You may | have accidentally pressed a key on the left half of the keyboard (left 19 keys). |
DISPOSAL CONSIDERATIONS

natural_image
Symbol of a trash bin crossed with a diagonal line, no text or numbers presentIf there is a legal regulation in your country regarding the disposal of electrical and electronic equipment, this symbol on the product or on the packaging indicates that this product must not be disposed of with household waste. Instead, it must be taken to a collection point for the recycling of electrical and electronic equipment. By disposing of this product in accordance with the regulations, you protect the environment and the health of those around you from negative consequences. For information on recycling and disposal of this product, contact your local government or household waste disposal service.
This product contains batteries. If there is a legal regulation in your country regarding the disposal of batteries, the batteries must not be disposed of in household waste. Consult your local regulations for the disposal of batteries. By disposing of this product in accordance with the regulations, you protect the environment and the health of those around you from negative consequences.
MANUFACTURER & IMPORTER (UK)
Manufacturer:
Chal-Tec GmbH, Wallstrasse 16, 10179 Berlin, Germany.
Importer for Great Britain:
Berlin Brands Group UK Ltd
PO Box 1145
Oxford, OX1 9UW
United Kingdom
Estimado cliente:
text_image
QR code image containing encoded data, no visible human-readable textÍNDICE
Datos técnicos 42
| Wood Block L | Hand Clap | Hi-Hat Open | Hi-Hat Closed | Snare L | Bongo L | Bass Drum H Soft | Bass Drum L |

natural_image
Row of eight gray rectangular icons with icons below each, no text or symbols presentEL ACOMPAÑAMIENTO RÍTMICO Y SUS FUNCIONES
Selección del ritmo
| 00 | Acoustic Grand Piano | 60 | French Horn | 120 | Guitar Fret Noise | 180 | Bright Violin | 240 | Psychedelic Synth Lead |
| 01 | Bright Acoustic Piano | 61 | Brass Section | 121 | Breath Noise | 181 | Stringed violin | 241 | Vibraphone Synth Lead |
| 02 | Electric Grand Piano | 62 | Synth Brass 1 | 122 | Seashore | 182 | Trill violin | 242 | Marimba Synth Lead |
| 03 | Honky-tonk Piano | 63 | Synth Brass 2 | 123 | Bird Tweet | 183 | Electronic violin | 243 | Metal FX |
| 04 | Rhodes Piano | 64 | Soprano Sax | 124 | Telephone Ring | 184 | Rock violin | 244 | Electronic FX |
| 05 | Chorused Piano | 65 | Alto Sax | 125 | Helicopter | 185 | Rhythm Orchestra | 245 | Electronic String Ensenbci |
| 06 | Harpsichord | 66 | Tenor Sax | 126 | Applause | 186 | Pizzicato Violin | 246 | Wind FX |
| 07 | Clavichord | 67 | Baritone Sax | 127 | Gunshot | 187 | Pizzicato Ensemble 1 | 247 | Clarinet FX |
| 08 | Celesta | 68 | Oboe | 128 | Percussion | 188 | Pizzicato Ensemble 2 | 248 | Organ FX |
| 09 | Glockenspiel | 69 | English Horn | 129 | Rhythm electric Piano | 189 | Percussion band | 249 | Crystal FX |
| 10 | Music box | 70 | Bassoon | 130 | Baritone Xylophone | 190 | Baritone Synth Contrabass | 250 | Synth Shamisen |
| 11 | Vibraphone | 71 | Clarinet | 131 | Glass instrument | 191 | Bass Flute | 251 | Electronic Shamisen |
| 12 | Marimba | 72 | Piccolo | 132 | Bright Dulcimer | 192 | Distortion Contrabass | 252 | Bright Sitar |
| 13 | Xylophone | 73 | Flute | 133 | Rhythm Grand Piano | 193 | Contrabass Lead | 253 | Whistle Accord |
| 14 | Tubular Bells | 74 | Recorder | 134 | Traditional Piano | 194 | Violin Lead | 254 | rhythm Nation |
| 15 | Dulcimer | 75 | Pan Flute | 135 | Aluminium jean | 195 | Cello Lead | 255 | Bright Koto |
| 16 | Hammond Organ | 76 | Bottle Blow | 136 | Rock Grand Piano | 196 | Pizzicato rhythm | 256 | Koto Lead |
| 17 | Percussive Organ | 77 | Shakuhachi | 137 | Electronic organ | 197 | high Harp | 257 | Diplophonia Koto |
| 18 | Rock Organ | 78 | Whistle | 138 | Psychedelic electronic | 198 | Harp ensemble | 258 | Baritone Koto |
| 19 | Church Organ | 79 | Ocarina | 139 | Water jean | 199 | Synth Harp | 259 | Synth Koto |
| 20 | Reed Organ | 80 | Lead 1 (square) | 140 | Bright Guitar | 200 | Baritone Trumpet | 260 | Environmental Lead |
| 21 | Accordian | 81 | Lead 2 (sawtooth) | 141 | Orchestra piccolo | 201 | Trumpet ensemble | 261 | Metal Lead |
| 22 | Harmonica | 82 | Lead 3 (caliope lead) | 142 | Heavy metal guitar | 202 | Rhythm Trumpet | 262 | Orchestra Lead |
| 23 | Tango Accordian | 83 | Lead 4 (chiff lead) | 143 | Crystal guitar | 203 | High Trumpet | 263 | Glockenspiel Lead |
| 24 | Acoustic Guitar (nylon) | 84 | Lead 5 (charang) | 144 | Queer electric Piano | 204 | Synth Trumpet | 264 | Bass Lead |
| 25 | Acoustic Guitar (steel) | 85 | Lead 6 (voice) | 145 | Bright bass | 205 | Baritone Trombone | 265 | Fifths Lead |
| 26 | Electric Guitar (jazz) | 86 | Lead 7 (fifths) | 146 | Rock Electric Bass | 206 | Trombone ensemble | 266 | Wind Lead |
| 27 | Electric Guitar (clean) | 87 | Lead 8 (bass+lead) | 147 | Rhythm Electric Bass | 207 | Rhythm Trombone | 267 | Atmosphere Lead |
| 28 | Electric Guitar (muted) | 88 | Pad 1 (new age) | 148 | Psychedelic Bass | 208 | High Trombone | 268 | Sharp Lead |
| 29 | Overdriven Guitar | 89 | Pad 2 (warm) | 149 | Heavy metal bass | 209 | Mediant Trombone | 269 | Bright Lead |
| 30 | Distortion Guitar | 90 | Pad 3 (polysynth) | 150 | Magic electronic | 210 | Synth Trombone | 270 | East Nation Pad |
| 31 | Guitar Harmonics | 91 | Pad 4 (choir) | 151 | Bright violin | 211 | Violin French Horn | 271 | Atmosphere Pad |
| 32 | Acoustic Bass | 92 | Pad 5 (bowed) | 152 | Atonic violin | 212 | French Horn ensemble | 272 | Clear Pad |
| 33 | Electric Bass(finger) | 93 | Pad 6 (metallic) | 153 | Heavy bass orchestra | 213 | Electronic French Horn | 273 | Electric Piano Pad |
| 34 | Electric Bass (pick) | 94 | Pad 7 (halo) | 154 | Synth clarinet | 214 | Synth French Horn | 274 | Clean Guitar Pad |
| 35 | Fretless Bass | 95 | Pad 8 (sweep) | 155 | Interactive Lead | 215 | Psychedelic Synth Brass | 275 | Western Pad |
| 36 | Slap Bass 1 | 96 | FX 1 (rain) | 156 | For the keyboard | 216 | Distortion Synth Brass | 276 | Sci-fi Pad |
| 37 | Slap Bass 2 | 97 | FX 2 (soundtrack) | 157 | Bagpipes | 217 | Vibraphone Synth Brass | 277 | Metal Sci-fi Pad |
| 38 | Synth Bass 1 | 98 | FX 3 (crystal) | 158 | Suona | 218 | Rock Synth Brass | 278 | Clarinet Pad |
| 39 | Synth Bass 2 | 99 | FX 4 (atmosphere) | 159 | Pipa | 219 | Synth Muted Trumpet | 279 | Electronic dance Pad |
| 40 | Violin | 100 | FX 5 (brightness) | 160 | Church Piano | 220 | Soprano Sax ensemble | 280 | Psychedelic electronic |
| 41 | Viola | 101 | FX 6 (goblins) | 161 | Church electric Piano | 221 | rhythm Soprano Sax | 281 | Double Kalimba |
| 42 | Cello | 102 | FX 7 (echoes) | 162 | Synth Piano | 222 | Synth Soprano Sax | 282 | Bright Kalimba |
| 43 | Contrabass | 103 | FX 8 (sci-fi) | 163 | Baritone Piano | 223 | National Sax | 283 | Crystal Kalimba |
| 44 | Tremolo Strings | 104 | Sitar | 164 | Piano PAD | 224 | Metal Sax | 284 | Synth Kalimba |
| 45 | Pizzicato Strings | 105 | Banjo | 165 | String Piano | 225 | Baritone Sax ensemble | 285 | Wind Bagpipe |
| 46 | Orchestral Harp | 106 | Shamisen | 166 | Metal Piano | 226 | Crystal Sax | 286 | high Bagpipe |
| 47 | Timpani | 107 | Koto | 167 | Light rhythm Piano | 227 | Soft Baritone Sax | 287 | Orchestra Bagpipe |
| 48 | String Ensemble 1 | 108 | Kalimba | 168 | electric Piano Pad | 228 | Synth Baritone Sax | 288 | Bright Bagpipe |
| 49 | String Ensemble 2 | 109 | Bagpipe | 169 | Classical piano | 229 | Heavy metal Sax | 289 | Baritone Bagpipe |
| 50 | Synth Strings 1 | 110 | Fiddle | 170 | Guitar organ | 230 | Church Oboe | 290 | Slap Bagpipe |
| 51 | Synth Strings 2 | 111 | Shanai | 171 | An electric guitar | 231 | Bass Oboe | 291 | Environmental Shanai |
| 52 | Choir Aahs | 112 | Tinkle Bell | 172 | synthesis Nylon Guitar | 232 | Bright Oboe | 292 | Mediant Shanai |
| 53 | Voice Oohs | 113 | Agogo | 173 | Synthetic electronic guitar | 233 | Bright Oboe | 293 | Baritone Shanai |
| 54 | Synth Voice | 114 | Steel Drums | 174 | Bright clean Guitar | 234 | Distortio oboe | 294 | Synth Shanai |
| 55 | Orchestra Hit | 115 | Woodblock | 175 | Orchestra Guitar | 235 | English Horn ensemble | 295 | high Shanai |
| 56 | Trumpet | 116 | Taiko Drum | 176 | Psychedelic Guitar | 236 | Pizzicato English Horn | 296 | Bright Steel Drums |
| 57 | Trombone | 117 | Melodic Tom | 177 | Bright organ | 237 | Diplophonia English Horn | 297 | Lyric Steel Drums |
| 58 | Tuba | 118 | Synth Drum | 178 | Pick organ | 238 | Bright English Horn | 298 | Orchestra Steel Drums |
| 59 | Muted Trumpet | 119 | Reverse Cymbal | 179 | Synth accordion | 239 | Synth English Horn | 299 | Synth Steel Drums |
TABLA DE RITMOS
| 00 | Beat 1 | 60 | Country3 | 120 | India samba1 | 180 | Jump Blues | 240 | Western Swing |
| 01 | Beat 2 | 61 | Country4 | 121 | India samba2 | 181 | New Orleans Blues | 241 | Alt-Country |
| 02 | Beat 3 | 62 | Country waltz1 | 122 | Jazz soul | 182 | New York Blues | 242 | Americana |
| 03 | Beat 4 | 63 | Country waltz2 | 123 | Country swing1 | 183 | Piano Blues | 243 | Charanga |
| 04 | Beat 5 | 64 | Country5 | 124 | Country swing2 | 184 | Soul Blues | 244 | Tropical |
| 05 | Beat 6 | 65 | Country6 | 125 | Country swing3 | 185 | Urban Blues | 245 | Ambient |
| 06 | Beat 7 | 66 | Country7 | 126 | Pop waltz | 186 | Afro Beat | 246 | Punk Metal |
| 07 | Beat 8 | 67 | Slow country1 | 127 | Pop classic | 187 | Afro Pop | 247 | Experimental Rock |
| 08 | Beat 9 | 68 | Slow country2 | 128 | OrientalBeat1 | 188 | Celtic Pop | 248 | Noise-Rock |
| 09 | Beat 10 | 69 | Soul country | 129 | OrientalBeat2 | 189 | Hawaiian Pop | 249 | Celtic New Age |
| 10 | Beat 11 | 70 | Baiao | 130 | OrientalBeat3 | 190 | Indian Pop | 250 | Ethnic Fusion |
| 11 | Beat 12 | 71 | Bequine | 131 | OrientalBeat4 | 191 | European Traditions | 251 | Techno-Tribal |
| 12 | Beat 13 | 72 | Bolero | 132 | OrientalBeat5 | 192 | World Fusion | 252 | Experimental |
| 13 | Beat 14 | 73 | Bossanoval | 133 | OrientalBeat6 | 193 | Dou Jin | 253 | Minimalism |
| 14 | Rock 1 | 74 | Lambada | 134 | OrientalBeat7 | 194 | Shima Uta | 254 | Traditional Pop |
| 15 | Rock 2 | 75 | Mambo | 135 | OrientalBeat8 | 195 | Enka | 255 | Noise |
| 16 | Cntr Rock | 76 | Samba | 136 | OrientalBeat9 | 196 | Japanese Folk Music | 256 | Classical beat1 |
| 17 | Country Rock | 77 | Reggae | 137 | OrientalBeat10 | 197 | Middle East Pop | 257 | Classical beat2 |
| 18 | Dance Rock | 78 | Rhumba | 138 | OrientalBeat11 | 198 | Pop baiao | 258 | Classical beat3 |
| 19 | Easy Rock | 79 | Tango | 139 | OrientalBeat12 | 199 | Pop bequine | 259 | Classical beat4 |
| 20 | Glam Rock | 80 | Habanera | 140 | OrientalBeat13 | 200 | New Age Latin | 260 | Classical beat5 |
| 21 | Hard Rock1 | 81 | March1 | 141 | OrientalBeat14 | 201 | New bossanoval | 261 | Classical beat6 |
| 22 | Hard Rock2 | 82 | March2 | 142 | Jazz Rock1 | 202 | Rock lambada | 262 | Classical beat7 |
| 23 | Pop Rock | 83 | Polka1 | 143 | Jazz Rock2 | 203 | Bluse mambo | 263 | Classical beat8 |
| 24 | Rock+Roll | 84 | Polka2 | 144 | Soft Rock | 204 | Pop samba | 264 | Classical beat9 |
| 25 | Rock Beat | 85 | Polka3 | 145 | Classic Rock | 205 | Reggae Ballad | 265 | Classical beat10 |
| 26 | Rock Folk | 86 | Vallenato | 146 | Folkrock1 | 206 | Pop Rhumba | 266 | Classical beat1 1 |
| 27 | Rocky Pop | 87 | Waltz1 | 147 | Folkrock2 | 207 | Rock Tango | 267 | Classical beat1 2 |
| 28 | Dance 1 | 88 | Waltz2 | 148 | Waltz Rock | 208 | Britpop1 | 268 | Classical beat1 3 |
| 29 | Dance 2 | 89 | Waltz3 | 149 | Heavy metal rock1 | 209 | Britpop2 | 269 | Classical beat1 4 |
| 30 | Dance 3 | 90 | Pop | 150 | Heavy metal rock2 | 210 | Britpop3 | 270 | Contemporary R&b1 |
| 31 | Dance 4 | 91 | Love ballad | 151 | 70' Rock | 211 | Britpop4 | 271 | Contemporary R&b2 |
| 32 | Dance 5 | 92 | Easy Beat | 152 | 80' Rock | 212 | Trip Hop1 | 272 | Contemporary R&b3 |
| 33 | Dance 6 | 93 | Soft Beat | 153 | Middle Eastern rock | 213 | Trip Hop2 | 273 | Contemporary R&b4 |
| 34 | Dance 7 | 94 | Shuffle | 154 | Traditional Rock | 214 | Chamber pop | 274 | Contemporary R&b5 |
| 35 | Dance 8 | 95 | Cobmo | 155 | Rock Disco | 215 | Britpopwaltz1 | 275 | Deep Funk |
| 36 | Dance 9 | 96 | Shuffle1 | 156 | Modern dance1 | 216 | Britpopwaltz2 | 276 | Doo Wop |
| 37 | Dance 10 | 97 | Shuffle2 | 157 | Modern dance2 | 217 | Britpopwaltz3 | 277 | Left-Field Hip-Hop |
| 38 | Soul funk | 98 | Slow folk | 158 | Modern dance3 | 218 | Classical ballad1 | 278 | Motown |
| 39 | Euro soul | 99 | Step | 159 | Modern dance4 | 219 | Classical ballad2 | 279 | Neo-Soul1 |
| 40 | Funky soul1 | 100 | Euro pop | 160 | Modern dance5 | 220 | Light Ballad | 280 | Neo-Soul2 |
| 41 | Funky soul2 | 101 | Bachata beat1 | 161 | New century1 | 221 | Rhythm Ballad | 281 | Neo-Soul3 |
| 42 | Funky soul3 | 102 | Bachata beat2 | 162 | New century2 | 222 | Hard House | 282 | New Jack Swing |
| 43 | Funky soul4 | 103 | Africa bossanova | 163 | New century3 | 223 | Deep House | 283 | Urban |
| 44 | Funky soul5 | 104 | China dance | 164 | RockDance1 | 224 | Acid House | 284 | Contemporary Instrumental |
| 45 | Slow soul1 | 105 | Pop beat | 165 | RockDance2 | 225 | Progressive House | 285 | Meditation |
| 46 | Slow soul2 | 106 | Vienna waltz | 166 | Psyche delic 1 | 226 | Epic House | 286 | Neo-Classical1 |
| 47 | Soul | 107 | Africa beat | 167 | Psyche delic 2 | 227 | Trible House | 287 | Neo-Classical2 |
| 48 | big band1 | 108 | Africa mambo | 168 | Soft Rock | 228 | Big Beat | 288 | Neo-Classical3 |
| 49 | big band2 | 109 | Euro march1 | 169 | Post Rock | 229 | Down tempo | 289 | New Acoustic |
| 50 | blue grass | 110 | Euro march2 | 170 | Goth Psychedelic ic | 230 | Electro1 | 290 | Solo Instrumental |
| 51 | jazz samba | 111 | Euro merengue1 | 171 | Soul Psychedelic 1 | 231 | Electro2 | 291 | Space |
| 52 | jazz waltz | 112 | Euro merengue2 | 172 | Soul Psychedelic 2 | 232 | Electro3 | 292 | Spiritual |
| 53 | Jazz1 | 113 | Middle East dance | 173 | Soul Psychedelic 3 | 233 | House dance | 293 | Rock New Age |
| 54 | Jazz2 | 114 | Africa dance | 174 | Soul Psychedelic 4 | 234 | Idm | 294 | Ragtime |
| 55 | Swing1 | 115 | Pop samba1 | 175 | Soul Psychedelic 1 | 235 | Jungle Drum | 295 | Bebop or Bop |
| 56 | Swing2 | 116 | Pop samba2 | 176 | Country Blues | 236 | Techno | 296 | Cool jazz |
| 57 | Swing3 | 117 | Africa reggae | 177 | Electric Blues | 237 | Trance | 297 | Free jazz |
| 58 | Country1 | 118 | Euro rhumba1 | 178 | Folk Blues | 238 | Trip-Hop | 298 | Jazz-Rock & Fusion |
| 59 | Country2 | 119 | Euro rhumba2 | 179 | Jazz Blues | 239 | Experimental Electronic | 299 | Jazz Funk |
TABLA DE DEMOS
| 00 | London Bridge Is Falling Down | 17 | Hand in hand | 34 | Prom queen |
| 01 | Fantasy | 18 | Two hundred and fourteen | 35 | Ni Mengruoze |
| 02 | The twist | 19 | Fkey | 36 | Nen blauen Donau |
| 03 | Butter fly | 20 | Mozart Symphonies | 37 | Hawthorn |
| 04 | Paddle a canoe | 21 | The girl's Prayer | 38 | Mary had a little lamb |
| 05 | Country songs | 22 | Nocturne | 39 | Yellow ribbon |
| 06 | Rhythm of the rain | 23 | Another day in paradise | 40 | Toreador Song |
| 07 | Serenade | 24 | Red River Valley | 41 | Radetzky march |
| 08 | Bluegrass Music | 25 | Green sleeves | 42 | Radiant |
| 09 | Music moment | 26 | Mozart Piano Sonatas | 43 | Long Long Ago |
| 10 | Merry Christmas | 27 | Orange and lemon | 44 | Katyusha |
| 11 | American Patrol | 28 | Hallelujah | 45 | Susanna |
| 12 | Flower | 29 | Minuet | 46 | Little star |
| 13 | Pour Elise | 30 | Handshake | 47 | I Don't Care |
| 14 | Direct seeding | 31 | Rain | 48 | Minuet in G major |
| 15 | Turkey March | 32 | Pamela | 49 | Carman Overture |
| 16 | A cradle | 33 | Bnnie Edgar |
natural_image
Symbol of a trash bin crossed with a diagonal line, no text or numbers presentBerlin Brands Group UK Ltd
PO Box 1145
Oxford, OX1 9UW
Reino Unido
Cher client, chère cliente,
text_image
QR code image containing encoded data, no visible human-readable textSOMMAIRE
Fiche technique 60
text_image
HEADPHONES MIC DC 9V ③ ② ①| Wood Block L | Hand Clap | Hi-Hat Open | Hi-Hat Closed | Snare L | Bongo L | Bass Drum H Soft | Bass Drum L |

natural_image
Row of eight gray rectangular icons with icons, no text or symbols presentACCOMPAGNEMENT RYTHMIQUE ET SES FONCTIONS
Choix du rythme
| 00 | Acoustic Grand Piano | 60 | French Horn | 120 | Guitar Fret Noise | 180 | Bright Violin | 240 | Psychedelic Synth Lead |
| 01 | Bright Acoustic Piano | 61 | Brass Section | 121 | Breath Noise | 181 | Stringed violin | 241 | Vibraphone Synth Lead |
| 02 | Electric Grand Piano | 62 | Synth Brass 1 | 122 | Seashore | 182 | Trill violin | 242 | Marimba Synth Lead |
| 03 | Honky-tonk Piano | 63 | Synth Brass 2 | 123 | Bird Tweet | 183 | Electronic violin | 243 | Metal FX |
| 04 | Rhodes Piano | 64 | Soprano Sax | 124 | Telephone Ring | 184 | Rock violin | 244 | Electronic FX |
| 05 | Chorused Piano | 65 | Alto Sax | 125 | Helicopter | 185 | Rhythm Orchestra | 245 | Electronic String Ensenbci |
| 06 | Harpsichord | 66 | Tenor Sax | 126 | Applause | 186 | Pizzicato Violin | 246 | Wind FX |
| 07 | Clavichord | 67 | Baritone Sax | 127 | Gunshot | 187 | Pizzicato Ensemble 1 | 247 | Clarinet FX |
| 08 | Celesta | 68 | Oboe | 128 | Percussion | 188 | Pizzicato Ensemble 2 | 248 | Organ FX |
| 09 | Glockenspiel | 69 | English Horn | 129 | Rhythm electric Piano | 189 | Percussion band | 249 | Crystal FX |
| 10 | Music box | 70 | Bassoon | 130 | Baritone Xylophone | 190 | Baritone Synth Contrabass | 250 | Synth Shamisen |
| 11 | Vibraphone | 71 | Clarinet | 131 | Glass instrument | 191 | Bass Flute | 251 | Electronic Shamisen |
| 12 | Marimba | 72 | Piccolo | 132 | Bright Dulcimer | 192 | Distortion Contrabass | 252 | Bright Sitar |
| 13 | Xylophone | 73 | Flute | 133 | Rhythm Grand Piano | 193 | Contrabass Lead | 253 | Whistle Accord |
| 14 | Tubular Bells | 74 | Recorder | 134 | Traditional Piano | 194 | Violin Lead | 254 | rhythm Nation |
| 15 | Dulcimer | 75 | Pan Flute | 135 | Aluminium jean | 195 | Cello Lead | 255 | Bright Koto |
| 16 | Hammond Organ | 76 | Bottle Blow | 136 | Rock Grand Piano | 196 | Pizzicato rhythm | 256 | Koto Lead |
| 17 | Percussive Organ | 77 | Shakuhachi | 137 | Electronic organ | 197 | high Harp | 257 | Diplophonia Koto |
| 18 | Rock Organ | 78 | Whistle | 138 | Psychedelic electronic | 198 | Harp ensemble | 258 | Baritone Koto |
| 19 | Church Organ | 79 | Ocarina | 139 | Water jean | 199 | Synth Harp | 259 | Synth Koto |
| 20 | Reed Organ | 80 | Lead 1 (square) | 140 | Bright Guitar | 200 | Baritone Trumpet | 260 | Environmental Lead |
| 21 | Accordian | 81 | Lead 2 (sawtooth) | 141 | Orchestra piccolo | 201 | Trumpet ensemble | 261 | Metal Lead |
| 22 | Harmonica | 82 | Lead 3 (caliope lead) | 142 | Heavy metal guitar | 202 | Rhythm Trumpet | 262 | Orchestra Lead |
| 23 | Tango Accordian | 83 | Lead 4 (chiff lead) | 143 | Crystal guitar | 203 | High Trumpet | 263 | Glockenspiel Lead |
| 24 | Acoustic Guitar (nylon) | 84 | Lead 5 (charang) | 144 | Queer electric Piano | 204 | Synth Trumpet | 264 | Bass Lead |
| 25 | Acoustic Guitar (steel) | 85 | Lead 6 (voice) | 145 | Bright bass | 205 | Baritone Trombone | 265 | Fifths Lead |
| 26 | Electric Guitar (jazz) | 86 | Lead 7 (fifths) | 146 | Rock Electric Bass | 206 | Trombone ensemble | 266 | Wind Lead |
| 27 | Electric Guitar (clean) | 87 | Lead 8 (bass+lead) | 147 | Rhythm Electric Bass | 207 | Rhythm Trombone | 267 | Atmosphere Lead |
| 28 | Electric Guitar (muted) | 88 | Pad 1 (new age) | 148 | Psychedelic Bass | 208 | High Trombone | 268 | Sharp Lead |
| 29 | Overdriven Guitar | 89 | Pad 2 (warm) | 149 | Heavy metal bass | 209 | Mediant Trombone | 269 | Bright Lead |
| 30 | Distortion Guitar | 90 | Pad 3 (polysynth) | 150 | Magic electronic | 210 | Synth Trombone | 270 | East Nation Pad |
| 31 | Guitar Harmonics | 91 | Pad 4 (choir) | 151 | Bright violin | 211 | Violin French Horn | 271 | Atmosphere Pad |
| 32 | Acoustic Bass | 92 | Pad 5 (bowed) | 152 | Atonic violin | 212 | French Horn ensemble | 272 | Clear Pad |
| 33 | Electric Bass(finger) | 93 | Pad 6 (metallic) | 153 | Heavy bass orchestra | 213 | Electronic French Horn | 273 | Electric Piano Pad |
| 34 | Electric Bass (pick) | 94 | Pad 7 (halo) | 154 | Synth clarinet | 214 | Synth French Horn | 274 | Clean Guitar Pad |
| 35 | Fretless Bass | 95 | Pad 8 (sweep) | 155 | Interactive Lead | 215 | Psychedelic Synth Brass | 275 | Western Pad |
| 36 | Slap Bass 1 | 96 | FX 1 (rain) | 156 | For the keyboard | 216 | Distortion Synth Brass | 276 | Sci-fi Pad |
| 37 | Slap Bass 2 | 97 | FX 2 (soundtrack) | 157 | Bagpipes | 217 | Vibraphone Synth Brass | 277 | Metal Sci-fi Pad |
| 38 | Synth Bass 1 | 98 | FX 3 (crystal) | 158 | Suona | 218 | Rock Synth Brass | 278 | Clarinet Pad |
| 39 | Synth Bass 2 | 99 | FX 4 (atmosphere) | 159 | Pipa | 219 | Synth Muted Trumpet | 279 | Electronic dance Pad |
| 40 | Violin | 100 | FX 5 (brightness) | 160 | Church Piano | 220 | Soprano Sax ensemble | 280 | Psychedelic electronic |
| 41 | Viola | 101 | FX 6 (goblins) | 161 | Church electric Piano | 221 | rhythm Soprano Sax | 281 | Double Kalimba |
| 42 | Cello | 102 | FX 7 (echoes) | 162 | Synth Piano | 222 | Synth Soprano Sax | 282 | Bright Kalimba |
| 43 | Contrabass | 103 | FX 8 (sci-fi) | 163 | Baritone Piano | 223 | National Sax | 283 | Crystal Kalimba |
| 44 | Tremolo Strings | 104 | Sitar | 164 | Piano PAD | 224 | Metal Sax | 284 | Synth Kalimba |
| 45 | Pizzicato Strings | 105 | Banjo | 165 | String Piano | 225 | Baritone Sax ensemble | 285 | Wind Bagpipe |
| 46 | Orchestral Harp | 106 | Shamisen | 166 | Metal Piano | 226 | Crystal Sax | 286 | high Bagpipe |
| 47 | Timpani | 107 | Koto | 167 | Light rhythm Piano | 227 | Soft Baritone Sax | 287 | Orchestra Bagpipe |
| 48 | String Ensemble 1 | 108 | Kalimba | 168 | electric Piano Pad | 228 | Synth Baritone Sax | 288 | Bright Bagpipe |
| 49 | String Ensemble 2 | 109 | Bagpipe | 169 | Classical piano | 229 | Heavy metal Sax | 289 | Baritone Bagpipe |
| 50 | Synth Strings 1 | 110 | Fiddle | 170 | Guitar organ | 230 | Church Oboe | 290 | Slap Bagpipe |
| 51 | Synth Strings 2 | 111 | Shanai | 171 | An electric guitar | 231 | Bass Oboe | 291 | Environmental Shanai |
| 52 | Choir Aahs | 112 | Tinkle Bell | 172 | synthesis Nylon Guitar | 232 | Bright Oboe | 292 | Mediant Shanai |
| 53 | Voice Oohs | 113 | Agogo | 173 | Synthetic electronic guitar | 233 | Bright Oboe | 293 | Baritone Shanai |
| 54 | Synth Voice | 114 | Steel Drums | 174 | Bright clean Guitar | 234 | Distortio oboe | 294 | Synth Shanai |
| 55 | Orchestra Hit | 115 | Woodblock | 175 | Orchestra Guitar | 235 | English Horn ensemble | 295 | high Shanai |
| 56 | Trumpet | 116 | Taiko Drum | 176 | Psychedelic Guitar | 236 | Pizzicato English Horn | 296 | Bright Steel Drums |
| 57 | Trombone | 117 | Melodic Tom | 177 | Bright organ | 237 | Diplophonia English Horn | 297 | Lyric Steel Drums |
| 58 | Tuba | 118 | Synth Drum | 178 | Pick organ | 238 | Bright English Horn | 298 | Orchestra Steel Drums |
| 59 | Muted Trumpet | 119 | Reverse Cymbal | 179 | Synth accordion | 239 | Synth English Horn | 299 | Synth Steel Drums |
TABLEAU DES RYTHMES
| 00 | Beat 1 | 60 | Country3 | 120 | India samba1 | 180 | Jump Blues | 240 | Western Swing |
| 01 | Beat 2 | 61 | Country4 | 121 | India samba2 | 181 | New Orleans Blues | 241 | Alt-Country |
| 02 | Beat 3 | 62 | Country waltz1 | 122 | Jazz soul | 182 | New York Blues | 242 | Americana |
| 03 | Beat 4 | 63 | Country waltz2 | 123 | Country swing1 | 183 | Piano Blues | 243 | Charanga |
| 04 | Beat 5 | 64 | Country5 | 124 | Country swing2 | 184 | Soul Blues | 244 | Tropical |
| 05 | Beat 6 | 65 | Country6 | 125 | Country swing3 | 185 | Urban Blues | 245 | Ambient |
| 06 | Beat 7 | 66 | Country7 | 126 | Pop waltz | 186 | Afro Beat | 246 | Punk Metal |
| 07 | Beat 8 | 67 | Slow country1 | 127 | Pop classic | 187 | Afro Pop | 247 | Experimental Rock |
| 08 | Beat 9 | 68 | Slow country2 | 128 | OrientalBeat1 | 188 | Celtic Pop | 248 | Noise-Rock |
| 09 | Beat 10 | 69 | Soul country | 129 | OrientalBeat2 | 189 | Hawaiian Pop | 249 | Celtic New Age |
| 10 | Beat 11 | 70 | Baiao | 130 | OrientalBeat3 | 190 | Indian Pop | 250 | Ethnic Fusion |
| 11 | Beat 12 | 71 | Bequine | 131 | OrientalBeat4 | 191 | European Traditions | 251 | Techno-Tribal |
| 12 | Beat 13 | 72 | Bolero | 132 | OrientalBeat5 | 192 | World Fusion | 252 | Experimental |
| 13 | Beat 14 | 73 | Bossanoval | 133 | OrientalBeat6 | 193 | Dou Jin | 253 | Minimalism |
| 14 | Rock 1 | 74 | Lambada | 134 | OrientalBeat7 | 194 | Shima Uta | 254 | Traditional Pop |
| 15 | Rock 2 | 75 | Mambo | 135 | OrientalBeat8 | 195 | Enka | 255 | Noise |
| 16 | Cntr Rock | 76 | Samba | 136 | OrientalBeat9 | 196 | Japanese Folk Music | 256 | Classical beat1 |
| 17 | Country Rock | 77 | Reggae | 137 | OrientalBeat10 | 197 | Middle East Pop | 257 | Classical beat2 |
| 18 | Dance Rock | 78 | Rhumba | 138 | OrientalBeat11 | 198 | Pop baiao | 258 | Classical beat3 |
| 19 | Easy Rock | 79 | Tango | 139 | OrientalBeat12 | 199 | Pop bequine | 259 | Classical beat4 |
| 20 | Glam Rock | 80 | Habanera | 140 | OrientalBeat13 | 200 | New Age Latin | 260 | Classical beat5 |
| 21 | Hard Rock1 | 81 | March1 | 141 | OrientalBeat14 | 201 | New bossanoval | 261 | Classical beat6 |
| 22 | Hard Rock2 | 82 | March2 | 142 | Jazz Rock1 | 202 | Rock lambada | 262 | Classical beat7 |
| 23 | Pop Rock | 83 | Polka1 | 143 | Jazz Rock2 | 203 | Bluse mambo | 263 | Classical beat8 |
| 24 | Rock+Roll | 84 | Polka2 | 144 | Soft Rock | 204 | Pop samba | 264 | Classical beat9 |
| 25 | Rock Beat | 85 | Polka3 | 145 | Classic Rock | 205 | Reggae Ballad | 265 | Classical beat10 |
| 26 | Rock Folk | 86 | Vallenato | 146 | Folkrock1 | 206 | Pop Rhumba | 266 | Classical beat1 1 |
| 27 | Rocky Pop | 87 | Waltz1 | 147 | Folkrock2 | 207 | Rock Tango | 267 | Classical beat1 2 |
| 28 | Dance 1 | 88 | Waltz2 | 148 | Waltz Rock | 208 | Britpop1 | 268 | Classical beat1 3 |
| 29 | Dance 2 | 89 | Waltz3 | 149 | Heavy metal rock1 | 209 | Britpop2 | 269 | Classical beat1 4 |
| 30 | Dance 3 | 90 | Pop | 150 | Heavy metal rock2 | 210 | Britpop3 | 270 | Contemporary R&b1 |
| 31 | Dance 4 | 91 | Love ballad | 151 | 70' Rock | 211 | Britpop4 | 271 | Contemporary R&b2 |
| 32 | Dance 5 | 92 | Easy Beat | 152 | 80' Rock | 212 | Trip Hop1 | 272 | Contemporary R&b3 |
| 33 | Dance 6 | 93 | Soft Beat | 153 | Middle Eastern rock | 213 | Trip Hop2 | 273 | Contemporary R&b4 |
| 34 | Dance 7 | 94 | Shuffle | 154 | Traditional Rock | 214 | Chamber pop | 274 | Contemporary R&b5 |
| 35 | Dance 8 | 95 | Cobmo | 155 | Rock Disco | 215 | Britpopwaltz1 | 275 | Deep Funk |
| 36 | Dance 9 | 96 | Shuffle1 | 156 | Modern dance1 | 216 | Britpopwaltz2 | 276 | Doo Wop |
| 37 | Dance 10 | 97 | Shuffle2 | 157 | Modern dance2 | 217 | Britpopwaltz3 | 277 | Left-Field Hip-Hop |
| 38 | Soul funk | 98 | Slow folk | 158 | Modern dance3 | 218 | Classical ballad1 | 278 | Motown |
| 39 | Euro soul | 99 | Step | 159 | Modern dance4 | 219 | Classical ballad2 | 279 | Neo-Soul1 |
| 40 | Funky soul1 | 100 | Euro pop | 160 | Modern dance5 | 220 | Light Ballad | 280 | Neo-Soul2 |
| 41 | Funky soul2 | 101 | Bachata beat1 | 161 | New century1 | 221 | Rhythm Ballad | 281 | Neo-Soul3 |
| 42 | Funky soul3 | 102 | Bachata beat2 | 162 | New century2 | 222 | Hard House | 282 | New Jack Swing |
| 43 | Funky soul4 | 103 | Africa bossanova | 163 | New century3 | 223 | Deep House | 283 | Urban |
| 44 | Funky soul5 | 104 | China dance | 164 | RockDance1 | 224 | Acid House | 284 | Contemporary Instrumental |
| 45 | Slow soul1 | 105 | Pop beat | 165 | RockDance2 | 225 | Progressive House | 285 | Meditation |
| 46 | Slow soul2 | 106 | Vienna waltz | 166 | Psyche delic 1 | 226 | Epic House | 286 | Neo-Classical1 |
| 47 | Soul | 107 | Africa beat | 167 | Psyche delic 2 | 227 | Trible House | 287 | Neo-Classical2 |
| 48 | big band1 | 108 | Africa mambo | 168 | Soft Rock | 228 | Big Beat | 288 | Neo-Classical3 |
| 49 | big band2 | 109 | Euro march1 | 169 | Post Rock | 229 | Down tempo | 289 | New Acoustic |
| 50 | blue grass | 110 | Euro march2 | 170 | Goth Psychedelic ic | 230 | Electro1 | 290 | Solo Instrumental |
| 51 | jazz samba | 111 | Euro merengue1 | 171 | Soul Psychedelic 1 | 231 | Electro2 | 291 | Space |
| 52 | jazz waltz | 112 | Euro merengue2 | 172 | Soul Psychedelic 2 | 232 | Electro3 | 292 | Spiritual |
| 53 | Jazz1 | 113 | Middle East dance | 173 | Soul Psychedelic 3 | 233 | House dance | 293 | Rock New Age |
| 54 | Jazz2 | 114 | Africa dance | 174 | Soul Psychedelic 4 | 234 | Idm | 294 | Ragtime |
| 55 | Swing1 | 115 | Pop samba1 | 175 | Soul Psychedelic 1 | 235 | Jungle Drum | 295 | Bebop or Bop |
| 56 | Swing2 | 116 | Pop samba2 | 176 | Country Blues | 236 | Techno | 296 | Cool jazz |
| 57 | Swing3 | 117 | Africa reggae | 177 | Electric Blues | 237 | Trance | 297 | Free jazz |
| 58 | Country1 | 118 | Euro rhumba1 | 178 | Folk Blues | 238 | Trip-Hop | 298 | Jazz-Rock & Fusion |
| 59 | Country2 | 119 | Euro rhumba2 | 179 | Jazz Blues | 239 | Experimental Electronic | 299 | Jazz Funk |
TABLEAU DES DÉMOS
| 00 | London Bridge Is Falling Down | 17 | Hand in hand | 34 | Prom queen |
| 01 | Fantasy | 18 | Two hundred and fourteen | 35 | Ni Mengruoze |
| 02 | The twist | 19 | Fkey | 36 | Nen blauen Donau |
| 03 | Butter fly | 20 | Mozart Symphonies | 37 | Hawthorn |
| 04 | Paddle a canoe | 21 | The girl's Prayer | 38 | Mary had a little lamb |
| 05 | Country songs | 22 | Nocturne | 39 | Yellow ribbon |
| 06 | Rhythm of the rain | 23 | Another day in paradise | 40 | Toreador Song |
| 07 | Serenade | 24 | Red River Valley | 41 | Radetzky march |
| 08 | Bluegrass Music | 25 | Green sleeves | 42 | Radiant |
| 09 | Music moment | 26 | Mozart Piano Sonatas | 43 | Long Long Ago |
| 10 | Merry Christmas | 27 | Orange and lemon | 44 | Katyusha |
| 11 | American Patrol | 28 | Hallelujah | 45 | Susanna |
| 12 | Flower | 29 | Minuet | 46 | Little star |
| 13 | Pour Elise | 30 | Handshake | 47 | I Don't Care |
| 14 | Direct seeding | 31 | Rain | 48 | Minuet in G major |
| 15 | Turkey March | 32 | Pamela | 49 | Carman Overture |
| 16 | A cradle | 33 | Bnnie Edgar |
RÉSOLUTION DES PROBLÈMES
natural_image
Symbol of a trash bin crossed with a diagonal line, no text or numbers presentBerlin Brands Group UK Ltd
PO Box 1145
Oxford, OX1 9UW
United Kingdom
Gentile cliente,
text_image
QR code image containing encoded data, no visible human-readable textINDICE
Dati tecnici 78
| Wood Block L | Hand Clap | Hi-Hat Open | Hi-Hat Closed | Snare L | Bongo L | Bass Drum H Soft | Bass Drum L |

natural_image
Row of eight gray rectangular icons with icons below each, no text or symbols presentACCOMPAGNAMENTO RITMICO E LE SUE FUNZIONI
Selezione del ritmo
| 00 | Acoustic Grand Piano | 60 | French Horn | 120 | Guitar Fret Noise | 180 | Bright Violin | 240 | Psychedelic Synth Lead |
| 01 | Bright Acoustic Piano | 61 | Brass Section | 121 | Breath Noise | 181 | Stringed violin | 241 | Vibraphone Synth Lead |
| 02 | Electric Grand Piano | 62 | Synth Brass 1 | 122 | Seashore | 182 | Trill violin | 242 | Marimba Synth Lead |
| 03 | Honky-tonk Piano | 63 | Synth Brass 2 | 123 | Bird Tweet | 183 | Electronic violin | 243 | Metal FX |
| 04 | Rhodes Piano | 64 | Soprano Sax | 124 | Telephone Ring | 184 | Rock violin | 244 | Electronic FX |
| 05 | Chorused Piano | 65 | Alto Sax | 125 | Helicopter | 185 | Rhythm Orchestra | 245 | Electronic String Ensenbci |
| 06 | Harpsichord | 66 | Tenor Sax | 126 | Applause | 186 | Pizzicato Violin | 246 | Wind FX |
| 07 | Clavichord | 67 | Baritone Sax | 127 | Gunshot | 187 | Pizzicato Ensemble 1 | 247 | Clarinet FX |
| 08 | Celesta | 68 | Oboe | 128 | Percussion | 188 | Pizzicato Ensemble 2 | 248 | Organ FX |
| 09 | Glockenspiel | 69 | English Horn | 129 | Rhythm electric Piano | 189 | Percussion band | 249 | Crystal FX |
| 10 | Music box | 70 | Bassoon | 130 | Baritone Xylophone | 190 | Baritone Synth Contrabass | 250 | Synth Shamisen |
| 11 | Vibraphone | 71 | Clarinet | 131 | Glass instrument | 191 | Bass Flute | 251 | Electronic Shamisen |
| 12 | Marimba | 72 | Piccolo | 132 | Bright Dulcimer | 192 | Distortion Contrabass | 252 | Bright Sitar |
| 13 | Xylophone | 73 | Flute | 133 | Rhythm Grand Piano | 193 | Contrabass Lead | 253 | Whistle Accord |
| 14 | Tubular Bells | 74 | Recorder | 134 | Traditional Piano | 194 | Violin Lead | 254 | rhythm Nation |
| 15 | Dulcimer | 75 | Pan Flute | 135 | Aluminium jean | 195 | Cello Lead | 255 | Bright Koto |
| 16 | Hammond Organ | 76 | Bottle Blow | 136 | Rock Grand Piano | 196 | Pizzicato rhythm | 256 | Koto Lead |
| 17 | Percussive Organ | 77 | Shakuhachi | 137 | Electronic organ | 197 | high Harp | 257 | Diplophonia Koto |
| 18 | Rock Organ | 78 | Whistle | 138 | Psychedelic electronic | 198 | Harp ensemble | 258 | Baritone Koto |
| 19 | Church Organ | 79 | Ocarina | 139 | Water jean | 199 | Synth Harp | 259 | Synth Koto |
| 20 | Reed Organ | 80 | Lead 1 (square) | 140 | Bright Guitar | 200 | Baritone Trumpet | 260 | Environmental Lead |
| 21 | Accordian | 81 | Lead 2 (sawtooth) | 141 | Orchestra piccolo | 201 | Trumpet ensemble | 261 | Metal Lead |
| 22 | Harmonica | 82 | Lead 3 (caliope lead) | 142 | Heavy metal guitar | 202 | Rhythm Trumpet | 262 | Orchestra Lead |
| 23 | Tango Accordian | 83 | Lead 4 (chiff lead) | 143 | Crystal guitar | 203 | High Trumpet | 263 | Glockenspiel Lead |
| 24 | Acoustic Guitar (nylon) | 84 | Lead 5 (charang) | 144 | Queer electric Piano | 204 | Synth Trumpet | 264 | Bass Lead |
| 25 | Acoustic Guitar (steel) | 85 | Lead 6 (voice) | 145 | Bright bass | 205 | Baritone Trombone | 265 | Fifths Lead |
| 26 | Electric Guitar (jazz) | 86 | Lead 7 (fifths) | 146 | Rock Electric Bass | 206 | Trombone ensemble | 266 | Wind Lead |
| 27 | Electric Guitar (clean) | 87 | Lead 8 (bass+lead) | 147 | Rhythm Electric Bass | 207 | Rhythm Trombone | 267 | Atmosphere Lead |
| 28 | Electric Guitar (muted) | 88 | Pad 1 (new age) | 148 | Psychedelic Bass | 208 | High Trombone | 268 | Sharp Lead |
| 29 | Overdriven Guitar | 89 | Pad 2 (warm) | 149 | Heavy metal bass | 209 | Mediant Trombone | 269 | Bright Lead |
| 30 | Distortion Guitar | 90 | Pad 3 (polysynth) | 150 | Magic electronic | 210 | Synth Trombone | 270 | East Nation Pad |
| 31 | Guitar Harmonics | 91 | Pad 4 (choir) | 151 | Bright violin | 211 | Violin French Horn | 271 | Atmosphere Pad |
| 32 | Acoustic Bass | 92 | Pad 5 (bowed) | 152 | Atonic violin | 212 | French Horn ensemble | 272 | Clear Pad |
| 33 | Electric Bass(finger) | 93 | Pad 6 (metallic) | 153 | Heavy bass orchestra | 213 | Electronic French Horn | 273 | Electric Piano Pad |
| 34 | Electric Bass (pick) | 94 | Pad 7 (halo) | 154 | Synth clarinet | 214 | Synth French Horn | 274 | Clean Guitar Pad |
| 35 | Fretless Bass | 95 | Pad 8 (sweep) | 155 | Interactive Lead | 215 | Psychedelic Synth Brass | 275 | Western Pad |
| 36 | Slap Bass 1 | 96 | FX 1 (rain) | 156 | For the keyboard | 216 | Distortion Synth Brass | 276 | Sci-fi Pad |
| 37 | Slap Bass 2 | 97 | FX 2 (soundtrack) | 157 | Bagpipes | 217 | Vibraphone Synth Brass | 277 | Metal Sci-fi Pad |
| 38 | Synth Bass 1 | 98 | FX 3 (crystal) | 158 | Suona | 218 | Rock Synth Brass | 278 | Clarinet Pad |
| 39 | Synth Bass 2 | 99 | FX 4 (atmosphere) | 159 | Pipa | 219 | Synth Muted Trumpet | 279 | Electronic dance Pad |
| 40 | Violin | 100 | FX 5 (brightness) | 160 | Church Piano | 220 | Soprano Sax ensemble | 280 | Psychedelic electronic |
| 41 | Viola | 101 | FX 6 (goblins) | 161 | Church electric Piano | 221 | rhythm Soprano Sax | 281 | Double Kalimba |
| 42 | Cello | 102 | FX 7 (echoes) | 162 | Synth Piano | 222 | Synth Soprano Sax | 282 | Bright Kalimba |
| 43 | Contrabass | 103 | FX 8 (sci-fi) | 163 | Baritone Piano | 223 | National Sax | 283 | Crystal Kalimba |
| 44 | Tremolo Strings | 104 | Sitar | 164 | Piano PAD | 224 | Metal Sax | 284 | Synth Kalimba |
| 45 | Pizzicato Strings | 105 | Banjo | 165 | String Piano | 225 | Baritone Sax ensemble | 285 | Wind Bagpipe |
| 46 | Orchestral Harp | 106 | Shamisen | 166 | Metal Piano | 226 | Crystal Sax | 286 | high Bagpipe |
| 47 | Timpani | 107 | Koto | 167 | Light rhythm Piano | 227 | Soft Baritone Sax | 287 | Orchestra Bagpipe |
| 48 | String Ensemble 1 | 108 | Kalimba | 168 | electric Piano Pad | 228 | Synth Baritone Sax | 288 | Bright Bagpipe |
| 49 | String Ensemble 2 | 109 | Bagpipe | 169 | Classical piano | 229 | Heavy metal Sax | 289 | Baritone Bagpipe |
| 50 | Synth Strings 1 | 110 | Fiddle | 170 | Guitar organ | 230 | Church Oboe | 290 | Slap Bagpipe |
| 51 | Synth Strings 2 | 111 | Shanai | 171 | An electric guitar | 231 | Bass Oboe | 291 | Environmental Shanai |
| 52 | Choir Aahs | 112 | Tinkle Bell | 172 | synthesis Nylon Guitar | 232 | Bright Oboe | 292 | Mediant Shanai |
| 53 | Voice Oohs | 113 | Agogo | 173 | Synthetic electronic guitar | 233 | Bright Oboe | 293 | Baritone Shanai |
| 54 | Synth Voice | 114 | Steel Drums | 174 | Bright clean Guitar | 234 | Distortio oboe | 294 | Synth Shanai |
| 55 | Orchestra Hit | 115 | Woodblock | 175 | Orchestra Guitar | 235 | English Horn ensemble | 295 | high Shanai |
| 56 | Trumpet | 116 | Taiko Drum | 176 | Psychedelic Guitar | 236 | Pizzicato English Horn | 296 | Bright Steel Drums |
| 57 | Trombone | 117 | Melodic Tom | 177 | Bright organ | 237 | Diplophonia English Horn | 297 | Lyric Steel Drums |
| 58 | Tuba | 118 | Synth Drum | 178 | Pick organ | 238 | Bright English Horn | 298 | Orchestra Steel Drums |
| 59 | Muted Trumpet | 119 | Reverse Cymbal | 179 | Synth accordion | 239 | Synth English Horn | 299 | Synth Steel Drums |
TABELLA DEI RITMI
| 00 | Beat 1 | 60 | Country3 | 120 | India samba1 | 180 | Jump Blues | 240 | Western Swing |
| 01 | Beat 2 | 61 | Country4 | 121 | India samba2 | 181 | New Orleans Blues | 241 | Alt-Country |
| 02 | Beat 3 | 62 | Country waltz1 | 122 | Jazz soul | 182 | New York Blues | 242 | Americana |
| 03 | Beat 4 | 63 | Country waltz2 | 123 | Country swing1 | 183 | Piano Blues | 243 | Charanga |
| 04 | Beat 5 | 64 | Country5 | 124 | Country swing2 | 184 | Soul Blues | 244 | Tropical |
| 05 | Beat 6 | 65 | Country6 | 125 | Country swing3 | 185 | Urban Blues | 245 | Ambient |
| 06 | Beat 7 | 66 | Country7 | 126 | Pop waltz | 186 | Afro Beat | 246 | Punk Metal |
| 07 | Beat 8 | 67 | Slow country1 | 127 | Pop classic | 187 | Afro Pop | 247 | Experimental Rock |
| 08 | Beat 9 | 68 | Slow country2 | 128 | OrientalBeat1 | 188 | Celtic Pop | 248 | Noise-Rock |
| 09 | Beat 10 | 69 | Soul country | 129 | OrientalBeat2 | 189 | Hawaiian Pop | 249 | Celtic New Age |
| 10 | Beat 11 | 70 | Baiao | 130 | OrientalBeat3 | 190 | Indian Pop | 250 | Ethnic Fusion |
| 11 | Beat 12 | 71 | Bequine | 131 | OrientalBeat4 | 191 | European Traditions | 251 | Techno-Tribal |
| 12 | Beat 13 | 72 | Bolero | 132 | OrientalBeat5 | 192 | World Fusion | 252 | Experimental |
| 13 | Beat 14 | 73 | Bossanoval | 133 | OrientalBeat6 | 193 | Dou Jin | 253 | Minimalism |
| 14 | Rock 1 | 74 | Lambada | 134 | OrientalBeat7 | 194 | Shima Uta | 254 | Traditional Pop |
| 15 | Rock 2 | 75 | Mambo | 135 | OrientalBeat8 | 195 | Enka | 255 | Noise |
| 16 | Cntr Rock | 76 | Samba | 136 | OrientalBeat9 | 196 | Japanese Folk Music | 256 | Classical beat1 |
| 17 | Country Rock | 77 | Reggae | 137 | OrientalBeat10 | 197 | Middle East Pop | 257 | Classical beat2 |
| 18 | Dance Rock | 78 | Rhumba | 138 | OrientalBeat11 | 198 | Pop baiao | 258 | Classical beat3 |
| 19 | Easy Rock | 79 | Tango | 139 | OrientalBeat12 | 199 | Pop bequine | 259 | Classical beat4 |
| 20 | Glam Rock | 80 | Habanera | 140 | OrientalBeat13 | 200 | New Age Latin | 260 | Classical beat5 |
| 21 | Hard Rock1 | 81 | March1 | 141 | OrientalBeat14 | 201 | New bossanoval | 261 | Classical beat6 |
| 22 | Hard Rock2 | 82 | March2 | 142 | Jazz Rock1 | 202 | Rock lambada | 262 | Classical beat7 |
| 23 | Pop Rock | 83 | Polka1 | 143 | Jazz Rock2 | 203 | Bluse mambo | 263 | Classical beat8 |
| 24 | Rock+Roll | 84 | Polka2 | 144 | Soft Rock | 204 | Pop samba | 264 | Classical beat9 |
| 25 | Rock Beat | 85 | Polka3 | 145 | Classic Rock | 205 | Reggae Ballad | 265 | Classical beat10 |
| 26 | Rock Folk | 86 | Vallenato | 146 | Folkrock1 | 206 | Pop Rhumba | 266 | Classical beat1 1 |
| 27 | Rocky Pop | 87 | Waltz1 | 147 | Folkrock2 | 207 | Rock Tango | 267 | Classical beat1 2 |
| 28 | Dance 1 | 88 | Waltz2 | 148 | Waltz Rock | 208 | Britpop1 | 268 | Classical beat1 3 |
| 29 | Dance 2 | 89 | Waltz3 | 149 | Heavy metal rock1 | 209 | Britpop2 | 269 | Classical beat1 4 |
| 30 | Dance 3 | 90 | Pop | 150 | Heavy metal rock2 | 210 | Britpop3 | 270 | Contemporary R&b1 |
| 31 | Dance 4 | 91 | Love ballad | 151 | 70' Rock | 211 | Britpop4 | 271 | Contemporary R&b2 |
| 32 | Dance 5 | 92 | Easy Beat | 152 | 80' Rock | 212 | Trip Hop1 | 272 | Contemporary R&b3 |
| 33 | Dance 6 | 93 | Soft Beat | 153 | Middle Eastern rock | 213 | Trip Hop2 | 273 | Contemporary R&b4 |
| 34 | Dance 7 | 94 | Shuffle | 154 | Traditional Rock | 214 | Chamber pop | 274 | Contemporary R&b5 |
| 35 | Dance 8 | 95 | Cobmo | 155 | Rock Disco | 215 | Britpopwaltz1 | 275 | Deep Funk |
| 36 | Dance 9 | 96 | Shuffle1 | 156 | Modern dance1 | 216 | Britpopwaltz2 | 276 | Doo Wop |
| 37 | Dance 10 | 97 | Shuffle2 | 157 | Modern dance2 | 217 | Britpopwaltz3 | 277 | Left-Field Hip-Hop |
| 38 | Soul funk | 98 | Slow folk | 158 | Modern dance3 | 218 | Classical ballad1 | 278 | Motown |
| 39 | Euro soul | 99 | Step | 159 | Modern dance4 | 219 | Classical ballad2 | 279 | Neo-Soul1 |
| 40 | Funky soul1 | 100 | Euro pop | 160 | Modern dance5 | 220 | Light Ballad | 280 | Neo-Soul2 |
| 41 | Funky soul2 | 101 | Bachata beat1 | 161 | New century1 | 221 | Rhythm Ballad | 281 | Neo-Soul3 |
| 42 | Funky soul3 | 102 | Bachata beat2 | 162 | New century2 | 222 | Hard House | 282 | New Jack Swing |
| 43 | Funky soul4 | 103 | Africa bossanova | 163 | New century3 | 223 | Deep House | 283 | Urban |
| 44 | Funky soul5 | 104 | China dance | 164 | RockDance1 | 224 | Acid House | 284 | Contemporary Instrumental |
| 45 | Slow soul1 | 105 | Pop beat | 165 | RockDance2 | 225 | Progressive House | 285 | Meditation |
| 46 | Slow soul2 | 106 | Vienna waltz | 166 | Psyche delic 1 | 226 | Epic House | 286 | Neo-Classical1 |
| 47 | Soul | 107 | Africa beat | 167 | Psyche delic 2 | 227 | Trible House | 287 | Neo-Classical2 |
| 48 | big band1 | 108 | Africa mambo | 168 | Soft Rock | 228 | Big Beat | 288 | Neo-Classical3 |
| 49 | big band2 | 109 | Euro march1 | 169 | Post Rock | 229 | Down tempo | 289 | New Acoustic |
| 50 | blue grass | 110 | Euro march2 | 170 | Goth Psychedelic ic | 230 | Electro1 | 290 | Solo Instrumental |
| 51 | jazz samba | 111 | Euro merengue1 | 171 | Soul Psychedelic 1 | 231 | Electro2 | 291 | Space |
| 52 | jazz waltz | 112 | Euro merengue2 | 172 | Soul Psychedelic 2 | 232 | Electro3 | 292 | Spiritual |
| 53 | Jazz1 | 113 | Middle East dance | 173 | Soul Psychedelic 3 | 233 | House dance | 293 | Rock New Age |
| 54 | Jazz2 | 114 | Africa dance | 174 | Soul Psychedelic 4 | 234 | Idm | 294 | Ragtime |
| 55 | Swing1 | 115 | Pop samba1 | 175 | Soul Psychedelic 1 | 235 | Jungle Drum | 295 | Bebop or Bop |
| 56 | Swing2 | 116 | Pop samba2 | 176 | Country Blues | 236 | Techno | 296 | Cool jazz |
| 57 | Swing3 | 117 | Africa reggae | 177 | Electric Blues | 237 | Trance | 297 | Free jazz |
| 58 | Country1 | 118 | Euro rhumba1 | 178 | Folk Blues | 238 | Trip-Hop | 298 | Jazz-Rock & Fusion |
| 59 | Country2 | 119 | Euro rhumba2 | 179 | Jazz Blues | 239 | Experimental Electronic | 299 | Jazz Funk |
TABELLA DELLE DEMO
| 00 | London Bridge Is Falling Down | 17 | Hand in hand | 34 | Prom queen |
| 01 | Fantasy | 18 | Two hundred and fourteen | 35 | Ni Mengruoze |
| 02 | The twist | 19 | Fkey | 36 | Nen blauen Donau |
| 03 | Butter fly | 20 | Mozart Symphonies | 37 | Hawthorn |
| 04 | Paddle a canoe | 21 | The girl's Prayer | 38 | Mary had a little lamb |
| 05 | Country songs | 22 | Nocturne | 39 | Yellow ribbon |
| 06 | Rhythm of the rain | 23 | Another day in paradise | 40 | Toreador Song |
| 07 | Serenade | 24 | Red River Valley | 41 | Radetzky march |
| 08 | Bluegrass Music | 25 | Green sleeves | 42 | Radiant |
| 09 | Music moment | 26 | Mozart Piano Sonatas | 43 | Long Long Ago |
| 10 | Merry Christmas | 27 | Orange and lemon | 44 | Katyusha |
| 11 | American Patrol | 28 | Hallelujah | 45 | Susanna |
| 12 | Flower | 29 | Minuet | 46 | Little star |
| 13 | Pour Elise | 30 | Handshake | 47 | I Don't Care |
| 14 | Direct seeding | 31 | Rain | 48 | Minuet in G major |
| 15 | Turkey March | 32 | Pamela | 49 | Carman Overture |
| 16 | A cradle | 33 | Bnnie Edgar |
natural_image
Symbol of a trash bin crossed with a diagonal line, no text or numbers presentPRODUTTORE E IMPORTATORE (UK)
Produttore:
Chal-Tec GmbH, Wallstraße 16, 10179 Berlino, Germania.
Berlin Brands Group UK Ltd
PO Box 1145
Oxford, OX1 9UW
United Kingdom