Etude 255 LCD - MIDI Keyboard Schubert - Free user manual and instructions
Find the device manual for free Etude 255 LCD Schubert in PDF.
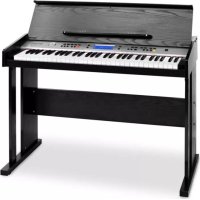
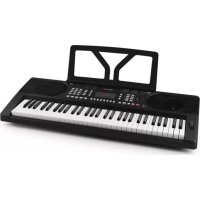
| Product Type | MIDI keyboard with illuminated keys |
| Number of keys | 61 keys |
| Dimensions (approx.) | 100 x 35 x 10 cm |
| Weight (approx.) | 4.5 kg |
| Power Supply | AC adapter 220-240 V ~ 50/60 Hz or 6 AA 1.5 V batteries (not included) |
| Number of sounds | 255 sounds (000-254) |
| Number of rhythms | 255 rhythms (000-254) |
| Demonstration songs | 24 songs (d00-d23) |
| Display | LED display |
| Main functions | Transposition, sustain, vibrato, metronome, recording, playback, auto accompaniment, single/fingered chords, state memory (4 banks), key lighting, 3-level training |
| Connections | Microphone input, audio input (stereo), headphone/audio output, power supply |
| Maintenance and cleaning | Use a dry, soft cloth. Do not use paint, alcohol or solvents. Disconnect before cleaning. |
| Safety | Use only the supplied adapter. Keep away from heat sources. Do not allow liquid or dust to enter. Disconnect if not used for extended periods. |
| Spare parts and repairability | Do not open or modify the device. Any repairs should be carried out by qualified personnel. |
| General information | Manufacturer: Chal-Tec GmbH, Wallstraße 16, 10179 Berlin, Germany. UK importer: Chal-Tec UK limited. |
Frequently Asked Questions - Etude 255 LCD Schubert
User questions about Etude 255 LCD Schubert
0 question about this device. Answer the ones you know or ask your own.
Ask a new question about this device
Download the instructions for your MIDI Keyboard in PDF format for free! Find your manual Etude 255 LCD - Schubert and take your electronic device back in hand. On this page are published all the documents necessary for the use of your device. Etude 255 LCD by Schubert.
USER MANUAL Etude 255 LCD Schubert

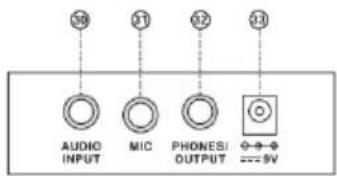
External ports on the rear panel
Training 3: Ensemble
Unit 6 Riverside Business Centre
Brighton Road
Shoreham-by-Sea
BN436RE
United Kingdom
Dear Customer,
Congratulations on purchasing this device. Please read the following instructions carefully and follow them to prevent possible damages. We assume no liability for damage caused by disregard of the instructions and improper use. Scan the QR code to get access to the latest user manual and more product information.
CONTENTS
Technical Data 15
Safety Instructions 16
Overview 17
Performance Preparation 18
Basic Operation 19
Auto Rhythm 20
Auto Bass Chord 21
Status Memory Function 21
Effect Control 22
Recording Programming 23
Rhythm Programming 23
Luminous Key Three-step Training 24
Disposal Considerations 25
TECHNICAL DATA
Item number 10035706 10035707
Power supply 220 - 240V 50 / 60Hz
SAFETY INSTRUCTIONS
Please read over the safety instructions before use!
- Only use the mains adapter included in the scope of delivery. If the mains adapter is damaged, have it replaced immediately.
- The keyboard may only be disassembled by qualified personnel. Do not modify the internal structure yourself. If the unit malfunctions, stop using the unit immediately and send it to qualified personnel for inspection.
- When connecting the keyboard to another device, make sure that both the keyboard and the other device are turned off before making the connection.
- Do not turn the volume all the way up while using the unit and do not use the unit at a very high volume for an extended period of time.
- To avoid damage, keep the unit away from heat sources.
- Take care not to allow liquid, dust, small particles or other foreign objects to enter the unit casing, as this could cause a short circuit.
- Before cleaning the keyboard, disconnect the mains plug from the socket. Never pull out the mains plug with wet hands.
- Use a dry and soft cloth to clean the keyboard. Paint, alcohol or other chemical solutions must not be used for cleaning as this could damage the surface of the device.
- Unplug the unit after use or when not in use for a long period of time.
OVERVIEW
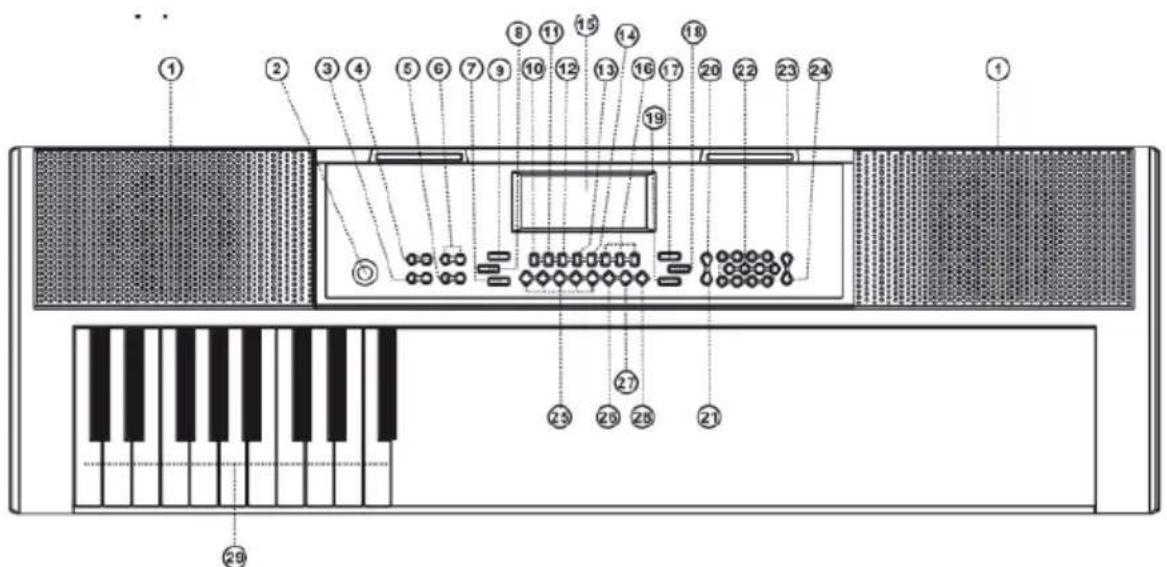
1 Loudspeaker
2 Power On/Off
3 Transpose
4 Master Volume
5 Tempo
6 Aecom Volume
7 Start/Stop
8 Fill-in
9 Sync
10 Single
11 Fingered
12 Record
13 Programming
14 Play
15 LED Display
16 One-key\Follow\Ensemble
17 Demo all
18 Demo one
19 Keyboard Percussion
20 Sustain
21 Vibrato
22 Numbers
23 Timbre
24 Rhythm
25 Memory M1-M4
26 Metronome
27 Split
28 KEYLIGHTING
29 Chord Zone
Anschlüsse
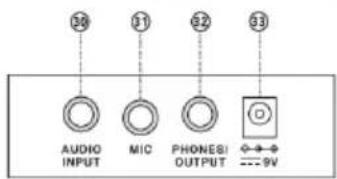
External ports on the rear panel
30 Audio output
31 MIC
32 Phones/Output
33 DC 9V
PERFORMANCE PREPARATION
Installing batteries
Note: Energy or voltage dissipation will result in the loss of volume and timbre distortion. Discharged or bad batteries MUST be replaced immediately to ensure the effect of performance. Always remove the batteries when you are not using the product for a long time.
Power adaptor
A dedicated power adapter shall be used. Connect the output end of the adaptor to the power port on the rear of the keyboard, and then the other end to the power socket. (Note: the input voltage of the adaptor shall be compatible with the power supply voltage)
Audio output / external headphone
- Audio output: firstly, turn off the keyboard and the external audio devices, secondly, connect one end of the audio cable to the PHONES/OUTPUT port on the rear panel rear of the keyboard, and then connect the other end to the audio input port of the audio devices.
- Headphone connection: When connecting a headphone to the PHONES/OUTPUT port on the back of the keyboard, the loudspeaker will be disenabled automatically. In this way, you can perform without disturbing others.
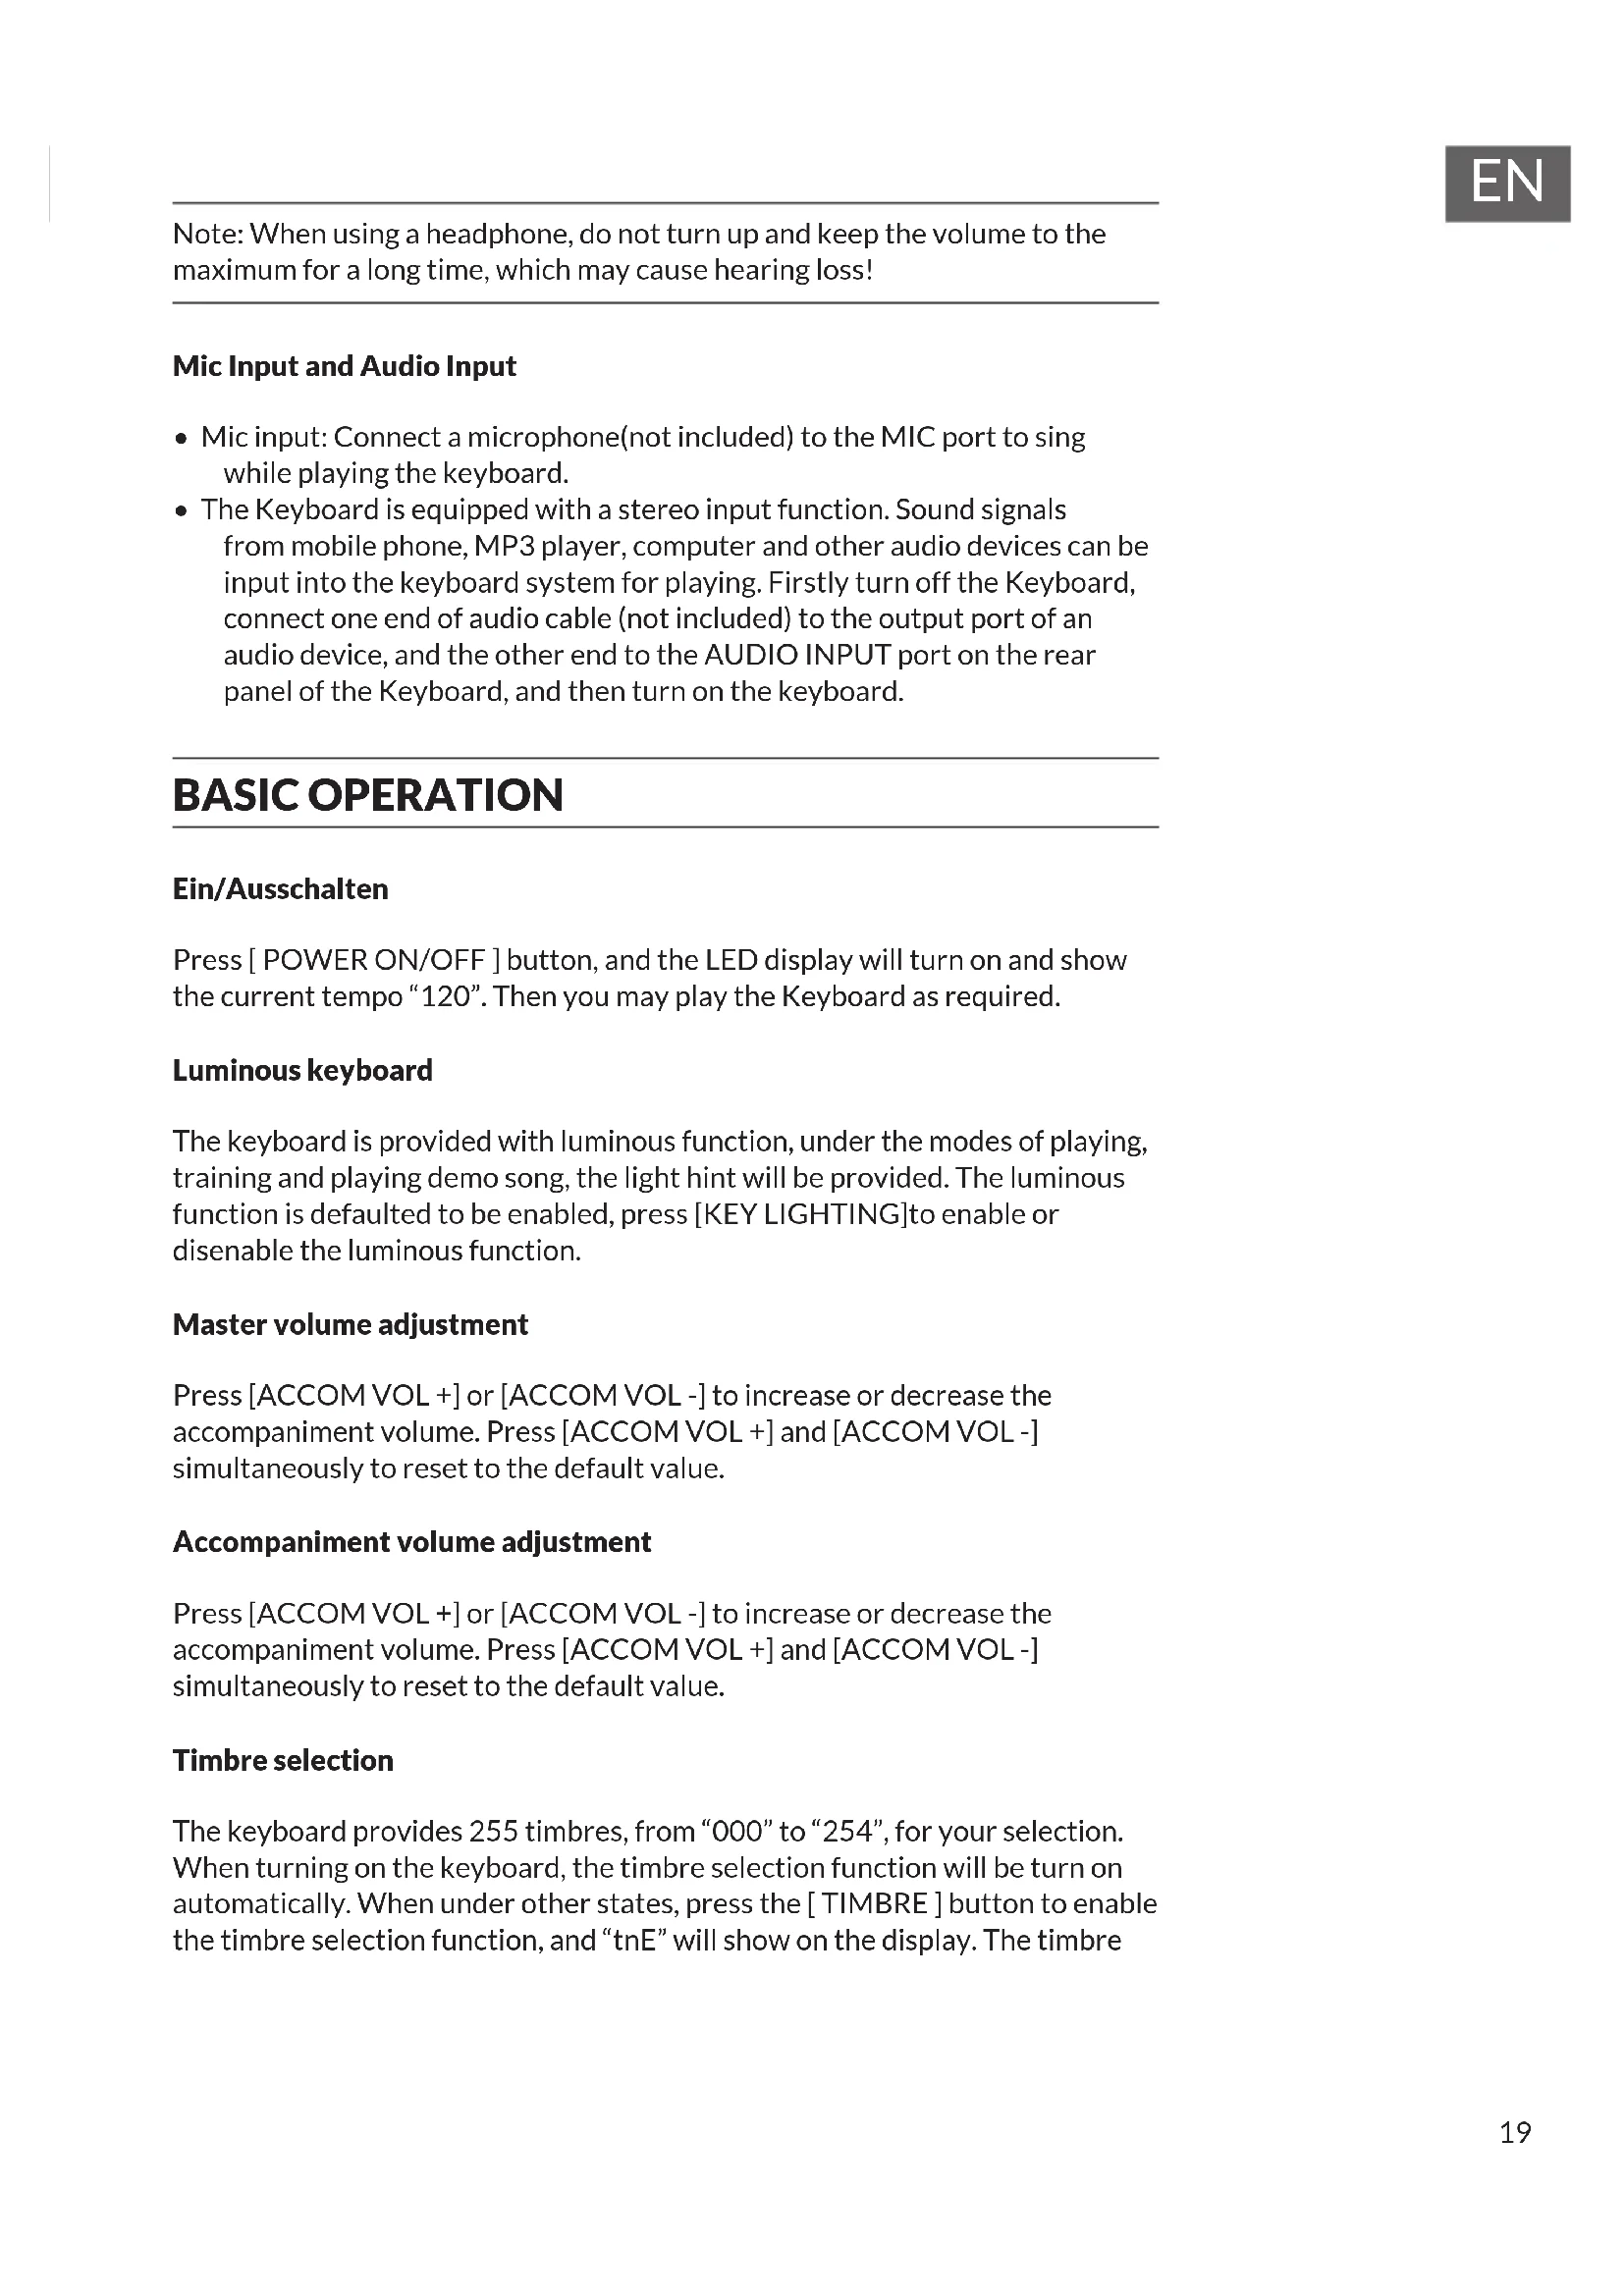
Note: When using a headphone, do not turn up and keep the volume to the maximum for a long time, which may cause hearing loss!
Mic Input and Audio Input
- Mic input: Connect a microphone(not included) to the MIC port to sing while playing the keyboard.
- The Keyboard is equipped with a stereo input function. Sound signals from mobile phone, MP3 player, computer and other audio devices can be input into the keyboard system for playing. Firstly turn off the Keyboard, connect one end of audio cable (not included) to the output port of an audio device, and the other end to the AUDIO INPUT port on the rear panel of the Keyboard, and then turn on the keyboard.
BASIC OPERATION
Ein/Ausschalten
Press [ POWER ON/OFF ] button, and the LED display will turn on and show the current tempo "120". Then you may play the Keyboard as required.
Luminous keyboard
The keyboard is provided with luminous function, under the modes of playing, training and playing demo song, the light hint will be provided. The luminous function is defaulted to be enabled, press [KEY LIGHTING]to enable or disenable the luminous function.
Master volume adjustment
Press [ACCOM VOL +] or [ACCOM VOL -] to increase or decrease the accompaniment volume. Press [ACCOM VOL +] and [ACCOM VOL -] simultaneously to reset to the default value.
Accompaniment volume adjustment
Press [ACCOM VOL +] or [ACCOM VOL -] to increase or decrease the accompaniment volume. Press [ACCOM VOL +] and [ACCOM VOL -] simultaneously to reset to the default value.
Timbre selection
The keyboard provides 255 timbres, from "000" to "254", for your selection. When turning on the keyboard, the timbre selection function will be turn on automatically. When under other states, press the [TIMBRE] button to enable the timbre selection function, and "tnE" will show on the display. The timbre
is defaulted to be "000", and it can be adjusted by pressing the corresponding number buttons or pressing the "+"/ "-" button.
Playing Percussion
This Keyboard provides 8 kinds of panel percussions. Press "Percussion" to play the corresponding precision. Percussion instruments can be added to enhance the atmosphere as required.
This Keyboard provides 61 kinds of keyboard percussions. Press [Percussion] to turn the keyboard into percussion keyboard, and each key corresponds to one percussion instrument. Press this button again to disenable the keyboard percussion function.
Playing demonstration songs
This Keyboard has stored 24 demo songs, from "d00" to "d23", for your selection. Press [Demo Song], and demonstration songs will play in order. During playing process, press [Demo Song] to play the next demonstration song, and press [Start/Strop] to stop playing.
During the playing process, you can press the number buttons or the "+"/ "-" buttons to select other demonstration song, and the selected demonstration song will play repeatedly.
AUTO RHYTHM
Rhythmusauswahl
This Keyboard provides 255 rhythms, from "000" to "254", for your selection, and the rhythm is defaulted to be "000". Press the [Rhythm] button to enable the rhythm selection function. After "rhy" is showed on the display, press the number buttons or the "+"/ "-" buttons to select other rhythms.
Rhythm control
1. Activation
- Press [START/STOP] to start accompaniment rhythm.
- Press [SYNC], after "Syn" is shown on the screen, play any key in the chord key zone (the 1st-19th key, from left), the accompaniment rhythm will be activated.
2. Fill-in
After the accompaniment rhythm is activated, press [FILL-IN] to have a temporary rhythm play during the accompaniment rhythm. If press and hold [FILL-IN], the temporary rhythm will continue.
3. Stop rhythm
During the accompaniment rhythm, press [ START/STOP ] to stop the accompaniment rhythm.
Metronome
The metronome contains four tempos, 1/4, 2/4, 3/4 and 4/4, respectively. Press the [Metronome] continuously to select the four tempos. Press the [Metronome] bottom again to stop the tempo.
Tempo adjustment
Press [TEMPO + ] or [TEMPO - ] to increase or decrease the rhythm speed. Pressing the two buttons simultaneously may reset to the default.
AUTO BASS CHORD
Single chord When the rhythm is activated, press [SINGLE]. After the "Sin" is shown on the screen, you can play a single chord on the keys in the chord zone of the keyboard.
Press [SINGLE] again, "OFF" will be shown on the screen, and the single chord function will be disassembled.
Single chord fingering
(see Appendix A)
Fingered chord fingering
(see Appendix B)
When the rhythm is activated, press [FINGERED]. After the "Fin" is shown on the screen, you can play a figured chord on the keys in the chord zone of the keyboard. When [FINGERED] is pressed again, "OFF" will show on the screen, and the fingered chord function will be disenable.
STATUS MEMORY FUNCTION
With the status memory function, you can save the tone, rhythm, tempo and other parameters to be changed during playing, for fast shifting. This keyboard is equipped with 3 status memories, which can be flexibly called at any time during playing.
Storage of Status Memory
Set the tone, rhythm, tempo and chord as required, and then press the
[Status Memory] button, and select [Memory 1] to [Memory 3] to save the current status.
Calling of Status Memory
Press any one of [Memory 1] to [Memory 3] to call the setting parameters saved under this memory to replace the current status.
HINWEIS
With the transposing function, you can play music of other tunes with C-tune fingering method. Press the [Transpose-] to decrease the tone by half-tone (minor second), and the tune in C-tune keyboard zone will change to B-tune. Press the [Transpose-] to increase the tone by half-tone (minor second), and the tune in C-tune keyboard zone will change to #C tune or bD tune. When pressing the [Transpose-] for twice, C-tune will shift to bB-tune, when pressing the [Transpose +] for five times, C-tune will shift to F-tune. Press [Transpose+] and [Transpose-] simultaneously to recover to C-tune "00". Press [Transpose +] and [Transpose -] to adjust the level from "P-6" to "P06".
Sustain function
Pressing [Sustain], "SUS" will show on the display, and the sustain effect will be activated. Press this button again to disenable the sustain effect..
Vibrato function
Press [Vibrato], "Vib" will show on the display, and the vibrato effect will be activated. Press this button again to disenable the vibrato effect.
RECORDING PROGRAMMING
Recording
Press the [REC] button to enable when the recording function is enabled by pressing [REC], "rEC" will show on the screendisplay. Under this mode all playing notes will be recorded. When the storage is full, "FUL" will show on the screendisplay, and recording will stop automatically.
Playback recording
Press the [PLAY] button to playback the recorded notes, and "PLy" will show on the screendisplay. On completion of playback, it will enter to the recording mode and "rEC" will show on the screendisplay. You can record a new rhythm, or you can press [PLAY] to playback the recorded rhythm.
Stop recording
Press [ START/STOP] or press [REC] again to disenable the recording function, and all recorded rhythm will be removed.
RHYTHM PROGRAMMING
When the rhythm programming function is enabled by press [PROG], "Prg" will show on the screen, and the keyboard percussion will be activated. Under this mode, you can create custom rhythms by playing the corresponding percussion key.
- 32 percussions can be recorded at maximum; after that "FUL" will show on the screen and programming will stop automatically.
- Press [PLAY] to playback the programming rhythm. By pressing [PLAY] again to stop playback, "Prg" will show on the screen and programming function will be enabled. You can re-program rhythms or you can press the [PLAY] button again to playback.
- Press [PLAY] to playback the programming rhythm.
- Press [START/STOP] or press [PROG] again to disenable the programming function, and all recorded rhythm will be removed.
LUMINOUS KEY THREE-STEP TRAINING
Training 1: ONE-KEY
Press [One Key] to enable the single key training function, and then press "+"/"" button to select the song to be learned.
One key training aims at duration learning, and there is no requirement on pitch or creativeness. This mode allows for mistakes when playing the keys, but the keyboard still plays correct notes, and the screen will show the correct notes.
After one song is finished, repeat the current song to be learned.
Press [Start/Stop] or press the [Single Key] button to disenable the training function.
Training 2: FOLLOW
Press [Follow] to enable the follow function, and then press +- button to select the song to be learned.
With [Follow] training, you can learn by following the correctly playing notes. You can also learn by following the notes show on the screen, it will wait for you to play the correct note before it moves to the next one.
Note: Under this state, the Keyboard plays only the correct notes, and gives no response to the wrong notes.
Press [Start/Stop] or press [Follow] to disenable the training function.
Training 3: ENSEMBLE
Press [Ensemble] to enable the ensemble function, and then press + /" button to select the song to be learned.
The Ensemble training aims at the correct and comprehensive learning of the song duration and notes. The keynote will be shielded for ensemble, and you need to play the correct note according to the correct duration of the song.
If you fail to play within 3 seconds, the keyboard will automatically play the correct note.
After one song is finished, repeat the current song to be learned.
Press the [Start/Stop] button or press [Ensemble] to disenable the training function.
DISPOSAL CONSIDERATIONS
If there is a legal regulation for the disposal of electrical and electronic devices in your country, this symbol on the product or on the packaging indicates that this product must not be disposed of with household waste. Instead, it must be taken to a collection point for the recycling of electrical and electronic equipment. By disposing of it in accordance with the rules, you are protecting the environment and the health of your fellow human beings from negative consequences. For information about the recycling and disposal of this product, please contact your local authority or your household waste disposal service.
This product contains batteries. If there is a legal regulation for the disposal of batteries in your country, the batteries must not be disposed of with household waste. Find out about local regulations for disposing of batteries. By disposing of them in accordance with the rules, you are protecting the environment and the health of your fellow human beings from negative consequences.
MANUFACTURER & IMPORTER (UK)
Manufacturer:
Chal-Tec GmbH, Wallstrasse 16, 10179 Berlin, Germany.
Importer for Great Britain:
Chal-Tec UK limited
Unit 6 Riverside Business Centre
Brighton Road
Shoreham-by-Sea
BN436RE
United Kingdom
Cher client, chere clientele,
External ports on the rear panel
30 Entre audio
31 MIC
32 Casque/sortie
33 DC 9V
PREPARATION
Insertion des piles
Unit 6 Riverside Business Centre
Brighton Road
Shoreham-by-Sea
BN436RE
United Kingdom
Estimado cliente,

External ports on the rear panel
30 Entrada de audio
31 MIC
32 Auriculares/ salida
33 CC 9V
PREPARACION
Unit 6 Riverside Business Centre
Brighton Road
Shoreham-by-Sea
BN436RE
United Kingdom
Gentile Cliente,

External ports on the rear panel
PRODUTTORE IMPORTATORE (UK)
Produtlore:
Chal-Tec GmbH, Wallstraße 16, 10179 Berlin, Germania.
Unit 6 Riverside Business Centre
Brighton Road
Shoreham-by-Sea
BN436RE
United Kingdom
ANHÄNGE APPENDICES
ANHANGA APPENDIX A
014 Acoustic Guitar (Nylon)
015 Acoustic Guitar (Steel)
016 Electric Guitar (Jazz)
017 Electric Guitar (Clean)1
018 DistortionGuitar
019 Acoustic Bass
020 Electric Bass (Finger)
021 Electric Bass (Pick)
022 Fretless Bass
023Slap Bass 1
024Slap Bass 2
025 Synth Bass 1
026 Synth Bass 2
027 Violin
028 Viola
029 Cello
030Orchestral Harp
031 String Ensemble 1
032 Trumpet
033 Trombone
034 Tuba
035 French Hom
036 Brass Section 089 Bag Pipe 1
037 Synth Brass 1
038 Soprano Sax
039 Alto Sax 1
040 Tenor Sax
041 Baritone Sax
042 Oboe
043 Bassoon
044 Clarinet
045 Piccolo
046Flute
047 Pan Flute
048 Lead (Square)
049 Banjo
050 E-Tone Piano
051 Electric Grand Piano
052 Honky-tonik Piano
053 Harpsichord 1
054Claw1
055 Glockenspiel 1
056 Tubular Bells 1
057 Dulcimer 1
058 Drawbar Organ 1
059 Tango Accordion 1
060 Electric Guitar
(Muted)1
061 Overdriven Guitar 1
062 Contrabass 1
063 Tremolo Strings
064 Pizzicato Strings 1
065 Timpani
066 String Ensemble 2
067 Synth Strings 1
068 Synth Strings 2
069 ChoiAahs
070VoiceOohs
071 Synth Voice
072Orchestra Hit
073 Muted Trumpet 1
074 Symth Brass 2
075 English Hom 1
076 Recorder
077 Blown Bottle 1
078 Shakuhach
079 Whistle
080 Ocarina
081 Lead (Sawtooth)1
082 Lead (Calliope)1
083 Lead (Bass+Lead)1
084 Pad (Warm)1
085 Sitar
086 Shamisen 1
087 Koto 1
088Kalimba1
089 Bag Pipe 1
090 Fiddle 1
091 Shanai 1
092 Tinkle Bell
093 Agogo 1
094 Steel Drums
095 Woodblock 1
096 Taiko Drum
097 Melodic Tom 1
098 Synth Drum
099 Reverse Cymbal
100 Jungle Bass 1
101 Pi Pa 1
102 Feedback Gl. 1
103 Uillean Harp 1
104 Jazz Bass 1
105 Flugel Horn 1
106 Muted Horn 1
107 Wood Barafon 1
108 Electric Piano 1
109 Multi Reed 1
110GuitarPinch1
111 Multi Wind 1
112 Clavi 2
113 Celesta 2
114 Harpsichord 2
115 Mellow Fm 1
116 Pi Pa 2
117 Upright Piano 1
118 Electric Piano 2
119 Hard Vibe 1
120 Wood Barafon 2
121 Music Box 2
122 Marimba 2
123 Santur
124 Reed Organ 2
125 Puff Harmonica 1
126 Ukulele 1
127 12-str. Gt 1
128GuitarPinch2
129 Slow Violin 1
130 Bright String 1
131 Jungle Bass 2
132 Indian Flute 1
133 Clavi 3
134 Celesta 3
135 Church Bells
136 Marimba 3
137 Dulcimer 2
138 Reed Organ 3
139 Electric Guitar (Clean)2
140 Koto 2
141 Xylophone 2
142 Shanai 2
143 Dulcimer 3
144 English Hom 2
145 Electric Guitar (Clean)3
146 Shamisen 2
147 Koto 3
148 Kalimba 2
149 Steel Bell 1
150 Alto Sax 2
151 Woodblock 2
152 Synth Harpsi. 1
153 Attack Clav. 1
154 Crystal 1
155 Bag Pipe 2
156 Barafon 1
157 Organ Flute 1
158 Kalimba 3
159 Reed Hom 1
160 Hard Vibe 2
161 Twin Trombones 1
162 Synth Harpsi. 2
163 Attack Clav. 2
164 Chorus Guitar 1
165 Steel Bell 2
166 Tsugaru
167 Oct Harp 1
168 Bodhran 1
169 Tubular Bells 2
170 Suona
171 Castanets
172 Attack Harp 1
173 Electric Vibraphone 1
174 Soft Sax 1
175 Soft Clay. 1
176 Soft Guitar 1
177 Grow Guitar 1
178 Didgeridoo 1
179 Attack Barafon 1
180 Mute Barafon 1
181 Nay 1
182 Soft Santur
183 Dual Homs 1
184 Hard Barsoon 1
185 Tron Flute 1
186 Kawala 1
187 Jazz Organ 1
188 Soft Accord 1
189 Wind Organ 1
190 Viola Attack 1
191 Bar & Tenor 1
192 Soft Sax 2
193 Attack Harp 2
194 Didgeridoo 2
195 Dual Homs 2
196 Hard Barsoon 2
197 Kawala 2
198 Soft Guitar 2
199 Mute Barafon 2
200 Lead (Bass+Lead)2
201 Melodic Tom 2
202 Grow Guitar 2
203 Lead (Sawtooth)2
204 Jazz Bass 2
205 Chorus Guitar 2
206 Feedback Gt. 2
207 Fiddle 2
208 Organ Flute 2
209 Flugel Horn 2
210 Crystal 2
211 Soft Clay. 2
212 Overdriven Guitar 2
213 Ukulele 2
214 Tango Accordion 2
215 Twin Trombones 2
216 Jazz Organ 2
217 Bright String 2
218 Reed Horn
219 Glockenspiel 2
220 Drawbar Organ 2
221 Muted Horn 2
222 Pizzicato Strings 2
223 Nay 2
224 Puff Harmonica 2
225 Muted Trumpet 2
226 Upright Piano 2
227 Soft Accord 2
228 Uillean Harp 2
229 Tron Flute 2
230 Blown Bottle 2
231 Indian Flute 2
232 Slow Violin 2
233 Electric Guitar
(Muted)2
234 Multi Wind 2
235 Electric Vibraphone 2
236 Bodhran 2
237 Mellow Fm 2
238 Multi Reed 2
239 Contrabass 2
240 Barafon 2
241 Wind Organ 2
242 12-str. Gt 2
243 Attack Barafon 2
244 Lead (Calliope)2
245 Viola Attack 2
246 Pad (Warm)2
247 Oct Harp 2
248 Bari & Tenor 2
249 Agogo 2
250 Flugel Hom 3
251 Organ Flute 3
252 Fiddle 3
253 Feedback Gt. 3
254 Chorus Guitar 3
Rhythmmen Rhythms
| 000 Hard Rock | 051 China 2 | 102 Jazz Latin 1 | 153 Club Dance 1 | 204 Caribbean Dance 2 |
| 001 Club Pop | 052 China 3 | 103 Unplugged | 154 Tricks Bossa Nova | 205 Jazz disco 2 |
| 002 Fusion | 053 China 4 | 104 Boogie | 155 Tarantella 2 | 206 Medium Jazz |
| 003 Rap Pop | 054 China 5 | 105 Cumbia 2 | 156 USA March | 207 Piano Ballad |
| 004 British Pop 1 | 055 8 Bt Up Tempo | 106 Classical Slow Rock | 157 Espag Nol 2 | 208 70's disco |
| 005 Twist | 056 16 Beat Pop | 107 European disco 1 | 158 Club Latin 2 | 209 Jazz Rock 2 |
| 006 8 Beat Pop 1 | 057 16 Bt Shuffle 1 | 108 Big Band Middle 1 | 159 Jazz Cha Cha 1 | 210 Europe 8 Beat 1 |
| 007 Fusion Shuffle | 058 16 Bt Shuffle 2 | 109 Christon | 160 Country Cha Cha | 211 Seville 2 |
| 008 Funk | 059 16 Bt Ballad 1 | 110 Pasodobi | 161 disco Party 2 | 212 Rumba 3 |
| 009 Funk Shuffle | 060 16 Bt Ballad 2 | 111 Cat Groove 1 | 162 Modern R&B 1 | 213 Soul Rock 2 |
| 010 Rock'n Roll 1 | 061 Soul | 112 Jazz Tango 1 | 163 8 Beat Pop 2 | 214 European disco 2 |
| 011 Rock Pop | 062 Pop Rock 1 | 113 Fast Gospel | 164 Country Jazz | 215 Analog Ballad 2 |
| 012 Rock Shuffle | 063 Pop Rock 2 | 114 Big Band Fast 1 | 165 Soul Rock 1 | 216 Pub Piano 2 |
| 013 Rock Cha Cha | 064 8 Bt Rock Balld | 115 Tricks Mambo | 166 Rumba 2 | 217 Europe Rumba |
| 014 Straight Rock | 065 16 Bt Rock Balld | 116 Funky disco 2 | 167 Samba 3 | 218 Rock'n Roll 2 |
| 015 Folk Rock | 066 6/8 Hvy Rock | 117 Latin Salsa | 168 Modern R&B 2 | 219 disco Trop |
| 016 Pasodoble | 067 16 Beat Rock | 118 Pop New Age 2 | 169 Club Dance 2 | 220 Rock Salsa 1 |
| 017 Cha Cha | 068 Bossa Nova 1 | 119 Jazz Swing 1 | 170 Country Bossa Nova | 221 Europe 8 Beat 2 |
| 018 Fox Trot | 069 Bossa Nova 2 | 120 Trip Hop | 171 Jazz Bo 1 | 222 Europe Samba |
| 019 Rumba 1 | 070 Salsa | 121 Rave 2 | 172 Modern Cha Cha 1 | 223 Show Tune 2 |
| 020 Samba 1 | 071 Mambo | 122 Acoustic Ballad 1 | 173 Pop Reggae 2 | 224 Jazz 16 Beat 2 |
| 021 Samba 2 | 072 Beguine | 123 India's Indigenous | 174 Rock Samba 1 | 225 Rock Samba 2 |
| 022 Schlager Rock | 073 Bolero Lento | 124 Indonesian Pop | 175 Jazz 8 Beat 1 | 226 Jazz Waltz 2 |
| 023 Tango 1 | 074 Espagnole | 125 Pop Ballad | 176 disco | 227 Europe Reggae |
| 024 Tango 2 | 075 Reggae 12 | 126 South Africa Country | 177 Seville 1 | 228 Modern Cha Cha 2 |
| 025 disco Latin 1 | 076 Pop Reggae 1 | 127 South Africa Polka | 178 disco Hands 2 | 229 R&B Ballad 2 |
| 026 Calypso | 077 Slow Rock 1 | 128 Tarantella 1 | 179 Rock Ballad | 230 Rock Boogie |
| 027 Latin Rock | 078 Slow Rock 2 | 129 Bright Pop | 180 Mixed Bossa Nova | 231 Jazz Bossa Nova |
| 028 Bolero | 079 R&B | 130 Pub Piano 1 | 181 Jazz 16 Beat 1 | 232 Rock Salsa 2 |
| 029 Analog Ballad 1 | 080 Dance Pop 1 | 131 West Shuffle | 182 Single 16 Beat 1 | 233 Slow & Easy |
| 030 E_Ballad | 081 Dance Pop 2 | 132 Big Band Fast 2 | 183 Love Song | 234 Hip Waltz 1 |
| 031 Country Ballad | 082 Euro Beat | 133 Espag Nol 1 | 184 Single 16 Beat 2 | 235 Jazz Latin 2 |
| 032 Electro Pop | 083 Euro House | 134 Disco Funk 2 | 185 Disco Fox 2 | 236 Rock disco 2 |
| 033 Pop New Age 1 | 084 Hip Hop | 135 Pop Mambo | 186 Pop Rock 3 | 237 Jazz Tango 2 |
| 034 8 Beat Modern 1 | 085 Swing | 136 Europe Swing 1 | 187 Tijuana Waltz | 238 Analog Ballad 3 |
| 035 R&B Ballad 1 | 086 Big Band Swing | 137 Tricks Latin | 188 British Pop 2 | 239 Europe Swing 2 |
| 036 Disco Fox 1 | 087 Jazz Quartet | 138 Disco Samba 2 | 189 Show Tune 1 | 240 Hip Waltz 2 |
| 037 Disco Funk 1 | 088 Dixieland | 139 Latin Waltz | 190 Schlager Alp | 241 Jazz Swing 2 |
| 038 Disco Party 1 | 089 Bluegrass 1 | 140 Dance Pop 3 | 191 Single Rock | 242 Party Pop |
| 039 Disco Samba 1 | 090 Bluegrass 2 | 141 Jazz Rock 1 | 192 Swing Waltz | 243 Jazz Club |
| 040 Disco Soul | 091 8 Bt Country | 142 Detroit | 193 Slow Waltz | 244 Guad Dance 2 |
| 041 Disco Trot | 092 Country Rock | 143 Fanatical Sand | 194 Cat Groove 2 | 245 Jazz Bo 2 |
| 042 Rave 1 | 093 Ctry Ballad | 144 European Rock 1 | 195 Country Slow Rock | 246 Dixie Jazz 2 |
| 043 Funky Disco 1 | 094 March 1 | 145 Ground Beat | 196 Rock Disco 1 | 247 Acoustic Ballad 2 |
| 044 Techno 1 | 095 March 2 | 146 8 Beat Modem 2 | 197 16 Beat Shuffle 1 | 248 Jazz Slow Rock |
| 045 Techno 2 | 096 Polka | 147 Jazz Disco 1 | 198 Jazz 8 Beat 2 | 249 16 Beat Shuffle 2 |
| 046 Saturday Night 1 | 097 Pop Waltz | 148 Dixie Jazz 1 | 199 Casa | 250 Polka Pop |
| 047 Club Latin 1 | 098 Jive | 149 Disco Chocolate | 200 Guad Dance 1 | 251 Latin Party Pop |
| 048 Disco Hands 1 | 099 Vienna Waltz | 150 Disco Latin 2 | 201 Jazz Cha Cha 2 | 252 Parranda |
| 049 Country | 100 8 Beat Soul | 151 Synth Boogie | 202 Country Waltz | 253 Carnival |
| 050 China 1 | 101 Classical 8 Beat | 152 Saturday Night 2 | 203 European Rock 2 | 254 60's Vintage Pop |