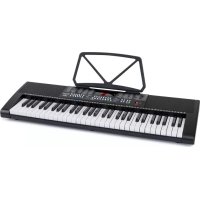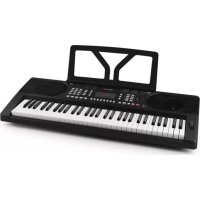
Etude61B - MIDI Keyboard Schubert - Free user manual and instructions
Find the device manual for free Etude61B Schubert in PDF.



User questions about Etude61B Schubert
0 question about this device. Answer the ones you know or ask your own.
Ask a new question about this device
Download the instructions for your MIDI Keyboard in PDF format for free! Find your manual Etude61B - Schubert and take your electronic device back in hand. On this page are published all the documents necessary for the use of your device. Etude61B by Schubert.
USER MANUAL Etude61B Schubert
text_image
R OUT L HEAD- PHONES DC 12V - - + 29 30 31| Number | Code of Song | Number | Code of Song |
| 01 | Turkey march | 05 | Red river valley |
| 02 | Oh! Susanna | 06 | Katyusha |
| 03 | American patrol | 07 | Zmpromptu |
| 04 | Hawthorn | 08 | Toreador song |
| Number | Name of drum | Number | Name of drum |
| 00 | Hi-Hat Closed | 04 | Bass Drum |
| 01 | Hi-Hat Open | 05 | Hand Clap |
| 02 | Low Tom | 06 | Hi-Hat Pedal |
| 03 | Snare | 07 | Slap Crash Cymbal |

flowchart
graph LR
    A["Stage 1"] --> B["Stage 2"]
    B --> C["Stage 3"]
    C --> D["Stage 4"]
    D --> E["Stage 5"]
    E --> F["Stage 6"]
    F --> G["Stage 7"]
    G --> H["Stage 8"]
natural_image
Symbol of a trash bin crossed with a diagonal line, no text or labels presentCongratulations on purchasing this equipment. Please read this manual carefully and take care of the following hints to avoid damages. Any failure caused by ignoring the mentioned items and cautions mentioned in the instruction manual are not covered by our warranty and any liability.
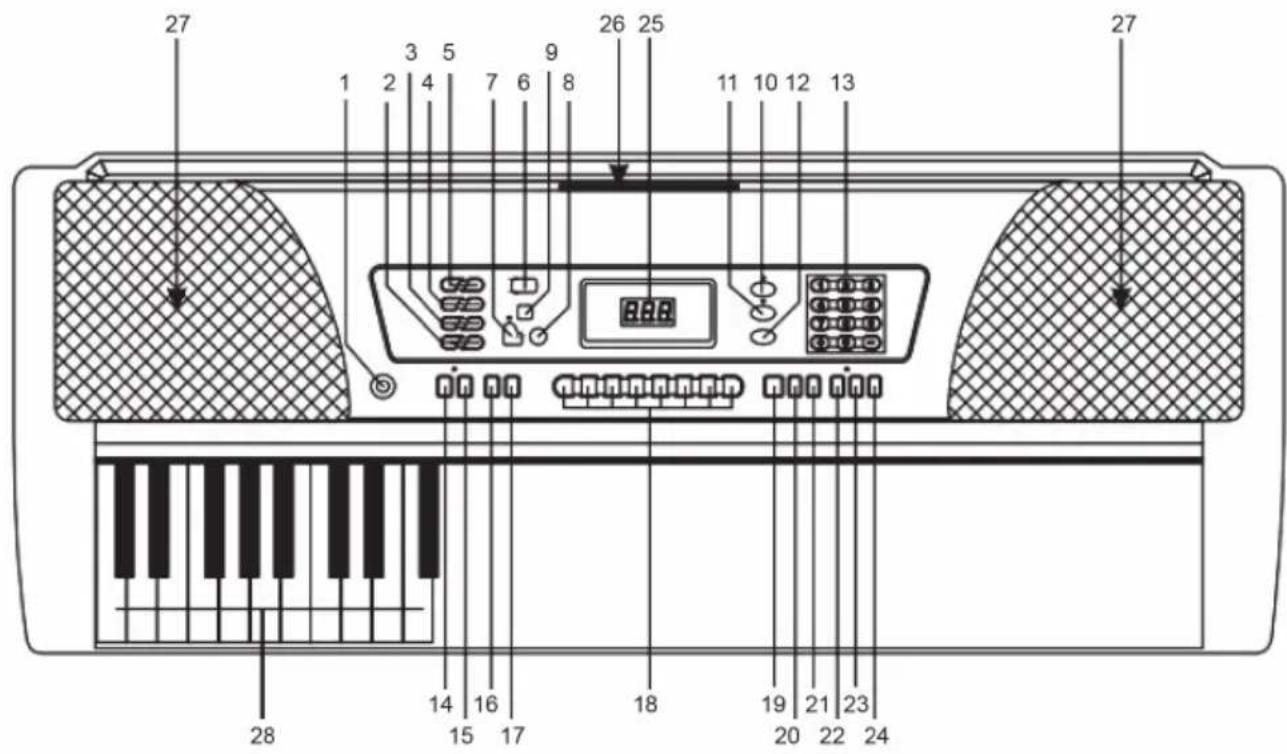
Panel Control and External Function
text_image
27 1 2 3 4 5 6 7 8 9 26 25 11 10 12 13 27 28 14 16 15 17 18 19 21 23 20 22 24-
Power switch
-
Transpose
3.Tempo
- RhyVol
5.Main Vol
- Demo song
7.Record
-
Program
-
Replay
10.Tone
11.Rhythm
-
Song
-
Digit key/ +/- button
-
Sustain
15.Vibrato
-
Guide A
-
Guide B
18.Panel drums
19.Start/Stop
20.Fill in
-
Sync
-
Single Chord
-
Finger Chord
24.ToneCLR
25.LED display
-
Music stand entry
-
Loudspeaker
-
Auto chord keyboard
text_image
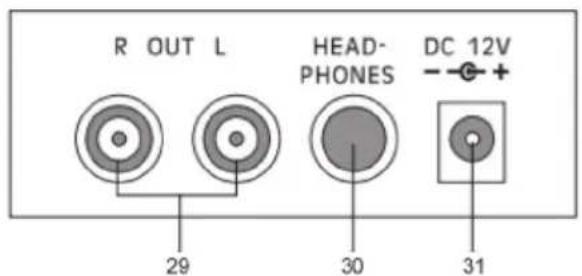
R OUT L HEAD- PHONES DC 12V - - + 29 30 31External Jacks in the rear:
29 Left/right track audio
30 Headphone
31 DC 12V input
Preparation before performance
Use AC/DC power adapter
Please use the special AC/DC power adapter provided with this electronic organ or the power adapter with DC 12V voltage and >1A out current and with central anode. Connect the DC plug of power adapter into the DC12V power socket in the rear of electronic organ. Then connect the other end into main socket (see that the input voltage of power adapter conform to the voltage of electric supply), finally turn on power switch and start performance. When you do not use this electronic organ for a long term, you should pull out the plug of power adapter from main socket safely to avoid possible causing trouble of part or other accident in long term charging.
Use of Batteries
Open the battery lid in the bottom of electronic organ and load eight 1.5V Size D batteries. Ensuring the polarity should conform to the direction marked on battery lid. Replace the lid after loading batteries.
Caution: Do not use batteries of different kinds and mix new and old batteries. Low batteries will cause low volume or poor timbre and replace batteries at that time. To avoid possible damage caused by battery liquid leakage, please take out batteries if you will not use the electronic organ for a long term.
Fitting Jack
Use of Headphone
Connect headphone plug into "HEADPHONE" jack in the rear of electronic organ. Now the internal speakers are automatically switched off. Use of headphone in performance does not interfere with anybody else, suiting personal monitor and exercising at night.
Connection with Amplifier or Hi-Fi Equipment
This electronic organ has built-in speaker system. Alternatively, it can also be connected to any external amplifier or hi-fi equipment. First turn off the switch of electronic organ and external equipment, then insert one end of stereo audio cable into LINE IN or AUXIN jack of other hi-fi equipment and connect the other end into OUT L/R jack in rear panel of electronic organ.
Basic Operation
Basic playing method
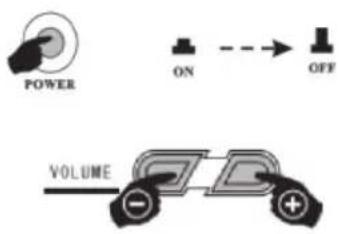
Turn on power switch: After AC adapter is connected or batteries installed correctly, press POWER button to turn on power switch. Press POWER button once again to turn of power switch of electronic organ.
text_image
POWER ON OFF VOLUMEAdjustment of Volume: This electronic organ has 16 levels of volume from 1 to 16 for your choice. The default level of volume is 12 Press Volume Up/Dn key, volume will be increased or decreased accordingly and correspondent change will be displayed on LED. Press Volume Up/Dn keys simultaneously, the VOLUME will be restored to the default level automatically. Meanwhile you adjust volume; the accompanying volume will also be changed accordingly.
Select Voice:
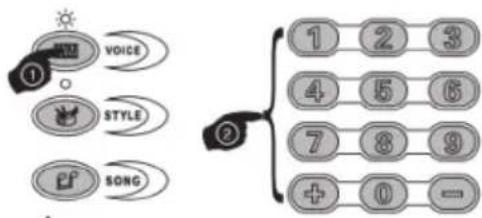
This electronic organ has 100 voices (00\~99) for your choice. For detailed information, refer to Appendix. The default status at startup is VOICE. If current status is not VOICE, you need to press VOICE Key and function LED will light up. To select a VOICE throughout 00\~99, please input two digits With numeric keyboard; Select VOICE can also be realized by pressing “+,-” keys. By pressing digits, LED will display corresponding VOICE code. Under VOICE status, press “+” or “-” key to select next or previous voice.
text_image
VOICE STYLE SONG 1 2 3 4 5 6 7 8 9 + 0 -Performing percussion instrument: Panel drums: Press Panel drum keys (altogether 8 panel drums) to respond relevant panel drums. According to needs, performers can insert relevant panel drums to improve performance effect.

flowchart
graph LR
    A["Stage 1"] --> B["Stage 2"]
    B --> C["Stage 3"]
    C --> D["Stage 4"]
    D --> E["Stage 5"]
    E --> F["Stage 6"]
    F --> G["Stage 7"]
    G --> H["Stage 8"]
Auto Rhythm
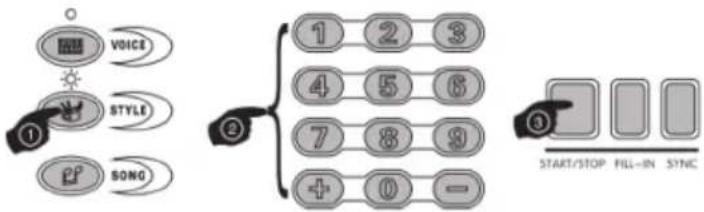
Select Rhythm: This electronic organ has 100 rhythms (00\~99) for your choice. For detailed STYLE table, refer to Appendix. Press STYLE key to trigger STYLE function and function LED will light up. To select a STYLE throughout 00\~99, input two digits; Select rhythm can also be realized by pressing keys. By pressing digits, LED will display corresponding STYLE code. Under STYLE status, press “+” or “-” key to select next or previous STYLE. After selecting STYLE, press START/STOP key to start STYLE and press STYLE once to exit STYLE function.
flowchart
graph TD
    A["VOICE"] --> B["STYLE"]
    B --> C["SONG"]
    D["1"] --> E["2"]
    F["4"] --> G["5"]
    H["7"] --> I["8"]
    J["+"] --> K["0"]
    L["START/STOP"] --> M["FILL-IN"]
    N["SYNC"] --> O["+"]
Fill in: You may press FILL-IN key to insert 1-2 measures of drum fill in current rhythm to enhance performance effect and then restore to original rhythm. Only in rhythm status can this function be realized.
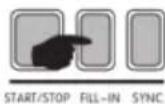
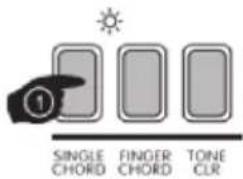
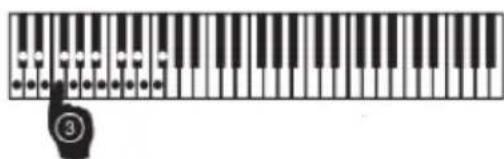
Function of Sync: First press SINGLE chord or FINGER chord keys, then SYNC key and finally B/W key. If keys belong to chord area, key and rhythm as well as chord will be played in synchronization. If keys do not belong to chord area, this function cannot be used.
text_image
SINGLE CHORD FINGER CHORD TONE CLR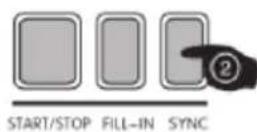
text_image
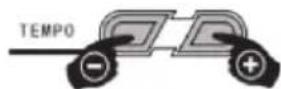
Piano keyboard diagram with finger pointing to the digit 3Tempo: The default tempo is 120. By pressing Tempo “+” or “-” key, you may correspondingly increase or decrease tempo and LED will be displayed accordingly. 32 levels of tempo maybe readjusted. Press Tempo „+” and “-” keys simultaneously to restore the default tempo setting.
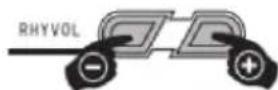
RhyVol: The default RhyVol is 11. By pressing RhyVol “+” or “-” key, you may correspondingly increase or decrease RhyVol and LED will be displayed accordingly. 8 levels of RhyVol may be readjusted. Press RhyVol “+” and “-” keys simultaneously to restore the default RhyVol setting automatically.
Bass
Single auto bass chord: Press SINGLE key to enter the mode of single chord accompaniment, function LED will light up and 001 will be displayed on LED display. Press different single fingering in chord key area (1\~19 key) to start chord accompaniment. Press SINGLE key once again to exit this function and OFF will be displayed on LED display. Chord key area will change to keyboard tone.

text_image
START/STOP PILL-IN SYNC SINGLE PINGER TONE CLR ② ① ④ CHORD CHORD CLRFinger Chord: Press FINGER key to enter the mode of single chord accompaniment, function LED will light up and O02 will be displayed on LED display. Press different single fingering in chord key area (1-19 key) to start chord accompaniment. Press FINGER key once again to exit this function and OFF will be displayed on LED display. Chord key area will change to keyboard tone.

text_image
START/STOP FILL-IN SYNC SINGLE CHORD FINGER CHORD TONE CLRToneCLR: Press ToneCLR key to start stop chord background. This function is circular: start chord > stop chord > start chord... Whenever demo song is started, the default setting of this function is to start chord. In the mode of SINGLE/FINGER chords, pressing this key will cancel single/finger chord accompaniment, and key pronunciation will restore to its original tone.
Tone Edit Function
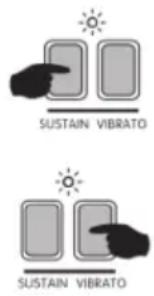
Sustain: Press SUSTAIN key to start sustain function, function LED will light up and 001 will be displayed on LED display. Now the note of key produces a sustain effect. Press SUSTAIN key once again to exit sustain function. OFF will be displayed on LED display and key pronunciation will restore to its original tone.
(2) Vibrato: Press VIBRATO key to start vibrato function, function LED will light up and 002 will be displayed on LED display. Now the note of key produces a vibrato effect. Press VIBRATO key once again to exit vibrato function. OFF will be displayed on LED display and key pronunciation will restore to its original tone.
text_image
SUSTAIN VIBRATO SUSTAIN VIBRATOTranspose function: By pressing transpose “+” or “-” key, you may increase or decrease half note when you perform with b/w keys, with ±+ levels adjustable. Press transpose “+” and “-” keys simultaneously to restore to its default note
Record function
Press RECORD key to begin recording, function LED will light up. ON will be displayed on LED display. Before recording, you should set tone, rhythm, tempo and auto chord in good order to minimize setting during record. Now performer may play according to his/her free will and the notes produced by the electric organ will be recorded until the record quantity of note exceeds the maximum limit and FUL is displayed on LED display. In Recode mode, press REPLAY key to replay recorded notes in sequence. In replay mode, tone may be switched. Upon completion, press RECORD key once again to exit the function and OFF will be displayed on LED display. In this mode keyboard transpose function will not work.
Rhythm Programming function
Press PROG key to enter rhythm programming function and ON is displayed on LED display. By pressing eight panel drums, you can program corresponding drum in the organ. When the number of programs exceeds the maximum limit, FUL will be displayed on LED display and PROG mode will be ended. Press a key in PROG mode to program an empty beat and replay the sound of beep. Press REPLAY key to replay the programmed drums in sequence and cycles and form a self-programmed rhythm. By readjusting tempo +/- key, you may reach the optimal performance effect. In replaying programmed rhythm, press REPLAY or Start/Stop key to stop replaying.
Intelligent Guide function
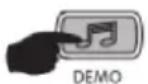
Demo Song: This electronic organ has 8 demo songs. For the table of demo songs, refer to Appendix. Press Demo Song key to replay current demo song. Press Demo Song key once again to replay next demo song. This key is a toggle key. Press this key to replay 8 demo songs in sequence.
Guide Function: Press Guide-A or Guide-B key to enter Guide function. During guide, unless a key be pressed, the song will not be continued. After a song is finished, repeat it again. You can select a demo song by Demo song key. In Guide mode, press Guide-A or Guide-B key to exit guide function
- Guide-A: No matter whether you perform correctly or not, the organ will emit correct notes.
- Guide-B: The themes notes will be screened by the notes played and if you do not play for 3 seconds, the theme notes will be restored for guide purpose.
Appendix 1: Table of Tone
| No. | Name of Tone | No. | Name of Tone | No. | Name of Tone | No. | Name of Tone |
| 00 | PIANO | 25 | CLEAN GUITAR 1 | 50 | ROCK ORGAN | 75 | ACCORDION |
| 01 | CLARINET | 26 | SOPRANO SAX1 | 51 | PICCOLO 1 | 76 | E-PIANO 1 |
| 02 | VIBRAPHONE | 27 | DULCIMER | 52 | STEEL DRUMS | 77 | REED ORGAN 2 |
| 03 | TRUMPET | 28 | STRINGS 1 | 53 | TUBA | 78 | HARMONICS 1 |
| 04 | BAN JO | 29 | RECORDER | 54 | HALO PAD | 79 | LOW TOM |
| 05 | FLUTE | 30 | ACOUSTIC GRAND PIANO | 55 | CLAVI | 80 | SOFT ACCORD |
| 06 | CHURCH ORGAN | 31 | ENGLISH HORN | 56 | FRETLESS BASS | 81 | SHAKHACHI |
| 07 | HARMONICA | 32 | SHANAI 2 | 57 | KALIMBA | 82 | XIAO |
| 08 | JAZZ GUITAR | 33 | CLEAN GUITAR 2 | 58 | CONTRABASS | 83 | HARP |
| 09 | SYNTHSTRS 1 | 34 | ATMOSPHERE | 59 | NYLON GUITAR | 84 | E-PIANO 2 |
| 10 | PIANO BRIGHT | 35 | VIOLA | 60 | PIANO ELEC 1 | 85 | BASS LEAD 1 |
| 11 | BRASS SYN | 36 | DRAWBAR ORGAN 2 | 61 | PICCOLO 2 | 86 | BASS LEAD 2 |
| 12 | SYNTH BASS | 37 | DISTORTION GUITAR | 62 | SYNTHSTRS 2 | 87 | BRASS SYN |
| 13 | LEAD SQUARE | 38 | STEEL GUITAR | 63 | PAD | 88 | BARITONE SAX |
| 14 | MARIMBA | 39 | SQUARE | 64 | FRENCH HORN | 89 | GUZHENG |
| 15 | CHORUSED PIANO | 40 | ALTO SAX | 65 | ELECTRIC GUITAR | 90 | CELESTA |
| 16 | ORCHES.HARP | 41 | ACOUSTIC BASS 2 | 66 | FINGER BASS 1 | 91 | XYLOPHONE |
| 17 | SAXOPHONE | 42 | SAWTOOTH | 67 | AGOGO 2 | 92 | FINGER BASS 2 |
| 18 | TANGO ACCORDIAN | 43 | OCARINA | 68 | BASSOON | 93 | REED ORGAN 3 |
| 19 | STEEL DRUMS | 44 | AGOGO 1 | 69 | FIFTHS | 94 | SLAP BASS 1 |
| 20 | HONKY-TONKPIANO | 45 | MUSICBOX | 70 | TENOR SAX | 95 | HARMONICS 2 |
| 21 | SHANAI 1 | 46 | STRINGS 2 | 71 | TINKLE BELL | 96 | PIANO ELEC 2 |
| 22 | TROMBONE | 47 | OBOE | 72 | GLOCKENSPIEL | 97 | STR SYN 3 |
| 23 | ACOUSTIC BASS 1 | 48 | REED ORGAN 1 | 73 | PIPA | 98 | SLAP BASS 2 |
| 24 | DRAWBAR ORGAN 1 | 49 | HARPSICHORD | 74 | PICK BASS | 99 | BASSOON |
Appendix 2: Table of Rhythm
| No. | Name of rhythm | No. | Name of rhythm | No. | Name of rhythm | .No. | Name of rhythm |
| 00 | RUMBA 1 | 25 | SOUL 1 | 50 | HOUSE 1 | 75 | TECHNO |
| 01 | SAMBA | 26 | RAP | 51 | REGGAE 3 | 76 | BALLAD |
| 02 | DISCO | 27 | TANGO 2 | 52 | SOUL 2 | 77 | DIXIE 1 |
| 03 | TANGO 1 | 28 | REGGAE2 | 53 | POLKA 2 | 78 | DISCO QUEEN |
| 04 | ROCK 1 | 29 | RUMBA 2 | 54 | HIP-HOP 1 | 79 | ROCK 4 |
| 05 | SWING | 30 | RAVE | 55 | 16-BEAT 2 | 80 | HOUSE 3 |
| 06 | COUNTRY 1 | 31 | COUNTRY 2 | 56 | N.O.R&R | 81 | BLUES 2 |
| 07 | WALTZ 1 | 32 | BEAT 1 | 57 | SLOWROCK 3 | 82 | DANCE 3 |
| 08 | BEGUINE | 33 | 8-BEAT 1 | 58 | 8-BEAT 2 | 83 | FUSNSHFL |
| 09 | LATIN | 34 | BARREL.HOUSE | 59 | PASODOB | 84 | 8-BEAT 4 |
| 10 | MARCH-POLKA | 35 | SLOWROCK 2 | 60 | DANCE 2 | 85 | DANCE 4 |
| 11 | BOSSANOVA | 36 | TRIPHOP | 61 | WORDPOP | 86 | REGGAE 4 |
| 12 | SALSA | 37 | OLDIEPOP | 62 | SLOWROCK 4 | 87 | HAPPY LOVE |
| 13 | 16-BEAT 1 | 38 | ROCK2 | 63 | 8-BEAT 3 | 88 | SKA |
| 14 | REGGAE 1 | 39 | BIG BALLAD | 64 | QUICKSTP | 89 | CHACHA 2 |
| 15 | MAMBO | 40 | MERENGUE | 65 | HIP-HOP 2 | 90 | BROWN |
| 16 | 8-BEAT | 41 | KERONCONG | 66 | MARCH 1 | 91 | MARCH 2 |
| 17 | CHACHA 1 | 42 | GUARACHA | 67 | BLUES 1 | 92 | 16-BEAT 3 |
| 18 | POPS | 43 | BIGBAND | 68 | CHARLESTON | 93 | CALIFORNIA |
| 19 | SLOWROCK 1 | 44 | WALTZ 3 | 69 | HOUSE 2 | 94 | CUMBIA |
| 20 | WALTZ 2 | 45 | ROCK 3 | 70 | BAROQUE | 95 | BOLERO |
| 21 | DANCE1 | 46 | PUNTA | 71 | NEW SAI DI | 96 | TEXMEX |
| 22 | LOUD FUSION | 47 | JAZZ | 72 | BOOGIE | 97 | ROCK 5 |
| 23 | POLKA1 | 48 | BEAT 2 | 73 | DISCO BEAT | 98 | DIXIE 2 |
| 24 | EURB | 49 | TRANCE | 74 | CANTALP | 99 | BOLERO |
Appendix 3: Table of Demo Song
| Number | Code of Song | Number | Code of Song |
| 01 | Turkey march | 05 | Red river valley |
| 02 | Oh! Susanna | 06 | Katyusha |
| 03 | American patrol | 07 | Zmpromptu |
| 04 | Hawthorn | 08 | Toreador song |
Appendix 4: Table of Panel Drum
| Number | Name of drum | Number | Name of drum |
| 00 | Hi-Hat Closed | 04 | Bass Drum |
| 01 | Hi-Hat Open | 05 | Hand Clap |
| 02 | Low Tom | 06 | Hi-Hat Pedal |
| 03 | Snare | 07 | Slap Crash Cymbal |

flowchart
graph LR
    A["Stage 1"] --> B["Stage 2"]
    B --> C["Stage 3"]
    C --> D["Stage 4"]
    D --> E["Stage 5"]
    E --> F["Stage 6"]
    F --> G["Stage 7"]
    G --> H["Stage 8"]
Troubleshooting
| Problem Possible Cause and Solution | |
| Accompanying a little noise in turning on/off power. | Normal condition. Please do not worry. |
| After turning on power, press keyboard but not sound canbeemitted. | Check whether volume control key is at proper position or headphone jack is heldby other equipmeD to break:offbuilt-in speaker system. |
| Thenote and its tone for asame voice are alittle different. | This isnormal phenomenon caused by different voice sampling diapason. |
| When using Sustain function. some tones have long sustain but some have short sustain. | This is normal phenomenon sincethe sustains of different tones are setto optimum lengths. |
| Too low volume, abnormal volume or accompaniment doesnot work. | Check whether volume control and accompaDiment volume control arein proper setting. |
| Sync/Start is begun and used in performance, auto accompaniment doesnot work. | Check whether autobass is set on Single or Finger chord position. Now only pressing the of autobass chord key area can accompanment be started. |
| When using mobile phone, the electronic organ will emit noise. | Mobile phone can disturb the electronic organ. To avoid the noise, turn off the mobile phone or use it faraway. |
| Not all keyspressed produces sound So long as your keyboard, auto accompaniment function seems skipped. | You may have usedtoo much notes than allowed quantity, including right-hand tone, left-hand tone, auto accompaniment and counterpoint note. The notes in excess of this limit willnotproduce sound. |
| The pitch of note isnot correct. Checkwhether the parameter of Transpose is "OO". | |
| When using batteries, the electronic organ does not emit sound after startup and indicating LED does not light up. | Check whether battery polarity is correct and batteries have run down. |
| When usin, AC adapter, you hear distorted or discontinued sound. or even the electronic organmaybe halted in terrible case. | You have used unqualified AC adapter or low batteries. Please use the AC adapter provided with this electronic organ or replace batteries. |
| No sound for external loudspeaker or amplifier. | Check whether volume is set too low or wire connection is proper. |
| No sound for external microphone. Check whether volume is set too low or wire connection is proper, or use electrer condenser microphone. | |
Note: Should the trouble of your electronic organ be unable to eliminate, please send it to your franchiser or its maintenance service to repair. Do not disassembly without authorization
Disposal and Declaration of Conformity

natural_image
Symbol of a trash bin crossed with a diagonal line, no text or numbers presentAccording to the European waste regulation 2002/96/EG this symbol on the product or on its packaging indicates that this product may not be treated as household waste. Instead it should be taken to the appropriate collection point for the recycling of electrical and electronic equipment. By ensuring this product is disposed of correctly, you will help prevent potential negative consequences for the environment and human health, which could otherwise be caused by inappropriate waste handling of this product. For more detailed information about recycling of this product, please contact your local council or your household waste disposal service.
Producer: Chal-Tec GmbH, Wallstraße 16, 10179 Berlin, Germany.

This product is conform to the following European Directives:
2014/30/EU (EMC)
2014/35/EU (LVD)
2011/65/EU (RoHS)
Technical Data
| Standards GB/T12105-1998, GB/8898-2001, GB13837-2003, GB17625.1-2003 | |
| Keyboard 61-key standard piano keyboard | |
| Display LED Display | |
| Tone 100 standard tones | |
| Rhythm 100 well-chosen accompaniments | |
| Demo 8 stereo demo songs | |
| Drums 8 panel drums | |
| Effect control Vibrato, Sustain, Transpose | |
| Recording Record, Replay | |
| Program Rhythm programming function | |
| Accompaniment control Start/Stop, Sync, Fill-In, Tempo | |
| Chord control ToneCLR, Single finger, Fingered, | |
| Intelligent guide Demo song, Guide-A, Guide-B | |
| Other control Power Switch, Main Volume, Accompaniment Volume | |
| External Ports Power jack, Headphone jack, left and right sound track jack | |
| Diapason | C2 C7 |
| Accuracy in musical tuning | ≤3% |
| AC adapter | AC 220V, DC 12V |
| DV Input | DC 12V |
| Output power | 6Wx2 |
Chère cliente, cher client,
text_image
R OUT L HEAD- PHONES DC 12V - - + 29 30 3129 Sortie audio L/R
30 Prise casque
31 Entrée DC 12 V
Avant utilisation
text_image
Diagram showing a finger pressing a string of piano keys with the number ③ at the index| Number | Code of Song | Number | Code of Song |
| 01 | Turkey march | 05 | Red river valley |
| 02 | Oh! Susanna | 06 | Katyusha |
| 03 | American patrol | 07 | Zmpromptu |
| 04 | Hawthorn | 08 | Toreador song |
| Number | Name of drum | Number | Name of drum |
| 00 | Hi-Hat Closed | 04 | Bass Drum |
| 01 | Hi-Hat Open | 05 | Hand Clap |
| 02 | Low Tom | 06 | Hi-Hat Pedal |
| 03 | Snare | 07 | Slap Crash Cymbal |

flowchart
graph LR
    A["Stage 1"] --> B["Stage 2"]
    B --> C["Stage 3"]
    C --> D["Stage 4"]
    D --> E["Stage 5"]
    E --> F["Stage 6"]
    F --> G["Stage 7"]
    G --> H["Stage 8"]