
Logik iSize - Car seat Foppapedretti - Free user manual and instructions
Find the device manual for free Logik iSize Foppapedretti in PDF.
| Product type | Car seat |
| Brand | Foppapedretti |
| Model | Logik iSize |
| Approval | ECE R129/03 (i-Size) |
| Group | i-Size (40-105 cm) |
| Direction of travel use | Forward-facing (76-105 cm, >15 months) / Rear-facing (40-105 cm, from birth) |
| Child height | 40 to 105 cm |
| Maximum child weight | 18 kg |
| Installation | ISOFIX + support leg |
| Rotation | 360° |
| Harness | 5-point, height-adjustable (13 positions) |
| Headrest | Height-adjustable (13 positions) |
| Recline positions | Rear-facing: 1 position (reclined); Forward-facing: 3 positions |
| Newborn insert | Included, for children up to 60 cm |
| Care | Removable cover, machine washable at 30°C (delicate cycle) |
| Harness cleaning | Soap and lukewarm water |
| Compatibility | ISOFIX i-Size seats (check vehicle list) |
| Warranty | 12 months (standard) |
| Country of origin | Italy |
Frequently Asked Questions - Logik iSize Foppapedretti
User questions about Logik iSize Foppapedretti
0 question about this device. Answer the ones you know or ask your own.
Ask a new question about this device
Download the instructions for your Car seat in PDF format for free! Find your manual Logik iSize - Foppapedretti and take your electronic device back in hand. On this page are published all the documents necessary for the use of your device. Logik iSize by Foppapedretti.
USER MANUAL Logik iSize Foppapedretti
EN CAR SEAT - Assembly instructions
| Warnings | PAG 25 |
| Car seat components | PAG 28 |
| Approval | PAG 29 |
| Checks before use | PAG 30 |
| Use in the vehicle | PAG 31 |
| Installation in the car | PAG 33 |
| Preliminary steps | PAG 33 |
| Installation in the forward-facing position, from 40 to 105 cm (part 1) | PAG 34 |
| Installation in the forward-facing position, from 76 to 105 cm (part 1) | PAG 34 |
| Adjusting the support leg | PAG 35 |
| Removing the car seat | PAG 36 |
| Inclining the car seat | PAG 36 |
| Placing the car seat in the rear-facing position for children from birth and with a height from 40 to 105 cm (part 2) | PAG 37 |
| Adjust the headrest | PAG 37 |
| Placing the car seat in the forward-facing position (part 2) | PAG 38 |
| 360° Seat rotation | PAG 38 |
| Harness | PAG 39 |
| Removing the newborn reducer | PAG 40 |
| Removing the lining | PAG 40 |
| Putting the fabric back on | PAG 40 |
| Maintenance and cleaning | PAG 41 |
| Formal guarantee | PAG 42 |
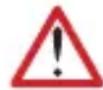
WARNING
CAUTION:
- Before use, it is recommended that you carefully read the instructions, which you will need to follow strictly in order to have the highest levels of product safety.
- The correct fixing of the ISOFIX system and the support leg anchoring system is of fundamental importance for the safety of your child.
- Store these instructions carefully for future reference. These instructions can be stored in the special compartment on the car seat during the period of use.
- Failure to follow the car seat installation instructions carefully could pose a risk to your baby
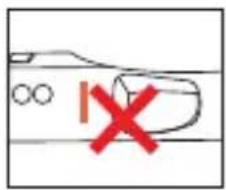
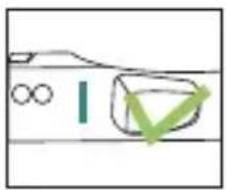
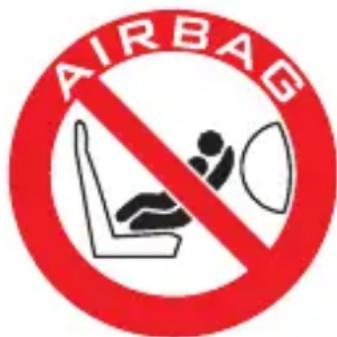
- Do not use a car seat on the front seat where active airbags are fitted, as this can be dangerous. This risk does not apply to the side airbags.
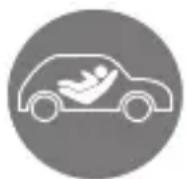
- The product can be installed both in a forward-facing and rear-facing position, provided that it is fitted with the ISOFIX system and with the support leg anchoring system.
- This product is approved in accordance with the strictest European standards (ECE R129) and can be forward-facing (for children 76-105 cm tall) and rearfacing (for children 40-105 cm tall) with the ISOFIX and support leg anchoring systems.
- IMPORTANT: Do not use in the forward-facing position until the child has exceeded the age of 15 months and 76~cm in height. The rear-facing position remains the safest, even after exceeding this limit, and it is therefore advisable to use the car seat facing backwards for as long as possible.
- WARNING: NEVER leave your child unattended - your child's safety is your responsibility.
WARNING: Adult assembly required. - WARNING: The child car seat must be fitted in accordance with the manufacturer's instructions. Incorrect installation could be dangerous.
- WARNING: Always ensure that new or occasional users [e.g. grandparents] have read the instructions or been taught the correct installation by someone who has read and understood the instructions.
- WARNING: Always keep this instruction manual with the child car seat, or in the vehicle in which you are carrying the child car seat. Some models of child car seat have a pocket to store the instructions.
- AVVERTENZA: In caso di dubbio riguardante l'installazione e il corretto utilizzato del seggiolino, contattare il produttore del dispositivo di ritenuta per bambini.
WARNING
BEFORE STARTING
- WARNING: Do not fit the child car seat in a rearward facing position
- WARNING: Before installing the child car seat ensure that the passenger seat you are using is locked in the upright position.
- WARNING: Do not use the child car seat in the home - it has only been designed to be used in the car.
- WARNING: Do not leave loose/unsecured objects on the back seat of your car or the parcel shelf. They may be dangerous to your child if you are forced to brake suddenly.
WHEN USING THE CHILD CAR SEAT
- WARNING: WARNING: Make sure that the child car seat is placed somewhere so that rigid items and plastic parts do not become trapped in doors or movable seat units when the seat is in everyday use.
- WARNING: Always use the vehicle's door child safety lock system, if one is available, to make it impossible for the child to open the car doors from inside.
- WARNING: Allow the child a break during long car journeys and make sure they don't get out of the car seat unaided and without supervision.
- WARNING: NEVER leave your child unattended - your child's safety is your responsibility.
- WARNING: Ensure that the child car seat is secured to the car seat at all times even when not in use.
- WARNING: The child car seat must be fitted securely to the passenger seat. Ensure that it is not loose or wobbly after you have fitted it.
- WARNING: The child seat shall not be used without the cover.
- WARNING: The seat cover should not be replaced with any other than the one
- recommended by the manufacturer, because the cover constitutes an integral part of the restraint performance.
- WARNING: Allow the child a break during long car journeys and make sure they don't get out of the car seat unaided and without supervision.
- WARNING: In the event of an emergency it is important to be able to release the child quickly (as defined by British Standards). This means that seat buckle cannot be fully tamper proof and you should actively discourage your child from playing with or using the buckle.
- You should actively discourage your child from playing with or using the buckle.
WARNING
SEAT BELT
- WARNING: NEVER use any load bearing contact points other than those described in these instructions.
- WARNING: Ensure that the lap section of the seatbelt or harness is worn low down, so that pelvis is firmly engaged. L'imbracatura deve essere abbastanza stretta, lo spazio tra le bretelle e il petto del bambino non deve essere superiore allo spessore di due dita. La cinghia addominale dell'imbracatura deve essere nella posizione più bassa possibile per trattenere adeguatamente il bacino del bambino.
- WARNING: Make sure that ALL the passengers in your vehicle have their seatbelts fastened, as unrestrained people can be very dangerous to the child in an accident..
- WARNING: NEVER use a seatbelt routing scheme that differs from these instructions.
- WARNING: The lap and diagonal seatbelt must be used at all times when your child is in the child car seat.
SUNLIGHT/HOT DAYS
- WARNING: Do not leave your child in the child car seat while parked in direct sunlight or on a hot day.
- WARNING: Do not subject the child car seat to prolonged direct sunlight as this may be dangerous for your child (the metal and plastic fittings could become hot) and may cause the fabric to fade. You can reduce this problem by covering the child car seat with a sheet when not in use.
SECOND HAND OR DAMAGED CHILD CAR SEATS AND SEATBELTS
- WARNING: Never buy a second hand child car seat. It may have unseen damage.
- WARNING: The manufacturer only guarantees this product when the original owner uses it.
- WARNING: You MUST replace the child car seat and your vehicles seatbelts if they become badly worn or amaged.
- WARNING: You MUST replace the child car seat if it is involved in an accident it may have unseen damage and may not protect your child as well as it should. At the very least send the child car seat to your retailer for inspection, together with the accident report.
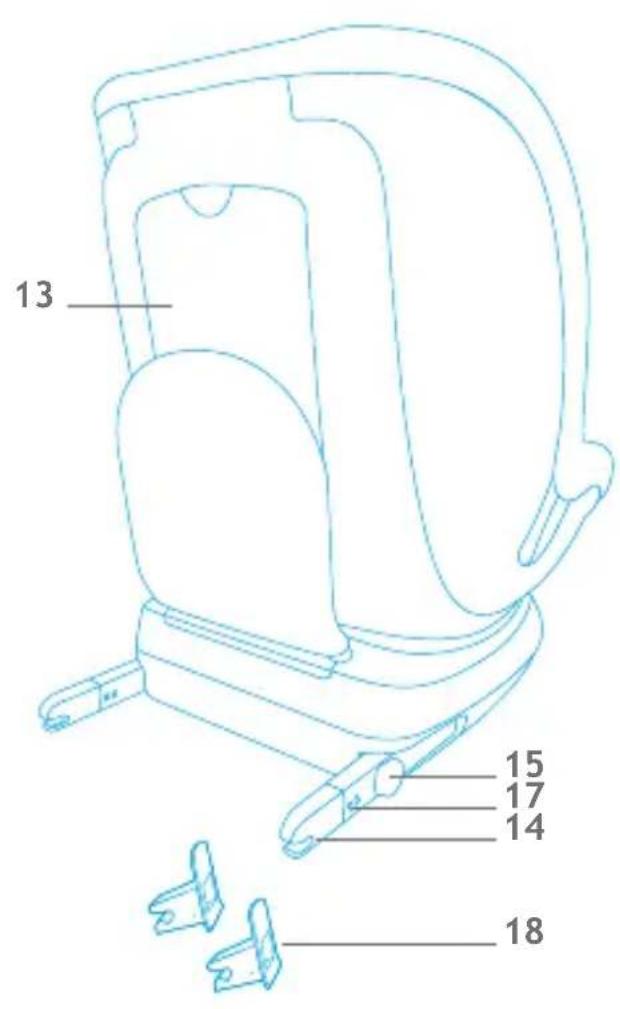
CAR SEAT COMPONENTS

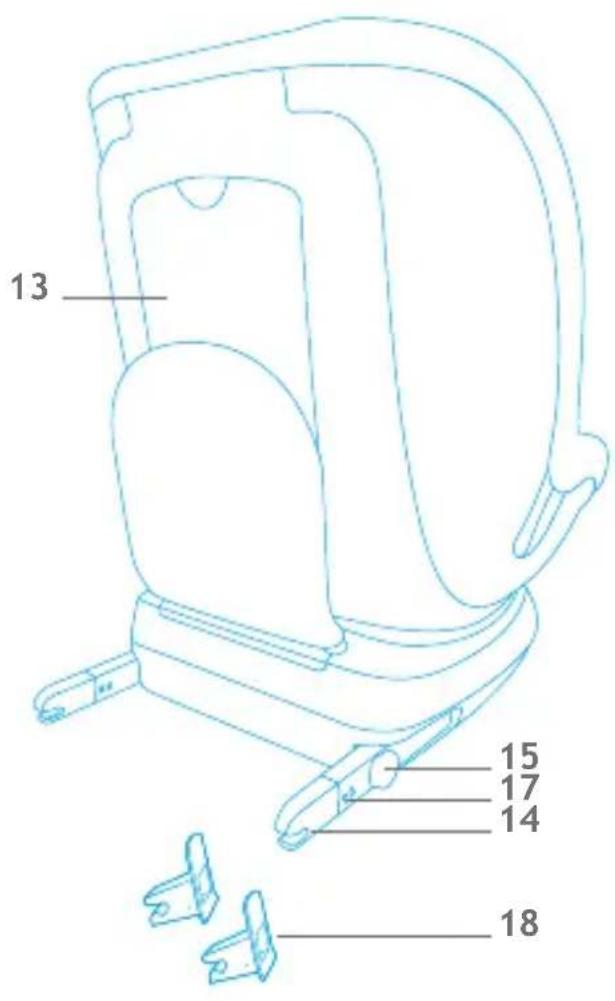
- Headrest height adjustment lever
- Headrest
- Reducer:
A Seat reducer
B Headrest reducer
- Chest belt protection
- Shoulder straps
- Buckle
- Central strap adjustment device button
- Belt adjustment strap
-
Support leg
-
Indicator for the correct adjustment of the support leg
- Car seat rotation lever
- Belt to extend the ISOFIX connectors
- Compartment for user manual
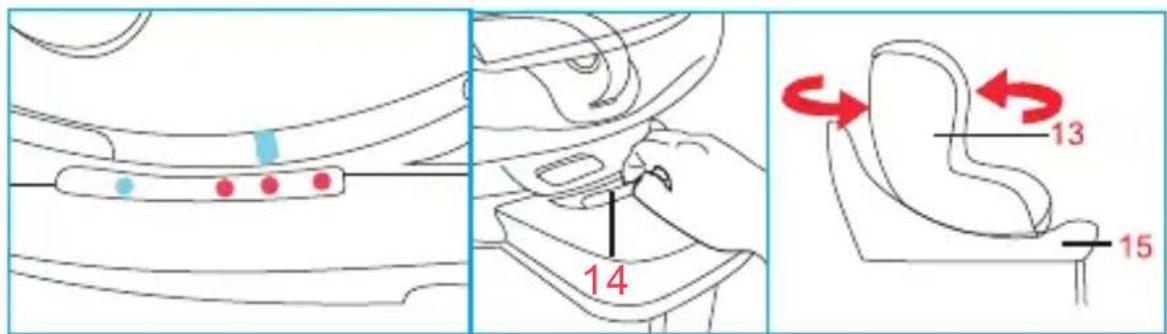
14.ISOFIX connector
15.ISOFIX attachment/release button - Support leg adjustment button
17.ISOFIX attachment/release indicator
18.ISOFIX insert guider
CERTIFICATION
...as a safety car seat.
| LOGIK i-Size car seat | Tested and certified according to the standard ECE R129 | ||
| GROUP | Rear facing | Forward facing | |
| type KX - 88 | HEIGHT 40-105 cm | 76-105 cm | |
ECE = European standard relating to safety devices
- The car seat has been designed, tested and approved in accordance with the requirements of the European Regulation concerning devices for the safety of children ECE R129/03.
- On the shell of the car seat there is a label that lists the approval number.
- Any changes made to the car seat will invalidate the approval.
- Only the manufacturer is authorised to make changes to the car seat.
GENERAL INFORMATION
Warning
- This is an "i-Size" child restraint device approved under regulation no. 129, to be used on the passenger seats of "i-Size compatible" vehicles, as indicated by car manufacturers in the user manual of the vehicle.
- If in doubt, contact the manufacturer of the child restraint device, or the retailer.
USING THE CAR SEAT
CHECKS BEFORE USE
Compatible vehicles fitted with ISOFIX system
The LOGIK i-Size car seat is a device classified as "i-Size", and is compatible with the vehicles shown in the "Vehicle list".
The vehicle list shows the vehicles and seats which are approved for using the child restraint with the ISOFIX attachment and support leg.
If your vehicle is not in the vehicle list, contact the manufacturer for information about compatibility of use before you buy the car seat.
The list is subject to continual revision with changes and additions of car models.
The updated list can be viewed on our website: https://www.foppapedretti.it/en/
Read the vehicle manual before installing the child restraint device. The manual will indicate which seats are compatible for the "i-Size" approved child restraint.
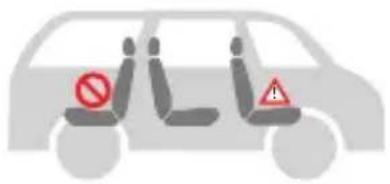
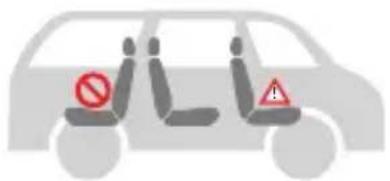
3. WARNINGS
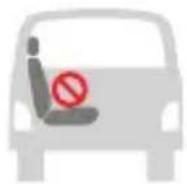
Do not install the LOGIK i-Size on passenger seats
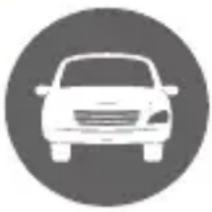
in the vehicle which are rear- or side-facing. Do not use the car seat on passenger seats with an active AIRBAG.
Read the instructions carefully before use and store them in the special compartment for reuse in future. Failure to follow the car seat installation instructions carefully could pose a risk to your child.


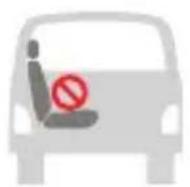
DO NOT USE IF THE FRONT PASSENGER SEAT IS EQUIPPED WITH AN ACTIVE FRONT AIRBAG.
USE IN THE VEHICLE
IMPORTANT
DO NOT USE IN THE FORWARD-FACING POSITION UNTIL THE CHILD HAS EXCEEDS THE AGE OF 15 Months (see instructions).
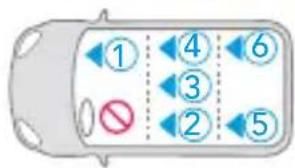
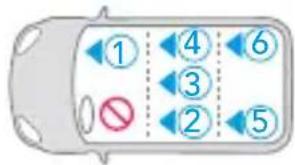
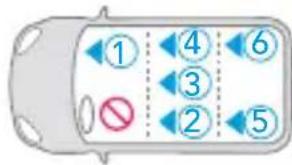
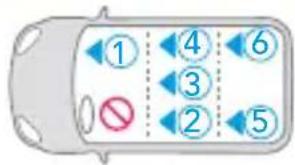
The car seat can be used in the following ways:
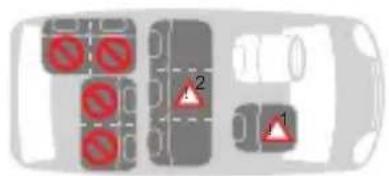

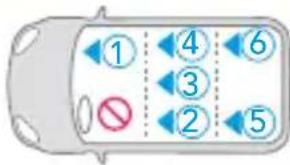
| ·Forward-facing | YES |
| ·Rear-facing | YES |
| ·With a 2-point seat belt | NO |
| ·With a 3-point seat belt | NO |
| ·With the ISOFIX and support leg | YES |
| ·On the front passenger seat | YES |
| If a front airbag is fitted: slide the passenger seat very far back and check the instructions contained in the vehicle manual. | |
| ·On the two rear side passenger seat | YES |
| ·On the rear centre passenger seat | YES |
| Compatible with passenger seats fitted with the ISOFIX system | |
(You must comply with local regulations in force in your country of residence).
USING THE CAR SEAT

For the safety of your child
CAUTION
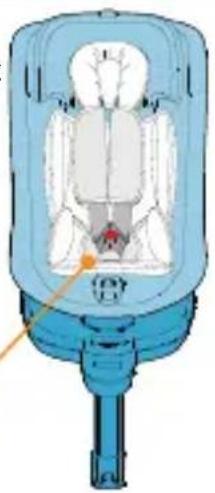
For children up to 60~cm in height, use the car seat with the reducer supplied.
The reducer is used to ensure greater comfort to young children. The reducer gives your child greater support during the first months.
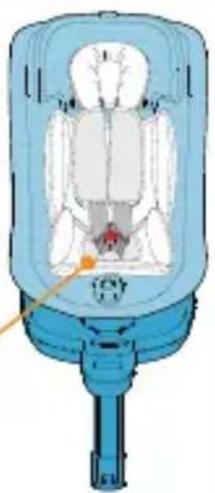
reducer
- Always secure the child with the belt when placed in the car seat.
- Never leave the child unattended in the car seat when placed on high-up surfaces (such as tables, etc).
- Make sure that the end of the belt does not get caught in moving parts (such as automatic doors, escalators, etc.).
- CAUTION! The plastic parts of the car seat can heat up in the sun, causing burns to the child. Protect the car seat from excessive heat, for example, by using a lightweight cover.
- Take regular breaks when travelling on long journeys. Your child can get tired very easily. Avoid leaving the child in the car seat for too long.
HE VEHICLE
INSTALLATION IN THE CAR
TIP: The child car seat is always secured in the car via the ISOFIX anchoring, even when there is no child in the set. ALWAYS mount the seat without a child in it.
SAFETY ON BOARD THE VEHICLE
WARNING! Do not use the car seat on passenger seats with an active front airbag. This recommendation does not apply to side airbags.
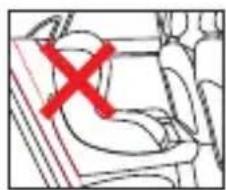
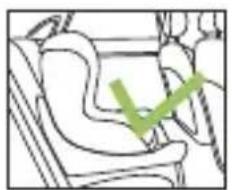
To ensure the highest level of safety for all passengers, make sure that:
- the reclining backrest of the passenger seats is locked in a vertical position;
- the passenger seat on which the i-Size car seat is installed is set to the rearmost position;
- all objects that can cause damage in the event of an accident are adequately immobilised;
- all passengers have buckled up their seat belts.
Preliminary steps
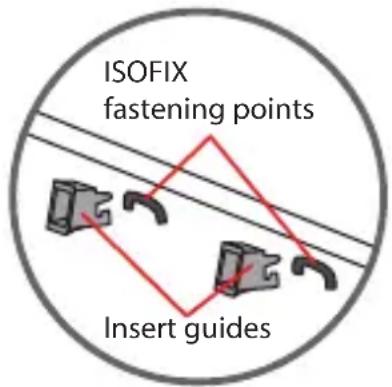
Make sure that your vehicle is fitted with ISOFIX anchoring points and that it is one of those approved in the list of compatible vehicles provided.
Locate the ISOFIX points; for any problem consult the user manual of the vehicle.
The ISOFIX anchoring points are located between the seat and the backrest of the
passengerseat.
Place the car seat on the vehicle passenger seat, insert the two ISOFIX connectors into the appropriate guides, and push to attach the two connectors to the ISOFIX hooks in the vehicle. You will hear a "click" once they have attached. Check that the ISOFIX attachment indicators are green on both sides.
USING THE CAR SEAT IN THE VEHICLE
USE IN THE VEHICLE
REARWARD-FACING (Part 1) FORWARD-FACING (Part 1)

Depending on the age and height of the child, the car seat can be installed in a forward- or rear-facing position.
NOTE: according to accident statistics, installing the car seat in the rear-facing position is safest. It is advisable to use the rear-facing position for as long as possible.
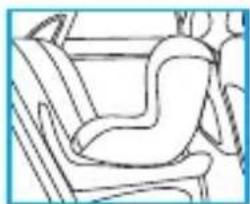
INSTALLATION IN THE FORWARD-FACING POSITION, from 40 to 105~cm (part 1)
It is advisable to use the car seat in the rear-facing position with children up to 105~cm , maximum weight 18~kg .
WARNING! Using the car seat in the rear-facing position is mandatory for a child up to 15 months of age and 75~cm in height. The rear-facing position remains the safest, even after exceeding this limit, and it is therefore advisable to use the car seat facing backwards for as long as possible.
NOTE: When in the rear-facing position, the car seat must be tilted in the most reclined position only (horizontal, marked blue) for children up to approximately 1 year of age. For further details, see the section "INSTALLATION IN THE REAR-FACING POSITION (part 2)".
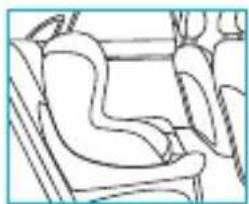
INSTALLATION IN THE FORWARD-FACING POSITION, from 76 to 105~cm (part 1).
The use of the car seat in the forward-facing position is allowed with children over 15 months and with a height of at least 76~cm , maximum weight 18~kg .
For more details, see the section "INSTALLATION IN THE FORWARD-FACING POSITION (part 2)".
CAT IN THE VEHICLE
INSTALLING THE CAR SEAT
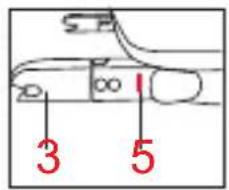
Fold down the "support leg" until it locks into position (1).
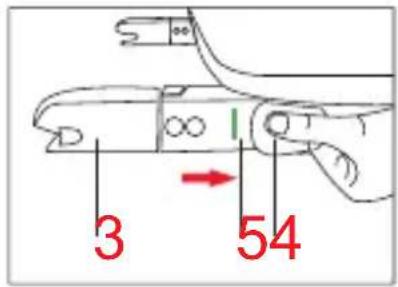
Pull the ISOFIX connector extension strap (2), which is located on the front of the car seat, between the seat and the base. Both ISOFIX connectors (3) will automatically extend. Place the car seat on the passenger seat of the car, insert the two ISOFIX connectors into the appropriate guides, and push to attach the two connectors to the ISOFIX hooks in the vehicle. You will hear a "click" once they have attached. Check that the ISOFIX attachment indicators are green on both sides (5).
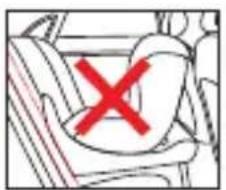
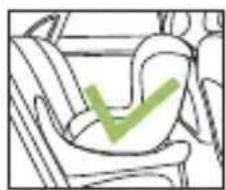
Make sure there is no space between the backrest of the passenger seat and the car seat. If necessary, pull the connector extension strap and push the car seat towards the passenger seat backrest.
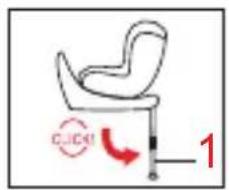
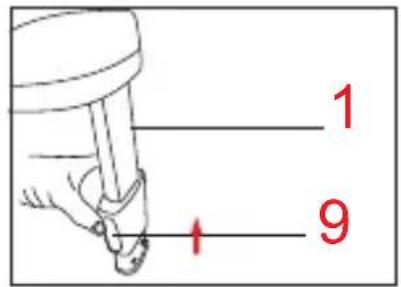
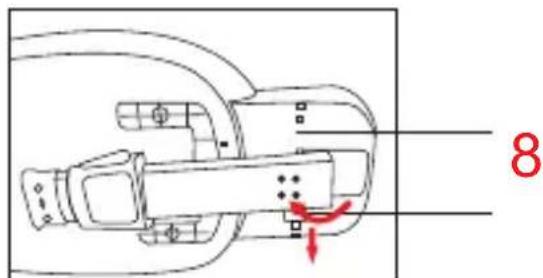
ADJUSTING THE SUPPORT LEG
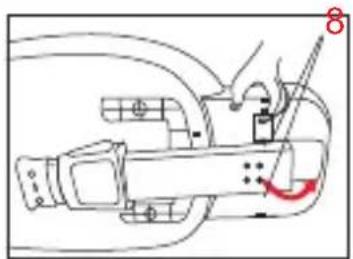

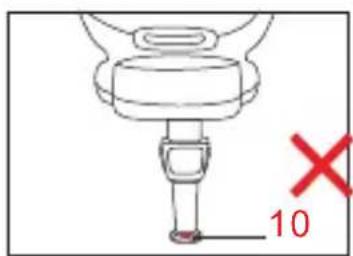
Fold down the "support leg" until it locks into position (8).
Press the support leg adjustment button and lower the leg down, so that it correctly touches the vehicle floor, then release the button (9). The leg height adjuster must change from red to green (10): this will indicate that the leg is placed correctly. Check that the support leg is positioned and adjusted correctly.

WARNING: Do not place the front support leg on a storage compartment located on the floor of the vehicle. The support leg must rest on a stable and secure surface on the floor of the vehicle.
WARNING: Make sure that the support leg does not lift the car seat up from the vehicle seat.
USING THE CAR SEAT IN THE VEHICLE
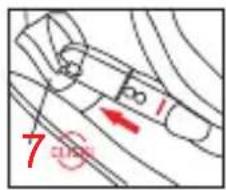
REMOVING THE CAR SEAT
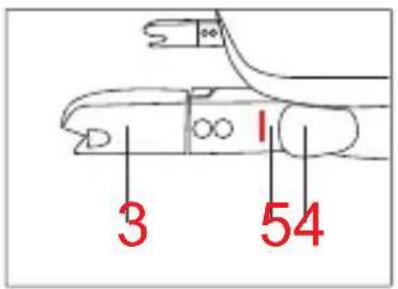
Press both ISOFIX release buttons (4) in the direction shown in the figure.
The ISOFIX indicator will turn red.
Pull the ISOFIX connector extension strap (2) and, at the same time, slide the connectors along the car seat frame to retract them inside the base, then release the strap.
Press the button (9) and lift up the support leg (1) until it locks.
Fold up the support leg under the base (8).
CAR SEAT ADJUSTMENT SYSTEM
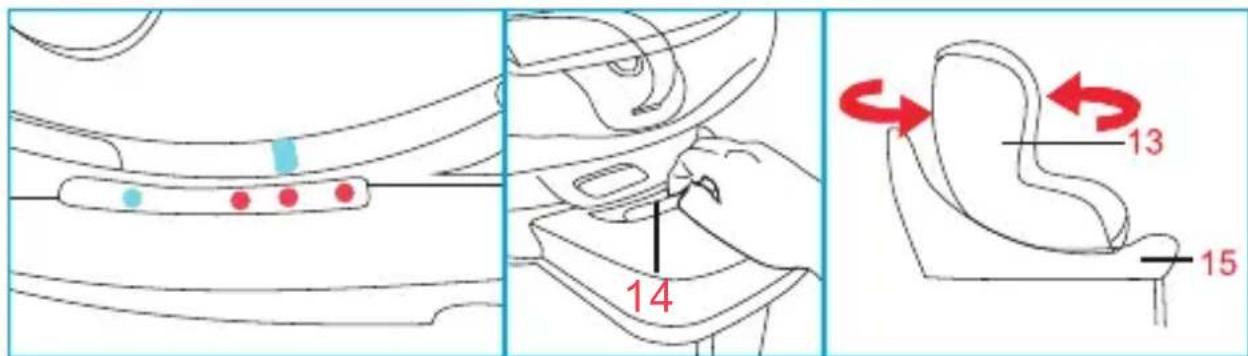
Inclining the car seat
Press the reclining handle, located on the front part of the seat, and adjust the seat to the position desired. Release the handle, making sure that the seat is locked in the chosen position.
IMPORTANT: In the forward-facing position (76 to 105 cm), there are three tilt positions marked in red.
In the rear-facing position (from 40 to 105~cm ), for children up to approximately 4 years of age, the seat must only be tilted in the most reclined position (horizontal), which is marked by the blue colour.
THEVEHICLE
PLACING THE CAR SEAT IN THE REAR-FACING POSITION FOR CHILDREN FROM BIRTH AND WITH A HEIGHT FROM 40 TO 105 CM (part 2)
DO NOT USE IF THE FRONT PASSENGER SEAT IS EQUIPPED WITH AN ACTIVE FRONT AIRBAG.
Press the rotation button and place the car seat in the rear-facing position. Make sure that it is locked.
CAUTION: Before every journey, make sure that the rotating part of child seat is fully engaged by trying to turn the seat around in both directions.
NOTE: The car seat must be used with the newborn reducer for children up to 60 cm in height.
NOTE: the use of the car seat in the rear-facing position is suitable for children up to 105 cm in height.
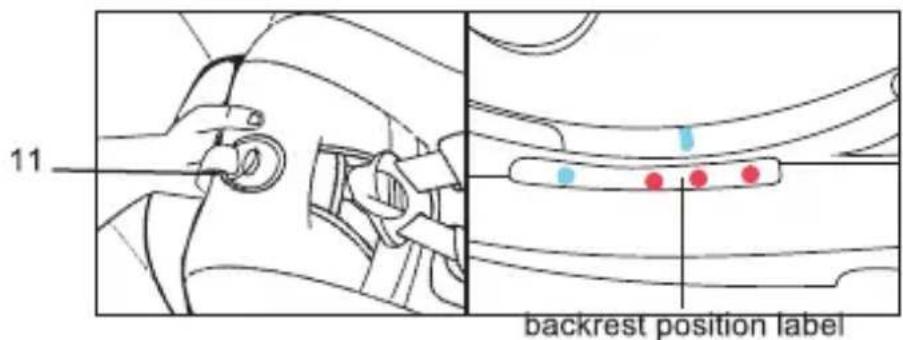
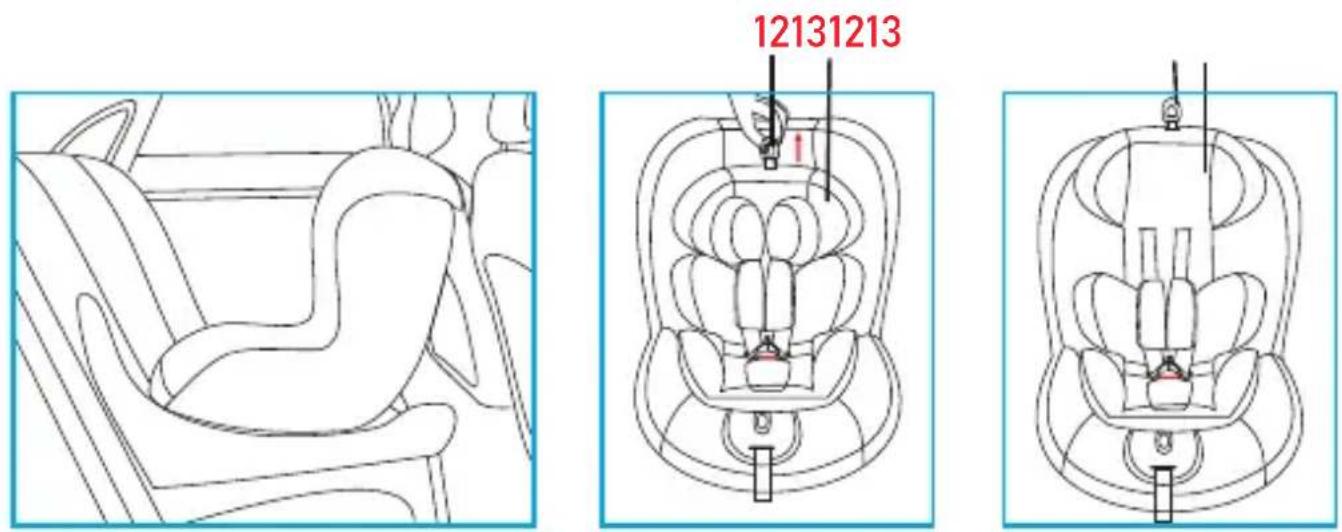
Adjust the headrest (13): The headrest can be adjusted to 13 different heights.
Pull the ring of the adjustment strap (12) and raise or lower the headrest to the correct position (for more details see "Harness adjustment").
USING THE CAR SEAT IN THE VEHICLE
PLACING THE CAR SEAT IN THE FORWARD-FACING POSITION (part 2)
(for children with a height of 76 to 105~cm and the child has exceeded the age of 15 months)
The use of the car seat in the forward-facing position is allowed with children over 15 months and with a height of at least 76~cm (pag 34). The rear-facing position remains the safest, even after exceeding this limit, and it is therefore advisable to use the car seat facing backwards for as long as possible.
Press the rotation button and place the car seat in the rear-facing position. Make sure that it is locked.
CAUTION: Before every journey, make sure that the rotating part of child seat is fully engaged by trying to turn the seat around in both directions.
The car seat can be installed in the forward-facing position only if:
The child is more than 76 cm tall;
- The child is at least 15 months old (it is recommended to use the car seat in the rear-facing position for as long as possible);
- The headrest is adjusted to at least the seventh position.
360^ seat rotation
The 360-degree rotation of the seat makes it easy to change the direction to forward-facing or rear-facing and facilitates the process of putting the child in the car seat and removing them. Press the rotation button (14) and rotate the seat towards the door, to place your child in the car seat easily. To secure the child, see section "harness adjustment".
Rotate the seat into the forward-facing or rear-facing position, and a click will indicate that it has locked in place correctly.
CAUTION: Before travelling, make sure that the seat is locked in a forward-facing or rearfacing position by trying to rotate the seat without pressing the rotation release button.
THEVEHICLE
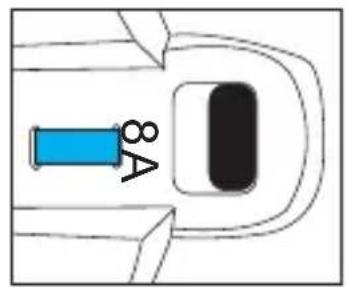
HARNESS
Loosening the harness: press the adjustment button A and at the same time grasp the straps (chest belts) in the lower part, below the chest protector padding, and pull them forwards to loosen them.
IMPORTANT: Do not pull on the straps by gripping the chest protector padding.
Press the red button (18) on the central buckle (20) to release the shoulder straps and place them on the sides of the car seat.
Place the child into the car seat. Slide the straps over the child's shoulders and join the two ends/tabs of the straps together (19), to form a single connector.
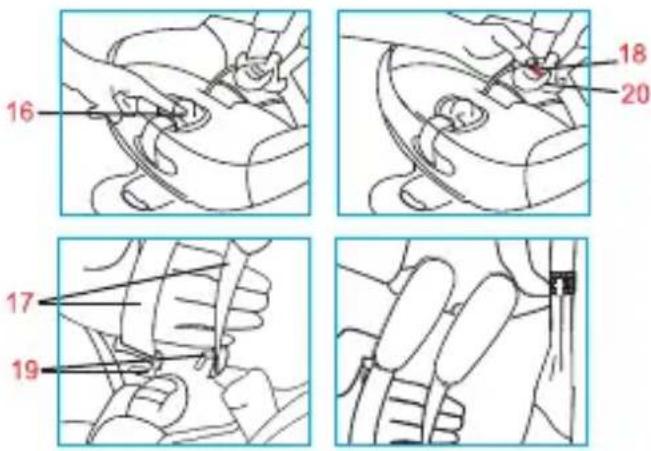

Insert the connector into the central buckle until you hear a click.
Make sure that the straps are not twisted.
Ensure that the straps are positioned just above the child's shoulders and that there is a space of about 1 cm (for more details see point 1, "Adjusting the headrest").
Tightening the harness: Pull the harness adjustment strap so as to tighten it properly against the body of the child. The harness is correctly tightened when the gap between the harness and the child is no greater than the thickness of your finger.
IMPORTANT! Pull the end of the adjustment strap outwards, not upwards or downwards.
To ensure the safety of your child, check before setting off that:
- the ISOFIX connectors (3) are attached to the vehicle and the support leg (1) is positioned correctly;
- the car seat is locked in the forward-facing or rear-facing position;
- the headrest is adjusted to an appropriate height;
- the 5-point seat belt is adjusted according to the child's body, the shoulder straps (17) are not twisted and the harness is locked;
- the support leg (1) is in contact with the vehicle floor and its indicator (10) is green.
- For infants and children who are unable to sit up independently (up to 1 year), the car seat is installed facing backwards and in the most reclined position possible.
USING THE CAR SEAT IN THE VEHICLE
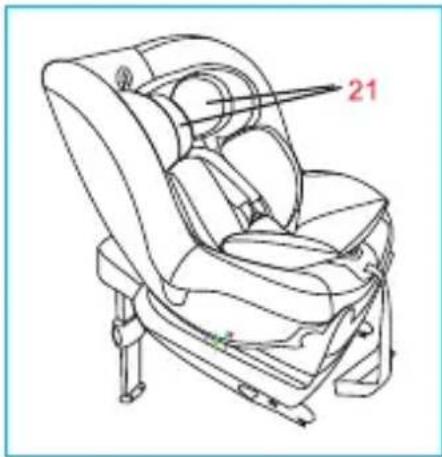
REMOVING THE NEWBORN REDUCER
The newborn reducer (21) gives babies the necessary support for the early months.
When the baby is over 61 cm tall (about 3 months), the reducer can be removed.
Remove the headrest reducer by pulling the elastic away from the headrest.
Remove the seat reducer.
Before washing it, remove the internal padding in the reducer through the opening located on the side.
When the lining is dry, insert the padding back inside the reducer.
REMOVING THE LINING
Unclip the harness buckle.
Remove the headrest reducer fixed with the elastic.
Remove the seat reducer.
Detach the press studs on the headrest to remove the chest straps.
Detach the press studs on the backrest fabric.
Remove the lining, carefully pulling the fabric off from the headrest.
Carefully pull the fabric off from the frame, starting from one side, paying
particular attention while pulling the fabric off from around the harness adjustment device.
Repeat the disassembly process in reverse order.
Place the seat lining on the car seat and insert the leg separator harness into the slot. Carefully replace the fabric around the harness adjustment device and then around the frame.
Carefully put the fabric back on the headrest.
Put the chest straps back into the headrest reducer slot and attach the press studs. Attach the press studs in the backrest fabric to the lining fabric.
Attach the buckle and check that the harness straps are not twisted.
Make sure that the chest straps are correctly inserted in the chest protectors.
EANING
MAINTENANCE AND CLEANING
Only use original linings, as these components are of fundamental importance for the device to function correctly.
Do not use the car seat without the lining.
CLEANING
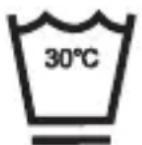
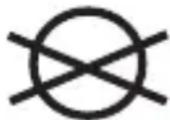
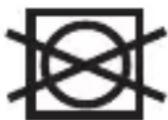
The lining can be removed and washed in a washing machine with a mild detergent, using the delicate fabric cycle (30^) . Follow the washing instructions shown on the label. The colours may fade if washed at temperatures above 30^ . Never spin dry or tumble dry (as the fabric could become detached from the padding).
The plastic parts may be cleaned with water and soap. Do not use harsh detergents (such as solvents).
The harness may be removed and washed with soap and warm water.
WARNING! Never remove the tabs of the buckles from the straps.
MAINTENANCE AND CLEANING
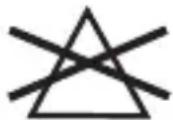
IMPORTANT: The lining is a fundamental component for your child's safety. Never use the car seat without the lining, nor replace it with other products which have not been approved, so as to avoid endangering the child's safety or compromising the proper functioning of the device.
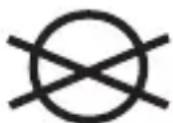
Washing instruction:
The lining can be removed, washed at 30^ and hung out to dry.
Washing machine cold water

Do not bleach
No dry cleaning
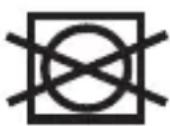
tumble dry

Do not ironDo not
The contents of this document as stated below will come into effect as from 01.01.2005 and replace, on every account and in full, any previous message referring to the guarantee provided by Foppa Pedretti S.p.A.
FORMAL GUARANTEE
Foppa Pedretti S.p.A. the head office of which is located at n. 11 Via Volta, Grumello del Monte (Italy), guarantees directly to the Consumer that this brand new product is free of faults with regard to the materials, design and manufacture and that it complies with the characteristics as declared by the manufacturer. This formal guarantee is valid in all Member Countries of the European Union and it neither excludes nor limits the Consumer's rights in accordance with mandatory measures provided for by the law with regard to the Retailer of the Product.
To take advantage of this formal guarantee, the Consumer must return the faulty product to the Retailer, presenting to the same the proof of purchase of the Product which must clearly show the Retailer's address, the date of purchase of the Product with the Retailer's stamp and signature and an indication of the Product itself or, alternatively, the receipt which must not have been altered and which must clearly show the same information as that referred to above.
The formal guarantee is valid for twelve (12) months from the date of purchase of the Product. During this period, Foppa Pedretti S.p.A. will repair or replace the faulty product, at its own discretion. The formal guarantee is granted to the end buyer of the Product (Consumer) and it neither excludes nor limits the mandatory rights of the Consumer as provided for by the law and/or the rights that the Consumer may have with regard to the Dealer/Retailer of the Product.
EXCLUSIONS TO THE FORMAL GUARANTEE.
The formal guarantee is excluded in the case of damage caused to the Product for the following reasons: if the product is used in a way that does not comply with the information contained in the use and assembly instruction sheet, if the product is knocked or dropped, if the Product is exposed to humidity or extreme heat or environmental conditions, or to sudden changes in the same, corrosion, oxidization, unauthorized alterations or repairs to the Product, repairs using unauthorised spare parts, improper use, improper maintenance or failure to carry out the same, improper maintenance compared to the information given on the use and assembly instruction sheet, incorrect assembly, accidents, damage caused by food or drink, damage caused by chemical products, cases of force majeure.
In any case, Foppa Pedretti S.p.A. declines all responsibility for damage caused to persons or to property, other than the Product, when such damage is caused by a failure to comply with the instructions/advice/warnings cont a ined in the manua I or, alternatively, in the use and assembly instruction sheet provided with each Product for the owner/user. (Purely as an example, in the case of a cot : "Check your baby constantly. Make sure that the sheets and blankets do not cover the baby's head...").
Furthermore, Foppa Pedretti S.p.A. declines all responsibility for damage to persons and to property when the breakage of its products is due to a deterioration in the components of the Product that are subject to wear. All the components of the Product made of plastic are considered to be components subject to wear.
INDEX
EXCLUSIONS DE LA GARANTIE CONVENTIONNELLE.
MANUTENÇÂO E LIMPEZA
MANUTENÇÂO E LIMPEZA
TONOEOETHENTOE TOYOXHMAO
Auro unoobekvuei tn owotn otnpiEtn tou noidou. Elambdae tto nodit npicns eiva ootat onoetnmuEv oai puthetaioevo.
PPOEIADONOIH2H: Mny tonooetie to npootivo nodtnpicn naaw o e nkn pfuaengs avtkieevw nou Bpioketao danedou tou oxmuato. To nodtnpicn npentv a evai otnpizoevo e mia otaepn kai aopaln emipaveia tou danedou tou oxmuato.
TONOEOETHENTOE TOYOXHMAO
tou ouotnmuatoC npo0e0nc>. NepiotppeTo kaoopa 0tn oopa tnc katueuvoOn oohynonc n otny avti0etn oopa kai 0a akouotei eva klik nou onmaivei ot to kaoopa exi aoqalioe i owotá.
PPO2OXH: Ipotou va i n to taIoi oac, BεBaωθεite oTI n εδpa tou kaθioμatoC εivai kλειδωμένη με katéuθuvon προς η φopa tou autokiνntou ἡ avτiθετa ano η φopa tou autokiνntou δokμαζovtac va περιστρεψετe ην εδpa xωpiς va πεσετe to kouπi ξεκλειδωμatoC περιστροφής.
Σuσημa προδεος
IpeBapnteHbIe DeIcTBnA CTp. 139
YcTaHOBka nO xOdy dBnJKeHnA BToMObnIa, poCT oT 40 do 105 cm (yacTb 1) CTP. 140
yctahOBka no xOdy dBnJKeHn, poCT oT 76 do 105 cm (caCTb 1) CTP. 140
PereynilpoBka onOpHNo HOxKn CTP. 141
AeMoHTaX aBtOKpeCna CTp. 142
YroI HaKIOHa aBtOKpeCna CTp. 142
OpneHTaun npOTnB XoJa DnHexeHna ABToMo6nla dIa DeTei c poKdEHHa,
poCTOMOT40do105cm(yactb2) CTP.143
OtpereyInpuIte noIroIobHnK CTP. 143
OpneHTaunnoXoDyDbNKeHnna (YacTb2) CTp.144
Iobopot cndeHbHa 360° CTP,144
Ocna6bTe ydepxnBaIOuIpe peMHN CTP. 145
YdaJIeHHe MraKOro BkIaDbIiHa dIy NepBbIX MeCraUeB Xn3Hn CTP. 146
IPEd HauJOM IcNoJIb3OBAHnA
BHIMAHHE: He yctaHaBnBaTb aBtOKpeCNo Ha aBTOMo6nHbIe cndeHbI, KOToPbIe NOBepHyTbI B CTOPOHy 3aDHe N acTH n aBTOMo6nJIa N B 60KOBOM HanpaBHeHH.
- PPEДУПЕЖДЕНЕ: Пе徳 установков abtokpeсla yбдntecb в TOM, чTO сннka naccajnpckoro сдения 3а6лokироваHA в ВертукальнOM поожени.
- PPEДУПЕЖДЕНЕ: 3anpeшаetcЯ ИспльбзOBaТь abTOKpeCNo B ДOMaшнx уСлOBиХ в КачесТВе Stуla. OHO npedHa3NaueHo ДЯ ИспльбзOBaHHa B aBtOMO6HJIe.
BHIMAHHE: PpOBepbTe, yTo 6aRaJ nn DpyrHe npEMeTbI, KOToPbIE TeOpEtNueckn MOryT HaHeCTn ydApbl nn NOBpeXdEHHa CndAeMy B aBtOKpecIe npn abapHn, HAdExKHO 3aKpeNJIeHbI.
ПИИСПОЛьЗOBAHИN ABTOKPECJIА
- ПЕДУПЕЖДEHNE: Тьердье злелемпьи И пл actмасье частдтckогудржИВаюцero устpoичТБа дOLЖнь 6ытб рacnoLOжeНьи yCTaHOBJIeHы ТAKIMобразом, уTOбы пи HopmaЛьнOM ИспOLTьОВAHи aBTOMOБиЯ OHH He 3aCTpeВалипOD NOДВИЖньIM сIDeHьem Или B пpoeme DBepсь.
- INPEДУПЕЖДEHNE: История Меним 6локары NGKpbIBaHЯ DBepey aВТOMOБИЯ n3HyTpN, ecn Имeelсь B haJIuHn. 3TO ppeDOTbpaTIT OTKpbITHe DBepey pe6EHKOM.
- ПЕДУПЕЖДEHИЕ: Делаite He6oJIbшe OCTaHOBKN BO BpeMЯ ДИHHOн NOe3dKN,ЧTO6bl pe6eHOK MOr paccIa6nTbcr N IOdbIaTb CBexHM BO3dYxOM.
- ПЕДУПЕЖДЕНЕ: He octabлайte pe6eнka B DeTcKOM ydepЖиBaHошем устpoистve 6e3 npncmOTpa.
- ПЕДУПЕЖДEHNE: Pa3Meшенhoe Ha aBTOMO6HbHOM cndeHbe aBTOKpeCNo 68a3aTeIbHo DoJxHO 6bITb 3akpeJIeHO npn nOMoUncTeMbI ISOFIX n onOpHOB HOKKN, daxke ecIn OHO B daHHbIM MOMENT He hCNOlb3yETcR. B npOTNBHom clyuae aBTOKpeCNo MOKeT HaHeCTn TpaBMbl NaCCaJnPam npn pe3KOM TOPMOKeHN.
- ПЕДУПЕЖДEHNE: Росле мontажа убенистов, чTo aBtOKpeсно наджно зфнckировано и He КачаETС. EcIn aBtOMO6nIbHbI peMeHb 6e3OnaCHoctn Ocna6, Вернite erO B пөжпee роложенгп в ВНOBь yCTaHOВпte aBtOKpeсно.
PPEyPPEKDEHNA
- ПЕДУПЕЖДЕНЕ: He польбоватбая удержиньюшустpoиством дя peбенka 6e3 чexлa.
- ПЕДУПЕЖДEHNE: He 3aMeHЯTe qExoJ, peKOMeHDoBaHHbI N3rOToBHTeJIeM, ДугIM qExIOM, OckoJIbky 3TO MOKeT NOBJIrTa Hа пpaBnIbHOcTb ФункцIOHnPoBaHnYydePKNBaIoUeRo yCTpoNCTBa.
BAJHO: OctaHOBKn BO BpeMa dInHHoN Noe3dkn LyuWe deLaTb Chepe3 peryIapHbIe npomexkyTKn, pRn 3TOM npOBepaTe Bcerda npaBnIbHOCTb yCTaHOBKn Kpecla, a TaKHe, YTO peMHN 6e3ONaCHocTHn He ocIa6JIeHbl. - ПЕДУПЕЖДEHNE: B слуаe abapин Heo6xOДИМо 6bICTpo paccTeRHyTb npЯKKy3amOK И OCBO6OДNTb pe6Eнka. ПОТOMу пяжka-3amOKdoJXHa JERKO OTKpbIbA TbCBa, He 3aKpbIbAite eë HnueM. He nO3BOJЯITE pe6Eнky nIrpaTb C npЯKKOJ-3aMKOM.
- ПЕДУПЕЖДEHWE: He pa3MeaIte pod aBtOKpeCJOM, MeJdY Hm n aBTOMO6HbHbIM cnDeHbEm, HnKaKHX TeKCTHbHbIX n3deJIiN (HaPpIMep, noJIoTeHcE HnI NODySKa), TAK KaK 3TO MOKeT NOBInrTa b Ha 6e3OnaCHOe ΦyHKcNoHIpOBaHne n3DeJIIn.
- I P E D Y N P E X K D E H N E: B 3 n m He y c a k h a I e pe b e h K a B a B T O K p e c l o, O d e t o r o B C n i s k o m o b b e M h y o o d e j d. C n i s k o m o b b e M h a r o d e j k d a M o x e t C t a t b p n u H o H e n p a B n l b H o p e r y l n p o B K n 6 p e T e J e C t p a x O B O Y h b i x p e m H e n a B T O K p e c l a. B c l y u a e a b a p h n, pe b e H o K M o x e T He n p a B n l b H o y d e p x H B a T b c a 6 p e T e J A M N.
- ПЕДУПЕЖДEHWE: Металлески и пlaactиковыdeТаи StaHOВЯТС РорчIMN IOД ВОздевим ВьICOKОI Temператypbl. ПOTOMу peKOMeHdyeTcH NaKpbIBaTb aBTOKpeCNo ри пapKOBKe aBTOMO6nla Ha coJIHcE.
- ПЕДУПЕЖДEHNE: Barajи дугп Тяжье педмétbl, ocobehо ecnnoKoIoune,doJxHbI 6bITb NaJExHo 3akpenJIeHbI B caLoHe aBtOMO6nla. B clyuaeabapn He3akpenJIeHHbI педмétbl MOryT HaHeCTN TpaMbI pe6EHNky.
- ПЕДУПЕЖДEHWE: He octablaite He3aKpeHnHbI e npeMeTbI Ha noJIke 6araJHKnka: B clyuae abapn OHN MOryT HAnecTI TJaKeIbI TpaMbI naccaKnpaM.
- ПЕДУПЕЖДEHNE: Пе徳 Наалом Испьзовая убенистов, ТО ВCE 6лokнице устороства паBNьно зacterHyтbl.
- INPEДУПЕЖДEHNE: 3anpeuaetcnoIb3OBAtbcra 3aunactamn nIN KOMNJIeKTuOuIMN, He NOCTaBIAEmbIMn nIN He Odo6peHHbIMn npOn3BOdnteMe, NockoJbKy 3TO MOKeT OTPucaTeJbHO cKa3aTbscHa 6e3OnaCHOCTn H3deJIy.
B clyuae abapnn aBtOKpeCNo MoKeT yTpAHTb 6e3OnaCHOCTb BCJeDCTBHe NOJyehHbIX NOBpeKdEHH, daJxe ecn OHn He cpa3y cTaHyT OYeBnDhbIMN.
3aPpeaaetcBCKpbIBaTb aBTOKpeCNo, NocKoJIbKy 3TO MOKeT OTPnCaTeJIbHO NOBIIaTb Ha o6uIyO 6e3OpacHocTb H3dEJIy.
PPEyIPEKDEHNA
- Yto6bI n36eXaTb nobpeXdEHHa OBnBKn, He peKoMeHdyetc
- ydaJIaTb IorOTnbl/3TNKeTkn.1oIb3yIteCb aBtOKpeCLOm daJxe BO BpeM KOpOTKnx IOe3dOK, nOcKOJIbKy 6OJIb7aay qAcTb aBapN npOnCXODIT HMeHHO B 3THX Clyuayx.
- Перацпобретенем убенистом, чTo aBtOKpeCNo COBmecTmo C Baшим abTomO6nIeM.
Bo Bpem JaIbHnx Noe3doK peKomeHdyeTcA DeJaTb OCTaHOBKn, YTo6bl pe6eHOK MOr HEMHO OTOxHyTb. - Побаваite Луньий пимери обяразелов польтугсь рем hem 6e3oNaChocTN.
- 06bЯСнITE pe6eHky, чTO OH HN B KOeM cIyae He DoJIkeH nIgpaTb C npJxKoY ydePKNBaIOuX pemHei.
PEMEHb 6E3OПАСHOCTN
- ПЕДУПЕЖДЕНЕ: РльзуITEсь TOЛьКО TeMn TOTKamN Kpeпленя, КOTOPbie yka3aHbIВИнСТPyкци.
- I P E D U N P E X K D E H N E: Y6eD nTecb B T O M, YTO yIepKnBaIOUne peMn aBtOKpeCna npaBnIbHO oTpeRyInpoBaHbI B 3aBnCSMOCTN OT KOMnEKn BaIeO pe6eHka. YdePknBaIOUne peMn Heo6xOJMo OTopeRyInpoBaTb DoCTaTOUHO nIOTHO: pacCToRnHe MeXdY JIAkAMn I rpyDbIO pe6eHka DoJXHO COCTaBLrTa MaKcIMyM dBa naIbua. IOnsHoi peMeHb DoJXeH paCnOlaRaTbC B CaMOM Hn3KOM nOLOXeHnn I3 BCex BO3MOXHbIX, YTO6bl ObecneuHTb pPaBnIbHyIO nOJIdepKky Ta3a pe6eHka.
- ПЕДУПЕЖДЕНЕ: Следи TeM, чтобь Вспажни Ровынсь ремим 6e3ОпаСнOCTN: В сlyчae abapии И поуЧенHOrо уд.apa Лиц 6e3 ремня 6e3ОпаСнOCTN может ТолКHyТь aВТOKpeсно.
- INPEДУПЕЖДЕНЕ: 3anpeuaetcЯ nCnoIb3OBAt b CnCTeMy npOdeBaHnЯ peMnei, OTlinuHyIO OT yKa3aHHoB B HnCTpyKcHn.
- ПЕДУПЕЖДEHWE: 06aTeIbHо пиСТeRnBaIte peMHЯМn pa3MeUeHHOrO b aBToKpeCJIe pe6eHka, дже пи КОРOTКИX NOe3dKax.
BO3DEICTBNE COJHEUHbIX Lyuei / JAPKHe dHn
BHIMAHNE: HNKOrDA He octablante pe6eHka npncterHytbIM B aBtOKpeCne B npnnapKObaHHOM aBTOMo6HHe, oO6eHHO, eCIn aBTOMo6Hb hXoDHTcHa cOJIHcE IIN B XapKHe dHN.
BHIMAHNE: HNKOrDA He octabJnTe aBtOKpeCNo Ha HeCKoJIbKO YacOB NOB Bo3deIcTBHeM npAmbIX COJIeHbIX Lyuei, 3TO MoKeT 6bITb ONaCHO dJa BaUero pe6EHKa, TaK KaK MeTaJIInuYeCKne I NlaCTMaCCobBle DeTaJIH aBtOKpeCJa MOryT
PPEyIPEKDEHNA
cHbHO pa30rpeTbcra. TkaHb 06NBKN MoKeT BbIropeTb. PnHKpoIte TkaHbIO aBtOKpeCNo, ecn napKyete aBTOMO6nJIb Ha coJHnce.
ABTOKPECJIO B/Y nnn IOBPEKdEHHbIE ABTOKPECJIa
BHIMAHNE: HNKoIa He noJIb3yIteCb aBtOKpeCJaMn, 6bIBuIMn B ynoTpe6JeHn npYHMn. OHN MOryt nMeTb He3aMeTHbIe dIra rla3a BVHTpeHHne NOBpeJdeHna.
BAJHO: RaapHTaJaETcA NCKIIOHTeJIbHO Ha BnepBbIe npno6peTehHoe n3dJIne HnpedHa3HaueHa dJaBaeJIbUa nepBNUHOn NOKyNk.
BHIMAHHE:Heo6xOdHMo 3aMeHnTb aBToKpeCNo n aBTOMo6HbHbIe peMHN 6e3OpacHOCTN, B cLyuae INX NOBpeKdEHHa INN H3HOca.
BHIMAHHE: ABTOKpeCNo Heo6xOdHMo 3aMeHnTb B Clyuae CnIbHOro ydaPa BO BpEmaBtOMo6NlBHO aBapn, YTO MOKeT npINBeCTn K BHyTpEHHM NOBpeXdEHNMA N3DeJIy, He 3aMeTHbIM rla3y, a TaKxe pRn erO n3HOce.
KOMNOHEHTbI

- Pbyar perylnpoBKn BblcOtbl NOIroJOBHnka
2.Подголовник - Márkni:
A BklaIbI W IJIa CnIeHbI
B BKlaDbI W Dn I NOdroJIOBHNka
- Haklaika Дя HarpydHoro peMHЯ
5.ПлесевbieЯмки
6.пражka - Khonka ceHTpaJIbHOro MexaHn3MapeRyIINPOBKN JAMOK
- PemeHb perylnpoBkn JAmOK
- OnopHaj Hoxka
- INdikatop npaBnIbHO
perynopBKn onOpHoi HOKKN
- Pbyar noBOpota aBtOKpecJa
- PemeHb Ia BbITraBaHna KpeIeHn ISOFIX
- OTeK dIa HcTpkyu
- KpenlneHne ISOFIX
- KhoNka npncTeRnBaHna/OTCTeRnBaHna CnCTeMbI ISOFIX
- PerylnpoBOHnK HONKa onOpHOH OXXN
- Иndикатор писсеговая/OTCTeRGaHЯ сИСтЕмbl ISOFIX
- Haprablaioüne ISOFIX
CEPTHΦHKAUJIa
...B KaueCTBe npedeoxpaHntbHoro aBtOKpeCna dIa aBTOMo6nla.
3. MEPbI IPEdoCTOPOXHOCTN
3anpeaetcyaTaHaBnBaTb Logik i-Size Ha
CndeHbB NOLOXeHNI pOTNB XoDa DBNXeHNJN60
nonepek HOpMaJIbHOrO XoDa DBNXeHNa BTOMO6nJIa.
3anpeuaeTcra NcNoJIb3OBaTb aBTOKpeCNo Ha cnDeHbAx C
BKnIOUeHHo IODyUkOJ BE3ONACHOCTN.
BHNMaTeIbHo npOHTaIte HNCTpyKcHIO do Haayala 3KcIIyatauHn XpaHIne ee B CneuaJIbHOM OTceKe dJa 6yduX KOnCylbTaU. EcIn BBi He 6ydeTe cTporo CO6JIHOdaTb HNCTpyKcHn No yCTaHOBke aBTOKpeCna, BBIMoJKeTe NOdBeprHyTb BaIero pe6eHka PNCKy.
NCHOJIb3OBAHNE 3ANPEUaETcA, ECIN NACCAJKNPCKOE CNDEHBe YKOMJIeKTOBAHO FOHTALbHOI NOyUKOI BE3ONACHOCTN.
ИСПОЛьЗOBAHNEВАВТOMОБЛЕ
BAKHO
3AIPPEIaETcNcIOJIb3OBATb IO XOy DnIXeHnI dJIa IpeBO3Kn DETeM JIAdIe 15 MecaueB (cm. nHCTpyKunHO).
ABTOKpecIOM MOXHO N0lb3OBaTbCra CneDyUOuM 06pa3OM:

OpneHaIPOxOyDnBxKeHn
A
-ПрOTиVBхODaДВИЖЕнЯ:
A
C2-xToueyhbIMpeMHrM6e3oNaCHOCTN

HET
C3-xToueyhbIMpeMHm6e30nacHOCTN

HET
CcnCTemOIISOFIXn onopHoi HOJKOIN
A
Ha nepeHem naccaxnpckom cndeHbe

A
IpnHaHnUHnΦpoHTaJbHOJ NOdyuKn 6e3OnaCHOCTN: CnJIbHO CdBnHbTe Ha3aI naccaxkpckoe cndeHbe I o6paTntecb K INHCTpyKzma, npNBedeHHbIM B pyKOBoDCTBe NO 3KcPnyatau n ABTOMO6nla.
Ha3aHem6OKOBOMcndHebe
A
Ha3aHemIeHTpaJbHOMcIeHbe

A
CoBmecTnMoC cnHebMa, OChaueHHbIMn CnCTeMoI ISOFIX
(Ctporo co6nOaTe Tpe6oBaHna 3aKHOaTeJIbCTBa, DeIcTByIOUeRO B BaWei cTpaHe).
YCTAHOBKA B ABTOMOENAb

Дя 6e3oNaChOCTn pe6eHka
BHIMAHHE
AЯ dete npocomdo 60 cm nCnoIb3yIte aBtOKpecNo BmecTe CMrKIM BKlaIbIWeM, BXOJaUH M KOMnJIeKT.
BklaDbI rapaHTnpyeT 6oJee KOMΦopTHoe pa3MeUeHne MaJIeHbKHX deten.
BklaDbIw o6ecneuHbAeT dONoHHTeIbHyo nOdepKky MaIbIy B nepBbIe MecaIb erO Xn3Hn.
MЯrkN BKNaDbIiW
- Пи поадke pe6eHka B abTOKpeCNo 68a3aTeIbHo npicTeHnte erO peMHem.
- HNKoRda He octaBnIte 6e3 npncMoTpa pe6eHka, cnJaIeRo B aBtOKpeCJIe, pa3MeueHHOM Ha BbICOKO paCNoJoxEHHoN IOBepxHOCTN (HaPnMep, Ha CTolax n T.I.).
- Cnéinte 3a Tem, YTO6bI KOHeu peMHr He nonaJI B dBHXyUneCra MExaHn3MbI (HapnIpMep, B aBTOMaTnueckNe DBepn, 3CKaJaTOpbl N T.I.).
BHIMAHHE!Пл actikobbie DeTaHn aBtOKpeCna MOryT cHbHO HarpeBaTbcra Ha coHnce n npuHHntb pe6eHky oXor. OBeperaIte aBtOKpeCno OT hCTOuHKnOB cnIbHoro TeNla, HApPImep, HApKpbIba ero JERKM YexlOM.
BcIyae daJIbHnx IOe3dOK Heo6xOIMo DeJaTb YAcTbIe OCTaHOBKn. MaJIbIu OYeHb 6bICrpo yCTaIoT. He ocTaBnTe pe6eHka B aBTOKpeCJe HaDoJIro.
YCTAHOBKA ABTOKPECJIAB ABTOMOиЛь
BHIMAHHE: ABTOKpeCNo DoJxHO Bcerda OCTaBaTbcra HaJeXHO npHCTerHyTbIM K cnDeHbIO npn NOMOUs CneuaJIbHbIX ToueK KpeIeHnIA ISOFIX, daKe KoRa OHO He 3KcNlyaTnpyETcra.
Ipn yctaHOBKe KpeCna 6ra3aTeJbHo BbIHMaIte n3 Hero pe6eHka.
БЕЗПАСНСТБВ.ABTOMОБИЛЕ
IPEyIeHHe! 3aIpeaaetcnaOJIb3OBaTb aBtOKpeCNo Ha cnJeHbAx C BkIoueHHo fpoHTaIbHOI NOUWKo6eONacHOCTN. DaHna peKOMeHaZnA He OTHOCNTcK 60KOByIM NOUYKam 6eONacHOCTN.
yTo6bI oBecneuHTb MaKcHMaJIbHbI yPoBeHb 6e3ONaChOCTn dJa BCex naccaJnPOB, y6eINTecb B TOM, yTO:
CINHka CndeHbA C peryIpyEmbIM HaKIOHOM 3a6IOKIpObaHa B BepTKaJIbHOM NOLOXeHN;
- naccaxnckoe cndeHbe, Ha KOtOpoe yCTaHaBnBaetcra ABTOKpecno i-Size, OTOdBnHyTo MaKcImaJIbHo DaJIeKO Ha3a;
- obecneueHa Heo6xOIMa HEnoBnKHOCTb BCex IpeMeTOB, KOTOpbIe MOryT CTaTb npuHHo TpaBMbl BO Bpem aBapn;
Bce naccaxkpbl npnterHytbpemHm6e30nacHOCTN.
PpeBapnteIbHbIe deIcTBnA
y6eHNTecb B TOM, yTO BaIa bTOMO6nJIb OcHaIeH TOnKaMn KpeIeHnRA ISOFIX n yka3aH B IpeIOCTaBLeEHOM IpeueHr COBMeCTnMbIX aBTOMo6nJIeN.
ydaIte BklaDbIiS cnDeHbI.
OTcTeHnTe KHOKNI NOJROJOBHnKa, YTO6bl CHaTb HArpydHbIe peMHN.
OTCTeHNTe KHOKN TkaHOJ 6NBKN CnHHKn.
OcToPoxKHO cHmnte TkaHyIO 6NBky C nOdrOJIOBHNka.
OcToPOxHNo cHIMnTe TkaHyU O6NBky C KApKaca, NaunHa C 6OKOBoN CTOpOHbI; co6JIouaIte Oco6yU OcToPOxHocTb Pn ChrTm N TkaHO N O6NBKn BOKpyr yCTpOHTBa peryJInPobKn ydePxxBaIOx pemHei.
YCTAHOBKA TKAHOJ OSUBKN HA IPEXHEE MECTO
Iobtopte B o6paTHOM npaKe BCE onepaunn no ChraTIO 6NBKN.
Bepnnte Ha npexhee Mecto o6NBky cndeHb y ABTOKpeCna n npodeHbTe B npope3b naXOBbl peMeHb.
TuaTeIbHo pa3MeCTnTe TkaHyIO 06NBky BOKpyr yCTpoIcTba peRyIInpOBKn yDepJXBaIOuN pemHei, a 3aTem BOKpyr Kapkaca.
OcToPoxKHO BepHnte Ha npexKHee MeCTO TkaHyO o6nBky NOIroJIOBHNka.
BHObB BCTaBbTe HaRpydHbIe peMHN B npope3b MraKOrO BKlaDbIsha NOrOJIOBnKa N 3aCTeHHTe KhoNKn.
PnCTeHNTe KhoNtTKaHOJ O6NBKn CnHHKn K TkaHOJ O6NBKe KapKaCa.
3acTeHnTe npKky n y6eHNTEcb B TOM, yTO ydePknBaIOUne peMn He nepeKpyeHbl.
y6eHNTecb B TOM, yTO HarpyDhBie peMHn npaBnIbHO npOnyuIeHbI uepe3 HarpyDhBie HaKlaIaKN.
YINCTKA N OBCJIyJXINBAHNE
PekomeHdyetc HcnoB3OBaTb TOLbKO opnHnHaIbHyIO 06NBky, NOCKoJIbKy OHa BXOINT B YNCLO KOMHOENTOB, IMeIoX NEPBOCTepeHHoe 3NaueHne IJa IpaBnIbHO pa6OTbI yCTpOietBa. 3anpeaaetc noB3OBaTbCra ABTOKpeCLOm 6e3 CneuaJIbHOJ OBKN.
CHNCTKA
06NBky MoJHO CHaTb I NOCTHpaTB B CTnpalbHOJ MaunHe C HeHTpaIbHbIM MOUcIM cpeCTBOM, Bbl6paB IIpoPamMy dIJI CTnPKI DeJIHKaTHbIX TkaHei (30^) . Co6JIIOJaTe peKoMeHdauHN IIO CTnPKE, pINBeDEHHbIe Ha CneuaJIbHOM apIbIke. 06NBka MoJET POJIHHaTb B Clyuae CTnPKI pRITemNepaType Bblwe 30^ . 3aPpeUaETcNPOJb3OBAtB ueHTpHpydIy OTKIma 6eJIbY nII cyuNkY dJIy 6eJIbY (NoCKOJIbKU TkaHb MoJET OTDeJIHTbcr OIT HanoJIHnteJI).
Пл actikobite DeTaIи OunuTcBdoi CMbIOM.3anpeaetcnoIb3OBaTbcra arpeccnBhbIMN MOUHMMCpeDCTBaMn (TaKIMKaK pactBopHTeI).
YdepKnBaIOUne peMHN MOxHO CHMaTb N MbITb TeIIOB ODoB CMbIOM.BHmAHHe! Kateropnueckn 3anpeuaeTcR CHMaTb 3bUYKn PpJKeC JAMOK.
CTNPKA N UXOД
BAxHO: 6nBka YBLaETcraBbIM KOMNoHENTom dIy oBeCneueHn 6e3oNaChOCTn pe6enka. YTo6bl He nOdBeprAtb pNcKy 6e3oNaChOCTb pe6enka nn Bo n36exaHn e HapuWeHn npaBnI 3KcPlyaTaun, KaTeOpNueckn 3anpeuaTcN cNoJb30BaTb aBtOKpeCNo 6e3 6nbKn IIn6o 3aMeHrTb ee Ha dpuyU, He npoWeDsyU OMOJOraunio.
Pekomehdaunno cTnnpke:
06nBky moXHo cHrTb, noCTnpaTb npn 30^ n BbIBeCNTb dJa npocuKn.

MaHHHa
CTnPKa B XOJIOHNOBDe
He OT6eJIINBaTb
Xmnctka 3anpeeHa
Cyushka B cyuHnKe dIa 6eIbIy 3aIpeSeHa
TlaJka 3anpeueHa
HnHexyka3aHHbIe nOLOXeHNr BCTyNaOT B DeIcTBHe c 01.01.2005 r. nNoJIHoCTbIO 3aMeHЯIOT IIO6yIO dpyryIO HΦOpMauHIO, UTO KacaETcra rapaHTn, PpeIoCTaBIAreMoKOMpaHHeFoppa Pedretti S.p.A., ABJRAcb.
TAPAHTHbIe O6R3ATEJIbCTBA
KOMnHn Foppa Pedretti S.p.A. OfHuHaJIbHo 3aperHcTpnpoBaHHo no aDpcy: Grumello del Monte (Italia) Via Volta 11, KOTopar rapaHTnpyet HENocpeIcTBeHHO NTope6nteJIIO, UTO DaHHoe I3DeJIne, TOJbKO UTo BbIyUeHHoe C fAp6nKn, He IMeET DeΦeKTOB HN MaTePnaIIOB, HN pPoEKTHpOBaHHa, HN pOn3BOdCTBeHHbIX, IN COOTBeTCTByET 3aABLeHHbIM XapakTePncTnKaM.
Hactoa rapaHTna DeiCTBntbHa BO BCex cTpaHax- YIeHax E3C n He NCKIOUaET n He orpaHnHbAet npaba POnb3ObaTeJI, B COOTBeTCTBn C 3aKHOdaTeJbCTBOM, perlaMeHTnpyUoMM B3aHMOOTHOWeHH n CpOn3BOdHTeMe H3DeJIa. YTO6bl BOCNoB3OBaTbcra DaHHo rapaHTnei, IOTpe6HTeNb DoJIKeH n pInHeCTn DeΦeKTHoE H3DeJIne IpOaBuY, npeOCTaBnB DOKyMeHT, yDOCTOBepaUOuO n O npNo6peTeHH N3DeJIa, c neaTbIO n NOINcBIO IpOaBuA u Yka3aHHe MHa3BaHn I3DeJIa NII, KaK aIbTePHaTHBa, fNCKaJIbHbI KACCOBbI YeK, 6e3 KaKHX-JIb60 H3MeHEN, n3 KOToPOrO YoETKO BnDa BcR yKa3aHHa DO 3TOrO INΦOpMaUz. rapaHTna IMeET cPoK DeIcTBn DBeHaDzAtb (12) MeCAUEBC DaTbI npNo6peTeHH N3DeJIa.
B TeueHne BbIeuyKa3aHHoro Cpoka KOMnHa Foppa Pedretti S.p.A. 683yETc0TpeMOHTnpoBaTb HIN 3aMeHHTb, Ha CBOB Bbl6op, DeΦeKTHoe N3dEIne. TapaHTna npedocTaBnAETc KoHeuHOMy POKynaTeJIO N3dEIna (NoIb3OBaTeJIIO) n He NCKIIOuaet n He orpaHnUbaet npab DaHHoro POnlb3OBaTeJI, npedycMOTpeHHbIX DeNCTByUOIM 3aKOHOdaTeJIbCTBOM n/HII npabAMn POnlb3OBaTeJI, Ha npedbYBLeHne CBOx npab B aDpec DnIepa/ProDaBca N3dEIna.
HE NOKPbIBAOTCRAPAHTNEI.
TapaHTne He NOKpbIbAeTcra yUepe6, CBy3aHHbI C NcNoJIb3OBAHHe M3dEInr, BO3HKnHn IIO CLeDyUoHIM PnHuHaM: HnPaBnIbHOe NcNoJIb3OBAHHe, He COOTBeTCTBvUoUe eYka3aHnM, CoDEpKaUHmCRA BO BklaDbIiue C INHCTpyKUHm IIO MOHTaxy I KcNlyaTaUHn, YdApbl I NaDeHn I3dEInr, I3dEIne NODBepraLoCb BO3dEICTBnIO BIAxHoCTn IIN 3KCTpeMaJbHbIM TeMnepaTypaM I He6JaIopnIyTHbIM YCLOBnM OKpyKaIoUe CpeDbIC NOCToAHHO CMeHO J THX YCLOBn, Kopp03Hn I OKsClEHIO, a TaKke HecAHKUHOHPOBaHHOMy PEmOH TY IIN MoDnΦnKaUHn, I3dEIne NCNoJIb3OBAJIOCb He IIO Ha3NaYeHNIO IINI HnPaBnJIbHO, 6e3 Co6LIODeHnry Ka3aHn B INHCTpyKUHX PO MOHTaxy I KcNlyaTaUHn, PnPiNTOXOM YXODe IINI OTCytCTBnT TakOBoro, PemOHTe C NcNoJIb3OBAHHeM HeOpnRHaJIbHbIX 3aNuaCTeN, IIO PnHuHe HnPaBnJIbHOJ c6OpKN, aBapHN, BO3dEICTBnI NIIu NII HAnNTKOB, XHMnueCKNX BeIeCTB, a TaKxe BCJeIDCTBHe qPe3BbIaHbIX 6ObToAteJBCTB.
B LIO6OM clyuae, KOMnAHnA Foppa Pedretti S.p.A. He HecET HnKaKoI OTBeTCTBENHOCTN 3a yuepe6, npuHHeHHbI JIOdAM NIn npeDMeTaM, OTINuHbIM O T N3deJIy, no npuHHe HECO6LIODeHnY kza3aHn / npedncaHn / npedynpeXdEHN, coepkauxxC8 B daHOM pyKOBODCTBE NIn, KaK aIbTePHaTHBa, B "HnCtpyKcHn NO MOHTaJxU N3KeHn COpOBQJaIoUe Kaxdoe N3deJeHn PpeHa3NaueHHoe dIy BnaDeIbua/ NOIb30BaTeJI. (HaNPmEp, YnCTO B KaueCTBe npimepa, B clyuae DeTCKoN KPOBaTKN: "HnkOrda He octablante 6e3 npncmOTpa pe6eHka. KoHTpoJIpyIte, YTO6bl rOLOBa pe6eHka He OKa3aJAcb NOKpbITOn pOcTBIHEO NN ODeJIOM...").
KoMaHnFoppa Pedretti S.p.A., Kpome npOyeRo, He HecET HnKaKoI OTBeTCTBENHOCTN 3a yUeP6, PnPHHeHHbI JIOdAm NIn NMyuEcTBy, eCIn NpOLOMka eE npOdyKcNn CBra3aHa C pa3pyuWeHem KOMNoHETOB N3dJIIna, NOBepraEmbIX HopMaJIbHOMy N3Hocy. KOMNoHENTamN, NOBepraUOnMnscn HOpMaJIbHOMy N3HOCy, CHTaOTcR BCE nlaCTMaCCOBbie KOMNoHEtbl N3deJIIna.
UPOZORENJA
OPREZ:
VEHICLE APPLICATION LIST
Can only be installed on seats in vehicles indicated on this list. Please note that this list undergoes ongoing revision procedures, with changes and additions of vehicles accordingly. The up to date list can be consulted on our web site: www.foppapedretti.it
INFORMATION
-
Do not place the front support leg on a floor storage compartment lid, the floor storage compartment lidsupport leg make a full&firm contact withthe veichle chassis.
-
Please consult with the vehicle manufacturer regarding access to ISOFIX points.
-
Because of the vehicle seat position care must be taken to correctly attach the child restraint system to the ISOFIX points.
-
Vehicle seat (mid row) must be adjusted forward.
-
Adjust the vehicle seat so that the base front support leg does not make contact with the floor storage compartment.
-
Vehicle seat has to be fully adjusted to the rear most position.
DO NOT USE ON A PASSENGER SEAT WITH A FRONT AIRBAG
CHECK
WARNING: before purchasing, consult the vehicle Use and Maintenance Guide to ensure the ISOFIX anchor is present, as this could be an optional.
A3 Hatchback (2012 >)
A3 (1996 - 2003)
A3 S3 (2012 >)
A3 e-Tron Sportback (2015 >)
A3 Saloon (2014 >)
A4 Allroad (2009 >)
A4 Avant (2008 >)
A4 Saloon (2008 >)
A4 S4 (2009 >)
A4 S4 Avant (2009 >)
A5 (2007 >)
A5 Sportback (2009 >)
A5 S5 Sportback (2007 >)
A6 (2011 >)
A6 Allroad (2011 >)
A6 Avant (2011 >)
A6 S6 (2011 >)
A7 Sportback (2011 >)
A8 (2011 >)
A8 S8 (2011 >)
Q3 (2013 >)
TT Coupe (2006 >)
X
X
-

A3 e-Tron Sportback (2015 >)
A3 Saloon (2014 >)
A4 Allroad (2009 >)
A4 Avant (2008 >)
A4 Saloon (2008 >)
A4 S4 (2009 >)
A4 S4 Avant (2009 >)
A5 (2007 >)
A5 Sportback (2009 >)
A5 S5 Sportback (2007 >)
A6 (2011 >)
A6 Allroad (2011 >)
A6 Avant (2011 >)
A6 S6 (2011 >)
A7 Sportback (2011 >)
A8 (2011 >)
A8 S8 (2011 >)
Q3 (2013 >)
Q5 (2009 >)
Q7 (2006 >)
Q5 (2009 >)
Q7 (2006 >)
Q5 (2009 >)
Q7 (2006 >)
X
X

A4 Saloon (2008 >)
A4 Saloon (2008 >)
A4 S4 (2009 >)
S5 Sportback (2007 >)
A6 (2011 >)
A6 Allroad (2011 >)
Avant (2011 >)
A6 S6 (2011 >)
A7 Sportback (2011 >)
A8 (2011 >)
A8 S8 (2011 >)
Q3 (2013 >)
TT Coupe (2006 >)
X
X
-
一
一
一
A5 Sportback (2009 >)
X
X
-
一
一
一
A6 (2011 >)
X
X
m = 311
A5 S5 Sportback (2007 >)
X
X
-
A6 (2011 >)
X
X
-
A7 Sportback (2011 >)
X
X
• •
-
一
一
A6 Allroad (2011 >)
X
X
• •
-
A8 (2011 >)
X
X
• •
m = 311
A6 Allroad (2011 >)
X
X
• •
-
A6 Avant (2011 >)
A6 S6 (2011 >)
X
X
• •
-
A8 (2011 >)
X
X
-
A6 Avant (2011 >)
X
X
• •
A6 Avant (2011 >)
X
X
-
A6 Avant (2011 >)
X
X
• •
-
A6 S6 (2011 >)
X
X
• •

A7 Sportback (2011 >)
A8 (2011 >)
X
X
• •

A8 (2011 >)
X
X
A8 S8 (2011 >)
X
X
• •

Q3 (2013 >)
X
X
• •
-
Q3 (2013 >)
X
X
A8 S8 (2011 >) Q3 (2013 >)
X
X
$$ \begin{array}{c} \bullet \ \bullet \ \bullet \end{array} $$
-
Q5 (2009 >)
X
X
$$ \begin{array}{c} \bullet \ \bullet \ \bullet \end{array} $$
Q5 (2009 >)
X
X
$$ \begin{array}{c} \bullet \ \bullet \ \bullet \end{array} $$
-
Q5 (2009 >)
X
X
$$ \begin{array}{c} \bullet \ \bullet \ \bullet \end{array} $$
-
Q5 (2009 >)
X
X
$$ \begin{array}{c} \bullet \ \bullet \ \bullet \end{array} $$
-
X
X
$$ \begin{array}{c} \bullet \ \bullet \end{array} $$
-
A8 S8 (2011 >) Q3 (2013 >) Q5 (2009 >)
X
X
• •

A8 S8 (2011 >) Q3 (2013 >) Q5 (2009 >)
X
X
A8 S8 (2011 >) Q3 (2013 >) Q5 (2009 >)
X
X
• •
-
A8 S8 (2011 >) Q3 (2013 >) Q5 (2009 >)
X
X
• •
-
A8 S8 (2011 >) Q3 (2013 >) Q5 (2009 >)
X
X
• •
-
A8 S8 (2011 >) Q3 (2013 >) Q5 (2009 >)
X
X
-
X
X
• •
A8 S8 (2011 >) Q3 (2013 >) Q5 (2009 >)
X
X
-
A8 S8 (2011 >) Q3 (2013 >) Q5 (2009 >)
X
• •
-
$$ \mathsf {X} $$
$$ \bigcirc $$
$$ X $$
$$ \begin{array}{c} \bullet \ \bullet \end{array} $$
$$ \begin{array}{c} - \ - \end{array} $$
A8 S8 (2011 >) Q3 (2013 >) Q5 (2009 >)
$$ \mathsf {X} $$
$$ \bigcirc $$
$$ X $$
$$ \begin{array}{c} \bullet \ \bullet \ \bullet \end{array} $$
A8 S8 (2011 >) Q3 (2013 >) Q5 (2009 >)
$$ \mathsf {X} $$
$$ \bigcirc $$
$$ X $$
$$ \begin{array}{c} \bullet \ \bullet \ \bullet \end{array} $$
$$ \begin{array}{c} - \ - \end{array} $$
Bentley
1 2 3 4 5 6
| Continental GT (2003 - 2012) | X | ● | X | ● | - | - |
| Continental Flying Spur (2005 - 2012) | X | ● | X | ● | - | - |
| Continental GTC (2006 - 2012) | X | ● | X | ● | - | - |
| Mulsanne (2010 >) | X | ● | X | ● | - | - |
BMW
| 1 Series Convertible (2008 >) | X | ● | X | ● | - | - |
| 1 Series Coupe (2008 >) | X | ● | X | ● | - | - |
| 1 Series F20 (2011 >) | X | ● | X | ● | - | - |
| 2 Series Active Tourer (2015 >) | ● | ● | X | ● | - | - |
| 2 Series Coupe | X | ● | X | ● | - | - |
| 3 Series Coupe (2007 >) | ● | ● | X | ● | - | - |
| 3 Series F30 (2012 >) | X | ● | X | ● | - | - |
| 5 Series Saloon (2003 - 2010) | X | ● | X | ● | - | - |
| 5 Series Touring (2003 - 2010) | X | ● | X | ● | - | - |
| 5 Series Touring (2011 >) | X | ● | X | ● | - | - |
| 5 Series Saloon (2011 >) | X | ● | X | ● | - | - |
| 5 Series (2011 >) | X | ● | X | ● | - | - |
| 6 Series Coupe (2011 >) | X | ● | X | ● | - | - |
| 6 Series Convertible (2011 >) | X | ● | X | ● | - | - |
| 6 Series Gran Coupe (2011 >) | X | ● | X | ● | - | - |
| 7 Series (2010 >) | X | ● | X | ● | - | - |
| i3 (2014 >) | X | ● | X | ● | - | - |
| X1 (2010 >) | X | ● | X | ● | - | - |
| X3 F25 (2011 >) | X | ● | X | ● | - | - |
| X4 (2014 >) | X | ● | X | ● | - | - |
| X5 (2007 >) | X | ● | ● | ● | X | X |
| X5 (2015) | X | ● | ● | ● | X | X |
| X6 (2008 >) | X | ● | X | ● | - | - |
| X6 (2015) | X | ● | X | ● | - | - |
| 3-GT (2013 >) | X | ● | X | ● | - | - |
| 5-GT (2010 >) | X | ● | X | ● | - | - |
Cadillac

①
(2)
3
4
5
6
BLS Saloon (2006 - 2011)
X
X
一
一
Chevrolet
Aveo (2012 >)
X
X
一
Captiva (2007 >)
X
X
一
一
Cruze (2009 >)
X
X
一
一
Spark (2012 >)
X
X
一
一
Volt (2011 >)
X
X
一
Orlando (2011 >)
X
X
一
一
Traxx (2013 >)
X
X
一
一
Chrysler
Grand Voyager (2008 >)
X
X
X
X
300C(2012>)
X
X
一
Delta (2011 >)
X
X
一
一
Ypsilon (2011 >)
X
X
一
一
Citroen
SB! Berlingo Multispace (2007 >)
X
!
X
!
X
X
C1 (2006 >)
X
X
一
一
C1 (2015)
X
X
一
一
C35Door(2009>)
X
X
一
一
SB! C3 Picasso (2009 >)
X
!
X
!
一
一
C4 (2010 >)
X
X
一
一
SB! C4 Picasso (2007 - 2014)
X
!
!
X
X
SBI C4 Picasso (2014 >)
X
!
!
X
X
C5 Saloon (2008 >)
X
X
一
一
C5 Tourer (2008 >)
X
X
一
一
C4-Cactus (2015 >)
DS3 (2011 >)
X
X
一
一
DS4 (2011 >)
X
X
一
一
DS5 (2013 >)
X
X
一
一
Dacia

①
(2)
(3)
4
5
6
| Duster (2012 >) | X | ● | X | ● | - | - |
| Sandero (2013 >) | X | ● | X | ● | - | - |
Fiat
| 500 (2008 >) | X | ● | X | ● | - | - |
| 500 C (2009 >) | X | ● | X | ● | - | - |
| Abarth 500 (2009 >) | X | ● | X | ● | - | - |
| Bravo (2007 >) | X | ● | X | ● | - | - |
| 500L (2013 >) | X | ● | X | ● | - | - |
| Panda (2012 >) | X | ● | X | ● | - | - |
| Grande Punto (2006 >) | X | ● | X | ● | - | - |
| Abarth Grande Punto (2008 - 2011) | X | ● | X | ● | - | - |
Ford
| B Max (2012 >) | X | ● | X | ● | - | - | |
| SB! | Focus CMax (2003 - 2010) | X | ! | X | ● | - | - |
| C Max (2010 -2012) | X | ● | ● | ● | - | - | |
| C Max (2012 >) | X | ● | ● | ● | - | - | |
| Fiesta (2004 - 2008)) | X | X | X | X | - | - | |
| Fiesta (2008 >) | X | ● | X | ● | - | - | |
| Focus (2010 >) | X | ● | X | ● | - | - | |
| Focus Electric (2015 >) | X | ● | X | ● | - | - | |
| SB! Galaxy (2006 >) | X | ! | X | ! | X | X | |
| KA (2009 >) | X | ● | X | ● | - | - | |
| Kuga (2013 >) | X | ● | X | ● | - | - | |
| Mondeo Estate (2007 >) | X | ● | X | ● | - | - | |
| Mondeo Hatchback (2007 >) | X | ● | X | ● | - | - | |
| Mondeo Saloon (2007 >) | X | ● | X | ● | - | - | |
| Mondeo (2015 >) | X | ● | X | ● | - | - | |
| SB! S Max (2006 >) | X | ! | X | ! | X | X | |
| EcoSport (2015 >) | X | ● | X | ● | - | - |
Honda

1 2 3 4 5 6
| Accord Saloon (2008 >) | X | ● | X | ● | - | - |
| Accord Tourer (2008 >) | X | ● | X | ● | - | - |
| Civic (2012 >) | X | ● | X | ● | - | - |
| Civic (2006 - 2011) | X | ● | X | ● | - | - |
| Civic Hybrid Saloon (2006 - 2010) | X | ● | X | ● | - | - |
| Civic Type R (2007 - 2010) | X | ● | X | ● | - | - |
| Civic Tourer (2014 >) | X | ● | X | ● | - | - |
| CRV (2007 - 2013) | X | ● | X | ● | - | - |
| CRV (2012 >) | X | ● | X | ● | - | - |
| Elysion (2012 >) | X | ● | X | ● | X | X |
| FRV (2006 - 2011) | X | ● | X | ● | - | - |
| Insight (2009 >) | X | X | X | X | - | - |
| Jazz (2008 >) | X | ● | X | ● | - | - |
| Odyssey (2010 >) | X | X | X | X | - | - |
Hyundai
| i10 Hatchback (2008 >) | X | ● | X | ● | - | - |
| i20 Hatchback (2009 >) | X | ● | X | ● | - | - |
| i30 (2012 >) | X | ● | X | ● | - | - |
| i40 (2011 >) | X | ● | X | ● | - | - |
| iX20 (2011 >) | X | ● | X | ● | - | - |
| iX35 (2010 >) | X | ● | X | ● | - | - |
| SantaFe (2012 >) | X | ● | X | ● | X | X |
| Tucson (2010 >) | X | ● | X | ● | - | - |
| Veloster (2012 >) | X | ● | X | ● | - | - |
Infiniti
| EX (2009 >) | X | ● | X | ● | - | - |
| FX (2009 >) | X | ● | X | ● | - | - |
| G Coupe (2009 >) | X | X | X | X | - | - |
| G Saloon (2009 >) | X | ● | X | ● | - | - |
| M (2010 >) | X | ● | X | ● | - | - |
Jaguar
1 2 3 4 5 6
| X-Type (2001 - 2010) | X | X | X | X | - | - |
| X-Type Estate (2004 - 2010) | X | X | X | X | - | - |
| XF (2008 >) | X | ● | X | ● | - | - |
| XF R (2009 >) | X | ● | X | ● | - | - |
| XF Sportbrake (2013 >) | X | ● | X | ● | - | - |
| XJ (2010 >) | X | ● | X | ● | - | - |
| XK (2006 >) | X | ● | X | ● | - | - |
| XK Convertible (2006 >) | X | ● | X | ● | - | - |
| XK R (2006 >) | X | ● | X | ● | - | - |
Jeep
| Grand Cherokee (2011 >) | X | ● | X | ● | - | - |
| Compass (2011 >) | X | ● | X | ● | - | - |
| Cherokee (2014 >) | X | ● | X | ● | - | - |
Kia
| SB! Carens (2013 >) | X | ! | ! | ! | X | X |
| Ceed Hatchback (2012 >) | X | ● | X | ● | - | - |
| Optima (2011 >) | X | ● | X | ● | - | - |
| Picanto (2008 >) | X | ● | X | ● | - | - |
| Rio (2012 >) | X | ● | X | ● | - | - |
| Sorento (2010 - 2014) | X | ● | X | ● | - | - |
| Sorento (2015 >) | X | ● | X | ● | X | X |
| Soul (2009 >) | X | ● | X | ● | - | - |
| Soul EV (2015 >) | X | ● | X | ● | - | - |
| Sportage (2011 >) | X | ● | X | ● | - | - |
| Venga (2010 >) | X | ● | X | ● | - | - |
Land Rover
| Discovery Sport (2015 >) | X | ● | X | ● | X | X |
| Discovery 4 (2009 >) | X | ● | X | ● | X | X |
| Freelander 2 (2006 >) | X | ● | X | ● | - | - |
Land Rover
①
(2)
(3)
4
5
6
| Range Rover (2013 >) | X | ● | X | ● | - | - |
| Range Rover (2002 - 2012) | X | ● | X | ● | - | - |
| Range Rover Sport (2005 - 2012) | X | ● | X | ● | - | - |
| Range Rover Sport (2013 >) | X | ● | X | ● | X | X |
| Range Rover Evoque (2011 >) | X | ● | X | ● | - | - |
Lancia
| Thema (2012 >) | X | ● | X | ● | - | - |
| Voyager (2010 >) | X | ● | X | ● | X | X |
| Delta (2011 >) | X | ● | X | ● | - | - |
| Ypsilon (2012 >) | X | ● | X | ● | - | - |
Lexus
| CT (2011 >) | X | ● | X | ● | - | - |
| GS (2013 >) | X | ● | X | ● | - | - |
| GSh (2013 >) | X | ● | X | ● | - | - |
| IS Saloon (2005 - 2012) | X | ● | X | ● | - | - |
| RX (2010 >) | X | ● | X | ● | - | - |
Mazda
| CX-5 (2011 >) | X | ● | X | ● | - | - |
| CX-7 (2007 - 2011) | X | ● | X | ● | - | - |
| Mazda 2 (2009 - 2015) | X | ● | X | ● | - | - |
| Mazda 2 (2015 >) | X | ● | X | ● | - | - |
| 3 Hatchback (2009 >) | X | ● | X | ● | - | - |
| 3 Saloon (2009 >) | X | ● | X | ● | - | - |
| 3 Hatchback (2014 >) | X | ● | X | ● | - | - |
| 5 (2005 - 2010) | X | ● | X | ● | - | - |
| 6 Estate (2008 - 2012) | X | ● | X | ● | - | - |
| 6 Hatchback (2007 - 2012) | X | ● | X | ● | - | - |
| 6 Saloon (2007 - 2009) | X | ● | X | ● | - | - |
| 6 Saloon (2013 >) | X | ● | X | ● | - | - |
| 6 Estate (2012 >) | X | ● | X | ● | - | - |
Mercedes-Benz

①
(2)
(3)
4
5
6
A Class (2005 - 2012)
A Class (2013 >)
B Class (2012 >)
B Class EV (2015 >)
C Class (2008 >)
C Class Estate (2008 >)
C Class Coupe (2011 >)
CLA (2013 >)
CLS Shootingbrake (2012 >)
CLS Coupe (2011 >)
E Class Saloon (2009 - 2012)
E Class Coupe (2009 >)
E Class Estate (2013)
E Class Saloon (2013 >)
GL Class (2006 - 2012)
GL Class (2012 >)
M/ML Class (2005 - 2012)
M/ML Class (2012 >)
R Class (2006 - 2012)
S Class (2006 - 2013)
S Class (2015 >)
SL Class (2012 >)
SLK (2011 >)
V Class (2015 >)
Mini
Mini (Cooper) Hatchback (2006 - 2013) X • X • - -
Mini (Cooper) Hatchback (2014 >)
Mini Coupe (2009 >) X - - - - - -
Mini Countryman (2010 >) X - -
Mini Paceman (2013 >)
Mini 5dr (2015 >)
Mitsubishi
1 2 3 4 5 6
ASX (2010 >)
Colt (2007 -2013)
Lancer (2008 - 2011)
Lancer Sportback (2008 - 2011)
Lancer Ralliart (2009 - 2011)
Outlander (2007 - 2013)
Outlander (2013 >)
Outlander PHEV (2015 >)
Shogun (2007 >)
X 00 - -
X O X O - -
X
X O X - -
X O X - -
X O O - -
X O X O -
X
× ×

Nissan
Juke (2010 >)
Micra (2011 >)
Note (2006 - 2013)
Note (2014 >)
Qashqai+2 (2008 >)
Qashqai (2014 >)
Quest MPV (2012 >)
X-Trail (2007 >)
X 00 - -
X 00
X
X X - -
X X X X
X
X X X X
X X - -
Opel
Adam (2013 >)
Agila (2008 >)
Ampera (2011 >)
Antara (2007 - 2015)
Astra 5dr (2010 >)
Astra Estate (2010 >)
Astra GTC (2011 >)
Corsa 3dr Hatchback (2006 - 2015)
Corsa 5dr Hatchback (2006 - 2015)
Corsa 5dr (2015 >)
Corsa VXR (2007 >)
Insignia Hatchback (2009 >)
Insignia Saloon (2009 >)
Insignia Sports Tourer (2009 >)
X
X X - -
X
X 00 - -
X
X 00 - -
X 00 - -
X O X - -
X O X - -
X 00
X C H
X O X O - -
X 00 - -
X
Opel

①
②
(3)
(4)
5
6
| Meriva (2010 >) | X | ● | X | ● | - | - |
| Mokka (2013 >) | X | ● | X | ● | - | - |
| Zafira (2005 - 2014) | X | ● | ● | ● | X | X |
| Zafira Tourer (2014 >) | X | ● | ● | ● | X | X |
Peugeot
| 107 (2005 >) | X | ● | X | ● | - | - |
| 108 (2015 >) | X | ● | X | ● | - | - |
| 207 3dr (2006 - 2012) | X | ● | X | ● | - | - |
| 207 5dr (2006 - 2012) | X | ● | X | ● | - | - |
| 207 SW (2007 - 2012) | X | ● | X | ● | - | - |
| 2008 (2013 >) | X | ● | X | ● | - | - |
| 208 3dr (2013 >) | X | ● | X | ● | - | - |
| 208 5dr (2013 >) | X | ● | X | ● | - | - |
| 307 (2001 - 2007) | X | ● | X | ● | - | - |
| 307 Estate (2002 - 2007) | X | ● | X | ● | - | - |
| 308 Hatchback (2007 - 2014) | X | ● | ● | ● | - | - |
| 308 SW (2008 >) | X | ● | X | ● | - | - |
| 308 (2014 >) | X | ● | X | ● | - | - |
| SB! 3008 (2009 >) | X | ! | X | ! | - | - |
| 508 (2011 >) | X | ● | X | ● | - | - |
| 508 SW (2011 >) | X | ● | X | ● | - | - |
| 508 RXH (2013 >) | X | ● | X | ● | - | - |
| SB! 5008 (2011 >) | X | ! | ● | ! | X | X |
| RCZ (2011 >) | X | X | X | X | - | - |
Porsche

| Cayenne (2011 >) | X | ● | X | ● | - | - |
| Cayenne E-Hybrid (2015 >) | X | ● | X | ● | - | - |
| Panamera (2011 >) | X | ● | X | ● | - | - |
| Panamera E-Hybrid (2015 >) | X | ● | X | ● | - | - |
Renault

①
(2)
3
4
5
6
| Captur (2015 >) | ● | ● | X | ● | - | - |
| Clio (2005 - 2012) | X | ● | X | ● | - | - |
| Clio Renault Sport (2006 - 2012) | X | ● | X | ● | - | - |
| Clio Sport Tourer (2007 - 2012) | X | ● | X | ● | - | - |
| Clio (2013 >) | ● | ● | X | ● | - | - |
| Laguna (2008 - 2012) | X | ● | X | ● | - | - |
| Laguna Sport Tourer (2008 - 2012) | X | ● | X | ● | - | - |
| SB! Megane Hatchback (2008 >) | X | ! | X | ! | - | - |
| Megane Sport Tourer (2009 >) | X | ● | X | ● | - | - |
| Modus (2004 - 2012) | X | ● | X | ● | - | - |
| Grand Modus (2008 - 2012) | X | ● | X | ● | - | - |
| SB! Scenic (2009 >) | X | ! | ● | ! | X | X |
| Twingo (2007 - 2012) | X | ● | X | ● | - | - |
| Twingo (2012 - 2015) | X | ● | X | ● | - | - |
| Twingo (2015 >) | X | ● | X | ● | - | - |
Saab
| 9-3 (2002 - 2012) | X | ● | X | ● | - | - |
| 9-3 Sport Wagon (2005 - 2012) | X | ● | X | ● | - | - |
| 9-3 X (2009 - 2012) | X | ● | X | ● | - | - |
| 9-5 Estate (2005 - 2010) | X | ● | X | ● | - | - |
| 9-5 (2011 - 2012) | X | ● | X | ● | - | - |
Seat
| SBI! Alhambra (2010 >) | X | ! | ! | ! | X | X |
| Altea (2004 - 2011) | X | ● | X | ● | - | - |
| Altea XL (2007 - 2011) | X | ● | X | ● | - | - |
| Altea Freetrack4 (2007 - 2009) | X | ● | X | ● | - | - |
| Exeo (2008 - 2014) | X | ● | X | ● | - | - |
| Exeo ST Estate (2008 - 2014) | X | ● | X | ● | - | - |
Seat
1
(2)
(3)
4
5
6
Ibiza Cupra (2009 >)
Ibiza FR (2009 >)
Ibiza Hatchback (2008 - 2013)
Leon Cupra (2007 - 2011)
Leon FR (2006 - 2012)
Leon Hatchback (2005 - 2012)
Leon (2013 >)
Mii (2011 >)
Toledo (2013 >)
m = 311
X
一
一
Skoda
Citigo (2012 >)
Fabia Estate Combi (2008 >)
Fabia Hatchback (2007 >)
Octavia Estate Combi (2005 - 2013)
Octavia Hatchback (2004 - 2012)
Octavia Scout (2007 - 2013)
Octavia Hatchback (2013 >)
Rapid (2013 >)
Roomster (2006 >)
Superb Combi Estate (2008 >)
Superb (2008 >)
Yeti (2009 >)
m = 311
X
Smart
For Two Coupe (2007 >)
FourFour (2015 >)
m = 311
X
Suzuki
①
(2)
(3)
4
5
6
Alto (2009 >)
Grand Vitara (2006 >)
Splash (2008 >)
Swift Sport (2011 >)
SX-4 (2006 >)
SX-4 Saloon (2009 >)
• X
•
• X
< x < 2 + 2 + 2
• X
• X
Subaru
BRZ (2012 >)
Forester (2013 >)
Impreza 5 Door (2013 >)
Legacy (2012 >)
Outback (2012 >)
XV Hatchback (2011 >)
• X
•
•
•
• X
• X
Toyota
Auris (2007 - 2012)
Auris (2013 >)
Avensis Hatchback (2003 - 2011)
Avensis Tourer (2009 >)
Aygo (2005 - 2014)
Aygo (2014 >)
EZ MPV (2013 >)
GT86 (2012 >)
Highlander (2013 >)
Land Cruiser (2003 - 2009)
Land Cruiser (2009 >)
Prius (2004 - 2010)
Prius (2010 >)
Prius PHEV (2015 >)
• X
• X
X
• X
• X
• X
•
•
• X
• X
• X
• X
•
• X
Toyota

①
(2)
(3)
4
5
6

Prius Plus + (2012 >)
Rav 4 MK3 (2006 - 2011)
RAV4 (2013 >)
SB! Verso (2009 - 2012)
SB! Verso (2013 >)
Yaris Hatchback (2011 >)
Vauxhall
Adam (2013 >)
Agila (2008 >)
Ampera (2011)
Antara (2007 - 2015)
Astra 5dr (2010 >)
Astra Estate (2010 >)
Astra GTC (2011 >)
Corsa D (2007 >)
Corsa 3dr Hatchback (2006 - 2015)
Corsa 5dr Hatchback (2006 - 2015)
Corsa 5dr (2015 >)
Corsa VXR (2007 >)
Insignia Hatchback (2009 >)
Insignia Saloon (2009 >)
Insignia Sports Tourer (2009 >)
Meriva (2010 >)
Mokka (2013 >)
Zafira (2005 - 2014)
Zafira Tourer (2012 >)
Volkswagen
Beetle (2012 >)
Multivan Caravelle (2008)
Golf Cabriolet (2009 - 2012)
Golf Hatchback (2009 - 2012)
X
X
X
一
X
一
一
1
X
1
一
一
1
X
1
一
一
X
(2)
! & X & ! & - & - ! & X & ! & - & - · & X & ·
| Adam (2013 >) | X | ● | X | ● | - | - |
| Agila (2008 >) | X | ● | X | ● | - | - |
| Ampera (2011) | X | ● | X | ● | - | - |
| Antara (2007 - 2015) | X | ● | X | ● | - | - |
| Astra 5dr (2010 >) | X | ● | X | ● | - | - |
| Astra Estate (2010 >) | X | ● | X | ● | - | - |
| Astra GTC (2011 >) | X | ● | X | ● | - | - |
| Corsa D (2007 >) | X | ● | X | ● | - | - |
| Corsa 3dr Hatchback (2006 - 2015) | X | ● | X | ● | - | - |
| Corsa 5dr Hatchback (2006 - 2015) | X | ● | X | ● | - | - |
| Corsa 5dr (2015 >) | X | ● | X | ● | - | - |
| Corsa VXR (2007 >) | X | ● | X | ● | - | - |
| Insignia Hatchback (2009 >) | X | ● | X | ● | - | - |
| Insignia Saloon (2009 >) | X | ● | X | ● | - | - |
| Insignia Sports Tourer (2009 >) | X | ● | X | ● | - | - |
| Meriva (2010 >) | X | ● | X | ● | - | - |
| Mokka (2013 >) | X | ● | X | ● | - | - |
| Zafira (2005 - 2014) | X | ● | ● | ● | X | X |
| Zafira Tourer (2012 >) | X | ● | ● | ● | X | X |
Volkswagen

1 2 3 4 5 6
| Golf Hatchback MK7 (2012 >) | X | ● | X | ● | - | - |
| Golf MK7 GTE (2014 >) | X | ● | X | ● | - | - |
| Golf E (2014 >) | X | ● | X | ● | - | - |
| Golf Plus (2009 - 2011) | X | ● | X | ● | - | - |
| Jetta (2011 >) | X | ● | X | ● | - | - |
| Passat (2005 - 2010) | X | ● | X | ● | - | - |
| Passat (2010 - 2015) | X | ● | X | ● | - | - |
| Passat Saloon (2015 >) | X | ● | X | ● | - | - |
| Passat Alltrack (2012 >) | X | ● | X | ● | - | - |
| Passat CC (2008 >) | X | ● | X | ● | - | - |
| Passat Estate (2005 -2011) | X | ● | X | ● | - | - |
| Passat Estate (2015 >) | X | ● | X | ● | - | - |
| Polo 3dr (2009 >) | X | ● | X | ● | - | - |
| Polo 5dr (2009 >) | X | ● | X | ● | - | - |
| Scirocco (2011) | X | ● | X | ● | - | - |
| SB! Sharan (2010 >) | X | ! | ! | ! | X | X |
| Tiguan (2008 >) | X | ● | X | ● | - | - |
| Touareg (2012 >) | X | ● | X | ● | - | - |
| SB! Touran (2010 >) | X | ! | ! | ! | X | X |
| UP! (2012 >) | X | ● | X | ● | - | - |
| E - UP! (2014 >) | X | ● | X | ● | - | - |
Volvo
| C30 (2007 - 2013) | X | ● | X | ● | - | - |
| S60 (2010 >) | X | ● | X | ● | - | - |
| S80 (2007 >) | X | ● | X | ● | - | - |
| V40 (2012 >) | X | ● | X | ● | - | - |
| V40 Cross Country (2013 >) | X | ● | X | ● | - | - |
| V60 (2011 >) | X | ● | X | ● | - | - |
| V60 PHEV (2015 >) | X | ● | X | ● | - | - |
| V70 (2008 >) | X | ● | X | ● | - | - |
| XC60 (2008 >) | X | ● | X | ● | - | - |
| XC70 (2008 >) | X | ● | X | ● | - | - |
| XC90 (2003 - 2014) | X | ● | X | ● | X | X |
NOTE
Importato da:


- WARNING
- CAUTION:
- BEFORE STARTING
- WHEN USING THE CHILD CAR SEAT
- SEAT BELT
- SUNLIGHT/HOT DAYS
- SECOND HAND OR DAMAGED CHILD CAR SEATS AND SEATBELTS
- CAR SEAT COMPONENTS
- CERTIFICATION
- GENERAL INFORMATION
- USING THE CAR SEAT
- CHECKS BEFORE USE
- Compatible vehicles fitted with ISOFIX system
- WARNINGS
- USE IN THE VEHICLE
- IMPORTANT
- For the safety of your child
- CAUTION
- HE VEHICLE
- INSTALLATION IN THE CAR
- SAFETY ON BOARD THE VEHICLE
- Preliminary steps
- USING THE CAR SEAT IN THE VEHICLE
- INSTALLATION IN THE FORWARD-FACING POSITION, from 40 to 105~cm (part 1)
- INSTALLATION IN THE FORWARD-FACING POSITION, from 76 to 105~cm (part 1).
- CAT IN THE VEHICLE
- INSTALLING THE CAR SEAT
- ADJUSTING THE SUPPORT LEG
- REMOVING THE CAR SEAT
- CAR SEAT ADJUSTMENT SYSTEM
- Inclining the car seat
- THEVEHICLE
- PLACING THE CAR SEAT IN THE REAR-FACING POSITION FOR CHILDREN FROM BIRTH AND WITH A HEIGHT FROM 40 TO 105 CM (part 2)
- DO NOT USE IF THE FRONT PASSENGER SEAT IS EQUIPPED WITH AN ACTIVE FRONT AIRBAG.
- PLACING THE CAR SEAT IN THE FORWARD-FACING POSITION (part 2)
- (for children with a height of 76 to 105~cm and the child has exceeded the age of 15 months)
- 360^ ° seat rotation
- HARNESS
- REMOVING THE NEWBORN REDUCER
- REMOVING THE LINING
- EANING
- MAINTENANCE AND CLEANING
- CLEANING
- Washing instruction:
- FORMAL GUARANTEE
- EXCLUSIONS TO THE FORMAL GUARANTEE.
- INDEX
- EXCLUSIONS DE LA GARANTIE CONVENTIONNELLE.
- MANUTENÇÂO E LIMPEZA
- TONOEOETHENTOE TOYOXHMAO
- Σuσημa προδεος
- IPEd HauJOM IcNoJIb3OBAHnA
- ПИИСПОЛьЗOBAHИN ABTOKPECJIА
- PPEyPPEKDEHNA
- PPEyIPEKDEHNA
- PEMEHb 6E3OПАСHOCTN
- BO3DEICTBNE COJHEUHbIX Lyuei / JAPKHe dHn
- ABTOKPECJIO B/Y nnn IOBPEKdEHHbIE ABTOKPECJIa
- KOMNOHEHTbI
- CEPTHΦHKAUJIa
- MEPbI IPEdoCTOPOXHOCTN
- ИСПОЛьЗOBAHNEВАВТOMОБЛЕ
- BAKHO
- ABTOKpecIOM MOXHO N0lb3OBaTbCra CneDyUOuM 06pa3OM:
- YCTAHOBKA B ABTOMOENAb
- Дя 6e3oNaChOCTn pe6eHka
- BHIMAHHE
- YCTAHOBKA ABTOKPECJIAB ABTOMOиЛь
- БЕЗПАСНСТБВ.ABTOMОБИЛЕ
- PpeBapnteIbHbIe deIcTBnA
- YCTAHOBKA TKAHOJ OSUBKN HA IPEXHEE MECTO
- YINCTKA N OBCJIyJXINBAHNE
- CHNCTKA
- CTNPKA N UXOД
- Pekomehdaunno cTnnpke:
- TAPAHTHbIe O6R3ATEJIbCTBA
- HE NOKPbIBAOTCRAPAHTNEI.
- UPOZORENJA
- OPREZ:
- VEHICLE APPLICATION LIST
- INFORMATION
- CHECK
- Bentley
- BMW
- Cadillac
- Chevrolet
- Chrysler
- Citroen
- Dacia
- Fiat
- Ford
- Honda
- Hyundai
- Infiniti
- Jaguar
- Jeep
- Kia
- Land Rover
- Lancia
- Lexus
- Mazda
- Mercedes-Benz
- Mini
- Mitsubishi
- Nissan
- Opel
- Peugeot
- Porsche
- Renault
- Saab
- Seat
- Skoda
- Smart
- Suzuki
- Subaru
- Toyota
- Vauxhall
- Volkswagen
- Volvo
- NOTE
Brand : Foppapedretti
Model : Logik iSize
Category : Car seat