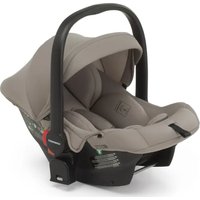
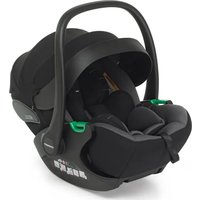
Iturn duoFIX - Car seat Foppapedretti - Free user manual and instructions
Find the device manual for free Iturn duoFIX Foppapedretti in PDF.
User questions about Iturn duoFIX Foppapedretti
0 question about this device. Answer the ones you know or ask your own.
Ask a new question about this device
Download the instructions for your Car seat in PDF format for free! Find your manual Iturn duoFIX - Foppapedretti and take your electronic device back in hand. On this page are published all the documents necessary for the use of your device. Iturn duoFIX by Foppapedretti.
USER MANUAL Iturn duoFIX Foppapedretti
EN CAR SEAT - Assembly instructions Complies with ECE R44-04
3.Use in the car PAG 39
4.1 How to use the buckle PAG 41
4.2 How to adjust the harness PAG 41
4.3 Headrest adjustment PAG 42
4.4 Adjusting the recline PAG 42
4.5 How to rotate the seat PAG 43
4.6 How to install the ISOFIX system PAG 44
4.7 Adjusting and using the Top Tether belt PAG 45
4.8 Removing and installing the harness PAG 46
-
Adjusting the car seat PAG 47
-
Cleaning and maintenance PAG 54
Formal guarantee PAG 55
This product complies with ECE Regulation R44/04.
Group 0 + / 1 / 2 / 3 car seat. Suitable for children from 0kg to 36kg (from birth to around 12 years of age).
CAUTION! Make sure you observe the relevant instructions in the user manual of your vehicle before transporting children. Take particular note of all information provided for the use of child seats in connection with airbags.
WARNING!
- Read the instructions carefully before use and store them in the special compartment for reuse in future. Failure to follow the car seat installation instructions carefully could pose a risk to your baby.
- Children often carry small objects (e.g.toys) in jacket or trouser pockets, and may also wear clothes with rigid components (e.g. belt buckle).
- Make sure that these objects are not clamped between the child and the safety harness, as this might cause unnecessary injuries in case of an accident. The same hazards also apply for adults.
- Naturally young children are often lively. Make sure to explain the importance of safety when in a vehicle. Your child will then understand that the harness lock should not be opened and the harness should not be removed, giving you more peace of mind.
- Your child's safety can only be guaranteed if the safety system is installed and used in accordance with the instruction manual.
- The assembly and installation needs to be carried out without the baby in the car seat.
- During use, the straps of the harness must be tight, not twisted, correctly adjusted according to the size of the child, and protected from any damage.
- Protect any parts of the restraint system not covered with fabric against direct sunlight to prevent your child from suffering burns.
- The child restraint system must not be damaged or crushed by moving parts in the vehicle or by the vehicle doors.
- Do not attempt any modifications to the restraint system as they might endanger your child's safety.
- After an accident, the entire child restraint system must be replaced or sent to the manufacturer for testing, along with an accident report.
- Make sure to instruct your passenger on how to remove the child from its safety seat in case of an accident or danger.
- The lap belts of the harness system must be fitted as low down as possible so that the child's hips are held correctly.
- The child seat must not be used on seats with activated front airbags. (Danger to
WARNING
life)!
- Never leave your child unsupervised in the car seat whether harnessed or not.
- Make sure that all the car passengers are wearing seat belts, and that luggage or other loose objects inside the vehicle are secured or fixed to reduce the risk of injury in the event of an accident.
- The manual must always be carried with the child safety seat.
- The use of any accessories or replacement parts is prohibited, and non compliance with result in the lapse of all warranty and liability claims.
- The child safety seat is to be used with original se at covers only. The lining is an integral part of the car seat and has a direct impact on the correct operation of the equipment.
- If the child restraint is used intensively, the car seat lining and the other components can be subject to various degrees of wear and tear, depending on the duration and intensity of use of the product, and consequently some parts may need to be replaced.
- For spare parts contact your baby product retailer or the manufacturer.
- This car seat has been tested according to the European regulation ECE R44.04, applicable to child safety devices. If used as intended and in accordance with the instructions for installation and use, the car seat serves to prevent or reduce any injury that may be suffered by children up to 18kg in the event of an accident, also depending on the type and severity of the accident.
- Iturn duoFIX must be installed as rear-facing when used as a Group 0+ car seat; it must be installed as forward-facing when used as a Group 1/2/3 car seat.
- A child safety device does not replace responsible and careful behavior in road traffic.
- Do not use the car seat if it has broken or missing parts, if it is second-hand, or if it has been subjected to violent stresses in an accident, as it may have suffered extremely dangerous structural damage.
- Do not carry out any modifications to the product.
- The child seat must always be secured in the vehicle, even when it is not occupied by the child. In the event of sudden braking, it may cause injury to the vehicle occupants.
- This child car seat is suitable for child's weight less than 36kg .
- Don't to use any load bearing content points other than those described in the instructions and marked in the child restraint
- Do not use forward-facing child car seat when child weighting less than 9kg .
- The rigid items and plastic parts of a child restraint must be so located and installed that are not liable, during everyday use of the vehicle, to become trapped by a movable seat or in a door of the vehicle.
WARNING
- WARNING: Always use the vehicle's door child safety lock system, if one is available, to make it impossible for the child to open the car doors from inside.
- WARNING: Allow the child a break during long car journeys and make sure they don't get out of the car seat unaided and without supervision.
- WARNING: Use the car seat even for short journeys, as it is in these cases that most accidents occur.
- WARNING: The child car seat must be fitted securely to the passenger seat. Ensure that it is not loose or wobbly after you have fitted it. If it is loose, refit it.
- WARNING: Ensure that the child car seat is secured to the car seat at all times even when not in use.
- WARNING: The seat cover should not be replaced with any other than the one recommended by the manufacturer, because the cover constitutes an integral part of the restraint performance.
- WARNING: Stop the car at regular intervals to check that the child car seat is in the correct position and that both the car seatbelt AND the child car seat harness (if required) are still fastened and latched.
- WARNING: In the event of an emergency it is important to be able to release the child quickly (as defined by British Standards). This means that seat buckle cannot be fully tamper proof and you should actively discourage your child from playing with or using the buckle.
- WARNING: Do not place anything under the child car seat (e.g. a towel or cushion) as this could affect the performance of the seat in an accident.
- WARNING: Avoid winter clothing bundling Bulky clothing can lead to incorrect harness tightening. In an accident, the child can slip right out of the extra padding - and thus out of the seat. Let the car warm up or cool down prior to placing your child in there if possible. If your child is cold, place a blanket over the top of the harness.
- WARNING: Make sure to properly secure any loose objects, such as luggage or books, in your car as they may cause injuries in the event of an accident. SEAT BELT
- WARNING: NEVER use any load bearing contact points other than those described in these instructions or marked on the child car seat.
- WARNING: Ensure that the lap section of the seatbelt or harness is worn low down, so that pelvis is firmly engaged.
- WARNING: Make sure that ALL the passengers in your vehicle have their seatbelts fastened, as unrestrained people can be very dangerous to the child in an accident.
- WARNING: NEVER use a seatbelt routing scheme that differs from these instructions.
- WARNING: The lap and diagonal seatbelt must be used at all times when your child is in the child car seat.
WARNING: Make sure that there are no twists in the seatbelt..
SUNLIGHT/HOT DAYS
- WARNING: Do not leave your child in the child car seat while parked in direct sunlight or on a hot day.
- WARNING: Do not subject the child car seat to prolonged direct sunlight as this may be dangerous for your child (the metal and plastic fittings could become hot) and may cause the fabric to fade. You can reduce this problem by covering the child car seat with a sheet when not in use.
SECOND HAND OR DAMAGED CHILD CAR SEATS AND SEATBELTS
- WARNING: Never buy a second hand child car seat. It may have unseen damage.
- WARNING: The manufacturer only guarantees this product when the original owner uses it.
- WARNING: You MUST replace the child car seat and your vehicles seatbelts if they become badly worn or amaged.
- WARNING: You MUST replace the child car seat if it is involved in an accident it may have unseen damage and may not protect your child as well as it should. At the very least send the child car seat to your retailer for inspection, together with the accident report.
BEFORE STARTING
WARNING: Do not fit the child car seat in a rearward facing position
- WARNING: Before installing the child car seat ensure that the passenger seat you are using is locked in the upright position.
- WARNING: Do not use the child car seat in the home - it has only been designed to be used in the car.
- WARNING: Do not leave loose/unsecured objects on the back seat of your car or the parcel shelf. They may be dangerous to your child if you are forced to brake suddenly.
WARNING
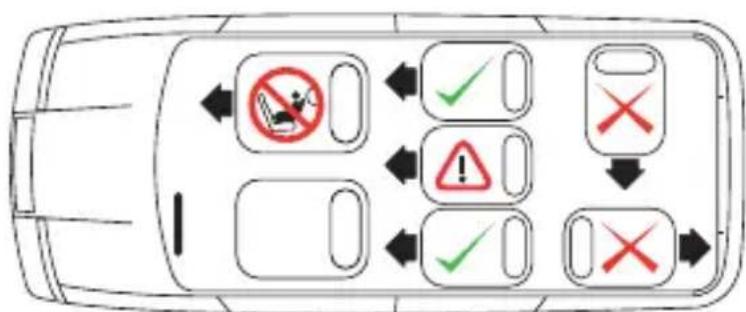
The child seat is approved for 2 different methods of installations:
| Group Installation Methods Approoral type | Weight | permitted | |
| 0+ ISOFIX + TOP TETHER Semi-Universal | 0-13 kg | ||
| 0+ 3-point seat belt Universal 0-13 kg | |||
| 1 ISOFIX and 3-point seat belt Semi-Universal | 9-18 kg | ||
| 1 3-point seat belt Universal 9-18 kg | |||
| 2/3 ISOFIX and 3-point seat belt Semi-Universal | 15-36 kg | ||
| 2/3 3-point seat belt Universal | 15-36 kg | ||
OVERVIEW
GENERAL INFORMATION
When used as a "universal" device (Group 0+/ I/II/III)
WARNING 1
- This car seat is a "Universal" child restraint system. It has been approved in accordance with regulation N°44/04, and is suitable for general use in vehicles and is compatible with the majority (some exceptions) of vehicle seats.
- A correct fit is likely if the vehicle manufacturer has declared in the vehicle hand book that the vehicle is capable of accepting a 'Universal' child restraint for this group.
- This child car seat has been declared 'Universal' under more stringent conditions than those applied to earlier designs, which do not carry the 'Universal' mark.
- You will need to keep your proof of purchase. We recommend you keep them together.
GENERAL INFORMATION
When used as a "universal" device(Gruppo 0+)
WARNING 1
- The mass group and the ISOFIX size class for which the device can be used are: Group 0+, D.
- This is an Isofix child restraint. It has been approved for general use in vehicle equipped with Isofix anchoring in compliance with ECE regulation 44.04.
It is suitable for use in vehicle with Isofix-approved seats (see vehicle list) accordance with the relevant child restraint and anchoring category. - This child restraint system complies with the ISOFIX size class: group 0+ (birth -13 kg) D.
- If you have any questions or doubts, please contact the manufacturer of the child safety unit or your retailer.
GENERAL INFORMATION
WARNING 2
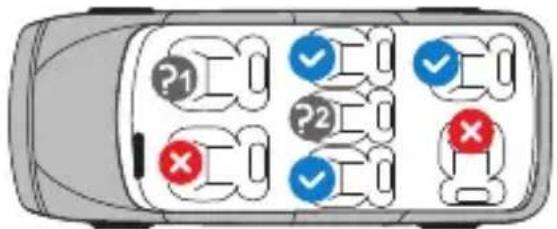
This Child Restraint is classified for "Semi-universal" use and is suitable for fixing into the seat positions of the following cars:
CAR
(See the car list)
FRONTREAR
Outer
Centre
YES YES NO
Seat positions in other cars may also be suitable to accept this child restraint. If in doubt, consult either the child restraint manufacturer or the retailer.
The vehicle manufacturer may include information in its manual on the suitability for installation on the passenger seat in different positions. If in doubt, contact the manufacturer of the child restraint, or the retailer.
GENERAL INFORMATION
When used as a "semi-universal" device (Group I/II/III)
WARNING 1
- This is a "SEMI-UNIVERSAL" ISOFIX child restraint device, approved according to Regulation No. 44/04 for general use in vehicles equipped with ISOFIX anchoring systems.
- This child restraint has been classified as "SEMI-UNIVERSAL" according to stricter approval criteria than previous models that do not have this notice.
- This car seat is suitable for the GROUP 1,2,3 (9-36 kg) and only in vehicles, listed in the vehicle list, which are equipped with ISOFIX anchoring systems and a 3-point seat belt, either static or with a retractor approved according to UN/ECE Regulation No. 16 or other equivalent standards.
- For the use of an ISOFIX system it is strictly necessary to read the vehicle manual before installing the car seat. The manual will indicate the passenger seats which are compatible with the size class of the car seat.
- If in doubt, contact the manufacturer of the child restraint, or the retailer.
WARNING 2
This Child Restraint is classified for "Semi-universal" use and is suitable for fixing into the seat positions of the following cars:
CAR
(See the car list)
FRONTREAR
Outer
Centre
YES YES NO
Seat positions in other cars may also be suitable to accept this child restraint. If in doubt, consult either the child restraint manufacturer or the retailer.
The vehicle manufacturer may include in its manual information on the suitability for installation on the passenger seat in different positions. If in doubt, contact the manufacturer of the child restraint, or the retailer.
Suitable only if the approved vehicles are equipped with lap/three-point/static/retractor seat belts, approved in accordance with UN/ECE Regulation no. 16 or other equivalent standards.
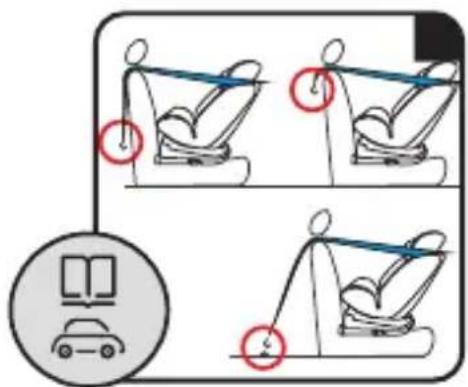
3. USE IN THE CAR
Refer to the vehicle manual to check the positions that are approved as ISOFIX positions.
This child restraint device can only be used on board the vehicles on the list, equipped with 3-point seat belts/with retractor, approved according to UN/ECE regulation no.16 or other equivalent standards.
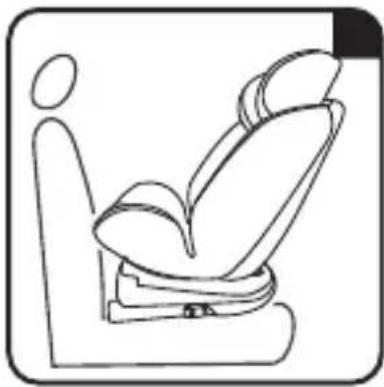
This car seat must be installed in the forward-facing position; it is forbidden to install it in a rear-facing or sideways position. Depending on the usage group, the 360^ rotating seat can be oriented in the forward-facing or rear-facing position.
DO NOT install the car seat in the rear-facing position on the front passenger seat if it has an active airbag: this may result in SERIOUS, OR EVEN FATAL, INJURY.
GENERAL INFORMATION

YES

NO
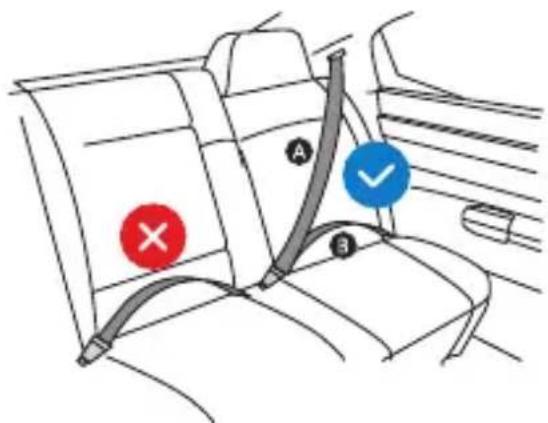
Diagonal belt
Lap belt
DO NOT install the car seat in the rear-facing position on the front passenger seat with an active airbag.
Can only be used on car seats with a 3-point seat belt.
BEFORE INSTALLATION
4. BEFORE INSTALLATION
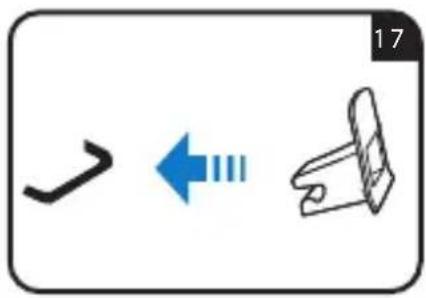
4.1 How to use the buckle
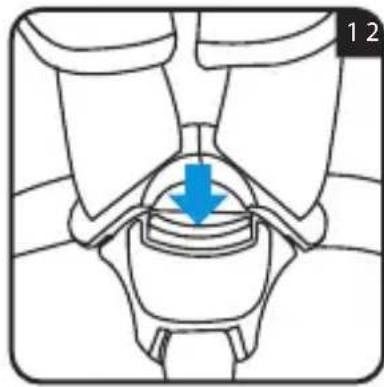
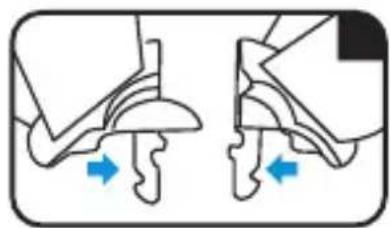
To release the buckle
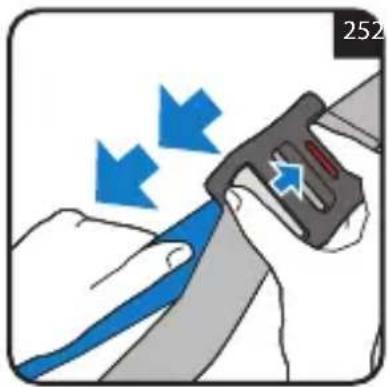
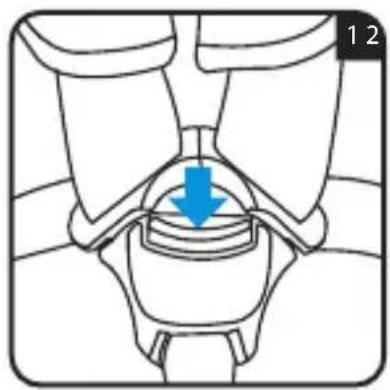
Press the red button to remove the tabs from the central buckle (fig. 1).
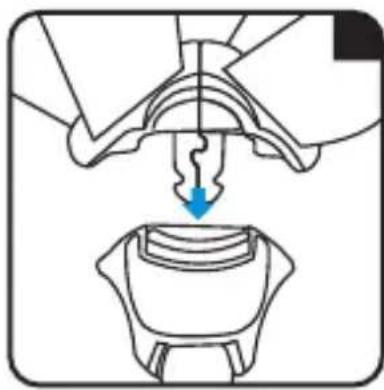
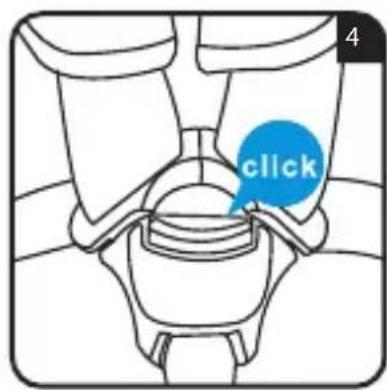
To attach the buckle
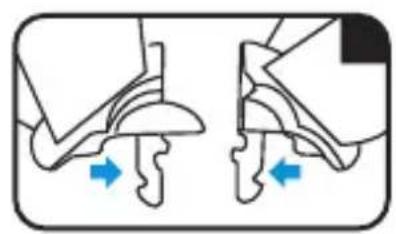
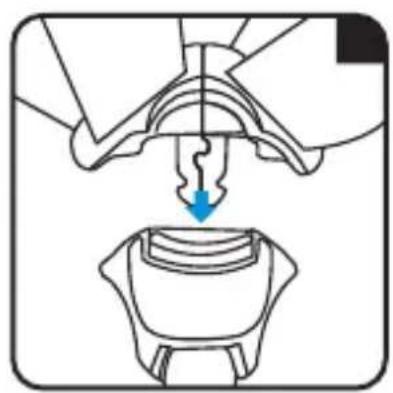
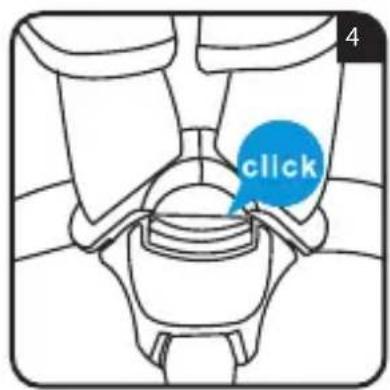
Hold together the central buckle tabs (fig. 2) and insert them in the special slot inside the harness buckle (fig. 3). A "click" will indicate that it has attached correctly (fig. 4).
NOTE: to attach the buckle, it is necessary to insert both tabs.
4.2 How to adjust the harness
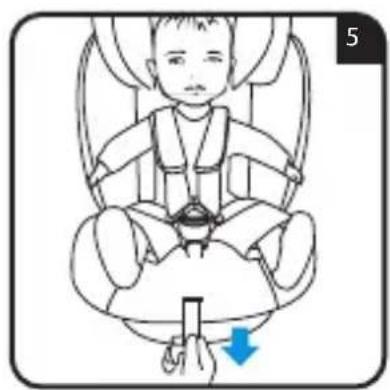
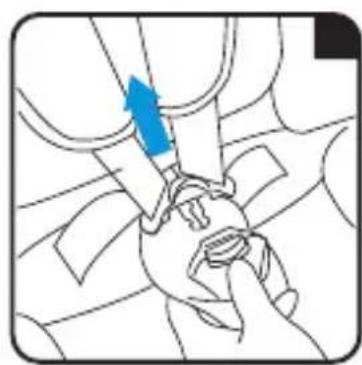
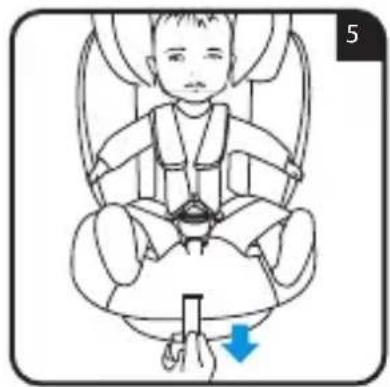
To tighten the harness
Pull the adjustment strap so that the harness is tight and close to the child's body (fig. 5).
NOTE: Check that there is a one-finger space (1 cm) between
the straps and the upper part of the shoulders. Make sure that the child is comfortable and protected.
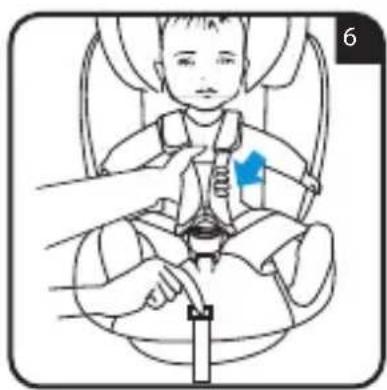
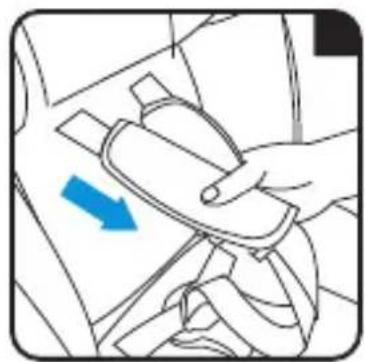
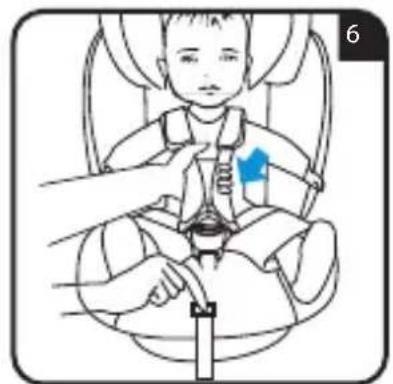
To loosen the harness
Press the adjustment button and at the same time grip the straps (chest belts) at the bottom, under the pads of the chest protectors, and pull them forwards to loosen them (fig.6). IMPORTANT: Do not pull on the shoulder pads.
ASSEMBLY AND OPERATION
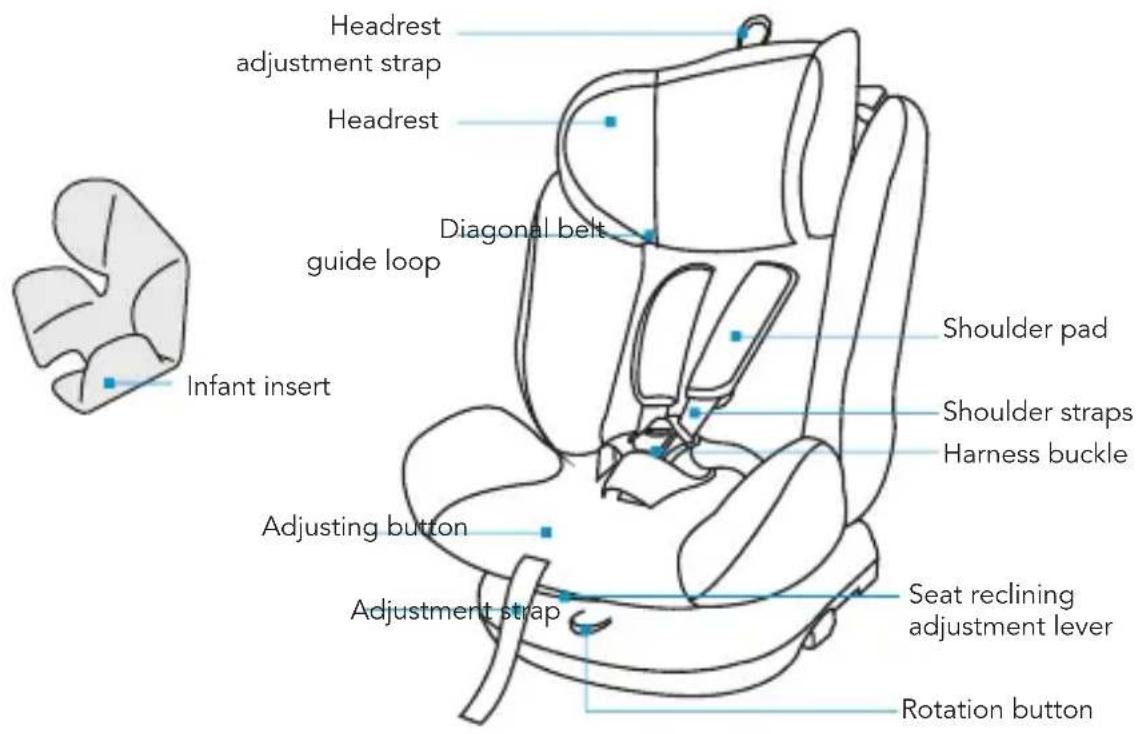
4.3 Headrest adjustment
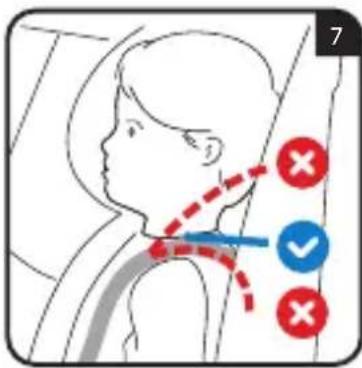
IMPORTANT! Correct adjustment of the headrest ensures maximum protection for your child when they are inside the car seat.

When using the 5-point harness, the headrest must be adjusted so that the straps are at the same height as the child's shoulders (fig. 7).
WARNING! to a lower height than the child's shoulders, nor to the level of the child's ears or above.
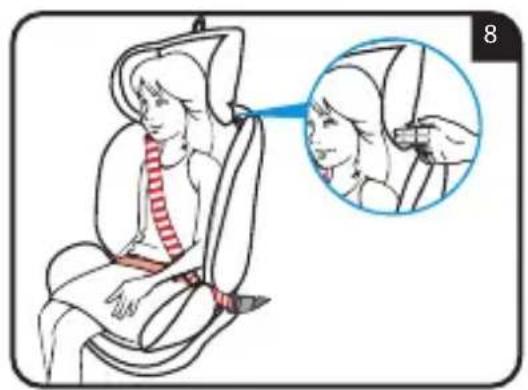
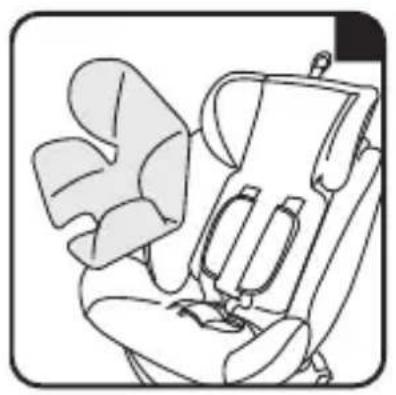
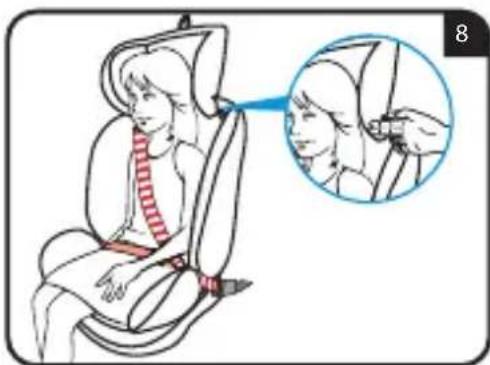
When using the 3-point vehicle seat belt, the headrest must be adjusted so that there is a two-finger space between the headrest and the child's shoulders. Make sure that the diagonal belt, when passing through the "diagonal belt guide loop" on the side of the headrest, is positioned at the shoulders and not at the child's neck (fig. 8).
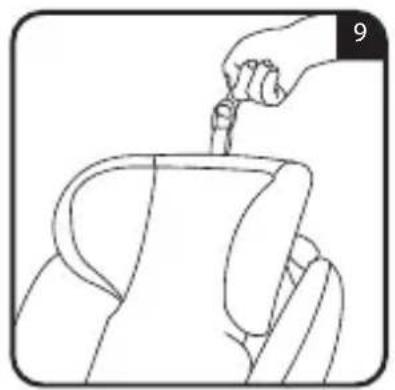
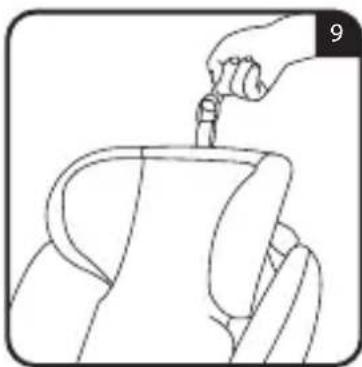
To raise the headrest: pull the headrest adjustment strap upwards.
NOTES: Loosen the shoulder straps before adjusting the headrest (for more details see point 4.2).
To lower the headrest: pull the headrest adjustment strap upwards and press the headrest downwards.
4.4 Adjusting the recline
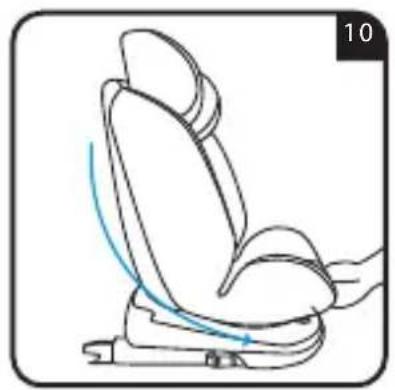
Press the adjustment handle located under the front of the car seat and, holding it down, pull or push the seat forwards or backwards. Release the handle when the seat is in the desired position and make sure that it is locked correctly; you will hear a "click" when the seat has attached (fig. 10).
WARNING! The seat can be reclined in the most horizontal position only when the car seat is installed in the rear-facing position.
ION
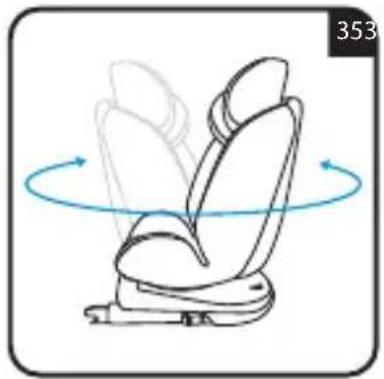
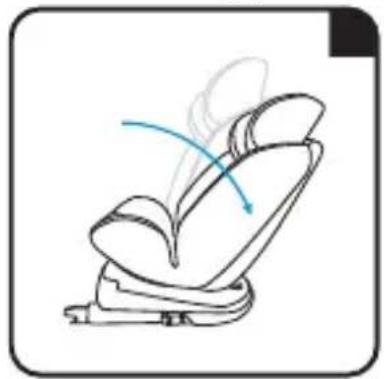
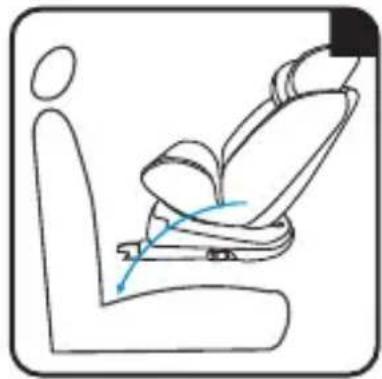
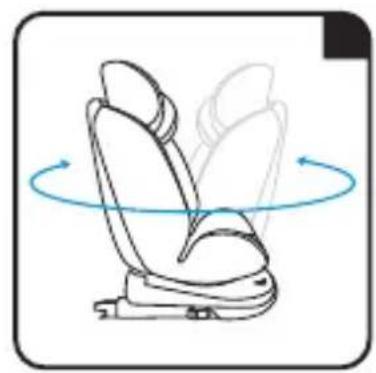
4.5 How to rotate the seat
In the rear-facing position
Exclusively for Group 0+

In the forward-facing position
Exclusively for Group 1-2-3
In the sideways position
Allows you to place and remove the child from the car seat very easily. This position is prohibited while driving

Press the rotation button and turn the seat of the car seat in the desired direction (fig. 14 and fig. 15).
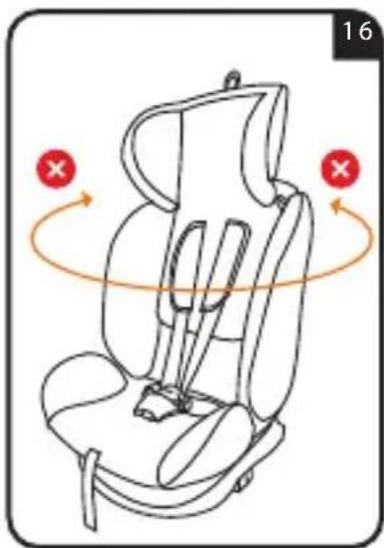
Once the desired position is reached, the seat will lock in place, a "click" will indicate that it has locked (fig. 16).
IMPORTANT: Before starting the engine make sure that the seat is locked in the forward-facing or rear-facing position.
Do not place the car seat in the forward-facing position if the child weighs less than 9kg .
ASSEMBLY AND OPERATION
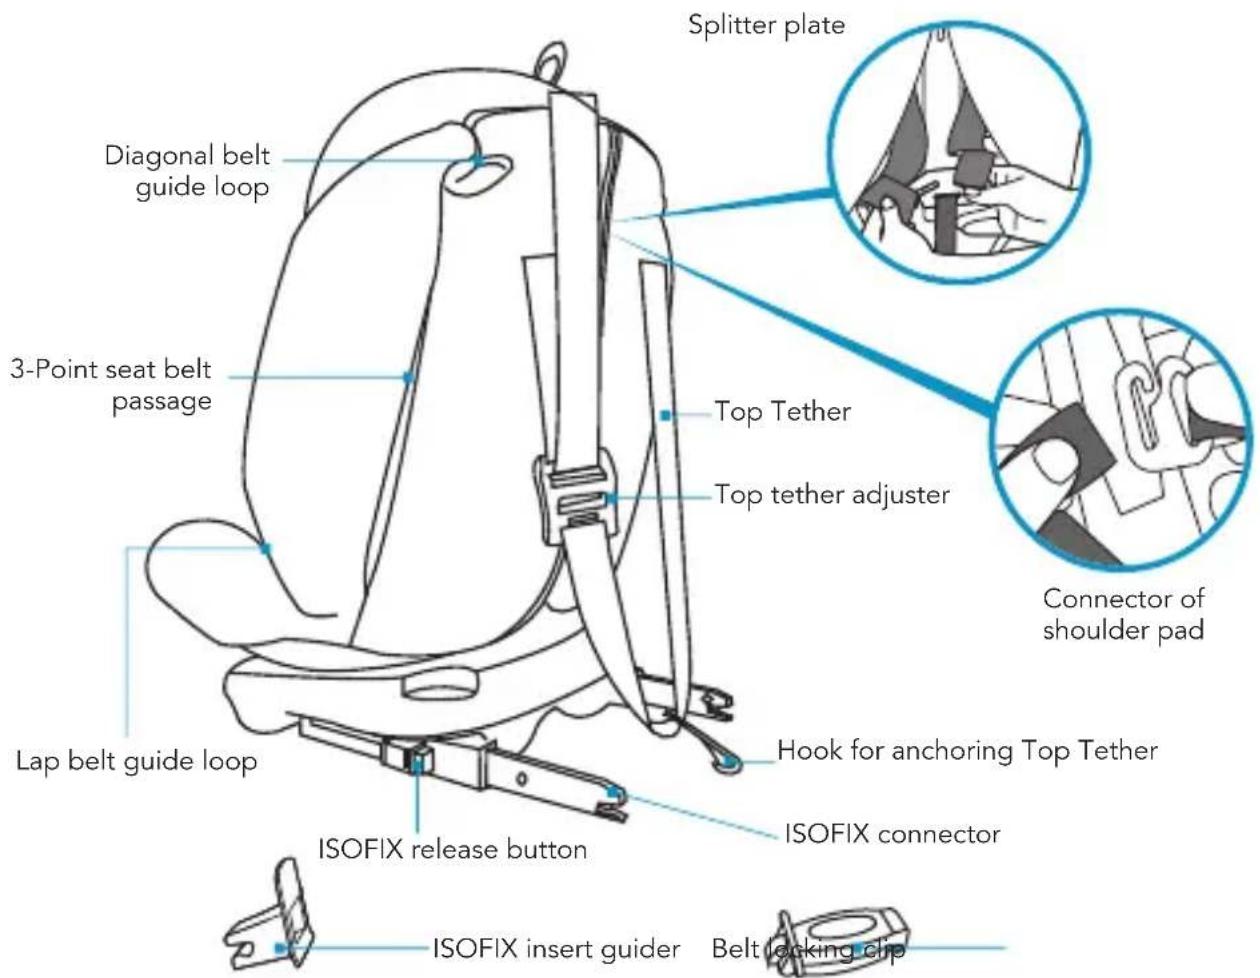
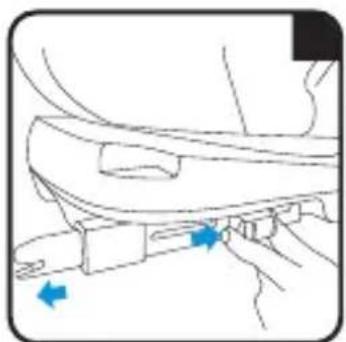
4.6 How to install the ISOFIX system
If your car does not have standard ISOFIX connector guides, insert those supplied with the car seat with the recess facing upwards in the two ISOFIX anchoring points in the car. SUGGESTION: The ISOFIX anchoring points are located between the seat and the backrest of the passenger seat.
4.6.1 Installing the ISOFIX system
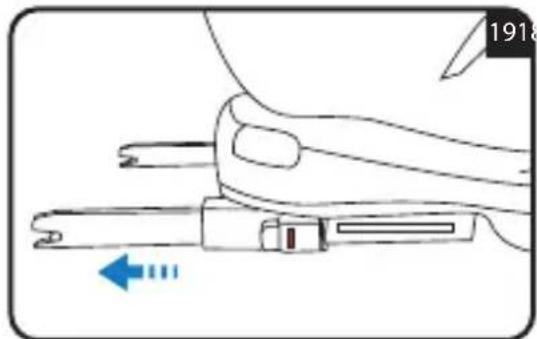
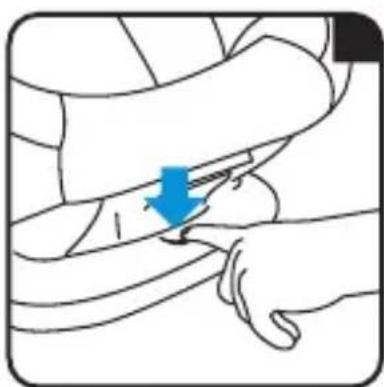
Press the ISOFIX buttons located on both sides of the seat and extend the ISOFIX connectors as much as possible (fig. 18 and 19).
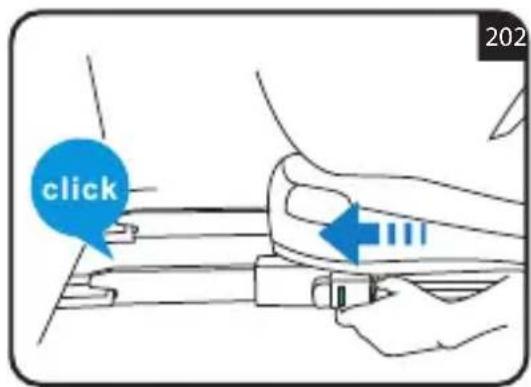

Insert the two ISOFIX connectors in the appropriate guides: a "click" will indicate that they have been inserted and
2.2 that the ISOFIX connectors are attached on both sides.
WARNING! The ISOFIX connectors are properly anchored when the respective buttons are green (fig. 20 and 21).
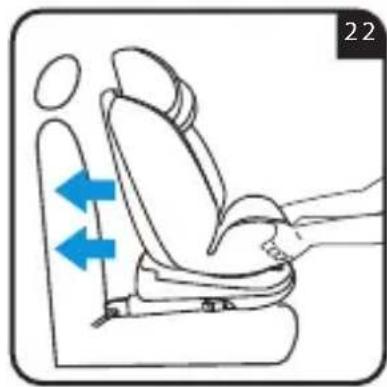
Push the car seat against the backrest of the passenger seat by applying even pressure on both sides. Shake the car seat to make sure it is firmly attached and check again that the ISOFIX safety buttons are green (fig. 22).
ON
4.6.2 Removing the ISOFIX system
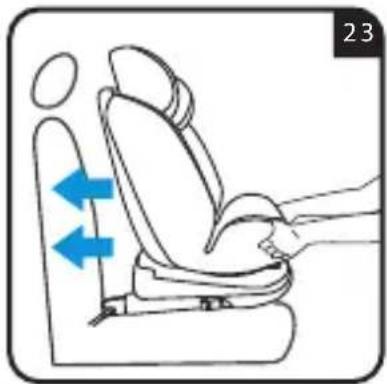
Push the car seat against the backrest of the passenger seat (fig. 23).
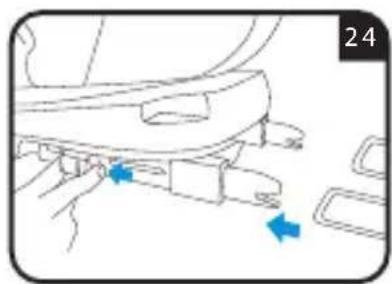
At the same time press the ISOFIX release buttons and retract the ISOFIX connectors (fig. 24).
4.7 Adjusting and using the Top Tether belt
Grasp the Top Tether belt and, if necessary, lengthen the strap by pressing the appropriate locking button, extending it to the desired length (fig. 25).
Attach the upper fixing device of the "Top Tether" to the anchoring point indicated in the vehicle user manual (fig. 26). Check that this icon is present inside the passenger compartment.
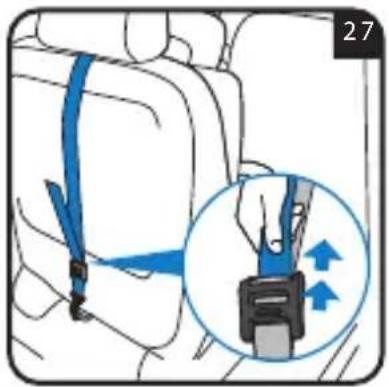
Tighten the Top Tether belt, pull the loose belt from the free end until it is sufficiently tight. A special indicator on the adjuster will turn green, to indicate that the belt has been tightened correctly (fig. 27).
ASSEMBLY AND OPERATION
4.8 Removing and installing the harness


Unhook the chest belt straps from the belt tensioning bracket on the back of the car seat (fig.28)
Place the belt tensioning bracket with adjustment strap in the fabric lining (fig.29)
Unhook the chest protector straps from the hook (fig.30)
Pull the chest protector straps and the chest belts through the slots (fig.31).
Unclip the buckle (fig.32).
Wrap up the shoulder straps and place them back in the lining housing (fig. 33).
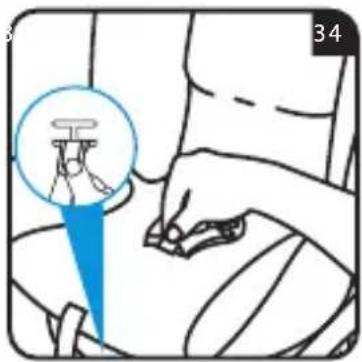
To remove the crotch strap, locate the locking ring on the lower side and rotate it to pass through the slot, while from the seat side pull up the crotch strap (fig.34).
Putting the harness back on: Follow the disassembly steps in the reverse order. Make sure that the crotch strap ring is properly locked, when pulling the crotch belt from the seat side, it should not slip out. Make sure that the chest belts are correctly attached to the belt tensioning bracket (fig. 28). When putting the completed harness back on, make sure that the belts are not twisted.
ADJUSTING THE CAR SEAT
5. ADJUSTING THE CAR SEAT
5.1 Group 0+ (0-13 kg, from birth up to about 15 months) - installation in the rear-facing position.
DO NOT install the car seat on the passenger seat with an active airbag: this can cause SERIOUS, OR EVEN FATAL, INJURY.
Rotate the car seat until it is in the rear-facing position (see par. 4.5), then tilt the seat
into the most horizontal position (see par. 4.4). Place the car seat so that it is in the rear-facing position (fig. 35, 36 and 37). Use the reducer with children weighing less than 9kg .
5.1.1nstalling the car seat with the ISOFIX connectors and Top Tether belt
If the car seat does not have an ISOFIX system, or if it is not equipped with the ISOFIX anchoring system, see par. 5.1.2 "Installation with 3-point seat belt".
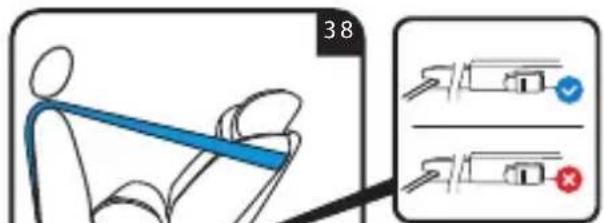
Attach the ISOFIX connectors (see par. 4.6) (fig. 38)
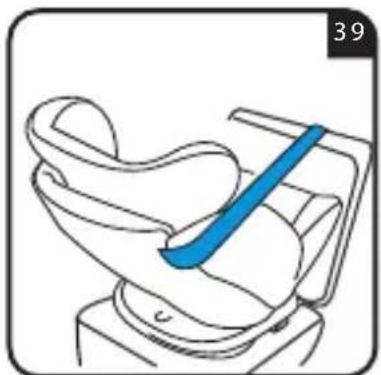
Slide the Top Tether belt along both sides of the car seat and attach the belt "hook" to the appropriate anchoring point (see par. 4.7) (fig. 39).
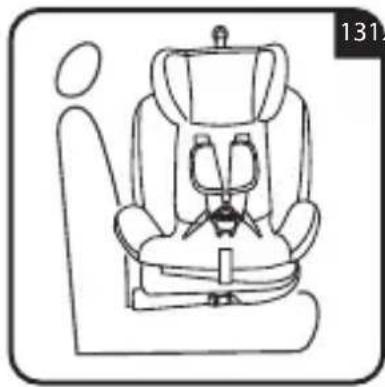
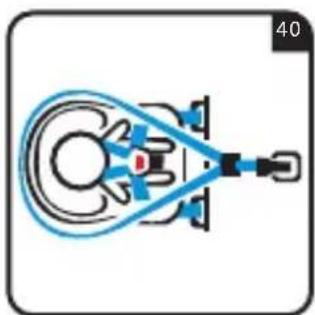
Place the child into the car seat. Adjust the headrest to the appropriate height (see par. 4.3), position the harness correctly and attach the buckle (see par. 4.1), finally tighten the harness (see par. 4.2) (fig. 40).
ADJUSTING THE CAR SEAT
For the safety of the child, check before every journey that:
- Both ISOFIX connectors are hooked into the appropriate anchoring points, and both indicators are green;
- The car seat is firmly installed on the car;
- The Top Tether belt is correctly tightened and adheres perfectly to the backrest of the passenger seat, the indicator turns green when it is correctly tightened.
- The harness of the car seat adheres to the body of the child without squeezing them, between the straps and the upper part of the shoulders there must be a one-finger space (1 cm);
- The straps are positioned at the right height and are not twisted;
- The chest protectors are at the same height as the child's shoulders;
- The tips of the central buckle are attached correctly
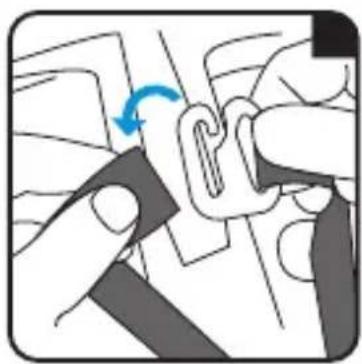
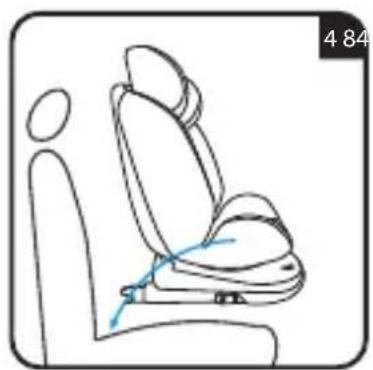
5.1.2 Installation with 3-point seat belt
Release the buckle and remove the reducer (fig. 41).
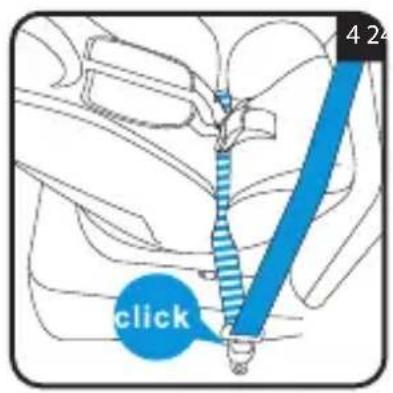
Slide the lap belt of the vehicle through the loops placed on the car seat, and hook the tip into the buckle of the car's seat belt (fig. 42). You will hear a "click" once it has attached. Put the reducer back on the car seat.
ADJUSTING THE CAR SEATADJUSTING THE CAR SEAT
WARNING! The vehicle's seat belt buckle must not be placed in the lower guide of the lap belt passage.
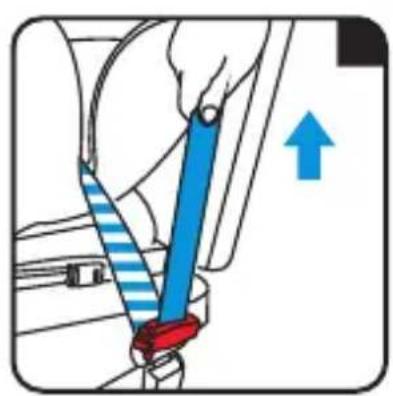
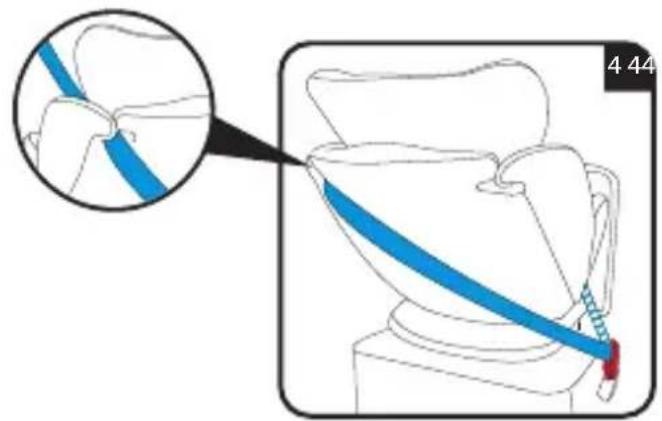
Pull the diagonal belt in order to tighten it and, keeping it pulled, close the belt locking device, bringing it as close as possible to the vehicle's seat belt buckle (fig. 43). Slide the diagonal belt behind the car seat backrest, insert it into the rear belt loop on the same side as the vehicle seat belt retractor (fig. 44)..
Shake the car seat to be sure it is firmly fixed in place (fig. 45).
WARNING! The belt must not be twisted, and the buckle must be properly fastened.
Place the child into the car seat. Adjust the headrest correctly (see par. 4.3), position the harness correctly and attach the buckle (see par. 4.1), finally tighten the harness (see par. 4.2) (fig. 46).
ADJUSTING THE CAR SEAT
5.2 Group I (9-18 kg, from 9 months up to about 4 years of age) - installation in the forward-facing position
IMPORTANT! DO NOT INSTALL THE CAR SEAT IN THE FORWARD-FACING POSITION IF THE CHILD WEIGHS LESS THAN 9 KG.
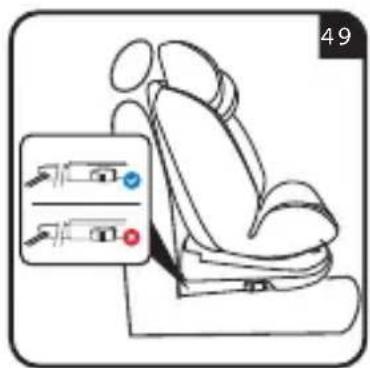
Rotate the seat into the forward-facing position (see par. 4.5). Place the seat so that it is in the forward-facing position (fig. 47 and 48).
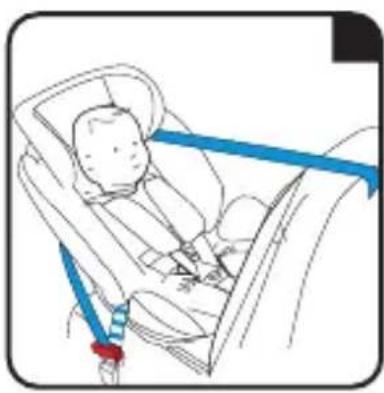
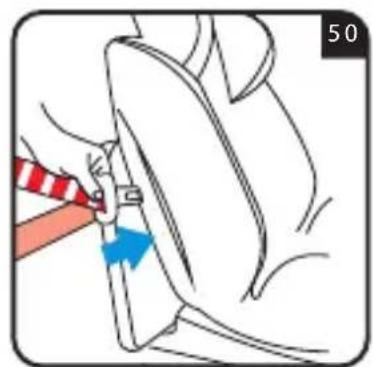
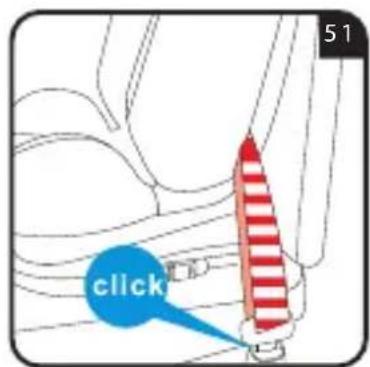
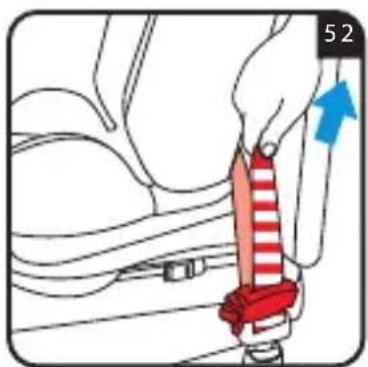
Attach the ISOFIX connectors (see par. 4.6) (fig. 49). If the car seat is not equipped with the ISOFIX anchoring system, you can use only the 3-point seat belt for the installation. Pull out the seat belt of the vehicle and place about 80~cm of the diagonal belt over a lap belt section of the same size. Insert the part of the combined 3-point belt (the diagonal and lap belt) into the belt loop of the car seat (fig. 50), make sure that the belt is not twisted and hook the tip to the buckle of the vehicle's seat belt. A "click" will indicate that it has been inserted (fig. 51). WARNING! The vehicle's seat belt buckle
ADJUSTING THE CAR SEATADJUSTING THE CAR SEAT
must not be placed in the belt loop of the car seat.
Pull the diagonal belt in order to tighten it and, keeping it pulled, close the belt locking device, bringing it as close as possible to the vehicle's seat belt buckle (fig. 52).
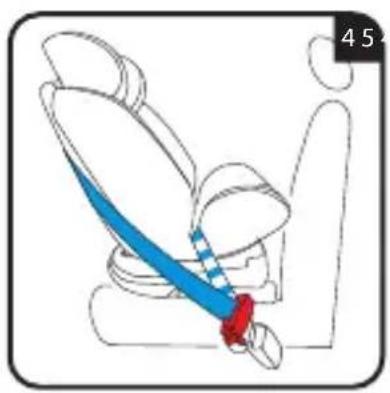
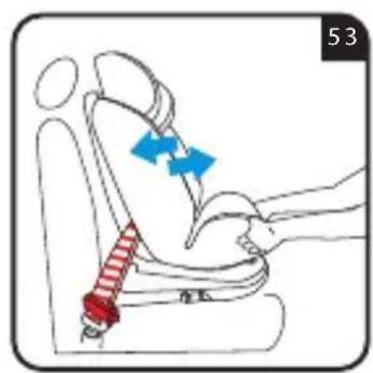
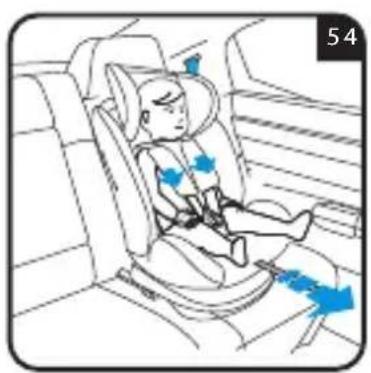
Shake the car seat to be sure it is firmly fixed in place (fig. 53). Place the child into the car seat. Adjust the headrest correctly (see par. 4.3), position the harness correctly and attach the buckle (see par. 4.1), finally tighten the harness (see par. 4.2) (fig. 54).
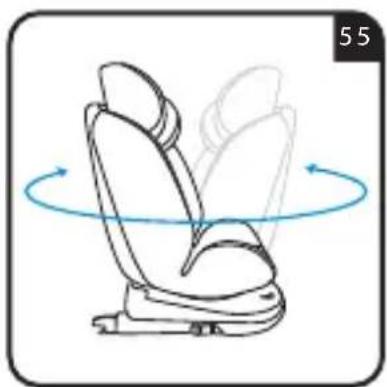
5.3 Group II/III (15-36 kg, from about 3 to 12 years of age) - installation in the forward-facing position
Remove the harness for use in Group II/III (see par. 4.8).
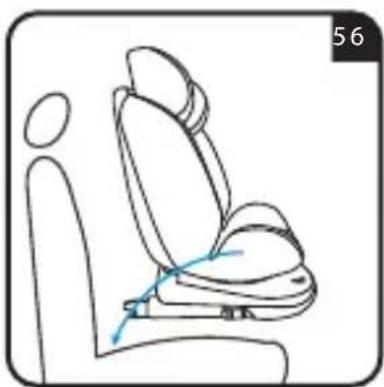
Rotate the seat into the forward-facing position (see par. 4.5). Place the seat so that it is in the forward-facing position (fig. 55 and 56).
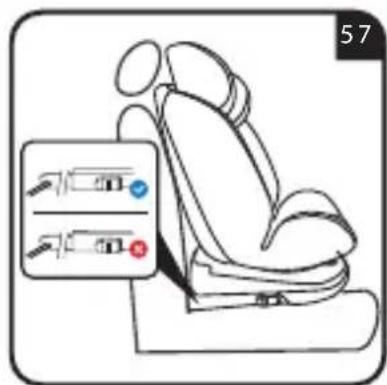
Attach the ISOFIX connectors (see par. 4.6) (fig. 57).
If the car seat is not equipped with the ISOFIX anchoring system, you can use only the 3-point seat belt for the installation.
ADJUSTING THE CAR SEAT
Place the child into the car seat. Adjust the headrest to the appropriate height (see par. 4.3).
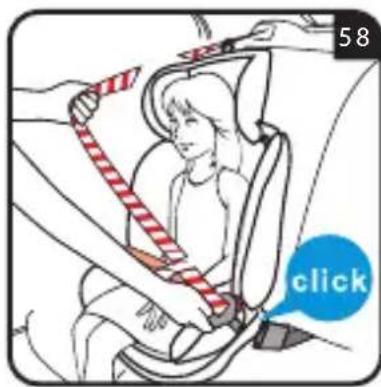
Pull the vehicle's seat belt and, running it across in front of the child, attach the buckle of the vehicle's seat belt, inserting the tip into the buckle (fig. 58). A "click" will indicate that it is attached correctly.
WARNING! The vehicle's seat belt buckle must not be placed in the lower guide of the lap belt passage.
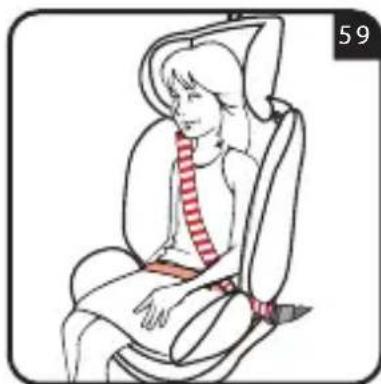
Insert the diagonal belt and the lap belt into the lower loop from the side near the fastening buckle of the vehicle's seat belt (fig. 59).
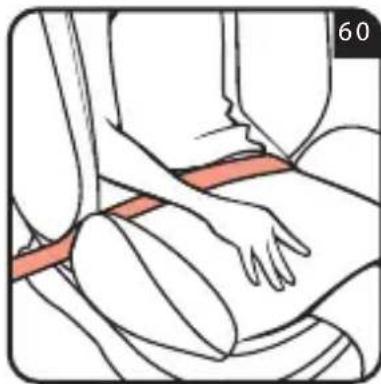
Thread the lap belt on the opposite side of the car seat into the lap belt loop (fig. 60).
WARNING! The lap belt must run as low as possible over your baby's pelvis.
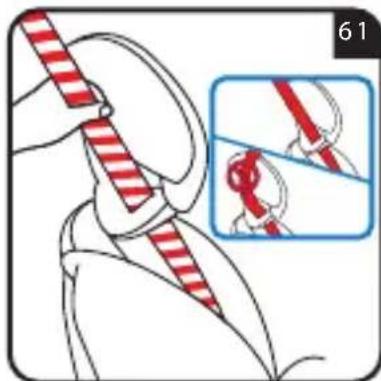
Insert the diagonal belt into the belt guide loop, making sure it is not twisted (fig. 61).
ADJUSTING THE CAR SEATADJUSTING THE CAR SEAT
For the safety of the child, check before every journey that:
- Both ISOFIX connectors are hooked into the appropriate anchoring points, and both indicators are green;
- The car seat is firmly installed on the car;
- The lap belt is inserted into the respective "lap belt guide" loops placed on the two sides of the car seat;
- The diagonal belt, on the buckle side of the vehicle's seat belt, is correctly inserted into the lap belt guide loop;
- The diagonal belt is inserted into the upper diagonal belt guide loop of the headrest from the belt retractor side;
- The buckle is properly fastened and the belt is not twisted.
CLEANING AND MAINTENANCE
6. CLEANING AND MAINTENANCE
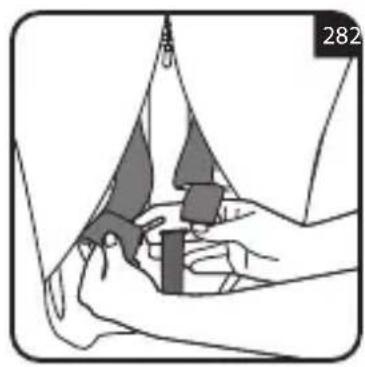
6.1 Cleaning the buckle
For child safety it is essential that the harness buckle works properly. Generally, any buckle malfunctions can be attributed to an accumulation of dirt or foreign bodies. Below are some possible malfunctions:
The buckle tips do not slide out easily when the red release button is pressed;
The tips do not attach (or slip out constantly each time you try to insert them;
The tips are attached without the "click" sound being emitted:
- Inserting the tips is difficult (a sort of resistance is noticed);
- You need to press down hard to open up the buckle.
Solution
Wash the harness buckle so as to restore its correct functioning:
Cleaning the harness buckle
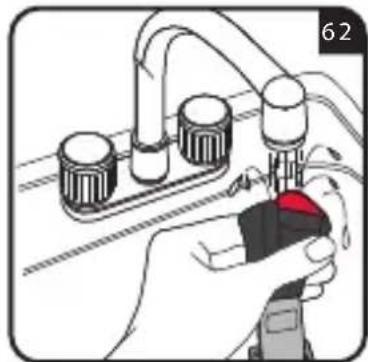
- Follow the instructions given in par. 4.8 to remove the harness.
- Soak the buckle in warm water with washing-up liquid for at least an hour, then rinse and leave to dry (fig. 62).
6.2 Cleaning
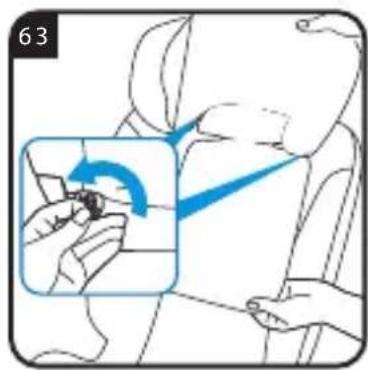
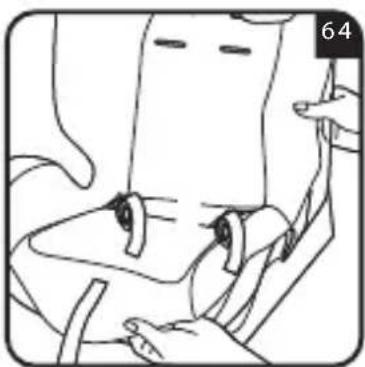
The lining can be removed and washed. Follow the instructions shown on the washing label of the lining.
How to remove the lining: remove the harness first (see par. 4.8) and then the lining (fig. 63 and 64). Follow the lining removal steps in reverse order to reposition it.
WARNING! DO NOT use the car seat without the fabric lining properly.
WARNING! Never use the car seat if the 5- point harness, for use in group 0 + / 1 is not assembled and attached to the car seat;
IMPORTANT: Make sure that the harness belts are not twisted.
FORMAL GUARANTEE
The contents of this document as stated below will come into effect as from 01.01.2005 and replace, on every account and in full, any previous message referring to the guarantee provided by Foppa Pedretti S.p.A.
FORMAL GUARANTEE
Foppa Pedretti S.p.A. the head office of which is located at n. 11 Via Volta, Grumello del Monte (Italy), guarantees directly to the Consumer that this brand new product is free of faults with regard to the materials, design and manufacture and that it complies with the characteristics as declared by the manufacturer.
This formal guarantee is valid in all Member Countries of the European Union and it neither excludes nor limits the Consumer's rights in accordance with mandatory measures provided for by the law with regard to the Retailer of the Product.
To take advantage of this formal guarantee, the Consumer must return the faulty product to the Retailer, presenting to the same the proof of purchase of the Product which must clearly show the Retailer's address, the date of purchase of the Product with the Retailer's stamp and signature and an indication of the Product itself or, alternatively, the receipt which must not have been altered and which must clearly show the same information as that referred to above.
The manufacturer's formal guarantee is valid for twelve (12) months from the date of purchase of the Product. During this period, Foppa Pedretti S.p.A. will repair or replace the faulty product, at its own discretion.
The formal guarantee is granted to the end buyer of the Product (Consumer) and it neither excludes nor limits the mandatory rights of the Consumer as provided for by the law and/or the rights that the Consumer may have with regard to the Dealer/Retailer of the Product.
EXCLUSIONS TO THE FORMAL GUARANTEE.
The formal guarantee is excluded in the case of damage caused to the Product for the following reasons: if the product is used in a way that does not comply with the information contained in the use and assembly instruction sheet, if the product is knocked or dropped, if the Product is exposed to humidity or extreme heat or environmental conditions, or to sudden changes in the same, corrosion, oxidization, unauthorized alterations or repairs to the Product, repairs using unauthorised spare parts, improper use, improper maintenance or failure to carry out the same, improper maintenance compared to the information given on the use and assembly instruction sheet, incorrect assembly, accidents, damage caused by food or drink, damage caused by chemical products, cases of force majeure.
In any case, Foppa Pedretti S.p.A. declines all responsibility for damage caused to persons or to property, other than the Product, when such damage is caused by a failure to comply with the instructions/advice/warnings cont a ined in the manua I or, alternatively, in the use and assembly instruction sheet provided with each Product for the owner/user. (Purely as an example, in the case of a cot : "Check your baby constantly. Make sure that the sheets and blankets do not cover the baby's head...").
Furthermore, Foppa Pedretti S.p.A. declines all responsibility for damage to persons and to property when the breakage of its products is due to a deterioration in the components of the Product that are subject to wear. All the components of the Product made of plastic are considered to be components subject to wear.
TABLE DES MATIÈRES
EXCLUSIONS DE LA GARANTIE CONVENTIONNELLE.
KoMaHOHeHTbl CTP.166
067aHΦopMaζη CTP. 167
IPEД HauJOM IcNoJIb3OBAHnIa
BHIMAHNE: He yctaHaBnBaTb aBtOKpeCNo Ha aBTOMo6nIbHbIe cnIeHbI, KOtOpbie NOBepHyTbI B CTOpOHy 3aDHeJ qAChn aBTOMo6nJIy N B 6OKOBom HappaBLeHn.
- ПЕДУПЕЖДЕНЕ: Пе徳 установков abtokpeсla yбдntecb в TOM, чTO сннka naccajnckoTo снденя 3a6лokирobаHaВ ВертукальHOM положени.
- ПЕДУПЕЖДEHИЕ: 3anpeuaetcЯ ИспльзоваТь aВТОКпесLO B ДOMaшнIX yСлOBиХ в Качеве CTуla. Оно п徳нэзченидя Испльзовань в aВТOMOБиЛe.
BHIMAHNE: PpOBepbTe, yTO 6aJx nn Dpyrne npeMeTbI, KOToPbIe TeOpEtNueCKn MOryT HaHeCTn ydApbl nn NOBpeXdEHHa CndAaMeMy B aBtOKpeCJIe npn abapHn, HAdExKHO 3aKpePJIeHbl.
ABTOKpeCNo OMOJIOHPOBaHO IyUCTaHOBKn DByMpa3JIuHbIMN CnOcO6aMn:
A. KaK «УнBEPCaJIbHOE», c 3-x ToueyHbIM pemHem 6e3OanacHocTn
B. KaK «ПОЛУΥΝΗΒΕΡΑΚΑΙνΗΟΕ», с 3-x TOUeyHbIM peMHem 6e30nacHocTn B coUeTaHnC coeHNHTeJIaMn ISOFIX, пиСТЕгИВаEТСЯ K HIXHm TOUkAm KpeNJIeHnA ISOFIX,пpeДуСМоТрЕнHBIM b aВТOMOБиLE, a тakxe K peMHIO Top Tether (ecIn Tpe6yETc).
4.1 KaK noIb3OBaTbcra npJxxko
YTO6blOTCTerHyTb npJxKy
Haxmte KpaChyIO KHONky, yTO6bl N3BLeyb Y3bIyKN I3 ceHTpaIbHO npJxKn (pnc. 1).
YTo6bI 3aCTeRHyTb npJxKy
CoBmecHTe 3bUckn ceHtpaIbHOJ npJxKn (pnc.2) n BCTaBbTe HX B CneuaJIbHbI Na3 BHyTpN npJxKn ydePknBaIOeTo peMnA (pnc.3). Pnp npaBnIbHOM 3aCteTnBaHIn DoJKeH npO3ByaTb IeLqok (pnc.4).
ПРИМЕЧАНЕ: утобь 3аcteгнуть пяжky, Heo6xOДиMo BCTaВNTb 06aЯ3bIчka.
4.2KakotperyulnpoBaTb ydepxnBaIoUnepeMeHb
YTo6bI HATaHyTb ydepxnBaOuIpeMeHb
IOTAHNTe peYIpOBOHbI peMeHb, YTO6bl oBecneuHTb xopoWee HATJKeHHe ydePKNBaUoZeRo peMHr, KOToPbI DOJIKeH npInJeRaTb K TeLy pe6eHka (pnc. 5).
ПРИМЕЧАНЕ: ПорочnéITE 3a Tem,
yTO6bI MeKdy IaMKamn N BepxHei YactbI OJIeY OCTaIOcB pacCToHne B 1 naLeu (1 cm). y6eINTecb B TOM, yTO pe6eHOK pa3MeUeH By IO6Hom N 6e3OpaCHOM NOLOKeHHN.
UTo6bI ocna6ntb ydepxnBaIOuIpeMeHb
HaЖмITE KHONKY perylnpoBKN, B3ЯВшись пп 3TOM 3a HIXHIOU qacTb ЛAMOK (HaRpydHBix peMHei), NOД Ha6NBHbIMN 3aIHTHbIMN HaRpydHnKamN, I NOTAHITE INX BpeEd, YTO6bl OcIa6bNTb (pnc. 6).
BAJHO: He TAHnte 3a 6peTei, DepeXacb 3a MraKne HapPyHbIe 3aunTHbIe HaKlaAdKn.
MOHTAXI 3KCIAYATALIN
4.3 PerynilpoBka noDroJIOBnIka
BAxHO! IpaBnIbHapeRyIInpOBKa IodroIobHnKa rapaHTnpyeT MaKcImaJIbHyU 3aunTy BaJero pe6eHka, pa3MeueHHoro B aBtOKpecJe.
При Исторьанни 5-Ти Точецногу уdeckимашero ремп NOДROLOBнК Heo6xOДМо OTpeулрOBaTb TaKIM OБразOM, ChTo6blЯмкп pacnoIaralncb Ha ypoBHe ПLEч pe6eHka (pnc.7). BHIMAHHE! OTpeuIrpOBaHHbI ЛмКн He DoJXHbI 6bITb HIXke BlicOTbl ПLEч pe6eHka, He DoJXHbI paCNoIaratbCЯ Ha ypoBHe uwey pe6eHka li60 Bblwe nx.
При Исторьанни 3-X ToyeHoro peMHЯ 6e3Oanachoctn aBToMObHnla NOdroLOBHnK Heo6xOДmO OtperyLInpObaTb TaKHM O6pa3OM, YTO6bI MExkDy HnM I ПleuAmN pe6eHka OCTaBaJIOCb pacCTOJHnE B DBA NaIbUca. ПрocLEdnte 3a TeM, YTO6bI HarpydHbI 3aUnTHbI peMeHb, npOnyuSeHHbI Yepe3 «PpoUShHy HAnpaBIAUoSeH HarpydHoro peMHЯ> c6OKy OT NOdroLOBHnKa, pacNoJaIacr Ha yPoBHe PJIeU, a He WeH pe6eHka (pnc. 8).
YTo6bI NOdHЯTb NOdroLoBHNK: NOTaHnTe BBepx peMeHb peryIInpOBKn NOdroLoBHNka.
TAPAHINHbIE O83ATEbCTBA
Hnkeyka3aHHbIe noJooKeHHB BCTyNaOT B DeiCTBHe c 01.01.2005 r. nnoJIHOCTbIO 3aMeHApT IIO6yIO dpyryIO HnΦOpMaUIO, yTO Kacaetcra rapaHTn, npedocTabIReMoKOMpaHneFoppa Pedretti S.p.A., ABJRAcB.
TAPAHINHbIEOB3ATEJIbCTBA
KOMnAHn Foppa Pedretti S.p.A.,OfHuaJIbHo 3aperHCTpnpoBaHHo no aDpcy: Grumello del Monte (Italia) Via Volta 11, KOTOPa rapaHTnpuyet HENOCpeDCTBeHHo IOTpe6nteIIO, YTO daHHoe H3deJIne, TOJbKO YTO BbINuEHHOE C φa6pnKHe HMeET DeΦeKToB HN MaTePnaIIOB, HN pOeKTHPOBaHHra, HN pON3BOdCTBeHHbIX, N COOTBeTCTByET 3aABLeHHbIM XapaKTepnCTNKaM. HAcToaJa rapaHTna DeIcTBNTeJIbHa BO BCex cTpaHax- YJeHax E3C n He NcklIoYaeT Hr OraPaHnUBAeT npaba POnb3ObaTeJI, B COOTBeTCTBnN C 3aKHOdaTeJIbCTBOM, perlaMeHTnpuOIm B3aHMOOTHoWeHHa C PpOn3BOdnteJIem N3deJIIn.
YTO6bI BOCNoJIb3OBAtbcra DaHHoJ rapaHTnei, IOTpe6nteIb DOJIKeH npINHeCTn DeΦeKTHoe H3dJIeNc IpOaBuCy, npEIOCTaBvB DOKyMeHT, yDcOCTOBepaUoiu O npHO6pTeHn N3dJIIna, c neaTbIO n NOINCbIO IpOaBua a Yka3aHHeM Ha3BaHnA N3dJIIna nn, KaK aIbTePHaTNa, fNcKaIbHbIK KaccOBbI ueK, 6e3 KaKx-Jn60 N3MeHn, IN KOTOPOrO qETKO BnDa BCa Yka3aHHa Do 3TOrO INΦOpMaun. TapaHTna HMeet CpOK DeIcTBn IABeHaAduTaB (12) MecaueB c DaTbI npHO6pTeHn N3dJIIna.
B TeuHne BbIeuyKa3aHHoro Cpoka KOMnHa Foppa Pedretti S.p.A. 683yETc8 OTpeMOHTnpoBaTb HIN 3aMeHNTb, Ha CBOB Bbl6Op, DeFeKTHOe N3dJIne. TapaHTnI ppeOCTabLraETc8 KOHeuHOMy POKyNaTeJIO N3dJIInr (POnb3OBaTeJIO) IN He NCKJIIOaET IN He ORpaHnUHBAe T npAB DaHHORO POnb3OBaTeJI, ppeDyCMOTpeHHbIX DeNCTBYIOUM 3aKOHODaTeJBCTBOM I/INI INpabAMN POnb3OBaTeJI, Ha ppeDbYBJIeHne cBOx npAB B aDPEC DnIepa/Ipodabua N3dJIInr.
HE NOKPbBAIOTCRAPAHTNEI.
. TapaHTne He nOKpbIbAeTcY uEp6, CBA3aHbI C NcNoJIb3OBaHHe M 3deJIH, BO3HNKsH N O cLeDyIOUHM pNCHAM: HnPaBnJIbHOe NcNoJIb3OBaHne, He COOTBeTCTBHyOuJee yKa3aHnM, COdepJauUMC B0 BKJaDbIWe C INHCTpyKzUAMN IIO MOHTaKy I EKcPlyatauIN, YdApbl N naDeHHN I3deJIH, N3deJIne NODBePRALocb BO3DeECTBnIO BIAJXHOCTNI IIN 3KCTpeMaJIbHbIM TEMpepaTypAM I He6JIaROpnIaTHbIM YCSLOBnM OKpykaUoJe Cpebl C NOCToAHHOcmEHON 3TNX UcLOBH, KoppO3H N OKscJIeHHO, a TaKxhe HecAHKuzOHUPoBaHHOMy PEmOH TY IIN MoDnΦnKaUHN, I3deJIne IcNoJIb3OBaIocb He No Ha3NaueHHIO IIN HnPaBnJIbHO, 6e3 co6JIouDEHHy yKa3aHn B INHCTpyKzIax NIO MOHTaKy I EKcPlyatauIN, pni NlOxOM yXoJe IIN OTCyTCTBnT TaKOBOrO, peMOHTe C INcNoJIb3OBaHHem HeOpnIHHaJIbHbIX 3anqacteN, IIO npNInHe HnPaBnJIbHOin C6OpKN, abAPHN, BO3DeIcTBnI NII IN HAHTKOB, XHMnueCKHX BeIeCTB, a TaKxte BCJeIcTBnE qpe3BbIaHbIX 06CTOaTeJIbCTB.
B liobom clyuae, komnaHn Foppa Pedretti S.p.A. He Hecet HnkaKoI OTBeTCTBeHHocTH 3a yuep6, npnuHennbI JIOJAM NIN ppeImTaM, OTNIyHbIM ot N3dEInra, no npnuHne HecO6JIooDeHn yka3AHN / npedncaHn / npdeynpeKdEHN, coepjauxxC8 B daHHOM pyKOBoDCTBe NIN, kak aIbTePHaTNaBa, B "INcHTpyKznnno MoNTaJky n EKcNlyaTaun", coppoBXdaIoUeN KaKdoe N3dEIne n npedHa3NaYeHHoe dIra BlaJeBua/ NOlb3OBaTeJI. (HaNPmep, YnCTO B KauEcTBe npimepa, B cLyuae DeTCKoN KPOBatKN: "HnkOrDa He OCTabJrte 6e3 npncmOTpa pe6EhKa. KoHTpOJIpyJte, YTO6bl rOJOba pe6EhKa He OKa3aJAcB NOKpbITOn IPoCtBiHeI OII NIO ODEJLOM...").
KoMaHnFoppa Pedretti S.p.A., Kpome npOye, He HecET HnKaKOJ OTBeTCTBHeHOctH 3a yUep6, npuHNHbI JIOdAm NIn NMyueCTBy, eCIn noLOMka eE npOdyKcNn CBra3aHa C pa3pyWeHEm KOMNoHErTOB N3deJIy, NOBepraeMbIX HopMaJIbHOMy H3HocY. KomNoHENTamn, nOdBepraHOzIMNCsH OHPMaJIbHOMy N3HOCy, CHTaOTcR BCE PIACTMaCCOBblk KOMNoHEnTBI N3DeJIy.
Upozorenje PAG 187
Pregled PAG 192
Opé informaciè PAG 193
- Koristenje u automobilu PAG 195
4.1 Kako koristiti kopcu PAG 197
VEHICLE APPLICATION LIST
Semi-Universal approved to ECE-R44.04 for use in the vehicles listed in the vehicle application list.
Please note that this list undergoes ongoing revision procedures, with changes and additions of vehicles accordingly.
The up to date list can be consulted on our web site: www. foppapedretti.it
INFORMATION
Please consult with the vehicle manufacturer regarding access to ISOFIX points.
DO NOT USE ON A PASSENGER SEAT WITH A FRONT AIRBAG
CHECK
WARNING: before purchasing, consult the vehicle Use and Maintenance Guide to ensure the ISOFIX anchor is present, as this could be an optional.