
Bornholm Smart - Heating Klarstein - Free user manual and instructions
Find the device manual for free Bornholm Smart Klarstein in PDF.

| Product type | Glass panel convector heater |
| Brand | Klarstein |
| Model | Bornholm Smart |
| Article numbers | 10034390, 10034391 |
| Power supply | 220-240 V ~ 50 Hz |
| Consumption (low level) | 1000 W |
| Consumption (high level) | 2000 W |
| Nominal heating power | 2.0 kW |
| Integrated Wi-Fi | Yes (Klarstein app) |
| Remote control | Via smartphone (iOS/Android) |
| Open window detection function | Yes |
| ECO mode (night) | Yes |
| Child lock | Yes |
| Programmable timer | 1 to 24 hours |
| LED display | Temperature, timer, heating level |
| Installation | On floor with castors or wall mounting |
| Protection rating | IP24 (suitable for bathrooms) |
| Dimensions (estimated) | 60 x 80 x 15 cm (H x W x D) |
| Weight (estimated) | 6 kg |
| Cleaning | Dust with a vacuum cleaner on the grilles |
| Safety | Overheat protection, automatic shut-off in case of fall? |
| Use | Indoors only, in well-insulated rooms |
Frequently Asked Questions - Bornholm Smart Klarstein
User questions about Bornholm Smart Klarstein
0 question about this device. Answer the ones you know or ask your own.
Ask a new question about this device
Download the instructions for your Heating in PDF format for free! Find your manual Bornholm Smart - Klarstein and take your electronic device back in hand. On this page are published all the documents necessary for the use of your device. Bornholm Smart by Klarstein.
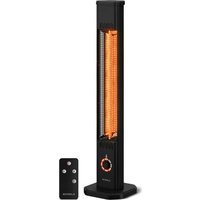
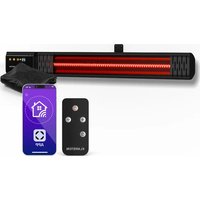
USER MANUAL Bornholm Smart Klarstein
Glass Convector Heater
Note: This product is only suitable for well insulated spaces or occasional use.
https://use.berlin/10034390
Dear Customer,
Congratulations on purchasing this equipment. Please read this manual carefully and take care of the following hints to avoid damages. Any failure caused by ignoring the items and cautions mentioned in the instruction manual are not covered by our warranty and any liability. Scan the QR code to get access to the latest user manual and other information about the product.

CONTENTS
Technical Data 15
Product Data Sheet 16
Safety Instructions 17
Product Overview 19
Installation 20
Control Panel 21
Operation 22
Device Control by Smartphone 24
Cleaning 25
Disposal Considerations 25
Declaration of Conformity 26
TECHNICAL DATA
| Item number 10034390, 10 | 034391 |
| Power supply 220-240 V ~ 50 Hz | |
| Power 1000 W (low heating) | 2000 W (high heating) |
PRODUCT DATA SHEET
| Model identifier(s): 10034390 | 10034391 | |||||
| Item Symbol Value Unit Item Unit | ||||||
| Heat output Type of heat input, for electric storage local space | heaters only | |||||
| Nominal heat output P | nom | 2.0 kW | manual heat charge | charge control, with integrated thermostat | NO | |
| Minimum heat output P | min | 1.0 kW | manual heat charge | charge control with room and/or outdoor temperature feedback | NO | |
| Maximum continuous heat output | Pmax | 1.98 kW | electronic heat | charge control with room and/or outdoor temperature feedback | NO | |
| Auxiliary electricity consumption | fan assisted heat output NO | |||||
| At nominal heat output | elmax | 1.985 | kW | Type of heat output/room temperature control (select one) | ||
| At minimum heat output | elmin | 0.979 | kW single stage | heat output and no room temperature control | NO | |
| In standby mode | elsb | 0.04 | W Two or more manual stages, no room temperature control | NO | ||
| with mechanic thermostat room temperature control | NO | |||||
| with electronic room temperature control | NO | |||||
| electronic room temperature control plus day timer | YES | |||||
| electronic room temperature control plus week timer | NO | |||||
| Other control options (multiple selections possible) | ||||||
| room temperature control, with presence detection | NO | |||||
| room temperature control, with open window detection | YES | |||||
| with distance control option | NO | |||||
| with adaptive start control | NO | |||||
| with working time limitation | NO | |||||
| with black bulb sensor | NO | |||||
| Contact details | Chal-Tec GmbH, Wallstraße 16, 10179, Berlin, Germany | |||||
Read and follow all the instructions in this manual even if you feel you are familiar with the product, and find a place to keep it handy for future reference. Read all instructions before using this appliance and keep them for future reference.
When using any electrically powered product, basic safety precautions should always be followed, including the following:
-
This appliance can be used by children aged from 8 years and above and persons with reduced physical, sensory or mental capabilities or lack of experience and knowledge if they have been given supervision or instruction concerning use of the appliance in a safe way and understand the hazards involved.
-
Use only the voltage specified on the rating plate of the heater.
-
Do not cover or restrict airflow to the inlet or exhaust grilles in any manner as the appliance may overheat and become a fire risk.
-
Do not cover grilles, block entry or exhaust of airflow by placing appliance against any surface. Keep all object at least 1 meter from the front, side and rear of the appliance.
-
Do not place the appliance close to a radiant heat source.
-
Do not operate in areas where gasoline, paint or other flammable liquids are used or stored.
-
This appliance heats up when in use. To avoid burns, do not let bare skin touch hot surface.
-
Switch off and let cooling before moving.
-
Do not use the appliance to dry clothes.
-
Do not insert or allow foreign object or metal utensils to enter any ventilation or exhaust opening, as this may cause an electric shock, fire or damage to the appliance.
-
Do not immerse in liquid or allow running into the interior of the appliance, as this could create an electrical shock hazard.
-
Do not reach for an appliance that has fallen into water. Switch of at supply and unplug immediately.
-
Do not operate any appliance with a damaged cord, plug or after the appliance malfunctions or has been dropped or damaged in any manner. Return to a qualified electrical person for examination, electrical or mechanical adjustment, service or repair.
-
Do not operate appliance with wet hands.
-
The most common cause of overheating is deposits of dust or fluff in the appliance. Ensure these deposits are removed regularly by unplugging the appliance and vacuum cleaning air vents and grilles.
-
Do not use this appliance in a window as rain may cause electric shock.
-
Do not use a abrasive cleaning products on this appliance. Clean with a damp cloth (not wet) rinsed in hot soapy water only. Always remove plug from the mains supply before cleaning.
-
Do not connect the appliance to the mains voltage until completely assembled and adjusted..
-
This appliance is not intended for use in outdoor locations.
-
This device is protected against splash water according to IP24, and therefore also suitable for installation in bathrooms / wet rooms. However, do not use the device in the immediate vicinity of a bathtub, shower, swimming pool or other fluids, and ensure that no live parts can come into contact with water.
Always operate upright.
-
Switch off and let cooling before moving.
-
Do not operate with cord set coiled up as a build up of heat is likely, which could be sufficient to become a hazard.
-
The use of an extension cord with this appliance is not recommended.
-
Do not remove plug from power socket until the appliance has been switched off.
-
Do not remove plug from power socket by pulling the supply cord-always grip plug.
Always unplug appliance when not in use.
- CAUTION: This product is NOT suitable to be used on long pile carpets or Flokati rugs.
- Do not allow cord to come in contact with heated surface during operation.
- Do not run cord under carpeting, throw rugs or runners etc. Arrange cord away from traffic areas so that it will not be tripped over.
- Do not twist, kink or wrap the cord around the appliance, as this may cause the insulation to weaken and split. Always ensure that all cord has been removed from any cord storage area.
- Do not use outdoors or whilst standing on a damp floor.
- Do not store appliance while it is still hot.
This appliance is not intended for use by young children or infirm persons without supervision. - Young children should be supervised to ensure they do not play with the appliance.
- The appliance must not be located immediately below a socket-outlet.
- Do not use this appliance with another programmer, timer or any other device that switches the heater on automatically, since a fire risk exists if the appliance is covered or positioned incorrectly.
- All covers of this appliance is intended to prevent direct access to the heating elements and must be in place when the appliance is in use.
WARNING: In order to avoid overloading, do not cover the heater."
To reduce the risk of electric shock, do not immerse or expose the product or flexible cord to rain, moisture or any liquid other than those necessary for correct operation of the product. - The fireguard does not give full protection for young children and for infirm persons.
If the supply cord is damaged, it must be replaced by a qualified electrical persons in order to avoid a hazard. - Do not use this appliance outdoors or on wet surfaces Avoid spilling liquid on the appliance
- CAUTION: In order to avoid a hazard due to inadvertent resetting of the thermal cutout, this appliance must not be supplied through an external switching device, such a timer, or connected to a circuit that is regularly on and off by the utility."
- Use this appliance only as described in this manual. Any other use is not recommended by the manufacturer and may cause fire, electric shock or injury.
This appliance is intended for household use only and not for commercial or industrial use.
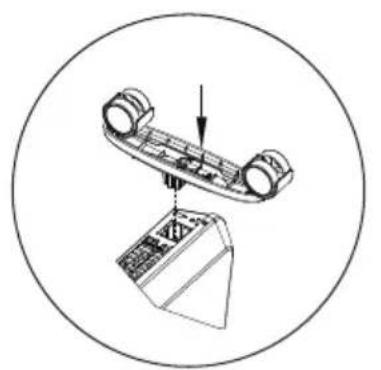
if the installation is complete, it's will hear a sound click.
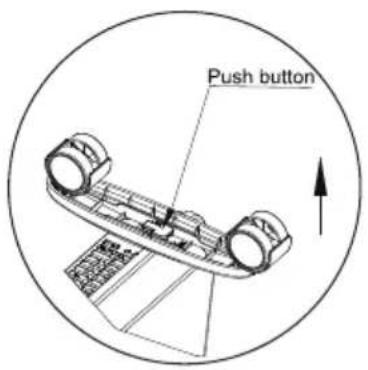
press the button up, take down the caster
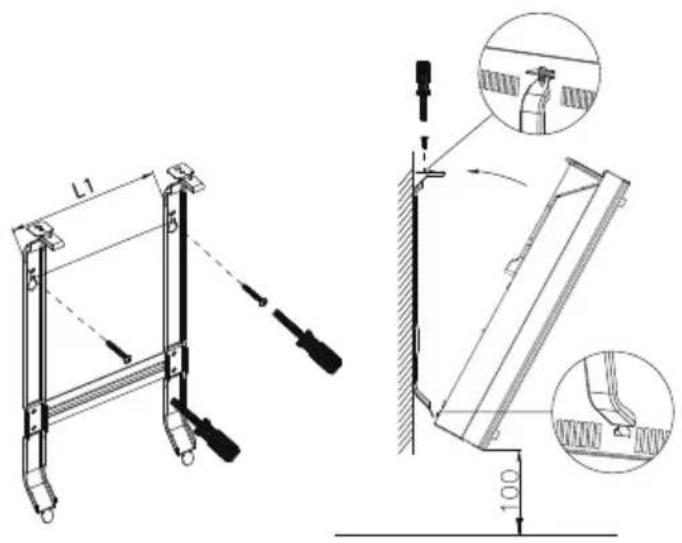
Wall mounted mode
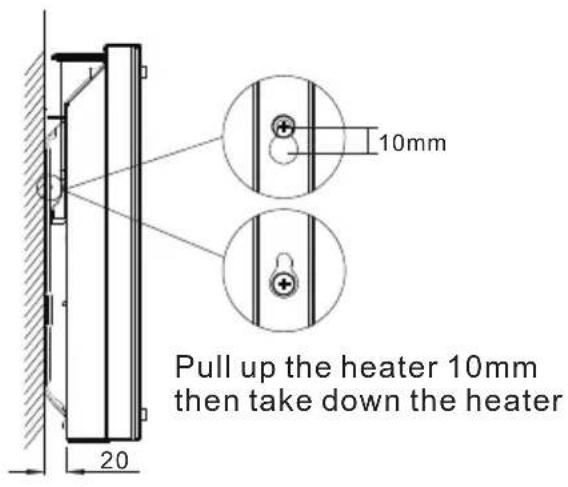
Take down the heater from wall
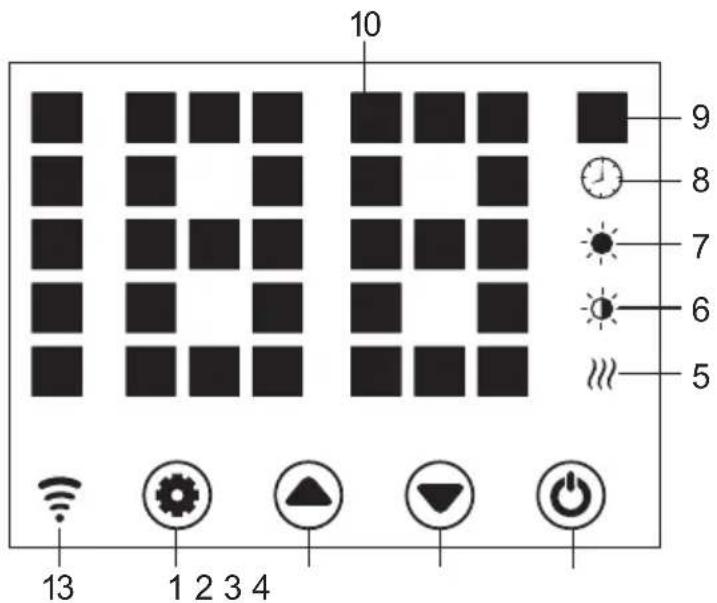
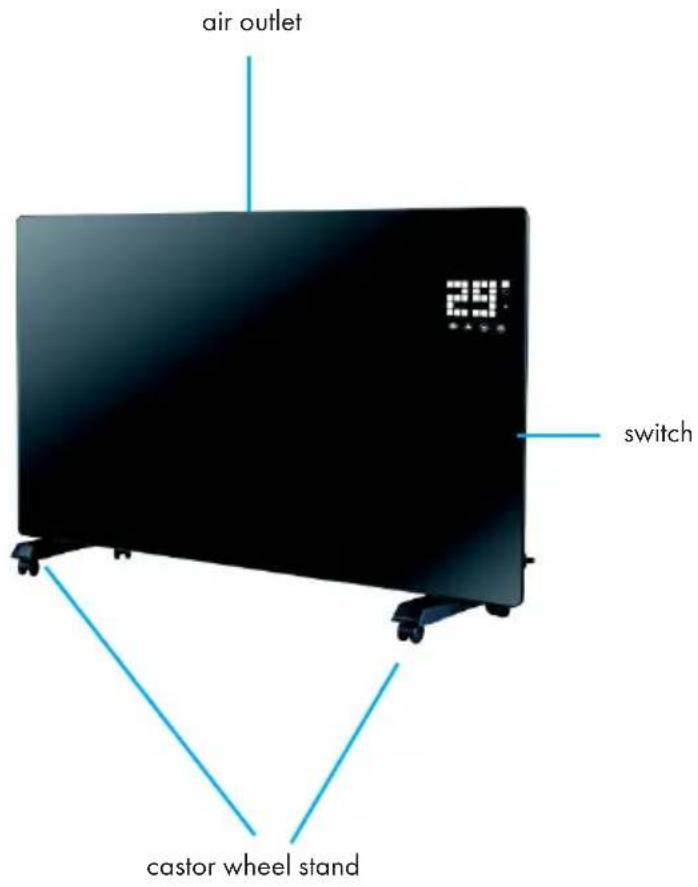
1 Setting button
2 Up button
3 Down button
4 Power button
5 Heating element working indicator
6 Low heating indicator
7 High heating indicator
8 Timer indicator
9 Temperature indicator (^)
10 LED number display
11 LED screen on-off button
12 Low/high heating selection
13 Wifi indicator (if connected ok, wifi indicator light is on; if failed, it flashes)
OPERATION
Starting
- Take out the heater from the carton carefully. Please save the carton for off-season storage.
- Make sure the power switch is in the OFF position before plugging it in.
- Ensure the heater is fully assembled according to the Mounting Guide.
- It is better not to use the same electric outlet with other high wattage electrical appliances in order to avoid overloading your circuit.
Turn on
Plug in and turn on power switch, heater is in standby with buttons 1/2/3/4 on.
Press button (4), heater turns on, display shows current area temperature.
Setting the temperature
Press button (1), temp. indicator flashes and its setting is activated. By pressing buttons (2) & (3), we select desired temp. and save it. Heater is heating, display shows current temperature and button 5 lights on.
Setting timer
Timer Start Heating Time
In off-heating mode, press (1) twice to set timer (0 H to 24 H), and button (2) & (3) to set temperature. After setting, it shows area temperature. Indicator (8) lights on in timer period and off when timer ends, then heater starts heating at high level.
Timer Stop Heating Time
In heating mode (high or low level), press (1) twice to set timer and button (2) & (3) to set temperature. After setting, it shows area temperature. Indicator (8) lights on in timer period and off when timer ends. Then heater stops heating.
High/Low Heat Selection
a. In working mode, button (2) shifts between high heating and stop heating (indicator (7) lights on when high heating and off when off heating).
b. In working mode, button (3) runs between low heating and off heating(indicator (6) lights on when low heating and off when off heating).
c. In working mode, button 12 shifts among Off/Low/High heating, indicator 7 lights on in high heating, indicator 6 lights on in low heat, and no light is on when off heating).
Child-lock function
In heating mode, press both (2) & (3) for 3 s, child lock function acts and system is locked, no setting could be done.
After 5 s, display shows area temperature. Unlock: Press both (2) & (3) for 3 s.
Display buttons activation
Display buttons are off when unit is working, touch the panel below display, they are on.
ECO function(night mode)
In heating mode, press (1) & (3) for 3 s (press ECO on RC), ECO function runs. In this mode, display shows only some indicator ((5) or (6) or (7) or (8), depending on which setting has been done before ECO runs).
Switching The Display Between Degrees Fahrenheit And Celsius
Press the keys (1) & (2) (the two keys on the left) simultaneously for about 10 seconds.
Switching the display between degrees Fahrenheit and Celsius
Press the keys SET and UP (the two keys on the left) simultaneously for about 10 seconds.
Open-window Detection
If temperature decreases 3^ or more in 2 min, open-window detection acts and, unit stops heating, indicator (9) flashes. Press button (4), turn off heater then turn on again..open-window detection is closed.
WIFI Reset
In heating mode, press button (1) for 3 s, WIFI setting is reset with its indication blinking rapidly (twice per second).
Turn off
Press button (4), turn off the heater.
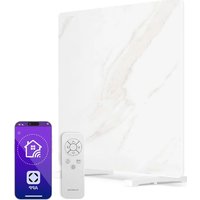
DEVICE CONTROL BY SMARTPHONE
If you integrate the device into your home WiFi, you can conveniently operate it via the associated Klarstein app. The app not only allows you to remotely control the device via your smartphone, but also gives you access to recipes and additional information.
Follow these steps to connect your smartphone to your Klarstein device:
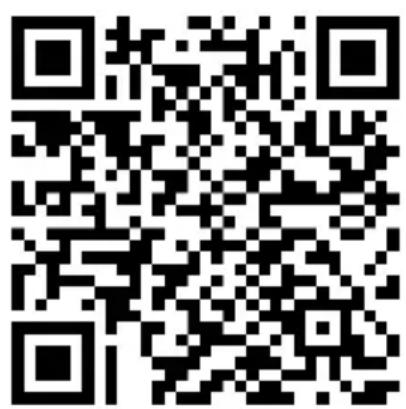
1 Download the Klarstein app first by scanning the QR code with your smartphone (see below), or download it directly from App Store or Google Play.
2 Make sure your smartphone is connected to the same WiFi network that your Klarstein device is to be connected to.
3 Open the Klarstein app.
4 Sign in to your account. If you do not have an account, sign up in the Klarstein app.
5 Follow the instructions from the app.
App Download
Use the scan function of your smartphone to scan the QR code and save the app on your smartphone.
Note: The app provides further information on how to use the app and help on how to connect to your device as soon as you open it for the first time.
iOS Android
Troubleshooting connection problems
If your Klarstein device cannot be found in the WLAN, check the following:
Is the device plugged in?
- Is the WiFi feature of my phone enabled?
- Is the WiFi function of the Klarstein device activated? (Follow the instructions in the app.)
- Has the WLAN password been entered correctly?
- Are the router, Klarstein device and smartphone in the immediate vicinity during the connection attempt? (Ideally no more than 5 m apart.)
If you have deactivated the 2.4 GHz band in the settings of your wireless router, activate it in your router settings.
Note: For further help, follow the instructions in the app when setting up the connection.
CLEANING
Cleaning
It is very easy to clean behind it. Hold two sides of the heater, after upwards pull the heater forwards. then you can clean behind. After cleaning, the heater must be fixed in the normal position.
Storage
If you do not plan to use the heater for extended periods of time, it is recommended that the heater is cleaned and then stored (preferably in its original packaging) in a cool dry place.
DISPOSAL CONSIDERATIONS
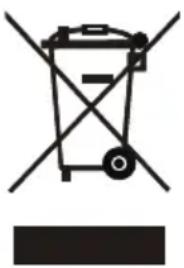
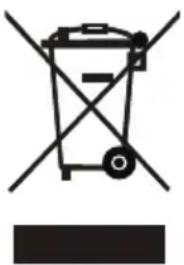
According to the European waste regulation 2012/19/EU this symbol on the product or on its packaging indicates that this product may not be treated as household waste. Instead it should be taken to the appropriate collection point for the recycling of electrical and electronic equipment. By ensuring this product is disposed of correctly, you will help prevent potential negative consequences for the environment and human health, which could otherwise be caused by inappropriate waste handling of this product. For more detailed information about recycling of this product, please contact your local council or your household waste disposal service.
Your product contains batteries covered by the European Directive. 2006/66/EC, which cannot be disposed of with normal household waste. Please check local rules on separate collection of batteries. The correct disposal of batteries helps prevent potentially negative consequences on the environment and human health.

Producer:
Chal-Tec GmbH, Wallstraße 16, 10179 Berlin, Germany.
This product is conform to the following European Directives:
2011/65/EU (RoHS)
2009/125/EC (ErP)
2015/53/EU (RED)

The complete declaration of conformity of the manufacturer
can be found at the following link.
Scan this QR code or enter the URL.
https://use.berlin/10034390
Chere cliente, cher client,
FICHE DE DONNÉES PRODUIT
https://use.berlin/10034390
Estimado cliente,
https://use.berlin/10034390
Gentile Cliente,
https://use.berlin/10034390
Geachte klant,
INSTRUCTIES VOOR AFVOER
https://use.berlin/10034390

Klarstein NELS KLAS
Klarstein NELS KLAS
Klarstein NELS KLAS
Klarstein NELS KLAS
Klarstein NELS KLAS
Klarstein NELS KLAS
- Dear Customer,
- CONTENTS
- TECHNICAL DATA
- OPERATION
- Starting
- Turn on
- Setting the temperature
- Setting timer
- Timer Stop Heating Time
- High/Low Heat Selection
- Child-lock function
- Display buttons activation
- ECO function(night mode)
- Switching The Display Between Degrees Fahrenheit And Celsius
- Open-window Detection
- WIFI Reset
- Turn off
- DEVICE CONTROL BY SMARTPHONE
- App Download
- Troubleshooting connection problems
- CLEANING
- Storage
- DISPOSAL CONSIDERATIONS
- Chere cliente, cher client,
- FICHE DE DONNÉES PRODUIT
- Estimado cliente,
- Gentile Cliente,
- Geachte klant,
- INSTRUCTIES VOOR AFVOER
Brand : Klarstein
Model : Bornholm Smart
Category : Heating