CMS30100 - Surveillance Camera SMARTWARES - Free user manual and instructions
Find the device manual for free CMS30100 SMARTWARES in PDF.
User questions about CMS30100 SMARTWARES
0 question about this device. Answer the ones you know or ask your own.
Ask a new question about this device
Download the instructions for your Surveillance Camera in PDF format for free! Find your manual CMS30100 - SMARTWARES and take your electronic device back in hand. On this page are published all the documents necessary for the use of your device. CMS30100 by SMARTWARES.
USER MANUAL CMS30100 SMARTWARES
1.1 Installation Safety 4
1.2 Operation Safety 4
2 Parts Description 5
3 Installation 6
3.1 Install the monitor 6
3.1.1 Mounting 6
3.1.2 Wiring 6
3.1.3 Insert the MicroSD card (not included) 6
3.2 Install the camera 6
3.2.1 Mounting 6
3.2.2 Wiring 7
4 On-screen menu 8
5 Setting up your device 9
5.1 Add a camera 9
5.2 Select WIFI channel (if required) 9
6 System operation 10
6.1 VideoPlayback 10
6.2 System Setup 11
6.2.1 Language 11
6.2.2 Time Setup 11
6.2.3 Wireless Internet 12
6.2.4 Wireless Channel 12
6.2.5 Camera Audio Enable 13
6.2.6 Volume setup 13
6.2.7 Auto Close 14
6.3 Add a camera 14
6.4 Record setup 15
6.4.1 Record Schedule 15
6.5 Alarm setup 16
6.6 System manage 16
6.6.1 System Info. 16
6.6.2 Factory Setting 17
6.6.3 Upgrade 17
6.6.4 IPC Upgrade 17
7 Setting up the mobile app. 18
8 Declaration of Conformity 19
1 Safety
- Please read these instructions carefully before installing and using the product.
- Do not cut the power supply cable to extend it; the device (transformer) will not work with a longer cable. Do not plug in the device until all the wiring has been finished.
1.1 Installation Safety
- Keep children and bystanders away while installing the products. Distractions can cause you to lose control.
- Do not overreach when installing this product. Keep proper footing and balance at all times. This enables better control in unexpected situations.
- This product is not a toy. Mount it out of reach of children.
1.2 Operation Safety
- Do not operate electrically powered products in explosive atmospheres, such as in the presence of flammable liquids, gases, or dust. Electrically powered products create sparks which may ignite the dust or fumes.
- The warnings, precautions, and instructions discussed in this instruction manual cannot cover all possible conditions and situations that may occur. It must be understood by the operator that common sense and caution are factors which cannot be built into this product, but must be supplied by the operator.
- Do not expose the Power Adapter of this product to rain or wet conditions. Water entering the Power Adapter will increase the risk of electric shock.
- Do not abuse the Power Cord. Never use the cord for unplugging the plug from the outlet. Keep cord away from heat, oil, sharp edges or moving parts. Damaged or entangled cords increase the risk of electric shock.
- The adapter must match the outlet. Never modify the plug in any way. Unmodified plugs and matching outlets will reduce risk of electric shock.
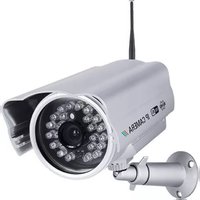
2 Parts Description
Camera
- Antenna
- LED light
- Lens
- Day/night sensor
- Microphone
- Speaker
Monitor
1.Antenna
2. Touch screen
3. Microphone
4. LED battery indicator
5. LED recording indicator
6. USB slot
7. MicroSD slot
8. On/Off switch for battery use
9. AC adaptor input
- Stand
Frequency: 2.4GHz
Maximum transmission power: 17.63dBm
3 Installation
Before doing the fixed installation, it is recommended that you consider the following: Connect everything to familiarize yourself with the units.
Check the wireless coverage at the intended mounting locations by temporarily placing the units.
3.1 Install the monitor
3.1.1 Mounting
The monitor is designed to stand on a table or any flat surface.
a) Pull out the stand leg on the back of the monitor.
b) Pull the two antennas on the back of the monitor to an upright position.
c) Place on any flat surface.
3.1.2 Wiring
The monitor is portable and can be used on battery power, AC power or both. When the AC adapter is connected the battery charges until full and then operates directly from the AC adapter.
Batteries must be purchased separately.
Battery type: 18650
3.1.3 Insert the MicroSD card (not included)
To record video, a MicroSD card is required.
a) Locate the MicroSD card slot on the right side of the monitor.
b) Insert the MicroSD card (It will only fit when in the correct position).
c) A class 10 MicroSD card with a maximum storage of 128gb is recommended.
3.2 Install the camera
3.2.1 Mounting
The camera can be mounted in any direction and on any surface that can hold its weight. The camera must be mounted near access to mains power or an extension may be needed.
To mount the camera, you will need the following tools:
A suitable screwdriver for the included screws.
A drill and suitable drill bit for the included screw plugs.
a) Position the camera where desired.
b) Mark the screw positions with a pen.
c) Drill the necessary holes.
d) Insert the plugs.
e) Drill a sufficiently sized hole to pull the cables.
f) Pull the required cables through the hole.
g) Mount the included antenna onto the camera.
h) Fasten the camera with the screws.
In case that you wish to run the cable on the outside of the wall, a weatherproof connection box is required.
3.2.2 Wiring
The camera is wireless and only requires an electrical connection.
Things to consider when wiring the camera:
- The cable connection must be done indoors or inside a weather proof connection box, mounted on the outside.
- The hole should be sealed with filler to avoid water ingress.
- It is recommended to pull all cables through the hole. The re-set button can be left outside but it is not recommended.
4 On-screen menu
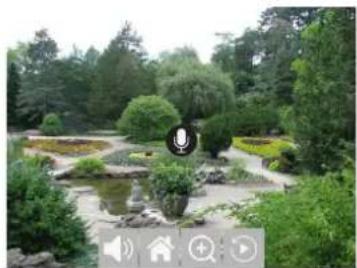
Illustration 1: On screen menu
The on screen menu appears when you tap in the video feed.
Button Description
Microphone Press and hold to enable communication with the currently watched camera. (Make sure camera microphone is enabled, See section "Camera Audio Enable".)
Mute Select to mute/unmute the monitor speakers
Main menu Select to enter the main menu
Zoom Select to Zoom the video feed. Tap once to select the zoom mode. Tap again in the image to zoom. Select the (-) icon to exit the zoom mode.
Playback Select to enter the Playback menu. This will allow you to view recordings.
5 Setting up your device
5.1 Add a camera
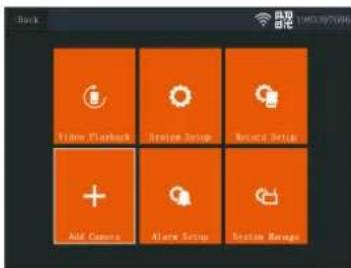
Illustration 2: Main menu - Add Camera

Illustration 3:Add Camera
The monitor can pair up to 4 cameras. To add a camera do the following procedure:
a) Turn the camera on by connecting it to the mains supply.
b) Wait for 30 seconds.
c) You will now hear "Start configuration mode".
NOTE: If you do not hear the voice, press the re-set button on the camera for 6 seconds until you hear "Restore factory settings".
d) On the monitor from the main menu: Select "Add Camera".
e) Select "Add Camera". (This must be done within x minutes from resetting the camera.)
f) On the camera: If the above steps are done correctly, you will hear:
-
"Wireless settings, please wait"
-
"Wireless connection successful"
g) On the monitor: Wait for the pairing to complete.
5.2 Select WIFI channel (if required)
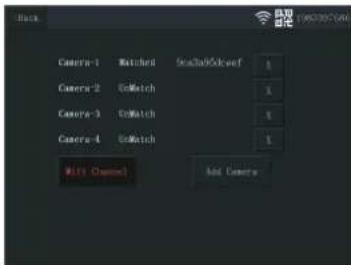
Illustration 4: Wifi channel
If there are many Wi-Fi networks in your area and you are experiencing bad reception, change the Wi-Fi channel by doing the procedure below:
a) From the main menu: Select "Add Camera".
b) Select "Wifi Channel"
c) Select "Wifi Channel"
d) Select a channel from the list. (Try different channels if the reception problem persists.)
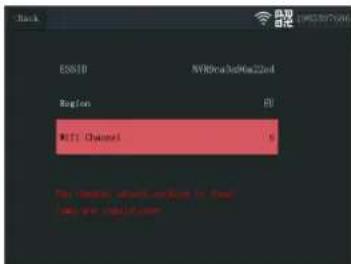
Illustration 5: Select wifi channel
6 System operation
6.1 Video Playback

Illustration 6: Video playback icon
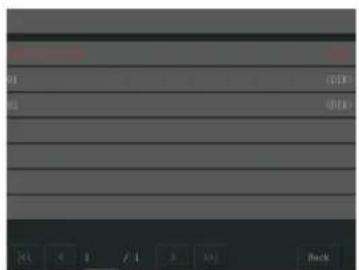
Illustration 7: Main directory
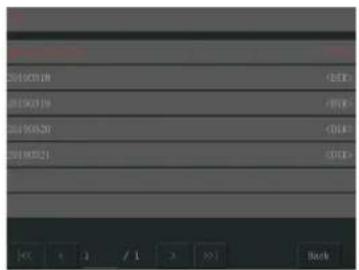
Illustration 8: Date directory
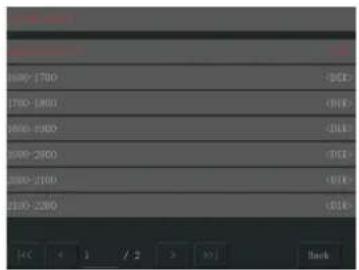
Illustration 9: Time directory
The monitor will start recording video depending on the settings in "Record Setup". To view the recordings do the procedure below:
a) From the main menu: Select "Video Playback".
b) Select the camera folder (1-4) you wish to view recordings from. (Up to 4 cameras are supported).
c) Select the folder with the desired date.
d) Select the folder with the desired time.
e) Select the desired file to view the recording.
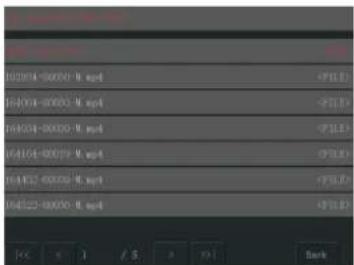
Illustration 10: File directory
6.2 System Setup
6.2.1 Language
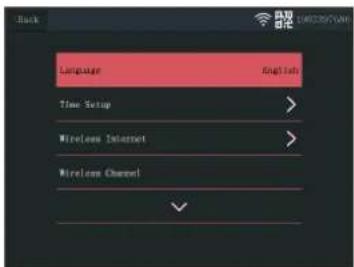
Illustration 11: System setup language
The monitor supports a wide range of languages that you can select from the "System Setup".
a) From the main menu: Select "System Setup".
b) Select "Language".
c) Select the desired language from the list.
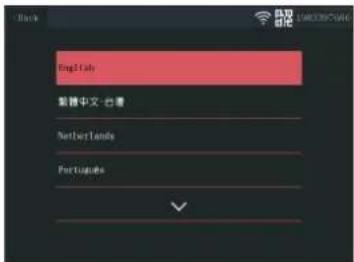
Illustration 12: Language selection
6.2.2 Time Setup
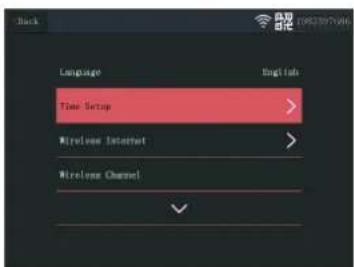
Illustration 13: Select Time Setup
The date and time can be set manually or by syncing to the internet.
a) From the main menu: Select "System Setup".
b) Select "Time Setup".
c) Choose whether to sync time automatically or not. (Syncing automatically requires the monitor to be connected to the internet. See section "Wireless Internet".
d) Select time zone. (This must be done even if you choose to sync time automatically.)
e) Select "Time Setup" if you choose to manually set up your time and date. (This option is only available if "Sync Time" is set to off.
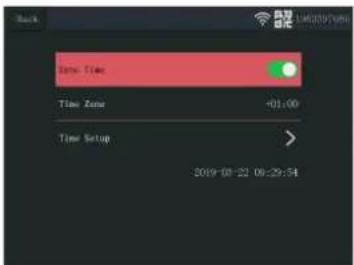
Illustration 14: Time Setup
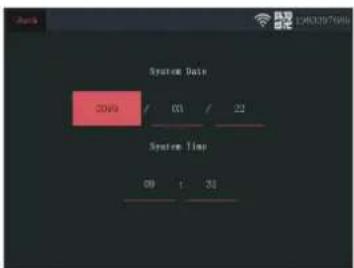
Illustration 15: Date Time Setup (manual)
6.2.3 Wireless Internet
Do the procedure below to enable the wireless internet connection. This feature is optional but it enables you to use the following features:
- App connectivity
Time and date synchronization.
a) Make sure that you have an internet connected WIFI router, your password and router name (SSID) available.
b) From the main menu: Select "System Setup".
c) Select "Wireless Internet".
d) Enable WLAN.
e) Select "Hotspot list".
f) Find and select your wireless router.
g) Type your password.
NOTE: Only 2.4GHz networks are supported
h) Download the "SW360" app.
i) Open the app, register as a new user and follow the instructions given in the app.
6.2.4 Wireless Channel
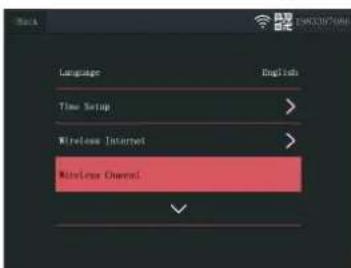
Illustration 16: Select Wireless Channel
In some cases the range of the wireless signal can be obstructed by other wireless networks occupying the same channel. If you experience a lower range than expected, changing the channel may provide a solution.
a) From the main menu: Select "System Setup".
b) Select "Wireless Channel".
c) Select "Wifi channel".
d) Select a new channel. (The Wifi router is usually set to automatically detect the channel. If not the channel must also be changed on the router manually).
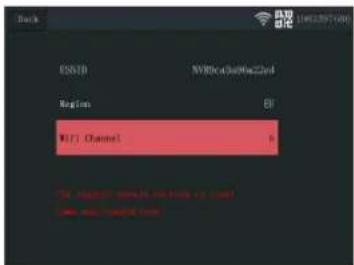
Illustration 17: Wifi Channel
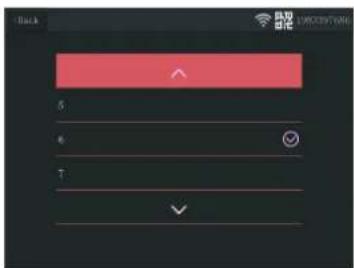
Illustration 18: Channel List
6.2.5 Camera Audio Enable
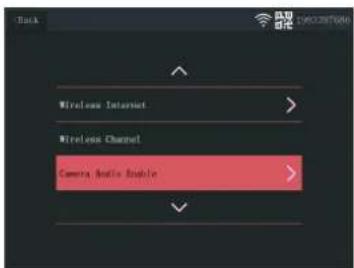
Illustration 19: Camera Audio Enable
The camera microphone can be enabled or disabled from this menu. It is important to note that if the camera microphone is disabled, 2-way communication with the camera is no longer possible.
a) From the main menu: Select "System Setup".
b) Select "Camera Audio Enable".
c) Select the relevant camera and pull the slider to the on or off position.
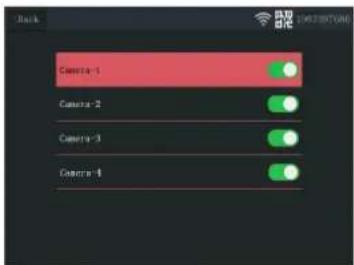
Illustration 20: Enable - Disable camera audio
6.2.6 Volume setup
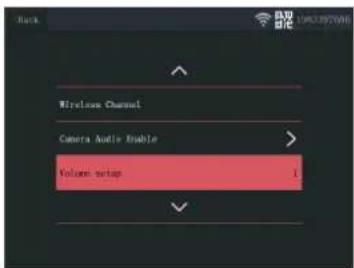
Illustration 21: Volume setup
The volume setup allows the volume of the monitor to be increased or decreased.
a) From the main menu: Select "System Setup".
b) Select "Volume Setup".
c) Set the volume by selecting a numbered volume value (0-4). Setting the value to 0 will mute the monitor speakers completely.

Illustration 22: Altering the volume
6.2.7 Auto Close
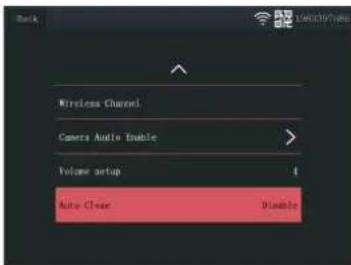
Illustration 23: Auto close
The auto close function enables/disables the screen time out. When the auto close function is enabled, it turns off the monitor screen after a set time while the system is running in normal operation.
a) From the main menu: Select "System Setup".
b) Select "Auto Close"
c) Select a duration before time out (the duration starts after the last interaction with the monitor).
Note: If the monitor is running on batteries, it is recommended to have a short time out duration to save power.
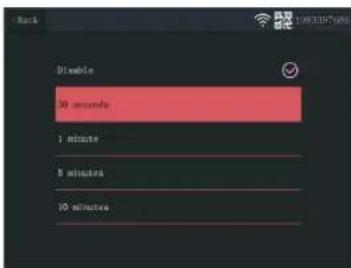
Illustration 24: Auto close (time out) duration
6.3 Add a camera
Illustration 25: Main menu - Add Camera
The monitor can pair up to 4 cameras. To add a camera do the following procedure:
a) Turn the camera on by connecting it to the mains supply.
b) Wait for 30 seconds.
c) You will now hear "Start configuration mode".
NOTE: If you do not hear the voice, press the re-set button on the camera for 6 seconds until you hear "Restore factory settings".
d) On the monitor from the main menu: Select "Add Camera".
e) Select "Add Camera". (This must be done within x minutes from resetting the camera.)
f) On the camera: If the above steps are done correctly, you will hear:
- "Wireless settings, please wait"
- "Wireless connection successful"
g) On the monitor: Wait for the pairing to complete.

Illustration 26:Add Camera
6.4 Record setup
The system can be set up to record video in different modes. It supports up to 4 separate schedules where each schedule can be set in different modes, using 1 or more installed cameras. See section "Record Schedule".
To configure the record setup settings, do the procedure below.
a) From the main menu: Select "Record Setup".
b) Select storage device. (This is only relevant if you have inserted a MicroSD card.)
c) Select "Storage Manage" to see the current memory use and format the MicroSD card.
d) Select "Overwrite" to enable/disable the monitor to overwrite older recordings when the memory runs out.
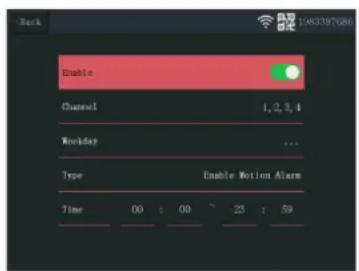
6.4.1 Record Schedule
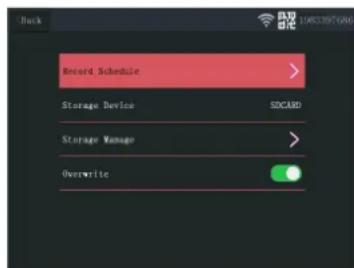
Illustration 27: Record Schedule
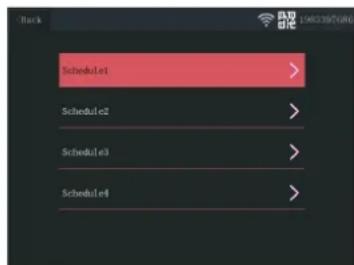
Illustration 28: Schedule 1-4
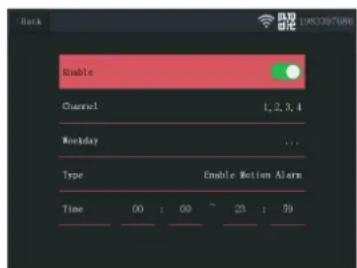
Illustration 29: Schedule settings
To make a recording schedule, do the procedure below.
a) From the main menu: Select "Record Setup".
b) Select "Record Schedule".
c) Select schedule 1-4.
d) Enable the selected schedule by moving the slider (it will turn green when enabled).
e) Select "channel" (cameras).
f) Select the "channel" (camera(s)) that you want to record from).
g) Select "Weekday".
h) Select the days that you want to record on, from the list.
i) Select "Time" and insert the time frame of which you want to record.
Note: The "Type" only has one option (Enable motion alarm) and it is enabled by default.
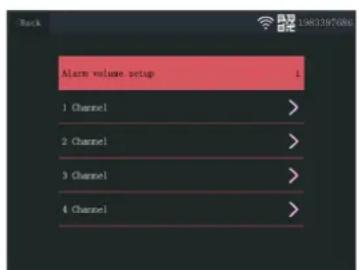
6.5 Alarm setup
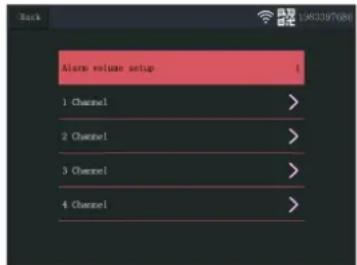
Illustration 30: Alarm setup channels
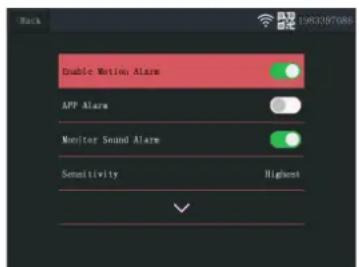
Illustration 31: Alarm setup channel settings

Illustration 32: Area Edit
The monitor has an alarm function that can be set to trigger when motion is detected. To set the alarm, do the procedure below.
a) From the main menu: Select "Alarm Setup".
b) Select "Alarm volume setup".
c) Set the desired alarm volume. (The alarm volume overrides any other sound settings if triggered.)
d) Select the "Channel" (camera) that you want to use to trigger the alarm.
e) Enable the "Enable Motion Alarm" by moving the slider (it will turn green when enabled).
f) Enable the "APP Alarm" by moving the slider (it will turn green when enabled) if you wish to receive alarms on your mobile device. (See section "Setting up the mobile app")
g) Enable the "Monitor Sound Alarm" if you wish to get an audible alarm from the monitor.
h) Select the "Sensitivity" to set the sensitivity of the motion detector.
i) Select "Area Edit" to mask areas that you do not want to trigger the alarm. (This is useful if you have trees or traffic etc. that is always seen by the camera.)
Note: Areas marked in orange will trigger the motion alarm.
6.6 System manage
6.6.1 System Info
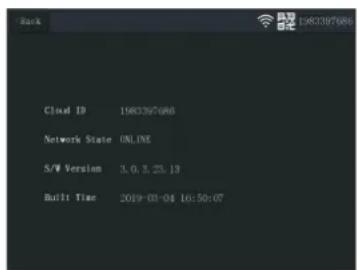
Illustration 33: System Info
The system info provides information about the monitor. This information is mainly used when support is required. To view the system info, do the procedure below.
a) From the main menu: Select "System Manage".
b) Select "System Info".
6.6.2 Factory Setting
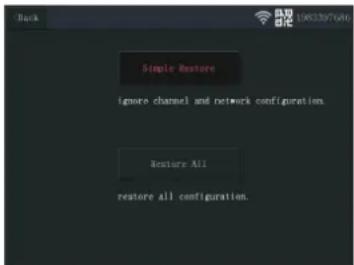
Illustration 34: Factory Setting
This menu allows the user to restore the factory settings at two levels.
- "Simple Restore" will reset all settings except your paired cameras and Wifi settings.
- "Restore All" will reset all settings including your paired cameras and Wifi settings.
- To restore your system, do the procedure below.
a) From the main menu: Select "System Manage".
b) Select "Factory Setting".
c) Select "Simple Restore" or "Restore All".
6.6.3 Upgrade
The "Upgrade" menu allows the user to update the monitor firmware using a MicroSD card. This is not recommended and is mainly used when required by support.
6.6.4 IPC Upgrade
The "IPC Upgrade" menu allows the user to update the camera firmware using a MicroSD card. This is not recommended and is mainly used when required by support.
7 Setting up the mobile app
The system supports the mobile app "SW360". The app can be used as an additional monitor on your mobile device. To set up the mobile app, do the procedure below.
a) Connect the monitor to a wifi network. (See section "Wireless Internet".)
b) Connect your mobile device to the same network.
c) Download the "SW360" app.
d) Open the app, register as a new user and follow the instructions given in the app.
e) Log in to the app.
f) Select the (+) icon to add a new device.
g) Select the monitor in the device list.
h) Select the device that appears in the list (normally a 10 digit number).
Note: Your device should now be added. To learn more about SW360, see the app manual.
8 Declaration of Conformity
Hereby, Smartwares Europe declares that the radio equipment type CMS-30100 is in compliance with Directive 2014/53/EU
The full text of the EU declaration of conformity is available at the following internet address: www.smartwares.eu/doc
Inhoudsopgave
1 Veiligheid 21
1.1 Veilige installment 21
1.2 Veilig gebruik 21
29: Schema-installingen
6.5 Alarmconfiguratie
30: Alarmconfiguratie - kanalen