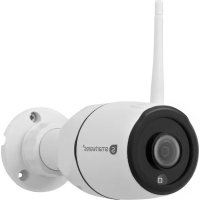
CIP39220 - Surveillance Camera SMARTWARES - Free user manual and instructions
Find the device manual for free CIP39220 SMARTWARES in PDF.



User questions about CIP39220 SMARTWARES
0 question about this device. Answer the ones you know or ask your own.
Ask a new question about this device
Download the instructions for your Surveillance Camera in PDF format for free! Find your manual CIP39220 - SMARTWARES and take your electronic device back in hand. On this page are published all the documents necessary for the use of your device. CIP39220 by SMARTWARES.
USER MANUAL CIP39220 SMARTWARES
SW360 app instruction manual

smartwares®
text_image
SW 360SW360 app instruction manual
Table of Contents
1 Introduction 5
1.1 Privacy.... 5
2 Installing the app.... 6
2.1 Creating an account.... 6
3 Adding a new device.... 7
3.1 Sharing a camera 8
4 General use 9
4.1 My device screen 9
4.2 Personal center.... 10
4.3 Live view screen.... 10
4.4 Settings menu 11
1 Introduction

This manual will instruct you on how to setup the SW360 app, add Smartwares cameras, adjust their settings according to your preference, and share them with your friends.
You will be able to manage and view your recordings, and even receive notifications when your camera detects motion.
- Please refer to your camera's quickstart guide on how to install your camera.
- Please check for compatibility with the SW360 app, before attempting to add your camera.
1.1 Privacy
We have taken the following precautions to protect your privacy:
- Your e-mail address will not be used for other purposes.
- Your password is always encrypted and unreadable/unusable to others.
- The cloud (server) is only used to establish the connection. Your images do not go through the cloud, but via a direct secure (encrypted) connection between camera and telephone. Your images are therefore never stored in a location other than the camera's memory card.
2 Installing the app
text_image
ANDROID APP ON Google™ play Available on the App StoreBefore you can start using your camera, you will first need to install the SW360 app on your smartphone. The SW360 app is available for Android and iOS (Apple) devices.
a) Open the Apple App Store, or the Google Play Store.
b) Search for "SW360".
c) Download and install the app.
→ You can now start using the SW360 app on your smartphone.
2.1 Creating an account
text_image
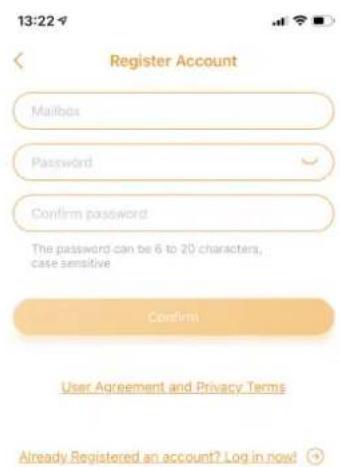
13:22 Register Account Mailbox Password Confirm password The password can be 6 to 20 characters, case sensitive Confirm User Agreement and Privacy Terms Already Registered an account? Log in now!Before you can add a camera to the SW360 app, you will need to log in first. If you do not already have an account, you will have to create one:
a) Open the SW360 app on your smartphone.
b) Tap on "Register account".
c) In the next menu, fill in your email address.
Note: Make sure there is no extra 'space' behind your email adress, this can be caused by using the automatic fill in function from your smartphone.
d) Now fill in a password. The password should be 6 to 20 characters. It is case sensitive.
e) Fill in the password again for confirmation.
f) Tap on "Confirm".
A verification mail will now be sent to your email address.
g) Open the email. If you can't find the email, please check your unwanted email (spam).
h) Click on the link in the email to verify your account.
→ You can now log in with the account you created.
Illustration 1: Registering an account.
3 Adding a new device
text_image
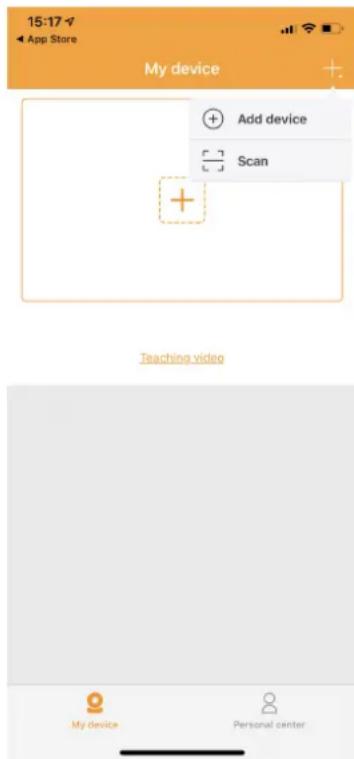
15:17 App Store My device Add device Scan Teaching video My device Personal centerIllustration 2: Adding a new device.
text_image
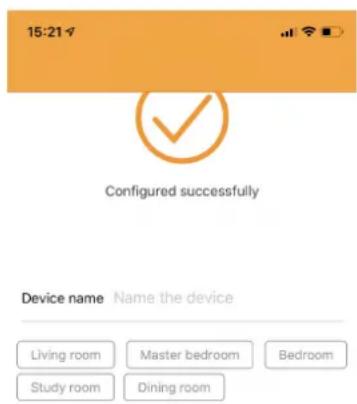
15:21 Configured successfully Device name Name the device Living room Master bedroom Bedroom Study room Dining roomIllustration 3: Naming your camera.
√ Your camera is ready for use.
√ You have installed the SW360 app, and are logged in to your account.
√ You have made sure that your camera is in close range (1m) of your mobile device.
a) Plug in the camera with the USB adapter to power it up.
b) Please wait for 30 seconds until the LED on the camera starts flashing.
c) Open the SW360 app.
d) Tap the + button to start the process of adding a new camera to your account.
e) Tap "add device".
f) Choose your camera from the list of pictures.
The following steps to add a new device are slightly different, depending on if you're using Android or iOS. Please follow the appropriate steps for your operating system.
iOS
g) Exit the app, and go to the Wi-Fi settings on your mobile device. The camera transmits its own private wireless network.
h) Connect to the Wi-Fi network SSID that corresponds to your Camera-ID. You can find the camera-ID on the sticker on the back of the camera. The password is "11111111". Wait for your mobile device to connect to the camera's Wi-Fi network.
i) When you have connected successfully to the camera's private network, return to the SW360 app.
j) In the SW360 app, choose the SSID of the wireless network you ultimately want to connect the camera to. Enter the corresponding password. Note: A 5Ghz Wi-Fi network is not supported.
k) The camera will now try to connect to your Wi-Fi network. Please wait.
I) When the connection is successful, the LED will turn green and the camera will say "Connection is successful".
m) Please give your camera a name (for instance "living room"), and tap "done".
Now you will be able to access your camera. You can watch the live view from anywhere in the world through the app on your mobile device.
Android
n) Select your camera-ID from the list. You can find the camera-ID on the sticker on the back of the camera.
o) In the SW360 app, choose the SSID of the wireless network you ultimately want to connect the camera to. Enter the corresponding password. Note: A 5Ghz Wi-Fi network is not supported.
p) The camera will now try to connect to your Wi-Fi network. Please wait.
q) When the connection is successful, the LED will turn green and the camera will say "Connection is successful".
r) Please give your camera a name (for instance "living room"), and tap "done".
Now you will be able to access your camera. You can watch the live view from anywhere in the world through the app on your mobile device.
text_image
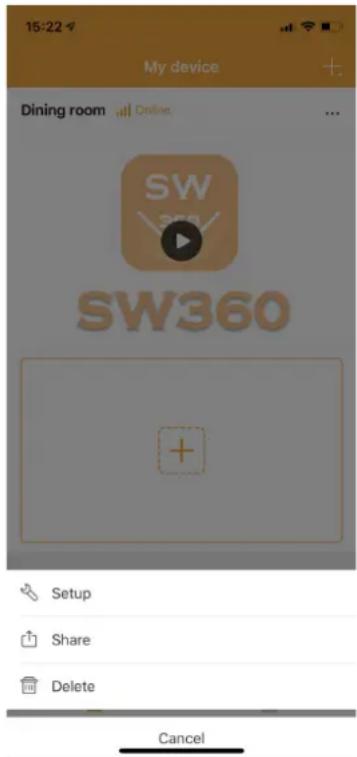
15:22 My device Dining room Online SW SW360 + Setup Share Delete CancelIllustration 4: Opening the share function.
- Note (for Android): The GPS location of your smartphone should be enabled during the process of adding a device. It is needed to determine the time zone. The GPS function can be disabled again after adding a device.
- Note: When the installation was not successful, please use the reset button on the camera to reset the camera and try again.
3.1 Sharing a camera
You can to share the live feed from your camera with a family member or a friend. They will be able to view live footage, but aren't allowed to view recordings or change the camera settings.
√ You have installed the SW360 app and have added one or more cameras to your account.
√ You have a friend or family member who has also installed the SW360 app on their smartphone.
a) Open the SW360 app.
b) Tap the three dots next to the name of the camera that you wish to share. A QR code will now appear on your screen.
The person who wishes to share your camera should now follow the instructions below:
c) Open the SW360 app.
d) Tap the + button to start the process of adding a new camera to your account.
e) Tap "Scan". The SW360 app will now access your camera.
f) Point your camera at the QR code on the screen of the other smartphone. The SW360 app will now automatically scan the code and add the camera.
Your friend or family member will now be able to access the live view from your camera.
4 General use
In this chapter we will discuss the functions of the SW360 app you will use the most:
- The my device screen
- The personal center
- The live view screen
- The settings menu
4.1 My device screen
text_image
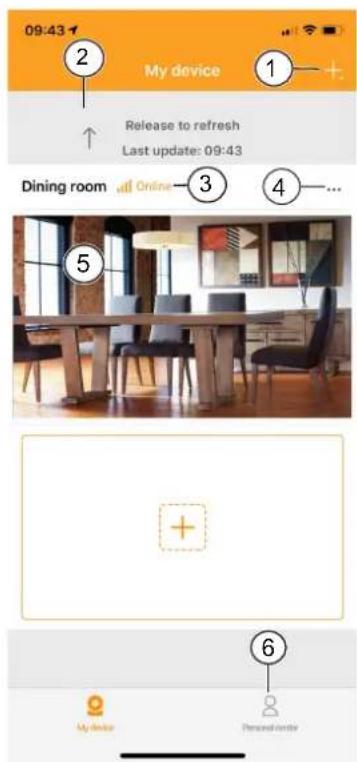
09:43 My device 1 Release to refresh Last update: 09:43 Dining room Online 3 4 ... 5 + 6 My device Personal centerYou can take the following actions from the "My device" screen:
- Tap the + sign to add a device, or scan a QR code from a friend or family member to share their camera.
- Pull down on the screen to refresh the connection status.
- Your camera's current status.
- Tap on the three dots symbol to go to the settings menu, to share the device, or to delete the camera from your account.
- Tap on this preview image of your camera feed to go to the live view screen.
- Tap to go to the Personal center.
Illustration 5: My device screen.
4.2 Personal center
text_image
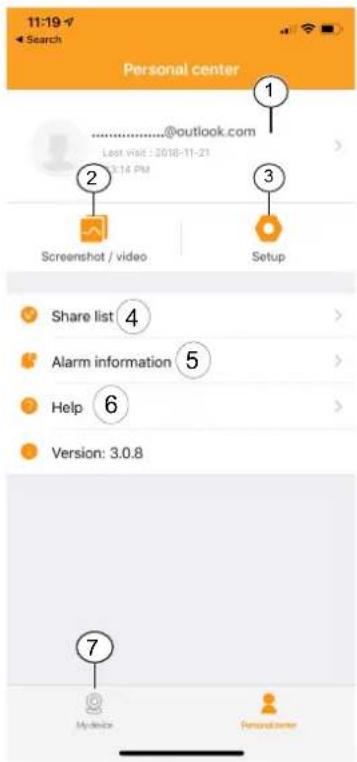
11:19 Search Personal center ---------------- ---------------- ---------------- ---------------- ---------------- ---------------- ---------------- ---------------- ---------------- ---------------- ---------------- ---------------- ---------------- ---------------- ---------------- ---------------- ---------------- ---------------- ---------------- ---------------- ---------------- ---------------- ---------------- ---------------- ---------------- ---------------- ---------------- ---------------- ---------------- ---------------- ---------------- ---------------- ---------------- ---------------- ---------------- ---------------- ---------------- ---------------- ---------------- ---------------- ---------------- ---------------- ---------------- ---------------- ---------------- ---------------- ---------------- ---------------- ---------------- ---------------- | | | | | | | | | | | | | | | | | | | | | | | | | | | | | | | | | | | | | | | | | | | | | | | | | | |Illustration 6: Personal center
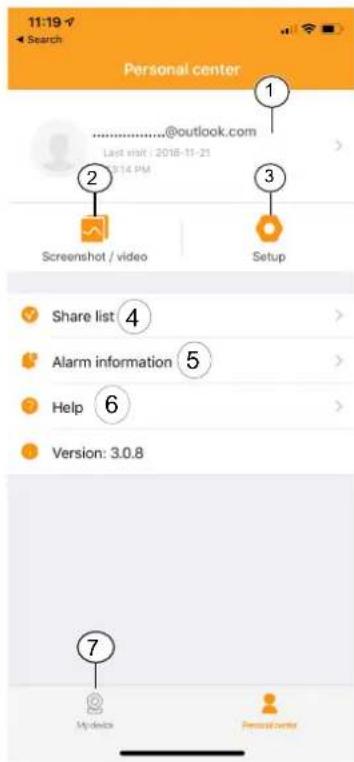
The following options are available from the Personal center:
- Tap here to go to the Personal information screen. You can view your account information and change your password from here.
- Tap here to go the screenshot/video gallery. You can manage and view your screenshots and recordings from the gallery.
- Tap here to go the cellular data settings menu.
- Tap here to go to the share list. You can view your shared devices in this list.
- Tap to go to the alarm information menu.
- Tap to go to the help menu. You can view the help sections, read frequently asked questions, and even watch a tutorial video.
- Tap to go to the "My device" screen.
text_image
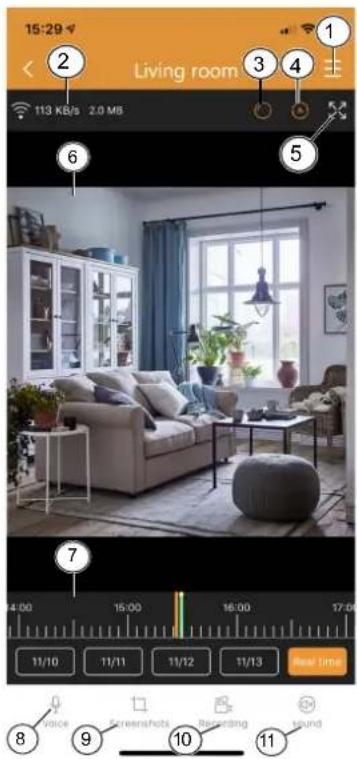
15:29 Living room 1 2 3 4 5 6 7 8 9 10 11 11/10 11/11 11/12 11/13 Real Time Voice Screenshob Renterang SoundIllustration 7: Live view.
4.3 Live view screen
To open the live view, tap on the preview of your camera from the home screen.
From the live view screen you can watch live footage or view recordings. The following functions are available from this screen:
- Settings menu.
- Your data usage information.
- Tap to switch camera perspective.
- Tap to turn scanmode on or off. In scanmode the camera will automatically pan from left to right.
- Tap to see a full screen landscape view of the camera feed. Tap again to go back to portrait mode.
-
Live view.
-
Drag the video feed to look around.
- Double tap to zoom in or out. Pinch to zoom in or out.
-
When in landscape mode, tap once to view the footage fullscreen.
-
Drag this bar left and right to view your recordings. Pinch to zoom in on this bar. A orange bar indicates a recording.
- You can also tap the dates to go back to a specific day in time. A orange bar indicates a recording. Drag this bar to the right to go back further in time.
- Tap this button to use the voice function. Your voice will be audible through the camera's speaker.
- Note: Some cameras do not offer this functionality.
-
Tap this button to make a screenshot of the live footage on the camera. You can view your screenshots from the personal center.
-
Tap this button to make a recording of the live footage on the camera. You can view your recordings from the personal center. Tap again to stop the recording.
-
Tap to mute or unmute the audio from the camera.
- Note: Some cameras do not offer this functionality.
4.4 Settings menu
text_image
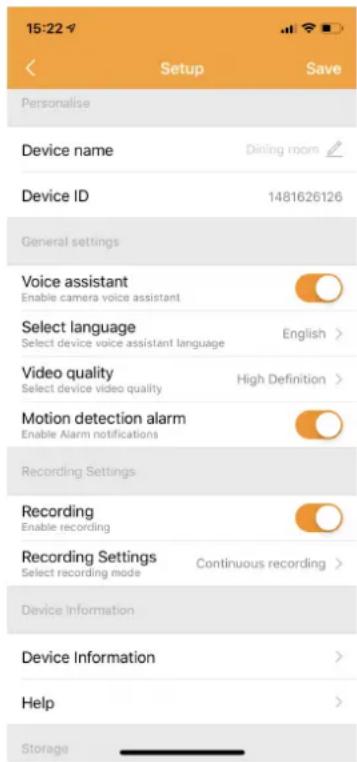
15:22 Setup Save Personalise Device name Dining room Device ID 1481626126 General settings Voice assistant Enable camera voice assistant Select language Select device voice assistant language English > Video quality High Definition > Select device video quality Motion detection alarm Enable Alarm notifications Recording Settings Recording Enable recording Recording Settings Continuous recording > Select recording mode Device Information Device Information > Help > StorageIllustration 8: Settings menu.
You can change various settings from your camera in this menu.
It's possible to:
- Change the device name.
– Turn the camera's voice assistant on or off. - Set the language of the voice assistant.
- Choose the video quality. A higher quality will take up more memory on your MicroSD card.
- Turn motion detection notifications on or off. When this is turned on, your smartphone will give you a notification if your camera detects motion.
– Turn recording on or off.
– Choose a recording setting. You can choose to let the camera record continuously, or only when it detects motion.
– View the device information - You can update the camera firmware from this menu, if available.
- Access the help section.
- Check the device storage.
- You can format your MicroSD card from this menu. You will lose all your screenshots and recordings if you choose to format.
– Turn daylight saving on or off, and choose you daylight saving area.

smartwares®
text_image
SW 360text_image
13:22 Register Account Mailbox Password Confirm password The password can be 6 to 20 characters, case sensitive Confirm User Agreement and Privacy Terms Already Registered an account? Log in now!text_image
15:17 App Store My device Add device ScanTeaching video
text_image
My device Personal centerConfigured successfully
Device name Name the device
Living room
Study room
Master bedroom
Dining room
Bedroom
[Non-Text]
text_image
15:22 My device Dining room All Online ... SW SW360
Setup

Share

Delete
text_image
09:43 My device Release to refresh Last update: 09:43 Dining room Online + My device Personal centertext_image
15:22 Setup Save Personalise Device name Dining room Device ID 1481626126 General settings Voice assistant Enable camera voice assistant Select language Select device voice assistant language English > Video quality High Definition > Motion detection alarm Enable Alarm notifications Recording Settings Recording Enable recording Recording Settings Continuous recording > Select recording mode Device information Device Information > Help > Storage8: instellingenmenu
text_image
13:22 Register Account Mailbox Password Confirm password The password can be 6 to 20 characters, case sensitive Confirm User Agreement and Privacy Terms Already Registered an account? Log in now!text_image
15:17 App Store My device Add device Scan Teaching video My device Personal centertext_image
15:21 Configured successfullyDevice name Name the device
Living room
Master bedroom
Bedroom
Study room
Dining room
text_image
15:22 My device Dining room Online SW SW360 + Setup Share Delete Canceltext_image
09:43 My device 1 Release to refresh Last update: 09:43 Dining room Online 3 4 ... 5 + 6 My device Personal ordertext_image
15:22 Setup Save Personalise Device name Dining room Device ID 1481626126 General settings Voice assistant Enable camera voice assistant Select language English > Select device voice assistant language Video quality High Definition > Select device video quality Motion detection alarm Enable Alarm notifications Recording Settings Recording Enable recording Recording Settings Continuous recording > Select recording mode Device Information Device Information > Help > Storagetext_image
13:22 Register Account Mailbox Password Confirm password The password can be 6 to 20 characters, case sensitive Confirm User Agreement and Privacy Terms Already Registered an account? Log in now!text_image
15:17 App Store My device Add device Scan Teaching video My device Personal centertext_image
15:21 Configured successfully Device name Name the device Living room Master bedroom Bedroom Study room Dining room Donetext_image
15:22 My device Dining room All Online ... SW SW360 + Setup Share Delete Canceltext_image
09:43 My device 1 Release to refresh Last update: 09:43 Dining room Online 3 4 ... 5 6 My device Personal center4.2 Centre personnel
text_image
11:19 Search Personal center ---------------- ---------------- ---------------- ---------------- ---------------- ---------------- ---------------- ---------------- ---------------- ---------------- ---------------- ---------------- ---------------- ---------------- ---------------- ---------------- ---------------- ---------------- ---------------- ---------------- ---------------- ---------------- ---------------- ---------------- ---------------- ---------------- ---------------- ---------------- ---------------- ---------------- ---------------- ---------------- ---------------- ---------------- ---------------- ---------------- ---------------- ---------------- ---------------- ---------------- ---------------- ---------------- ---------------- ---------------- ---------------- ---------------- ---------------- ---------------- ---------------- ---------------- | | | | | | | | | | | | | | | | | | | | | | | | | | | | | | | | | | | | | | | | | | | | | | | | | | |Fig. 6: Centre personnel
text_image
15:22 Setup Save Personalise Device name Dining room Device ID 1481626126 General settings Voice assistant Enable camera voice assistant Select language Select device voice assistant language English > Video quality High Definition > Select device video quality Motion detection alarm Enable Alarm notifications Recording Settings Recording Enable recording Recording Settings Continuous recording > Select recording mode Device information Device Information > Help > Storagetext_image
13:22 Register Account Mailbox Password Confirm password The password can be 6 to 20 characters, case sensitive Confirm User Agreement and Privacy Terms Already Registered an account? Log in now!text_image
15:17 App Store My device Add device Scan