C903IP.2 - Surveillance Camera SMARTWARES - Free user manual and instructions
Find the device manual for free C903IP.2 SMARTWARES in PDF.


User questions about C903IP.2 SMARTWARES
0 question about this device. Answer the ones you know or ask your own.
Ask a new question about this device
Download the instructions for your Surveillance Camera in PDF format for free! Find your manual C903IP.2 - SMARTWARES and take your electronic device back in hand. On this page are published all the documents necessary for the use of your device. C903IP.2 by SMARTWARES.
USER MANUAL C903IP.2 SMARTWARES
natural_image
Close-up of a security camera with visible LED lights and a WiFi, set against a blue abstract background (no text or symbols)outdoor pan & tilt IP camera
GB WIFI NETWORK CAMERA
DE WIFI NETZWERK-KAMERA
PL BEZPRZEWODOWA KAMERA IP
NL WIFI NETWERKCAMERA
FR CAMÉRA EN RÉSEAU WIFI
ES CÁMARA IP WIFI
TR IP AĞI KAMERASI
GR ΔIKTYAKH KAMEPA
CZ IP SÍTOVÁ KAMERA
text_image
Diagram showing labeled components of a security camera with numbered pins and cable connections12345687
2
text_image
Diagram of an electric motor with labeled components including a stepper motor and cable connectors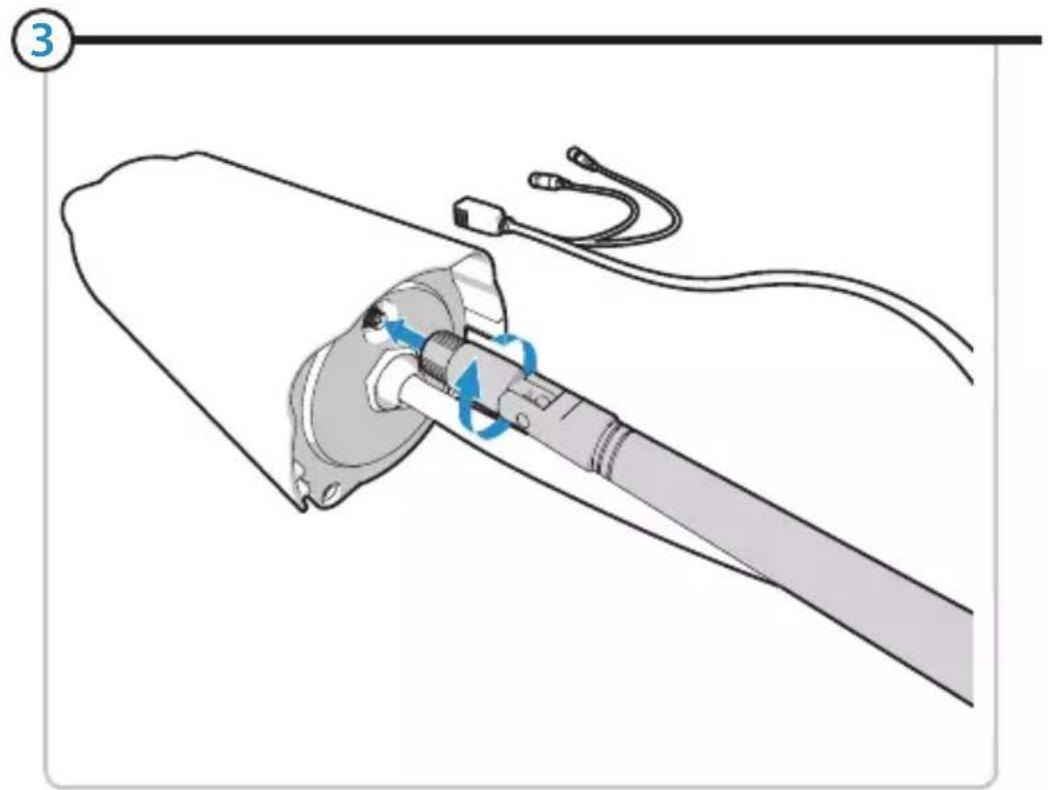
natural_image
Diagram of a medical or electrical device with a tool and cable, showing internal components and blue circular arrows indicating motion (no text or symbols)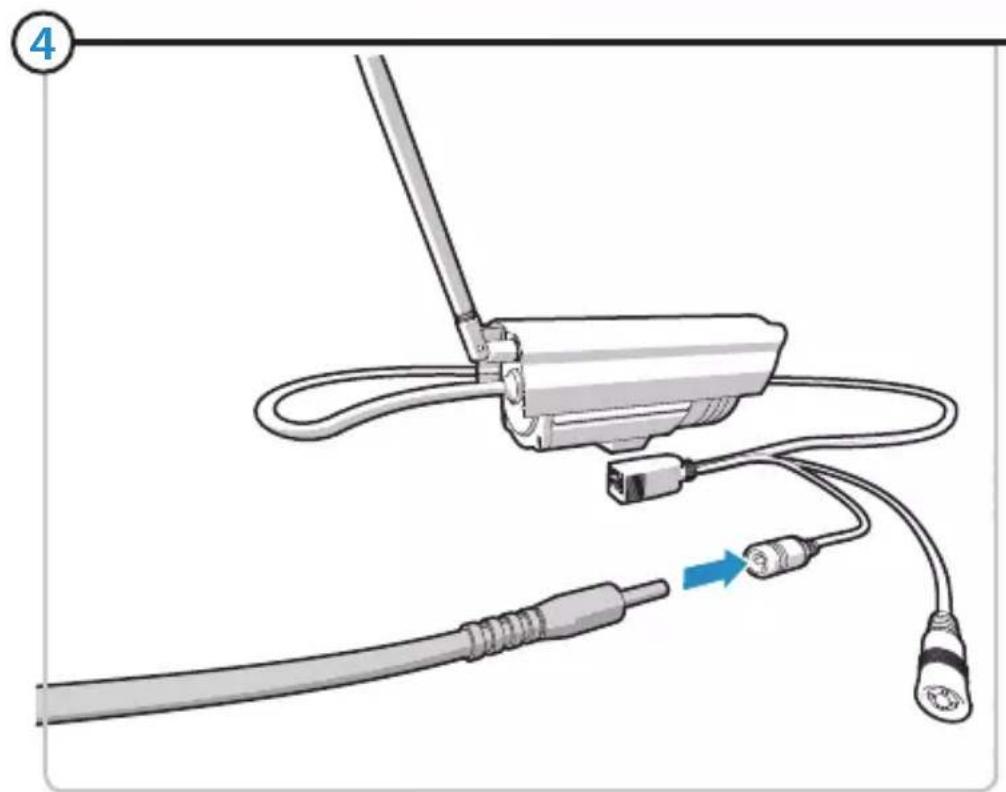
natural_image
Diagram of a cable connector with connectors and a cable, showing wiring and connection (no text or symbols)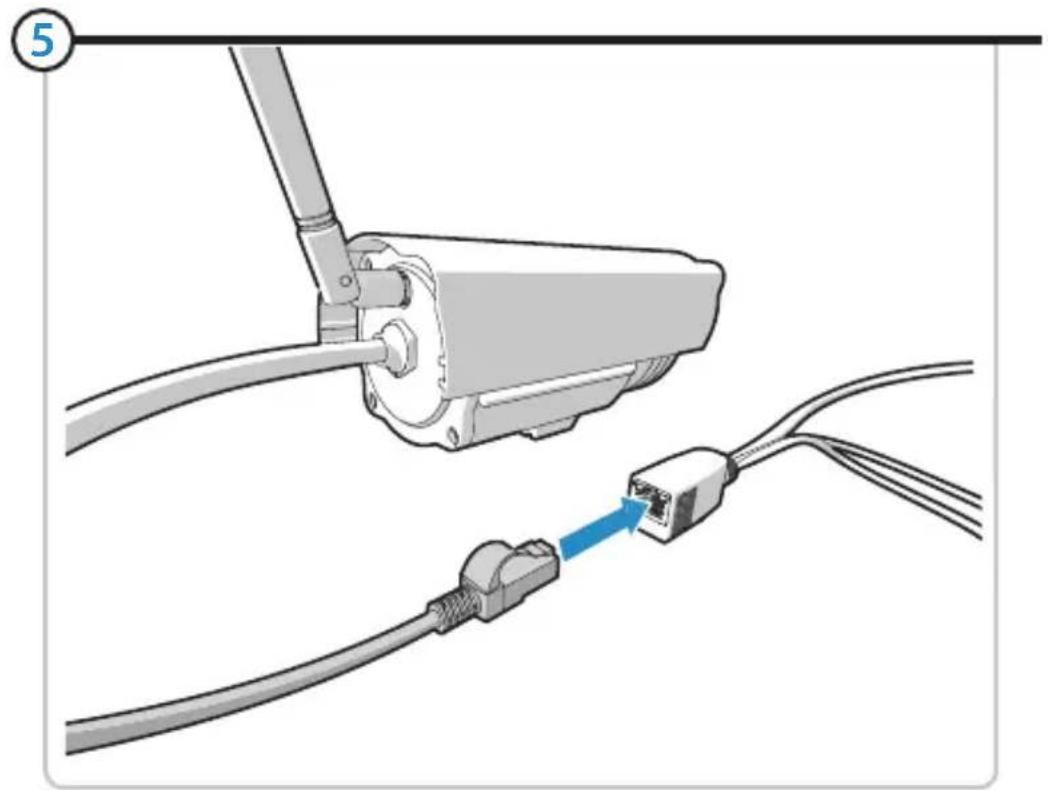
natural_image
Diagram showing connection between a mechanical device and a USB cable with a blue arrow indicating the cable's connector (no text or symbols present)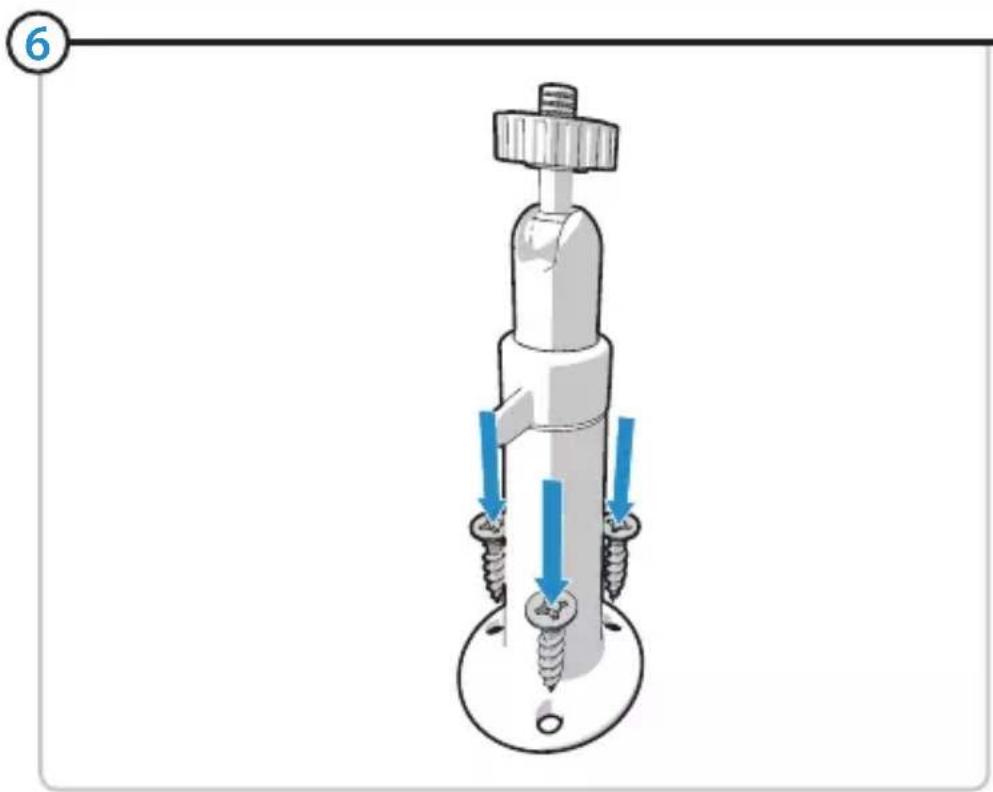
text_image
6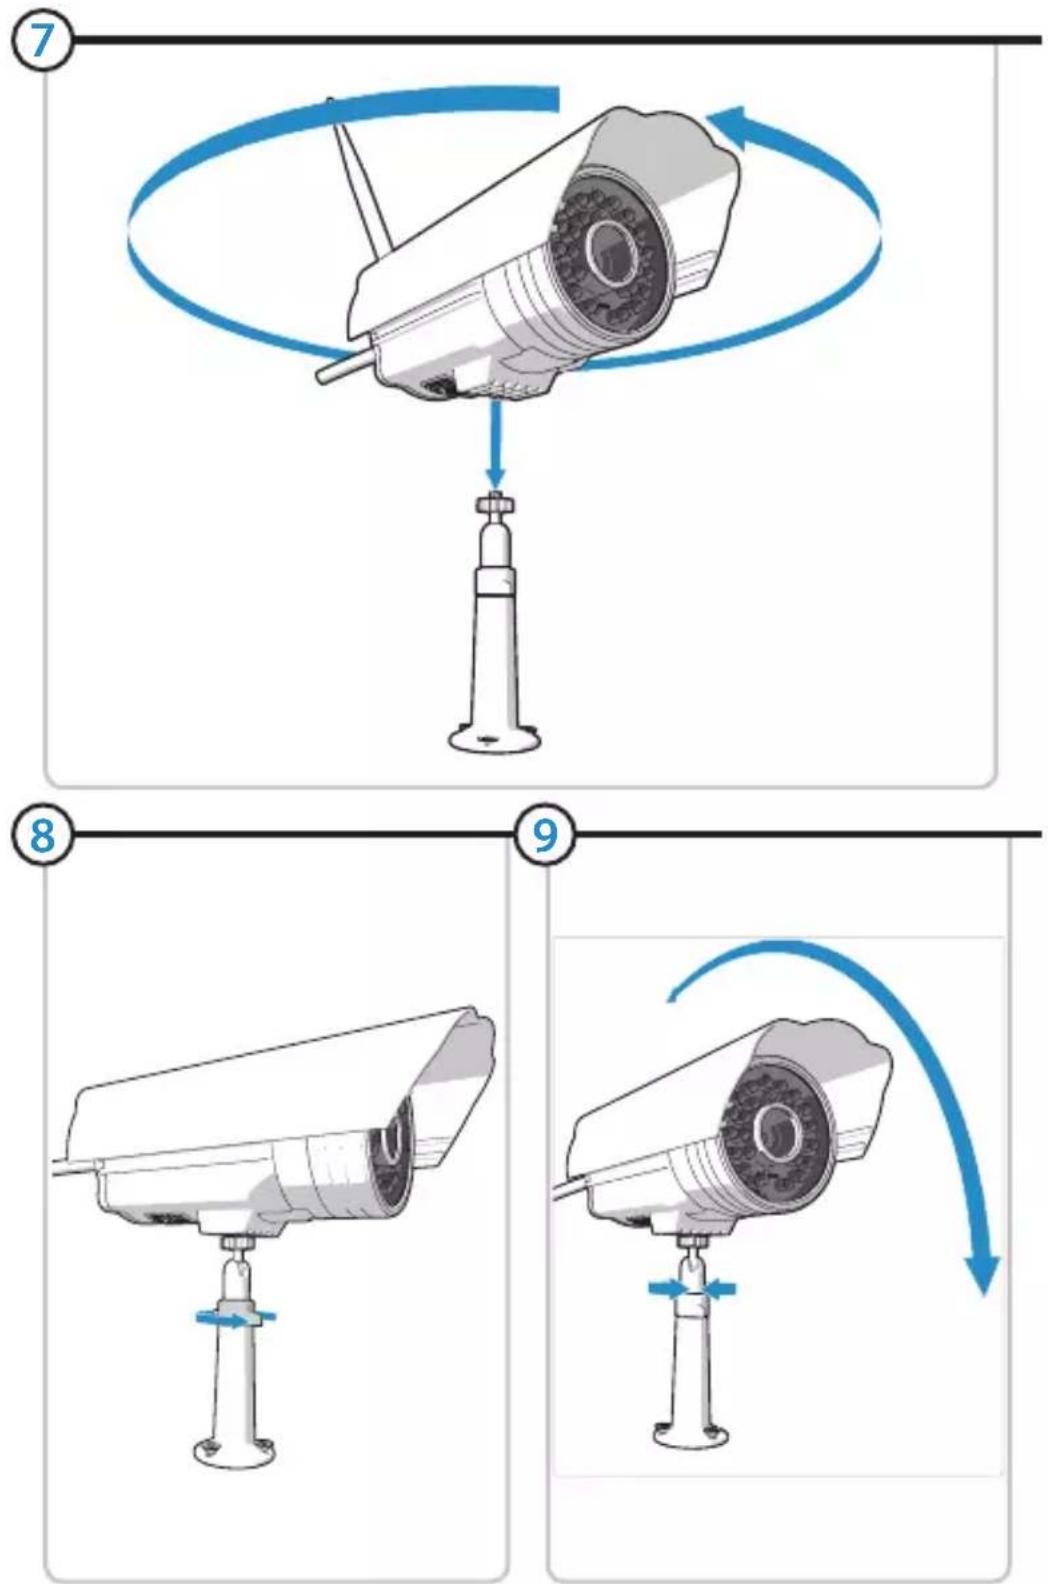
flowchart
graph TD
    A["Sensor Input"] --> B{Rotation}
    B --> C["Output"]

text_image
Anonymous Http://192.168.2.104
text_image
Language: English ActiveX Mode (For IE Browser) Sign in Download ActiveX Server Push Mode (For Safari, FireFox, Google Browser) Sign in VLC mode (for IE, Safari, FireFox, Google, Opera browser) Sign in Sign in mobile phone attention case sensitive propose using 1024 * 768 screen resolution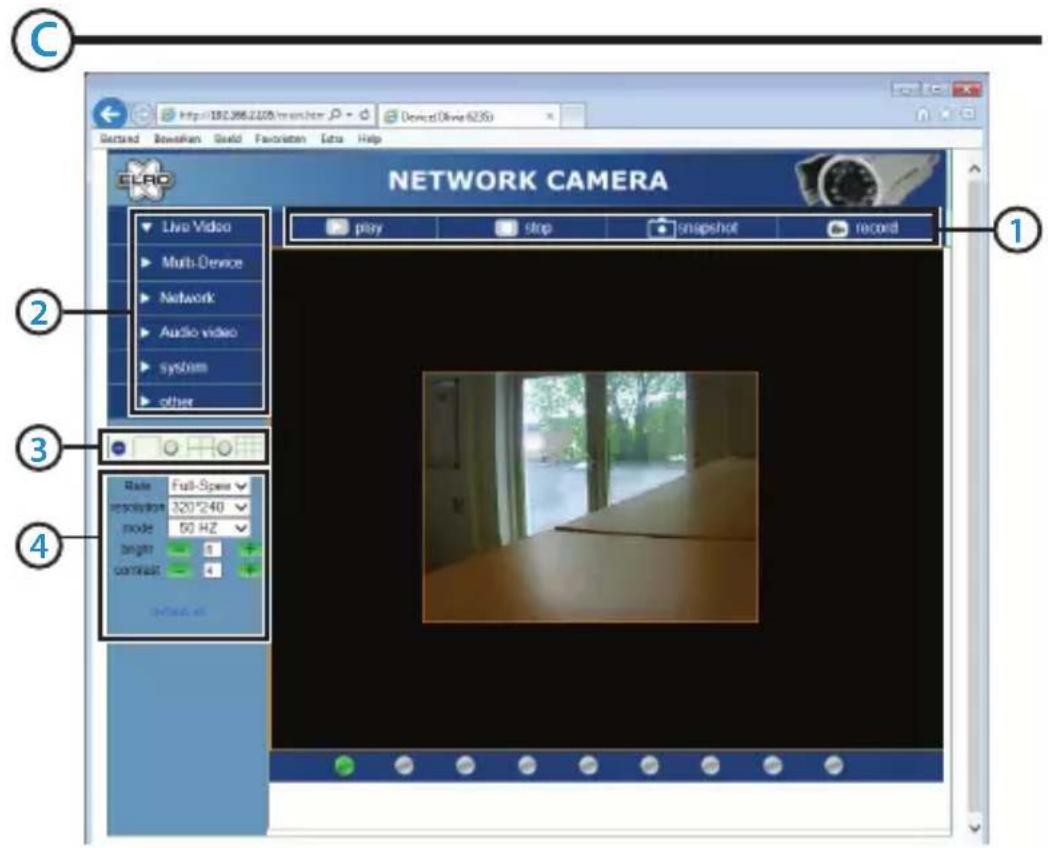
text_image
C http://182.366.2209/mosn.html - D:\Device\Device 6250 Gesetred Bowelkan Sisid Fanciaticn Extra Help NETWORK CAMERA Live Video Multi-Device Network Audio video system other play stop snapshot record ① ② ③ ④ Make Full-Space resolution 320*240 mode 60 Hz height 0 contrast 0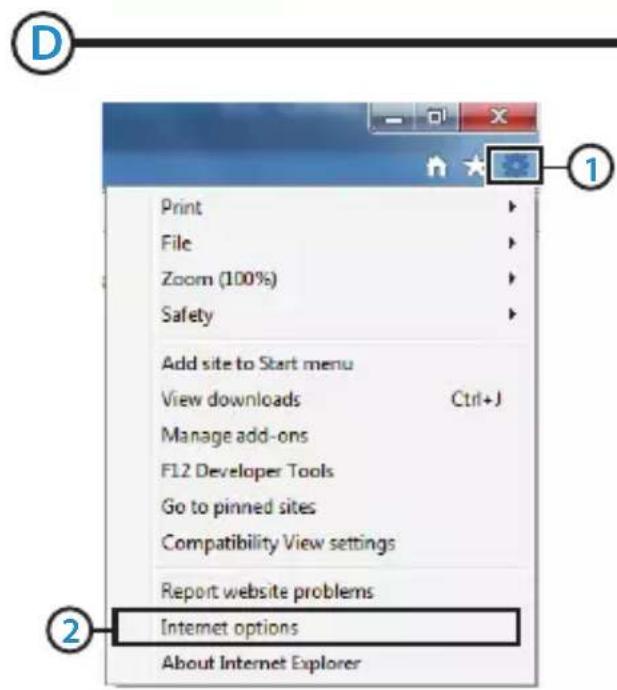
text_image
D Print File Zoom (100%) Safety Add site to Start menu View downloads Ctrl+J Manage add-ons F12 Developer Tools Go to pinned sites Compatibility View settings Report website problems Internet options About Internet ExplorerE
text_image
Internet Options General Security Privacy Content Connections Programs Advanced Select a zone to view or change security settings. Internet Local intranet Trusted sites Internet This zone is for Internet websites, except those listed in trusted and restricted zones. Security level for this zone: Allowed levels for this zone: Medium to High Medium-high - Appropriate for most websites - Prompts before downloading potentially unsafe content - Unsigned ActiveX controls will not be downloaded Enable Protected Mode (requires restarting Internet Explorer) Custom level... Default level Reset all zones to default level OK Annularen TotpassenF
text_image
Security Settings - Internet Zone Settings Download unsigned ActiveX controls Disable (recommended) Enable (not secure) Prompt Initialize and script ActiveX controls not marked as safe for s Disable (recommended) Enable (not secure) Prompt Only allow approved domains to use ActiveX without prompt Disable Enable Run ActiveX controls and plug-ins Administrator approved Disable Enable Prompt *Takes effect after you restart your computer Reset custom settings Reset to: Medium-high (default) Reset... OK Cancel

text_image
Security Settings - Internet Zone Settings ActiveX controls and plug-ins Allow ActiveX Filtering Disable Enable Allow previously unused ActiveX controls to run without pron Disable Enable Allow Scriptlets Disable Enable Prompt Automatic prompting for ActiveX controls Disable Enable Binary and script behaviors Administrator approved *Takes effect after you restart your computer Reset custom settings Reset to: Medium-high (default) Reset... OK Cancel

text_image
ELPO Network Camera Live Video play stop snapshot record Multi Device Network Audio video system other Raw Full Space installation 320*240 mode 5.0 H2 target = 8 contrast = 8 Wireless Lan Settings Basic Network Settings Wireless Lan Settings ADSL Settings UPYP Settings CONS Service Settings POP Settings Scan ✓ SSLP Network Type: Infra Encryption: Share Key: Submit Refresh
text_image
NETWORK CAMERA Live Video play stop snapshot record Multi-Device Network Audio video system other Pack Settings Record Path Browse... Alarm Record Path Browse... Mail Service Settings Fly Service Settings Alarm Service Settings Path Settings Rate Full-Speed resolution 320*240 mode 50 Hz bright 1 contrast 4 stop record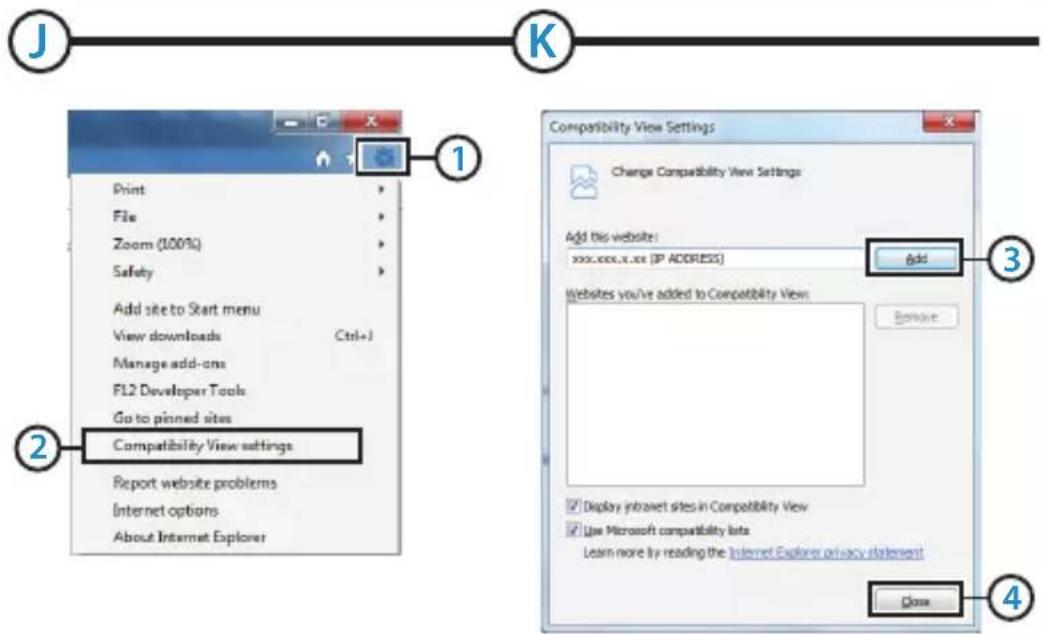
text_image
J K 1 Print File Zoom (100%) Safety Add site to Start menu View downloads Ctrl+1 Manage add-ons FL2 Developer Tools Go to pinned sites Compatibility View settings Report website problems Internet options About Internet Explorer 3 Add Remove 4 Change Compatibility View Settings Add this website: xxx.xxx.x.xx [IP ADDRESS] Add ✓ Display intravet sites in Compatibility View ✓ Use Microsoft compatibility lists Learn more by reading the Internet Explorer privacy statement Close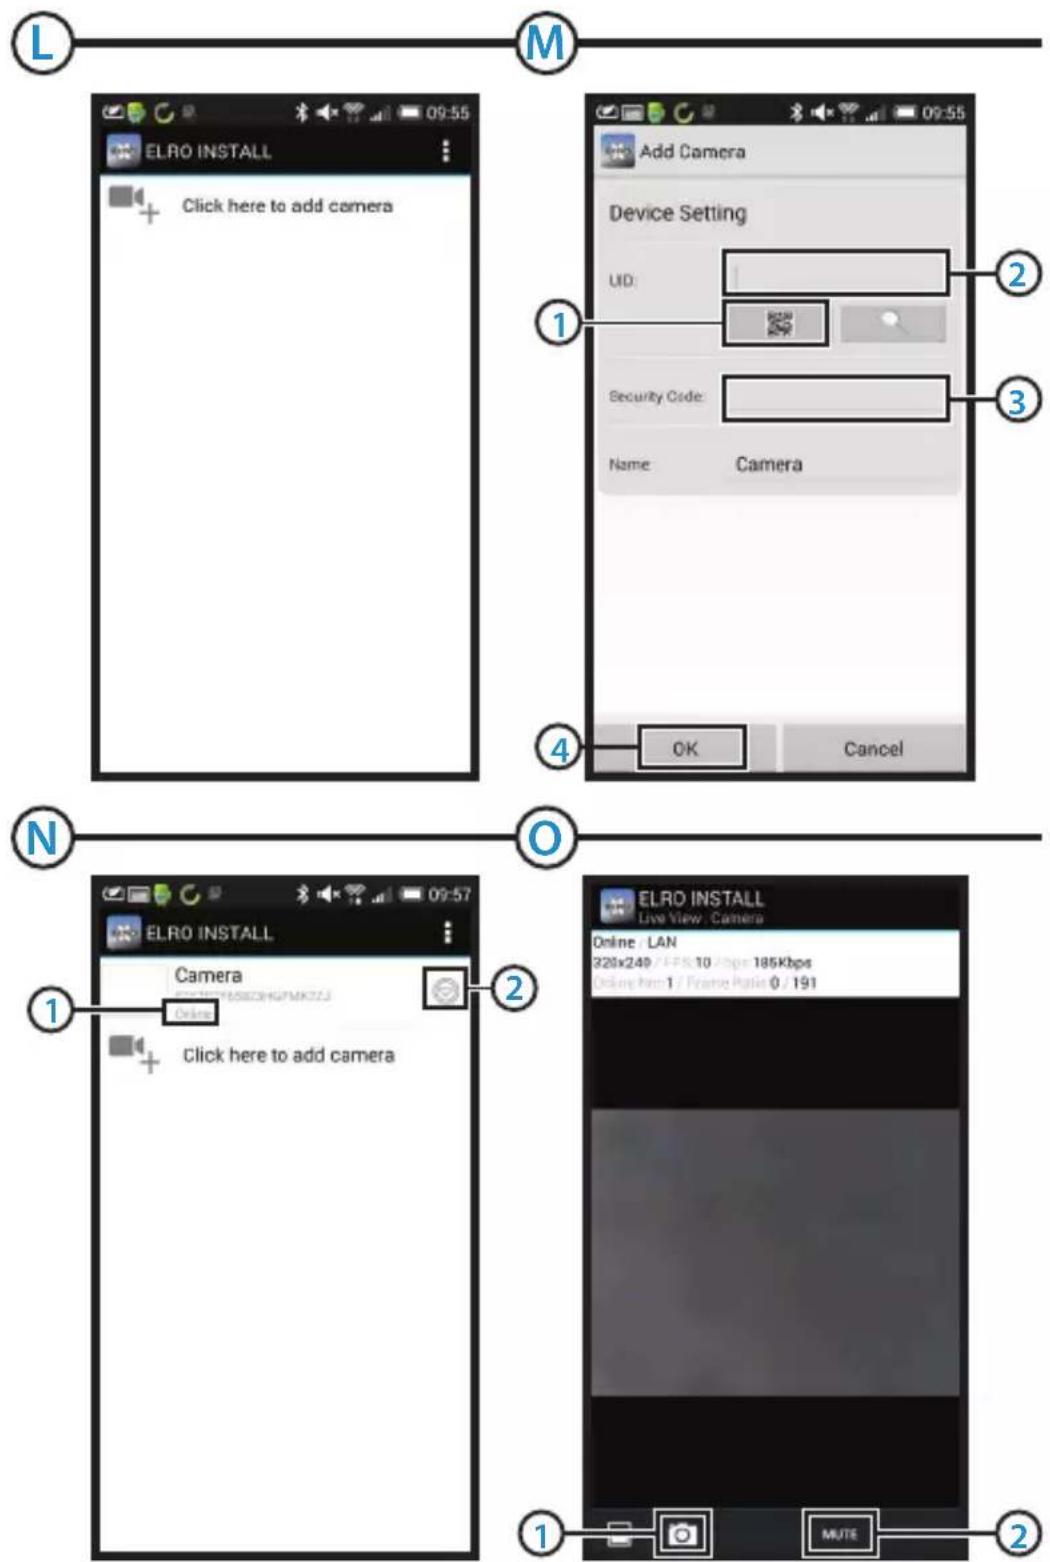
text_image
L M 1 Add Camera Device Setting UD: 2 3 Security Code: Name: Camera 4 OK Cancel N O 1 ELRO INSTALL Camera Online: LAN 220x249 / EFPX 10 /bps 185Kbps Online Item 1 / Frame Ratio 0 / 191 2 ELRO INSTALL Live View: Camera 1 MUTE 2
text_image
ELRO INSTALL Camera Click here to add camera Reconnect Edit Camera View Event View Snapshot Remove Camera
text_image
Edit Camera Device Setting UID: FTST9TF65823HGPMK Security Code: ****** Name: Camera Advanced Setting Advanced OK Cancel
text_image
Advanced Setting Security Code Setting Modify Security Code 1 Video Setting Video Quality Medium Video Flip Normal Environment Indoor(50hz) Mode Wi-Fi Setting SSID None Disconnect OK Cancel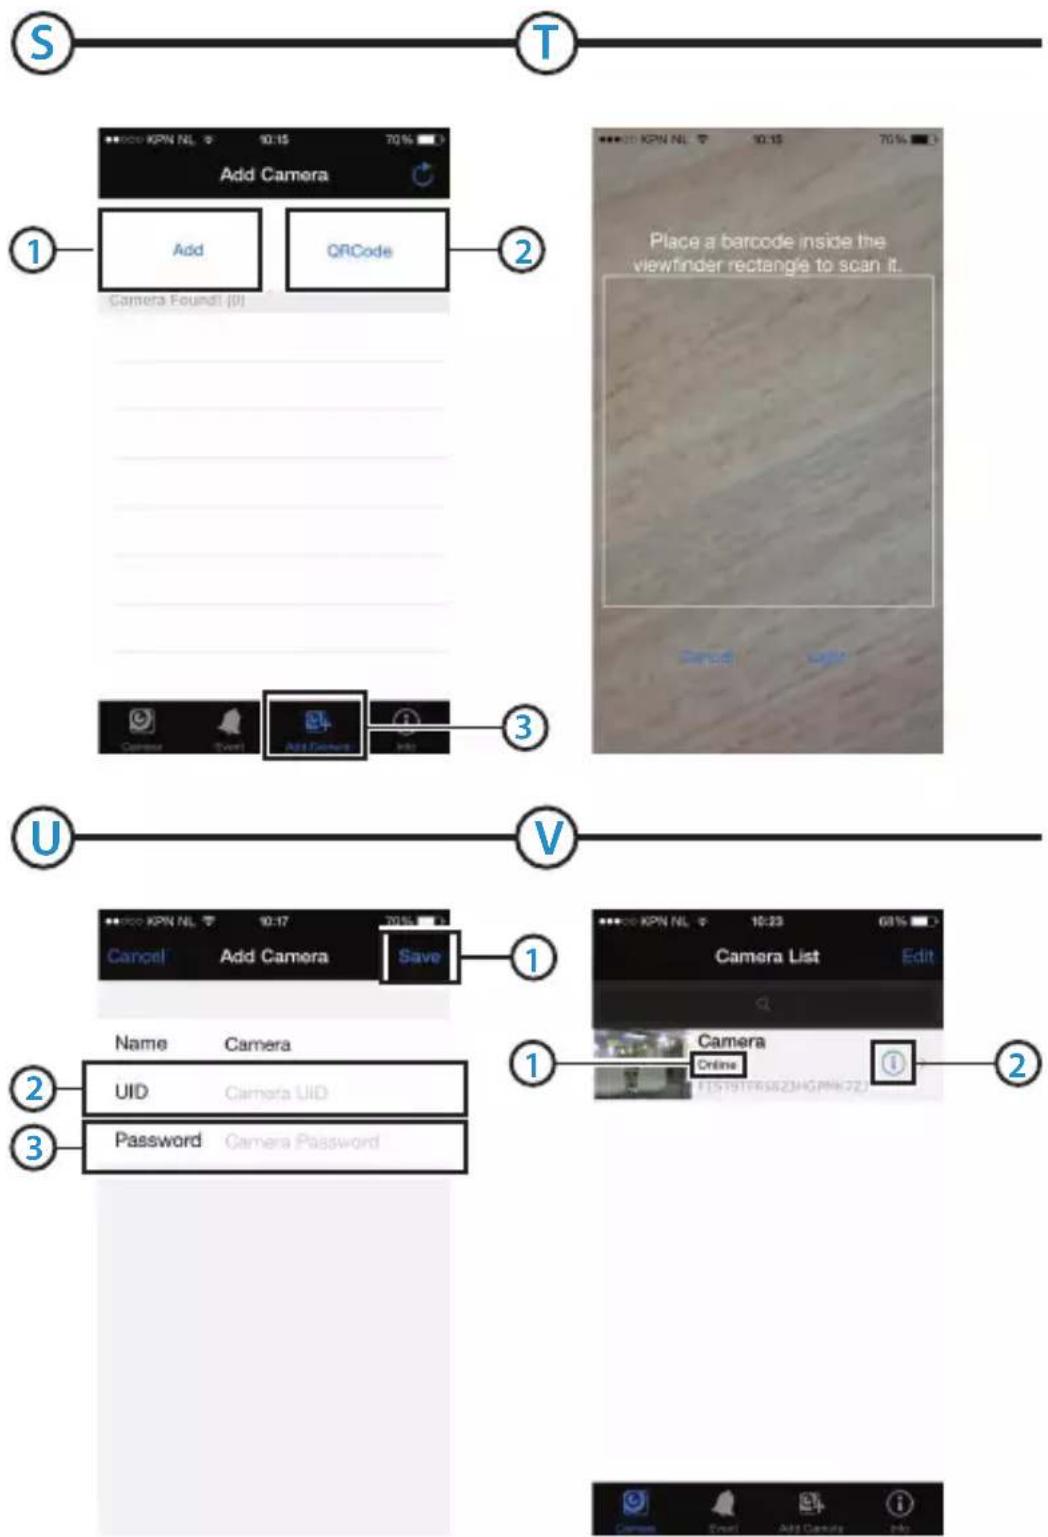
text_image
S T 1 Add Camera Add QRCode Camera Found! (0) Place a barcode inside the viewfinder rectangle to scan it. 3 U V 1 Cancel Add Camera Save 2 Name Camera UID Camera UID 3 Password Camera Password 1 Camera List Edit 2 Camera Online 3
text_image
••000 KPN NL 10.21 68% Camera Back Live View Online 640x480 Online Nm: 1 Quality:Good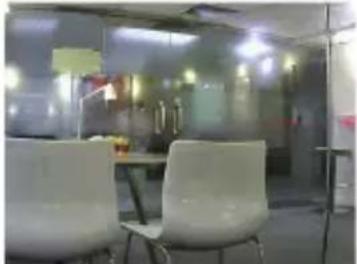
natural_image
Interior view of an office with two white chairs and a glass partition (no visible text or symbols)
text_image
KPN NL 10:25 67% Back Advanced Setting Security Code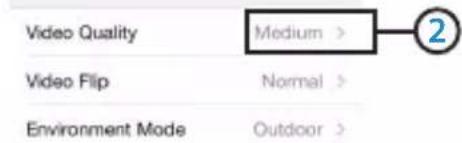
text_image
Video Quality Medium > Video Flip Normal > Environment Mode Outdoor >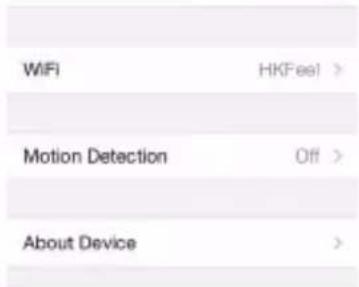
text_image
WiFi HKFeel > Motion Detection Off > About Device >
flowchart
graph LR
    Y --> Z
text_image
Back Video Quality Max High Medium Low Min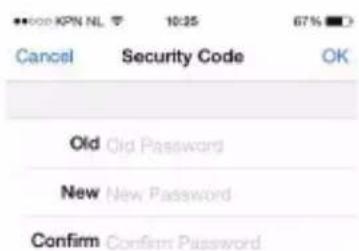
text_image
000KPN NL 10:25 67% Cancel Security Code OK Old Old Password New New Password Confirm Confirm PasswordC903IP.2manual
Thank you for your purchase of the C903IP.2 network camera. We recommend that you carefully read this manual before use in order to use your camera as quickly and easily as possible.
You can find the illustrations from this manual prior to this chapter.
| smartwares safety & lighting b.v. | NL : 0900-2088888 lokaal tarief |
| BE : 070-233031 lokaal tarief | |
| F : 0825 560 650 15ct/min | |
| Broekakkerweg 15 5126 BD Gilze The Netherlands | DE : +49 (0) 1805 01076214Ct./Min. dt. Festnetz,Mobil max. 42Ct./Min |
| UK : +44 (0) 845 230 1231 | |
| www.smartwares.eu | ES : +34 938427589 |

1. Preventive measures and safety instructions
1.1. Safety symbols used
Warning! A warning indicates the risk of (serious) damage to the user or the product if the user does not carry out the procedures with care.
⚠️ Please note! A comment makes the user aware of possible problems.
Tip: A tip makes the user aware of convenient functions and additional options.
1.1.1. Notifications
Warning! Do not install the product in any place that might be exposed to extreme heat or cold.
Warning! Before beginning assembly, check to make sure there are no electrical wires or water pipes running through the wall where you want to drill.
Warning! By removing the plug from the power outlet, you immediately cut off power to the product; then contact the Smartwares service desk when:
- the product's hardware components are open, drilled through, damp or have suff ered a hard fall;
• the adapter's power cable is frayed or open, so that the metal is showing;
• the adapter housing is damaged;
• the adapter has come in contact with moisture or liquid;
• the glass of the camera is cracked or broken;
Warning! It is not permitted to open the product yourself or to have it opened, neither is it permitted to repair the product yourself or to have it repaired. This will void the warranties. Please let any maintenance be carried out by certified maintenance personnel.
Warning! Only use original accessories from the manufacturer.
Warning! Keep the product out of reach of children.
Warning! Disconnect the device from all power sources before cleaning it.
Warning! Use a clean, dry cloth to clean the product.
Warning! Do not use any abrasive agents, corrosive cleaning products or any substances that contain bleach or solvents to clean the product.
Warning! Remove the adapter from the power outlet during storms, lightning and whenever the product will not be used for a longer period of time.
⚠️ Plesasnote! Install the product as indicated in this manual. If in doubt, consult a recognised technician and always take account of local installation codes and regulations.
⚠️Please note! The camera should be kept out of direct sunlight.
⚠️ Plesenote! Do not point the camera at bushes, tree branches or other moving objects.
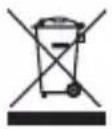
⚠️ Please note! The product must not be discarded as unsorted municipal waste, it must be disposed of separately.
⚠️Please note! Find out about the options in your region for disposing of the product after use. Do not throw away electrical appliances or components, but see whether the product (components) can be turned in, recycled or reused.
⚠️ Plesenote! Wireless systems can be affected by interference from wireless telephones, microwave ovens and other wireless devices that operate in the 2.4 GHz range. Keep the product at least 3 metres away from any possible sources of interference during installation and operation.
⚠️ Plesenote! The camera is not able to view through glass at night. Keep this in mind when positioning it.
2. Intended use
The C903IP.2 is a security camera that makes it possible to view surveillance images via a local network, an Internet connection or the Elro App "ELRO INSTALL" on your smartphone. The C903IP.2 can be connected either through an Ethernet cable or a Wi-Fi connection.
The camera is equipped with infrared LEDS and is able to make video and audio recordings both during the day and at night. The camera has also been fitted with motion detection and can be used both indoors and outdoors.
3. Technical specifications
3.1. General product specifications
Sensor: 1/4" Colour CMOS Sensor
Resolution: 640 x 480 pixels (300k pixels)
IR Lens: f: 6mm, F 2.0
Viewing angle: 60 degrees
Minimal brightness: 0.5Lux @ F2.0
Night vision range: 20 meters
Video compression: MJPEG
Images per second: 15fps(VGA), 30fps(QVGA)
Power source: 230VAC/5VDC/2A Adapter
Energy consumption: 5W (Max.)
Temperature: -10^ 55^ ( 14^ 131^ )
Minimal system requirements:
CPU: 2.0 GHZ or higher
Memory: 256 MB or higher
Video card: 64 MB or higher
Supported OS: Windows 98/ME/2000/XP/Vista/7/8
Supported browsers: IE6.0-10.0, Firefox, Safari, Google Chrome
Supported mobile OS: iOS 4.3 and higher / Android 2.1 and higher
Certification: CE, FCC, RoHS, R&TTE
Warranty: Limited 3-year warranty
3.2. Main component parts ①
- 3 assembly screws and plugs
- C903IP.2 camera
- Camera base
- Detachable antenna
- Software CD-ROM
- User's manual
- DC supply
- Ethernet cable
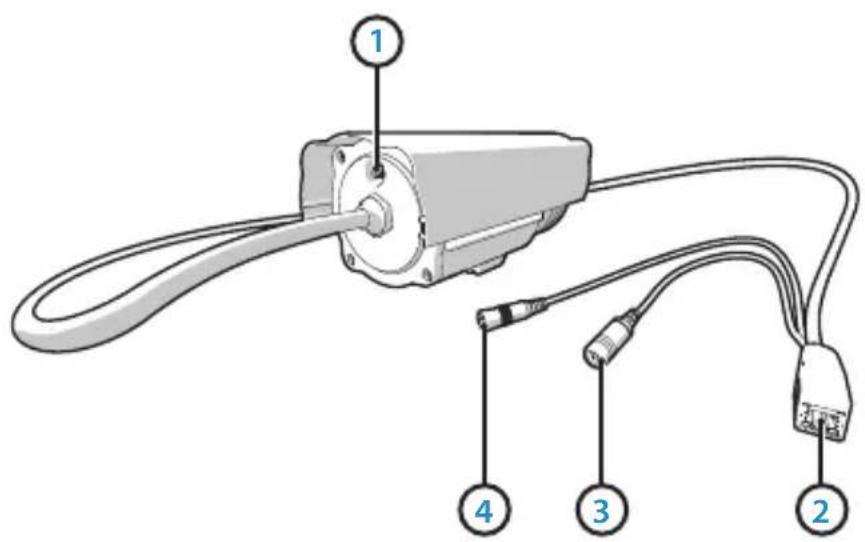
3.3. Connections ②
- Antenna port
- Ethernet port
- DC connection
- Reset button
4. Camera installation
4.1. Connecting the camera
- Screw the antenna into the antenna port 3.
- Connect the adapter cable to the DC connection of the camera ④. Then insert the adapter plug into the power outlet.
- Connect the included ethernet cable to the network port of the camera ⑤. Connect the other end of the ethernet cable to your router. The green LED on the ethernet port will light up when the camera is connected to the network.
You can now operate your IP Camera using your smartphone or PC. Go to section 4.2 for use with smartphone and go to section 4.3 for installation on your PC.
4.2. Settings for smartphone use
Attention! To use the "ELRO INSTALL" App, you need a smartphone with internet access.
Attention! To scan a QR code, you need an APP that can scan barcodes.
To set up your camera using Android, go to section 4.2.1. To set up your camera using iOS, go to section 4.2.2.
4.2.1. Android
- Download the App: "Elro Install" via Google Play and install it.
• Start the App. The start screen of the app appears. -
Press the "Click here to add camera" option. The "Add camera" menu appearsM
-
Press the "Scan" button.M1 Next, scan the QR code on the bottom of your camera. You can also choose to manually enter the code behind "UID".M2 You can find this code under the QR code on your IP camera.
• Next, enter the code: 000000 after "Security code" M3
• After "Name" enter the name you want to assign to the camera. - Then press the "OK" button. M4
Your camera has been added to your phone and will appear on the start screen of your App. On this you can see if the camera is connected (ONLINE) or if it is not connected (OFFLINE).
4.2.2. iOS
- Download the App "Elro Install" from the App Store and install it.
• Start the App. The start screen of the app appears. - Press "Add camera".S3 The "Add camera" menu appears. S
- Press the "QR code" button. S2 Next, scan the QR code at the bottom of your camera.
- You can also choose to manually enter the code of your camera. To do this, press the "Add" button. ^S1 Next, enter the code of your camera behind "UID". ^U2 You can find this code under the QR code on your IP camera.
- Next, enter the code behind "Password": 000000. U3
• After "Name" enter the name you want to assign to the camera. - Then press the "Save" button. U1
Your camera has now been added to your App and will appear on the home screen of your App. √ Here you can see if the camera is connected (Online) √ or not connected (Offline).
4.2.3. General
• For instructions on placing your camera go to section 4.6.
• For instructions on using your camera with the App go to chapter 5.
4.3. Install your camera on your PC
- Insert the included CD-ROM into your computer.
- Launch "IPCamSetup.exe" from the CD-ROM.
- Go through the installation by double clicking on "Next".
- Complete the installation by clicking on "Restart computer".
The IP camera tool is now installed on your computer. You will find the shortcut on your desktop.
⚠️ Plesasnote! Do not remove this shortcut! You will have to re-install the IP camera tool if you do.
4.4. Linking to your camera
⚠️ Plesenote! To be able to use the IP camera's full functionality, you have to use Internet Explorer 6 or higher (32 bit) and select ActiveX Mode. It is not possible to make video recordings in other web browsers.
⚠️ Please note! If you opt for the ActiveX mode there is a possibility that you will not have any picture yet. If this is the case, perform the following steps:
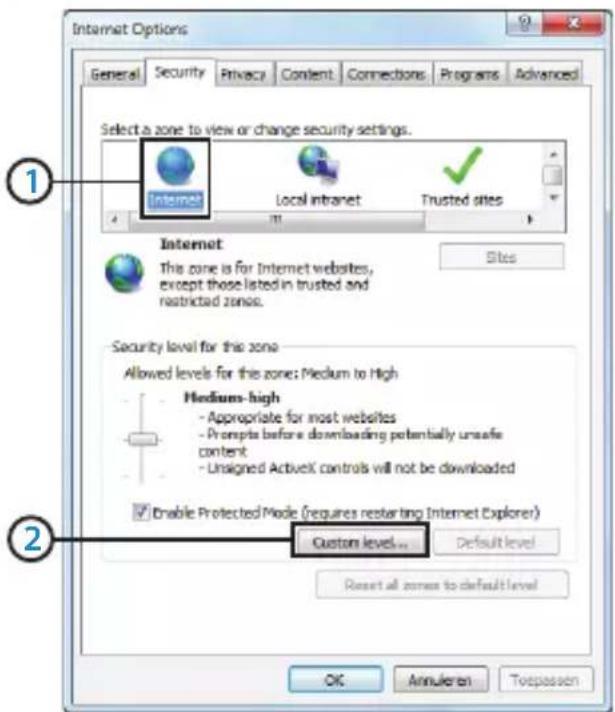
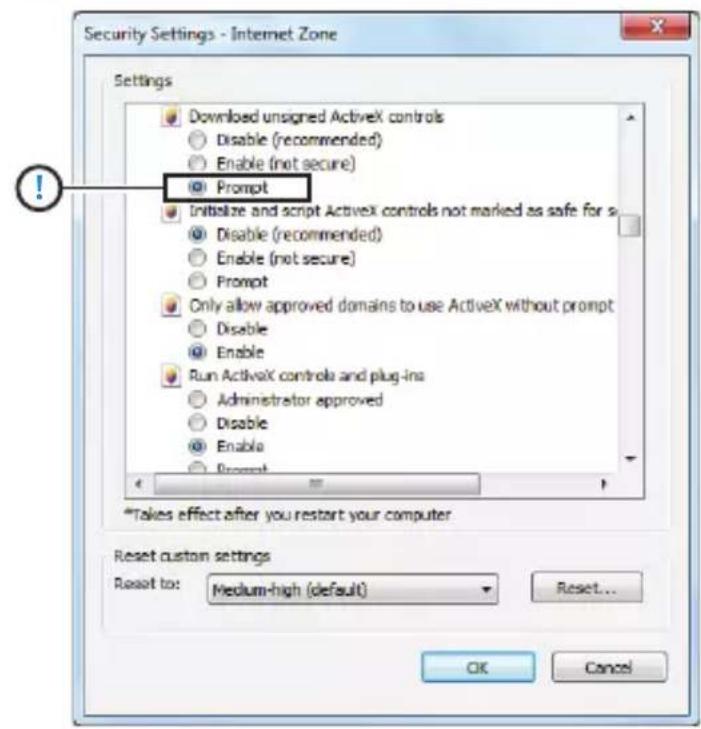
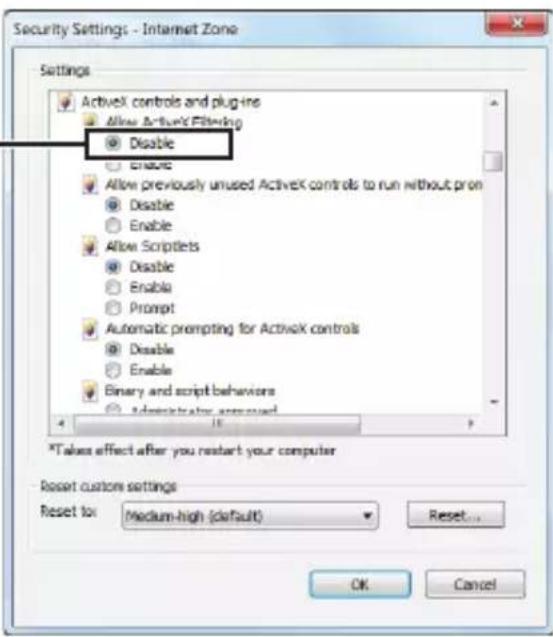
- In Internet Explorer, go to: Tools-> Internet options-> Security settings ->Custom level
- Change the deactivated options to "Questions" under the ActiveX control elements and insertion applications. If the "Questions" option is not available, tick "Activate". See also: E F G
Tip: if you wish to use a different web browser than the standard browser, copy the link from the open browser to a browser of your choice.
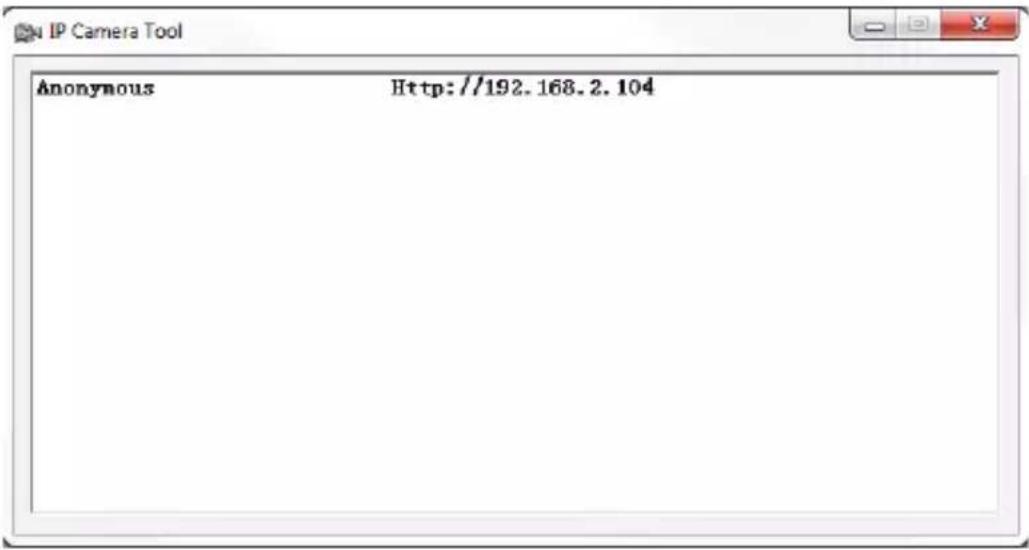
- Start the IP Camera Tool via the "IP camera tool" shortcut on your desktop. The IP camera tool automatically searches for the IP camera(s) connected to your network.
A window opens Ⓐ. This window displays all your IP cameras. If no cameras are connected, the window will remain empty.
- Double click on the camera you want to use. In your standard web browser, an identification window will open up asking for your user name. - For the user name, enter "admin" and click on "sign in". You do not need to enter a password.
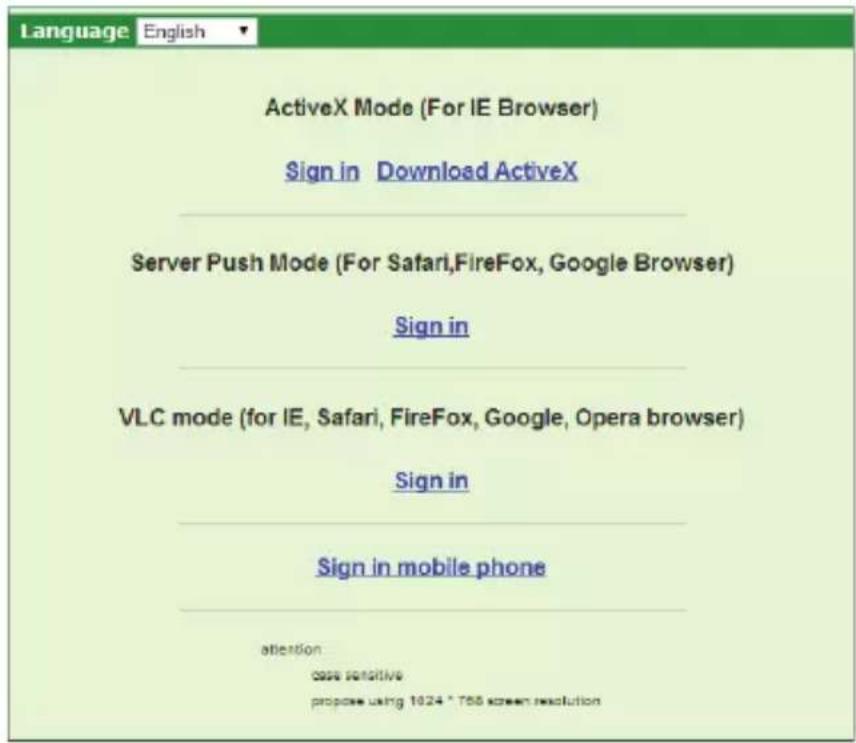
A menu will open Ⓑ. You can choose from the following options:
ActiveX Mode: Internet Explorer
Server Push Mode: Safari, Firefox and Google Chrome
VLC Mode: Internet Explorer, Safari, Firefox, Google Chrome and
Opera
⚠️Please note! You have to download the VLC player for VLC Mode.
Sign in mobile phone: Access with a mobile browser
- Click on "Sign In" under the option that applies to your web browser.
You are now logged in to the Network Camera browser screen ©. You can manage your camera and camera settings via this screen. (see chapter 6)
4.5. Linking to your camera wirelessly
⚠️Please note! In order to set up a wireless connection, your camera must be linked to your network via the included ethernet cable during set-up.
!Plesenote! You need a wireless router in order to establish a wireless connection with your camera.
⚠️Please note! If your router is password protected, you will need to know the password.
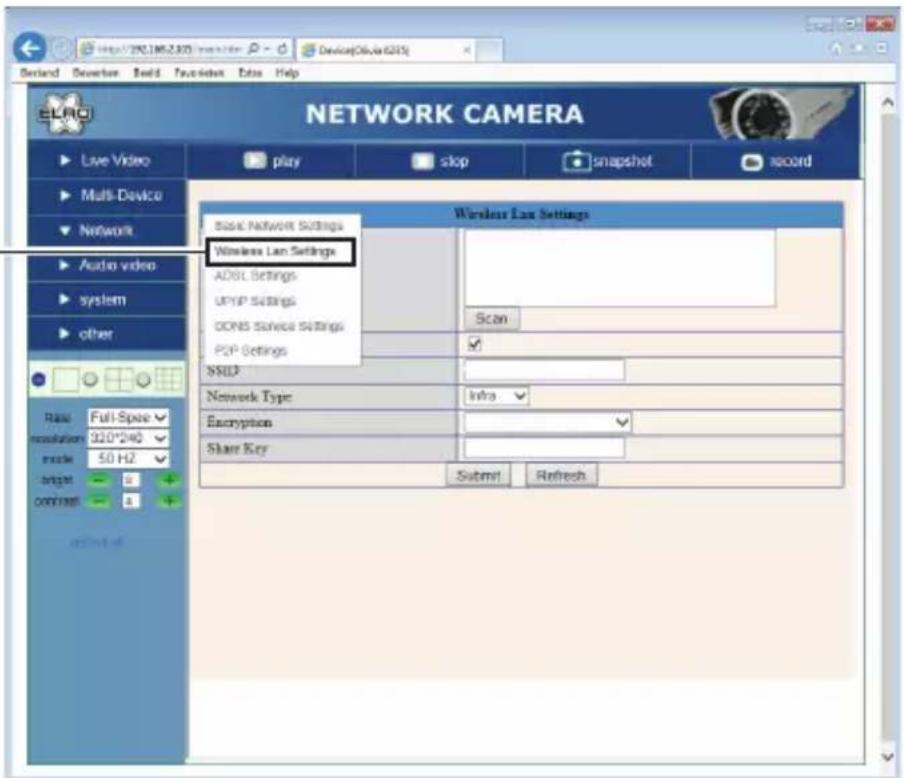
- In the Network Camera browser screen Ⓒ click on the "Network" tab. A list of settings will appear Ⓗ
- Select the Wireless Lan Settings: the Wireless Lan Settings screen will appear.
- Double-click on "scan" in the Wireless Lan Settings screen. A list of available wireless networks will appear.
- Click on your wireless network.
- If you do not require a password for your wireless network, just click on 'submit' after this.
- If your wireless network does require a password, you will need to enter your password after "Share Key" or "key1", depending on the encryption.
- Click on 'submit' after this.
The camera restarts automatically when you click 'submit'. This takes approximately 30 seconds.
- Close your browser and camera tool after the computer has restarted.
- Remove the network cable from the camera.
- Open the IP camera tool and click on your camera's address. You can now operate your camera wirelessly.
- If your camera is not in the camera tool window, right click on the tool window, then press the "refresh camera list" option.
4.6. Camera installation
⚠️ Plesasnote! Make sure that the camera functions properly in the chosen location before starting installation.
- Screw in the base of the camera with the aid of the 3 included screws ⑥.
⚠️ Plesenote! If the surface is too hard for the screws (stone/concrete), you will need to drill holes and use the screw plugs which are included.
- Screw the camera onto the base.⑦.
4.7. Adjusting the camera angle
- Untighten the button at the top of the base.⑧
- Then adjust the camera angle and tighten the knob again ⑨.
5. Managing your camera using your smartphone
Make sure your camera(s) is/are connected to your smartphone via the ELRO INSTALL App (see section 4.1 and 4.2).
5.1. You can view your camera image on your Android smartphone
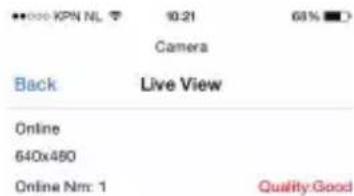
- On the initial screen of the App press the camera you want to manage. N The camera picture appears on your smartphone. O
- Swipe your finger across the screen to zoom in and out and to move the camera image.
Attention! If you do not have a picture it is possible that your wireless connection is not fast enough. In that case change the resolution of your camera image (see section 5.1.1)
The camera screen provides a number of options:
- Press the "Snapshot" button ^01 to make a snapshot of your camera image.
- Press the "mute/listen/speak" button ^02 to adjust your sound settings.
5.1.1. Changing the settings of your camera on your Android smartphone
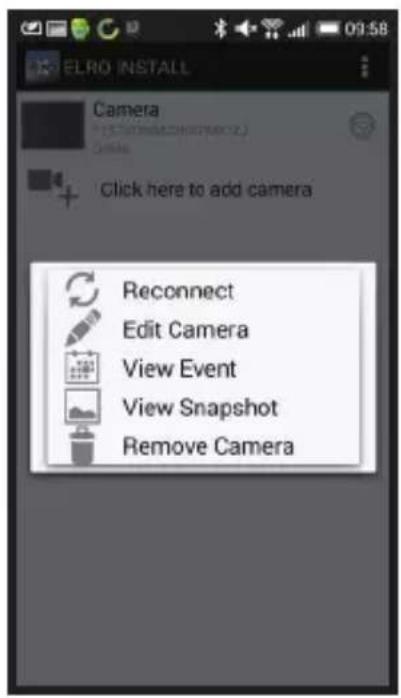
- On the start screen of your App press the arrow button next to the camera you want to manage. N2 A menu with options opens. P
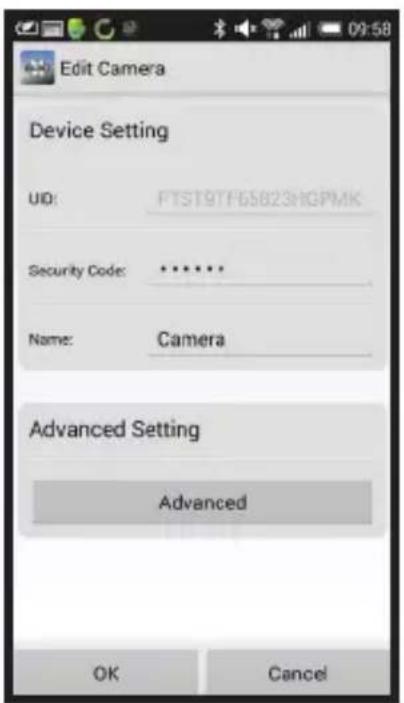
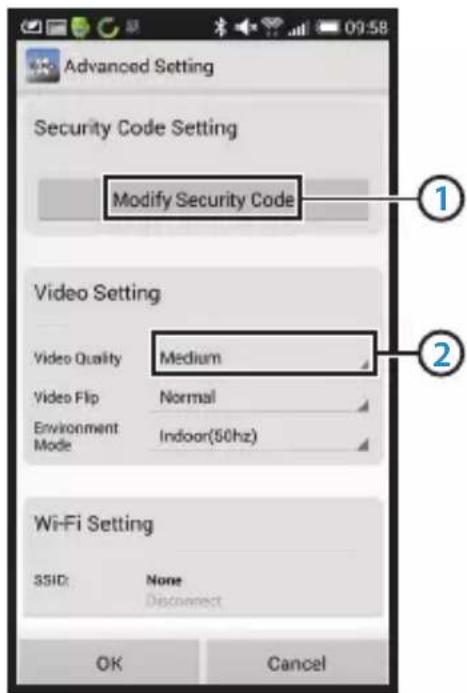
- Press the "Edit camera" button and then the "Advanced settings" button. The "Advanced settings" window opens. In the "Advanced settings" window you can change a number of properties of the camera.
The main functions are described below:
Modify security code R1: Adjust the code of your camera. The default code is: 000000.
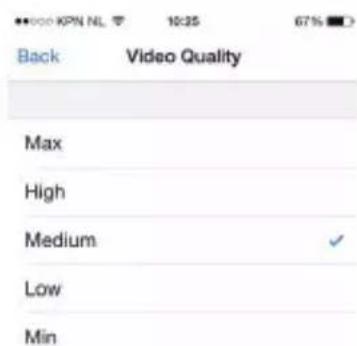
Video Quality R2: Adjust the resolution of your camera. If you have a slow wireless connection, change this setting to a lower setting.
5.2. Viewing your camera image on your iPhone
- On the initial screen of the App press the camera you want to manage. V The camera picture appears on your smartphone. W
- Swipe your finger across the screen to zoom in and out and to move the camera image. ⚠ Attention! If you do not have a picture it is possible that your wireless connection is not fast enough. In that case change the resolution of your camera image (see section 5.2.1)
The camera screen provides a number of options:
- Press the "Snapshot" button ^WT to make a snapshot of your camera image.
- Press the "mute/listen/speak" button ^W2 to adjust your sound settings.
5.2.1. Changing the settings of your camera on your iPhone
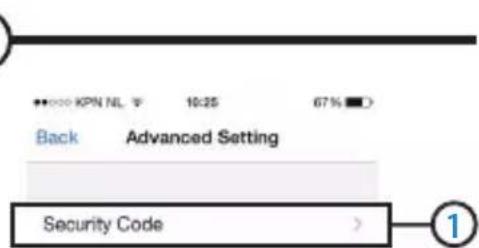
- On the start screen of your App press the arrow button next to the camera you want to manage. ^V2 A menu with options opens. ✗
In the "Advanced settings" window you can change a number of properties of the camera.
The main functions are described below:
Security code ^X1 : Adjust the code of your camera here. The default code is: 000000.
Video Quality ^X2 : Adjust the resolution of your camera. If you have a slow wireless connection, change this setting to a lower setting.
6. Managing your camera using your PC ©
To be able to manage your camera from your PC, you need to be logged in to the "Network Camera" browser screen, with the aid of your web browser (see section 4.4). This screen contains the camera's control panel C1 a number of tabs C2, a channel overview C3 and a settings menu for the camera C4.
6.1. Camera control panel ^①
You can use the control panel when you have selected the "live video" tab. This control panel provides the following options:
Play: Press "Play" to view your camera images live.
Stop: Press "Stop" to stop the live streaming of your camera images.
Record: Press "Record" to make a recording. Press record again to stop recording.
⚠️ Plesasnote! To be able to make recordings, you have to indicate where to save the recordings in the "Other" tab. This is explained in section 6.2.3.
Audio: Click on "Audio" to activate the sound. Click on audio again to turn the sound off.
6.2. Tabs
The tabs offer many different options for managing your camera(s). This manual covers the most important functions. If you would like to know more about specific settings, we advise you to consult the manual on the CD-ROM.
6.2.1. Live video
Click on the live video tab to view images from the set camera.
6.2.2. Network
Wireless Lan settings: This lets you set the wireless access to your camera. You can find more information in section 4.5 H.
DDNS Service settings: This lets you make your camera accessible via the Internet. Consult the manual on the CD-ROM for more information about this.
6.2.3. Other
⚠️ Please note! Before you can save recordings in Windows 7, 8 or Vista, you need to make the following security setting changes in Internet Explorer. While changing these settings, make sure that the Network Camera screen is open in Internet Explorer.
- Go to: Tools -> Internet Options -> Security-> Trusted Sites Ⓙ -> Sites Ⓗ
- On the screen, turn off the Server Verification option (https:). Then click "Add".
- Restart Internet Explorer.
Path settings: Under the "Path settings" option, select where you want to save the recordings that your camera makes ⓘ.
6.3. The camera's channel overview C3
With the channel overview you have the option to view images from multiple connected cameras simultaneously.
6.4. Camera menu settings C4
You can adjust the camera's image settings using this menu: resolution, image speed, clarity and contrast.
7. Cleaning and maintenance
Warning! Disconnect the device from all power sources before cleaning it.
The devices are maintenance-free, so do not open them. Opening the device will void the warranty. Only clean the outside of the devices with a soft, dry cloth or brush
8. Environment and disposal
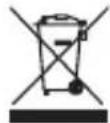
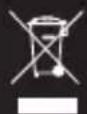
The symbol on the material, accessories or packaging indicates that this product may not be discarded as household waste. Dispose of the equipment through a recycling centre that handles electronics and electrical appliances within the EU and in other European countries which use separate collection systems for used electronics and electrical appliances. By disposing of the equipment in the proper way, you will be helping to prevent possible risks to the environment and public health, which might otherwise be caused by improper handling of the discarded equipment. Recycling of materials contributes to the conservation of natural resources. Therefore, please do not dispose of your old electronics and electrical appliances via household waste.
9. Warranty
A limited 3 year warranty applies to this device. To view the warranty terms please go to: www.smartwares.eu.
CE, FCC, RoHS, R&TTE
Garantie:
IR Lens: f: 6mm, F 2.0
Kijkhoek: 60 Graden
Minimale lichtsterkte: 0.5Lux @ F2.0
ActiveX Mode: Internet Explorer
Server Push Mode: Safari, Firefox en Google Chrome
VLC Mode: Internet Explorer, Safari, Firefox, Google Chrome en
Opera
⚠ Letop! Voor de VLC Mode dient u de VLC player te downloaden.
Mémoire: minimum 256 MB
Certifications: CE, FCC, RoHS, R&TTE
ActiveX Mode: Internet Explorer
Server Push Mode: Safari, Firefox a Google Chrome
VLC Mode: Internet Explorer, Safari, Firefox, Google Chrome a Opera
Certificare: CE, FCC, RoHS, R&TTE
ActiveX Mode: Internet Explorer
Server Push Mode: Safari, Firefox i Google Chrome
VLC Mode: Internet Explorer, Safari, Firefox, Google Chrome i Opera
⚠ Napomena! Preuzmite VLC player za VLC Mode.
ActiveX Mode: Internet Explorer
Server Push Mode: Safari, Firefox e Google Chrome
EC DECLARATION OF CONFORMITY
GB Smartwares hereby declares that the device complies with the essential requirements and other relevant provisions of Directive 1999/5/EC. Go to www.elro.eu for the declaration of conformity or scan the QR code.
Authorized representative: Mr. Ad Netten
Quality Manager
Date: 01.02.2013
QR code

natural_image
Pure geometric lines and symbols without any text, numbers, or labels
natural_image
Blank white image with two small black crosshair markers in the bottom-left corner (no text or symbols)
bar
| Category | Value | | -------- | ----- | | Bar | 130 |


CE
R&TTE APPROVED
C903IP.2 - 2,4 GHz.
3 YEAR
| smartwares safety & lighting b.v. | NL : 0900-2088888 lokaal tarief |
| BE : 070-233031 lokaal tarief | |
| F : 0825 560 650 | |
| Broekakkerweg 15 5126 BD Gilze The Netherlands | DE : +49 (0) 1805 010762 14Ct./Min. dt. Festnetz, Mobil max. 42Ct./Min |
| UK : +44 (0) 845 230 1231 | |
| www.smartwares.eu | ES : +34 938427589 |
text_image
QR code image containing encoded data, no visible human-readable textScan this code
with your
smartphone
for more
information