AR370 - Fireplace ARDES - Free user manual and instructions
Find the device manual for free AR370 ARDES in PDF.
User questions about AR370 ARDES
0 question about this device. Answer the ones you know or ask your own.
Ask a new question about this device
Download the instructions for your Fireplace in PDF format for free! Find your manual AR370 - ARDES and take your electronic device back in hand. On this page are published all the documents necessary for the use of your device. AR370 by ARDES.
USER MANUAL AR370 ARDES
2006/95/EC e 2004/108/EC.
ATTENTION : read this booklet carefully it contains important instructions for a safe installation, use and maintenance. Important instructions to be kept for future reference.
Keep handy the guarantee, receipt of payment and these instructions for future use and reference.
After removing the packaging, check the appliance for any signs of damage.
In case of visible damage, do not use it and contact a qualified technician. Do not leave parts of the packaging with in the reach of children. This appliance is not a children's toy: it is an electrical device and must be treated with the necessary caution.
Before connecting the appliance, make sure that the power supply voltage matches the indication on the data plate.
If the plug and socket are not compatible, the socket has to be replaced with a suitable type by skilled persons.
Do not use adapters or extension cables which do not meet current safety standards or that exceed the current carrying capacity limits.
When you don't use the appliance disconnect it from the power supply and assure that the interruptor is off.
Do not tug on the power cable or on the appliance itself to remove the plug from the socket.
The use of any electrical appliance requires that a number of basic rules are observed, namely:
-
Never touch the appliance with wet or humid hands.
-
This appliance should not be used by people (including children) with limited physical, sensory or mental capacities or anyone who lacks experience and knowledge, unless they are supervised or have been instructed on how to use the appliance by someone who is responsible for their safety. Children should not be allowed to play with appliance.
-
Do not leave the appliance exposed to weathering (rain, sunlight).
-
Do not subject it to rough handling.
In case of a breakdown or malfunctioning of the appliance, disconnect it at once.
Do not attempt to repair it, but take it to a service centre approved by the manufacturer.
If you decide you do not want to use this appliance any longer, disable it by cutting the power cable - of course, after disconnecting it from the socket.
The power cable should be extended to its full lenght to avoid over heating.
If the power cable gets damaged, it has to be replaced only at a service centre approved by the manufacturer.
For safety reasons, the appliance should never be opened.
The appliance has been designed and manufactured to operate in the home. Any other use is considered inappropriate and dangerous.
Do not insert objects through the safety grill or the air inlets.
The appliance must be installed in a fixed position (see assembly instructions) so that the user inside the bath or shower cannot touch it.
Do not place the appliance directly under an electrical socket.
Do not use the heater close to sinks, bathtubs, showers and swimming-pools.
Do not use the heater in presence of flammable substances (petrol,paints, etc.).
Do not place the cord near sources of heat.
In order to avoid a hazard due to inadvertent resetting of the thermal cutout, this appliance must not be supplied through an external switching device, such as a timer, or connected to a circuit that is regularly switched on and off by the utility.
WARNING: DO NOT COVER THIS PRODUCT NEAR CURTAINS OROTHER COMBUSTIBLE MATERIAL.
WARNING: DO NOT COVER THE APPLIANCE OR OBSTRUCT THE AIR INLETS TO AVOID OVERHEATING.
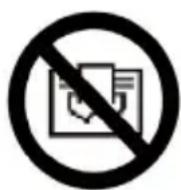
DO NOT COVER
Technical informations
GB
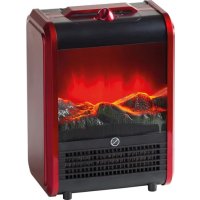
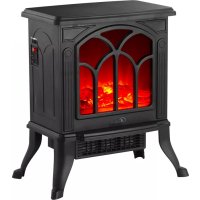
1 - Ventilation grid.
2 - Function switch.
3 - Control panel.
4 - Side handles.

Picture at pag.2
This product has been manufactured in conformity to current 2006/95/
EC and 2004/108/EC
Technical data indicated on the appliance.
Instructions for use
GB
WALL INSTALLATION.
Kit provided:
-steelbracket 580× 80mm
-
8 screws 40 × 4 ~mm
-
8 wall plugs
The appliance must be positioned so that the air emission grid situated at the top is completely free and away from the ceiling, shelves or any other obstacle.
Drill holes in the wall, insert the plastic plugs and fix the steel bracket (A) using the relevant screws provided and consulting the layout.
The screws must be screwed into the relevant slots under and above the bracket hooks positioned approximately in the centre of the slot. Screw in fully.
After mounting the bracket to the wall, make sure that it is well fixed to hold the weight of the appliance and prevent falling and damage.
Hook the appliance by matching the slots at the back of the appliance with the bracket hooks.
Handle the appliance with care.

OPERATING INSTRUCTIONS.
Before connecting and disconnecting the appliance, make sure that the function switch is in the OFF position.
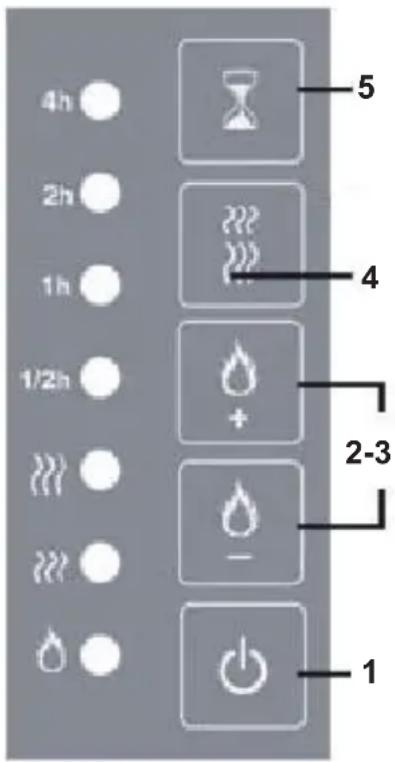
To switch on the appliance, insert the plug in the power socket. Move the switch to ON and then select the ON-OFF switch (1) on the control panel situated at the back left of the appliance.
Use the control panel to:
-
Adjust the luminous intensity of the ardent block by pressing keys + o - (2-3).
-
adjust the power by pressing key 4.
On the first pulse the appliance operates on half power; by pressing the key in sequence, it cyclically operates as follows: maximum power - off - half power - maximum etc
During functioning on half power one warning light switches on, whilst on maximum power both warning lights switch on.
- set the TIMER by pressing key 5:
With each pulse the led corresponding to the selected time switches on.
The timer can be programmed from a minimum of half an hour to a maximum of 7.5 hours.
Example: if the 1/2h, 1h and 2h warning lights are switched on, the timer is programmed until the appliance switches off after 3 h and 1/2h.
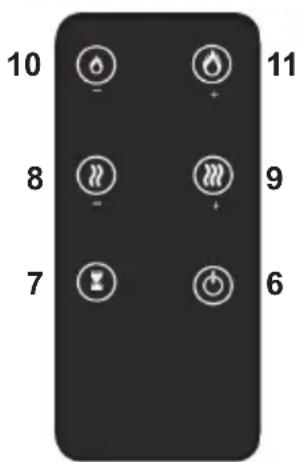
OPERATING WITH REMOTE CONTROL
The equipment can be made to function by using the remote control provided.
The functions available on the remote control are switch on and switch off with ON-OFF key (6), TIMER programmer (key 7), power selection (keys 8 and 9) and the adjustment of the luminous intensity (keys 10 and 11).
Maintenance
GB
Disconnect the plug from the socket and let the appliance cool down well before cleaning it.
This appliance does not require any special maintenance.
In order to clean the appliance, use a soft or slight damp cloth.
Never use abrasives or chemical solvents.
Do not use very wet substances, liquids or cloths to prevent water from entering into the appliance and irreparably damaging it.
NEVER IMMERSE THE APPLIANCE INTO THE WATER.
Replacing the lamp that produces the flame effect must only be carried out by an authorised after sales centre.
Battery Replacement.
In order to remove the cover of the battery seat, replace the battery with another one featuring the same specifications, and replace the cap correctly.
If you do not intend to use the appliance for an extended period of time, remove the batteries. If the batteries are leaking, be careful not to touch the acid which has leaked out.
If you come into contact with the acid, wash your hands thoroughly.
Be careful that the acid does not come into contact with the eyes and that it is not ingested.
Remove the batteries from the appliance before its disposal.
The batteries must be disposed of in the appropriate containers.
Avvertissements
FR
INSTALLATION AU MUR.
Kit fourni:
- étrier en acier 580 × 80 ~mm
-8vis 40× 4mm - 8 tasseaux muraux
Characteristicas techniques
ES
Terms and Conditions
The guarantee is valid for 24 months.
This guarantee applies only if it has been duly filled in and is submitted with the receipt showing the date of purchase.
The guarantee covers the replacement or repair of parts making up the appliance which were faulty at source due to manufacturing faults.
After the guarantee has expired, the appliance will be repaired against payment.
The manufacturer declines any responsibility for damage to persons, animals or property due to misuse of the appliance and failure to observe the directions contained in the instructions.
Limits
All rights under this guarantee and any responsibility on our part will be avoided if the appliance has been:
-
mishandled by unauthorized persons
-
improperly used, stored or transported.
The guarantee does not cover damage to the outward appearance or any other that does not prevent regular operation.
If any faults should be found despite the care taken in selecting the materials and in creating the product, or if any information or advice are required, please contact your local dealer.
Date of sale SELLER'S STAMP
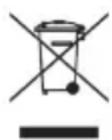
IMPORTANT INFORMATION FOR CORRECT DISPOSAL OF THE PRODUCT IN ACCORDANCE WITH EC DIRECTIVE 2002/96/EC.
At the end of its working life, the product must not be disposed of as urban waste.
It must be taken to a special local authority differentiated waste collection centre or to a dealer providing this service.
Disposing of a household appliance separately avoids possible negative consequences for the environment and health deriving from inappropriate disposal and enables the constituent materials to be recovered to obtain significant savings in energy and resources. As a reminder of the need to dispose of household appliances separately, the product is marked with a crossed-out wheeled dustbin.
GARANTIE
FR