
M65700 - Toilet DOMETIC - Free user manual and instructions
Find the device manual for free M65700 DOMETIC in PDF.
| Product Type | Gravity Discharge Toilet |
| Brand | Dometic |
| Model | M65700 |
| Dimensions (L × W × H) | 50 cm × 44 cm × 79 cm |
| Weight | 20.9 kg |
| Water Supply | Fresh water, pressure 35-40 psi (2.4-2.8 bar) |
| Black Water Tank Capacity | 24.6 L |
| Water Consumption per Flush | Minimum 0.5 L, average 1.0 L |
| Flush Type | Pedal, gravity discharge |
| Recommended Maintenance | Mild non-abrasive detergent; avoid chlorinated, alcoholic, or petroleum-based products |
| Safety | Close valves when not in use; double stainless steel clamps on fittings |
| Recommended Spare Parts | Closure cap, seal kit, water inlet valve kit |
| Warranty | 2 years (USA/Canada); legal elsewhere |
| Intended Use | Marine installation |
| Vent Connection | 5/8 in (16 mm) outer diameter |
| Discharge Pump Connection | 1.5 in (38 mm) outer diameter |
| Residual Water in Bowl | Low amount after flush |
Frequently Asked Questions - M65700 DOMETIC
User questions about M65700 DOMETIC
0 question about this device. Answer the ones you know or ask your own.
Ask a new question about this device
Download the instructions for your Toilet in PDF format for free! Find your manual M65700 - DOMETIC and take your electronic device back in hand. On this page are published all the documents necessary for the use of your device. M65700 by DOMETIC.
USER MANUAL M65700 DOMETIC
natural_image
Technical line drawing of a mechanical device with a cylindrical top and base housing (no text or symbols)
natural_image
Technical line drawing of a mechanical device with a circular top and base housing (no text or symbols)M65-700, M65-5000
Instruction and Operation....2
Service Center & Dealer Locations
Visit: www.dometic.com
Please read these instructions carefully and follow all instructions, guidelines, and warnings included in this product manual in order to ensure that you install, use, and maintain the product properly at all times. These instructions MUST stay with this product.
By using the product, you hereby confirm that you have read all instructions, guidelines, and warnings carefully and that you understand and agree to abide by the terms and conditions as set forth herein. You agree to use this product only for the intended purpose and application and in accordance with the instructions, guidelines, and warnings as set forth in this product manual as well as in accordance with all applicable laws and regulations. A failure to read and follow the instructions and warnings set forth herein may result in an injury to yourself and others, damage to your product, or damage to other property in the vicinity. This product manual, including the instructions, guidelines, and warnings, and related documentation, may be subject to changes and updates. For up-to-date product information, please visit www.dometic.com.
Contents
Contents....2
1 Explanation of Symbols and Safety Instructions 2
1.1 Recognize Safety Information .... 2
1.2 Understand Signal Words.....2
1.3 Supplemental Directives....3
1.4 General Safety Messages .... 3
2 Intended Use.... 3
3 General Information....4
3.1 Tools and Materials .... 4
3.2 Component Locations.....4
3.3 Toilet Dimensions .... 5
3.4 Model Identification .... 5
4 Specifications 6
5 Preinstallation....6
5.1 Preparing to Install the Toilet 6
5.2 Removing an Existing Toilet 6
6 Installation....6
6.1 Installing the Holding Tank....6
6.2 Installing the Thru-hull Fitting ..... 6
6.3 Installing the Dockside Discharge Fitting . . . 7
6.4 Connecting the Water Supply .....7
7 Operation....8
8 Maintenance 8
8.1 Cleaning the Toilet 8
8.2 System Maintenance....8
8.3 Recommended Spare Parts ..... 9
8.4 Winterizing the Toilet 9
9 Troubleshooting 10
10 Disposal....11
11 Warranty Information....11
11.1 United States and Canada ..... 11
11.2 Asia-Pacific (APAC) Countries ..... 11
11.3 All Other Regions ..... 11
1 Explanation of Symbols and Safety Instructions
This manual has safety information and instructions to help you eliminate or reduce the risk of accidents and injuries.
1.1 Recognize Safety Information
This is the safety alert symbol. It is used to alert you to potential physical injury hazards. Obey all safety messages that follow this symbol to avoid possible injury or death.
1.2 Understand Signal Words
A signal word will identify safety messages and property damage messages, and also will indicate the degree or level of hazard seriousness.
WARNING
Indicates a hazardous situation that, if not avoided, could result in death or serious injury.
NOTICE: Used to address practices not related to physical injury.
i Indicates additional information that is not related to physical injury.
1.3 Supplemental Directives
To reduce the risk of accidents and injuries, please observe the following directives before proceeding to install, operate, or service this appliance:
- Read and follow all safety information and instructions.
- Read and understand these instructions before installing, operating, or servicing this product.
- The installation must comply with all applicable local or national codes, including the latest edition of the following standards:
U.S.A.
• ANSI/NFPA1192, Recreational Vehicles Code
• ANSI Z21.57, Recreational Vehicles Code
• American Boat and Yacht Council (ABYC)
Canada
• SA Z240 RV Series, Recreational Vehicles
1.4 General Safety Messages

WARNING: FLOOD HAZARD. Failure to obey the following warnings could result in death or serious injury:
- If the toilet is connected to any thru-hull fittings, always close the seacocks when the toilet is not in use (even if boat is unattended for a brief period). All passengers must be instructed on how to close the valves when the toilet is not in use.
- If the toilet is connected to any thru-hull fittings, all flexible hoses must be of marine sanitation quality and must be secured to any fittings (such as those at the seacock or toilet) with two stainless steel, worm-drive hose band clamps at each connection. Connections must be checked frequently for integrity.
-
Ensure that seacocks are in the closed or off position before installing the toilet or performing any maintenance.
-
If the toilet uses fresh water for flushing and is connected directly or indirectly to a shoreside municipal water system at any time, shoreside water connections must be disconnected if the boat is unattended (even if boat is unattended for a brief period).
- Use only Dometic replacement parts and components that are specifically approved for use with the appliance.
- Avoid improper installation, adjustment, alterations, service, or maintenance of the appliance. Service and maintenance must be done by a qualified service person only.
- Do not modify this product in any way. Modification can be extremely hazardous.
NOTICE: Do not overfill the holding tank, or damage can occur to the sanitation system.
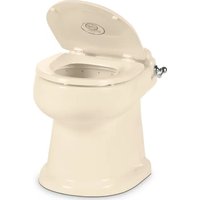
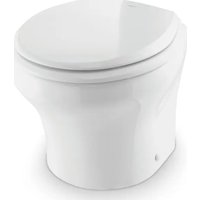
2 Intended Use
The Gravity-discharge Toilet (hereinafter referred to as toilet) is designed and intended for installation in a boat during or after manufacture. This toilet is only suitable for the intended purpose and application in accordance with these instructions.
This manual provides information that is necessary for proper installation and operation of the toilet. Poor installation and/or improper operating or maintenance will result in unsatisfactory performance and a possible failure. The manufacturer accepts no liability for any injury or damage to the product resulting from:
- Incorrect assembly or connection, including excess voltage
- Incorrect maintenance or use of spare parts other than original spare parts provided by the manufacturer
• Alterations to the product without express permission from the manufacturer - Use for purposes other than those described in this manual
Dometic reserves the right to change product appearance and product specifications.
3 General Information
This section provides general information about the toilet and its components and dimensions.
The images used in this document are for reference purposes only. Components and component locations may vary according to specific product models. Measurements may vary ±0.38 in. (10 mm).
3.1 Tools and Materials
Dometic recommends that the following tools and materials be used while installing the appliance.
Included Parts
| Gravity-discharge Toilet |
| Tank Mounting Screws with Washers (4) |
Installer-Supplied Parts
| Thru-hull Vent Fitting |
| Dockside Discharge Fitting |
| 5/8 in. (16 mm) I.D. Marine Sanitation Quality Hose |
| 1.5 in. (38 mm) I.D. Marine Sanitation Quality Hose |
| Stainless Steel Band Clamps (8) |
| Water Supply |
Recommended Tools
| Drill Pan-head Screwdriver |
| Drill Bit Screwdriver for Band Clamps |
| Marker Phillips-head Screwdriver |
3.2 Component Locations
This section identifies the toilet components. The components may vary slightly depending on the model.

1 M65-700 Components
① Check Valve
② Supply Hose
③ Bowl
④ Band Clamp Adjustment Nut
⑤ Base to Bowl Band Clamp
⑥ Flush Ball Seals
⑦ Toilet Base
⑧ Toilet Mounting Nuts and Washers
⑨ Lever
⑩ Spring Cartridge
⑪ Water Valve Assembly
⑫ Pedal Cover
⑬ Flush Ball
⑭ Pedestal Cover
⑮ Floor Base Seal
⑯ Studs
⑰ Vent Fitting
⑱ Pumpout Fitting
⑲ Holding Tank
⑳ Tank Mounting Screws and Washers
②1 Tank Mounting Holes
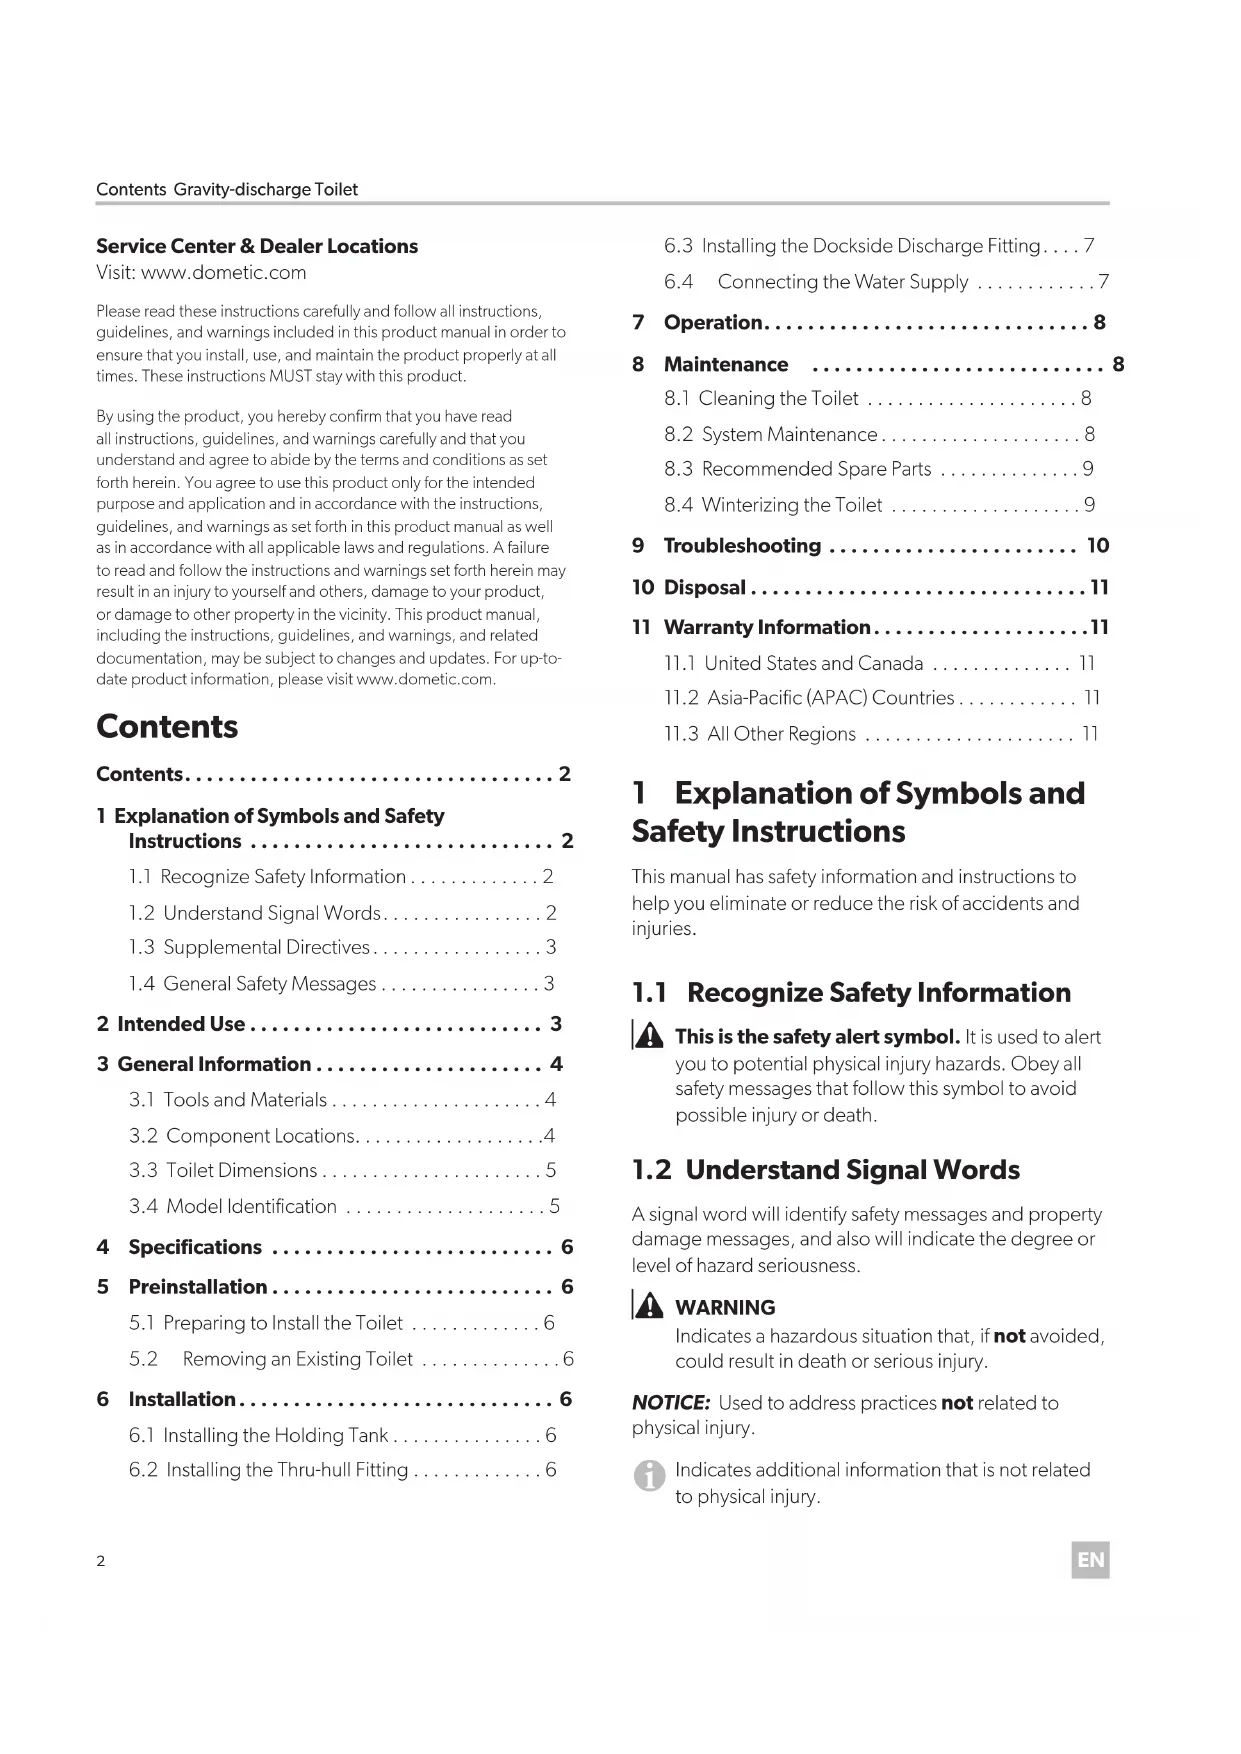
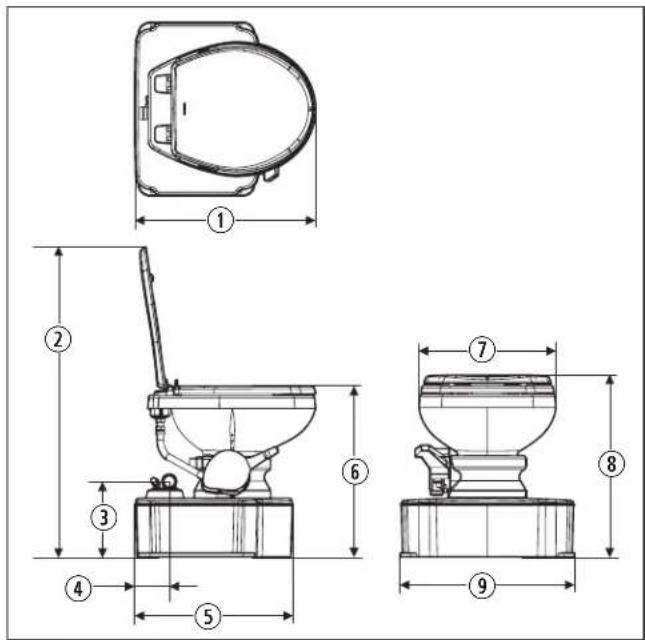
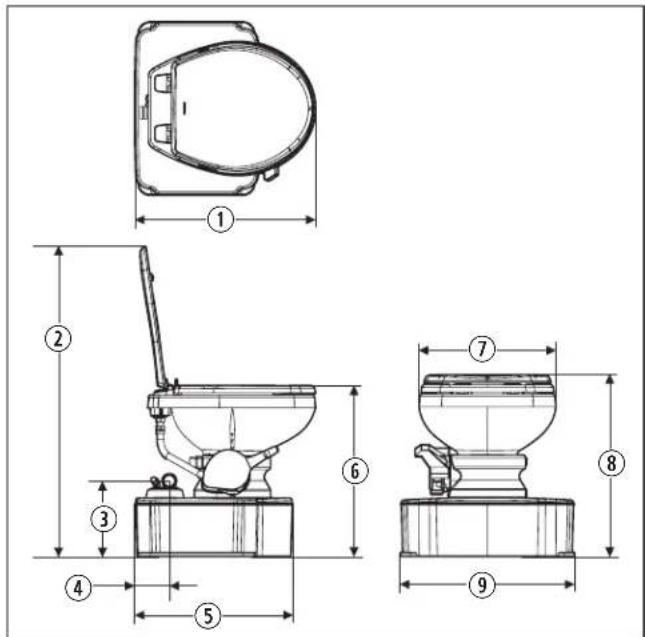
3.3 Toilet Dimensions
The section provides the dimensions for the M65-700 and M65-5000 toilet.
2 M65-700 Dimensions
① 19.5 in. (50 cm)
② 31.0 in. (79 cm)
③ 8.3 in. (21 cm)
④ 3.8 in. (10 cm)
⑤ 17.3 in. (44 cm)
⑥ 17.3 in. (44 cm)
⑦ 14.5 in. (37 cm)
⑧ 17.0 in. (43 cm)
⑨ 18.8 in. (48 cm)

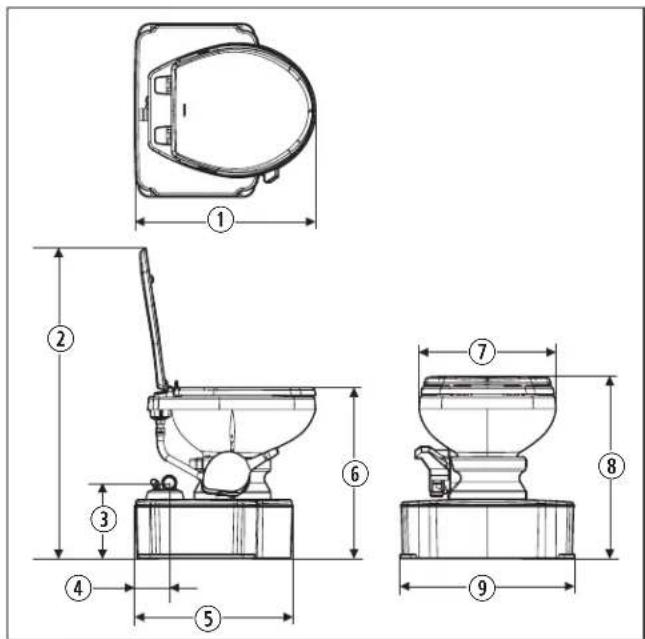
3 M65-5000 Dimensions
① 19.8 in. (50 cm)
② 33.8 in. (86 cm)
③ 8.3 in. (21 cm)
④ 3.8 in. (10 cm)
⑤ 17.3 in. (44 cm)
⑥ 18.8 in. (48 cm)
⑦ 14.8 in. (38 cm)
⑧ 19.8 in. (50 cm)
⑨ 18.8 in. (48 cm)
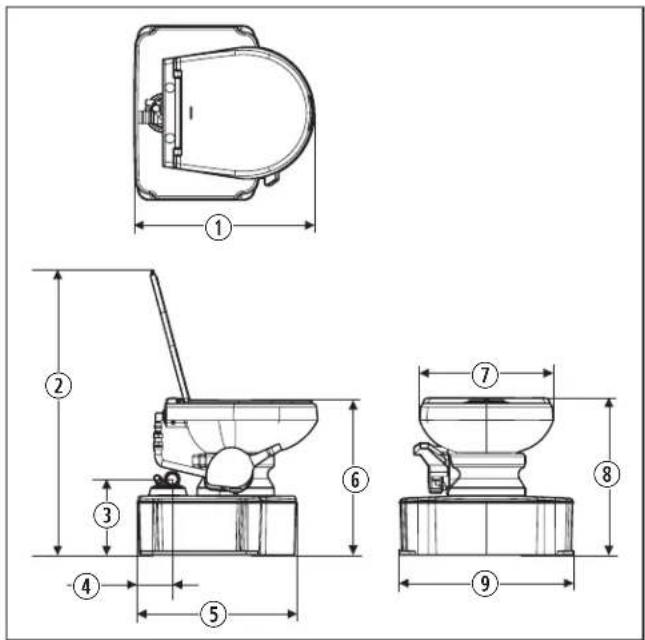
3.4 Model Identification
The model identification label is located on the front of the base of the toilet under the pedestal cover. See "Component Locations" on page 4.
4 Model Identification Label
4 Specifications
This section provides general specifications for the toilet.
| Weight M65-700 | 46 lbs (20.9 kg) |
| Weight M65-5000 | 49 lbs (22.2 kg) |
| Fresh Water Supply Pressure | 35–40 psi |
| Water Inlet Size | 0.5 in. (13 mm) NPT |
| Vent Fitting | 5/8 in. (16 mm) O.D. |
| Pumpout Fitting | 1.5 in. (38 mm) O.D. |
| Holding Tank Capacity | 6.5 gal (24.6 L) |
| Minimum Water Consumption per Flush | 0.1 gal (0.5 L) |
| Average Water Consumption per Flush | 0.3 gal (1.0 L) |
5 Preinstallation
This section describes the steps to complete prior to installing the toilet.
5.1 Preparing to Install the Toilet
-
Select a position in the bathroom where the toilet can operate properly. Allow room for flushing the pedal and clearance for raising the seat and lid. See "Toilet Dimensions" on page 5.
-
Turn off the water supply to the toilet's location.
5.2 Removing an Existing Toilet
If there is no existing toilet, skip to "Installation" on page 6.
- Flush the toilet to drain the water from the bowl.
Have a towel or shallow container ready to collect any residual water.
- Disconnect and drain the water supply line.
- Remove the fasteners anchoring the toilet to the floor.
- Remove the toilet from the floor.
- Dispose of the toilet, fasteners, and any removal debris.
6 Installation
This section describes how to install the toilet.
6.1 Installing the Holding Tank
5 Positioning the Holding Tank
① Holding Tank
③ Tank Mounting Holes
② Tank Mounting Screws and Washers
④ Pumpout Fitting
⑤ Vent Fitting
- Position the rear of the holding tank 0.8 in. (19 mm) from the wall.
- Mark the position of the mounting holes on the floor, then remove the holding tank.
- Drill a pilot hole for each mounting hole.
- Move the holding tank back into position.
- Secure the holding tank to the floor with the tank mounting screws and washers.
Do not over-tighten the screws.
6.2 Installing the Thru-hull Fitting
- Install the thru-hull fitting according to the manufacturer's instructions.
The thru-hull fitting should be located well above the water line and directly over the toilet.
-
Run a 5/8 in. (16 mm) I.D. marine sanitation quality hose from the thru-hull vent fitting to the vent fitting on the holding tank.
-
Secure the hose to the vent fittings with two stainless steel band clamps at each connection.
6.3 Installing the Dockside Discharge Fitting
NOTICE: The holding tank on the toilet is designed to withstand discharge by a properly operating discharge pump.
- Install the dockside discharge fitting according to the manufacturer's instructions.
The dockside discharge fitting should be located in the deck directly above the toilet.
-
Run a 1.5 in. (38 mm) I.D. marine sanitation quality hose from the dockside discharge fitting to the pumpout fitting.
-
Secure the hose to the fittings with two stainless steel band clamps at each connection.
6.4 Connecting the Water Supply
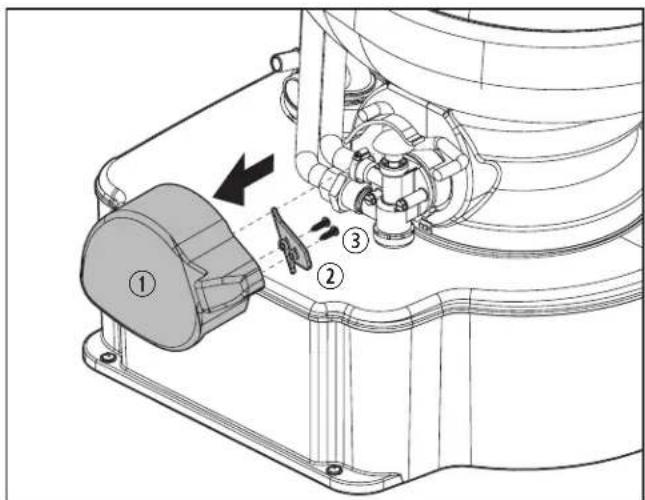
6 Removing the Pedal Cover
① Pedal Cover
③ Screws
② Back Plate
- Remove the two screws from the rear of the pedal cover.
EN
- Pull off the pedal cover.
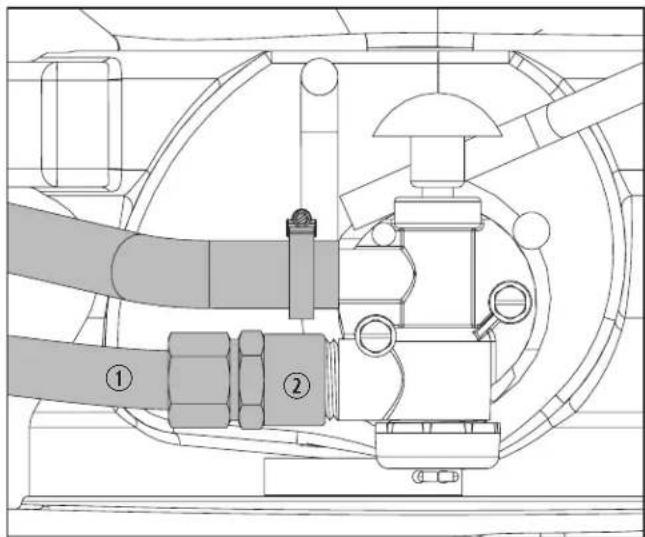
7 Water Supply Connections
① Water Supply Line
② Inlet Fitting
-
Attach the water supply line to the inlet fitting.
-
Turn on the water supply and flush several times to check for leaks.
-
Replace the pedal cover.
-
Replace the back plate and secure with the screws.
7 Operation
NOTICE: Only flush water, bodily wastes, and rapid-dissolving toilet tissue. Do not dispose of feminine hygiene products or other non-dissolving items in the toilet.
This section describes how to operate the toilet.

natural_image
Technical illustration of a toilet with internal components and a magnified inset showing the mechanism (no text or symbols)8 Using the Pedal
① Pedal
-
To add water to the toilet before using, lift the pedal.
-
To flush the toilet, push the pedal all the way down until the waste leaves the toilet bowl.
Water flow pressures vary at different locations, therefore holding the pedal down for 4–8 seconds may be required. Holding the flush pedal down longer than necessary will result in excessive water usage.
- Release the pedal by allowing it to snap back. A small amount of water should remain in the bowl.
8 Maintenance
NOTICE: Do not use abrasive cleaners, caustic chemicals or lubricants, or cleaners that contain chlorine, alcohol, or petroleum distillates. These substance may cause damage to the toilet's internal seals.
The maintenance and cleaning instructions provided in this section should be performed at the intervals indicated, or as needed, depending on the use of the toilet.
Failure to properly maintain the toilet may void the warranty and could result in unsafe operation. Preventive maintenance is not covered under the warranty.
8.1 Cleaning the Toilet
The toilet should be cleaned regularly with a mild, non-abrasive cleaner like the Dometic toilet bowl cleaner.
If odor is apparent:
- Completely discharge the holding tank.
- Mix 8 oz (237 ml) of liquid biodegradable laundry soap with 5 gal (19 L) of fresh water and flush through the toilet.
Do not exceed the capacity of your holding tank. See "Specifications" on page 6.
-
Discharge the holding tank.
-
Add an odor control product in the amount specified for your holding tank capacity after cleaning and every few days during use.
8.2 System Maintenance
Maintenance procedures vary widely and depend on factors such as frequency of use, quality of the flushing water, etc. The chart provides a general guideline for keeping your toilet ready for use at any time.
Maintenance Procedure Service Interval
| Check all clamped hose joints Monthly | |
| Check the filter screen in the water valve assembly | Annually |
| Replace the flush ball seal and the flush ball (if required) | Every three years |
8.3 Recommended Spare Parts
When operating a boat or other vehicle in remote areas, keep the following spare parts on hand to assure continuous toilet system operation.
- Flush Ball, Shaft, and Spring Cartridge Kit
- Seal Kit
• Water Valve Assembly Kit
8.4 Winterizing the Toilet
At the end of each season, the toilet should be winterized for storage.
- Empty the holding tank.
- Thoroughly flush the system with fresh water.
- Shut off the water supply to the toilet.
Have a towel or shallow container ready to collect any residual water. - Disconnect the water supply line and flush the toilet to drain any residual water.
- Empty the holding tank.
9 Troubleshooting
It is recommended to always wear personal protective equipment, such as gloves, goggles, or safety glasses when servicing any sanitation products.
The following table lists some of the possible issues that might be encountered when the toilet is in use, the possible causes of these issues, and the recommended actions that should be taken to remedy the issues.
| Problem Possible Cause Recommended Solution | ||
| The water does not stay in the bowl. | The base to bowl band clamp is loose. Tighten the band clamp adjustment nut. | |
| There is an improper seal around the flush ball due to dirt or debris on the underside of the flush ball seal. | 1. Inspect the flush ball and the underside of the flush ball seal for dirt or debris.2. Clean if necessary. | |
| The flush ball seal is worn or damaged. 1. Inspect the flush ball seal for wear or damage.2. Replace the flush ball seal if necessary. | ||
| Worn or damaged flush ball 1. Inspect the flush ball for wear or damage.2. Replace the flush ball if necessary. | ||
| The flush ball does not close completely. | The base to bowl band clamp is over-tightened and causing too much tension on the flush seal and flush ball. | Loosen the band clamp adjustment nut. |
| The spring cartridge is weak or defective. 1. Press the pedal then quickly let go.2. If the pedal does not snap back, replace the spring cartridge. | ||
| The water does not shut off in the toilet. | Dirt is lodged in the water valve seal^1 | Disassemble and clean the water valve. |
| The lever is bent down, holding the water valve open. | Bend the front of the lever up approximately 0.1 in. (2 mm). | |
| The water valve is worn or defective. Replace the water valve assembly. | ||
| The spring cartridge is weak or defective. 1. Press the pedal then quickly let go.2. If the pedal does not snap back, replace the spring cartridge. | ||
| Water does not enter the bowl properly | Low water pressure Check the incoming water pressure. See "Specifications" on page 6. | |
| Clogged water valve | Remove and clean the filter screen.1 | |
| Water leaking from the water valve | Loose connection | Tighten the bottom cap, inlet fitting1, and discharge hose band clamp. |
| Worn or defective water valve | Replace the water valve assembly. | |
| Water line connection is not seated properly | 1. Ensure that the threads on the inlet fitting are not cross-threaded.2. Tighten the connection. | |
| Stripped threads on the inlet fitting | Replace the water valve assembly. | |
| Water valve seal^1 is worn or missing | ||
| Water valve body is cracked | ||
| Water is leaking from the rear of the bowl | Loose water supply hose connection | Tighten the water supply hose connections. |
| Loose check valve assembly | Tighten the check valve-to-bowl connection. | |
| Worn or defective check valve | Replace the check valve assembly. | |
| Cracked or defective bowl | Replace the bowl. | |
^1 Part of the water valve assembly
10 Disposal
Place the packaging material in the appropriate recycling waste bins, whenever possible. Consult a local recycling center or specialist dealer for details about how to dispose of the product in accordance with all applicable national and local regulations.
11 Warranty Information
Refer to the sections below for information about warranty and warranty support in the US, Canada, Australia, New Zealand, and all other regions.
11.1 United States and Canada
LIMITED TWO-YEAR WARRANTY AVAILABLE AT DOMETIC.COM/EN-US/TERMS-AND-CONDITIONS-CONSUMER/WARRANTY.
IF YOU HAVE QUESTIONS, OR TO OBTAIN A COPY OF THE LIMITED WARRANTY FREE OF CHARGE, CONTACT:
DOMETIC CORPORATION
CUSTOMER SERVICE
13128 STATE ROUTE 226
BIG PRAIRIE, OH USA 44611
1-800-321-9886
011-330-439-5550
11.2 Asia-Pacific (APAC) Countries
If the product does not work as it should, please contact your retailer or the manufacturer's branch in your country (see the back of this instruction manual for the web addresses to locate your region or retailer). The warranty applicable to your product is two years.
For repair and warranty processing, please include the following documents when you send in the device:
• A copy of the receipt with purchasing date
- A reason for the claim or description of the fault
11.2.1 Australia Only
Our goods come with guarantees that cannot be excluded under the Australian Consumer Law. You are entitled to a replacement or refund for a major failure and for compensation for any other reasonably foreseeable loss or damage. You are also entitled to have the goods repaired or replaced if the goods fail to be of acceptable quality and the failure does not amount to a major failure.
11.2.2 New Zealand Only
This warranty policy is subject to the conditions and guarantees which are mandatory as implied by the Consumer Guarantees Act 1993(NZ).
11.3 All Other Regions
The statutory warranty period applies. If the product is defective, please contact the manufacturer's branch in your region or your retailer (see the back of this instruction manual for the web addresses to locate your region or retailer).
For repair and guarantee processing, please include the following documents when you send in the device:
• A copy of the receipt with purchasing date
- A reason for the claim or description of the fault
① 19.5" (50 cm)
② 31,0" (79 cm)
③8,3" (21 cm)
④ 3,8" (10 cm)
⑤17,3" (44 cm)
⑥17,3" (44 cm)
⑦14,5" (37 cm)
⑧ 17,0" (43 cm)
⑨ 18,8" (48 cm)
DE
① 19,8" (50 cm)
② 33,8" (86 cm)
③ 8,3" (21 cm)
④ 3,8" (10 cm)
⑤ 17,3" (44 cm)
⑥ 18,8" (48 cm)
⑦ 14,8" (38 cm)
⑧ 19,8" (50 cm)
⑨ 18,8" (48 cm)
3.4 Typenschild
5 Fäkalientank positionieren
① Fäkalientank
natural_image
Technical illustration of a toilet with internal components and a magnified inset showing the mechanism (no text or symbols)6 Installation....26
3 Dimensions du M65-5000
① 19,8 po. (50 cm)
② 33,8 po. (86 cm)
③ 8,3 po. (21 cm)
④ 3,8 po. (10 cm)
⑤ 17,3 po. (44 cm)
⑥18,8 po. (48 cm)
⑦ 14,8 po. (38 cm)
⑧ 19,8 po. (50 cm)
⑨ 18,8 po. (48 cm)
natural_image
Technical illustration of a toilet with internal components and a magnified inset showing the mechanism (no text or symbols)• ANSI/NFPA 1192, Recreational Vehicles Code
• ANSI Z21.57, Recreational Vehicles Code
• American Boat and Yacht Council (ABYC)
Canadá
• SA Z240 RV Series, Recreational Vehicles
1 Componentes del M65-700
2 Dimensiones del M65-700
① 19.5 pulg. (50 cm)
② 31.0 pulg. (79 cm)
③ 8.3 pulg. (21 cm)
④ 3.8 pulg. (10 cm)
⑤ 17.3 pulg. (44 cm)
⑥ 17.3 pulg. (44 cm)
⑦ 14.5 in. (37 cm)
⑧ 17.0 pulg. (43 cm)
⑨ 18.8 pulg. (48 cm)

3 Dimensiones del M65-5000
① 19.8 pulg. (50 cm)
② 33.8 pulg. (86 cm)
③ 8.3 pulg. (21 cm)
④ 3.8 pulg. (10 cm)
⑤ 17.3 pulg. (44 cm)
⑥ 18.8 pulg. (48 cm)
⑦ 14.8 pulg. (38 cm)
⑧ 19.8 in. (50 cm)
⑨ 18.8 pulg. (48 cm)
natural_image
Technical illustration of a toilet with internal components and a magnified inset showing the mechanism (no text or symbols)8 Uso del pedal
① Pedal
• ANSI/NFPA 1192, Recreational Vehicles Code
• ANSI Z21.57, Recreational Vehicles Code
• American Boat and Yacht Council (ABYC)
Canada
• SA Z240 RV Series, Recreational Vehicles
2 Afmetingen M65-700
① 19,5 in. (50 cm)
② 31,0 in. (79 cm)
③ 8,3 in. (21 cm)
④ 3,8 in. (10 cm)
⑥ 17,3 in. (44 cm)
⑦ 14,5 in. (37 cm)
⑧ 17,0 in. (43 cm)
⑨ 18,8 in. (48 cm)
⑤ 17,3 in. (44 cm)
3 Afmetingen M65-5000
①19,8 in. (50 cm)
② 33,8 in. (86 cm)
③8,3 in. (21 cm)
④ 3,8 in. (10 cm)
⑤17,3 in. (44 cm)
⑥ 18,8 in. (48 cm)
⑦ 14,8 in. (38 cm)
⑧ 19,8 in. (50 cm)
⑨ 18,8 in. (48 cm)
3.4 Identificatie model
natural_image
Technical line drawing of a mechanical assembly with labeled components (no text or symbols present)natural_image
Technical illustration of a toilet with internal components and a magnified inset showing the handle mechanism (no text or symbols)8 Pedaal gebruiken
① Pedaal
DOMETIC CORPORATION CUSTOMER SERVICE
13128 STATE ROUTE 226
BIG PRAIRIE, OH VS 44611
1-800-321-9886
011-330-439-5550
1 Componenti M65-700
2 Dimensioni M65-700
① 19,5 in. (50 cm)
② 31,0 in. (79 cm)
③ 8,3 in. (21 cm)
④ 3,8 in. (10 cm)
⑤ 17,3 in. (44 cm)
⑥ 17,3 in. (44 cm)
⑦ 14,5 in. (37 cm)
⑧ 17,0 in. (43 cm)
⑨ 18,8 in. (48 cm)
3 Dimensioni M65-5000
① 19.8 in. (50 cm)
② 33,8 in. (86 cm)
③ 8,3 in. (21 cm)
④ 3,8 in. (10 cm)
⑤ 17,3 in. (44 cm)
⑥ 18,8 in. (48 cm)
⑦ 14,8 in. (38 cm)
⑧ 19,8 in. (50 cm)
⑨ 18,8 in. (48 cm)
natural_image
Technical line drawing of a mechanical assembly with labeled components (no text or symbols present)natural_image
Technical illustration of a toilet with internal components and a magnified inset showing the mechanism (no text or symbols)1 M65-700 komponentit
2 M65-700 mitat
① 50 cm (50 cm)
② 79 cm (31,0")
③ 21 cm (8,3")
④ 10 cm (3,8")
⑤ 44 cm (17,3")
⑥ 44 cm (17,3")
⑦ 37 cm (14,5")
⑧ 43 cm (17,0")
⑨ 48 cm (18,8")
3 M65-5000 mitat
① 50 cm (50 cm)
② 86 cm (33,8")
③ 21 cm (8,3")
④ 10 cm (3,8")
⑤ 44 cm (17,3")
⑥ 48 cm (18,8")
⑦ 38 cm (14,8")
⑧ 50 cm (50 cm)
⑨ 48 cm (18,8")
[Non-Text]
3.4 Mallin tunniste
natural_image
Technical illustration of a toilet with internal components and a magnified inset showing the mechanism (no text or symbols)8 Polkimen käyttö
① Poljin
6 Installation....76
• SA Z240 RV Series, Recreational Vehicles
1 M65-700 Komponenter
2 M65-700 Dimensioner
① 19,5 tum (50 cm)
② 31,0 tum (79 cm)
③ 8,3 tum (21 cm)
④ 3,8 tum (10 cm)
⑥ 17,3 tum (44 cm)
⑦ 14,5 tum (37 cm)
⑧ 17,0 tum (43 cm)
⑨ 18,8 tum (48 cm)
⑤ 17,3 tum (44 cm)

3 M65-5000 Dimensioner
① 19,8 tum (50 cm)
② 33,8 tum (86 cm)
③ 8,3 tum (21 cm)
④ 3,8 tum (10 cm)
⑤ 17,3 tum (44 cm)
⑥ 18,8 tum (48 cm)
⑦ 14,8 tum (38 cm)
⑧ 19,8 tum (50 cm)
⑨ 18,8 tum (48 cm)
6 Ta bort pedalkåpan
① Pedalkåpa
③ Skruvar
② Bakre platta
natural_image
Technical line drawing of a mechanical assembly with labeled components (no text or symbols)natural_image
Technical illustration of a toilet with internal components and a magnified inset showing the mechanism (no text or symbols)8 Använda pedalen
① Pedal
1 M65-700 Komponenter
5 Placering af opbevaringstanken
① Opbevaringstanken
③ Tankmonteringshuller
⑤ Ventilationsfitting
natural_image
Technical line drawing of a mechanical assembly with labeled components (no text or symbols)7 Vandforsyningsforbindelser
natural_image
Technical illustration of a toilet with internal components and a magnified inset showing the mechanism (no text or symbols)8 Pedalibrug
① Pedal
DOMETIC CORPORATION CUSTOMER SERVICE
13128 STATE ROUTE 226
BIG PRAIRIE, OH USA 44611
1-800-321-9886
011-330-439-5550
11.2 Asien-Stillehavet (APAC) Lande
11.2.2 Kun for New Zealand
Denne garantipolitik er underlagt de betingelser og garantier, som er obligatoriske som antydet af Consumer Guarantees Act 1993(NZ).
1 M65-700 Komponenter
natural_image
Technical line drawing of a mechanical assembly with labeled components (no text or symbols present)natural_image
Technical illustration of a toilet with internal components and a magnified inset showing the mechanism (no text or symbols)dometic.com/en-us/terms-and-conditions-consumer/contact-us

- Service Center & Dealer Locations
- Contents
- Explanation of Symbols and Safety Instructions
- Recognize Safety Information
- Understand Signal Words
- WARNING
- Supplemental Directives
- U.S.A.
- Canada
- General Safety Messages
- WARNING: FLOOD HAZARD. Failure to obey the following warnings could result in death or serious injury:
- Intended Use
- General Information
- Tools and Materials
- Component Locations
- Toilet Dimensions
- Model Identification
- Specifications
- Preinstallation
- Preparing to Install the Toilet
- Removing an Existing Toilet
- Installation
- Installing the Holding Tank
- Installing the Thru-hull Fitting
- Installing the Dockside Discharge Fitting
- Connecting the Water Supply
- Operation
- Maintenance
- Cleaning the Toilet
- System Maintenance
- Recommended Spare Parts
- Winterizing the Toilet
- Troubleshooting
- Disposal
- Warranty Information
- United States and Canada
- Asia-Pacific (APAC) Countries
- Australia Only
- New Zealand Only
- All Other Regions
- Typenschild
- Canadá
- Identificatie model
- Mallin tunniste
- Asien-Stillehavet (APAC) Lande
- Kun for New Zealand
Brand : DOMETIC
Model : M65700
Category : Toilet