
Blend & Heat 578 - Blender ARIETE - Free user manual and instructions
Find the device manual for free Blend & Heat 578 ARIETE in PDF.
| Product type | Heating blender (Blend & Heat 578) |
| Maximum capacity (cold liquids) | 1200 ml |
| Maximum capacity (hot liquids) | 800 ml |
| Automatic functions | Soup, Sauce, Vegetables, Ice Crusher, Smoothies |
| Manual function | Yes (adjustable speed and time, pulse mode) |
| Power supply | Mains (standard electrical outlet) |
| Safety devices | Double safety (motor unit and lid) - prevents operation if the jug or lid are incorrectly positioned |
| Cleaning of removable parts | Jug, lid and cap dishwasher safe (top rack) |
| Cleaning of the motor unit | Damp cloth, do not immerse |
| Spare parts included | 2 spare transmission seals |
| Repairs | Exclusively by an Ariete authorized service center |
| Compliance | EC Regulation 1935/2004 |
Frequently Asked Questions - Blend & Heat 578 ARIETE
User questions about Blend & Heat 578 ARIETE
0 question about this device. Answer the ones you know or ask your own.
Ask a new question about this device
Download the instructions for your Blender in PDF format for free! Find your manual Blend & Heat 578 - ARIETE and take your electronic device back in hand. On this page are published all the documents necessary for the use of your device. Blend & Heat 578 by ARIETE.
USER MANUAL Blend & Heat 578 ARIETE
natural_image
Line drawing of a blender with handle and control panel (no text or symbols)Frullatore
Blender
Mixeur
Mischer
Mezclador
Liquidificador
Menger
Blender
Μίξερ
блендер
змішувач
Mikser
خلاط
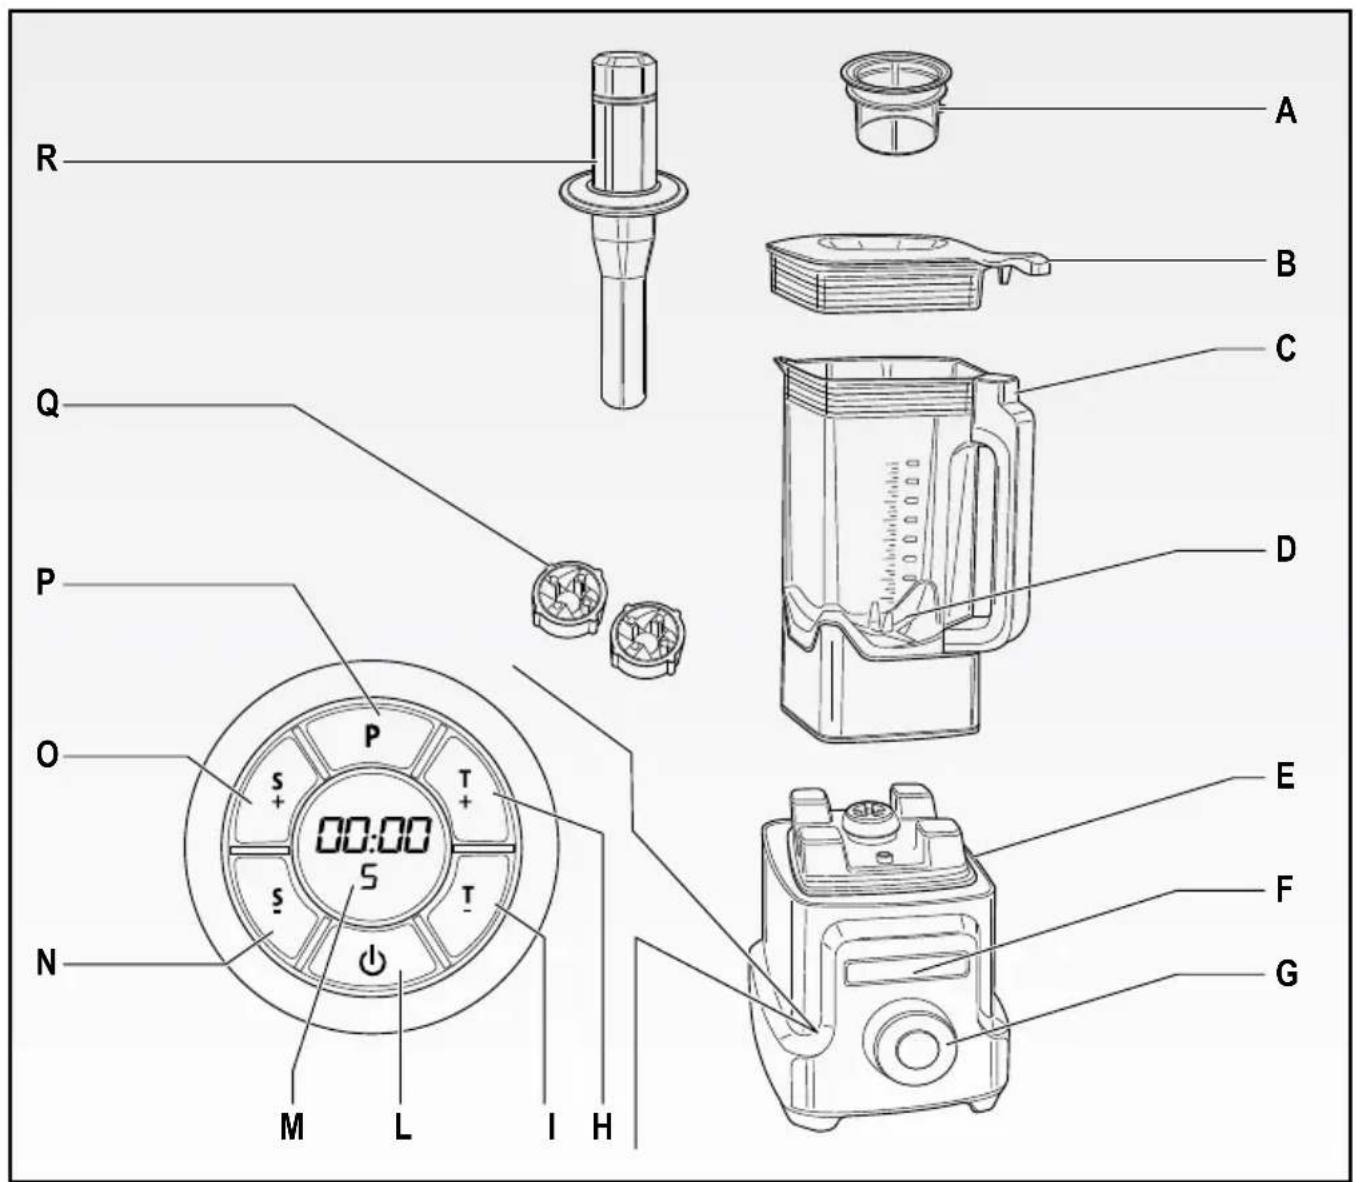
Fig. 1
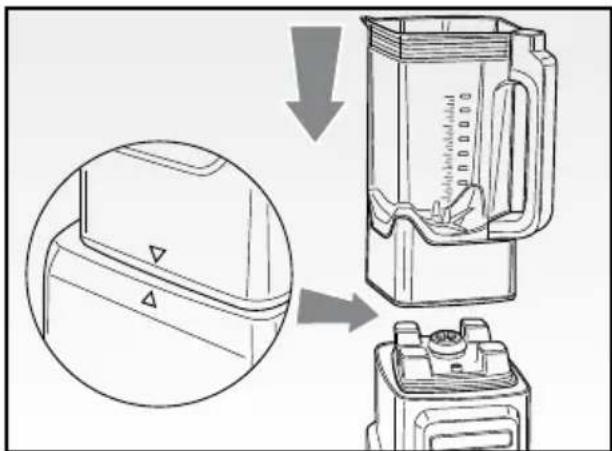
Fig. 2
natural_image
Technical line drawing of a mechanical device with an inset showing a hand pressing a component (no text or symbols present)Fig. 3
natural_image
Illustration of a hand holding a cylindrical mechanical component on a stovetop, with an arrow indicating rotation (no text or symbols present)Fig. 4
natural_image
Line drawing of a hand using a mechanical tool to press or install a cylindrical component (no text or symbols present)Fig. 5
natural_image
Technical line drawing of a mechanical component with central hub and mounting flanges (no text or symbols)Fig. 6
natural_image
Illustration of a blender with a hand holding a glass and crossed out, connected to an electrical outlet (no text or symbols)Fig. 7
natural_image
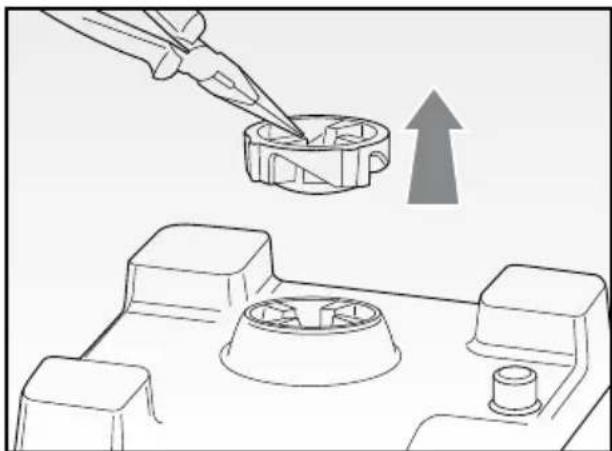
Technical illustration showing a tool applying material to a mechanical component with an upward arrow (no text or symbols)Fig. 8
natural_image
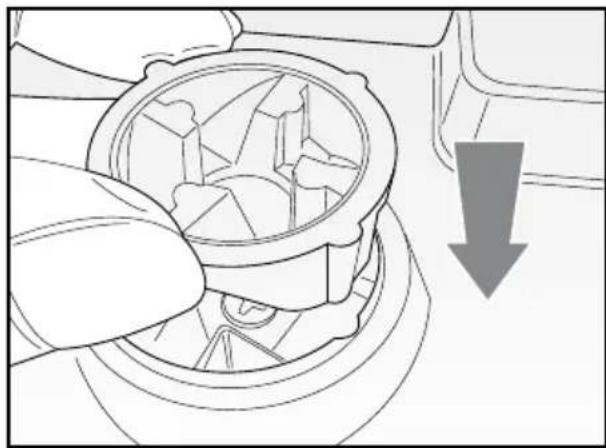
Mechanical component diagram showing a hand turning a gear-like component with a downward arrow indicating rotation (no text or symbols present)Fig. 9
natural_image
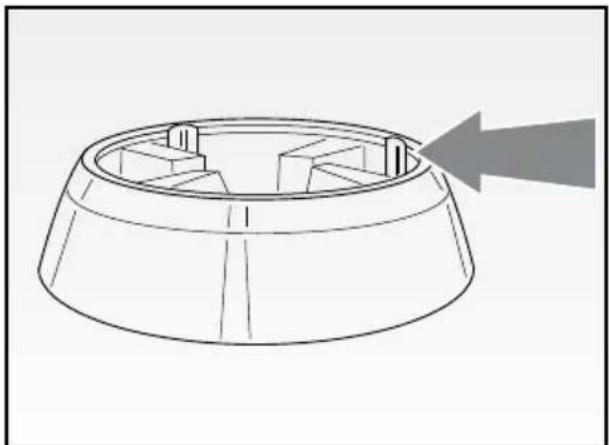
Technical line drawing of a mechanical component with a central hub and a directional arrow (no text or symbols)Fig. 10
AVVERTENZE IMPORTANTI
LEGGERE QUESTE ISTRUZIONI PRIMA DELL'USO.
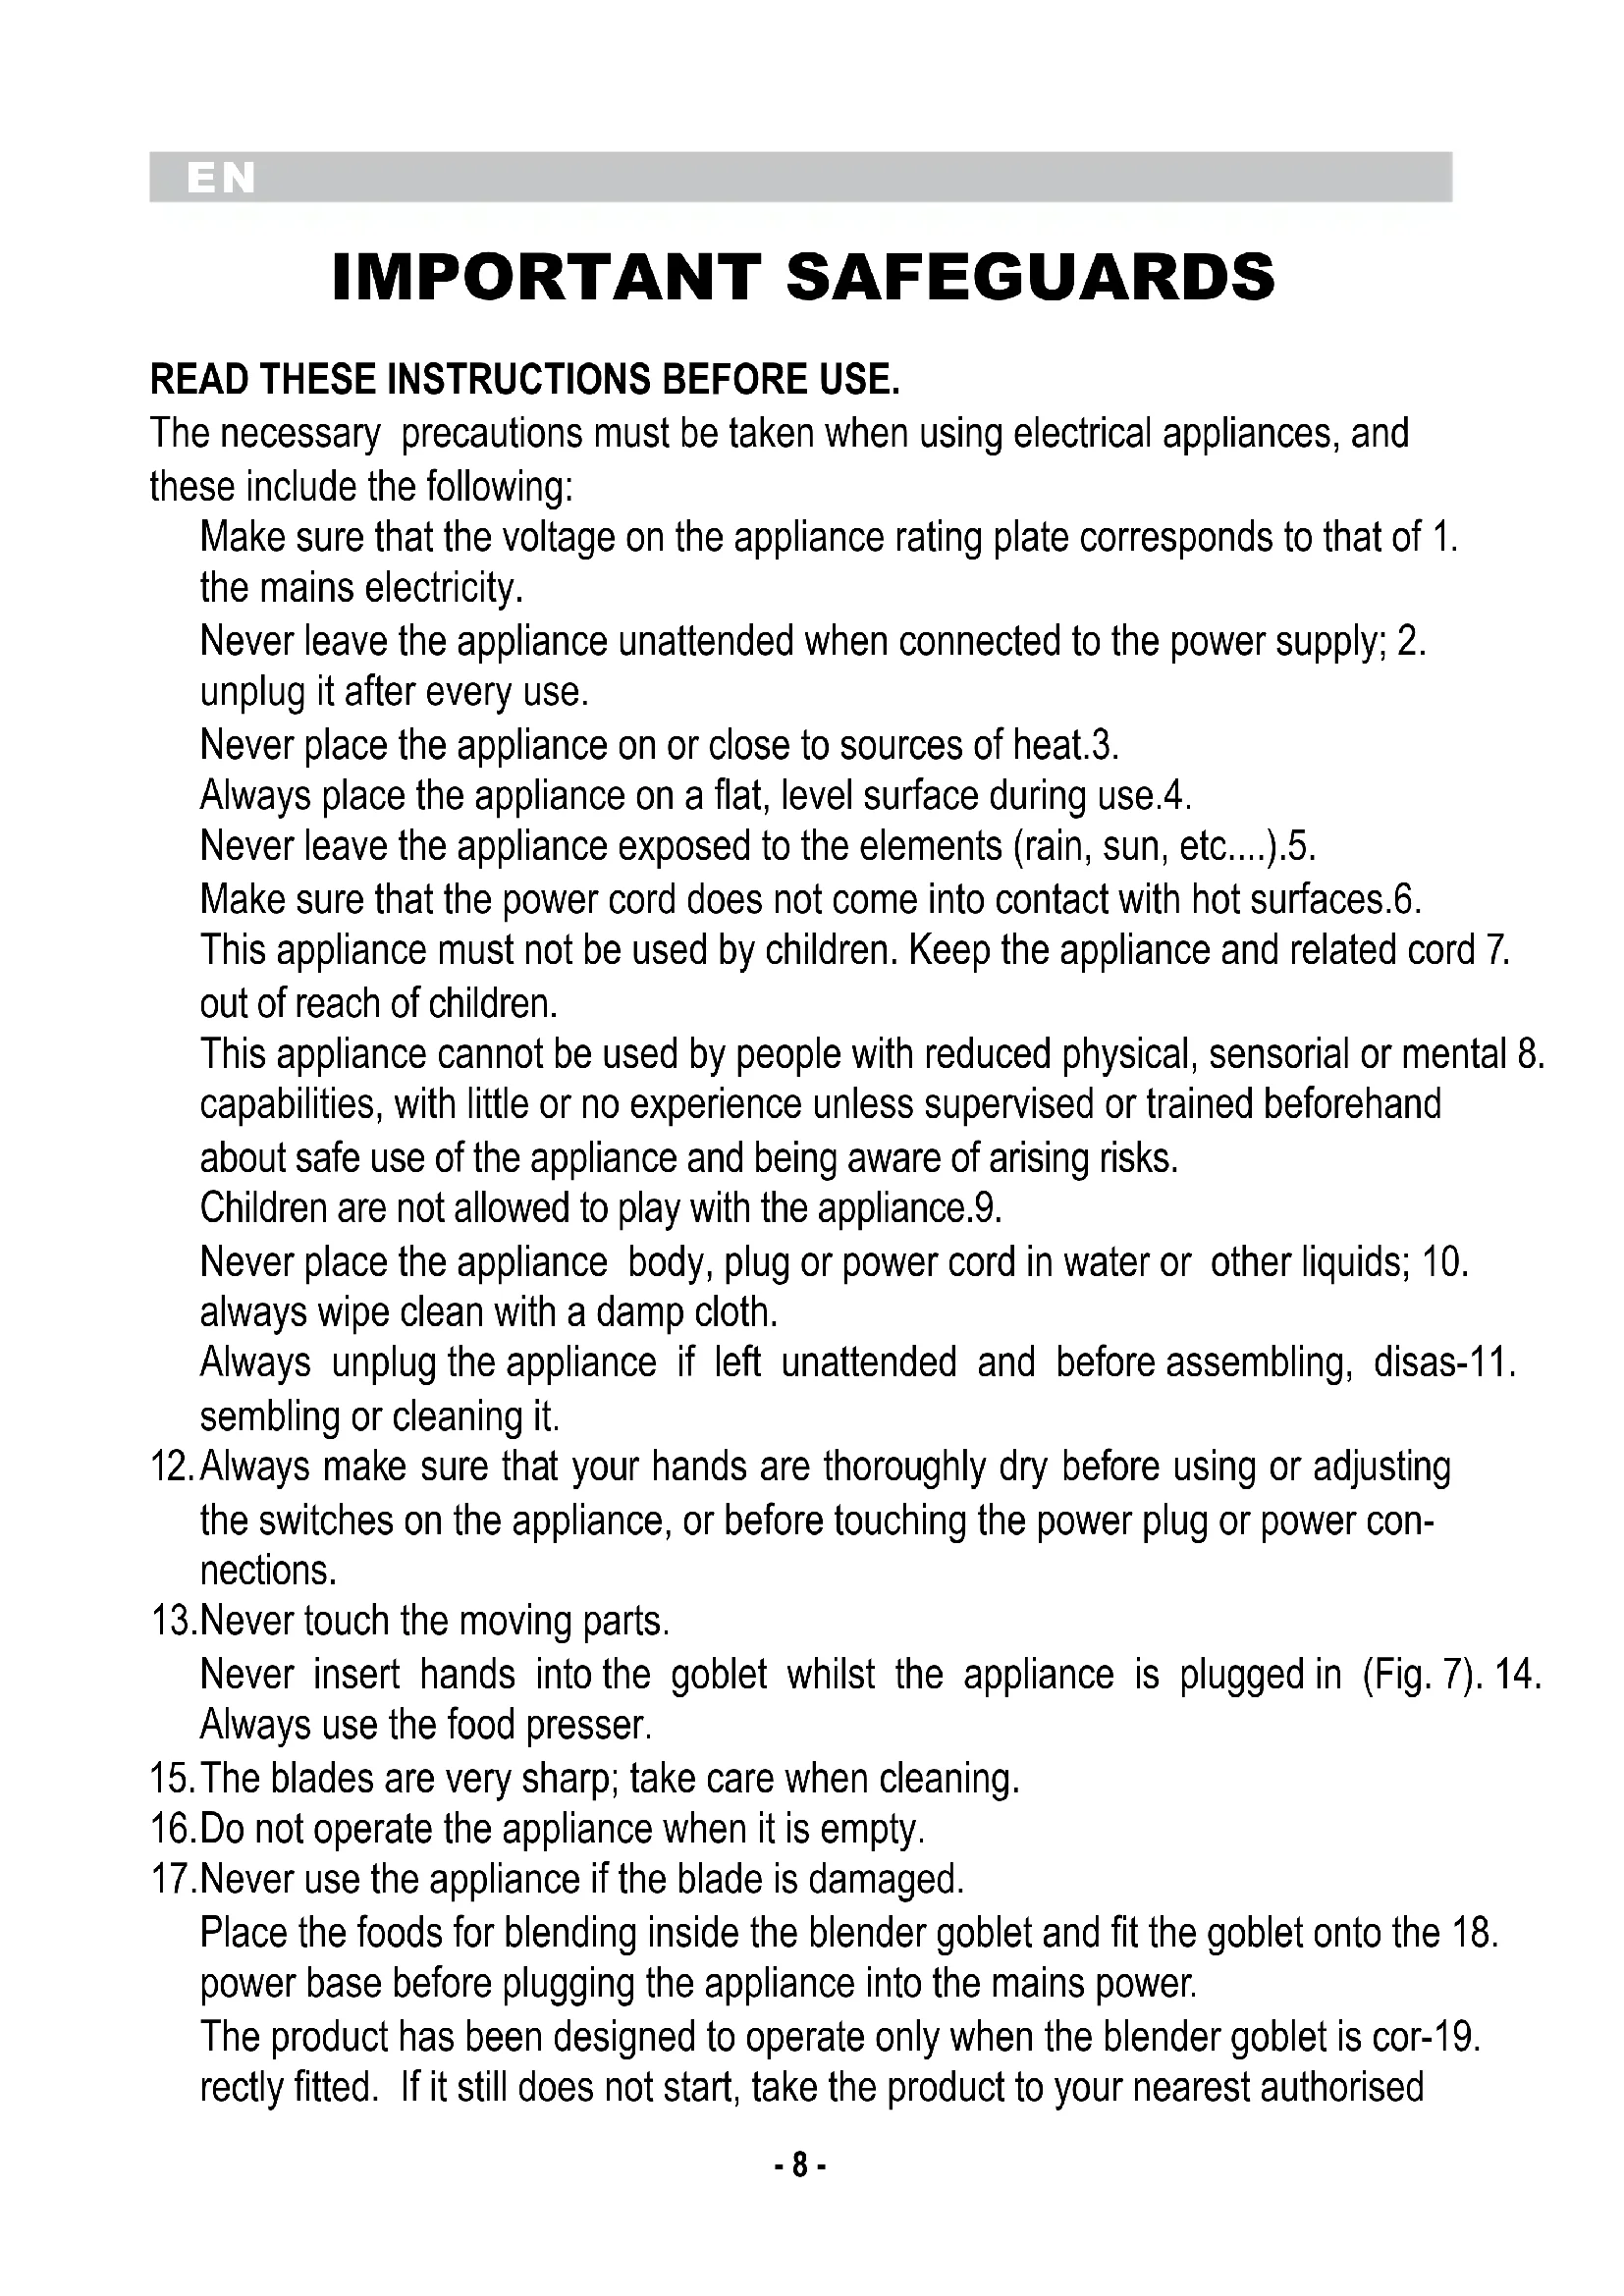
The necessary precautions must be taken when using electrical appliances, and these include the following:
Make sure that the voltage on the appliance rating plate corresponds to that of 1. the mains electricity.
Never leave the appliance unattended when connected to the power supply; 2. unplug it after every use.
Never place the appliance on or close to sources of heat.3.
Always place the appliance on a flat, level surface during use.4.
Never leave the appliance exposed to the elements (rain, sun, etc....).5.
Make sure that the power cord does not come into contact with hot surfaces.6.
This appliance must not be used by children. Keep the appliance and related cord 7. out of reach of children.
This appliance cannot be used by people with reduced physical, sensorial or mental 8. capabilities, with little or no experience unless supervised or trained beforehand about safe use of the appliance and being aware of arising risks.
Children are not allowed to play with the appliance.9.
Never place the appliance body, plug or power cord in water or other liquids; 10. always wipe clean with a damp cloth.
Always unplug the appliance if left unattended and before assembling, disas-11. sembling or cleaning it.
-
Always make sure that your hands are thoroughly dry before using or adjusting the switches on the appliance, or before touching the power plug or power connections.
-
Never touch the moving parts.
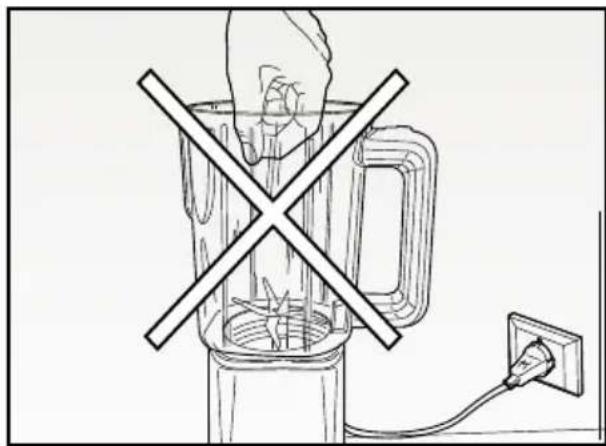
Never insert hands into the goblet whilst the appliance is plugged in (Fig. 7). 14. Always use the food presser.
-
The blades are very sharp; take care when cleaning.
-
Do not operate the appliance when it is empty.
-
Never use the appliance if the blade is damaged.
Place the foods for blending inside the blender goblet and fit the goblet onto the 18. power base before plugging the appliance into the mains power.
The product has been designed to operate only when the blender goblet is cor-19. rectly fitted. If it still does not start, take the product to your nearest authorised
assistance centre.
Do not use the handle on the goblet to carry the blender.20.
Wait for the blade to stop completely before removing the cover.21.
To prevent accidents or damage to the appliance, always keep hands and cooking 22. utensils well away from blades and any moving parts.
To unplug the appliance, grip the plug and remove it directly from the power 23 socket. Never pull the power cord to unplug the appliance.
Should the power cord be damaged, have it be repaired by the manufacturer or 24. related service centre, otherwise by a similar skilled person, to prevent any risk.
All repairs, including power cord replacement, are to be carried out only by the Service Centre or the technicians authorized by Ariete, to prevent any risk.
In case of using extension leads, these must be suitable for the appliance power 25. to avoid danger to the operator and for the safety of the environment in which the appliance is being used. Extension leads, if not suitable, can cause operating anomalies.
Do not threaten the safety of the appliance by using parts that are not original or 26. which have not been approved by the manufacturer.
This appliance is designed for HOME USE ONLY and may not be used for com-27. mercial or industrial purposes.
This appliance complies with the EC regulation 1935/2004 concerning the materi-28. als and objects intended to come in contact with food.
Any changes to this product that have not been expressly authorised by the 29. manufacturer may lead to the user's guarantee being rendered null and void.
In the event that you decide to dispose of the appliance, we advise you to make 30. it inoperative by cutting off the power cord. We also recommend that any parts that could be dangerous be rendered harmless, especially for children, who may play with the appliance or its parts.
- Packaging must never be left within the reach of children since it is potentially dangerous.

- For disposing the appliance in an adequate manner, according to the European Directive 2012/19/EC, please read the appropriate leaflet attached.
DO NOT THROW AWAY THESE INSTRUCTIONS
APPLIANCE DESCRIPTION (Fig. 1)
A Filler cap
B Lid
D Graduated goblet
D Blades
E Motor body
F Function panel
G Function selecting dial
H Operating time increase button (+)
I Operating time decrease button (+)
L ON-OFF button
M Digital display
N Operating speed decrease button (-)
O Operating speed increase button (-)
P Pulse operation button
Q Connecting joint
R Food presser
HOW TO OPERATE
This appliance is equipped with a dual safety device, on the motor body (E) and on the lid (B).
The motor body safety device allows to stop the operation when the goblet is raised (C). The safety device on the lid stops or prevents operation when the lid is not properly positioned on the goblet.
The lid is equipped with a hook that engages in the handle and that, connected to the motor body, prevents the operation without a specific contact.
- Make sure the appliance is plugged in.
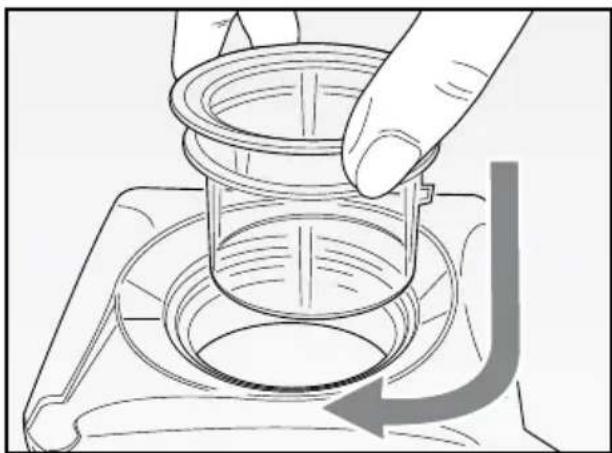
- Position the goblet (C) on the motor body (E), always with the handle in the position shown in Fig. 2, matching the arrow on the goblet side with the one on the motor body.
- Cut fruit and vegetable into small pieces and place them into the goblet (C) adding water or milk. The liquid ingredients must not exceed 1200 ml.
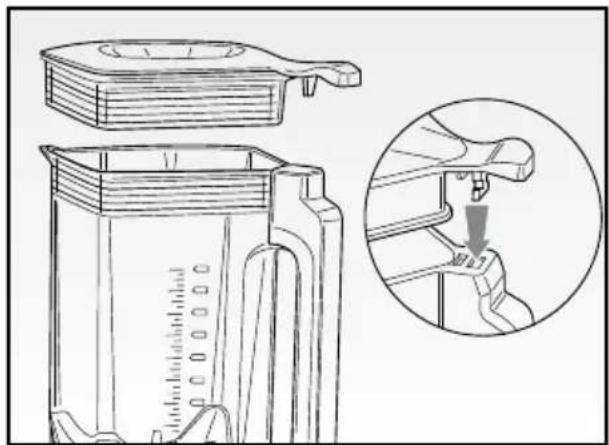
- Position the lid (B) on the goblet (C) so that the lid hook engages with the goblet handle and press it slightly downwards until it locks in place (Fig. 3).
- Close the upper hole of the lid (B) by inserting the apposite cap (A) and rotating it clockwise (Fig. 4). Make sure the lid (B) and the cap (A) are properly inserted to prevent food from coming out during the processing stages.
- Plug power cord into a socket. The function panel (F) and the function selecting dial (G) will light. The ON-OFF button (L) will become red indicating that the appliance is ready.
- Press the ON-OFF button (L) and select one of the functions that can be seen on the function panel (F) by rotating the apposite dial (G). The function icon will flash.
- Once having selected the required function, press the ON-OFF button (L) that will become green and the appliance will run automatically:
SOUP
The appliance will operate at the highest speed for 6 minutes, heating the ingredients necessary for preparing hot soups.
SAUCE
This function allows to prepare sauces of any kind (tomato, pesto, etc.) in a very short time.
VEGETABLE
Use this function for preparing “green smoothies”. Unlike the “Smoothies” function, this program allows to perfectly mix the leafy ingredients.
CRUSHER
This program allows to crush ice finely. Suitable for preparing water ice.
SMOOTHIES
Use this function for preparing pure fruit smoothies that do not contain green leaves.
RESET (manual)
By selecting this function, the appliance will run in manual mode:
- set the speed and the operating time using the apposite increase or decrease buttons (M). The selected parameters will be shown on the digital display (M).
- Press the ON-OFF button (L) that will become green and the appliance will run automatically. The digital display (M) will show the elapsed time.
-
By selecting this function, it is possible to use also the pulse operation. Press and release the apposite "PULSE" button (P) to stop operation. For best results, keep pressed for a very short period (2/3 seconds).
-
Press the ON-OFF button (L) to stop operation.
- If the appliance should fail to start, make sure the goblet and the lid are fitted properly. The appliance is fitted with a dual safety device to prevent it from operating if the goblet is not fitted or if it has been fitted incorrectly and prevents the blade from rotating if the lid is not suitably closed.
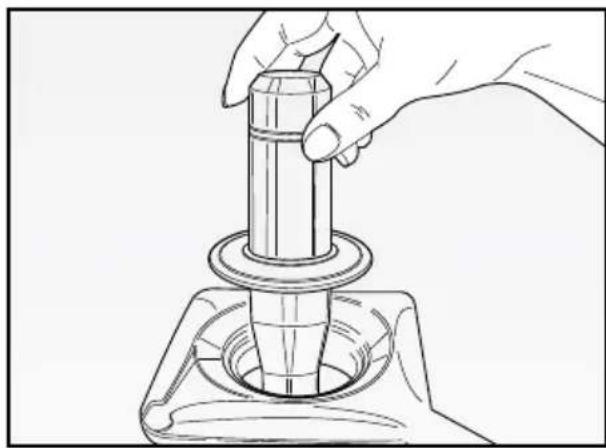
- During use, it is possible to add foods into the goblet, by lifting out the filler cap (A) after having switched off the appliance. Press inserted food using the apposite presser (R) - Fig. 5.
- It may be necessary to switch the appliance off several times in order to remove food residues from the goblet sides. In this case, switch the appliance off and unplug it.
- Remove the cap and the lid and remove eventual remains inside the goblet by means of an appropriate spatula.
WARNING:
Prepare the container with the food to mix and put it on the motor body before plugging the appliance in.
Never remove the lid (B) during use or when the goblet is positioned on the motor body: a safety closing system locks the lid on the goblet. Remove the goblet from the motor body before lifting the lid to avoid damages to the safety lock.
Never pour hot liquids into the blender. The liquids must be within 50^ C and must not exceed the 800 ml level in the goblet.
Pay attention when removing the cap (A) to add and mix the hot ingredients. Steam may come out unexpectedly.
Keep the food presser away from blades to avoid damage.
AFTER PROCESSING
- At the end of a program (crush, smooth, soup...), after 3 minutes downtime, the appliance enters the stand-by mode: the ON-OFF button (L) will go on with the corresponding flashing red light, while the other buttons/lights will remain off.
- At this point, to proceed with another use of the appliance, press the ON-OFF button (L) which flashes (the only light on). The whole panel and the texts on the dial (G) will go on and the “RESET” function will start flashing.
- Rotate the dial (G) to proceed with the selection of one function, or press the increase/decrease buttons of time and speed to enter the manual mode.
- Press the ON-OFF button (L) to start the program.
- At the end of a program, if the goblet (C) is removed from the motor body (E), e.g. for pouring, and immediately after it is placed back properly, after 3 minutes downtime, the appliance enters the stand-by mode: the ON-OFF button (L) will go on with the corresponding flashing red light, while the other buttons/lights will remain off.
- At this point, press the ON-OFF button (L) which flashes (the only light on). The whole panel and the texts on the dial (G) will go on.
- Press any other button, but NOT the ON-OFF button (L) to restart the appliance. The "RESET" function will start flashing.
- Rotate the dial (G) to proceed with the selection of one function, or press the increase/decrease buttons of time and speed to enter the manual mode.
- Press the ON-OFF button (L) to start the program.
DISASSEMBLY OF THE BLENDER
- Unplug the appliance and wait for the blades to stop completely before removing the goblet (C) from the base.
- To remove the lid (B), remove the goblet (C) from the motor body so that the safety device locks and the lid can be removed easily without the risk of damaging the lock.
- Pour the contents into a glass.
CLEANING AND MAINTENANCE
Do not disassemble the appliance or try to intervene in any way inside it. Keep the appliance properly clean and tidy to ensure an optimal quality of prepared food and a longer life of the machine itself.
- The goblet (C), the lid (B), and the cap (A) may be put in the upper part of the dishwasher.
- Use a slightly damp cloth for cleaning the motor base. Do not use potentially abrasive products.
- Clean blade thoroughly.
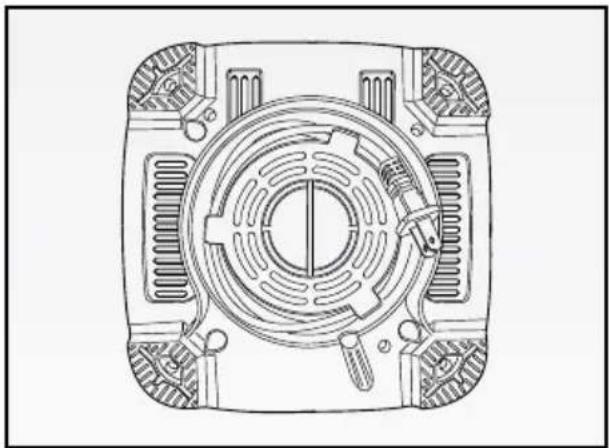
- Store the appliance by winding the power cord on the appropriate cord winder (Fig. 6).
WARNING:
Never place the appliance body, plug or power cord in water or other liquids; always wipe clean with a damp cloth.
Even when not in use, unplug the appliance before fitting or removing the single parts or before cleaning.
Be very careful during cleaning of blade as it is extremely sharp.
NOTE:
The package contains 2 connecting joints (Q). They are spare parts to replace the damaged part already present in the product on the motor body (E).
To replace the part:
- remove the goblet (C) from the motor body (E);
- remove the old joint by using the pliers (Fig. 8);
- insert a new joint (Fig. 9);
- make sure the new adapter is at the same height as the joint support (Fig. 10).
INSTRUCTIONS IMPORTANTES
LIRE CES INSTRUCTIONS AVANT L'EMPLOI.
SMOOTHIES (Smoothies)
SMOOTHIES (milkshake)


- AVVERTENZE IMPORTANTI
- LEGGERE QUESTE ISTRUZIONI PRIMA DELL'USO.
- DO NOT THROW AWAY THESE INSTRUCTIONS
- APPLIANCE DESCRIPTION (Fig. 1)
- HOW TO OPERATE
- SOUP
- SAUCE
- VEGETABLE
- CRUSHER
- SMOOTHIES
- RESET (manual)
- WARNING:
- AFTER PROCESSING
- DISASSEMBLY OF THE BLENDER
- CLEANING AND MAINTENANCE
- NOTE:
- INSTRUCTIONS IMPORTANTES
- LIRE CES INSTRUCTIONS AVANT L'EMPLOI.
- SMOOTHIES (Smoothies)
- SMOOTHIES (milkshake)
Brand : ARIETE
Model : Blend & Heat 578
Category : Blender