Dr. Jones - Metal detector Duramaxx - Free user manual and instructions
Find the device manual for free Dr. Jones Duramaxx in PDF.
User questions about Dr. Jones Duramaxx
0 question about this device. Answer the ones you know or ask your own.
Ask a new question about this device
Download the instructions for your Metal detector in PDF format for free! Find your manual Dr. Jones - Duramaxx and take your electronic device back in hand. On this page are published all the documents necessary for the use of your device. Dr. Jones by Duramaxx.
USER MANUAL Dr. Jones Duramaxx
natural_image
Green circuit board pattern with white traces and connectors (no text or symbols)Metalldetektor
natural_image
Line drawing of a metal detector with attached digital meter (no text or symbols)text_image
QR code image containing encoded data, no visible human-readable textINHALTSVERZEICHNIS
text_image
Technical diagram of a metal detector with numbered components for identificationnatural_image
Line drawing of a handheld device with digital display, safety goggles, and mechanical components (no text or symbols)natural_image
Line drawing of a mechanical lever system with weights and a pulley (no text or symbols)text_image
Diagram illustrating a robotic arm and hand motion with labeled actions and a 'X' mark indicating a specific movement.text_image
GND BALANCE P DEPTHnatural_image
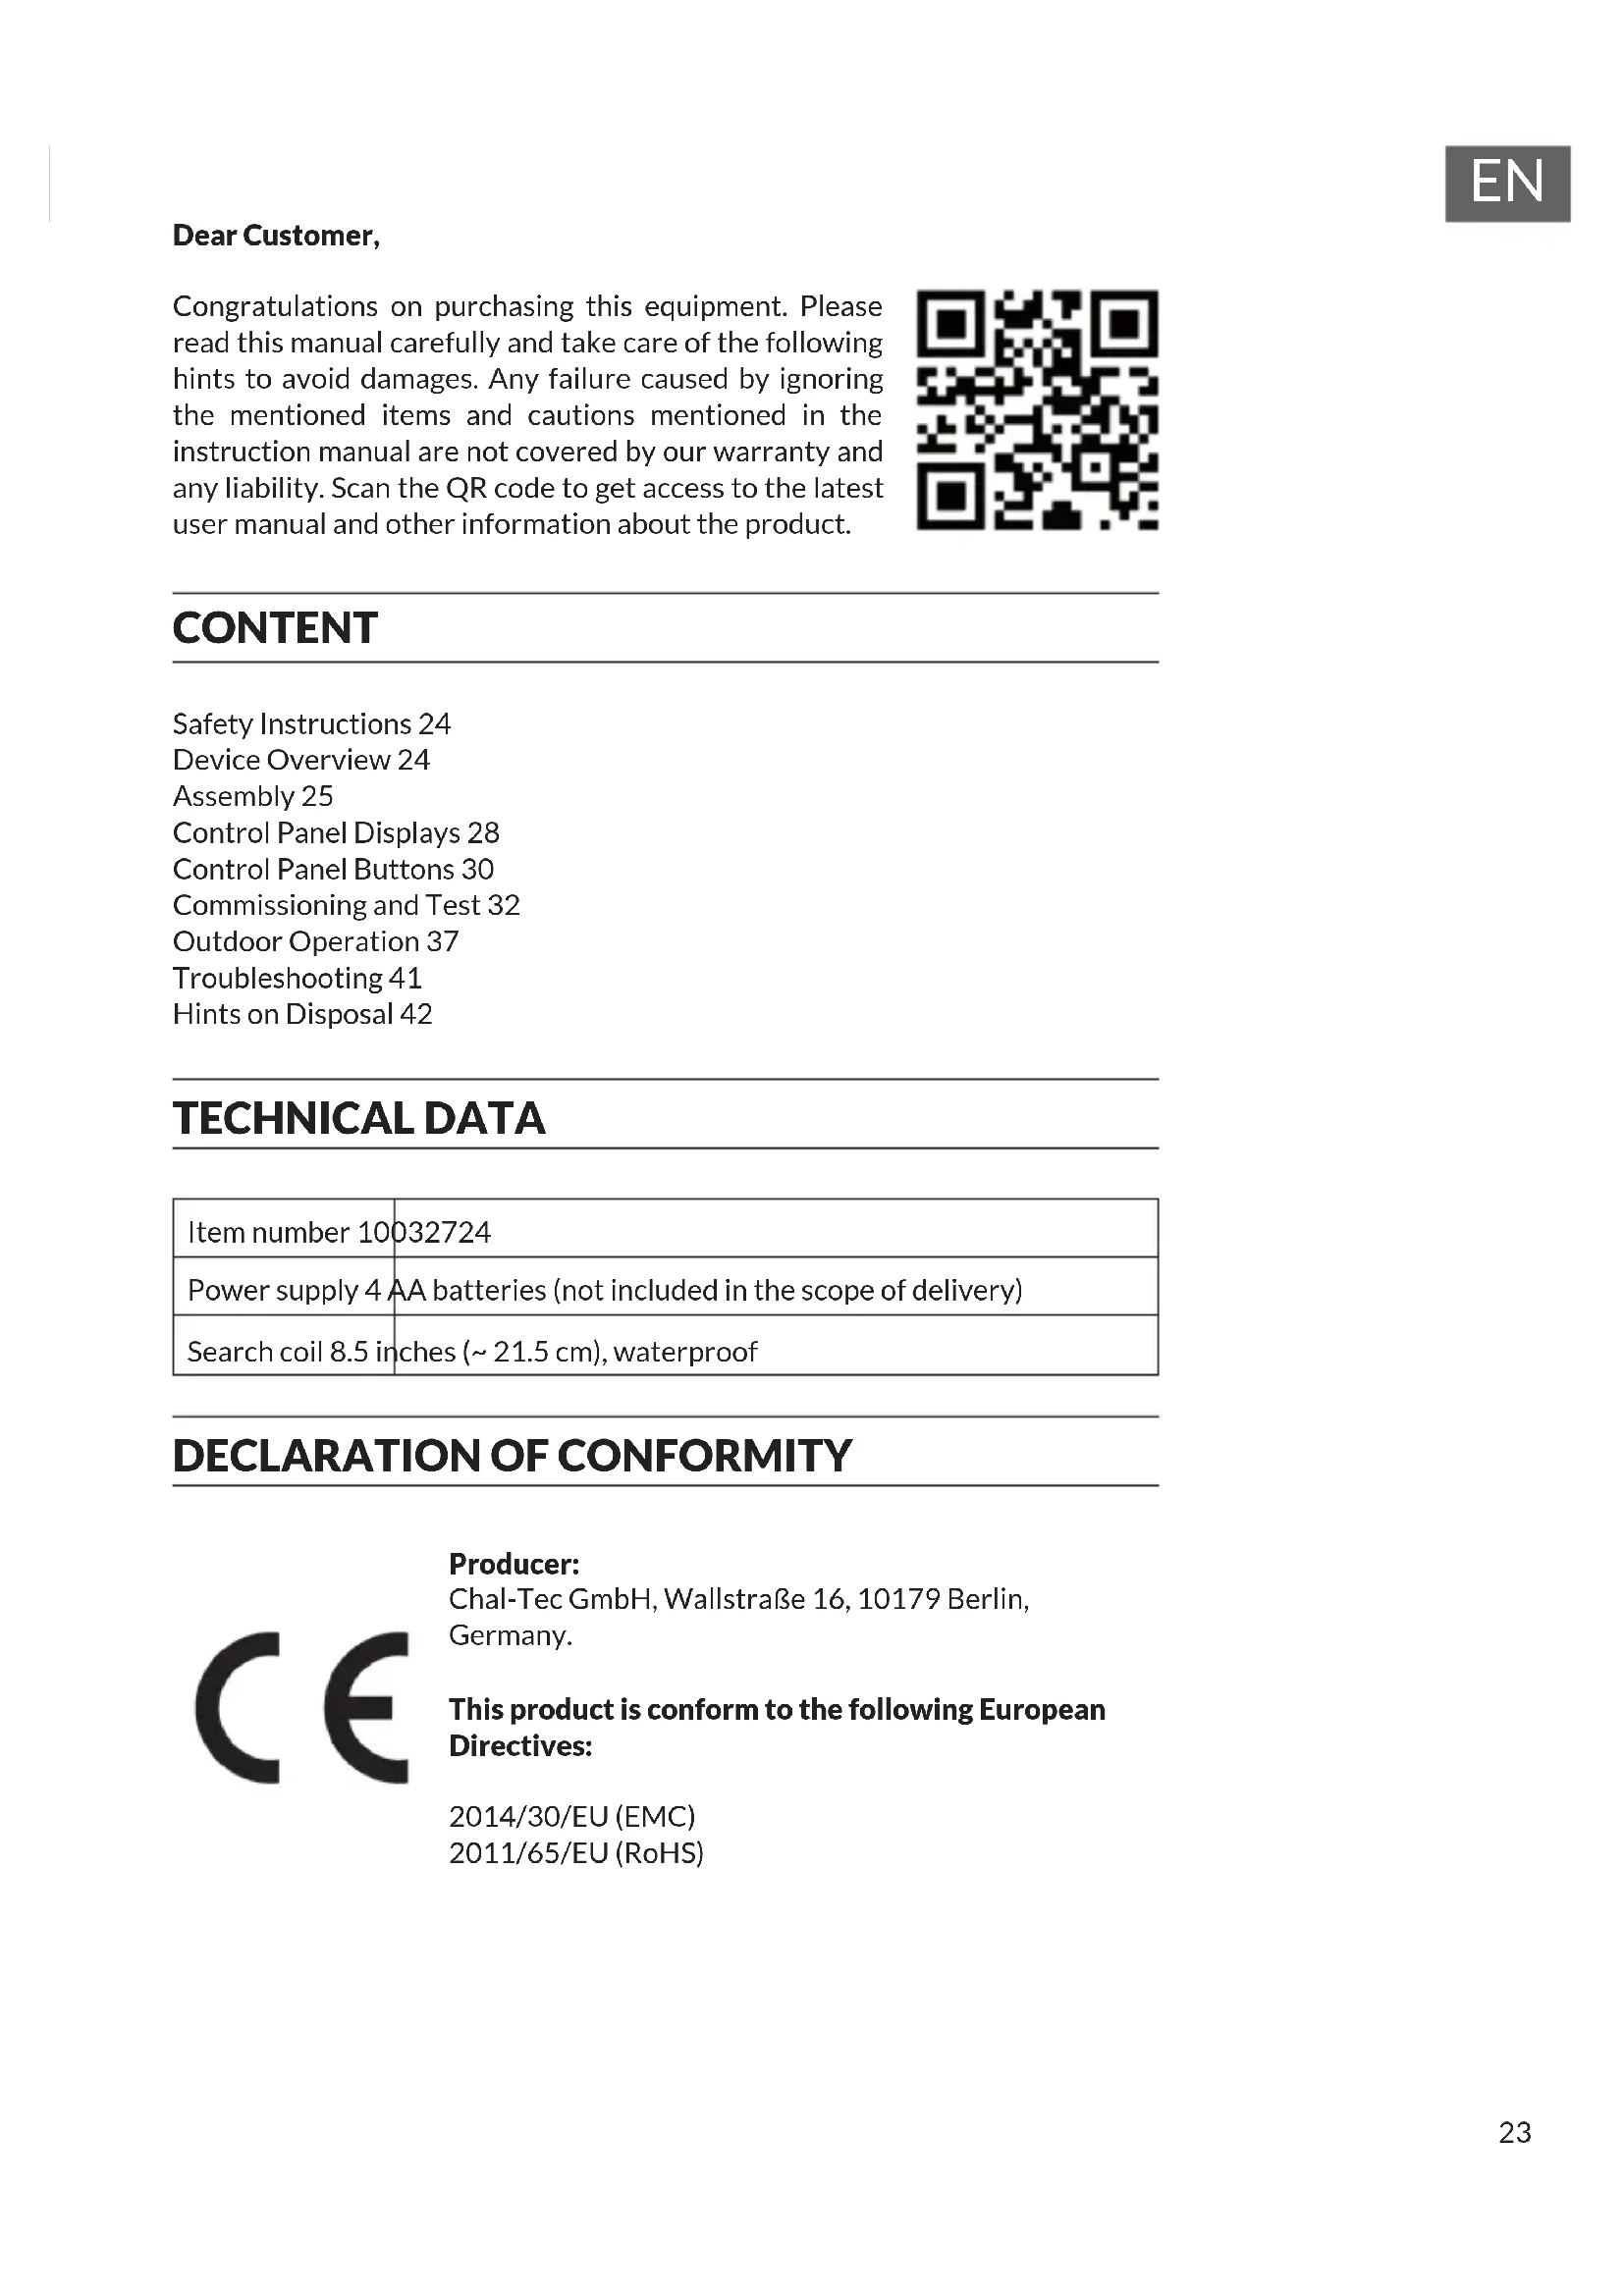
Symbol of a trash bin crossed with a diagonal line, no text or labels presentCongratulations on purchasing this equipment. Please read this manual carefully and take care of the following hints to avoid damages. Any failure caused by ignoring the mentioned items and cautions mentioned in the instruction manual are not covered by our warranty and any liability. Scan the QR code to get access to the latest user manual and other information about the product.

text_image
QR code image containing encoded data, no visible human-readable textCONTENT
Safety Instructions 24
Device Overview 24
Assembly 25
Control Panel Displays 28
Control Panel Buttons 30
Commissioning and Test 32
Outdoor Operation 37
Troubleshooting 41
Hints on Disposal 42
TECHNICAL DATA
| Item number 10032724 | |
| Power supply 4 | AA batteries (not included in the scope of delivery) |
| Search coil 8.5 inches (~ 21.5 cm), waterproof | |
DECLARATION OF CONFORMITY

text_image
C€Producer:
This product is conform to the following European
Directives:
2014/30/EU (EMC)
2011/65/EU (RoHS)
SAFETY INSTRUCTIONS
- Do not wear headphones in areas of high traffic.
• Always get a permit before searching.
- Keep away from underground piping, cables, and pipelines, especially those that carry flammable gases and liquids.
- Searching in military areas is not allowed and poses a great danger.
- When excavating an object, be careful not to destroy vegetation or the environment. Refill all holes that have been dug.
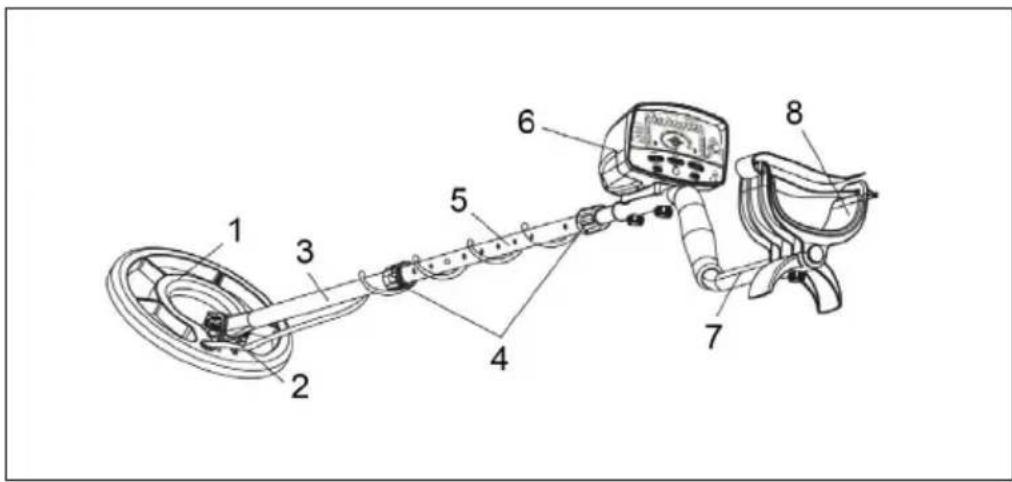
DEVICE OVERVIEW
text_image
Labeled diagram of a metal detector with numbered components for identification| 1 Search coil 5 Center tube | ||
| 2 Locking button 6 Control panel | ||
| 3 Lower tube 7 Top tube | ||
| 4 Locking nut 8 Armrest |
ASSEMBLY
1 Open the packaging and remove the parts. Release the locking button on the lower tube and remove the screw. Attach the search coil to the lower tube and lock it.
Note: The rubber seal must be correctly mounted (see picture).
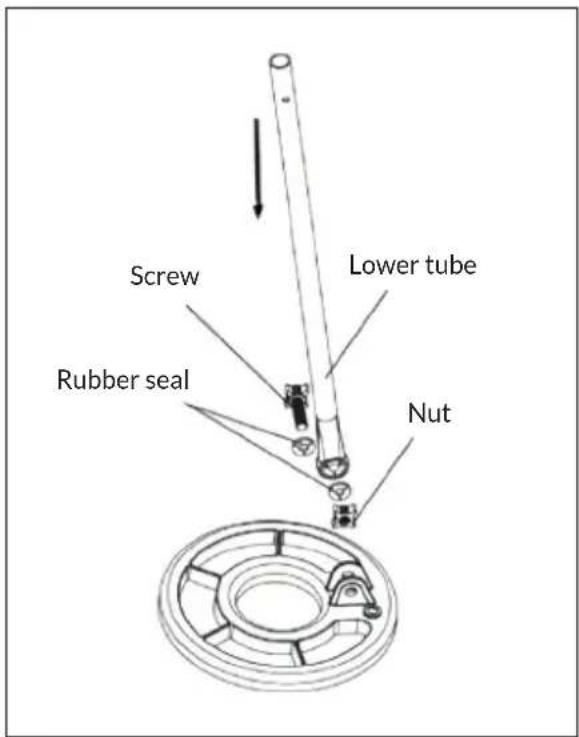
text_image
Screw Lower tube Rubber seal Nut2 Loosen the lock nut on the center tube, then press the silver button on the lower tube and insert it into the center tube.
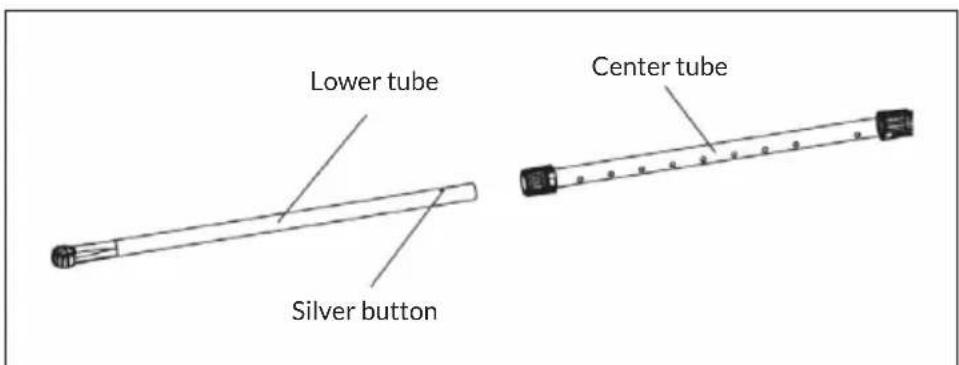
text_image
Lower tube Silver button Center tube3 Loosen the lock nut on the other end of the center tube, then push the silver button on the top tube and insert it into the center tube. Then tighten the lock nut again.
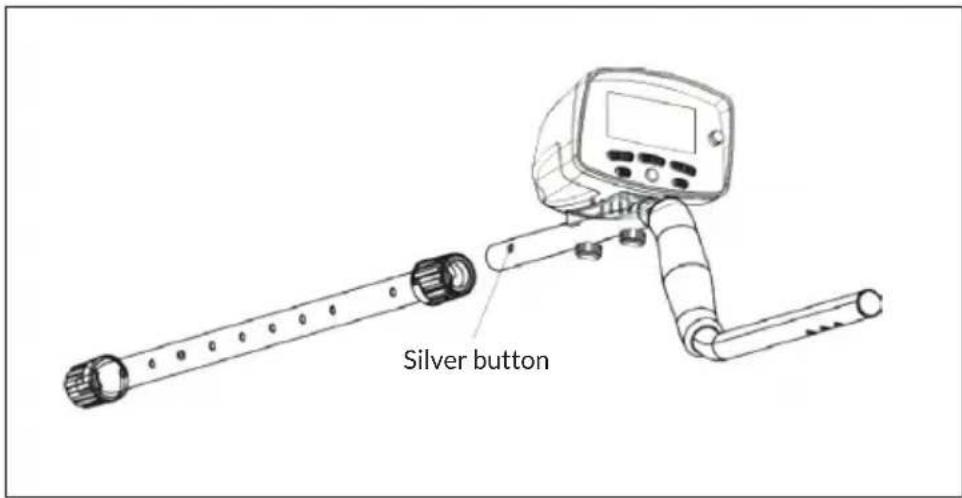
text_image
Silver button4 Adjust the full length of the detector so that your arms are straight when searching. Once the desired length has been determined, tighten the locknuts. This makes detection easier and more comfortable.
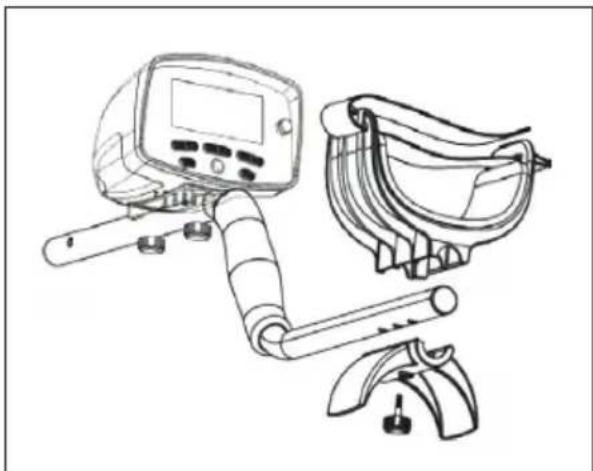
5 The armrest has three positions. Use the triangular fixing screw to secure the armrest in the correct position, depending on the length of your arms.
natural_image
Line drawing of a medical or safety device with digital display, gowns, and tool (no text or symbols)How to insert the batteries
Note: You need 4 AA batteries. The batteries are NOT included. The batteries should provide about 40 hours of search time. If the detector is not going to be used for a long time, please remove the batteries so they do not leak or rust.
123Battery compartment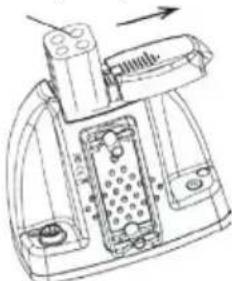 | 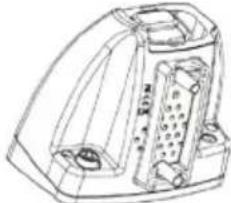 | 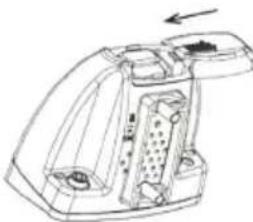 |
| Press the button on the battery compartment and slide it open. | Remove the battery compartment and insert 4 AA batteries. Be sure to insert the batteries in the correct direction. | Align the lid with the battery compartment and close it again. |
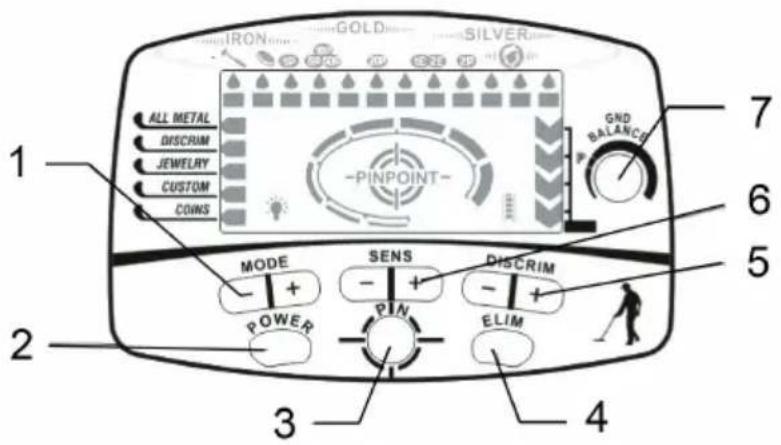
CONTROL PANEL DISPLAYS
All settings and search results are clearly displayed on the LCD screen.

text_image
Target metal indicator Mode display 3 Upper scale (arrows) Backlight indicator PINPOINT Lower scale (segments) Target depth display Pinpoint display Sensitivity indicator Battery indicator1 Mode display: Displays the selected mode of operation of the 5 modes. Select different modes by pressing the [+] or [-] key.
2 Target metal indicator: At the top of the screen, the three types of metal are displayed, depending on which metal you are looking for.
3 Upper scale: Consists of 12 arrows that allow you to identify and distinguish the target object as accurately as possible. In ALL METAL mode, all 12 indicators will light up. When selecting the modes, the eliminated metals will not light up. In pinpoint mode, the upper scale shows the signal strength.
4 Lower scale: Consists of 12 illuminated segments, which can be used to determine the position and direction even better.
5 Target depth display: Consists of 4 settings: 2 inches (5 cm), 4 inches (10 cm), 6 inches (15 cm) and 8+ inches (20 cm), showing the approximate coin depth depending on size, metal and soil texture. In pinpoint mode, the detector can more accurately determine the target.
6 Battery indicator: 4 illuminated segments indicate a high power; at low power the lights will go out.
7 Sensitivity indicator: Consists of 8 indicators. When all 8 are lit, the sensitivity is highest. Select the sensitivity by pressing + or - (not required in pinpoint mode).
8 Pinpoint display: Hold down the PINPOINT button until the pinpoint indicator lights up. This activates the non-motion mode and improves the accuracy of finding an object.
9 Backlight indicator
CONTROL PANEL BUTTONS
text_image
1 ALL METAL DISCRIM JEWELRY CUSTOM COINS 2 MODE SENS DISCRIM POWER PIN ELIM 3 4 5 6 7 GND BALANCE| Button Function | ||
| 1 MODE Press the [+] or | -9 button to select the desired mode:ALL METAL: All metals are displayed.DISCRIM: Pressing the [+] or [-] key eliminates certain metals.JEWELRY: Eliminates iron and reacts faster to other metals.CUSTOM: To eliminate certain types of metals, press the [+] or [-] until the arrow on the upper scale lights up under this type of metal. Then press the ELIM key to eliminate and replace this metal group.COINS: Ignores the common waste metals. Coins made of similar metals are also ignored. | |
| 2 POWER Press once to | turn on the device. Press again to turn off the device. | |
| 3 PINPOINT Press and hold the PINPOINT key to determine the exact location of a target that is hidden in the ground, behind a wall, or inside another object. When pinpointing, the PINPOINT scale indicates the signal strength. The closer the detector is to the metal object, the brighter the indicator light will become and the louder the beep will sound. | ||
| 4 ELIM This button can be used in conjunction with the DISCRIM button to eliminate certain metals. Press and hold the ELIM button for three seconds. An indicator will light up on the screen to confirm activation. | ||
| 5 DISCRIM Remove metal types by pressing DISCRIM [+] or [-]. | ||
| 6 SENS Choose between 8 different levels of sensitivity by pressing the [+] or [-] key. If all the lights are on, this means it is set to the highest sensitivity. If you encounter interference, reducing sensitivity will provide better detection (not relevant to pinpoint mode). | ||
| 7 GROUND BALANCE Used in PINPOINT mode. By default, the position [P] is set. For heavily mineralized soils, ground balance should be used. Move the coil of the detector close to the ground and turn the knob until you eliminate as much background noise as possible. | ||
COMMISSIONING AND TEST
1 Test the device with a metal sample before searching outside, e.g. with:
- Iron nail
• 10/20/50 Euro cent coin (copper)
• 1 or 2 Euro coin (copper / nickel) - Silver coin
2 Carefully place the detector on a wooden or plastic table with the search coil protruding at least 30 cm beyond the end. Hold the test objects as centrally as possible over the search coil. Important: Keep the detector away from other power sources. Please remove all personal metallic objects before testing as they may interfere with detection.
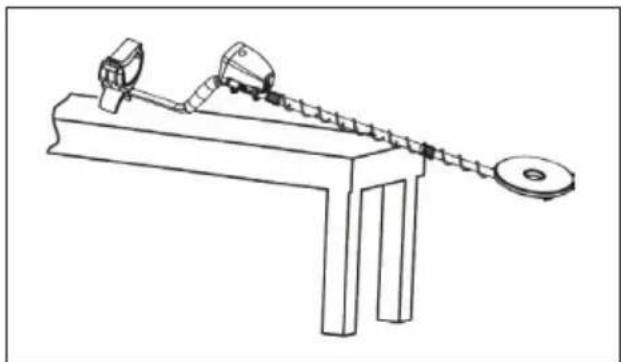
natural_image
Line drawing of a mechanical lever system with weights and a pulley (no text or symbols)3 After pressing the POWER button, the detector will beep twice and the screen will light up. As soon as the detector is ready, it will resume the mode it was in before it was last turned off.

text_image
IRON GOLD SILVER 1 ALL METAL DISCRUM JIMIKLET CUSTOM CORN SIDE BALANCE P MODE SENSO DISCRUM POWER ELOW4 Test: ALL METAL mode
Guide each of the four metal samples 10 cm above the search coil. The detector will make a different sound for each sample.
- The distance of the sample will be displayed as 4".
- The arrow in the upper scale will indicate which metal is involved.
text_image
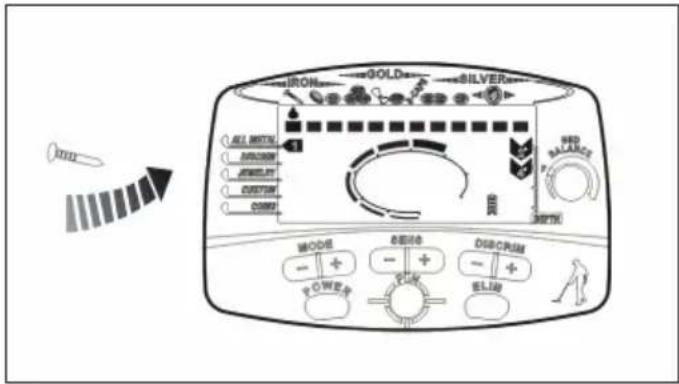
IRON GOLD SILVER ALL SWITCH JIMIKIN JEWELRY CUSTOM CORNY WALD BALANCE MINI MODER 表面 finish DISCIPLUM - + - + - + - + - POWER POWER BLUE5 Test: DISCRIM mode
Press the MODE + button until the arrow points to DISCRIM. Press the DISCRIM + button until the top scale arrow lights below the metal you wish to exclude. Press the DISCRIM + button again and the segment on the lower scale will go off, ignoring the iron nail while searching. Guide each of the four metal objects 10 cm above the coil.
• The detector will not respond to the iron nail.
- The reaction of the detector to the other three metal objects will be the same as in the ALL METAL mode.
- By repeating the above steps, other unwanted metals can be excluded.
text_image
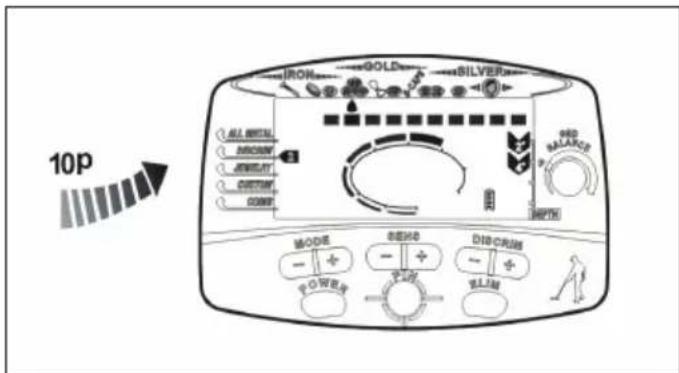
10p ALI TOTAL BROOD JEWELL CUSTOM COME GOLD SILVER RED BALANCE MODE DISH CREAM POWER FLAM6 Test: JEWELRY mode
Press the MODE + button until the arrow points to JEWELRY. The first and second segments of the lower scale will go out. Guide each of the four metal objects 10 cm above the coil.
• The detector will not respond to the iron nail.
- The reaction of the detector to the other three metal objects will be the same as in the ALL METAL mode.
text_image
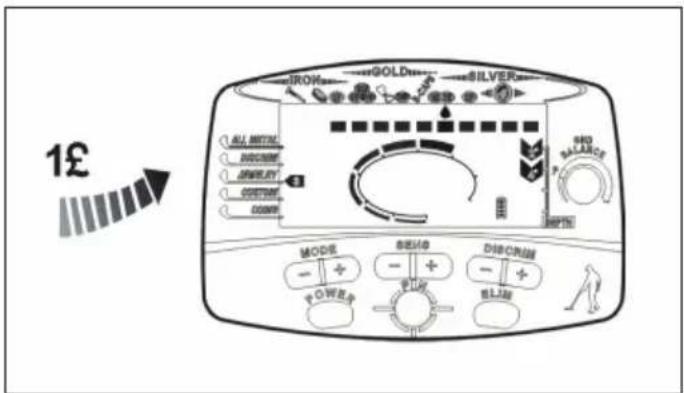
1£ GOLD SILVER ILO ALL MOUNTAL DISCUIT AMOUNT CONDITION COUNTER MODE BEAG DISCRANE POWER ELET BLUE BASLANCE 100%7 Test: CUSTOM mode
Press the MODE + button until the arrow points to CUSTOM. For example, to remove the 1 pound coin, press the DISCRIM + button until the top scale arrow points to the 1 pound coin. Press the ELIM button and the segment in the lower scale will go out. If you use this mode, the detector will remember the setting and recall it the next time you start it up. Guide each of the four metal objects 10 cm above the coil.
• The detector will not respond to the 1 pound coin.
- The reaction of the detector to the other three metal objects will be the same as in the ALL METAL mode.
- By using the DISCRIM + key, several metals can be excluded in the search.
text_image
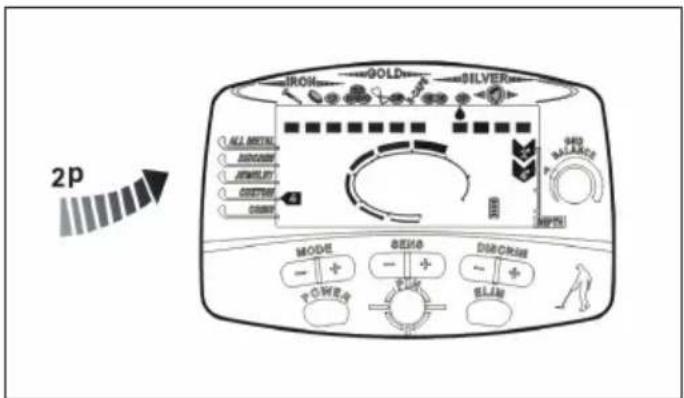
2p IRON GOLD SILVER ALL MOUNTING DUNCHIN MINIMUM CUSTOM COUNT MODE BEACH DIAB CREAM POWER PULL BLAN8 Test: COINS mode
Press the MODE + button until the arrow points to COINS. The segments under iron nails, bottle caps and can tabs will disappear, eliminating the three most common waste metals in the search. Guide each of the four metal objects 10 cm above the coil. Note: Coins that contain one of the three waste metals will also be eliminated.
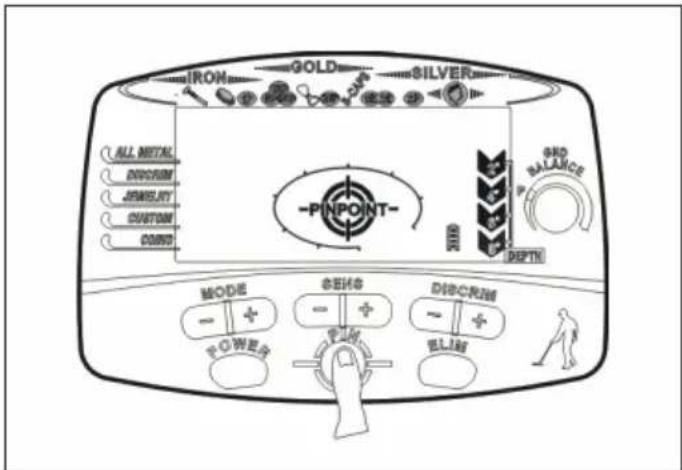
- Press and hold the PINPOINT button and the PINPOINT indicator will light up. The coin depth indicator shows [8+]. The upper and lower scale displays will all go out. The detector will emit a deep tone. If the displays do not go out, release the PINPOINT key and try again.
text_image
IRON GOLD SILVER ALL METAL DISCRIM JEWELRY CUSTOM CONO -PINPOINT- MODE - + POWERS GENS - + DIMCRIM - + ELIAS DEPTH GND BALANCE- As soon as the upper scale indicators have gone out, bring for example a 2-pence coin towards the search coil. At a distance of 8", the segments will start to glow and a signal will sound. The closer the coin gets to the search coil, the louder the sound will become.
text_image
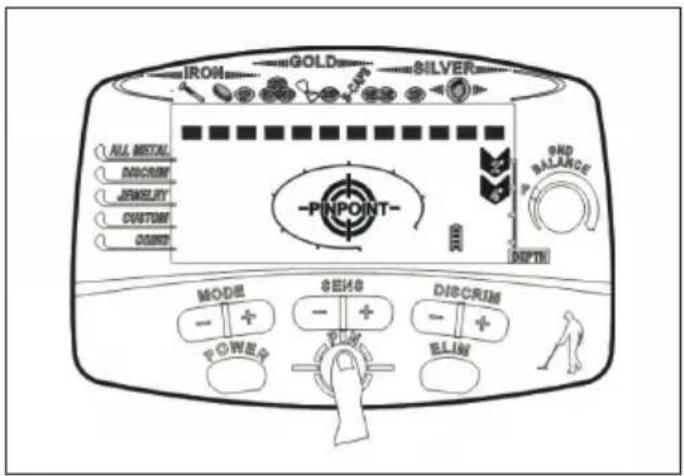
IRON GOLD SILVER ALL METAL DISCRIM JEWELERY CUSTOM CORNIS -PINPOINT- MODE + - P O W R S SENS + - DISCRIM + - E L I N END BALANCE DEPTH- Hold the coin and release the PINPOINT button. Press the button again after a few seconds. The lower scale will disappear, the sound will return to normal and the depth display will return to full scale.
- Move the coin back to the middle of the coil and the segments will return, the sound will be louder and the depth display will be weaker.
- Repeat the test with other metals as well.
OUTDOOR OPERATION
Metal detectors are primarily intended for outdoor use. Do not use the detector near sources of power or places with a lot of metal. Field detection may also be complicated due to soil conditions, size, shape and oxidation of metals. The more you practice, the more experienced you will become, and will thus get better and more accurate results.
(1) Turn on the device
After pressing the POWER button, the detector will beep twice and all screen icons will light up briefly. Once the detector is ready, it will return to the mode it was in before it was last turned off.
(2) Set the operating mode
Start with the mode ALL METAL. If a particular metal is desired, set the detector to one of the previously described modes. As soil conditions vary, it is sometimes a good idea to take samples of certain metals, bury them, and then adjust the settings of the detector for the most accurate results possible. Using the PINPOINT mode can also help increase accuracy and indicate soil contamination.
(3) Adjust sensitivity
The lower the sensitivity, the more accurate the results will be. However, in soils that contain many minerals, this can also lead to undesirable results. Adjust the sensitivity to get the best results for this type of soil. When working near another person using a metal detector, stay at least 10 meters apart so as not to interfere with each other's results.
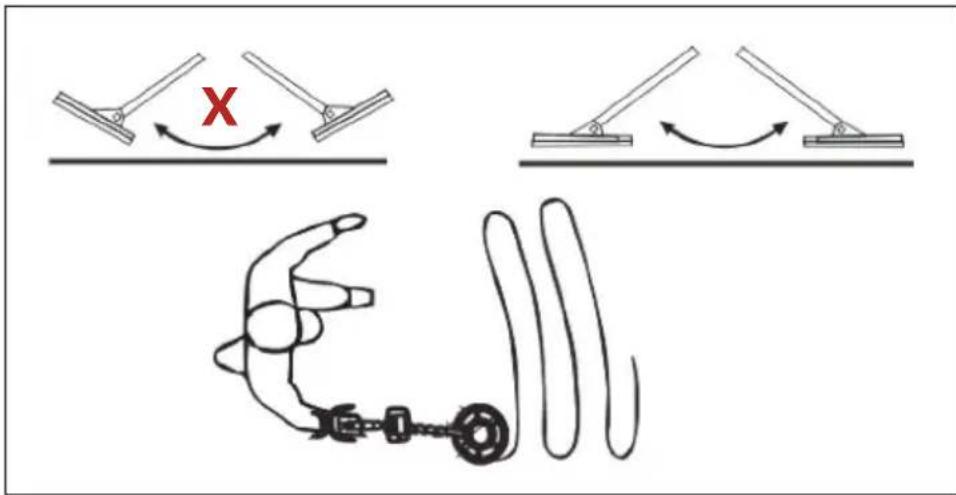
(4) The right pattern of motion
Try to maintain a steady pace of swinging. Jerky movements may prevent the detector from being able to probe the ground quickly enough. Hold the search coil parallel to the ground, not at an angle. Move in a constant slow motion.
text_image
Diagram illustrating a robotic arm motion with labeled joints and a hand, showing X-axis movement and curved motion paths.(5) Metal detection by pitch
With detection, sound is sometimes more helpful than looking at the screen. There are four pitches that will help you recognize what kind of metal has been discovered:
- Low pitch: ferrous metals such as iron, lids, etc.
• Medium-low pitch: pull tabs, 10-pence nickel coins, etc.
• Medium pitch: can tabs, 1 and 2-pound coins
• High pitch: copper, aluminum, silver, etc.
(6) Pinpoint
While in motion mode, it is possible to locate something metallic, but the exact location can be difficult to find. After something has registered on the detector, switch to PINPOINT mode to get the exact location.
- Press and hold the PINPOINT button and the PINPOINT indicator will light up. The coin depth indicator shows [8+]. The upper and lower scale displays will all go out. The detector will emit a deep tone. If the displays do not go out, release the PINPOINT key and try again.
- Once in PINPOINT mode, move the search coil slowly near the object until a high signal strength indicates the exact position. Once the position is determined, the sound will become louder and the target depth indicator will brighten.
- Hold the detector firmly in this position and release the PINPOINT key. Press the button again after a few seconds. The indicator will go off and a single low tone will sound. Move the search coil slowly around the target until the sound becomes louder and the depth indicator brightens again.
- Repeat this process several times until the exact position and depth are known.
- When a depth of 2-4" is displayed, the subject is close to the center of the search coil.
- Note: In PINPOINT mode, the depth indicator becomes the signal strength indicator at the same time.
(7) Adjust ground balance
Before using the PINPOINT mode, use the ground balance button to adjust the detector. This helps to eliminate minerals in mineral-rich soils.
• Find a metal-free area of the soil. Set the ground balance setting to [P].
- Lift the search coil more than a meter above the ground (see picture). Press the PINPOINT button and bring the coil to about 1.5 cm above the floor.

text_image
GND BALANCE P DEPTH- If both the signal frequency and the signal strength show no obvious change, the ground balance is already set.
- If there is an obvious change when approaching the ground, then you need to adjust the ground balance.
- Raise the search coil again and turn the ground balance knob 15 degrees clockwise.
- Press the PINPOINT button again and bring the coil to about 1.5 cm above the ground.
- If there is an obvious change again, repeat the process until the ground balance is set and there is no major change when lowering.
- Adjust the ground balance slowly so as not to over-adjust and reduce the sensitivity.
- Note: In heavily mineralized or magnetic soils, it may be difficult to achieve the correct ground balance.
(8) Depth and destination
- The five modes selected with the MODE button are all motion modes. They indicate a rough metal type, depth and location.
- When the position and type of metal of the object are detected, a repeated beep will sound. If this is not the case, it could be an incorrect target, a waste metal or a heavily oxidized object.
- Once a metal object has been found, the upper scale arrow will indicate the type of metal. The results will be more accurate in neutral soil than in heavily mineralized soil.
- Smaller, thinner gold objects show a result comparable to the 10 pence coin, while larger gold pieces point to the can tab or the 1 pound coin. The largest will be displayed only if the object is at least as large as a 2-pence coin.
- Silver is displayed on the right, and the larger the item, the farther to the right it will appear.
- The depth display for coin-sized objects is very accurate. Larger, irregularly shaped objects may vary in reading. In this case, repeatedly crossing the same area can lead to better results. If the depth display still varies, more than one object may be detected.
- As already mentioned, in unknown areas, the detector will show different results depending on the soil type and composition of the found objects. Certain types of metals may need to be eliminated to avoid missing metals.
(9) The use of non-motion mode
This is the most responsive type of detection. In heavily mineralized soils or in confined spaces, PINPOINT mode may be the best choice for object detection. Move the search coil slowly in PINPOINT mode.
TROUBLESHOOTING
| Problem Possible cause and solution | |
| No power, boot sound or LCD indication. | Ensure batteries are installed correctly. |
| Check batter cover is in the UP position. | |
| 3Replace the batteries. | |
| LCD shows cursor, but doesn’t respond. | Self-check did not complete; turn off and restart. |
| Sound a successive “DI” “DI” tone | Don’t use indoors; too much interference. |
| Keep away from power lines, cables, Electric fences, etc. Reduce sensitivity. | |
| Unstable signal or target detection is fluctuating. | Try to pan at different angles. |
| For deeply buried objects, try increasing the sensitivity or changing the search pattern. | |
| Maybe more than one object has been discovered. Reset the sensitivity or eliminate metal types. | |
| Strongly oxidized object or soil is magnetic. Reduce the sensitivity. | |
| The unit sounds when the coil approaches the ground in PINPOINT mode. | High magnetic background. Decrease sensitivity by pressing the PINPOINT button. |
| There is a large buried metal object. | |
| The unit sounds when the coil moves away from the ground. | The ground balance is too sensitive. Turn the knob counterclockwise. |
HINTS ON DISPOSAL
natural_image
Symbol of a trash bin crossed with a diagonal line, no text or numbers presentAccording to the European waste regulation 2012/19/EU this symbol on the product or on its packaging indicates that this product may not be treated as household waste. Instead it should be taken to the appropriate collection point for the recycling of electrical and electronic equipment. By ensuring this product is disposed of correctly, you will help prevent potential negative consequences for the environment and human health, which could otherwise be caused by inappropriate waste handling of this product. For more detailed information about recycling of this product, please contact your local council or your household waste disposal service.
Estimado cliente:
text_image
QR code image containing encoded data, no visible human-readable textÍNDICE DE CONTENIDOS
text_image
Labeled diagram of a metal detector with numbered components for identificationnatural_image
Line drawing of a handheld device with digital display, safety goggles, and mechanical components (no text or symbols)Colocar las pilas
natural_image
Line drawing of a mechanical lever system with weights and a pulley (no text or symbols)text_image
Diagram illustrating a robotic arm motion with labeled joints and a hand, showing correct and incorrect movement directions.text_image
2ND BALANCE P DEPTHnatural_image
Symbol of a trash bin crossed with a diagonal line, no text or numbers presenttext_image
QR code image containing encoded data, no visible human-readable textSOMMAIRE
DÉCLARATION DE CONFORMITÉ

text_image
C€Fabricant :
Chal-Tec GmbH, Wallstraße 16, 10179 Berlin, Allemagne.