862-BT-DAB - Radio Duramaxx - Free user manual and instructions
Find the device manual for free 862-BT-DAB Duramaxx in PDF.


| Product Type | Digital DAB+/FM Radio with Bluetooth |
| Model | 862-BT-DAB |
| Brand | Duramaxx |
| Dimensions (approx.) | 200 x 120 x 80 mm |
| Weight (approx.) | 0.5 kg |
| Power Supply | AC adapter (DC 5V) or 4 x AA batteries |
| Radio Bands | DAB/DAB+ (Band III) and FM (87.5–108 MHz) |
| Bluetooth | Bluetooth 4.2 for wireless audio streaming |
| Audio Output | Built-in stereo speaker (3W each) and 3.5mm headphone jack |
| Additional Inputs | AUX input (3.5mm) for external devices |
| USB Port | USB port for charging mobile devices (5V/1A) |
| Preset Stations | 20 presets (10 DAB + 10 FM) |
| Display | LCD display with backlight |
| Alarm & Sleep Timer | Dual alarm with snooze, sleep timer up to 90 min |
| Clock | Auto-sync DAB/FM RDS clock |
| Antenna | Extendable telescopic antenna for DAB/FM |
| Maintenance & Cleaning | Wipe with a soft, dry cloth; do not use solvents |
| Safety Notes | Keep away from moisture and extreme temperatures |
| Spare Parts & Repairability | Contact Duramaxx customer service for spare parts |
| Package Contents | Radio, AC adapter, user manual |
Frequently Asked Questions - 862-BT-DAB Duramaxx
User questions about 862-BT-DAB Duramaxx
0 question about this device. Answer the ones you know or ask your own.
Ask a new question about this device
Download the instructions for your Radio in PDF format for free! Find your manual 862-BT-DAB - Duramaxx and take your electronic device back in hand. On this page are published all the documents necessary for the use of your device. 862-BT-DAB by Duramaxx.
USER MANUAL 862-BT-DAB Duramaxx
natural_image
Abstract green circuit board pattern with interconnected lines and nodes (no text or symbols)862-BT-DAB
natural_image
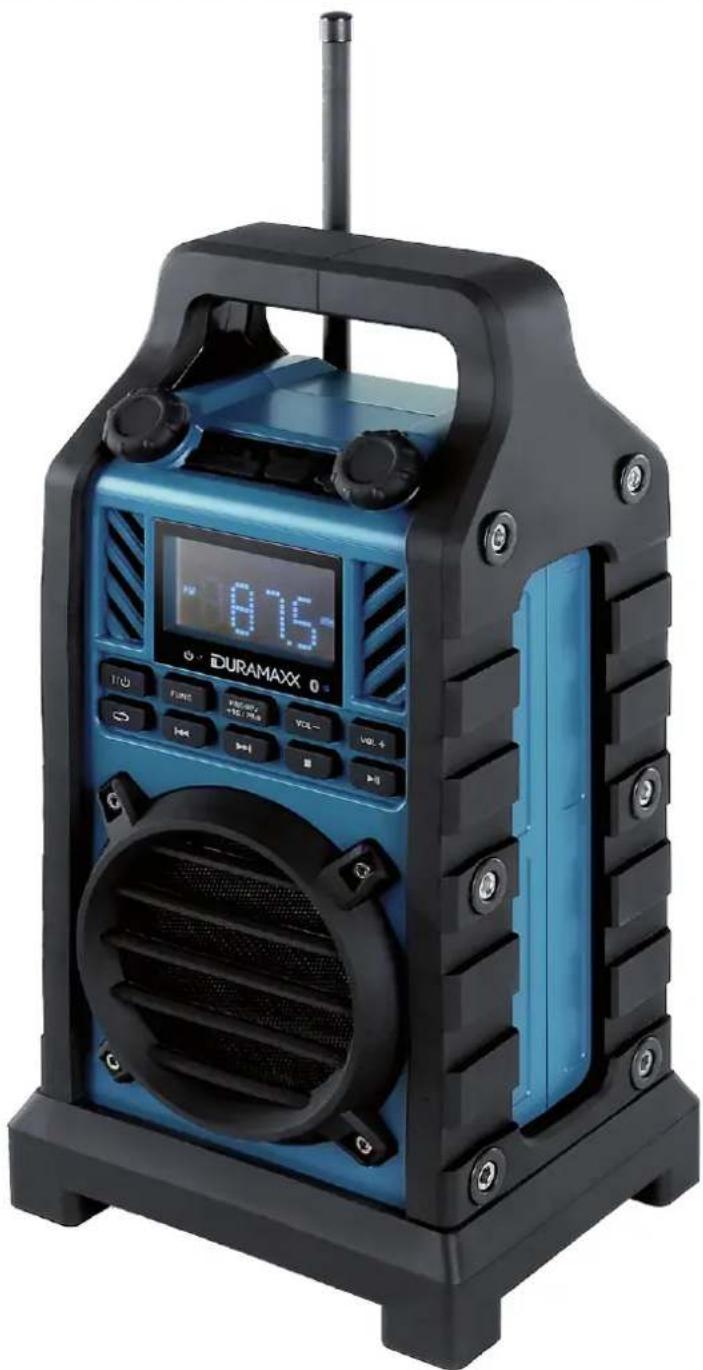
Blue and black Duramaxxx 0 portable radio device with digital display and speaker grille (no visible text or symbols on main body)natural_image
Symbol of a trash bin crossed with a diagonal line, no text or numbers presentCongratulations on purchasing this product. Please read and follow these instructions, in order to avoid damaging the item. We do not cover any damages that may arise from improper use of the item or the disregard of the safety instructions.
Important Safety Instructions
- Read all instructions before using.
- Do not place on or near a hot gas or electric burner or in a heated oven.
- To protect against a fire, electric shock or personal injury, do not immerse cord, electric plugs or device in water or other liquids.
- Do not place the appliance close to heating equipment or any heat source, or in a location subjected to excessive dust or mechanical shocks.
- Do not expose the appliance to extreme temperatures. The appliance shall be used in moderate climates.
- Place the appliance on a surface that is flat, rigid and stable.
• Children should be supervised to ensure that they do not play with the appliance. - The appliance is not a toy. Do not let the children play with it. Never let children insert foreign objects into the appliance.
- Do not use the appliance for other than intended use. This appliance has been designed solely for domestic use; the manufacturer's liability shall not be engaged in the event of any professional use, by any misuse or by any use not complying with the operating instructions.
- Save these instructions.
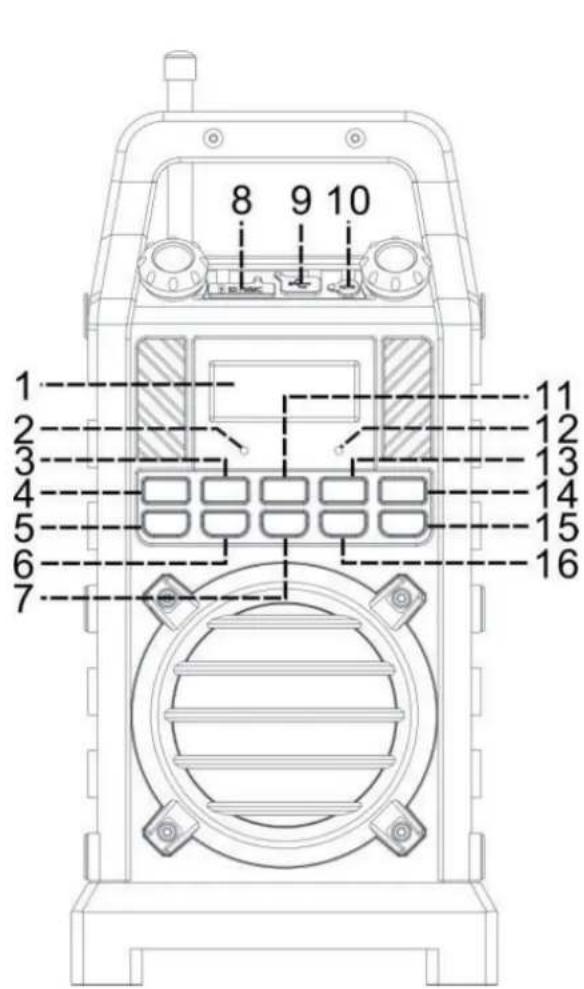
Controls
text_image
8 9 10 1 2 3 4 5 6 7 11 12 13 14 15 16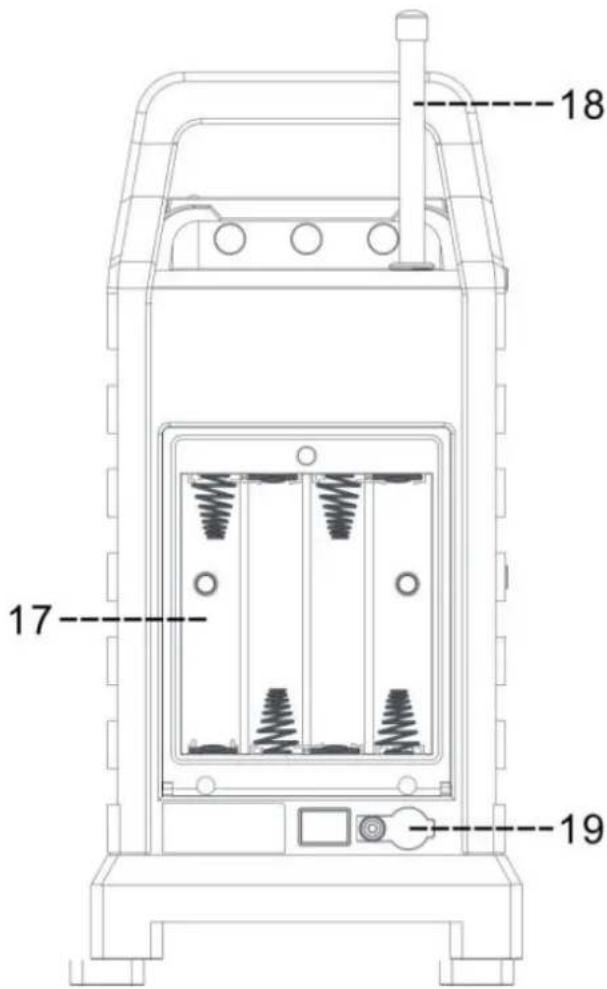
text_image
17 18 19| Display | 1 11 | Info (RDS, DAB text) |
| Power LED | 2 12 | BT LED |
| Function | 3 13 | VOL- |
| Power on/off | 4 14 | VOL+ |
| Pre / Mem / Rlay Mode (Repeat/Random) | 5 15 | Play / Pause / Scan |
| 6 16 | Stop / Enter | |
| 7 17 | Battery compartment | |
| SD card slot | 8 18 | Antenna |
| USB Slot | 9 19 | DC jack |
| 3,5mm AUX In | 10 |
Initial Use
Installation
- Unpack all parts and remove protective material.
- Do not connect the unit to the mains before checking the main voltage and before all other connections have been made.
- Do not cover any vents and make sure that there is a space of several centimeters around the unit for ventilation.
AC connection
- Connect the DC plug of AC/DC adaptor (included) to the DC jack (19) of the main unit, then, connect the AC/DC adaptor to the AC outlet. The on/off indicator (2) will light up
- Turn on the unit by On/Off (4), if the LCD display (1) is on with backlighting, it means the power supply is normal. Now your system is ready to play the music.
DC connection
For DC operation, please insert 8 pcs size C (UM-2) battery to the battery compartment (17) as the indication in battery compartment and remove the DC plug from the DC jack (19).
FM-Radio and DAB Functions
Tuning in FM radio / DAB stations
- Turn on the unit by On/off button (4) & then press the Function button (3) until it reaches the FM, respectively the DAB mode.
- Press the Tune up or down button (6/7) to tune your desired station. Press and hold to make the device jump to the next receivable station in the chosen direction.
- Press the Play/Scan button (15) once, unit will start to scan at tuning up direct until radio station received. Press and hold the Play/Scan button (15) for one second, the unit will scan to tuning down direction. If the radio data system (RDS) broadcasting signal received, the unit will set the actual time automatically.
- In DAB mode, press the Play/Scan (15) button once, unit will start to full scan from range 11b-12d one time within around 2 seconds. Then press Tune up or down buttons (6/7) to select your desired DAB channel.
Radio data system (RDS) / DAB Info
This is the features to display the information released from the radio broadcast and will show on LCD display step by step as below by pressing the Info/+10 button (11) continuously.
- In FM mode these are: Radio text -> program type -> signal strength -> date/time -> frequency -> mono/stereo
- whereas in DAB mode the additional info is: Group name -> frequency -> transfer rate -> signal strength -> date/time -> program type -> scrolling text
Save and recall stations
- You can store up to 60 radio stations in the memory (30-FM/30-DAB).
- Set to FM/DAB mode and tune in the desired station.
- Press and hold the Pre/Mem/Play mode button (5) to enable memory state.
- Use tune up / down buttons (13/14) to select the desired station memory for storage.
- Press Stop/Enter (16) to confirm the preset memory.
- Repeat step 2 to 5 to store other stations.
- To recall any previously saved station, press the Pre/Mem/Play mode button (5) once to enable recall state, select the desired memory station using the tune up and down buttons (13/14) and confirm your choice hitting the enter button (16).
Please Note:
- The pre-set memories will be deleted completely when the main power supply is detached. You are recommended to switch the system into standby mode for convenience usage.
- When in programming state, after 3 secs of no input the device will turn back to normal tuner mode automatically.
- You can overwrite a present station by storing another frequency in its place.
MP3 Playback via USB/SD
The system is able to decode and playback all MP3 file which stored in the memory media with USB connecting port or SD/MMC card.
- Set the system at off mode first or other function except USB/SD mode.
- Open the USB socket cover then plug-in the USB pen-drive facing up and make sure it is going in completely. Else, open the SD slot cover then insert the memory card in the direction of the arrow as shown in the cover of the memory card slot. Insert straight without bending.
- Connecting the USB pen drive upside down or backwards could damage the audio system or the storage media (USB thumb drive). Check to be sure the direction is correct before connection.
- Turn on the unit again by On/Off button (4) and press Function button (3) to "USB" or "SD" mode. The system will start reading the storage media automatically after connecting, and LCD display (1) will show the running time of MP3 files.
- Navigate through your media library as you're used to (with ◀◀, ▶▶, ▶|| and ■)
- Skip 10 tracks by using the +10 button.
- Repeat/Random mode: Press "Play/Mode" (5) to select Repeat/Random functions as in this diagram:
Repeat 1 -> Repeat ALL -> Random -> Off

natural_image
Simple black horizontal line with an upward arrow at the top-left end (no text or symbols)Remarks
- The system can detect and read the file under MP3 format only at USB mode but not other music file format.
-
If you connect the system to MP3 player via the USB socket, due to variances in MP3 encoding format, some MP3 player may not be able to play via the USB socket. This is not a malfunction of the system.
-
The USB port does not support connection with USB extension cable and is not designed for communication with computer directly.
- To remove the USB pen drive, turn off the power or switch the function mode to either Aux or FM first. For USB port – un-plug it by pulling out from the USB socket directly.
MP3 track format requirements:
Bit rate: 32 kbps\~320kbps
Sampling rate: 32kHz, 44.1kHz, 48kHz
BT
- Set the main Function selector (3) to BT mode.
- The BT LED indicator (12) will be flashing indicating BT is not connected.
- Switch on the BT feature of your BT device (such as mobile phone) and select "DURAMAXX".
- Once the connection is established, the BT LED (12) will light up.
AUX
Connect another audio device, e.g. (portable) CD player, MP3 player, (portable) cassette player, iPod, etc. to this system with a 3.5mm audio cable (not supplied). Connect one end of this cord to the headphone jack of the external device and the other end to the aux-in jack (9) at the side of the unit. Then press Function button (3) to "AUX" mode. Start to playback your external device to enjoy your music.
Environment Concerns
natural_image
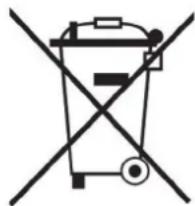
Symbol of a trash bin crossed with a diagonal line, representing no waste or elimination (no text or labels)According to the European waste regulation 2002/96/EG this symbol on the product or on its packaging indicates that this product may not be treated as household waste. Instead it should be taken to the appropriate collection point for the recycling of electrical and electronic equipment. By ensuring this product is disposed of correctly, you will help prevent potential negative consequences for the environment and human health, which could otherwise be caused by inappropriate waste handling of this product. For more detailed information about recycling of this product, please contact your local council or your household waste disposal service.
Declaration of Conformity
This product is conform to the following European Directives:
1999/105/EC (R&TTE)
2011/65/EU (RoHS)
CE