Eyeview IP - Surveillance Camera Duramaxx - Free user manual and instructions
Find the device manual for free Eyeview IP Duramaxx in PDF.

User questions about Eyeview IP Duramaxx
0 question about this device. Answer the ones you know or ask your own.
Ask a new question about this device
Download the instructions for your Surveillance Camera in PDF format for free! Find your manual Eyeview IP - Duramaxx and take your electronic device back in hand. On this page are published all the documents necessary for the use of your device. Eyeview IP by Duramaxx.
USER MANUAL Eyeview IP Duramaxx
natural_image
Abstract black-and-white graphic with diagonal stripes and a large upward arrow, no text or symbols present.DURAMAXX
Eyewiew IP
Überwachungskamera
Surveillance Camera
text_image
QR code image containing encoded data, no visible human-readable textINHALTSVERZEICHNIS
text_image
Diagram showing installation of a power supply device connected to a fan, with a hand holding a tool to adjust the fan's internal structure.Member of Berlin Brands Group
Handwerkerstr. 11
15366 Dahlwitz-Hoppegarten
Deutschland
natural_image
Symbol of a trash bin crossed with a diagonal line, no text or numbers presentBerlin Brands Group UK Limited
PO Box 42
272 Kensington High Street
London, W8 6ND
United Kingdom
Dear customer,
Congratulations on the purchase of your device. Please read the following instructions carefully and follow them to prevent potential damage. We accept no liability for damage caused by disregarding the instructions or improper use. Please scan the QR code to access the latest operating instructions and for further information about the product.

text_image
QR code image containing encoded data, no visible human-readable textCONTENTS
Safety Instructions 18
Installation and App Download 19
Setting Up the Android App 20
Setting Up the iOS App 25
Disposal Considerations 28
Manufacturer & importer (UK) 28
TECHNICAL DATA
| Article number 10028834, 10028835 | |
| Power supply 220-240 V ~ | 50/60 Hz |
SAFETY INSTRUCTIONS
- Do not remove any covers. This device contains parts that are not accessible to the user. Repairs may only be carried out by qualified specialists.
- Do not drop metal objects on this device.
- Only use accessories and add-on parts that have been approved by the manufacturer.
- Have repairs carried out by qualified specialists only. Repair is required if the device has been damaged in any way, i.e. if objects have fallen on it, if it is not working properly or if it has been dropped. Do not try to repair the device yourself. In the case of damage caused by unqualified maintenance or repairs, the manufacturer is not liable and the warranty will be void.
- Make sure that no children play with the unit.
- Plug the power plug completely into the wall socket.
- Do not pull, bend or place heavy objects on the cord.
- Do not touch the plug with wet hands. Grasp the plug by its body when pulling it out.
- Do not use a damaged mains plug or socket.
- Install this unit so that the mains cable can be unplugged from the socket immediately if faults occur.
- Do not place sources of naked flames, e.g. burning candles, on the device.
- Keep the device away from water and moisture.
- The mains adapter can be operated from a standard 220-240 V socket.
Transporting the Unit
Please keep the original packaging. To achieve sufficient protection when transporting the unit, pack the unit in the original packaging.
Cleaning the Outer Surface
Do not use volatile liquids such as bug sprays. Excessive pressure when wiping the surface can cause damage. Rubber or plastic parts should not be in contact with the appliance for a long period of time.
INSTALLATION AND APP DOWNLOAD
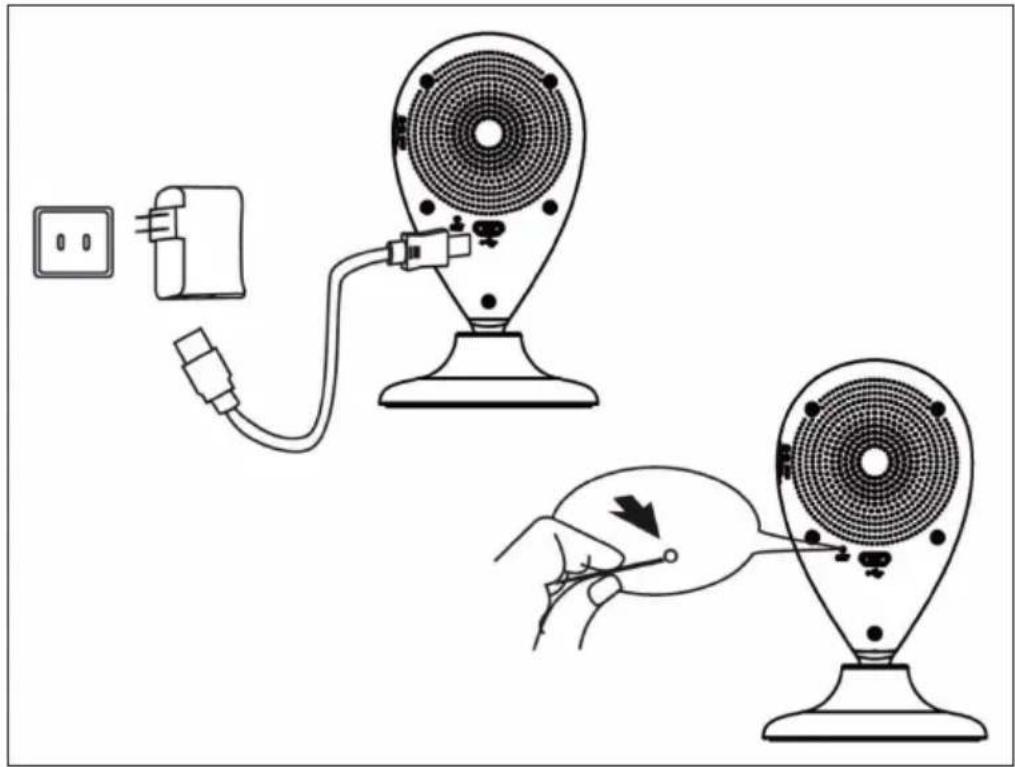
Connect the device to an adequate power source using the supplied USB cable: Use a computer USB port or a 5 V USB power adapter available at electronics retailers. It takes about a minute for the blue LED to start flashing. Then the camera is ready and you can proceed with the IP connection.
If the camera does not start up, press and hold the reset button on the back with a thin object (e.g. a paper clip) for 5 seconds to restart the device (see image):
text_image
Diagram showing installation of a power supply device connected to a fan, with a hand holding a tool to adjust the fan's internal structure.Scan the QR code below to download the associated app.
| iOS Android | |
 |  |
text_image
Step 1 WLAN MyAPRPYH Connected vivitar-sz Saved, secured with WPA/WPA2 Gowiny Secured with WPA2 (protected network available) taijiayun Secured with WPA DIRECT-PZSCX-3400 Series Secured with WPA2 (protected network available) ChinaNet-jUnV Secured with WPA/WPA2 (protected network available) JindianTech Secured with WPA/WPA2 (protected network available) Connected to WLAN network "MyAPRPYH" ChinaNet-tbYX SCAN WLAN DIRECT Activate WiFi on your Android device. Scan for the available networks and connect to MyAPxxxx. Launch the app and follow these steps.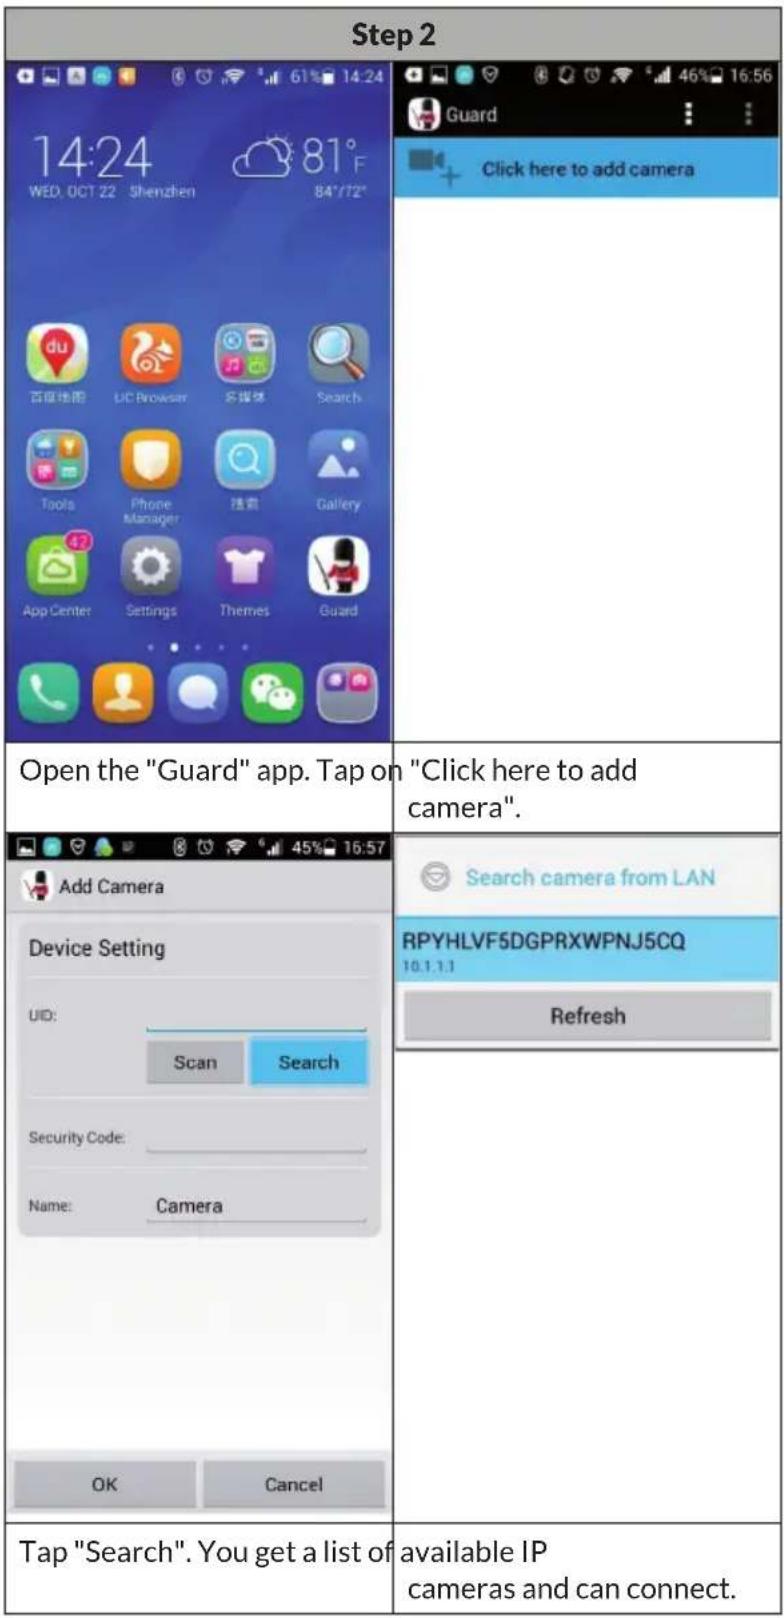
text_image
Step 2 14:24 WED, OCT 22 Shenzhen 81°F 84°/72° Open the "Guard" app. Tap on "Click here to add camera". Add Camera Device Setting UID: Scan Search Security Code: Name: Camera OK Cancel Tap "Search". You get a list of available IP cameras and can connect.
text_image
Step 2 Add Camera Device Setting UID: RPYHLVF5DGPRXWPN. Scan Search Security Code: OK Cancel Add Camera Device Setting UID: RPYHLVF5DGPRXWPN. Scan Search Security Code: ****** OK Cancel 1 2 3 4 5 6 7 8 9 0 q w e r t y u i o p ! @ # 5 % & * ( ) a s d f g h j k l ↑ z x c v b n m × 123 En abc — . 符 下一项 123 En abc — . 符 下一项 Enter your WiFi password. Click on "OK". Edit your WiFi password. Click on "OK".After connecting the IP camera to the app, you will see a list of available IP cameras with their names, IDs and status. To connect the IP camera to your WiFi router:
text_image
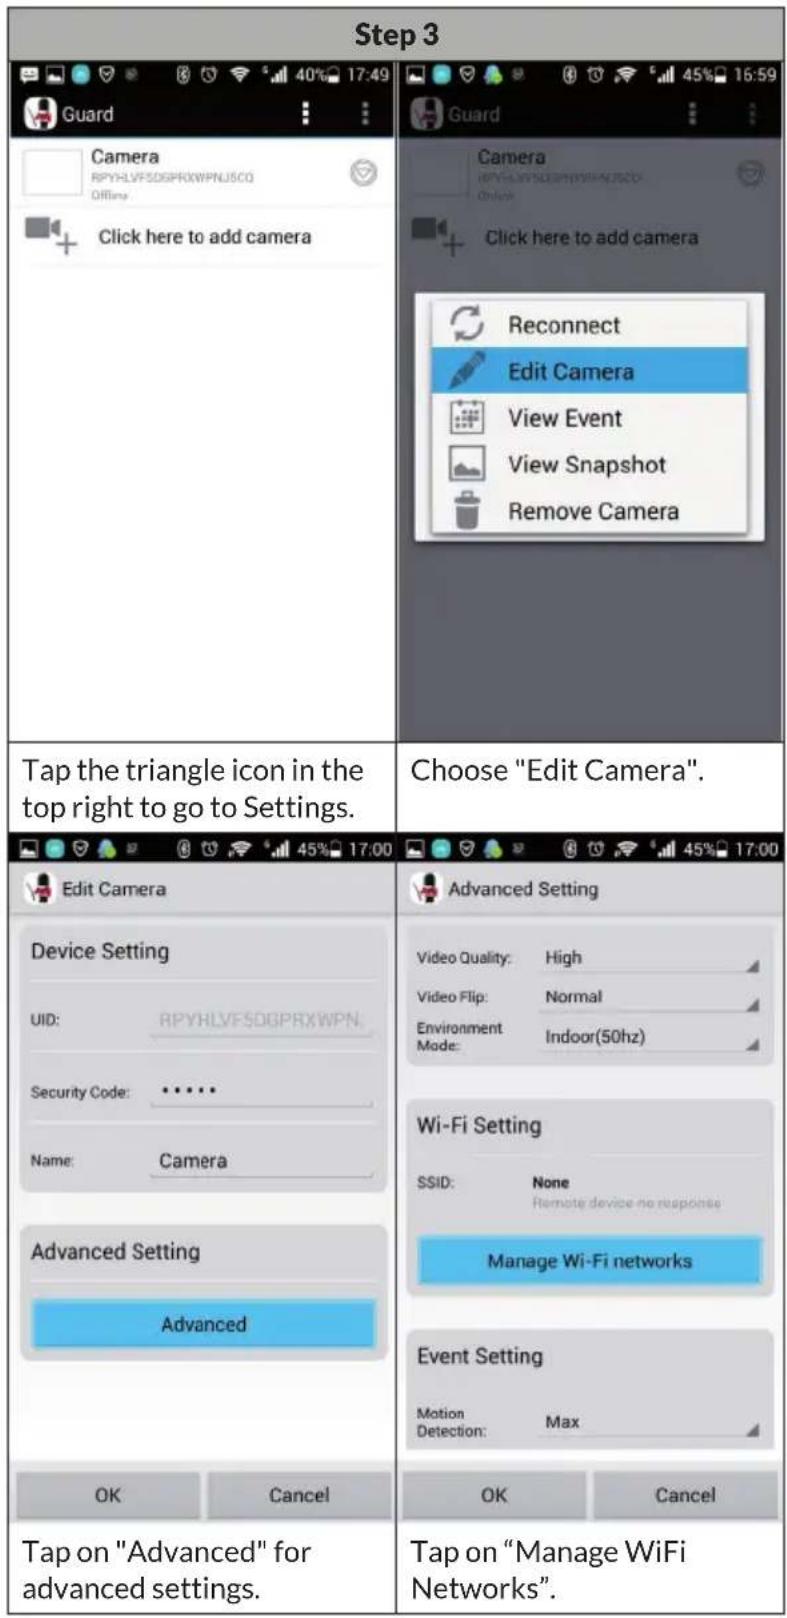
Step 3 Guard Camera RPYHLVFSDGPRXWPNUSCO Offins Click here to add camera Trap the triangle icon in the top right to go to Settings. Choose "Edit Camera". Edit Camera Device Setting UID: RPYHLVFSDGPRXWPN. Security Code: ***** Name: Camera Advanced Setting Advanced OK Cancel Tap on "Advanced" for advanced settings. Advanced Setting Video Quality: High Video Flip: Normal Environment: Indoor(50hz) Mode: Wi-Fi Setting SSID: None Remote device no response Manage Wi-Fi networks Event Setting Motion Max Detection: OK Cancel Tap on "Manage WiFi Networks". OK Cancel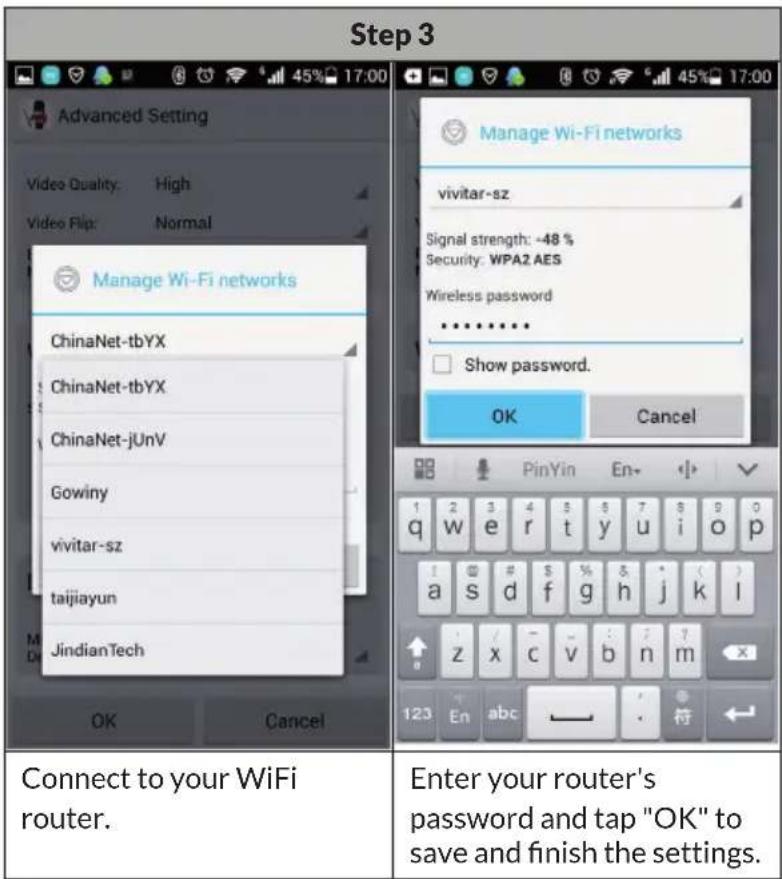
text_image
Step 3 Advanced Setting Video Quality: High Video Flip: Normal Manage Wi-Fi networks ChinaNet-tbYX ChinaNet-tbYX ChinaNet-jUnV Gowiny vivitar-sz taijiayun JindianTech OK Cancel Manage Wi-Fi networks vivitar-sz Signal strength: -48 % Security: WPA2 AES Wireless password ······· Show password. OK Cancel Connect to your WiFi router. Enter your router's password and tap "OK" to save and finish the settings.SETTING UP THE IOS APP
| Step 1 | |
| No Service 18:50 @ 100% | |
| < Settings Wi-Fi | |
| Wi-Fi | |
| ✓ MyAPHB3F | |
| CHOOSE A NETWORK... | |
| ChinaNet-146v | |
| ChinaNet-4D94 | |
| gwtj88 | |
| iTV-146v | |
| iTV-4D94 | |
| KAAYEE | |
| Step 2 Step 3 | |
| No Service 18:19 @ 100% | No Service 18:19 @ 100% |
| My Cameras + | < My Cameras Setup a new camera |
| WIFI Setup New DeviceAdd By Lan SearchAdd By QR Code | MAKE SURE YOUR PHONE IS CONNECTED TO CAMERA'S SOFT APStart Scanning WLAN on Camera |
| Launch the app and tap "+" then tap "WIFI Setup New Device". | Tap "Start Scanning WLAN on Camera" to search for the IP camera. |
text_image
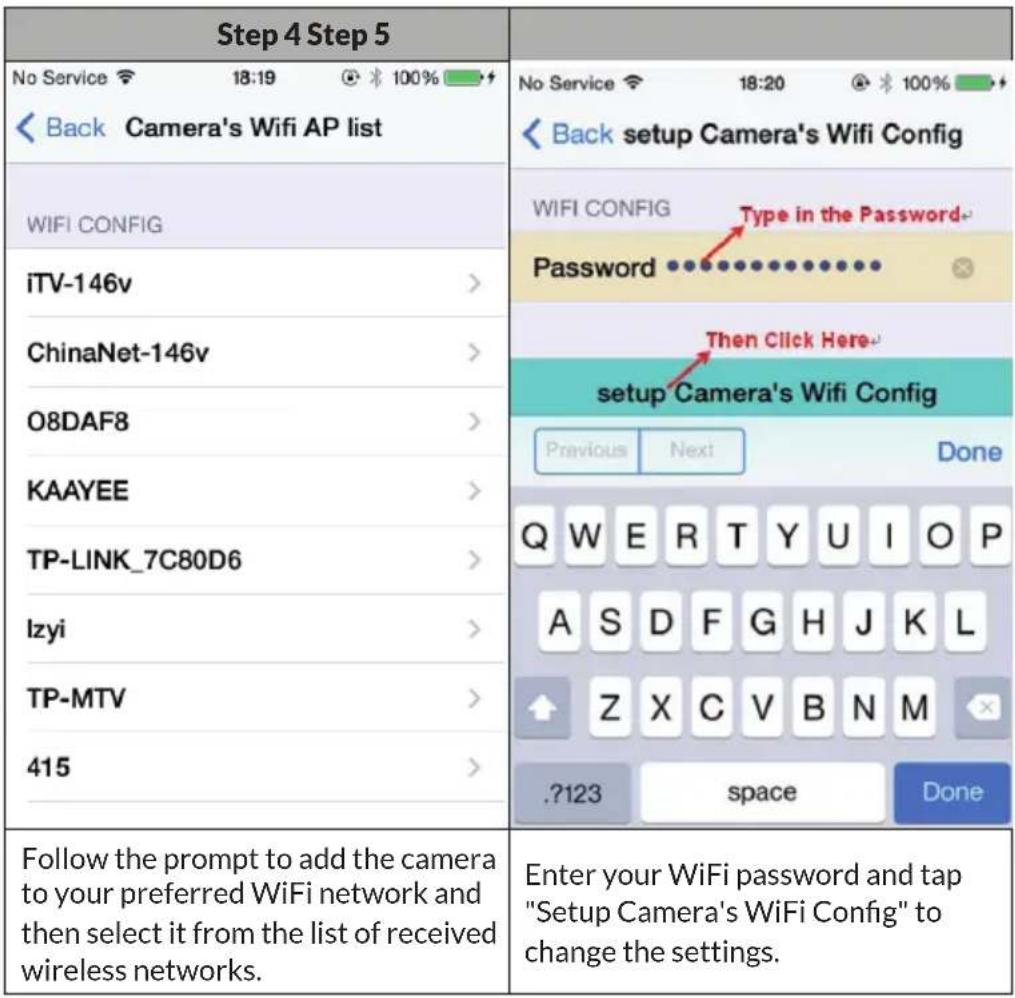
Step 4 Step 5 No Service 18:19 100% No Service 18:20 100% Back Camera's Wifi AP list WIFI CONFIG iTV-146v > ChinaNet-146v > O8DAF8 > KAAYEE > TP-LINK_7C80D6 > Izyi > TP-MTV > 415 > Follow the prompt to add the camera to your preferred WiFi network and then select it from the list of received wireless networks. Enter your WiFi password and tap "Setup Camera's WiFi Config" to change the settings. Back setup Camera's Wifi Config WIFI CONFIG Type in the Password... Password Then Click Here- setup Camera's Wifi Config Previous Next Done Q W E R T Y U I O P A S D F G H J K L Z X C V B N M ?123 space Done| Step 6 | |
| No Service 18:20 | Tap on "Apply". The camera will restart and then automatically connect to your local WiFi. The connection setup is complete as soon as the blue LED lights up continuously. This process can take about a minute. |
| Back Add Camera to My Account | |
| PLEASE INPUT ACCOUNT AND PASSWORD FOR ACCESS CAMERA | |
| Account admin | |
| Password •••••• | |
| PLEASE INPUT EXTENSION INFORMATION FOR THE CAMERA | |
| Name Camera | |
| Location Location | |
| Apply | |
| Step 7 | |
| No Service 18:22 @ 100% My Cameras | Close and restart the app to complete the connection. The process can take a few seconds. The icon will show "active" once the connection is successful. Tap the play icon to start live streaming. |
Note: If you experience any problems or connection errors, go back to step 3 or press and hold Reset for 5 seconds to start connecting again.
DISPOSAL CONSIDERATIONS

natural_image
Symbol of a trash bin crossed with a diagonal line, no text or numbers presentIf there is a legal regulation in your country regarding the disposal of electrical and electronic equipment, this symbol on the product or on the packaging indicates that this product must not be disposed of with household waste. Instead, it must be taken to a collection point for the recycling of electrical and electronic equipment. By disposing of this product in accordance with the regulations, you protect the environment and the health of those around you from negative consequences. For information on recycling and disposal of this product, contact your local government or household waste disposal service.
This product contains batteries. If there is a legal regulation in your country regarding the disposal of batteries, the batteries must not be disposed of in household waste. Consult your local regulations for the disposal of batteries. By disposing of this product in accordance with the regulations, you protect the environment and the health of those around you from negative consequences.
MANUFACTURER & IMPORTER (UK)
Manufacturer:
Chal-Tec GmbH, Wallstrasse 16, 10179 Berlin, Germany.
Importer for Great Britain:
Berlin Brands Group UK Limited
PO Box 42
272 Kensington High Street
London, W8 6ND
United Kingdom
Estimado cliente:
text_image
QR code image containing encoded data, no visible human-readable textÍNDICE
text_image
Diagram showing installation of a power supply device connected to a fan, with a hand holding a tool to adjust the fan's internal structure.natural_image
Symbol of a trash bin crossed with a diagonal line, no text or numbers presentBerlin Brands Group UK Limited
PO Box 42
272 Kensington High Street
London, W8 6ND
Reino Unido
Cher client, chère cliente,
text_image
QR code image containing encoded data, no visible human-readable textSOMMAIRE
text_image
Diagram showing installation of a power supply device connected to a fan, with a hand holding a tool to adjust the fan's internal structure.natural_image
Symbol of a trash bin crossed with a diagonal line, no text or numbers presentBerlin Brands Group UK Ltd
PO Box 42
272 Kensington High Street
London, W8 6ND
United Kingdom
Gentile cliente,
text_image
QR code image containing encoded data, no visible human-readable textINDICE
text_image
Diagram showing installation of a power supply device connected to a fan, with a hand holding a tool to adjust the fan's internal structure.text_image
1° passaggio WLAN MyAPRPYH Connected vivitar-sz Saved, secured with WPA/WPA2 Gowiny Secured with WPA2 (protected network available) taijiayun Secured with WPA DIRECT-PZSCX-3400 Series Secured with WPA2 (protected network available) ChinaNet-jUnV Secured with WPA/WPA2 (protected network available) JindianTech Secured with WPA/WPA2 (protected network available) Connected to WLAN network "MyAPRPYH" ChinaNet-tbYX SCAN WLAN DIRECT Attivare la funzione WiFi del dispositivo Android. Cercare le reti disponibili e collegarsi con MyAPxxxx. Avviare la app e seguire questi passaggi.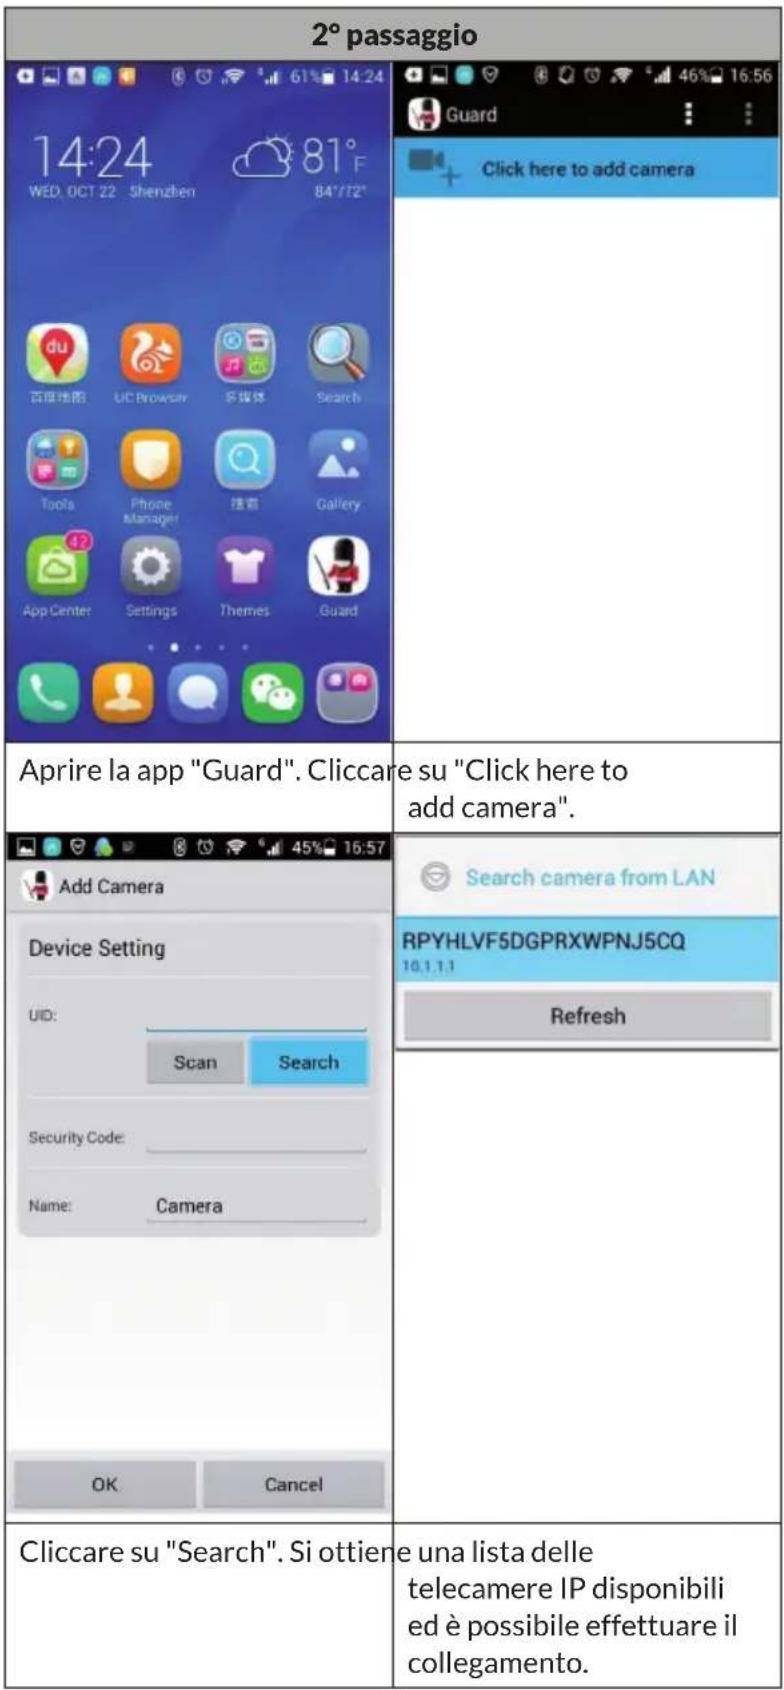
natural_image
Symbol of a trash bin crossed with a diagonal line, no text or numbers presentPRODUTTORE E IMPORTATORE (UK)
Produttore:
Chal-Tec GmbH, Wallstraße 16, 10179 Berlino, Germania.
Berlin Brands Group UK Limited
PO Box 42
272 Kensington High Street
London, W8 6ND
United Kingdom